MERCEDES-BENZ G55AMG 2010 W463 Workshop Manual
Manufacturer: MERCEDES-BENZ, Model Year: 2010, Model line: G55AMG, Model: MERCEDES-BENZ G55AMG 2010 W463Pages: 272, PDF Size: 7.04 MB
Page 51 of 272
compartment is not in use. Make sure that
seat backrests are secured properly by
pushing and pulling on the seat backrests. If
a seat backrest is not locked properly, the
seat backrest could fold. The child seat would
no longer be supported properly or positioned
to provide its intended benefit. That could
cause serious or even fatal injuries.
This vehicle is equipped with tether
anchorages for a top tether strap at each of
the rear seating positions. The anchorage
rings are located on the floor behind each rear
seat.
Top tether straps enable an additional
connection to be made between child
restraint systems secured with LATCH-type
(ISOFIX) anchors and rear seats. This can
further reduce the risk of injury.
XRemove the cargo compartment cover
blind, if installed (Y page 132).
XGuide the top tether strap between head
restraint and top of the seat backrest.
The head restraint must be installed and
positioned such that the top tether strap
can pass freely between the head restraint
and top of the seat backrest.
XMake sure the top tether strap is not
twisted.
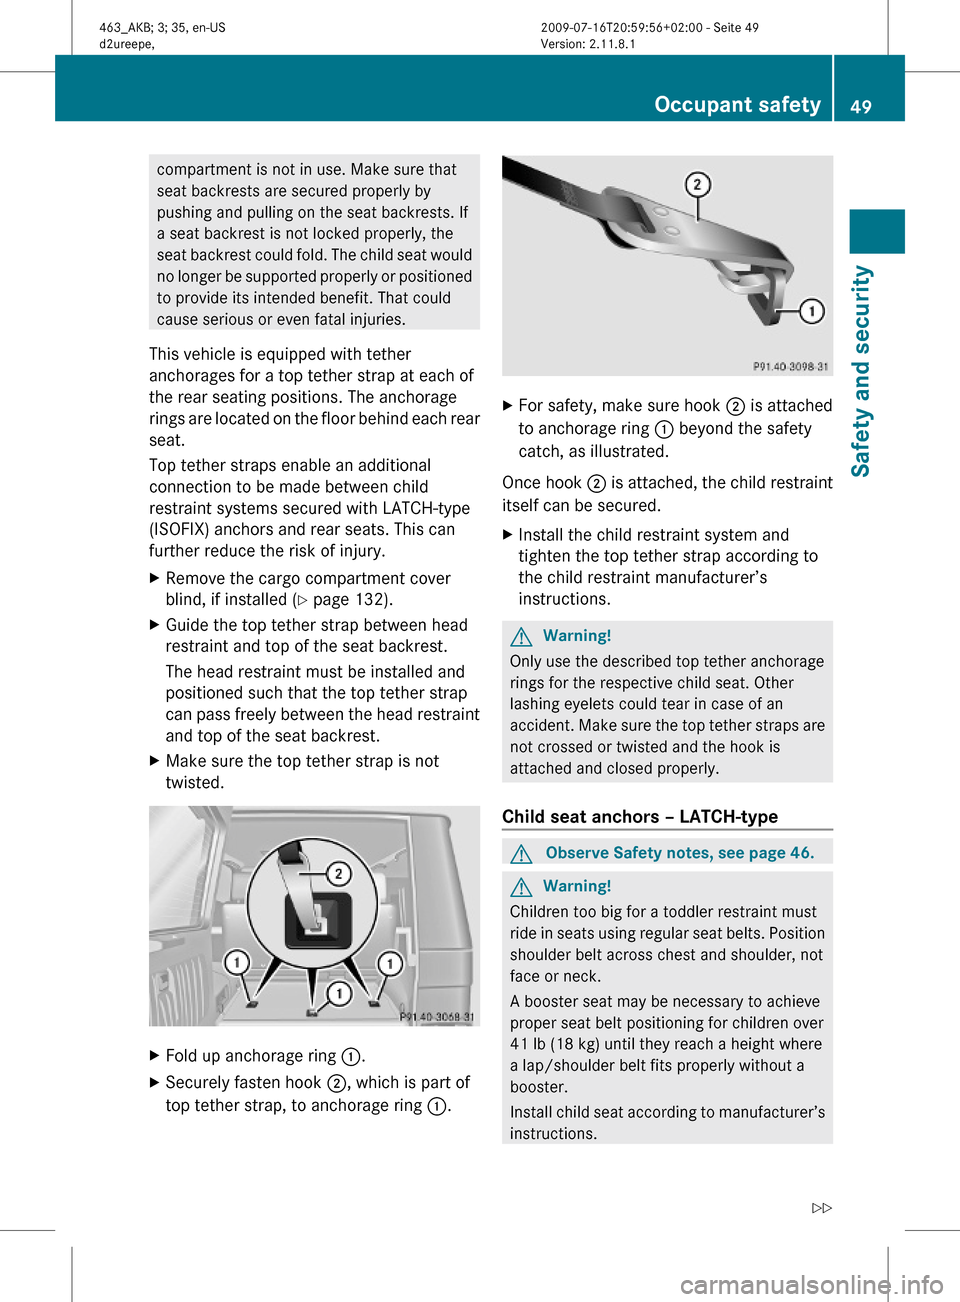
XFold up anchorage ring :.XSecurely fasten hook ;, which is part of
top tether strap, to anchorage ring :.
XFor safety, make sure hook ; is attached
to anchorage ring : beyond the safety
catch, as illustrated.
Once hook ; is attached, the child restraint
itself can be secured.
XInstall the child restraint system and
tighten the top tether strap according to
the child restraint manufacturer’s
instructions.
GWarning!
Only use the described top tether anchorage
rings for the respective child seat. Other
lashing eyelets could tear in case of an
accident. Make sure the top tether straps are
not crossed or twisted and the hook is
attached and closed properly.
Child seat anchors – LATCH-type
GObserve Safety notes, see page 46.GWarning!
Children too big for a toddler restraint must
ride in seats using regular seat belts. Position
shoulder belt across chest and shoulder, not
face or neck.
A booster seat may be necessary to achieve
proper seat belt positioning for children over
41 lb (18 kg) until they reach a height where
a lap/shoulder belt fits properly without a
booster.
Install child seat according to manufacturer’s
instructions.
Occupant safety49Safety and security463_AKB; 3; 35, en-USd2ureepe,Version: 2.11.8.12009-07-16T20:59:56+02:00 - Seite 49Z
Page 52 of 272
The child seat must be firmly attached to both
anchors.
An incorrectly mounted child seat may come
loose during an accident which could result in
serious injury or death to the child.
Damaged or impact damaged child seats or
child seat mounting fittings must be replaced.
Each rear outer seat has two LATCH-type
(ISOFIX) anchors for the installation of a
LATCH-type (ISOFIX) child seat with matching
mounting fittings.
Non-LATCH-type (ISOFIX) child seats may
also be used and can be installed using the
vehicle’s seat belt system. Install child seat
according to the manufacturer’s instructions.
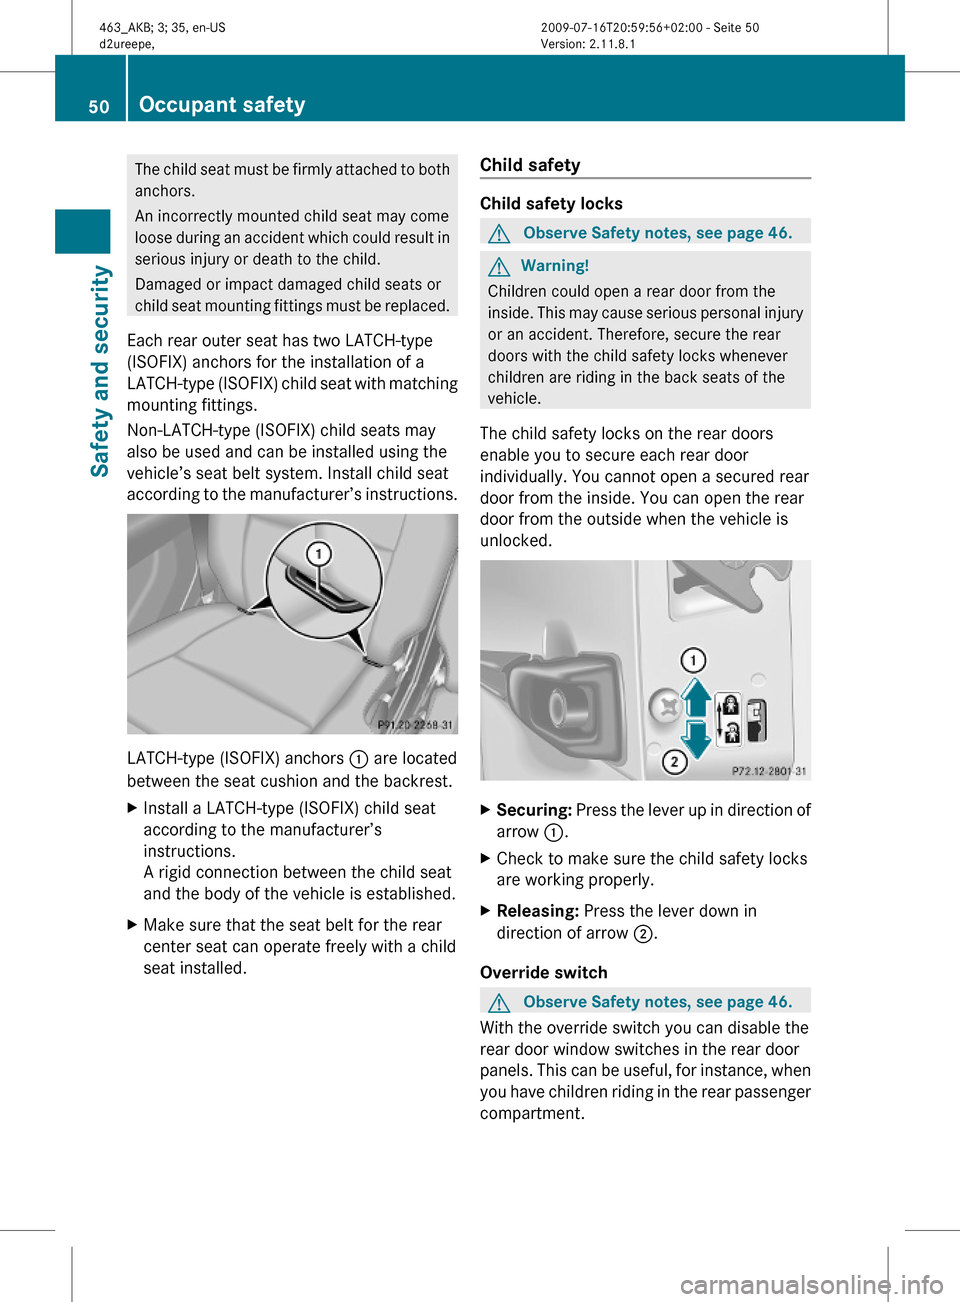
LATCH-type (ISOFIX) anchors : are located
between the seat cushion and the backrest.
XInstall a LATCH-type (ISOFIX) child seat
according to the manufacturer’s
instructions.
A rigid connection between the child seat
and the body of the vehicle is established.
XMake sure that the seat belt for the rear
center seat can operate freely with a child
seat installed.
Child safety
Child safety locks
GObserve Safety notes, see page 46.GWarning!
Children could open a rear door from the
inside. This may cause serious personal injury
or an accident. Therefore, secure the rear
doors with the child safety locks whenever
children are riding in the back seats of the
vehicle.
The child safety locks on the rear doors
enable you to secure each rear door
individually. You cannot open a secured rear
door from the inside. You can open the rear
door from the outside when the vehicle is
unlocked.
XSecuring: Press the lever up in direction of
arrow :.
XCheck to make sure the child safety locks
are working properly.
XReleasing: Press the lever down in
direction of arrow ;.
Override switch
GObserve Safety notes, see page 46.
With the override switch you can disable the
rear door window switches in the rear door
panels. This can be useful, for instance, when
you have children riding in the rear passenger
compartment.
50Occupant safetySafety and security
463_AKB; 3; 35, en-USd2ureepe,Version: 2.11.8.12009-07-16T20:59:56+02:00 - Seite 50
Page 53 of 272
GWarning!
Activate the override switch when children
are riding in the back seats of the vehicle. The
children may otherwise injure themselves,
e.g. by becoming trapped in the rear door
window opening.
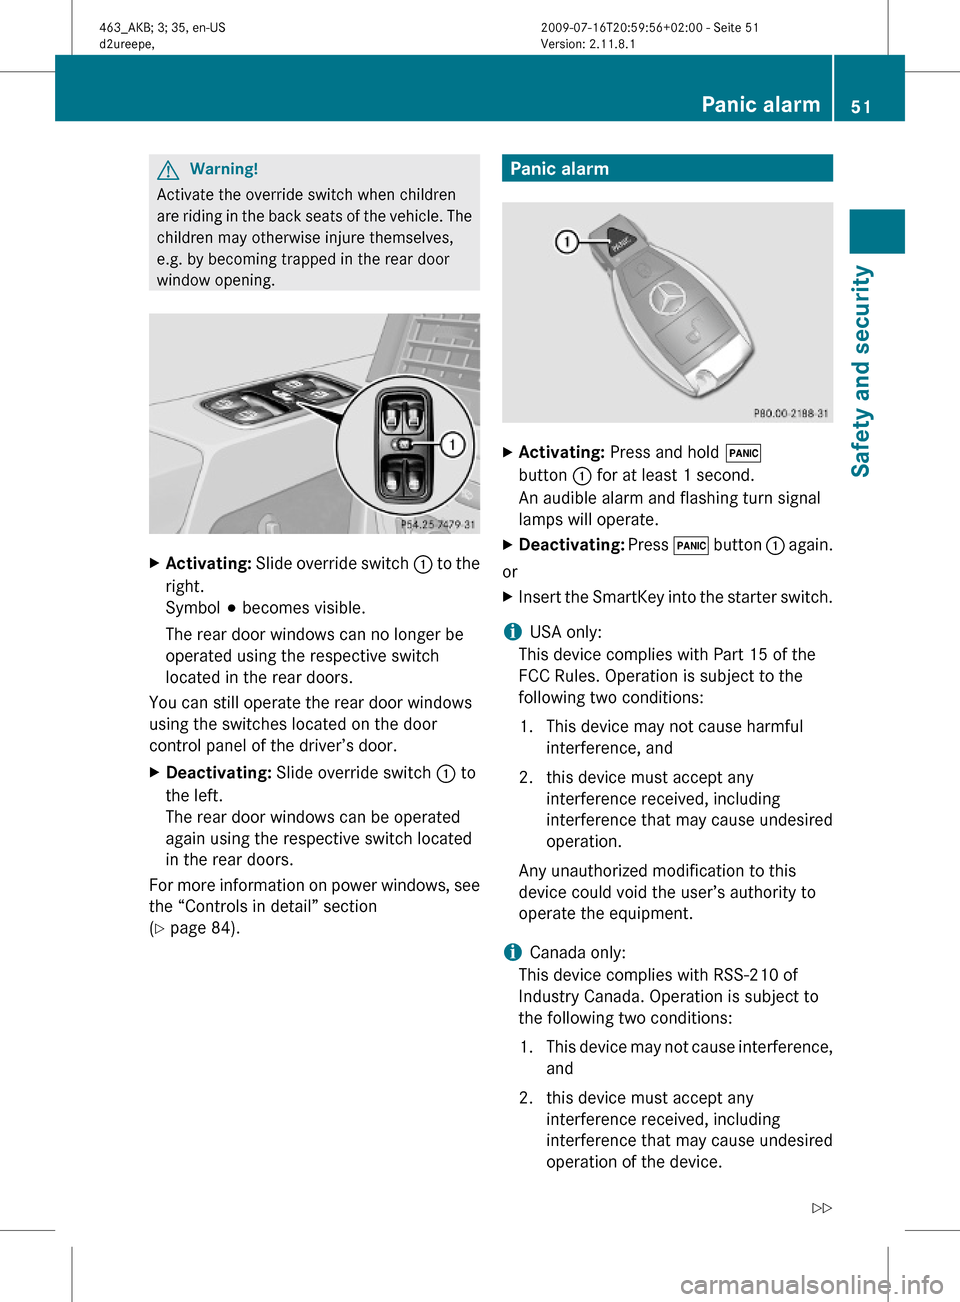
XActivating: Slide override switch : to the
right.
Symbol # becomes visible.
The rear door windows can no longer be
operated using the respective switch
located in the rear doors.
You can still operate the rear door windows
using the switches located on the door
control panel of the driver’s door.
XDeactivating: Slide override switch : to
the left.
The rear door windows can be operated
again using the respective switch located
in the rear doors.
For more information on power windows, see
the “Controls in detail” section
(Y page 84).
Panic alarmXActivating: Press and hold !
button : for at least 1 second.
An audible alarm and flashing turn signal
lamps will operate.
XDeactivating: Press ! button : again.
or
XInsert the SmartKey into the starter switch.
iUSA only:
This device complies with Part 15 of the
FCC Rules. Operation is subject to the
following two conditions:
1. This device may not cause harmful
interference, and
2. this device must accept any
interference received, including
interference that may cause undesired
operation.
Any unauthorized modification to this
device could void the user’s authority to
operate the equipment.
iCanada only:
This device complies with RSS-210 of
Industry Canada. Operation is subject to
the following two conditions:
1.This device may not cause interference,
and
2. this device must accept any
interference received, including
interference that may cause undesired
operation of the device.
Panic alarm51Safety and security463_AKB; 3; 35, en-USd2ureepe,Version: 2.11.8.12009-07-16T20:59:56+02:00 - Seite 51Z
Page 54 of 272
Any unauthorized modification to this
device could void the user’s authority to
operate the equipment.
Driving safety systems
Introduction
This section contains information about the
following driving safety systems:
R ABS (
Antilock Brake System)
R BAS (
Brake Assist System)
R EBB (
Electronic Brake Booster)
R ESP ®
(
Electronic Stability Program)
i In winter operation, the maximum
effectiveness of most of the driving
systems described in this section is only
achieved with winter tires, or snow chains
as required.
Safety notes
GWarning!
The following factors increase the risk of
accidents:
R Excessive speed, especially in turns
R Wet and slippery road surfaces
R Following another vehicle too closely
The driving safety systems described in this
section cannot reduce these risks or prevent
the natural laws of physics from acting on the
vehicle. They cannot increase braking or
steering efficiency beyond that afforded by
the condition of the vehicle brakes and tires
or the traction afforded.
Only a safe, attentive, and skillful driver can
prevent accidents.
The capabilities of a vehicle equipped with the
driving safety systems described in this
section must never be exploited in a reckless
or dangerous manner which could jeopardize
the user’s safety or the safety of others.
Always adjust your driving style to the
prevailing road and weather conditions and
keep a safe distance to other road users and
objects on the street.
If a driving system malfunctions, other driving
safety systems may also switch off. Observe
indicator and warning lamps that may come
on as well as messages in the multifunction
display that may appear.GWarning!
The ABS, the BAS, and the ESP ®
switch off
when the differential locks are switched on.
When the ABS, the BAS, and the ESP ®
are
switched off
R wheels may lock during hard braking
R steering capabilities are reduced
R braking distance is increased
R vehicle stability in standard driving
maneuvers is increased
Make sure the differential locks are switched
on at all times except when driving off-road
for example. Switch on the differential locks
immediately when returning from off-road
driving.
ABS
GObserve Safety notes, see page 52.GWarning!
Do not pump the brake pedal. Use firm, steady
brake pedal pressure instead. Pumping the
brake pedal defeats the purpose of the ABS
and significantly reduces braking
effectiveness.
The Antilock Brake System (ABS) regulates
the brake pressure so that the wheels do not
lock during braking. This allows you to
maintain the ability to steer your vehicle.
The ABS is functional above a speed of
approximately 5 mph (8 km/h) independent
of road surface conditions, provided the
differential locks are not engaged.
52Driving safety systemsSafety and security
463_AKB; 3; 35, en-USd2ureepe,Version: 2.11.8.12009-07-16T20:59:56+02:00 - Seite 52
Page 55 of 272
On slippery road surfaces, the ABS will
respond even to light brake pressure.
The ABS indicator lamp ! in the
instrument cluster comes on when you switch
on the ignition. It goes out when the engine
is running.
Braking
At the instant one of the wheels is about to
lock up, a slight pulsation can be felt in the
brake pedal. The pulsation indicates that the
ABS is in the regulating mode.
XKeep firm and steady pressure on the brake
pedal while you feel the pulsation.
Continuous, steady brake pedal pressure
yields the advantages provided by the ABS,
namely braking power and the ability to steer
the vehicle.
The pulsating brake pedal can be an
indication of hazardous road conditions and
functions as a reminder to take extra care
while driving.
Emergency brake maneuver
XKeep continuous full pressure on the brake
pedal.GWarning!
If the ABS malfunctions, other driving safety
systems such as the BAS or the ESP ®
are also
switched off. Observe indicator and warning
lamps that may come on as well as messages
in the multifunction display that may appear.
If the ABS malfunctions, the wheels may lock
during hard braking, reducing steering
capability and extending the braking distance.
LOW-RANGE ABS
During off-road driving, a special low-range
system for the ABS is operational with the
transfer case in position LOW ( Y page 93).
An improved braking action (dig-in effect) is
obtained for vehicles speeds of up to 37 mph
(60 km/h) through a change in the ABS
control function.
BAS
GObserve Safety notes, see page 52.
The Brake Assist System (BAS) operates in
emergency situations. If you apply the brakes
very quickly, the BAS provides full brake
boost automatically, thereby potentially
reducing the braking distance.
XApply continuous full braking pressure until
the emergency braking situation is over.
The ABS will prevent the wheels from
locking.
When you release the brake pedal, the brakes
function again as normal. The BAS is then
deactivated.
GWarning!
If the BAS malfunctions, the brake system still
functions, but without the additional brake
boost available that the BAS would normally
provide in an emergency braking maneuver.
Therefore, the braking distance may increase.
EBB
GObserve Safety notes, see page 52.
The Electronic Brake Booster (EBB) enhances
braking effectiveness by allowing the rear
brakes to supply a greater proportion of the
braking effort in straight-line braking without
a loss of vehicle stability.
GWarning!
If the EBB malfunctions, the brake system is
still functioning. However, the rear wheels
may lock up during hard braking. You may to
lose control over the vehicle and possibly
cause an accident. Adjust your driving style to
the non-operating status of the EBB.
Driving safety systems53Safety and security463_AKB; 3; 35, en-USd2ureepe,Version: 2.11.8.12009-07-16T20:59:56+02:00 - Seite 53Z
Page 56 of 272
ESP®GObserve Safety notes, see page 52.
The Electronic Stability Program (ESP
®
) is
operational as soon as the engine is running.
It monitors the vehicle’s traction (force of
adhesive friction between the tires and the
road surface) and handling.
The ESP ®
recognizes that the vehicle deviates
from the direction of travel as intended by the
driver. By applying brakes to individual
wheels and by limiting the engine output, the
ESP ®
works to stabilize the vehicle. The
ESP ®
is especially useful while driving off and
on wet or slippery road surfaces. The ESP ®
also stabilizes the vehicle during braking and
steering maneuvers.
The ESP ®
warning lamp d in the
instrument cluster comes on when you switch
on the ignition. It goes out when the engine
is running.
The ESP ®
warning lamp d in the
instrument cluster flashes when the ESP ®
is
engaged.
GWarning!
Never switch off the ESP ®
when you see the
ESP ®
warning lamp d flashing in the
instrument cluster. In this case proceed as
follows:
R When driving off, apply as little throttle as
possible.
R While driving, ease up on the accelerator
pedal.
R Adapt your speed and driving style to the
prevailing road conditions.
Failure to observe these guidelines could
cause the vehicle to skid. The ESP ®
cannot
prevent accidents resulting from excessive
speed.
! Only conduct operational or performance
tests on a two-axle dynamometer. If such
tests are necessary, contact an authorized
Mercedes-Benz Center. You could
otherwise seriously damage the brake
system or the transfer case which is not
covered by the Mercedes-Benz Limited
Warranty.
! Because the ESP ®
operates
automatically, the engine and ignition must
be shut off (SmartKey in starter switch
position 0 or 1) when the parking brake is
being tested on a brake test dynamometer.
Such testing should be no longer than 10
seconds.
Active braking action through the ESP ®
may otherwise seriously damage the brake
system which is not covered by the
Mercedes-Benz Limited Warranty.
! The ESP ®
will only function properly if you
use wheels of the recommended tire size
as specified in the “Technical data” section
of this Operator’s Manual.
Electronic Traction System (4-ETS) GObserve Safety notes, see page 52.
The 4-ETS (four-wheel Electronic Traction
System) is a component of the ESP ®
. The
4-ETS improves the vehicle’s ability to utilize
available traction, especially under slippery
road conditions by applying the brakes to a
spinning wheel. In addition, more power is
transferred to the wheel(s) with traction.
The 4-ETS function is available between
vehicle speeds of 0 mph ( km/h) and 37 mph
(60 km/h).
When you switch off the ESP ®
, the 4-ETS is
still enabled.
Switching off the ESP ®
GWarning!
The ESP
®
should not be switched off during
normal driving other than in the
circumstances described below. Disabling
54Driving safety systemsSafety and security
463_AKB; 3; 35, en-USd2ureepe,Version: 2.11.8.12009-07-16T20:59:56+02:00 - Seite 54
Page 57 of 272
the system will reduce vehicle stability in
driving maneuvers.
To improve the vehicle’s traction, switch off
the ESP®. This allows the drive wheels to spin
and thus cut into surfaces for better grip, for
example
Rwhen driving with snow chains
Rin deep snow
Rin sand or gravel
Rwhen driving off-road
GWarning!
Switch on the ESP® immediately if the
aforementioned circumstances do not apply
anymore. Otherwise the ESP® will not
stabilize the vehicle when it is starting to skid
or a wheel is spinning.
When you switch off the ESP®,
Rthe ESP® does not stabilize the vehicle
Rthe engine output is not limited, which
allows the drive wheels to spin and thus cut
into surfaces for better grip
Rthe ESP® continues to operate when you
are braking
Rthe 4-ETS will still apply the brakes to a
spinning wheel at vehicle speeds up to
approximately 37 mph (60 km/h)
Rthe cruise control cannot be activated
Rthe cruise control switches off if activated
iWhen the ESP® is switched off and one or
more drive wheels are spinning, the ESP®
warning lamp d in the instrument
cluster flashes. However, the ESP® will
then not stabilize the vehicle.
iWhen the ESP® is switched off, it will be
switched on again automatically when
exceeding a vehicle speed of 37 mph (60
km/h) or exceeding a severity threshold of
side acceleration.
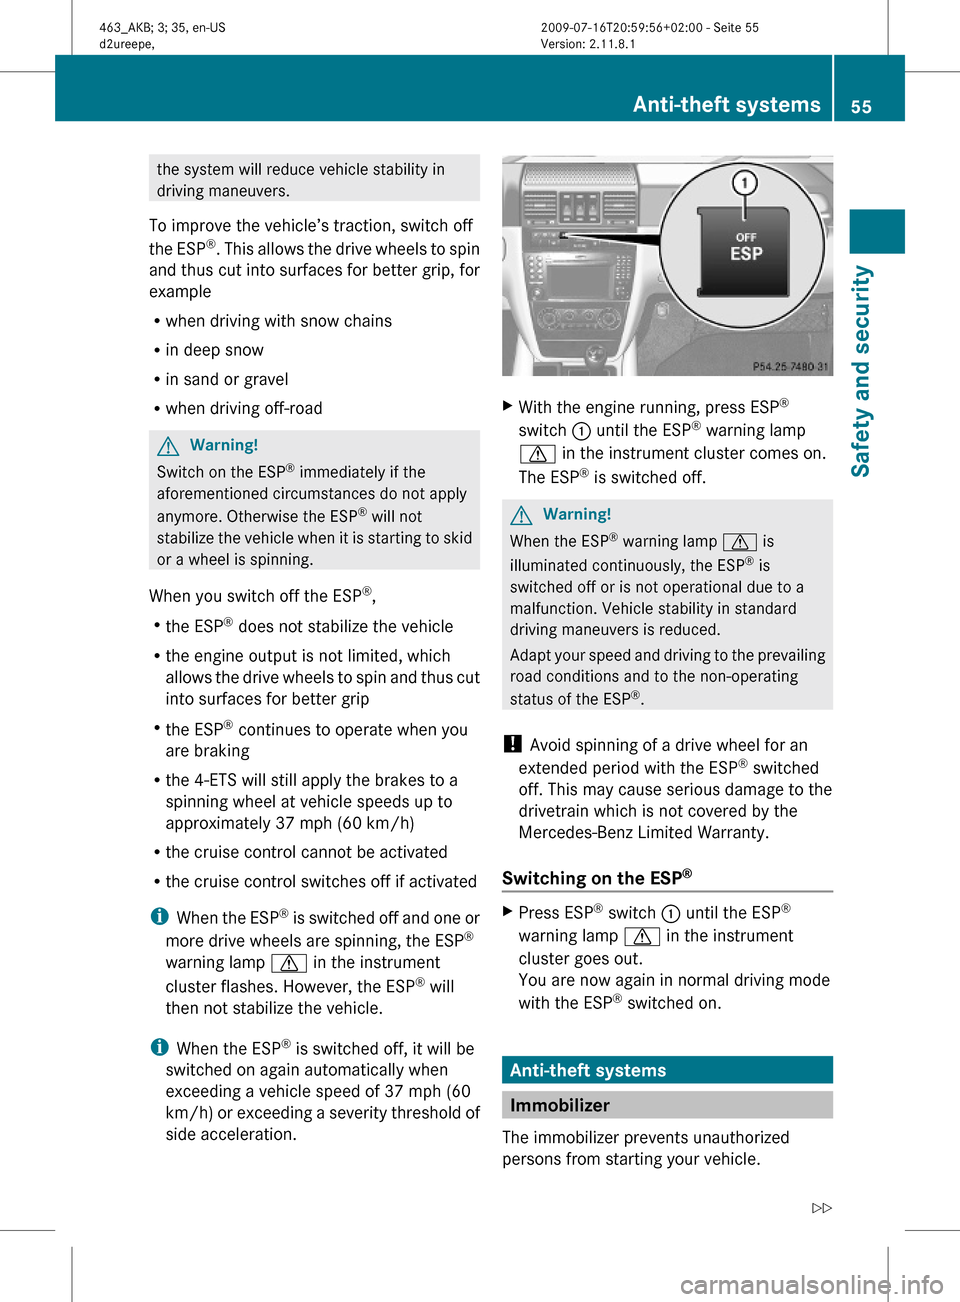
XWith the engine running, press ESP®
switch : until the ESP® warning lamp
d in the instrument cluster comes on.
The ESP® is switched off.
GWarning!
When the ESP® warning lamp d is
illuminated continuously, the ESP® is
switched off or is not operational due to a
malfunction. Vehicle stability in standard
driving maneuvers is reduced.
Adapt your speed and driving to the prevailing
road conditions and to the non-operating
status of the ESP®.
! Avoid spinning of a drive wheel for an
extended period with the ESP® switched
off. This may cause serious damage to the
drivetrain which is not covered by the
Mercedes-Benz Limited Warranty.
Switching on the ESP®
XPress ESP® switch : until the ESP®
warning lamp d in the instrument
cluster goes out.
You are now again in normal driving mode
with the ESP® switched on.
Anti-theft systems
Immobilizer
The immobilizer prevents unauthorized
persons from starting your vehicle.
Anti-theft systems55Safety and security463_AKB; 3; 35, en-USd2ureepe,Version: 2.11.8.12009-07-16T20:59:56+02:00 - Seite 55Z
Page 58 of 272
When leaving the vehicle, always take the
SmartKey with you and lock the vehicle. The
engine can be started by anyone with a valid
SmartKey that is left inside the vehicle.
Activating
XRemove the SmartKey from the starter
switch.
Deactivating
XSwitch on the ignition.
iStarting the engine will also deactivate
the immobilizer.
In the event that the engine cannot be
started (yet the vehicle’s battery is
charged), the system is not operational.
Contact an authorized Mercedes-Benz
Center or call 1-800-FOR-MERCedes (in the
USA) or 1-800-387-0100 (in Canada).
Anti-theft alarm system
Once the alarm system has been armed, a
visual and audible alarm is triggered when
someone opens
Ra door
Rthe tailgate
Rthe hood
The alarm will stay on even if the activating
element, a door, for example, is closed
immediately.
The alarm system will also be triggered when
Rthe vehicle is opened with the mechanical
key
Ra door is opened from the inside
Rthe tailgate is opened from the inside
To cancel the alarm after it has been
triggered, see “Canceling the alarm”
(Y page 57).
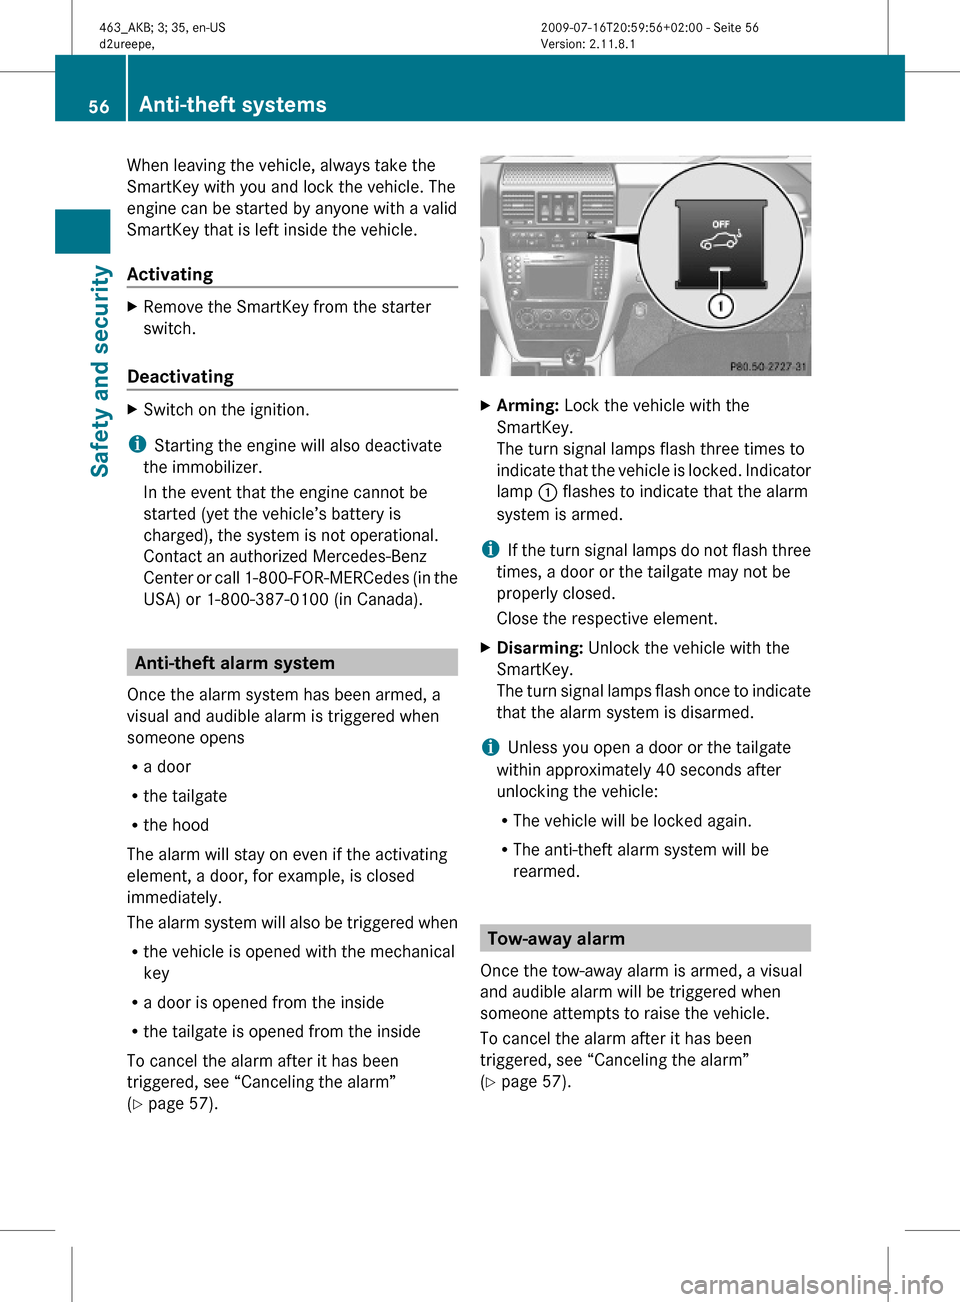
XArming: Lock the vehicle with the
SmartKey.
The turn signal lamps flash three times to
indicate that the vehicle is locked. Indicator
lamp : flashes to indicate that the alarm
system is armed.
iIf the turn signal lamps do not flash three
times, a door or the tailgate may not be
properly closed.
Close the respective element.
XDisarming: Unlock the vehicle with the
SmartKey.
The turn signal lamps flash once to indicate
that the alarm system is disarmed.
iUnless you open a door or the tailgate
within approximately 40 seconds after
unlocking the vehicle:
RThe vehicle will be locked again.
RThe anti-theft alarm system will be
rearmed.
Tow-away alarm
Once the tow-away alarm is armed, a visual
and audible alarm will be triggered when
someone attempts to raise the vehicle.
To cancel the alarm after it has been
triggered, see “Canceling the alarm”
(Y page 57).
56Anti-theft systemsSafety and security
463_AKB; 3; 35, en-USd2ureepe,Version: 2.11.8.12009-07-16T20:59:56+02:00 - Seite 56
Page 59 of 272
XArming: Lock the vehicle with the
SmartKey.
The tow-away alarm is armed after about
30 seconds automatically.
XDisarming: Unlock the vehicle with the
SmartKey.
The tow-away alarm remains disarmed until
you lock the vehicle again.
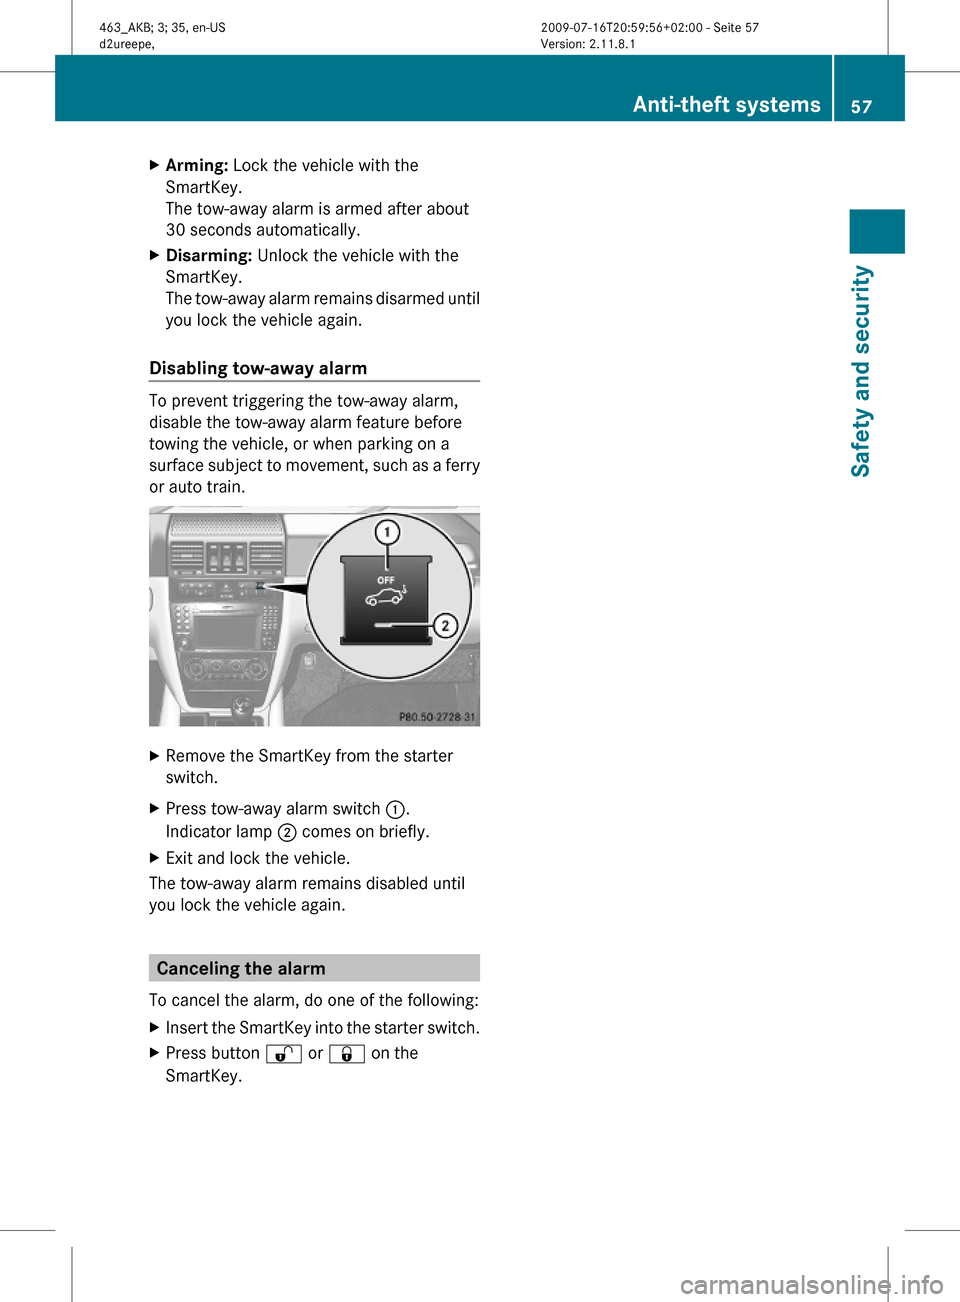
Disabling tow-away alarm
To prevent triggering the tow-away alarm,
disable the tow-away alarm feature before
towing the vehicle, or when parking on a
surface subject to movement, such as a ferry
or auto train.
XRemove the SmartKey from the starter
switch.
XPress tow-away alarm switch :.
Indicator lamp ; comes on briefly.
XExit and lock the vehicle.
The tow-away alarm remains disabled until
you lock the vehicle again.
Canceling the alarm
To cancel the alarm, do one of the following:
XInsert the SmartKey into the starter switch.XPress button % or & on the
SmartKey.
Anti-theft systems57Safety and security463_AKB; 3; 35, en-USd2ureepe,Version: 2.11.8.12009-07-16T20:59:56+02:00 - Seite 57Z
Page 60 of 272

58463_AKB; 3; 35, en-USd2ureepe,Version: 2.11.8.12009-07-16T20:59:56+02:00 - Seite 58