clock setting MERCEDES-BENZ G55AMG 2010 W463 Owner's Manual
[x] Cancel search | Manufacturer: MERCEDES-BENZ, Model Year: 2010, Model line: G55AMG, Model: MERCEDES-BENZ G55AMG 2010 W463Pages: 272, PDF Size: 7.04 MB
Page 100 of 272

GWarning!
Always remember to disengage the
differential locks when returning to drive on
paved roads, see “A few words about
differentials and differential locks”.
Instrument cluster
Introduction
For a full view illustration of the instrument
cluster, see “Instrument cluster”
(Y page 26).
GWarning!
No messages will be displayed if either the
instrument cluster or the multifunction
display is inoperative.
As a result, you will not be able to see
information about your driving conditions,
such as
Rspeed
Routside temperature
Rwarning/indicator lamps
Rmalfunction/warning messages
Rfailure of any systems
Driving characteristics may be impaired.
If you must continue to drive, do so with added
caution. Contact an authorized Mercedes-
Benz Center as soon as possible.
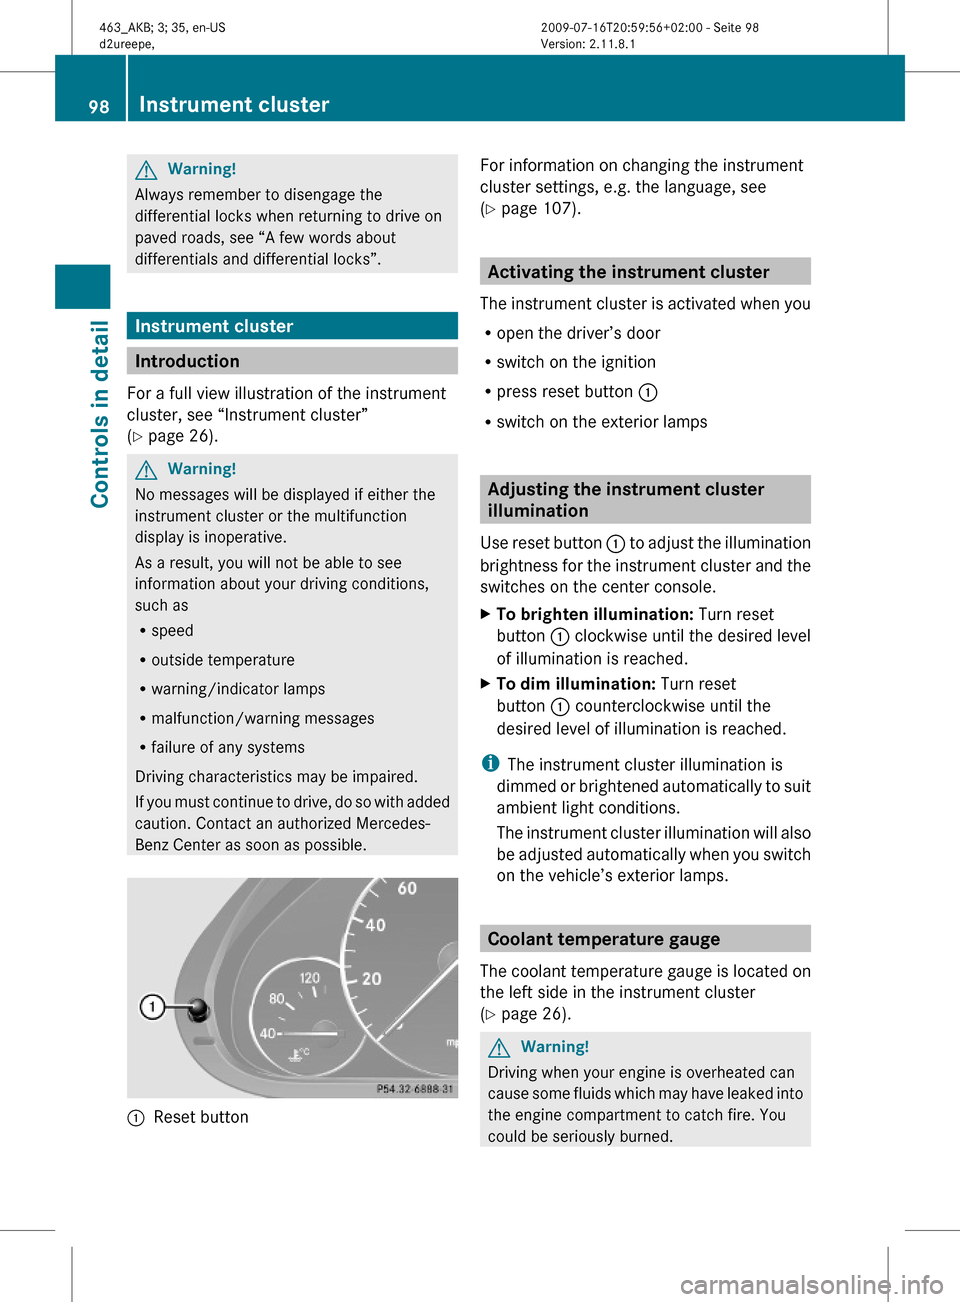
:Reset button For information on changing the instrument
cluster settings, e.g. the language, see
(Y page 107).
Activating the instrument cluster
The instrument cluster is activated when you
Ropen the driver’s door
Rswitch on the ignition
Rpress reset button :
Rswitch on the exterior lamps
Adjusting the instrument cluster
illumination
Use reset button : to adjust the illumination
brightness for the instrument cluster and the
switches on the center console.
XTo brighten illumination: Turn reset
button : clockwise until the desired level
of illumination is reached.
XTo dim illumination: Turn reset
button : counterclockwise until the
desired level of illumination is reached.
iThe instrument cluster illumination is
dimmed or brightened automatically to suit
ambient light conditions.
The instrument cluster illumination will also
be adjusted automatically when you switch
on the vehicle’s exterior lamps.
Coolant temperature gauge
The coolant temperature gauge is located on
the left side in the instrument cluster
(Y page 26).
GWarning!
Driving when your engine is overheated can
cause some fluids which may have leaked into
the engine compartment to catch fire. You
could be seriously burned.
98Instrument clusterControls in detail
463_AKB; 3; 35, en-USd2ureepe,Version: 2.11.8.12009-07-16T20:59:56+02:00 - Seite 98
Page 103 of 272

XPress button V or U repeatedly to
pass through each menu one after the
other.
XPress button * or & repeatedly to
pass through each function display, one
after the other, in the current menu.
In the Settings menu, instead of functions,
you will find a number of submenus for calling
up and changing settings. For instructions on
using these submenus, see “Settings menu”
(Y page 106).
The number of menus available in the system
depends on which optional equipment is
installed in your vehicle.
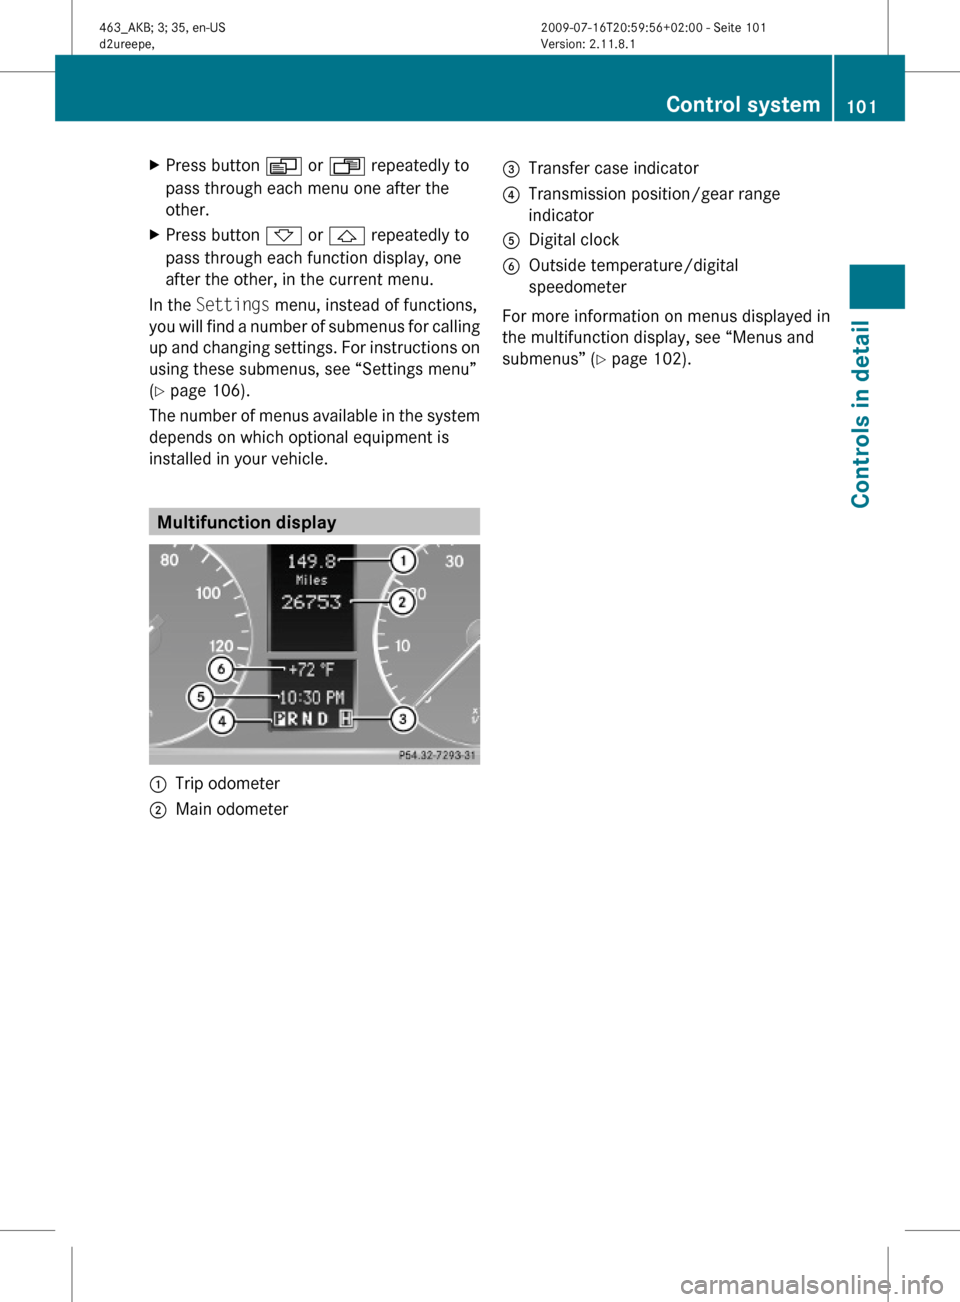
Multifunction display
:Trip odometer;Main odometer =Transfer case indicator?Transmission position/gear range
indicator
ADigital clockBOutside temperature/digital
speedometer
For more information on menus displayed in
the multifunction display, see “Menus and
submenus” (Y page 102).
Control system101Controls in detail463_AKB; 3; 35, en-USd2ureepe,Version: 2.11.8.12009-07-16T20:59:56+02:00 - Seite 101Z
Page 126 of 272

In automatic mode, cooling with
dehumidification is switched on. This function
can be switched off if necessary.
GWarning!
If you deactivate the air conditioning, the
vehicle will not be cooled when weather
conditions are warm. The windows can fog up
more quickly. Window fogging may impair
visibility and endanger you and others.
XSet the desired temperature
(Y page 124).
XActivating: Press button Ã.
The indicator lamp in the button comes on.
The air volume and air distribution are
adjusted automatically.
XDeactivating: Press button à again.
The indicator lamp in the button goes out.
Automatic control of air volume and air
distribution are switched off.
Setting temperature
You can adjust the air temperature on each
side of the passenger compartment. You
should raise or lower the temperature setting
in small increments, preferably starting at
72‡ (22†).
XIncreasing/decreasing: Turn
temperature control ; and/or =
(Y page 121) slightly clockwise or
counterclockwise.
iIf you turn the temperature control fully
clockwise or counterclockwise for one side
of the vehicle, you are increasing or
decreasing the temperature for the other
side of the vehicle as well.
Adjusting air vents
GWarning!
When operating the climate control, the air
that enters the passenger compartment
through the air vents can be very hot or very
cold (depending on the set temperature). This
may cause burns or frostbite to unprotected
skin in the immediate area of the air vents.
Always keep sufficient distance between
unprotected parts of the body and the air
vents. If necessary, use the air distribution
adjustment to direct the air to air vents in the
vehicle interior that are not in the immediate
area of unprotected skin.
For best possible performance of the climate
control:
XKeep the air intake grille in front of the
windshield free of snow, leaves, sticks, and
any other debris.
XAlways keep all air vents and grilles in the
passenger compartment free from
obstruction.
iFor draft-free ventilation, move the
adjustable center and side air vents to the
middle position.
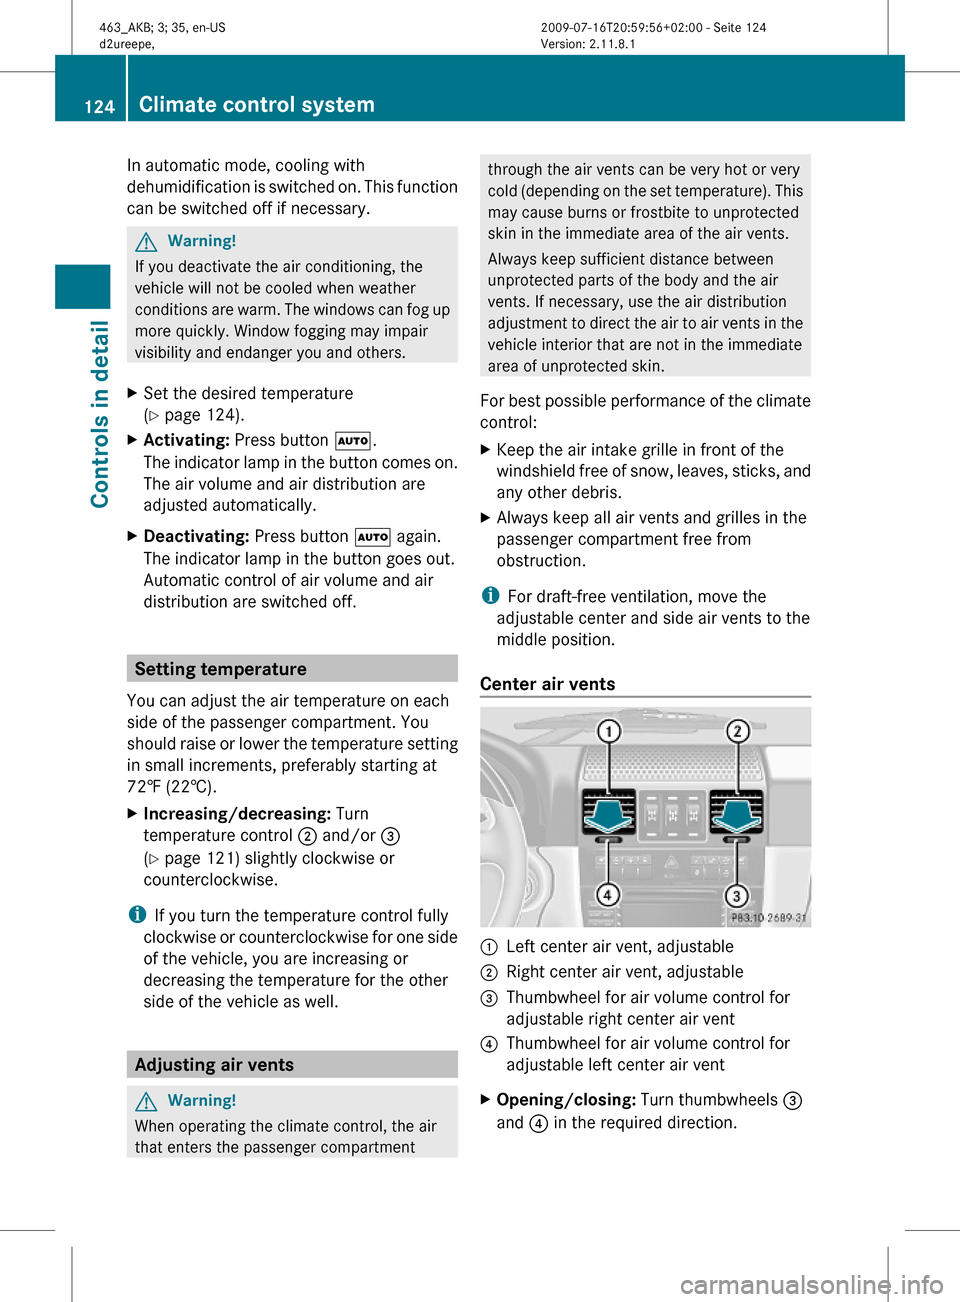
Center air vents
:Left center air vent, adjustable;Right center air vent, adjustable=Thumbwheel for air volume control for
adjustable right center air vent
?Thumbwheel for air volume control for
adjustable left center air vent
XOpening/closing: Turn thumbwheels =
and ? in the required direction.
124Climate control systemControls in detail
463_AKB; 3; 35, en-USd2ureepe,Version: 2.11.8.12009-07-16T20:59:56+02:00 - Seite 124
Page 127 of 272

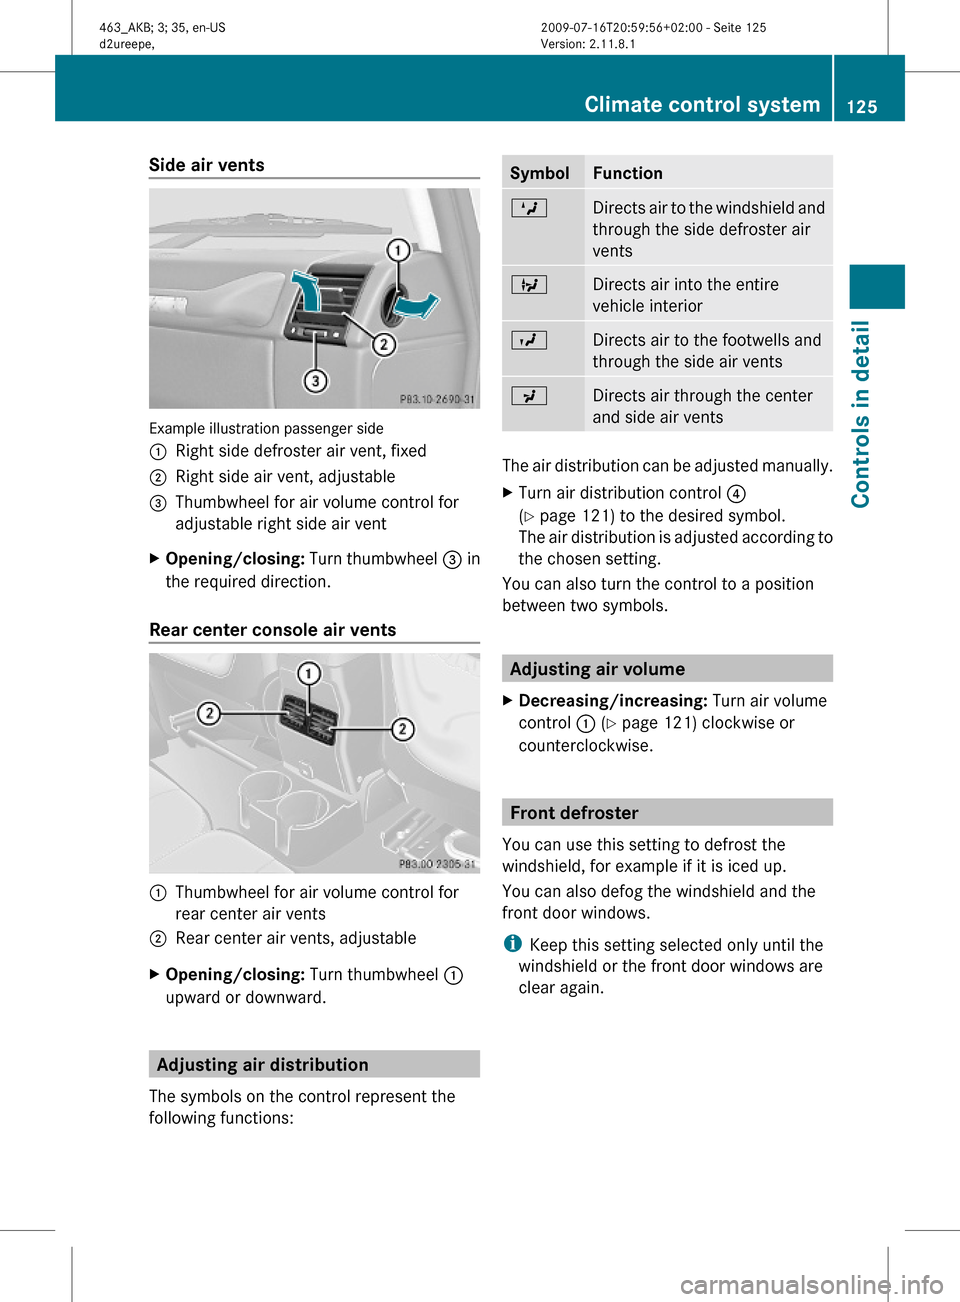
Side air vents
Example illustration passenger side
:Right side defroster air vent, fixed;Right side air vent, adjustable=Thumbwheel for air volume control for
adjustable right side air vent
XOpening/closing: Turn thumbwheel = in
the required direction.
Rear center console air vents
:Thumbwheel for air volume control for
rear center air vents
;Rear center air vents, adjustableXOpening/closing: Turn thumbwheel :
upward or downward.
Adjusting air distribution
The symbols on the control represent the
following functions:
SymbolFunctionMDirects air to the windshield and
through the side defroster air
vents
QDirects air into the entire
vehicle interior
ODirects air to the footwells and
through the side air vents
PDirects air through the center
and side air vents
The air distribution can be adjusted manually.
XTurn air distribution control ?
(Y page 121) to the desired symbol.
The air distribution is adjusted according to
the chosen setting.
You can also turn the control to a position
between two symbols.
Adjusting air volume
XDecreasing/increasing: Turn air volume
control : (Y page 121) clockwise or
counterclockwise.
Front defroster
You can use this setting to defrost the
windshield, for example if it is iced up.
You can also defog the windshield and the
front door windows.
iKeep this setting selected only until the
windshield or the front door windows are
clear again.
Climate control system125Controls in detail463_AKB; 3; 35, en-USd2ureepe,Version: 2.11.8.12009-07-16T20:59:56+02:00 - Seite 125Z