MERCEDES-BENZ G55AMG 2011 W463 Owner's Manual
Manufacturer: MERCEDES-BENZ, Model Year: 2011, Model line: G55AMG, Model: MERCEDES-BENZ G55AMG 2011 W463Pages: 288, PDF Size: 11.16 MB
Page 161 of 288
Menus and submenus
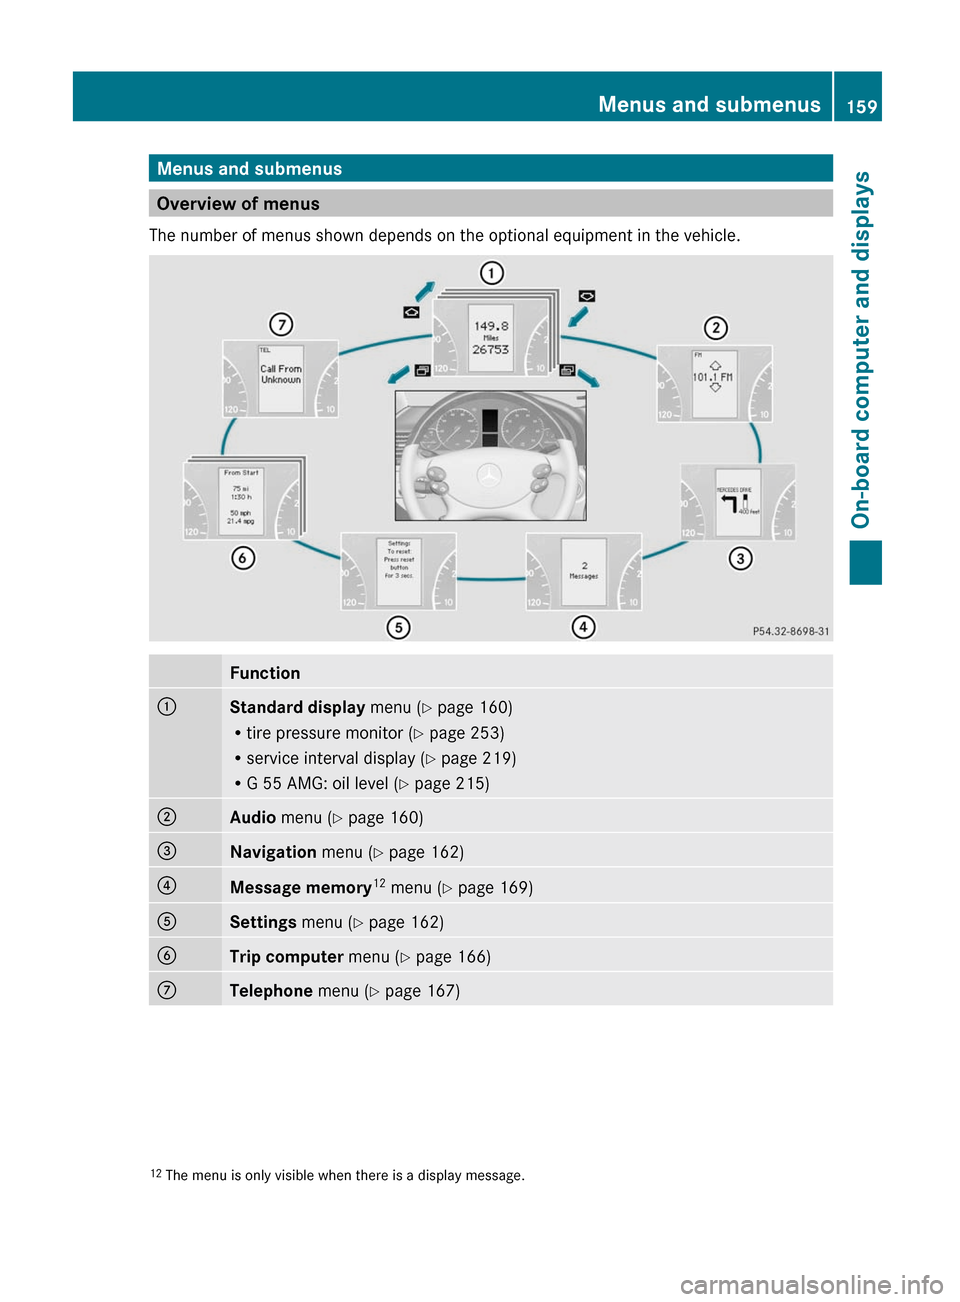
Overview of menus
The number of menus shown depends on the optional equipment in the vehicle.
Function:Standard display menu (Y page 160)
R tire pressure monitor ( Y page 253)
R service interval display ( Y page 219)
R G 55 AMG: oil level ( Y page 215);Audio menu ( Y page 160)=Navigation menu (Y page 162)?Message memory 12
menu ( Y page 169)ASettings menu (Y page 162)BTrip computer menu (Y page 166)CTelephone menu (Y page 167)12
The menu is only visible when there is a display message.Menus and submenus159On-board computer and displaysZ
Page 162 of 288
Standard display menu
Standard displayXPress the V or U button on the
steering wheel to select the standard
display.
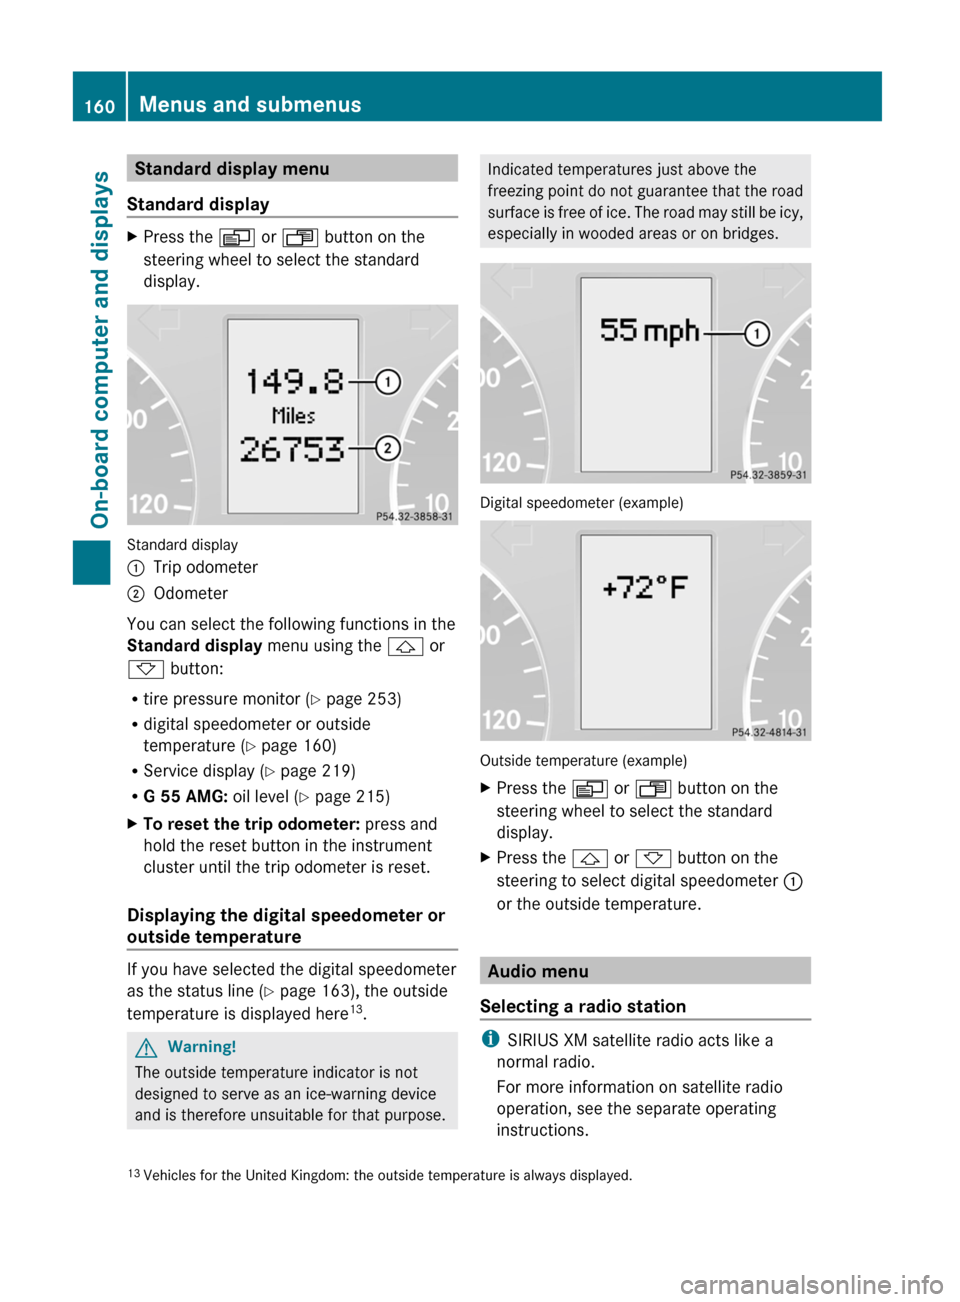
Standard display
:Trip odometer;Odometer
You can select the following functions in the
Standard display menu using the & or
* button:
R tire pressure monitor ( Y page 253)
R digital speedometer or outside
temperature ( Y page 160)
R Service display ( Y page 219)
R G 55 AMG: oil level (Y page 215)
XTo reset the trip odometer: press and
hold the reset button in the instrument
cluster until the trip odometer is reset.
Displaying the digital speedometer or
outside temperature
If you have selected the digital speedometer
as the status line ( Y page 163), the outside
temperature is displayed here 13
.
GWarning!
The outside temperature indicator is not
designed to serve as an ice-warning device
and is therefore unsuitable for that purpose.
Indicated temperatures just above the
freezing point do not guarantee that the road
surface is free of ice. The road may still be icy,
especially in wooded areas or on bridges.
Digital speedometer (example)
Outside temperature (example)
XPress the V or U button on the
steering wheel to select the standard
display.XPress the & or * button on the
steering to select digital speedometer :
or the outside temperature.
Audio menu
Selecting a radio station
i SIRIUS XM satellite radio acts like a
normal radio.
For more information on satellite radio
operation, see the separate operating
instructions.
13 Vehicles for the United Kingdom: the outside temperature is always displayed.160Menus and submenusOn-board computer and displays
Page 163 of 288
You can only change the waveband and store
new stations using COMAND.XSwitch on COMAND and select Radio (see
the separate operating instructions).XPress the V or U button on the
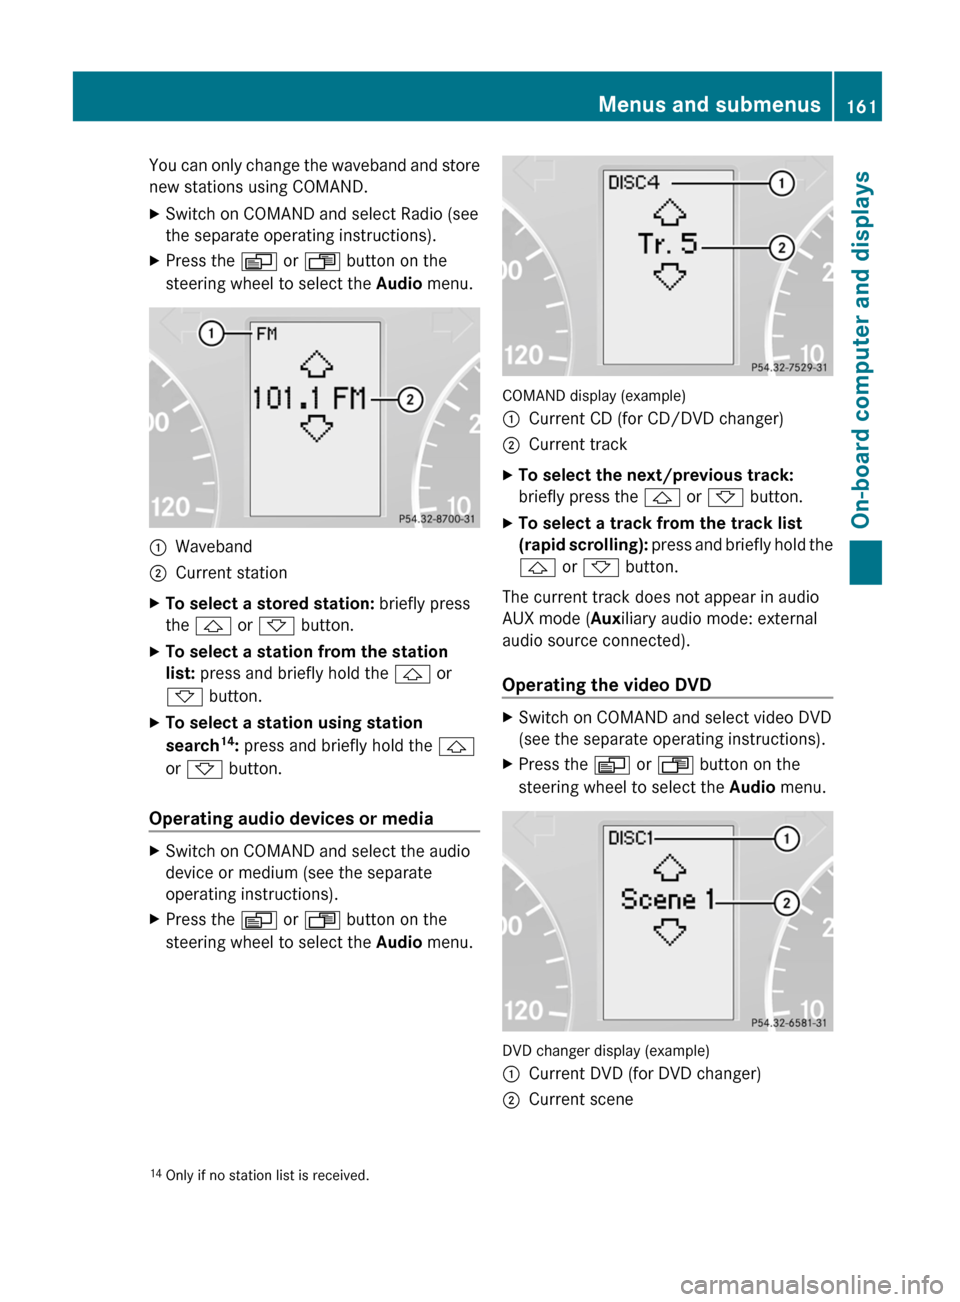
steering wheel to select the Audio menu.:Waveband;Current stationXTo select a stored station: briefly press
the & or * button.XTo select a station from the station
list: press and briefly hold the & or
* button.XTo select a station using station
search 14
: press and briefly hold the &
or * button.
Operating audio devices or media
XSwitch on COMAND and select the audio
device or medium (see the separate
operating instructions).XPress the V or U button on the
steering wheel to select the Audio menu.
COMAND display (example)
:Current CD (for CD/DVD changer);Current trackXTo select the next/previous track:
briefly press the & or * button.XTo select a track from the track list
(rapid scrolling): press and briefly hold the
& or * button.
The current track does not appear in audio
AUX mode ( Auxiliary audio mode: external
audio source connected).
Operating the video DVD
XSwitch on COMAND and select video DVD
(see the separate operating instructions).XPress the V or U button on the
steering wheel to select the Audio menu.
DVD changer display (example)
:Current DVD (for DVD changer);Current scene14
Only if no station list is received.Menus and submenus161On-board computer and displaysZ
Page 164 of 288
XPress the & or * button to select a
scene.
Navigation menu
Displaying navigation instructions
In the Navigation menu: the instructions
from the navigation system appear in the
multifunction display. For more information,
see the separate operating instructions.
XSwitch on COMAND (see the separate
operating instructions).XPress the V or U button on the
steering wheel to select the Navigation
menu.
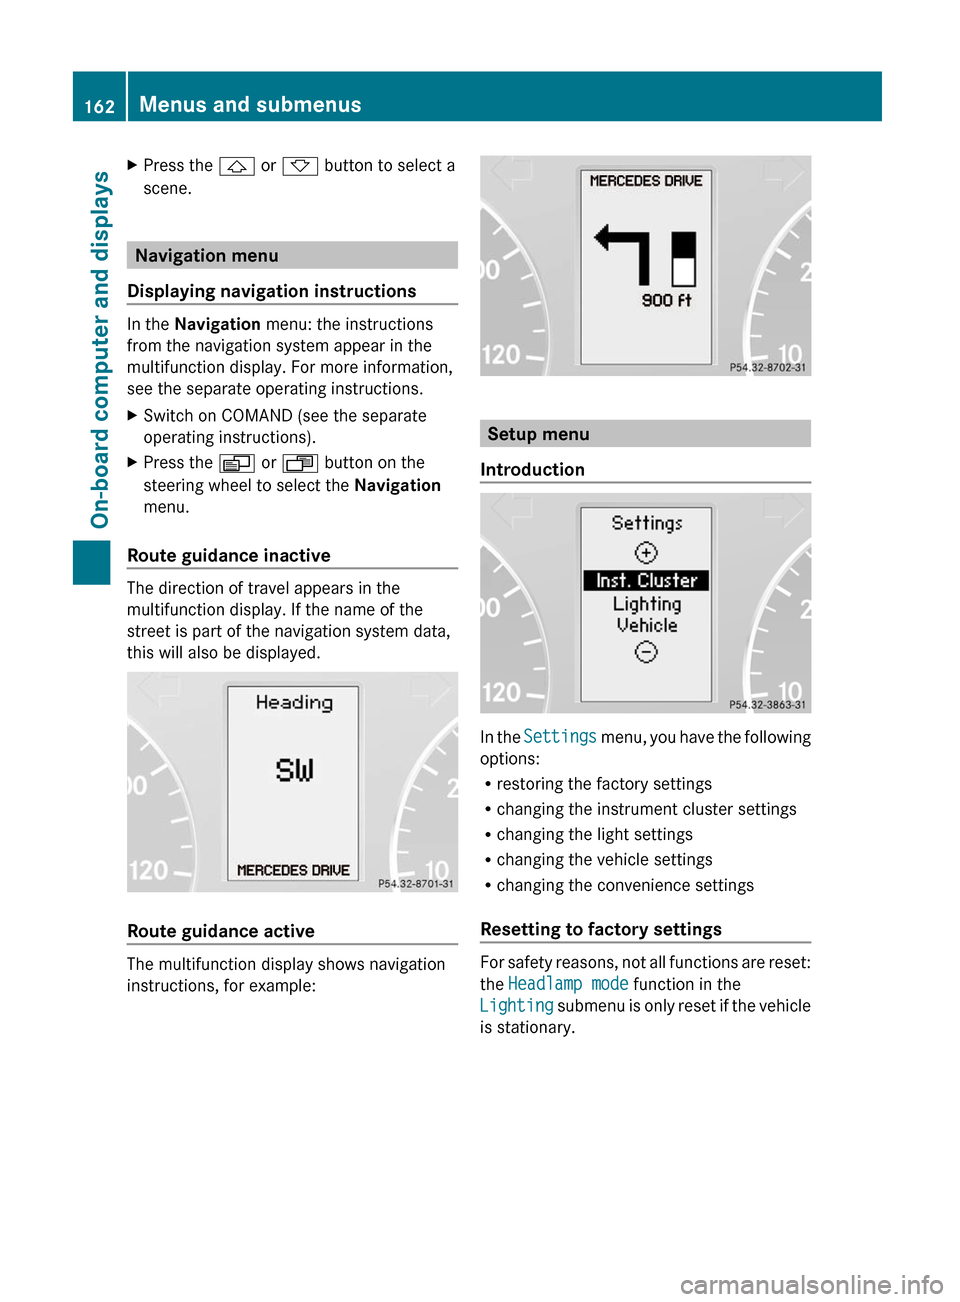
Route guidance inactive
The direction of travel appears in the
multifunction display. If the name of the
street is part of the navigation system data,
this will also be displayed.
Route guidance active
The multifunction display shows navigation
instructions, for example:
Setup menu
Introduction
In the Settings menu, you have the following
options:
R restoring the factory settings
R changing the instrument cluster settings
R changing the light settings
R changing the vehicle settings
R changing the convenience settings
Resetting to factory settings
For safety reasons, not all functions are reset:
the Headlamp mode function in the
Lighting submenu is only reset if the vehicle
is stationary.
162Menus and submenusOn-board computer and displays
Page 165 of 288
XPress the V or U button on the
steering wheel to select the Settings
menu.XPress and hold the reset button on the left
of the instrument cluster for approximately
three seconds.
A prompt appears in the multifunction
display asking you to confirm by pressing
the reset button again.XPress the reset button again.
The settings of most functions are restored
to the factory settings.
or
XIf you want to retain the settings, do not
press the reset button a second time.
The Settings menu appears again after
approximately five seconds.XPress the V or U button to select a
different menu.
Instrument cluster
Selecting the unit of measurement for
distance
The selected unit of measurement for
distance applies to:
R the odometer and the trip odometer
R the trip computer
R the digital speedometer
XPress the V or U button on the
steering wheel to select the Settings
menu.XPress the & button to select submenus.XPress the W or X button to select the
Inst. Cluster submenu.XPress the & button to select Disp.
Unit Speed-/Odom.XPress the W or X button to select
Km (kilometers) or Miles as the unit of
measurement for distance.XPress the &, V or U button to
select a different display.Selecting the language
The Language function allows you to select
the language for the instrument cluster.XPress the V or U button on the
steering wheel to select the Settings
menu.XPress the & button to select submenus.XPress the W or X button to select the
Inst. cluster submenu.XPress the & button to select Language.XPress the W or X button to select the
desired language.XPress the &, V or U button to
select a different display.
Selecting the status line display
XPress the V or U button on the
steering wheel to select the Settings
menu.XPress the & button to select submenus.XPress the W or X button to select the
Inst. cluster submenu.XPress the & button to select Status
line display .XPress the W or X button to select the
status line display: speed ( Speed) or
outside temperature ( Outside temp.).
The selected display now appears
constantly in the lower multifunction
display. When you scroll through the
Standard display menu (Y page 160), you
will see the display you have not selected.XPress the &, V or U button to
select a different display.
Lighting
Adjusting the instrument cluster lighting
The instrument cluster lighting automatically
adjusts to the ambient light.
XBrighter or dimmer: turn reset button
( Y page 26) clockwise or counter-
clockwise.Menus and submenus163On-board computer and displaysZ
Page 166 of 288
Switching the daytime running lamps on/
off
This function is not available in Canada.
If you have activated the daytime running
lamps function and the light switch is in the
$ or à position, the low-beam
headlamps are switched on automatically
when the engine is running.
In the dark, the following also light up:
R the low-beam headlamps
R the standing lamps
R the tail lamps
R the license plate lamp
R the side marker lamp
In countries where daytime running lamps are
legally required, Constant is the factory
setting.XPress the V or U button on the
steering wheel to select the Settings
menu.XPress the & button to select submenus.XPress the W or X button to select the
Lighting submenu.XPress the & button to select Headlamp
mode .XPress the W or X button to set the
mode for the headlamps to Manual or
Constant (daytime running lamps).XPress the &, V or U button to
select a different display.
Switching the surround lighting on or off
If you activate the surround lighting function
and the light switch is set to Ã, the
following will light up if it is dark and you
unlock the vehicle using the key:
R the standing lamps
R the license plate lamp
R the tail lamps
R the fog lamps
R the side marker lamp
The surround lighting switches off
automatically after 40 seconds or when the
driver's door is opened.XPress the V or U button on the
steering wheel to select the Settings
menu.XPress the & button to select submenus.XPress the W or X button to select the
Lighting submenu.XPress the & button to select Surround
lighting .XPress the W or X button to switch
the Surround lighting on or off.XWhen leaving the vehicle, turn the light
switch to position Ã.
The surround lighting is activated.XPress the &, V or U button to
select a different display.
Activating/deactivating the exterior
lighting delayed switch-off
If you have activated the delayed switch-off
function, the light switch is set to à and
you switch off the engine, the following
remain lit:
R the standing lamps
R the license plate lamp
R the tail lamps
R the fog lamps
R the side marker lamp
If the engine is switched off and then none of
the doors are opened, or if an open door is
not closed, the exterior lighting goes out after
60 seconds.
XPress the V or U button on the
steering wheel to select the Settings
menu.XPress the & button to select submenus.XPress the W or X button to select the
Lighting submenu.XPress the & button to select Headl.
Delayed Switch Off .164Menus and submenusOn-board computer and displays
Page 167 of 288
XPress the W or X button to activate
or deactivate the Headl. Delayed
Switch Off function.XBefore switching off the engine, turn the
light switch to position Ã.
The exterior lighting delayed switch-off is
activated.XPress the &, V or U button to
select a different display.
Deactivating the delayed switch-off
temporarily:
XBefore leaving the vehicle, turn the key to
position 0 in the ignition lock.XTurn the key to position 2 in the ignition
lock and back to position 0.
The delayed switch-off is deactivated.
Delayed switch-off is reactivated the next
time you start the engine.
Activating/deactivating the interior
lighting delayed switch-off
If the Interior Light. Delay. Sw. Off:
function is activated and you pull the key out
of the ignition lock, the interior lighting
remains on for around 10 seconds.
XPress the V or U button on the
steering wheel to select the Settings
menu.XPress the & button to select submenus.XPress the W or X button to select the
Lighting submenu.XPress the & button to select Interior
Light. Delay Sw. Off .XPress the W or X button to activate
or deactivate Interior Light. Delay.
Sw. Off .XPress the &, V or U button to
select a different display.Vehicle
Activating/deactivating the automatic
door locking feature
If you select the Automatic Locking
function, the vehicle is centrally locked above
a speed of around 9 mph (15 km/h).
i For more information on the automatic
locking feature, see ( Y page 68).
XPress the V or U button on the
steering wheel to select the Settings
menu.XPress the & button to select submenus.XPress the W or X button to select the
Vehicle submenu.XPress the & button to select
Automatic Door Lock .XPress the W or X button to switch
the Automatic Door Lock feature on or
off.XPress the &, V or U button to
select a different display.
Convenience
Activating/deactivating the EASY-
ENTRY/EXIT feature
You can use the Easy-entry Function to
activate or deactivate the EASY-ENTRY/EXIT
feature ( Y page 84).
GWarning!
You must make sure no one can become
trapped or injured by the moving steering
wheel when the easy-entry/exit feature is
activated.
To stop steering wheel movement do one of
the following:
R Move steering wheel adjustment stalk.
R Press one of the memory position buttons.
R Press the memory button.
Do not leave children unattended in the
vehicle, or with access to an unlocked vehicle.
Children could open the driver’s door and
Menus and submenus165On-board computer and displaysZ
Page 168 of 288
unintentionally activate the easy-entry/exit
feature, which could result in an accident
and/or serious personal injury.XPress the V or U button on the
steering wheel to select the Settings
menu.XPress the & button to select submenus.XPress the W or X button to select the
Convenience submenu.XPress the & button to select the Easy-
entry Function .XPress the W or X button to activate
or deactivate the Easy-entry Function .XPress the &, V or U button to
select a different display.
Trip computer menu
Trip computer "From start" or "From
reset"
The values in the From Start submenu are
calculated from the start of a journey whilst
the values in the From Reset submenu are
calculated from the last time the submenu
was reset.
XPress the V or U button to select
From Start .
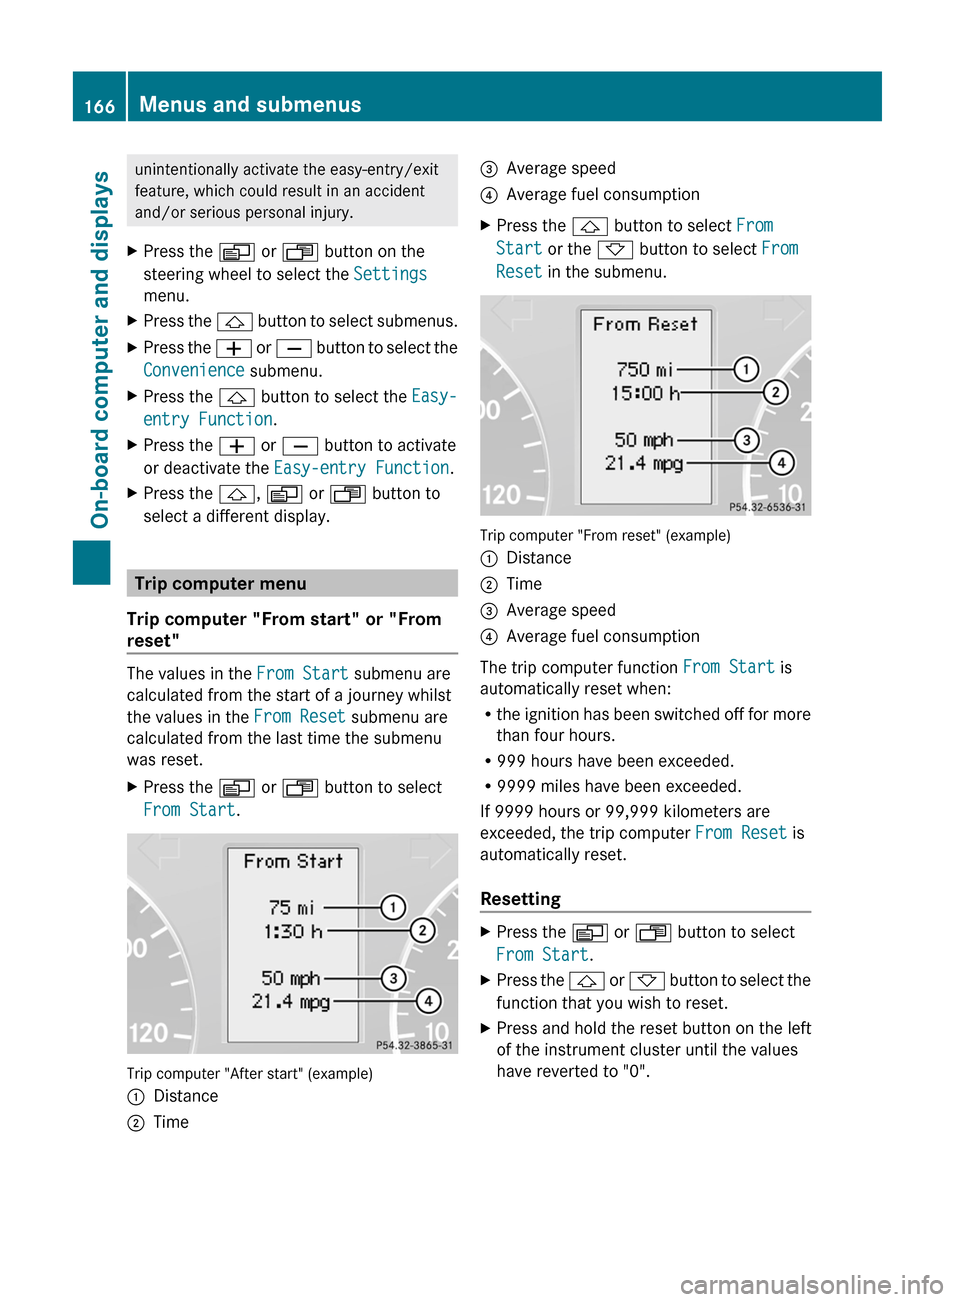
Trip computer "After start" (example)
:Distance;Time=Average speed?Average fuel consumptionXPress the & button to select From
Start or the * button to select From
Reset in the submenu.
Trip computer "From reset" (example)
:Distance;Time=Average speed?Average fuel consumption
The trip computer function From Start is
automatically reset when:
R the ignition has been switched off for more
than four hours.
R 999 hours have been exceeded.
R 9999 miles have been exceeded.
If 9999 hours or 99,999 kilometers are
exceeded, the trip computer From Reset is
automatically reset.
Resetting
XPress the V or U button to select
From Start .XPress the & or * button to select the
function that you wish to reset.XPress and hold the reset button on the left
of the instrument cluster until the values
have reverted to "0".166Menus and submenusOn-board computer and displays
Page 169 of 288
Calling up the rangeXPress the V or U button to select
From Start .XPress the & or * button to select
Range: .
The multifunction display shows the
estimated range of the vehicle, based on
the current driving style and the fuel level.
If there is only a small amount of fuel
remaining in the fuel tank, a gas pump
7 appears instead of the range.
Telephone menu
Introduction
You can establish a Bluetooth ®
connection to
COMAND (see the separate operating
instructions).
GWarning
A driver's attention to the road must always
be his/her primary focus when driving. For
your safety and the safety of others, we
recommend that you pull over to a safe
location and stop before placing or taking a
telephone call. If you choose to use the
telephone while driving, please use the hands-
free device and only use the telephone when
weather, road and traffic conditions permit.
Some jurisdictions prohibit the driver from
using a mobile phone while driving a vehicle.
Bear in mind that at a speed of just 30 mph
(approximately 50 km/h ), your vehicle is
covering a distance of 44 feet (approximately
14 m) every second.
XSwitch on the mobile phone and COMAND
(see the separate operating instructions).XPress the V or U button on the
steering wheel to select the Telephone
menu.
You will see one of the following display
messages in the multifunction display:
R Ready or the name of the network provider:
the mobile phone has found a network and
is ready to receive.
R Bluetooth Ready : the mobile phone is not
yet connected via Bluetooth ®
to COMAND.
R No Service : no network is available.
Accepting a call
If someone calls you when you are in the
Telephone menu, a display message appears
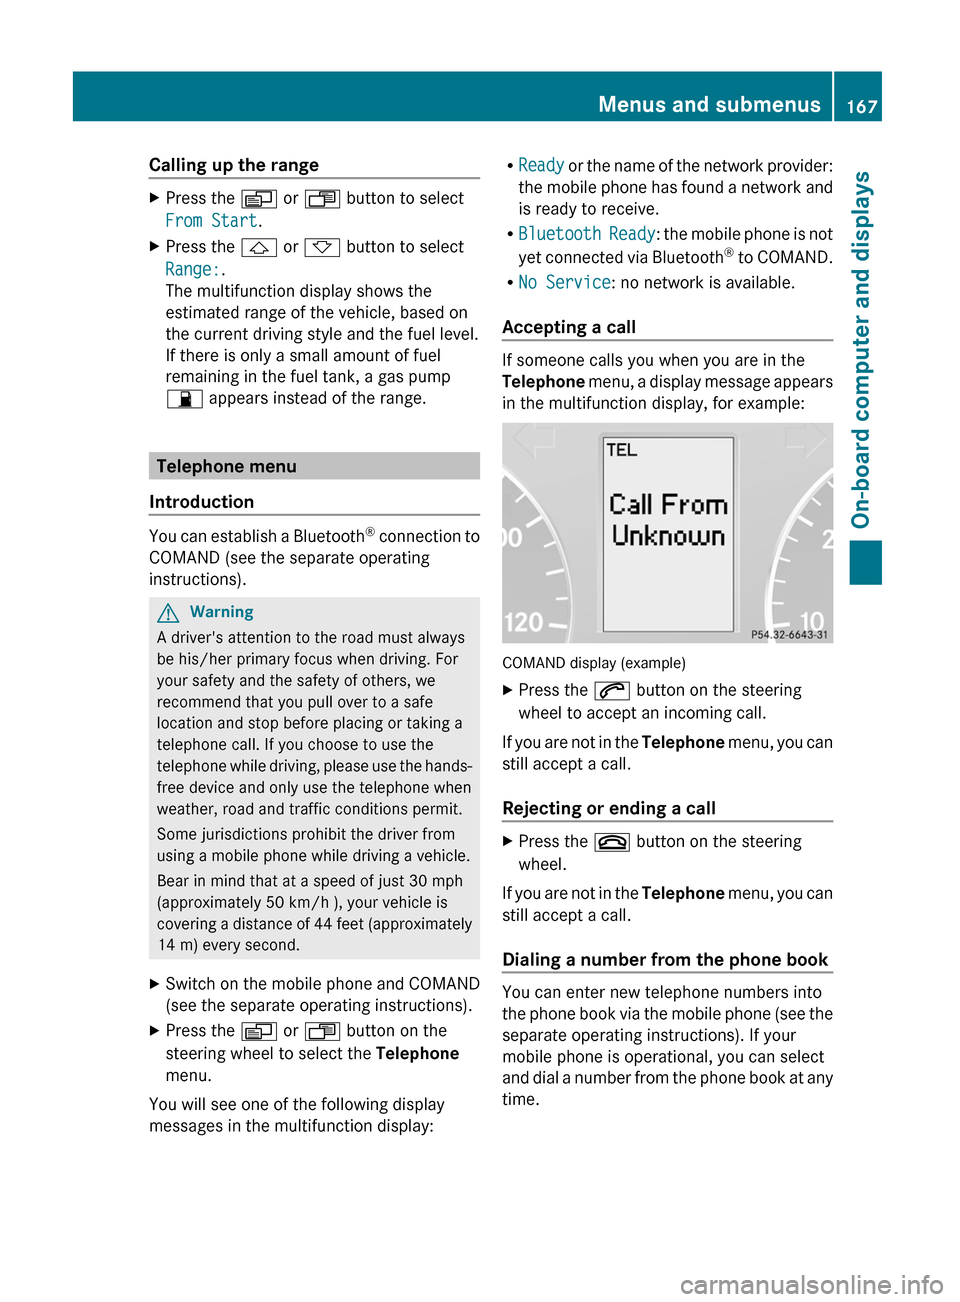
in the multifunction display, for example:
COMAND display (example)
XPress the 6 button on the steering
wheel to accept an incoming call.
If you are not in the Telephone menu, you can
still accept a call.
Rejecting or ending a call
XPress the ~ button on the steering
wheel.
If you are not in the Telephone menu, you can
still accept a call.
Dialing a number from the phone book
You can enter new telephone numbers into
the phone book via the mobile phone (see the
separate operating instructions). If your
mobile phone is operational, you can select
and dial a number from the phone book at any
time.
Menus and submenus167On-board computer and displaysZ
Page 170 of 288
XPress the V or U button on the
steering wheel to select the Telephone
menu.XPress the & or * button to select the
desired name.
To start scrolling rapidly, press and hold the
& or * button for longer than one
second.XPress 6 to start dialing.
The multifunction display shows the
Connecting call display message.
The number dialed is stored in the redial
memory.
If the call is connected, the call duration
appears in the multifunction display. If it is
stored in the phone book, the name is also
displayed. Otherwise, the number dialed is
displayed.
or
XIf you do not want to make a call, press the
~ button.
Redialing
The on-board computer stores the last phone
numbers which have been dialed.
XPress the V or U button on the
steering wheel to select the Telephone
menu.XPress the 6 button to switch to the
redial memory.XPress the & or * button to select the
desired name or number.XPress 6 to start dialing.168Menus and submenusOn-board computer and displays