time MERCEDES-BENZ G55AMG 2011 W463 User Guide
[x] Cancel search | Manufacturer: MERCEDES-BENZ, Model Year: 2011, Model line: G55AMG, Model: MERCEDES-BENZ G55AMG 2011 W463Pages: 288, PDF Size: 11.16 MB
Page 47 of 288
Adjust the seat belt so that the upper part
of the belt is as close as possible to the
center of the shoulder. It should not touch
the neck. Never route the belt under the
shoulder. The height of the belt outlet can
be altered to ensure correct usage.
R The lap belt should be routed as low as
possible across the hips, not across the
abdomen. If the lap belt is routed across the
abdomen, it could cause serious injuries in
the event of an impact.
R Never route the seat belt over rigid or
fragile objects in or on your clothing, such
as eyeglasses, pens, keys etc, as this could
cause injuries.
R Always ensure that the seat belt is routed
correctly. This is particularly important if
you are wearing loose clothing.
R Only one person should use each seat belt
at any one time. Never use a seat belt to
restrain more than one person or route the
belt around additional objects.
R Never wear seat belts when they are
twisted. Otherwise, in the event of an
impact, the full width of the seat belt is
unavailable to distribute the force of the
impact. The twisted seat belt routed across
your body could cause injuries.
R Pregnant women should also wear a three-
point seat belt. The lap belt must always
pass across your lap as low down as
possible, i.e. across your hips; not across
your abdomen.
R The seat backrest should be set as close to
vertical as possible.
R Check the seat belt during the journey in
order to make sure that it is correctly
positioned.
R Never rest your feet on the dashboard or
the seat. Always keep both feet on the floor
in front of the seat.
R When using a seat belt to secure an infant
restraint system, child restraint system or
a child on a booster seat, always follow the
child seat manufacturer's instructions.GWarning
Do not pass seat belts over sharp edges. They
could tear.
Do not allow the seat belt to get caught in the
door or in the seat adjustment mechanism.
This could damage the seat belt.
Never attempt to make modifications to seat
belts. This could impair the effectiveness of
the seat belts.
Fastening seat belts
Important safety notes
GWarning
According to accident statistics, children are
safer when properly restrained on the rear
seats than on the front-passenger seat. Thus,
we strongly recommend that children be
placed in the rear seat whenever possible.
Regardless of seating position, children 12
years old and under must be seated and
properly secured in an appropriately sized
child restraint system or booster seat
recommended for the size and weight of the
child. For additional information, see the
"Children in the vehicle" section.
A child's risk of serious or fatal injuries is
significantly increased if the child restraints
are not properly secured in the vehicle and/
or the child is not properly secured in the child
restraint.
GWarning!
Children 12 years old and under must never
ride in the front seat, except in a Mercedes-
Benz authorized BabySmart™ compatible
child seat, which operates with the
BabySmart™ system installed in the vehicle
to deactivate the front passenger front air bag
when it is installed properly. Otherwise they
will be struck by the air bag when it inflates in
a crash. If this happens, serious or fatal injury
will result.
Occupant safety45SafetyZ
Page 50 of 288
Releasing seat belts
Notes
! Make sure that the seat belt is fully rolled
up. Otherwise, the seat belt or belt tongue
will be trapped in the door or in the seat
mechanism. This could damage the door,
the door trim panel and the seat belt.
Damaged seat belts can no longer fulfill
their protective function and must be
replaced. Consult an authorized Mercedes-
Benz Center.
Three-point seat belt, front
XPress release button = and guide belt
tongue ; back towards belt sash guide ?
( Y page 46).
Three-point seat belt in the rear, center
XPress release button B on seat belt buckle
A (Y page 46).XOpen belt buckle ; with a screwdriver or
similar item ( Y page 46).XLet the seat belt roll up to the stop.XGuide both seat belt tongues ? and C
into bracket : one on top of the other.
( Y page 46).GWarning!
To help prevent the possibility of injury,
always store the rear center seat belt latch
plates in the attachment when the rear center
seat belt is not in use.
Belt warning for the driver and front
passenger
The 7 seat belt warning lamp in the
instrument cluster is a reminder for all
occupants to fasten their seat belts.
Regardless of whether the driver and front-
passenger seat belts have already been
fastened, the 7 seat belt warning lamp will
always illuminate for six seconds each time
the engine is started. It then goes out if the
driver and the front passenger have fastened
their seat belts.
If the driver or front-passenger seat belt is not
fastened when the engine is started, an
additional warning tone will sound. This
warning tone ceases after a maximum of six
seconds or when the driver and front
passenger have fastened their seat belts.
If after six seconds, the driver or front
passenger have not fastened their seat belts
and the doors are closed:
R the 7 seat belt warning lamp remains
illuminated as long as either the driver's or
front-passenger seat belt is not fastened.
R the 7 seat belt warning lamp lights up
if the vehicle speed exceeds 15 mph
( 25 km/h). Additionally, a warning tone will
sound with increasing intensity for a
maximum of 60 seconds or until the
driver's or front-passenger seat belt are
fastened.
If the driver or front passenger unfasten their
seat belt while the vehicle is in motion, the
7 seat belt warning lamp lights up and a
warning tone sounds again.
The warning tone ceases even if the driver or
front passenger have still not fastened their
seat belt after 60 seconds. The 7 seat belt
warning lamp stops flashing but remains
illuminated.
After the vehicle comes to a standstill, the
warning tone is reactivated and the 7 seat
belt warning lamp flashes again if the vehicle
speed again exceeds 15 mph (25 km/h) .
The 7 seat belt warning lamp only goes
out if:
R both the driver and the front passenger
have fastened their seat belts.
or
R the vehicle is stationary and a door is open.
i For more information on the 7 seat
belt warning lamp, see "Indicator and
warning lamps in the instrument cluster,
seat belt" ( Y page 184).48Occupant safetySafety
Page 52 of 288
If children open a door, they could injure other
persons or get out of the vehicle and injure
themselves or be injured by following traffic.
Do not expose the child restraint system to
direct sunlight. The child restraint system's
metal parts, for example, could become very
hot, and the child could be burned on these
parts.GWarning!
Do not carry heavy or hard objects in the
passenger compartment or trunk unless they
are firmly secured in place.
Unsecured or improperly positioned cargo
increases a child's risk of injury in the event
of
R strong braking maneuvers
R sudden changes of direction
R an accident
If an infant or child is traveling in the vehicle:
XSecure the child using an infant or child
restraint system appropriate to the age and
weight of the childXMake sure that the infant or child is
properly secured at all times while the
vehicle is in motion.
Child restraint systems
Important safety notes
GWarning
Observe "Important safety notes"
( Y page 49).
We recommend all infants and children be
properly restrained using the child restraint
systems at all times while the vehicle is in
motion.
Always use a child restraint system that is
compatible with BabySmart™ on the front-
passenger seat.
The use of infant or child restraints is required
by law in all 50 states, the District of
Columbia, the U.S. territories and all
Canadian provinces.
Infants and children should always be seated
in an infant or child seat restraint system
appropriate for the size and weight of the
child. They must be properly secured in
accordance with the manufacturer's
installation instructions for the infant or child
seat restraint system. All infant and child seat
restraint systems must comply with the US
Federal Motor Vehicle Safety Standards 213
and 225 and Canadian Motor Vehicle Safety
Standards 213 and 210.2.
A statement by the child restraint
manufacturer of compliance with these
standards can be found on the instruction
label on the restraint system. You will also
find the statement in the instruction manual
provided with the child restraint system.
When using an infant restraint system, child
restraint system or booster seat, make sure
to carefully read and follow all manufacturer's
instructions for installation and use.
Please read the warning labels affixed to the
interior of the vehicle or to the infant restraint
or child restraint system.GWarning!
According to accident statistics, children are
safer when properly restrained in the rear
seating positions than in the front seating
position. Thus, we strongly recommend that
children be placed in the rear seats whenever
possible. Regardless of seating position,
children 12 years old and under must be
seated and properly secured in an appropriate
infant restraint, toddler restraint, or booster
seat recommended for the size and weight of
the child.
The infant or child restraint must be properly
secured with the vehicle’s seat belt, the seat
belt and top tether strap, or lower anchors and
top tether strap, fully in accordance with the
child seat manufacturer’s instructions.
Occupants, especially children, should always
sit as upright as possible, wear the seat belt
properly and use an appropriately sized infant
50Children in the vehicleSafety
Page 58 of 288
Rbraking distance is increased
R vehicle stability in standard driving
maneuvers is increased
Make sure the differential locks are switched
on at all times except when driving off-road
for example. Switch on the differential locks
immediately when returning from off-road
driving.
i In wintry driving conditions, always use
winter tires (M+S tires) and if necessary,
snow chains. Only in this way will the
driving safety systems described in this
section work as effectively as possible.
ABS (Anti-lock Braking System)
Important safety notes
GWarning
Observe "Important safety notes"
( Y page 55).
GWarning
Do not pump the brake pedal. Use firm, steady
brake pedal pressure instead. Pumping the
brake pedal defeats the purpose of the ABS
and significantly reduces braking
effectiveness.
ABS regulates brake pressure in such a way
that the wheels do not lock when you brake.
This allows you to continue steering the
vehicle when braking.
ABS operates above a speed of about
5 mph(8 km/h) regardless of road-surface
conditions, provided the differential locks are
not active. ABS works on slippery surfaces,
even when you only brake gently.
The ! warning lamp in the instrument
cluster lights up when the ignition is switched
on. It goes out when the engine is running.
Braking
If ABS intervenes when braking, you will feel
a pulsing in the brake pedal.
XIf ABS intervenes: continue to depress the
brake pedal with force until the braking
situation is over.XTo make a full brake application:
depress the brake pedal with full force.
The pulsating brake pedal can be an
indication of hazardous road conditions and
functions as a reminder to take extra care
while driving.
GWarning
If the ABS malfunctions, other driving systems
such as the BAS or the ESP ®
are also switched
off. Observe indicator and warning lamps that
may come on as well as messages in the
multifunction display that may appear.
If the ABS malfunctions, the wheels may lock
during hard braking, reducing the steering
capability and extending the braking distance.
Off-road ABS
If the LOW shift range ( Y page 126) is
selected on the transfer case, an ABS system
specifically suited to off-road terrain is
activated.
At speeds below 37 mph(60 km/h) , the front
wheels lock periodically when braking. The
digging-in effect achieved in the process
reduces the stopping distance on off-road
terrain. This limits steering capability.
BAS (Brake Assist)
GWarning
Observe "Important safety notes"
( Y page 55).
BAS operates in emergency braking
situations. If you depress the brake pedal
quickly, BAS automatically boosts the braking
force, thus shortening the stopping distance.
56Driving safety systemsSafety
Page 64 of 288
Vehicle equipment
i This manual describes all the standard
and optional equipment of your vehicle
which was available at the time of
purchase. Country-specific differences are
possible. Please note that your vehicle may
not be equipped with all features
described. This also applies to safety-
relevant systems and functions.
SmartKey
Important safety notes
GWarning
When leaving the vehicle, always remove the
SmartKey from the ignition lock. Always take
the SmartKey with you and lock the vehicle.
Do not leave children unsupervised in the
vehicle, even if they are secured in a child
restraint system, and do not give them access
to an unlocked vehicle. A child's unsupervised
access to a vehicle could result in an accident
and/or serious personal injury. They could:
R injure themselves on vehicle parts
R be seriously or fatally injured by extreme
heat or cold
R injure themselves or have an accident with
vehicle equipment that may still be in
operation even after the SmartKey has
been removed from the ignition, such as the
seat adjustment, steering wheel
adjustment or memory function.
If children open a door, they could cause
severe or even fatal injury to other persons; if
they get out of the vehicle, they could injure
themselves when doing so or be seriously or
even fatally injured by any passing traffic.
Do not expose the child restraint system to
direct sunlight. The child restraint system's
metal parts, for example, could become very
hot, and a child could be burned on these
parts.
GWarning!
Do not carry heavy or hard objects in the
passenger compartment or cargo
compartment unless they are firmly secured
in place.
Unsecured or improperly positioned cargo
increases a child’s risk of injury in the event
of
R strong braking maneuvers
R sudden changes of direction
R an accident
General notes
If you cannot lock or unlock the vehicle with
the SmartKey then the battery in the
SmartKey is discharged, the SmartKey is
faulty or the starter battery is discharged.
XCheck the battery in the SmartKey and
replace it if necessary ( Y page 64).XUnlock the driver's door using the
mechanical key ( Y page 68).XLock the vehicle using the mechanical key
( Y page 68).XHave the starter battery and the battery
contacts checked at an authorized
Mercedes-Benz Center.
If the SmartKey is faulty, contact Roadside
Assistance or an authorized Mercedes-Benz
Center.
SmartKey functions
General notes
i USA only:
This device complies with Part 15 of the
FCC regulations. Operation is subject to
the following conditions:
1. This device must not cause any harmful
interference, and
2. This device must be able to
accommodate interference that is
62SmartKeyOpening and closing
Page 65 of 288
received, including interference which
could cause unwanted functions.
Unapproved modifications to this device
may lead to withdrawal of permission to
operate it.
i Canada only:
This device complies with Industry
Canada's RSS210 regulations. Operation is
subject to the following conditions:
1. This device must not cause any harmful
interference, and
2. This device must be able to
accommodate interference that is
received, including interference which
could cause unwanted functions.
Unapproved modifications to this device
may lead to withdrawal of permission to
operate it.
Locking and unlocking centrally
The SmartKey centrally locks/unlocks:
R the doors
R the rear door
R the fuel filler flap
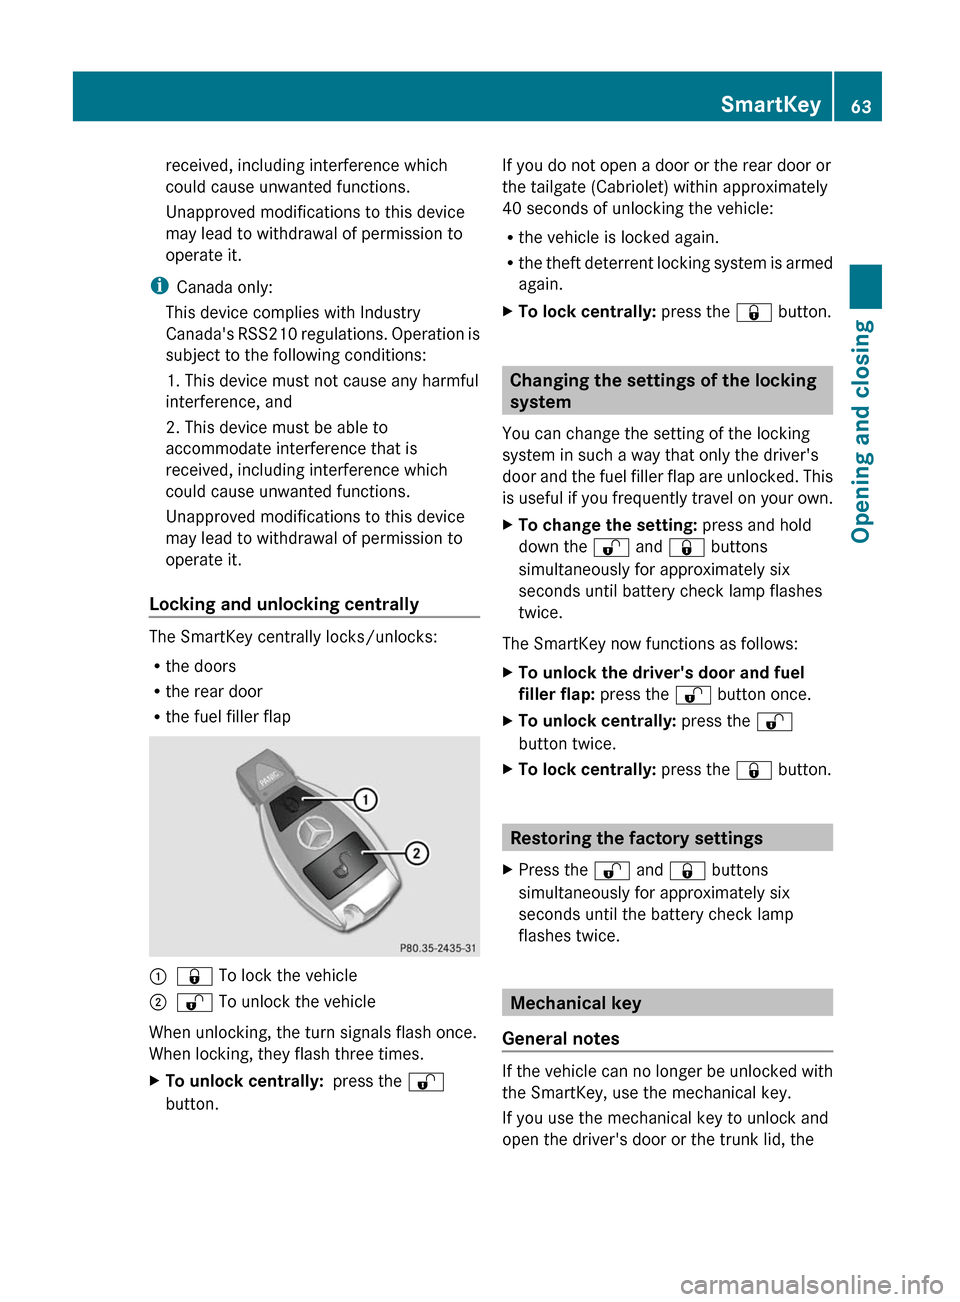
:& To lock the vehicle;% To unlock the vehicle
When unlocking, the turn signals flash once.
When locking, they flash three times.
XTo unlock centrally: press the %
button.If you do not open a door or the rear door or
the tailgate (Cabriolet) within approximately
40 seconds of unlocking the vehicle:
R the vehicle is locked again.
R the theft deterrent locking system is armed
again.XTo lock centrally: press the & button.
Changing the settings of the locking
system
You can change the setting of the locking
system in such a way that only the driver's
door and the fuel filler flap are unlocked. This
is useful if you frequently travel on your own.
XTo change the setting: press and hold
down the % and & buttons
simultaneously for approximately six
seconds until battery check lamp flashes
twice.
The SmartKey now functions as follows:
XTo unlock the driver's door and fuel
filler flap: press the % button once.XTo unlock centrally: press the %
button twice.XTo lock centrally: press the & button.
Restoring the factory settings
XPress the % and & buttons
simultaneously for approximately six
seconds until the battery check lamp
flashes twice.
Mechanical key
General notes
If the vehicle can no longer be unlocked with
the SmartKey, use the mechanical key.
If you use the mechanical key to unlock and
open the driver's door or the trunk lid, the
SmartKey63Opening and closingZ
Page 66 of 288
anti-theft alarm system will be triggered
( Y page 59).XTo end the alarm: insert the key into the
ignition lock.
Removing the mechanical key
XPush release catch : in the direction of
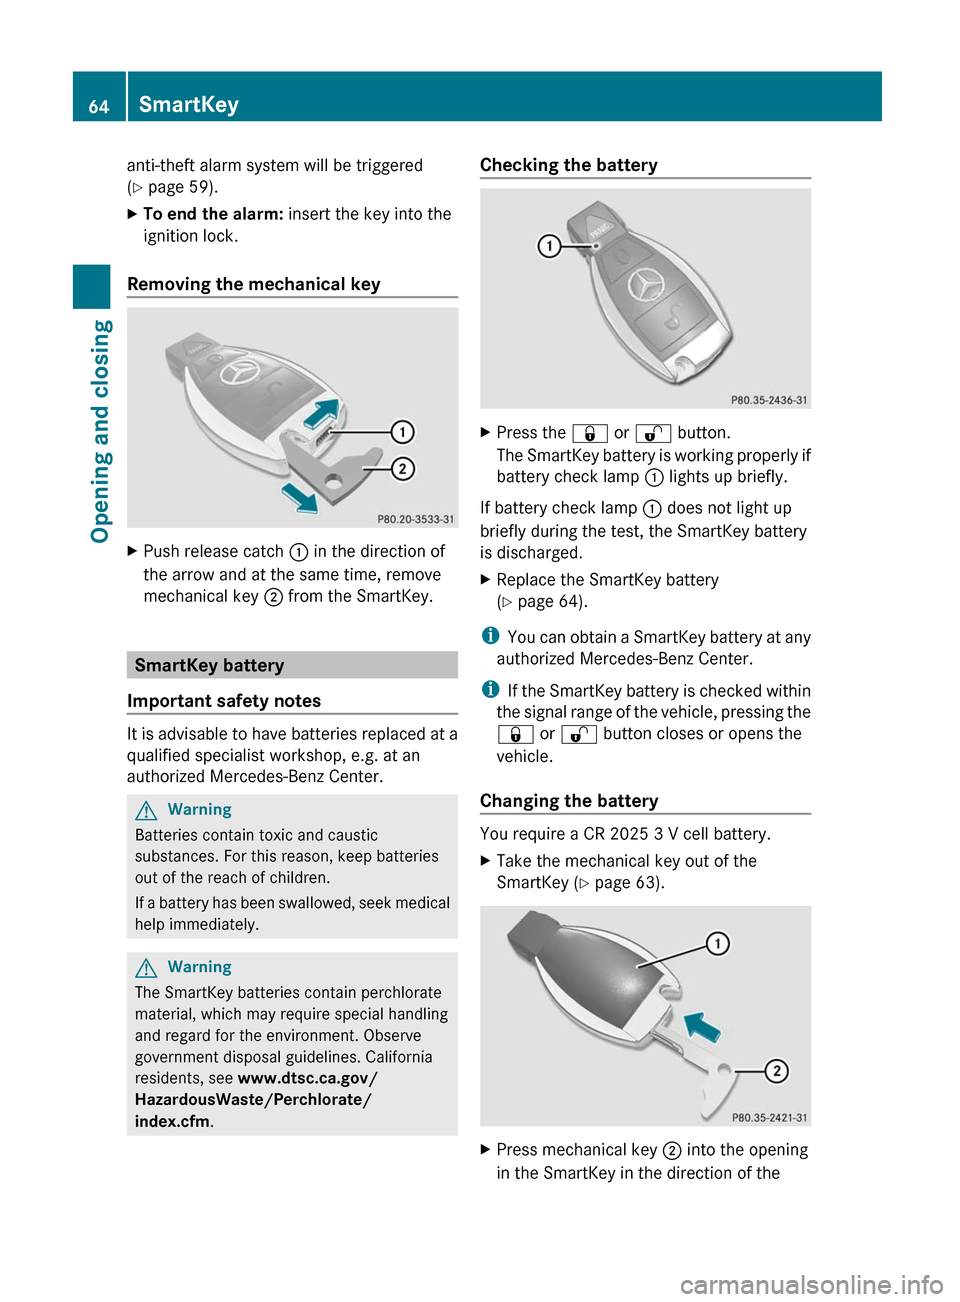
the arrow and at the same time, remove
mechanical key ; from the SmartKey.
SmartKey battery
Important safety notes
It is advisable to have batteries replaced at a
qualified specialist workshop, e.g. at an
authorized Mercedes-Benz Center.
GWarning
Batteries contain toxic and caustic
substances. For this reason, keep batteries
out of the reach of children.
If a battery has been swallowed, seek medical
help immediately.
GWarning
The SmartKey batteries contain perchlorate
material, which may require special handling
and regard for the environment. Observe
government disposal guidelines. California
residents, see www.dtsc.ca.gov/
HazardousWaste/Perchlorate/
index.cfm .
Checking the batteryXPress the & or % button.
The SmartKey battery is working properly if
battery check lamp : lights up briefly.
If battery check lamp : does not light up
briefly during the test, the SmartKey battery
is discharged.
XReplace the SmartKey battery
( Y page 64).
i
You can obtain a SmartKey battery at any
authorized Mercedes-Benz Center.
i If the SmartKey battery is checked within
the signal range of the vehicle, pressing the
& or % button closes or opens the
vehicle.
Changing the battery
You require a CR 2025 3 V cell battery.
XTake the mechanical key out of the
SmartKey ( Y page 63).XPress mechanical key ; into the opening
in the SmartKey in the direction of the64SmartKeyOpening and closing
Page 68 of 288
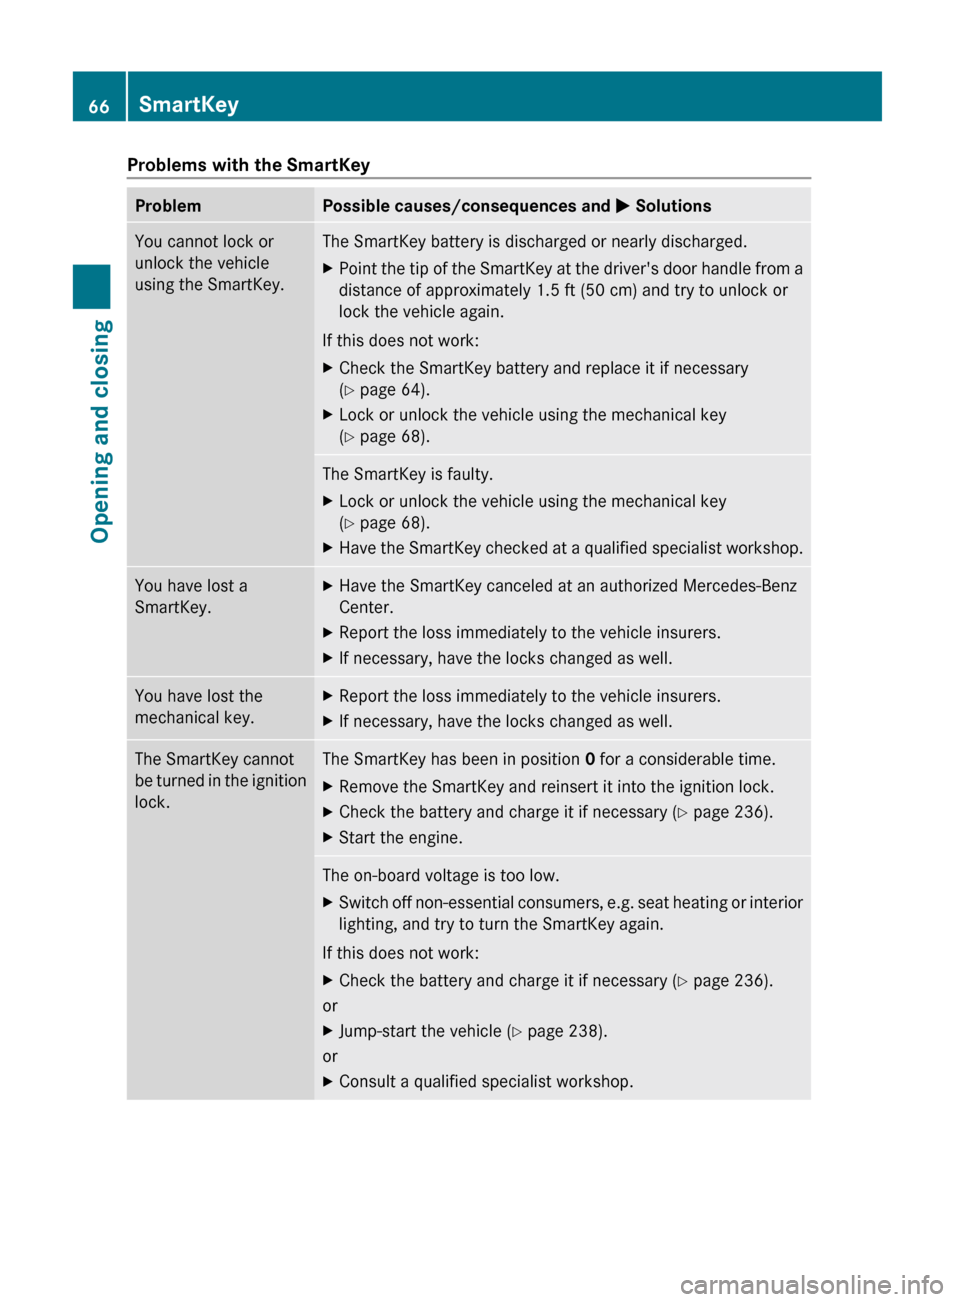
Problems with the SmartKeyProblemPossible causes/consequences and M SolutionsYou cannot lock or
unlock the vehicle
using the SmartKey.The SmartKey battery is discharged or nearly discharged.XPoint the tip of the SmartKey at the driver's door handle from a
distance of approximately 1.5 ft (50 cm) and try to unlock or
lock the vehicle again.
If this does not work:
XCheck the SmartKey battery and replace it if necessary
( Y page 64).XLock or unlock the vehicle using the mechanical key
( Y page 68).The SmartKey is faulty.XLock or unlock the vehicle using the mechanical key
( Y page 68).XHave the SmartKey checked at a qualified specialist workshop.You have lost a
SmartKey.XHave the SmartKey canceled at an authorized Mercedes-Benz
Center.XReport the loss immediately to the vehicle insurers.XIf necessary, have the locks changed as well.You have lost the
mechanical key.XReport the loss immediately to the vehicle insurers.XIf necessary, have the locks changed as well.The SmartKey cannot
be turned in the ignition
lock.The SmartKey has been in position 0 for a considerable time.XRemove the SmartKey and reinsert it into the ignition lock.XCheck the battery and charge it if necessary ( Y page 236).XStart the engine.The on-board voltage is too low.XSwitch off non-essential consumers, e.g. seat heating or interior
lighting, and try to turn the SmartKey again.
If this does not work:
XCheck the battery and charge it if necessary ( Y page 236).
or
XJump-start the vehicle ( Y page 238).
or
XConsult a qualified specialist workshop.66SmartKeyOpening and closing
Page 69 of 288
Doors
Important safety notes
GWarning
When leaving the vehicle, always remove the
SmartKey from the ignition lock. Always take
the SmartKey with you and lock the vehicle.
Do not leave children unsupervised in the
vehicle, even if they are secured in a child
restraint system, and do not give them access
to an unlocked vehicle. A child's unsupervised
access to a vehicle could result in an accident
and/or serious personal injury. They could:
R injure themselves on vehicle parts
R be seriously or fatally injured by extreme
heat or cold
R injure themselves or have an accident with
vehicle equipment that may still be in
operation even after the SmartKey has
been removed from the ignition, such as the
seat adjustment, steering wheel
adjustment or memory function.
If children open a door, they could cause
severe or even fatal injury to other persons; if
they get out of the vehicle, they could injure
themselves when doing so or be seriously or
even fatally injured by any passing traffic.
Do not expose the child restraint system to
direct sunlight. The child restraint system's
metal parts, for example, could become very
hot, and a child could be burned on these
parts.
GWarning!
Do not carry heavy or hard objects in the
passenger compartment or cargo
compartment unless they are firmly secured
in place.
Unsecured or improperly positioned cargo
increases a child’s risk of injury in the event
of
R strong braking maneuvers
R sudden changes of direction
R an accident
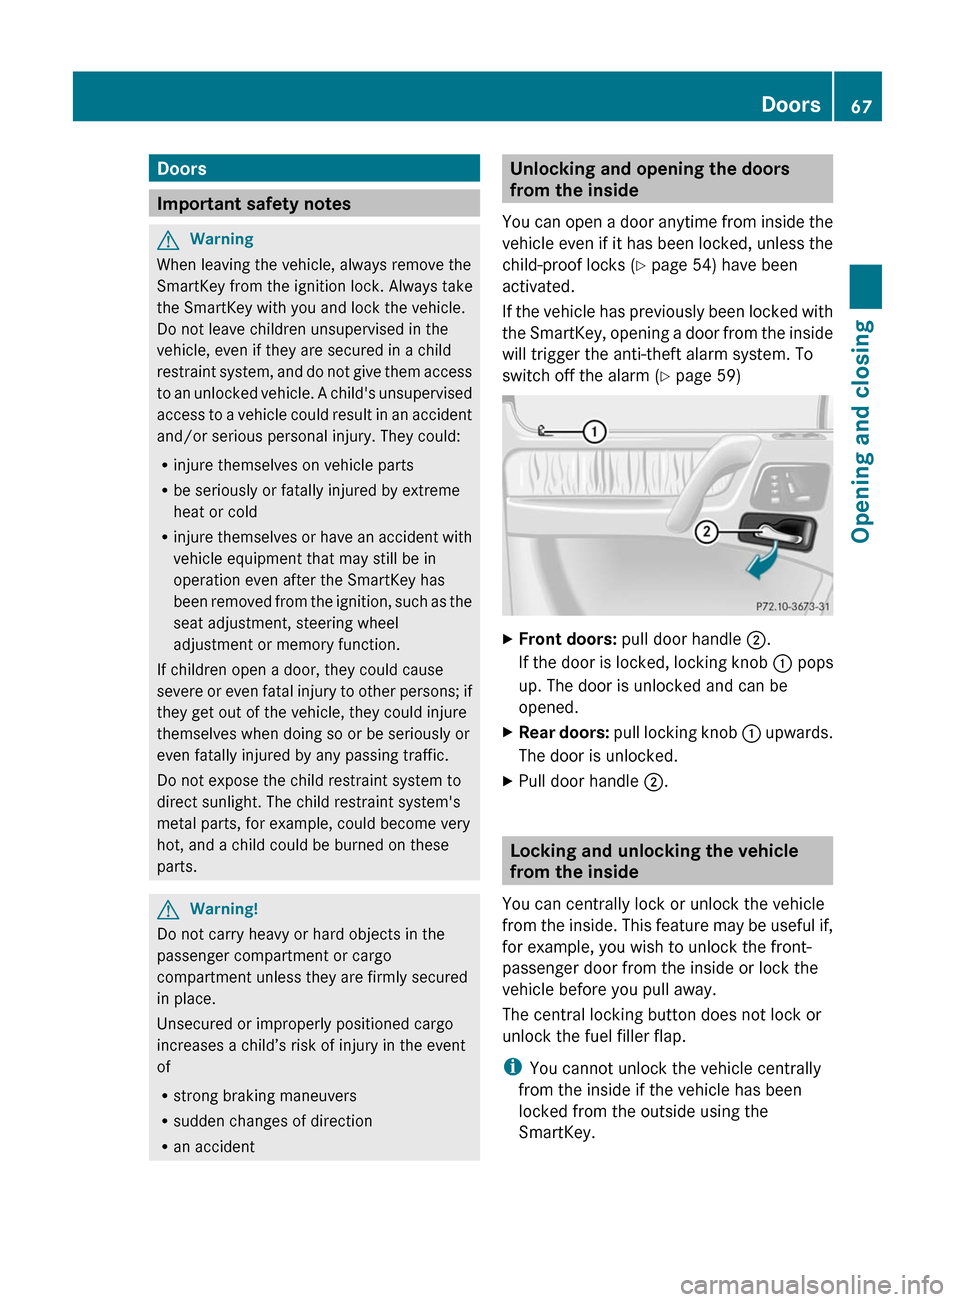
Unlocking and opening the doors
from the inside
You can open a door anytime from inside the
vehicle even if it has been locked, unless the
child-proof locks ( Y page 54) have been
activated.
If the vehicle has previously been locked with
the SmartKey, opening a door from the inside
will trigger the anti-theft alarm system. To
switch off the alarm ( Y page 59)XFront doors: pull door handle ;.
If the door is locked, locking knob : pops
up. The door is unlocked and can be
opened.XRear doors: pull locking knob : upwards.
The door is unlocked.XPull door handle ;.
Locking and unlocking the vehicle
from the inside
You can centrally lock or unlock the vehicle
from the inside. This feature may be useful if,
for example, you wish to unlock the front-
passenger door from the inside or lock the
vehicle before you pull away.
The central locking button does not lock or
unlock the fuel filler flap.
i You cannot unlock the vehicle centrally
from the inside if the vehicle has been
locked from the outside using the
SmartKey.
Doors67Opening and closingZ
Page 78 of 288
Vehicle equipment
i This manual describes all the standard
and optional equipment of your vehicle
which was available at the time of
purchase. Country-specific differences are
possible. Please note that your vehicle may
not be equipped with all features
described. This also applies to safety-
relevant systems and functions.
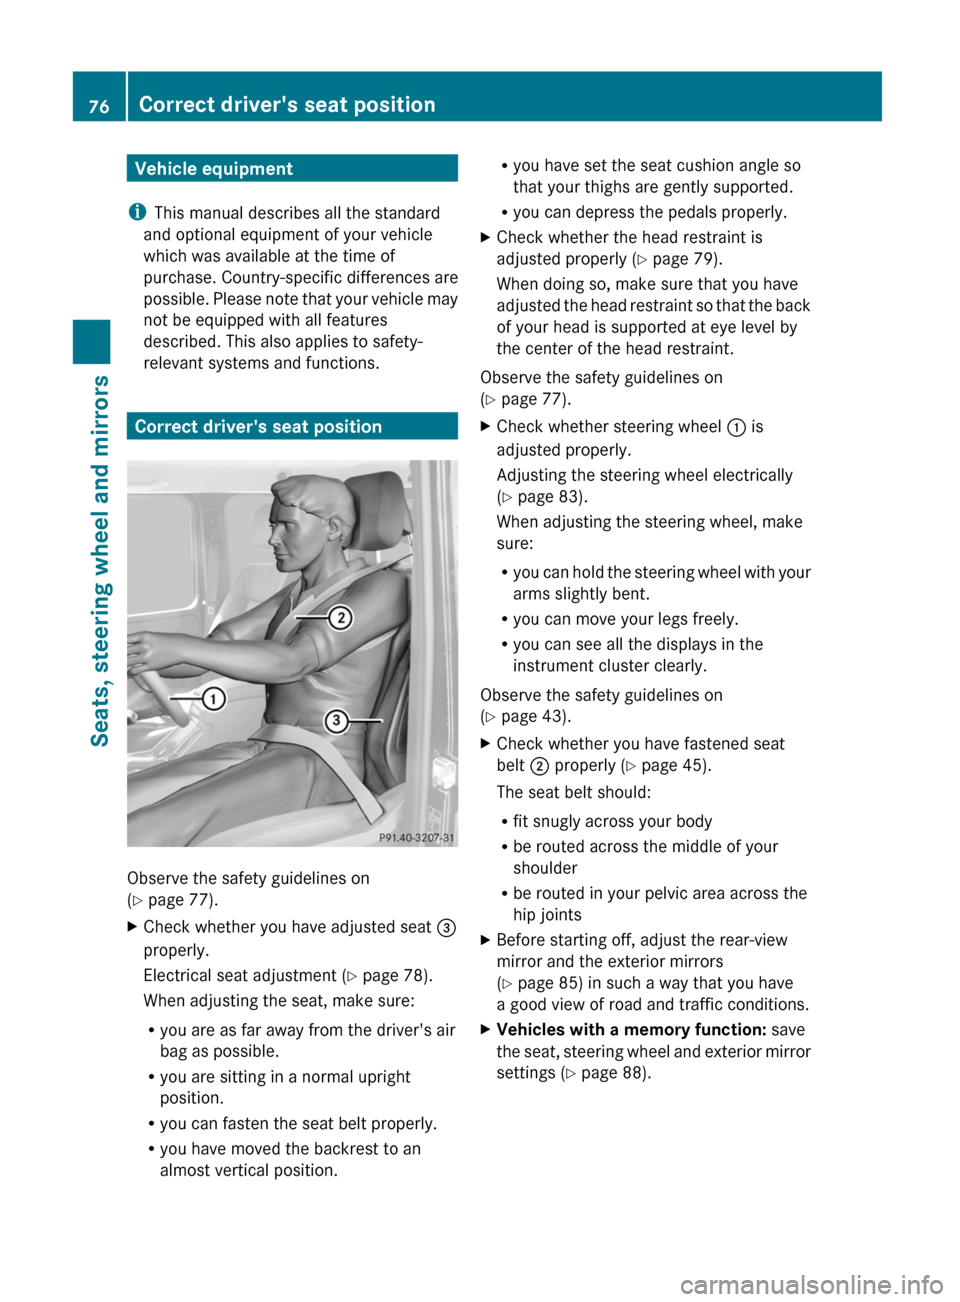
Correct driver's seat position
Observe the safety guidelines on
( Y page 77).
XCheck whether you have adjusted seat =
properly.
Electrical seat adjustment ( Y page 78).
When adjusting the seat, make sure:
R you are as far away from the driver's air
bag as possible.
R you are sitting in a normal upright
position.
R you can fasten the seat belt properly.
R you have moved the backrest to an
almost vertical position.R you have set the seat cushion angle so
that your thighs are gently supported.
R you can depress the pedals properly.XCheck whether the head restraint is
adjusted properly ( Y page 79).
When doing so, make sure that you have
adjusted the head restraint so that the back
of your head is supported at eye level by
the center of the head restraint.
Observe the safety guidelines on
( Y page 77).
XCheck whether steering wheel : is
adjusted properly.
Adjusting the steering wheel electrically
( Y page 83).
When adjusting the steering wheel, make
sure:
R you can hold the steering wheel with your
arms slightly bent.
R you can move your legs freely.
R you can see all the displays in the
instrument cluster clearly.
Observe the safety guidelines on
( Y page 43).
XCheck whether you have fastened seat
belt ; properly ( Y page 45).
The seat belt should:
R fit snugly across your body
R be routed across the middle of your
shoulder
R be routed in your pelvic area across the
hip jointsXBefore starting off, adjust the rear-view
mirror and the exterior mirrors
( Y page 85) in such a way that you have
a good view of road and traffic conditions.XVehicles with a memory function: save
the seat, steering wheel and exterior mirror
settings ( Y page 88).76Correct driver's seat positionSeats, steering wheel and mirrors