MERCEDES-BENZ G55AMG 2011 W463 Owner's Manual
Manufacturer: MERCEDES-BENZ, Model Year: 2011, Model line: G55AMG, Model: MERCEDES-BENZ G55AMG 2011 W463Pages: 288, PDF Size: 11.16 MB
Page 231 of 288
After an accidentProblemPossible causes/consequences and M SolutionsFuel is leaking from the
vehicle.GRisk of explosion or fire
The fuel line or the fuel tank is faulty.
XImmediately turn the SmartKey to position 0 ( Y page 117) in the
ignition lock and remove it.XDo not restart the engine under any circumstances.XConsult a qualified specialist workshop.You are unable to
determine the extent of
the damage.XConsult a qualified specialist workshop.You cannot detect any
damage.XStart the engine as normal.The NECK-PRO head
restraints on the
driver's and front-
passenger seats have
been triggered.Your vehicle has been involved in a rear-end collision.XReset the NECK-PRO head restraints ( Y page 43).Where will I find...?
First-aid kit
i Check the expiration date on the first-aid
kit at least once a year. Replace the
contents if necessary, and replace missing
contents.
The first-aid kit is located in the stowage
compartment in the front-passenger door.
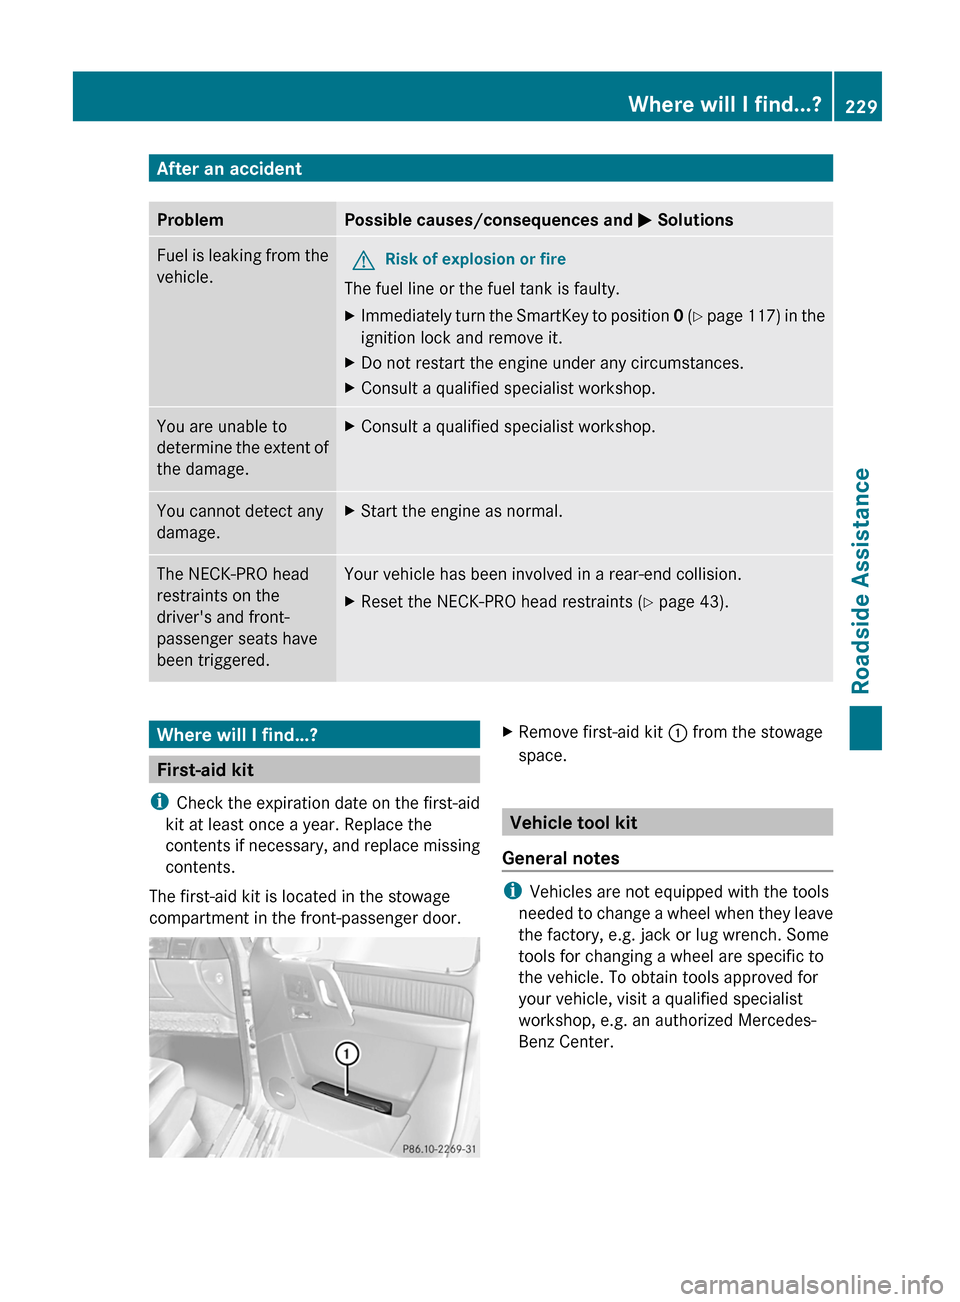
XRemove first-aid kit : from the stowage
space.
Vehicle tool kit
General notes
i Vehicles are not equipped with the tools
needed to change a wheel when they leave
the factory, e.g. jack or lug wrench. Some
tools for changing a wheel are specific to
the vehicle. To obtain tools approved for
your vehicle, visit a qualified specialist
workshop, e.g. an authorized Mercedes-
Benz Center.
Where will I find...?229Roadside AssistanceZ
Page 232 of 288
The vehicle tool kit contains:
R vehicle tool kit with:
- fuse extractor
- Allen key, e.g. to operate the sliding roof
manually in an emergency
- pump lever for vehicle jack
- screwdriver
- lug wrench
R jack
Vehicle tool kit
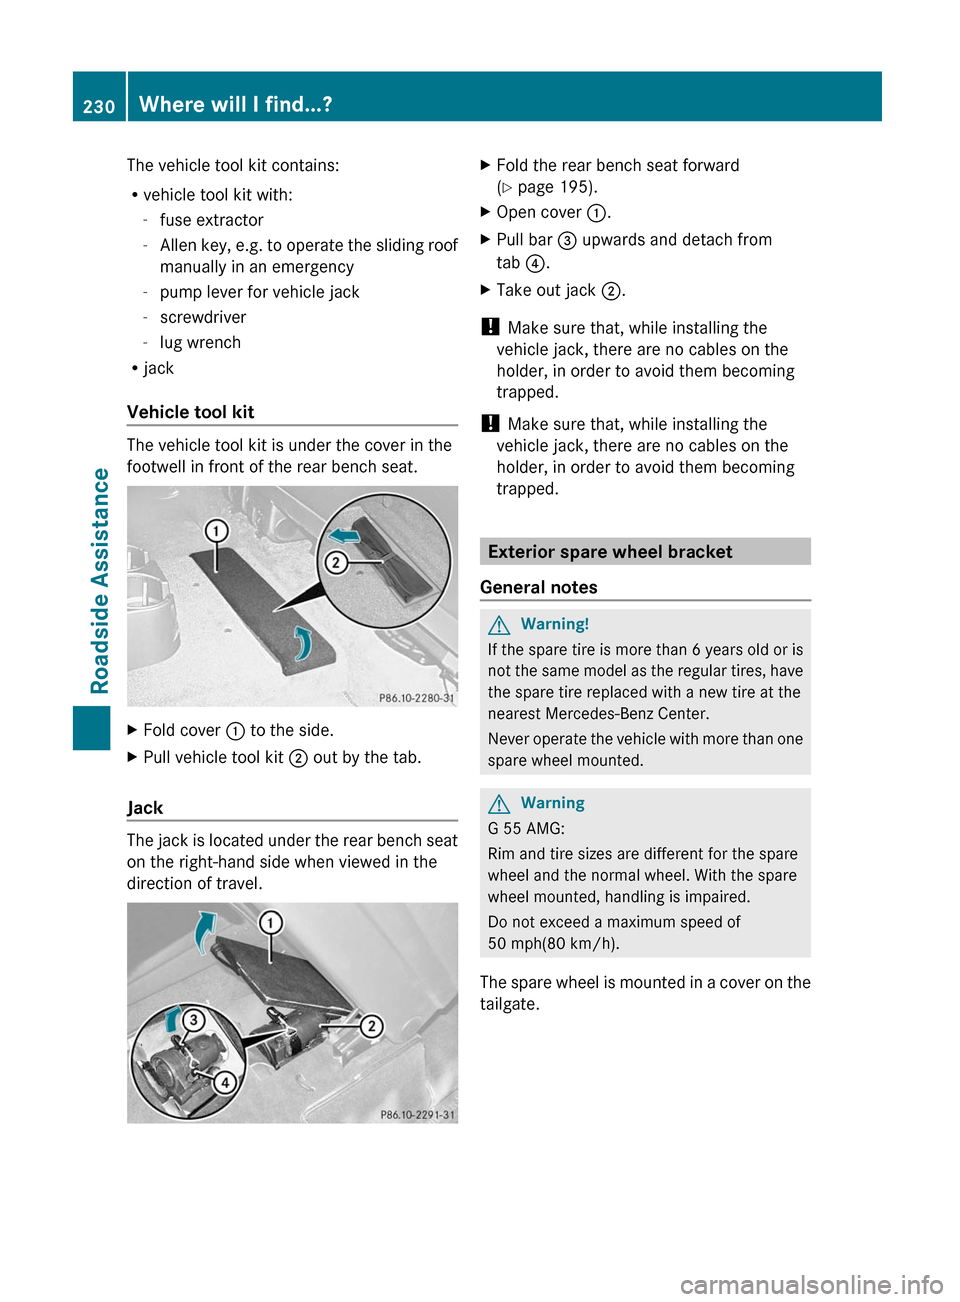
The vehicle tool kit is under the cover in the
footwell in front of the rear bench seat.
XFold cover : to the side.XPull vehicle tool kit ; out by the tab.
Jack
The jack is located under the rear bench seat
on the right-hand side when viewed in the
direction of travel.
XFold the rear bench seat forward
( Y page 195).XOpen cover :.XPull bar = upwards and detach from
tab ?.XTake out jack ;.
!
Make sure that, while installing the
vehicle jack, there are no cables on the
holder, in order to avoid them becoming
trapped.
! Make sure that, while installing the
vehicle jack, there are no cables on the
holder, in order to avoid them becoming
trapped.
Exterior spare wheel bracket
General notes
GWarning!
If the spare tire is more than 6 years old or is
not the same model as the regular tires, have
the spare tire replaced with a new tire at the
nearest Mercedes-Benz Center.
Never operate the vehicle with more than one
spare wheel mounted.
GWarning
G 55 AMG:
Rim and tire sizes are different for the spare
wheel and the normal wheel. With the spare
wheel mounted, handling is impaired.
Do not exceed a maximum speed of
50 mph(80 km/h).
The spare wheel is mounted in a cover on the
tailgate.
230Where will I find...?Roadside Assistance
Page 233 of 288
Removing the cover
Stainless-steel spare hub cap
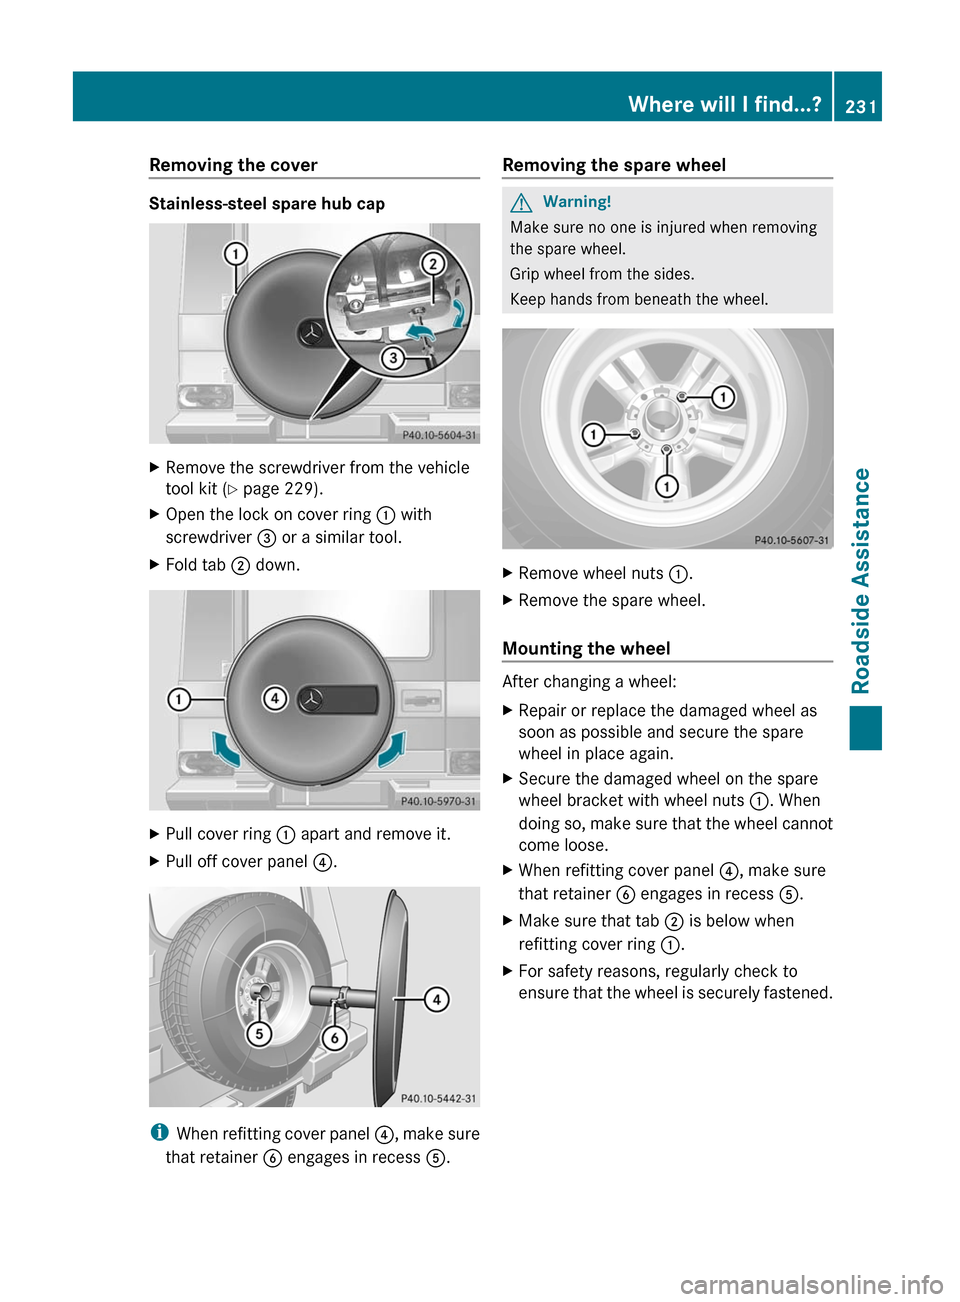
XRemove the screwdriver from the vehicle
tool kit ( Y page 229).XOpen the lock on cover ring : with
screwdriver = or a similar tool.XFold tab ; down.XPull cover ring : apart and remove it.XPull off cover panel ?.
i
When refitting cover panel ?, make sure
that retainer B engages in recess A.
Removing the spare wheelGWarning!
Make sure no one is injured when removing
the spare wheel.
Grip wheel from the sides.
Keep hands from beneath the wheel.
XRemove wheel nuts :.XRemove the spare wheel.
Mounting the wheel
After changing a wheel:
XRepair or replace the damaged wheel as
soon as possible and secure the spare
wheel in place again.XSecure the damaged wheel on the spare
wheel bracket with wheel nuts :. When
doing so, make sure that the wheel cannot
come loose.XWhen refitting cover panel ?, make sure
that retainer B engages in recess A.XMake sure that tab ; is below when
refitting cover ring :.XFor safety reasons, regularly check to
ensure that the wheel is securely fastened.Where will I find...?231Roadside AssistanceZ
Page 234 of 288
Flat tire
Preparing the vehicle
XStop the vehicle as far away as possible
from traffic on solid, non-slippery and level
ground.XSwitch on the hazard warning lamps.XApply the parking brake.XBring the front wheels into the straight-
ahead position.XMove the selector lever to P.XSwitch off the engine.XRemove the SmartKey from the ignition
lock.XAll occupants must get out of the vehicle.
Make sure that they are not endangered as
they do so.XMake sure that no one is near the danger
area while a wheel is being changed.
Anyone who is not directly assisting in the
wheel change should, for example, stand
behind the barrier.XGet out of the vehicle. Pay attention to
traffic conditions when doing so.XClose the driver's door.
Changing a wheel and mounting the
spare wheel
Important safety notes
GWarning!
If the spare tire is more than 6 years old or is
not the same model as the regular tires, have
the spare tire replaced with a new tire at the
nearest Mercedes-Benz Center.
Never operate the vehicle with more than one
spare wheel mounted.
GWarning
G 55 AMG:
Rim and tire sizes are different for the spare
wheel and the normal wheel. With the spare
wheel mounted, handling is impaired.
Do not exceed a maximum speed of
50 mph(80 km/h).
Preparing the vehicleXPrepare the vehicle as described
( Y page 232).GWarning!
You must remove the spare wheel from the
spare wheel carrier before lifting the vehicle.
Otherwise the vehicle could fall off the jack
and injure you or others.
XRemove the vehicle tool kit and the jack
( Y page 229).XRemove the spare wheel from the spare
wheel bracket ( Y page 230).
i
Vehicles without an emergency spare
wheel/spare wheel are not equipped with
a wheel-changing tool kit at the factory. For
more information on which tools are
required to perform a wheel change on your
vehicle e.g. lug wrench or jack, consult an
authorized Mercedes-Benz Center.
Securing the vehicle to prevent it from
rolling away
XSecure the vehicle to prevent it from rolling
away.
On level ground: place chocks or similar
items under the front and rear of the wheel
that is diagonally opposite to the wheel you
wish to change.XOn downhill gradients: place chocks or
similar items behind both wheels of the
other axle.GWarning
Only jack up the vehicle on level ground or on
slight inclines/declines. The vehicle could
otherwise fall off the jack and injure you or
others.
232Flat tireRoadside Assistance
Page 235 of 288
Raising the vehicleGWarning!
When jacking up the vehicle, only use the jack
which has been specifically approved by
Mercedes-Benz for your vehicle.
The jack is designed exclusively for jacking up
the vehicle under the axle housing. Make sure
the jack is positioned correctly under the axle
housing. The jack must always be vertical
when in use, especially on inclines or
declines.
The jack is intended only for lifting the vehicle
briefly for wheel changes. It is not suited for
performing maintenance work under the
vehicle. To help avoid personal injury, use the
jack only to lift the vehicle during a wheel
change.
Never get beneath the vehicle while it is
supported by the jack. Keep hands and feet
away from the area under the lifted vehicle.
Always lower the vehicle onto sufficient
capacity jackstands before working under the
vehicle.
Always firmly engage the parking brake and
block the wheels with wheel chocks or other
sizeable objects before raising the vehicle
with the jack. Do not disengage the parking
brake while the vehicle is raised.
Make sure that the ground on which the
vehicle is standing and where you place the
jack is solid, level and not slippery. If
necessary, use a large underlay. On slippery
surfaces, such as tiled floors, you should use
a non-slip underlay, for example a rubber mat.
Do not use wooden blocks or similar objects
to support the jack. Otherwise the jack may
not be able to achieve its load-bearing
capacity if it is not at its full height.
Never start the engine when the vehicle is
raised.
Also observe the notes on the jack.
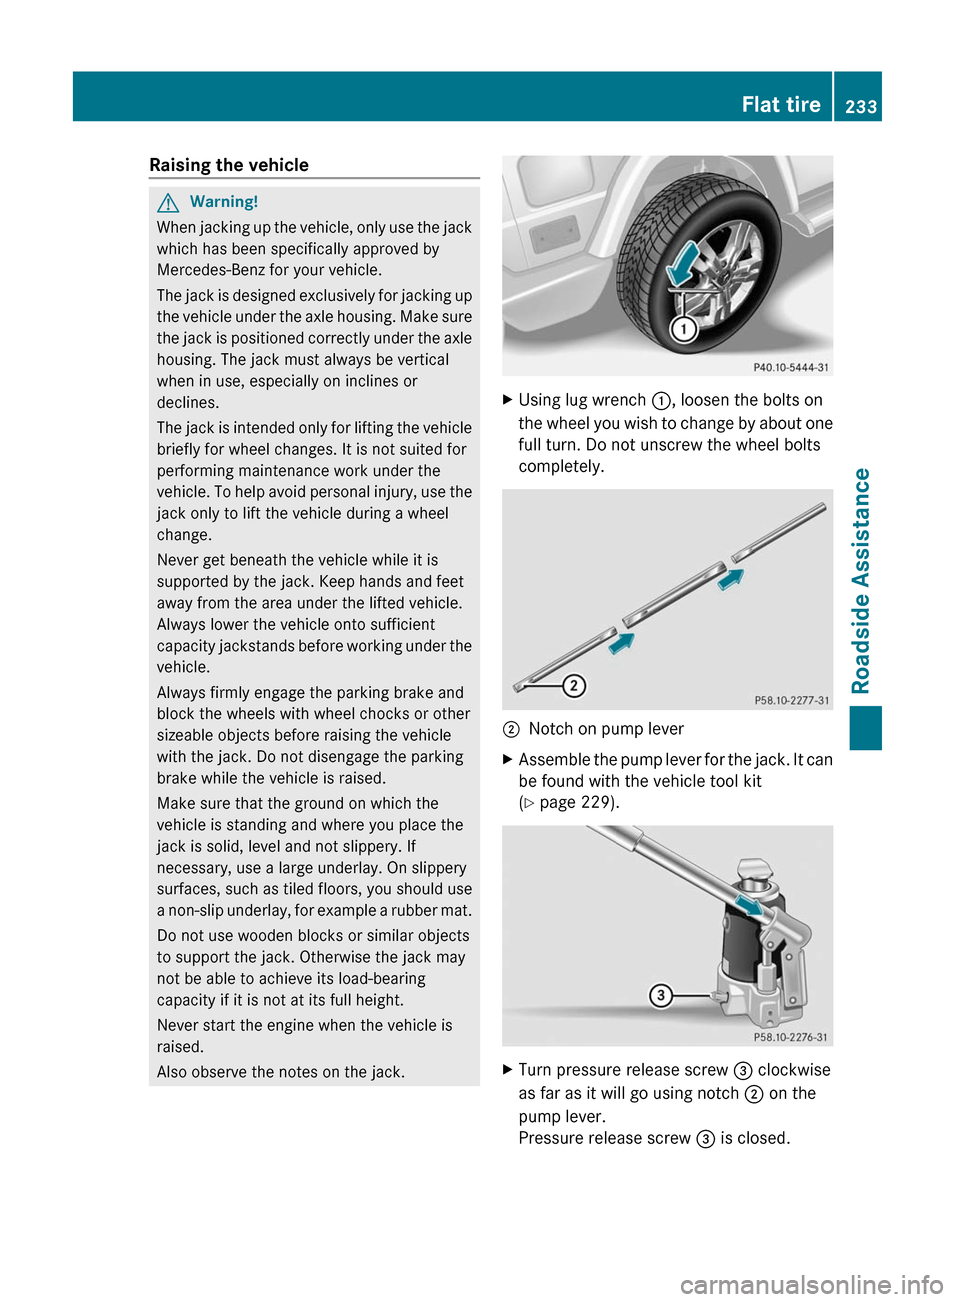
XUsing lug wrench :, loosen the bolts on
the wheel you wish to change by about one
full turn. Do not unscrew the wheel bolts
completely.;Notch on pump leverXAssemble the pump lever for the jack. It can
be found with the vehicle tool kit
( Y page 229).XTurn pressure release screw = clockwise
as far as it will go using notch ; on the
pump lever.
Pressure release screw = is closed.Flat tire233Roadside AssistanceZ
Page 236 of 288
iNever turn pressure release screw = by
more than one to two revolutions.
Otherwise, hydraulic fluid could escape.
! The jack is designed exclusively for
jacking up the vehicle at the jacking points.
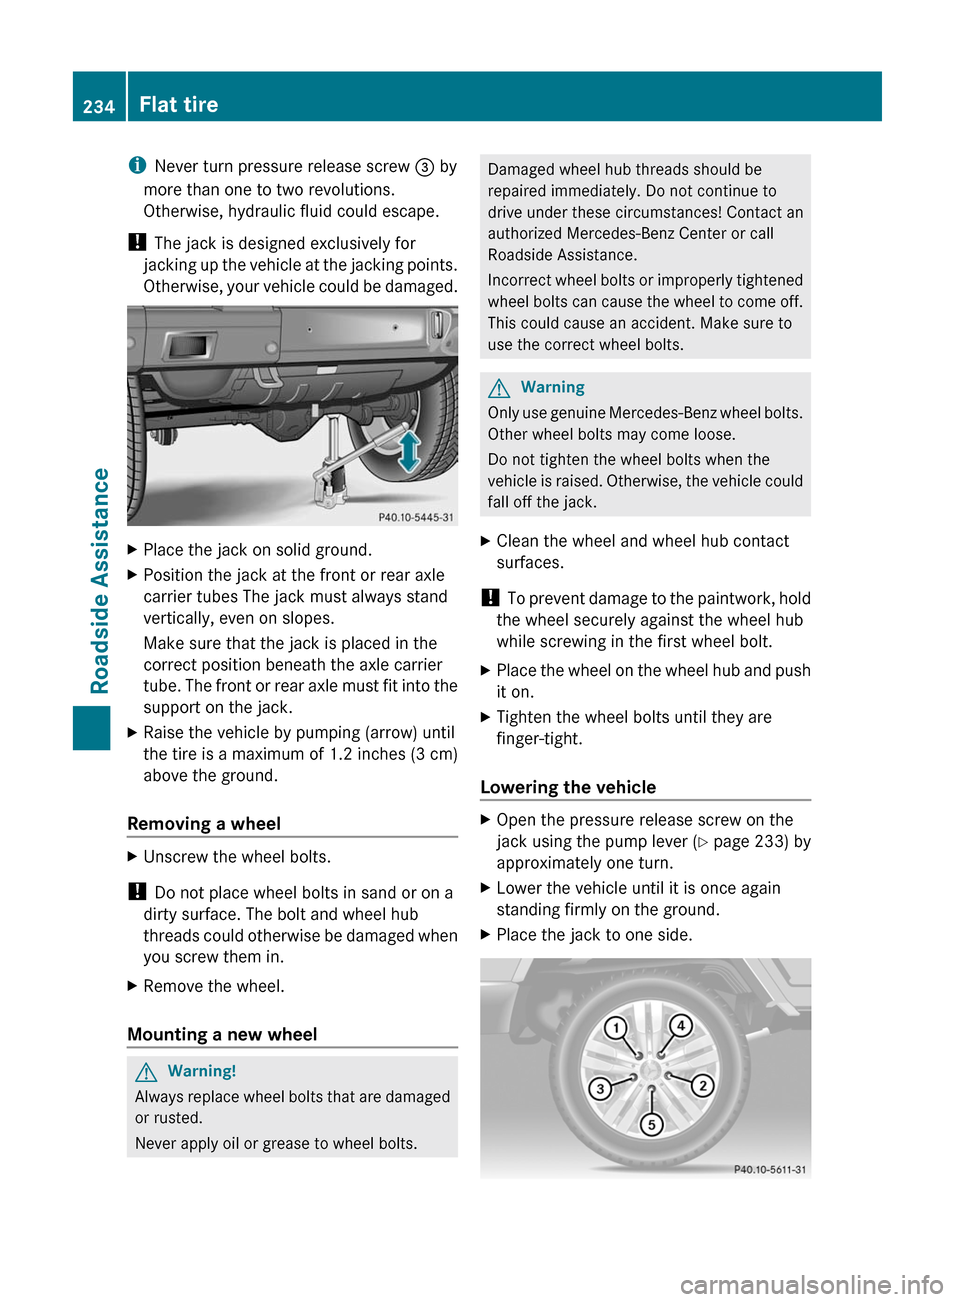
Otherwise, your vehicle could be damaged.XPlace the jack on solid ground.XPosition the jack at the front or rear axle
carrier tubes The jack must always stand
vertically, even on slopes.
Make sure that the jack is placed in the
correct position beneath the axle carrier
tube. The front or rear axle must fit into the
support on the jack.XRaise the vehicle by pumping (arrow) until
the tire is a maximum of 1.2 inches (3 cm)
above the ground.
Removing a wheel
XUnscrew the wheel bolts.
! Do not place wheel bolts in sand or on a
dirty surface. The bolt and wheel hub
threads could otherwise be damaged when
you screw them in.
XRemove the wheel.
Mounting a new wheel
GWarning!
Always replace wheel bolts that are damaged
or rusted.
Never apply oil or grease to wheel bolts.
Damaged wheel hub threads should be
repaired immediately. Do not continue to
drive under these circumstances! Contact an
authorized Mercedes-Benz Center or call
Roadside Assistance.
Incorrect wheel bolts or improperly tightened
wheel bolts can cause the wheel to come off.
This could cause an accident. Make sure to
use the correct wheel bolts.GWarning
Only use genuine Mercedes-Benz wheel bolts.
Other wheel bolts may come loose.
Do not tighten the wheel bolts when the
vehicle is raised. Otherwise, the vehicle could
fall off the jack.
XClean the wheel and wheel hub contact
surfaces.
! To prevent damage to the paintwork, hold
the wheel securely against the wheel hub
while screwing in the first wheel bolt.
XPlace the wheel on the wheel hub and push
it on.XTighten the wheel bolts until they are
finger-tight.
Lowering the vehicle
XOpen the pressure release screw on the
jack using the pump lever ( Y page 233) by
approximately one turn.XLower the vehicle until it is once again
standing firmly on the ground.XPlace the jack to one side.234Flat tireRoadside Assistance
Page 237 of 288
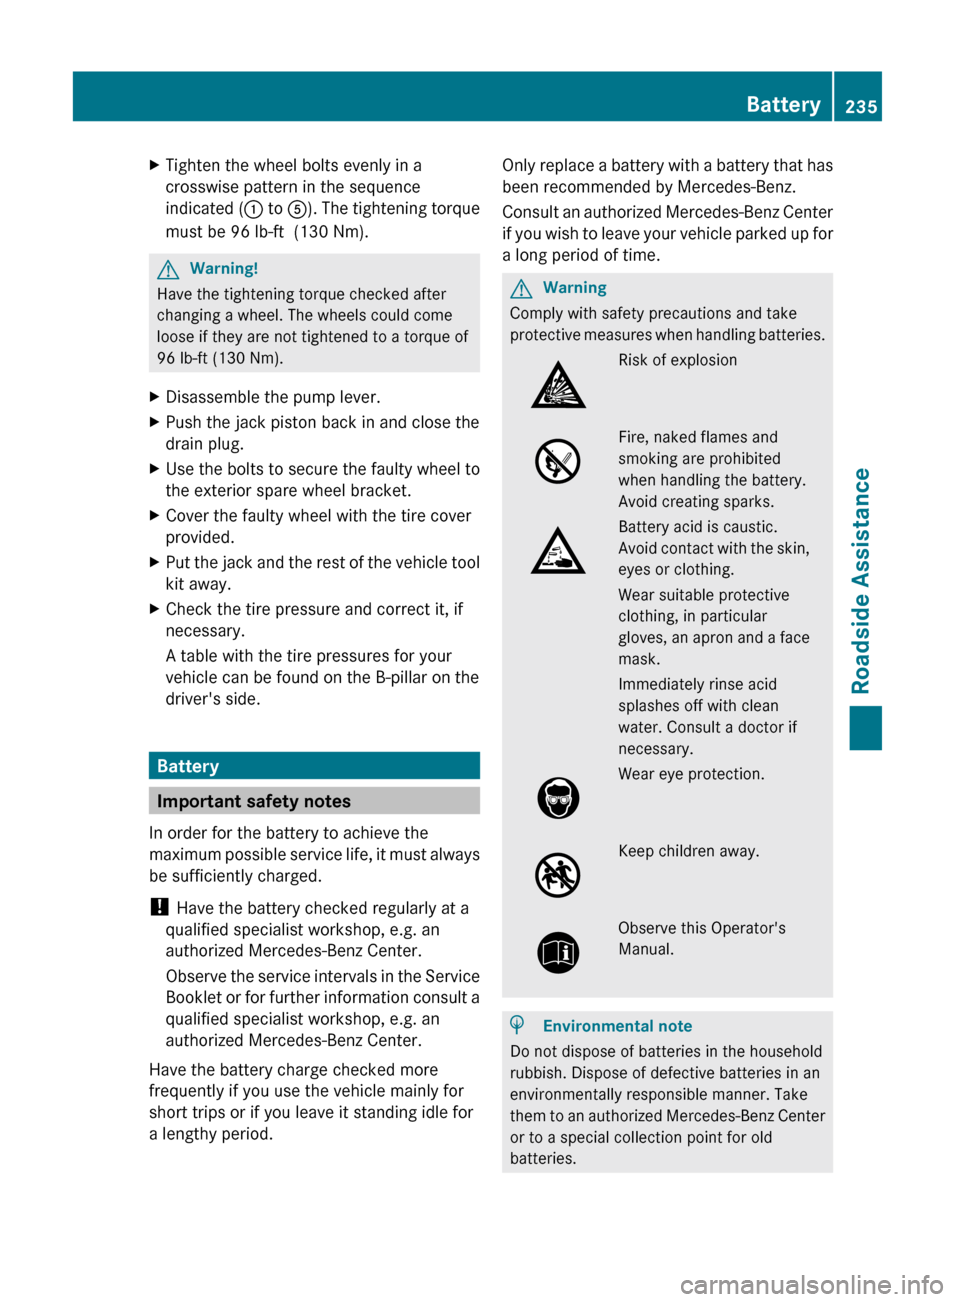
XTighten the wheel bolts evenly in a
crosswise pattern in the sequence
indicated (: to A). The tightening torque
must be 96 lb-ft (130 Nm).
GWarning!
Have the tightening torque checked after
changing a wheel. The wheels could come
loose if they are not tightened to a torque of
96 lb-ft (130 Nm).
XDisassemble the pump lever.XPush the jack piston back in and close the
drain plug.
XUse the bolts to secure the faulty wheel to
the exterior spare wheel bracket.
XCover the faulty wheel with the tire cover
provided.
XPut the jack and the rest of the vehicle tool
kit away.
XCheck the tire pressure and correct it, if
necessary.
A table with the tire pressures for your
vehicle can be found on the B-pillar on the
driver's side.
Battery
Important safety notes
In order for the battery to achieve the
maximum possible service life, it must always
be sufficiently charged.
! Have the battery checked regularly at a
qualified specialist workshop, e.g. an
authorized Mercedes-Benz Center.
Observe the service intervals in the Service
Booklet or for further information consult a
qualified specialist workshop, e.g. an
authorized Mercedes-Benz Center.
Have the battery charge checked more
frequently if you use the vehicle mainly for
short trips or if you leave it standing idle for
a lengthy period.
Only replace a battery with a battery that has
been recommended by Mercedes-Benz.
Consult an authorized Mercedes-Benz Center
if you wish to leave your vehicle parked up for
a long period of time.
GWarning
Comply with safety precautions and take
protective measures when handling batteries.
Risk of explosionFire, naked flames and
smoking are prohibited
when handling the battery.
Avoid creating sparks.
Battery acid is caustic.
Avoid contact with the skin,
eyes or clothing.
Wear suitable protective
clothing, in particular
gloves, an apron and a face
mask.
Immediately rinse acid
splashes off with clean
water. Consult a doctor if
necessary.
Wear eye protection.Keep children away.Observe this Operator's
Manual.
HEnvironmental note
Do not dispose of batteries in the household
rubbish. Dispose of defective batteries in an
environmentally responsible manner. Take
them to an authorized Mercedes-Benz Center
or to a special collection point for old
batteries.
Battery235Roadside AssistanceZ
Page 238 of 288
GWarning
Failure to follow these instructions can result
in severe injury or death.
Never lean over batteries while connecting.
You might get injured.
Battery fluid contains sulfuric acid. Do not
allow this fluid to come in contact with eyes,
skin or clothing. In case it does, immediately
flush affected area with water and seek
medical help if necessary.
A battery will also produce hydrogen gas,
which is flammable and explosive. Keep
flames or sparks away from battery, avoid
improper connection of jumper cables,
smoking etc.
GWarning
Do not place any metal objects on the battery
as this could result in a short circuit.
Use leak-proof batteries only to avoid the risk
of acid burns in the event of an accident.
Take care that you do not become statically
charged, e.g. by wearing synthetic clothing or
rubbing against textiles. For this reason, you
also should not pull or push the battery over
carpets or other synthetic materials.
Never touch the battery first. First, touch the
outside body of the vehicle in order to release
any possible electrostatic charges.
Do not rub the battery with rags or cloths. The
battery could explode if touched due to
electrostatic charge or due to spark
formation.
! Switch off the engine and remove the
SmartKey before disconnecting the
terminal clamps from the battery. You may
otherwise destroy electronic components,
such as the alternator.
! Like other batteries, the vehicle battery
may discharge over time if you do not use
the vehicle. In this case, have the battery
disconnected at a qualified specialist
workshop, e.g. an authorized Mercedes-
Benz Center. You can also charge the
battery with a charger recommended by
Mercedes-Benz. Contact an authorized
Mercedes-Benz Center for further
information.
The battery, breather hose and cover of the
positive terminal clamp must be installed
securely during operation.
i Remove the SmartKey if you park the
vehicle and do not require any electrical
consumers. The vehicle will then use very
little energy, thus conserving battery
power.
Mercedes-Benz recommends that you do not
carry out work on batteries yourself, e.g.
removing, charging or replacing. Always have
this work performed at a qualified specialist
workshop, e.g. an authorized Mercedes-Benz
Center.
i If the power supply has been interrupted,
e.g. if the battery has been reconnected,
you must carry out the following tasks:
R reset the head restraints on the front
seats ( Y page 80).
Charging the battery
GWarning
Never charge a battery while still installed in
the vehicle unless the accessory battery
charge unit approved by Mercedes-Benz is
being used. Gases may escape during
charging and cause explosions that may
result in paint damage, corrosion or personal
injury.
An accessory battery charge unit specially
adapted for Mercedes-Benz vehicles and
tested and approved by Mercedes-Benz is
available. It permits the charging of the
battery in its installed position. Contact an
authorized Mercedes-Benz Center for
information and availability.
Charge the battery in accordance with the
separate instructions for the accessory
battery charger.
236BatteryRoadside Assistance
Page 239 of 288
GWarning
There is a risk of acid burns during the
charging process due to the gases which
escape from the battery. Do not lean over the
battery during the charging process.
GWarning
Battery acid is caustic. Avoid contact with the
skin, eyes or clothing.
! Only charge the installed battery with a
battery charger which has been tested and
approved by Mercedes-Benz. These battery
chargers allow the battery to be charged
while still installed.
! Only use battery chargers with a
maximum charging voltage of 14.8 V.
! Only charge the battery using the jump-
starting connection point.
The jump-starting connection point is in the
engine compartment ( Y page 238).
XOpen the hood ( Y page 214).XConnect the battery charger to the positive
terminal and earth point in the same order
as when connecting the donor battery in
the jump-starting procedure
( Y page 238).XRead the battery charger's operating
instructions before charging the battery.Battery237Roadside AssistanceZ
Page 240 of 288
Jump-startingGWarning
Failure to follow these directions will cause damage to the electronic components, and can lead
to a battery explosion and severe injury or death.
Never lean over batteries while connecting or jump starting. You might get injured.
Battery fluid contains sulfuric acid. Do not allow this fluid to come in contact with eyes, skin or
clothing. In case it does, immediately flush affected area with water, and seek medical help if
necessary.
A battery will also produce hydrogen gas, which is flammable and explosive. Keep flames or
sparks away from battery, avoid improper connection of jumper cables, smoking, etc.
Attempting to jump start a frozen battery can result in it exploding, causing personal injury.
Read all instructions before proceeding.
! Avoid repeated and lengthy starting attempts. Otherwise, non-combusted fuel may
damage the catalytic converter and create a risk of fire.
Do not use a rapid charging device to start the vehicle.
Make sure the jumper cables are not damaged.
Make sure the jumper cables are not touching any other metal objects when they are
connected to the battery.
If your vehicle's battery is discharged, the engine can be jump-started from another vehicle
or from a second battery using jumper cables.
Observe the following points:
XThe battery is not accessible in all vehicles. If the other vehicle's battery is not accessible,
jump-start the vehicle using a second battery or a jump-starting device.XYou may only jump-start the vehicle when the engine and catalytic converter are cold.XDo not start the engine if the battery is frozen. Let the battery thaw first.XJump-starting may only be performed from batteries with a nominal voltage of 12 V.XOnly use jumper cables that have a sufficient cross-section and insulated terminal clamps.XMake sure that the jumper cables cannot come into contact with parts, such as the pulley
or the fan. These parts move when the engine is started and while it is running.XIf the battery is fully discharged, leave the battery that is being used to jump-start connected
for a few minutes before attempting to start. This charges the empty battery a little.
i Jumper cables and further information about jump-starting can be obtained from any
authorized Mercedes-Benz Center.
XMake sure that the two vehicles do not touch.XApply the parking brake.XMove the selector lever to P.XSwitch off all electrical consumers (e.g. radio, blower, etc.).XOpen the hood ( Y page 214).238Jump-startingRoadside Assistance