center console MERCEDES-BENZ G55AMG 2011 W463 Owner's Manual
[x] Cancel search | Manufacturer: MERCEDES-BENZ, Model Year: 2011, Model line: G55AMG, Model: MERCEDES-BENZ G55AMG 2011 W463Pages: 288, PDF Size: 11.16 MB
Page 7 of 288
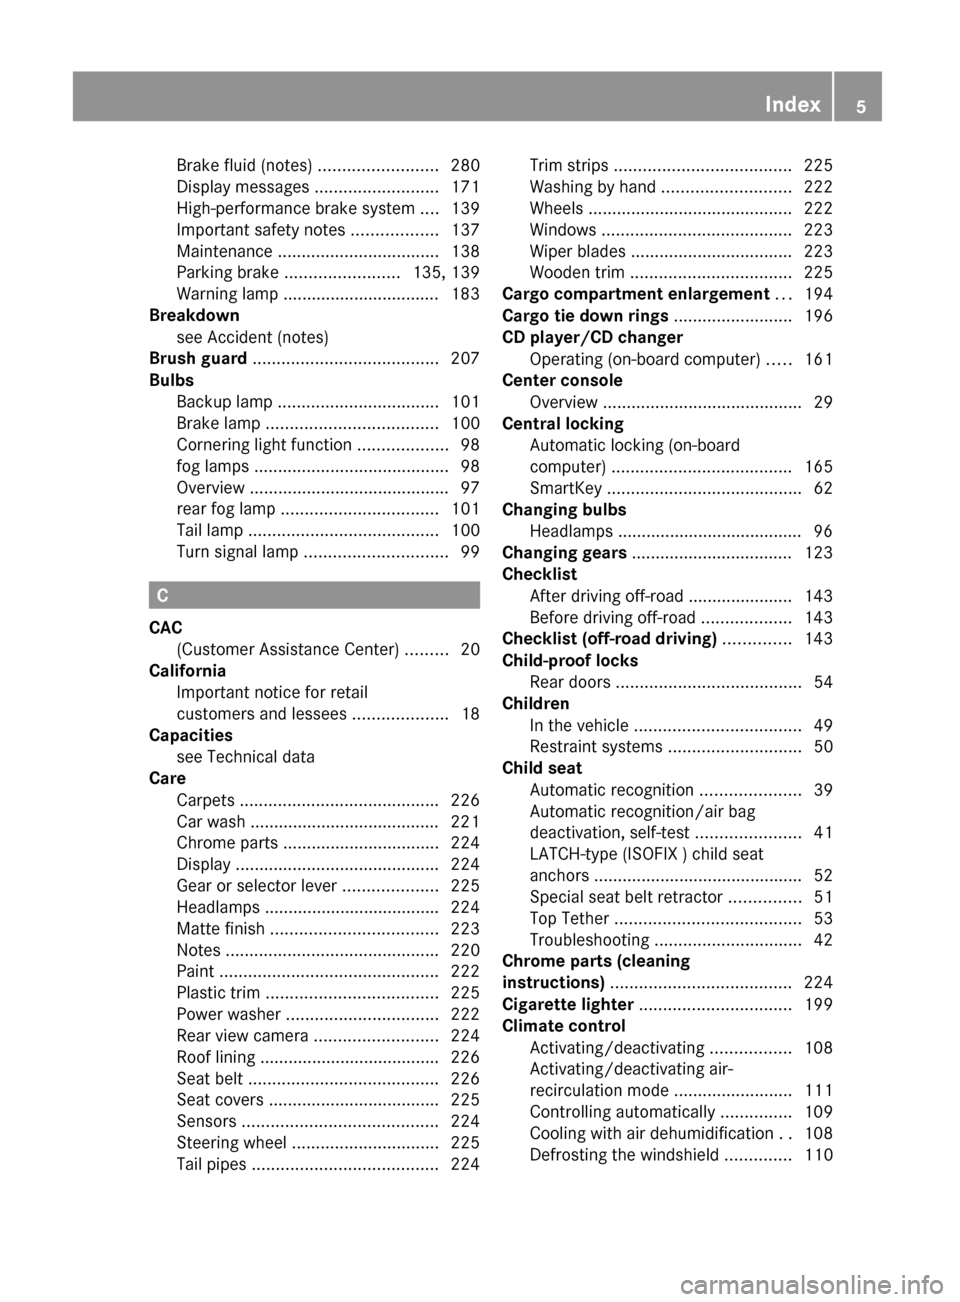
Brake fluid (notes) .........................280
Display messages ..........................171
High-performance brake system ....139
Important safety notes ..................137
Maintenance .................................. 138
Parking brake ........................ 135, 139
Warning lamp ................................. 183
Breakdown
see Accident (notes)
Brush guard ....................................... 207
Bulbs Backup lamp .................................. 101
Brake lamp .................................... 100
Cornering light function ...................98
fog lamps ......................................... 98
Overview .......................................... 97
rear fog lamp ................................. 101
Tail lamp ........................................ 100
Turn signal lamp .............................. 99
C
CAC (Customer Assistance Center) .........20
California
Important notice for retail
customers and lessees ....................18
Capacities
see Technical data
Care
Carpets .......................................... 226
Car wash ........................................ 221
Chrome parts ................................. 224
Display ........................................... 224
Gear or selector lever ....................225
Headlamps ..................................... 224
Matte finish ................................... 223
Notes ............................................. 220
Paint .............................................. 222
Plastic trim .................................... 225
Power washer ................................ 222
Rear view camera .......................... 224
Roof lining ...................................... 226
Seat belt ........................................ 226
Seat covers .................................... 225
Sensors ......................................... 224
Steering wheel ............................... 225
Tail pipes ....................................... 224
Trim strips ..................................... 225
Washing by hand ........................... 222
Wheels ........................................... 222
Windows ........................................ 223
Wiper blades .................................. 223
Wooden trim .................................. 225
Cargo compartment enlargement ... 194
Cargo tie down rings ......................... 196
CD player/CD changer Operating (on-board computer) .....161
Center console
Overview .......................................... 29
Central locking
Automatic locking (on-board
computer) ...................................... 165
SmartKey ......................................... 62
Changing bulbs
Headlamps ....................................... 96
Changing gears .................................. 123
Checklist After driving off-road ...................... 143
Before driving off-road ...................143
Checklist (off-road driving) .............. 143
Child-proof locks Rear doors ....................................... 54
Children
In the vehicle ................................... 49
Restraint systems ............................ 50
Child seat
Automatic recognition .....................39
Automatic recognition/air bag
deactivation, self-test ......................41
LATCH-type (ISOFIX ) child seat
anchors ............................................ 52
Special seat belt retractor ...............51
Top Tether ....................................... 53
Troubleshooting ............................... 42
Chrome parts (cleaning
instructions) ...................................... 224
Cigarette lighter ................................ 199
Climate control Activating/deactivating .................108
Activating/deactivating air-
recirculation mode .........................111
Controlling automatically ...............109
Cooling with air dehumidification ..108
Defrosting the windshield ..............110Index5
Page 25 of 288
Exterior view ....................................... 24
Cockpit ................................................. 25
Instrument cluster ..............................26
Multifunction steering wheel .............28
Center console .................................... 29
Overhead control panel ......................30
Door control panel .............................. 3123At a glance
Page 27 of 288
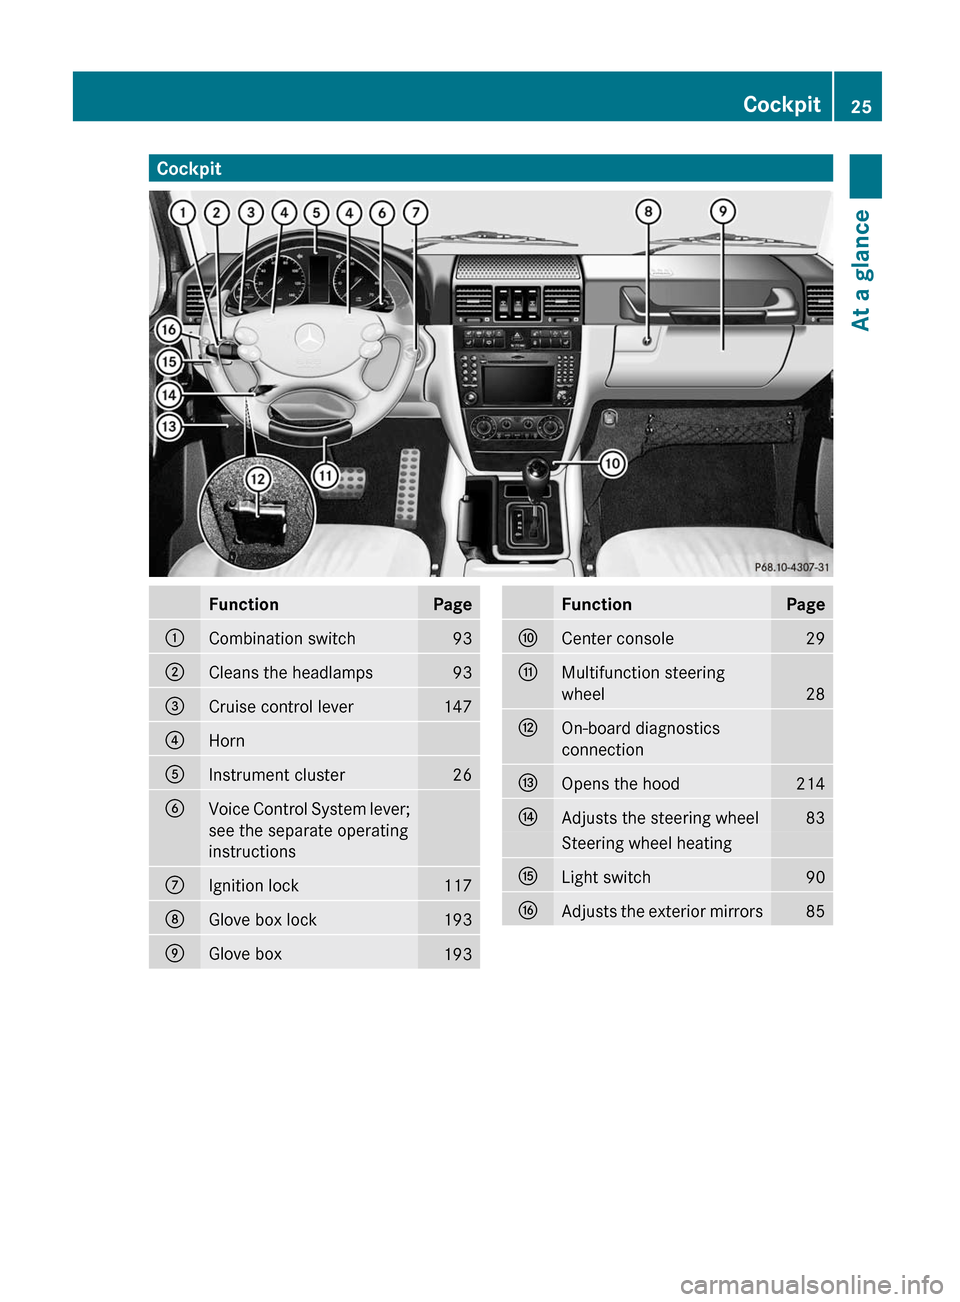
CockpitFunctionPage:Combination switch93;Cleans the headlamps93=Cruise control lever147?HornAInstrument cluster26BVoice Control System lever;
see the separate operating
instructionsCIgnition lock117DGlove box lock193EGlove box193FunctionPageFCenter console29GMultifunction steering
wheel
28
HOn-board diagnostics
connectionIOpens the hood214JAdjusts the steering wheel83Steering wheel heatingKLight switch90LAdjusts the exterior mirrors85Cockpit25At a glance
Page 31 of 288
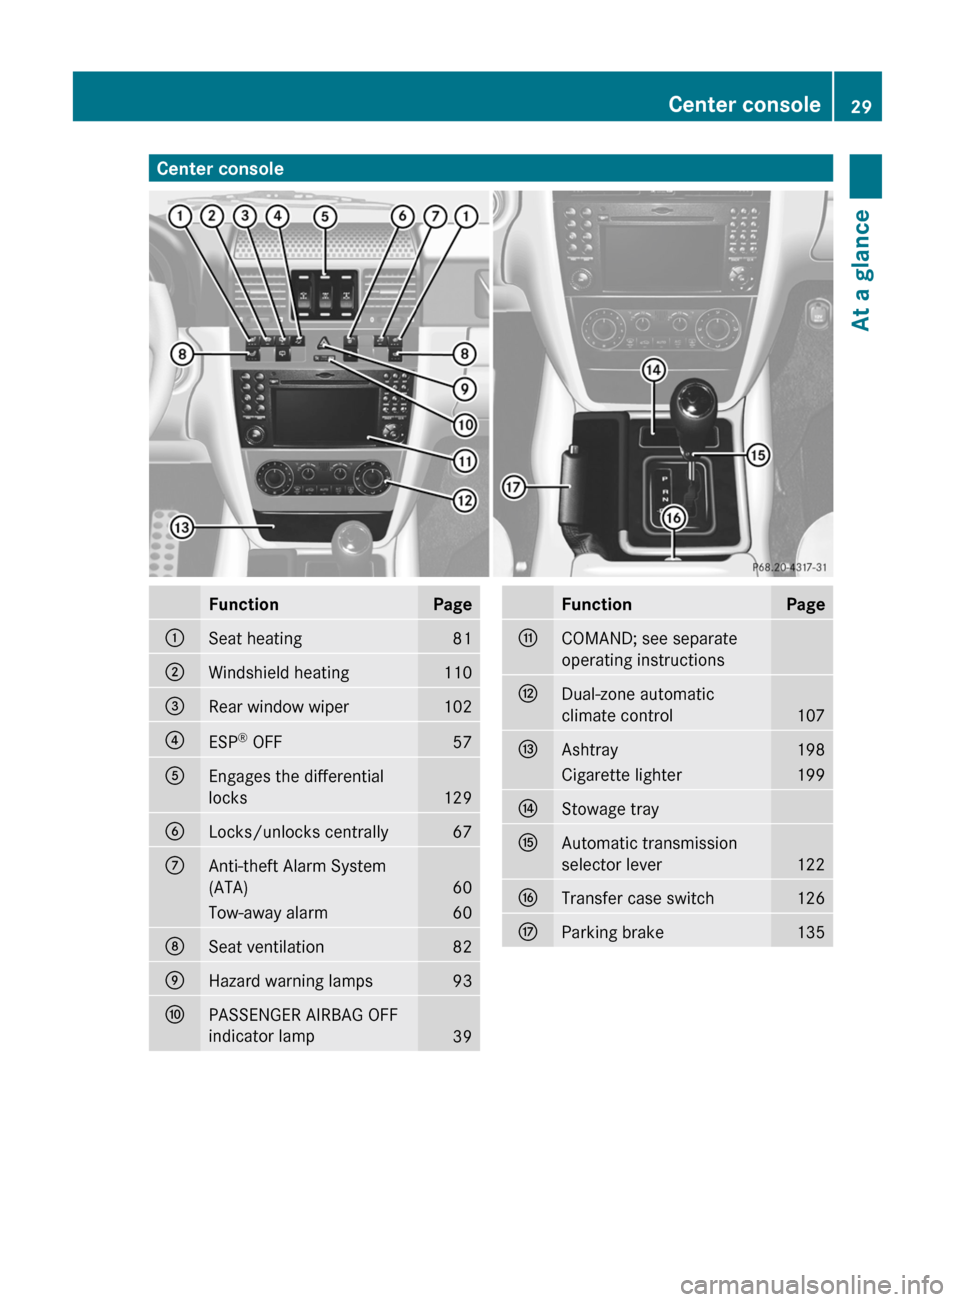
Center consoleFunctionPage:Seat heating81;Windshield heating110=Rear window wiper102?ESP®
OFF57AEngages the differential
locks
129
BLocks/unlocks centrally67CAnti-theft Alarm System
(ATA)
60
Tow-away alarm60DSeat ventilation82EHazard warning lamps93FPASSENGER AIRBAG OFF
indicator lamp
39
FunctionPageGCOMAND; see separate
operating instructionsHDual-zone automatic
climate control
107
IAshtray198Cigarette lighter199JStowage trayKAutomatic transmission
selector lever
122
LTransfer case switch126MParking brake135Center console29At a glance
Page 40 of 288
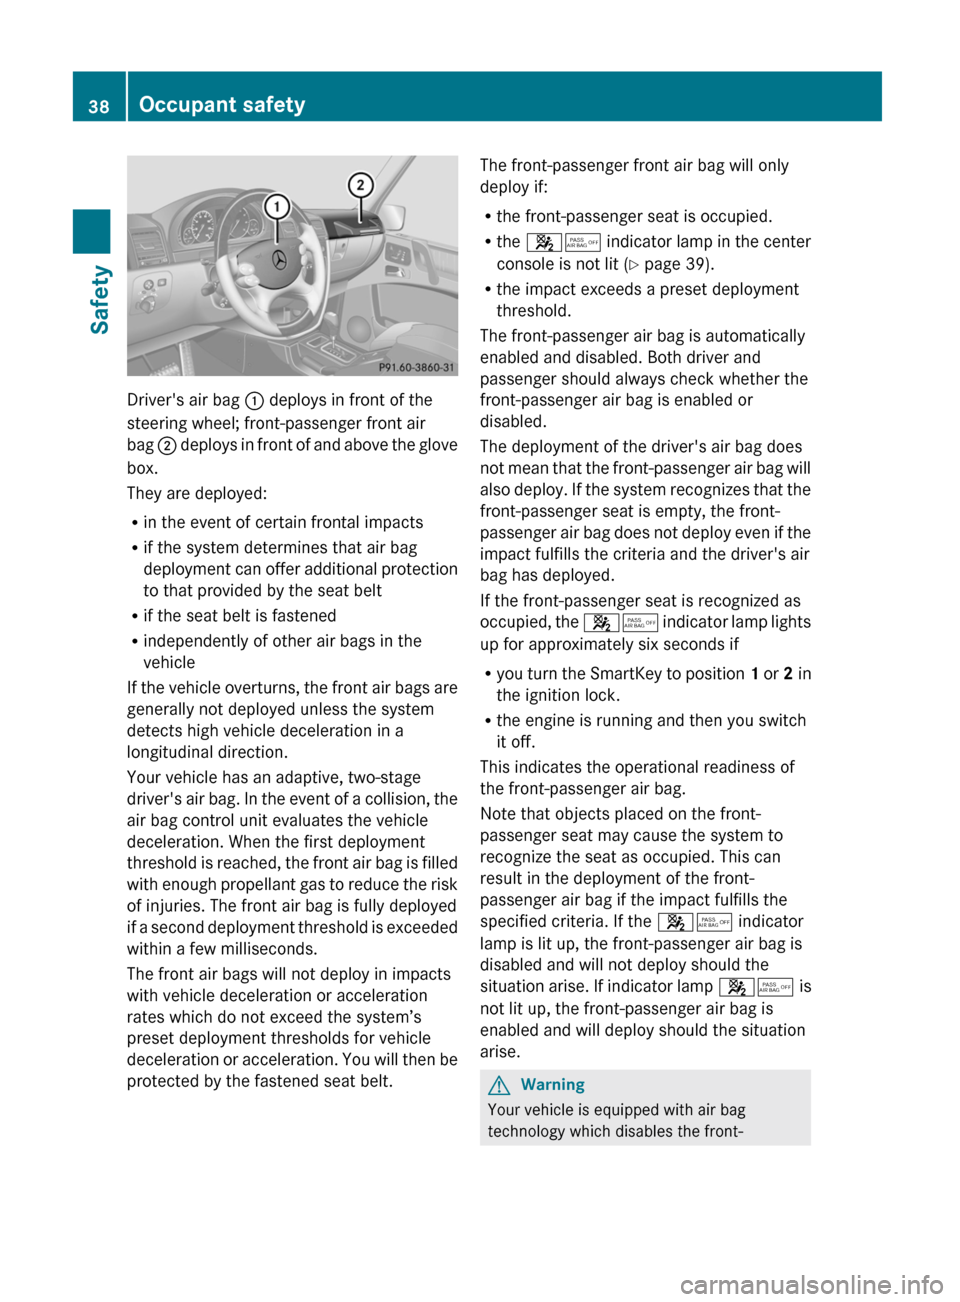
Driver's air bag : deploys in front of the
steering wheel; front-passenger front air
bag ; deploys in front of and above the glove
box.
They are deployed:
R in the event of certain frontal impacts
R if the system determines that air bag
deployment can offer additional protection
to that provided by the seat belt
R if the seat belt is fastened
R independently of other air bags in the
vehicle
If the vehicle overturns, the front air bags are
generally not deployed unless the system
detects high vehicle deceleration in a
longitudinal direction.
Your vehicle has an adaptive, two-stage
driver's air bag. In the event of a collision, the
air bag control unit evaluates the vehicle
deceleration. When the first deployment
threshold is reached, the front air bag is filled
with enough propellant gas to reduce the risk
of injuries. The front air bag is fully deployed
if a second deployment threshold is exceeded
within a few milliseconds.
The front air bags will not deploy in impacts
with vehicle deceleration or acceleration
rates which do not exceed the system’s
preset deployment thresholds for vehicle
deceleration or acceleration. You will then be
protected by the fastened seat belt.
The front-passenger front air bag will only
deploy if:
R the front-passenger seat is occupied.
R the 45 indicator lamp in the center
console is not lit ( Y page 39).
R the impact exceeds a preset deployment
threshold.
The front-passenger air bag is automatically
enabled and disabled. Both driver and
passenger should always check whether the
front-passenger air bag is enabled or
disabled.
The deployment of the driver's air bag does
not mean that the front-passenger air bag will
also deploy. If the system recognizes that the
front-passenger seat is empty, the front-
passenger air bag does not deploy even if the
impact fulfills the criteria and the driver's air
bag has deployed.
If the front-passenger seat is recognized as
occupied, the 45 indicator lamp lights
up for approximately six seconds if
R you turn the SmartKey to position 1 or 2 in
the ignition lock.
R the engine is running and then you switch
it off.
This indicates the operational readiness of
the front-passenger air bag.
Note that objects placed on the front-
passenger seat may cause the system to
recognize the seat as occupied. This can
result in the deployment of the front-
passenger air bag if the impact fulfills the
specified criteria. If the 45 indicator
lamp is lit up, the front-passenger air bag is
disabled and will not deploy should the
situation arise. If indicator lamp 45 is
not lit up, the front-passenger air bag is
enabled and will deploy should the situation
arise.GWarning
Your vehicle is equipped with air bag
technology which disables the front-
38Occupant safetySafety
Page 80 of 288
Do not drive the vehicle without the seat head
restraints. Head restraints are intended to
help reduce injuries during an accident.
! To avoid damage to the seats and the seat
heating, observe the following information:
R do not spill any liquids on the seats. If
liquid is spilled on the seats, dry them as
soon as possible.
R if the seat covers are damp or wet, do not
switch on the seat heating. The seat
heating should also not to be used to dry
the seats.
R clean the seat covers as recommended;
see the "Interior care" section.
R do not transport heavy loads on the
seats. Do not place sharp objects on the
seat cushions, e.g. knives, nails or tools.
The seats should only be occupied by
passengers, if possible.
R when the seat heating is in operation, do
not cover the seats with insulating
materials, e.g. blankets, coats, bags,
seat covers, child seats or booster seats.
! Make sure that there are no objects in the
footwell or behind the seats when resetting
the seats. There is a risk that the seats
and/or the objects could be damaged.
! When the rear bench seat is folded
forwards, the front seats cannot be moved
to their rearmost position. You could
otherwise damage the seats and the rear
bench seat.
! Make sure that the sun visor is folded up
before adjusting the backrest and head
restraint height. The head restraint and sun
visor could otherwise collide when the head
restraint is fully extended.
i If the front door is open, the seats can be
adjusted for up 30 minutes after the
ignition has been switched off.
i The head restraints in the front and rear
seats can be removed ( Y page 80).Please contact an authorized Mercedes-
Benz Center for more information.
i You can find further information about
enlarging the cargo compartment (folding
the rear bench seat forwards) on
( Y page 194).
Adjusting the seat electrically
Front seat adjustment
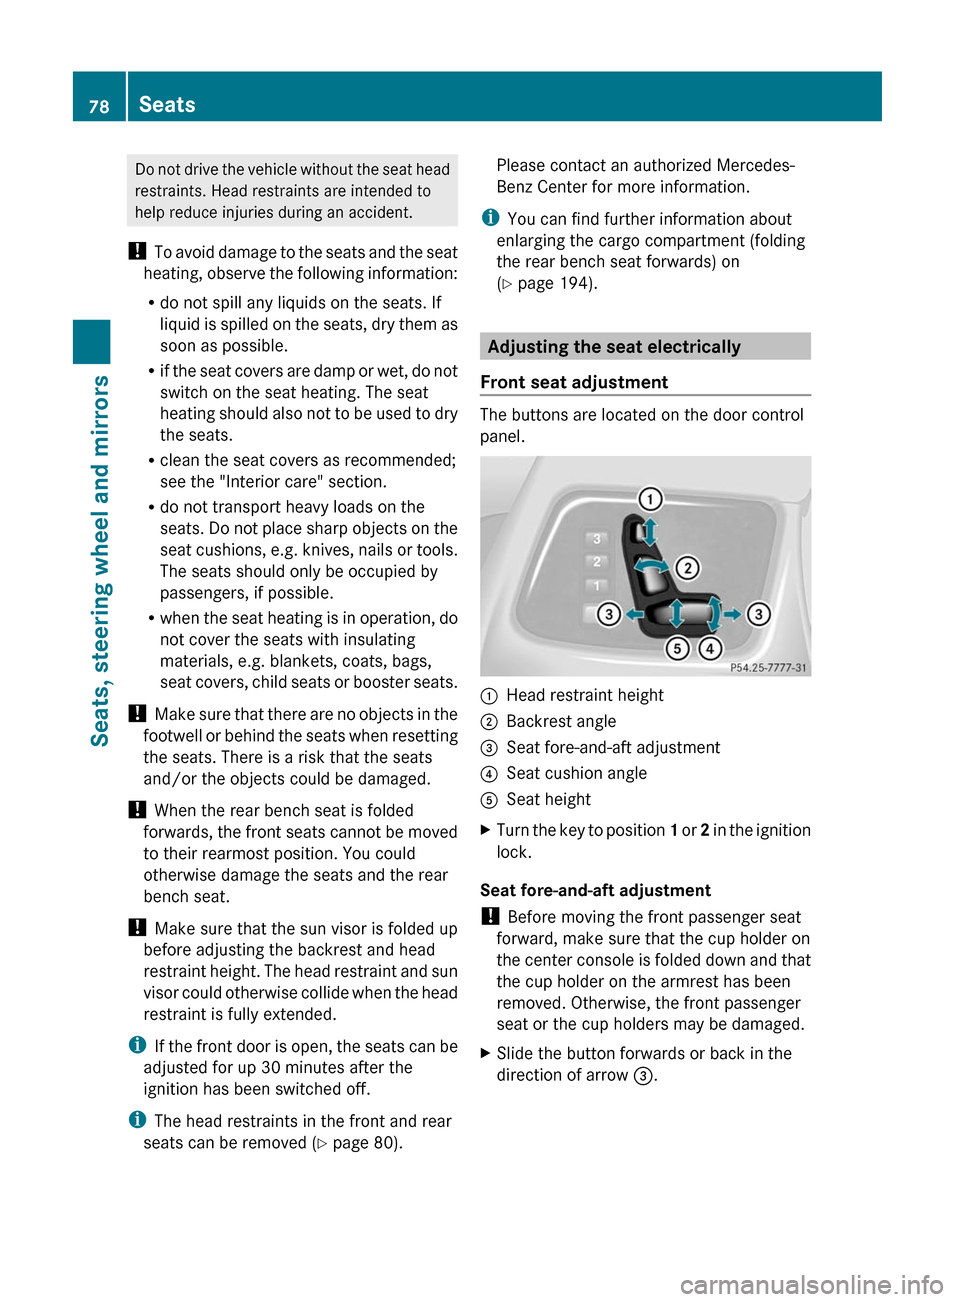
The buttons are located on the door control
panel.
:Head restraint height;Backrest angle=Seat fore-and-aft adjustment?Seat cushion angleASeat heightXTurn the key to position 1 or 2 in the ignition
lock.
Seat fore-and-aft adjustment
! Before moving the front passenger seat
forward, make sure that the cup holder on
the center console is folded down and that
the cup holder on the armrest has been
removed. Otherwise, the front passenger
seat or the cup holders may be damaged.
XSlide the button forwards or back in the
direction of arrow =.78SeatsSeats, steering wheel and mirrors
Page 82 of 288
Resetting the front seat head restraints
It is necessary to reset the front seat head
restraints after the voltage supply has been
interrupted, e.g. if the battery has been
completely discharged or disconnected.
XMake sure that the cup holder on the center
console is folded down ( Y page 197).XMove the seat as far forward as possible
and the head restraint in as far as possible.
Rear seat head restraints
Important safety notes
GWarning!
For safety reasons, always drive with the rear
head restraints in the upright position when
the rear seats are occupied.
Keep the area around head restraints clear of
articles (e.g. clothing) to not obstruct the
folding operation of the head restraints.
GWarning!
For your protection, drive only with properly
positioned head restraints.
Adjust the head restraint in such a way that it
is as close to the head as possible and the
center of the head restraint supports the back
of the head at eye level. This will reduce the
potential for injury to the head and neck in the
event of an accident or similar situation.
With a rear seat occupied, make sure to move
the respective head restraint up from the
lowest non-use position and have the
occupant adjust the head restraint properly.
Do not drive the vehicle without the seat head
restraints installed when the rear seats are
occupied. Head restraints are intended to
help reduce injuries during an accident.
GWarning!
Make sure the rear seat head restraints
engage when placing them upright manually.
Otherwise their protective function cannot be
ensured.
The back of the head will not be supported in
the event of a collision. That could cause
serious or even fatal injuries. Rear seat
occupants can be seriously injured or killed.
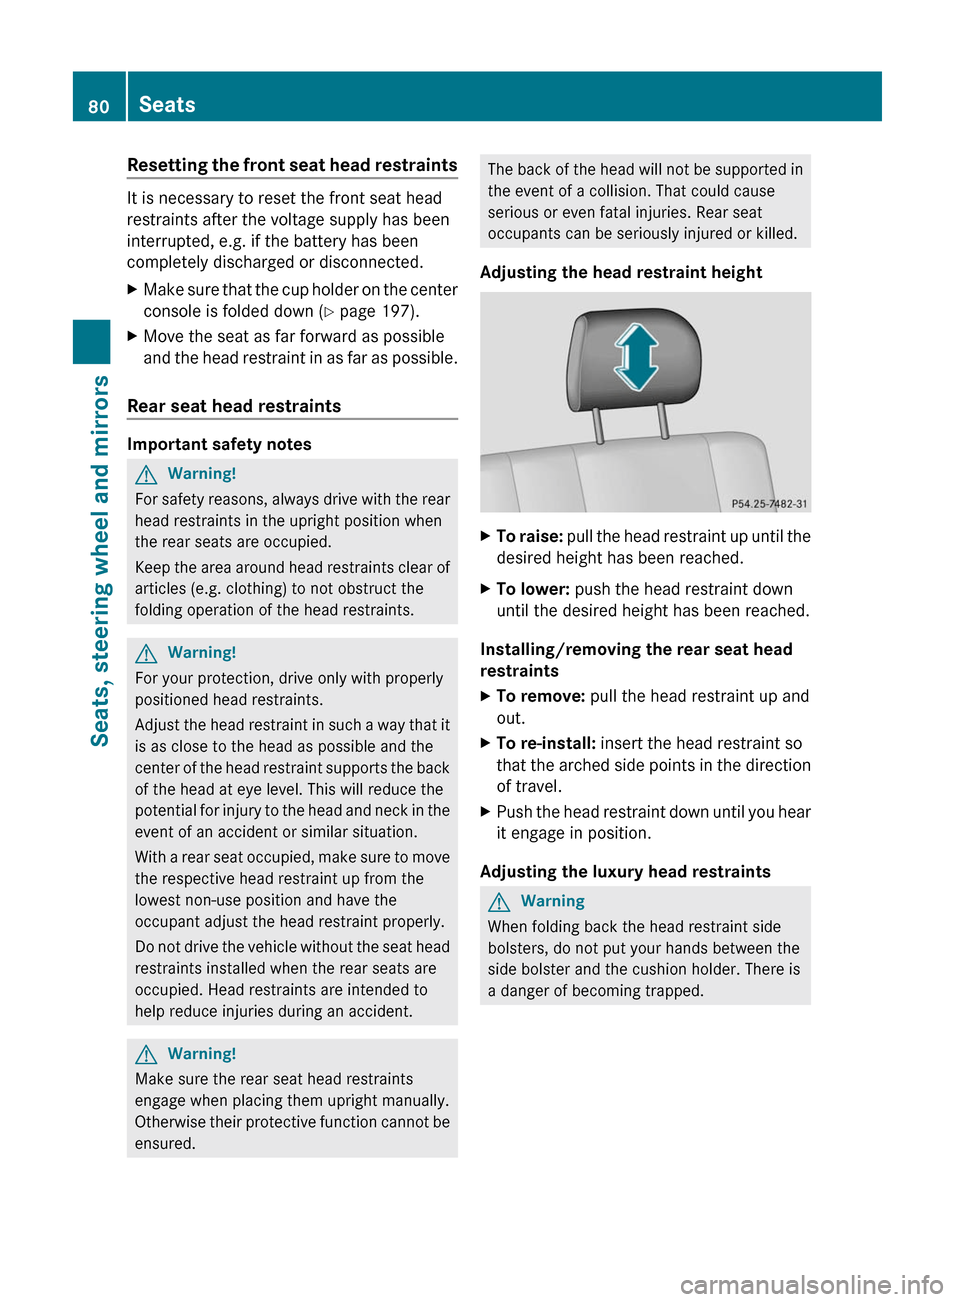
Adjusting the head restraint heightXTo raise: pull the head restraint up until the
desired height has been reached.XTo lower: push the head restraint down
until the desired height has been reached.
Installing/removing the rear seat head
restraints
XTo remove: pull the head restraint up and
out.XTo re-install: insert the head restraint so
that the arched side points in the direction
of travel.XPush the head restraint down until you hear
it engage in position.
Adjusting the luxury head restraints
GWarning
When folding back the head restraint side
bolsters, do not put your hands between the
side bolster and the cushion holder. There is
a danger of becoming trapped.
80SeatsSeats, steering wheel and mirrors
Page 129 of 288
Shift rangesHHIGH
Position for all normal on-road
driving conditions.LLOW
Low-range position for driving off-
road.
Also for use on steep uphill or
downhill gradients, especially
when towing a trailer.
! When the transfer case is in the
off-road driving position LOW
range, the automatic
transmission does not shift up,
even when the engine has
reached the overrevving limit.
There is then a risk of engine
damage. Make sure that you do
not exceed the maximum
permissible engine speed.
The vehicle travels around half the
speed of on-road driving range
HIGH . The drive power is
correspondingly higher.NNeutral
Neutral position.
No power is transmitted to the
drive wheels.
Shifting the transfer case
General notes
GWarning!
Always wait until the procedure of shifting
from HIGH to LOW – and from LOW to HIGH
– has been entirely completed. During this
procedure do not turn off the engine or shift
the automatic transmission into another gear.
If you do not wait until the shifting procedure
has been entirely completed then it might not
be correctly performed. The transfer case
might be in neutral, thus interrupting the
transfer of power between the engine and the
drive axle.
The vehicle is then freely movable, even if a
gear has been selected, and could
unintentionally be set into motion –
particularly on up – or downhill grades. This
could lead to an accident and cause injury to
yourself and others.
Please observe related messages appearing
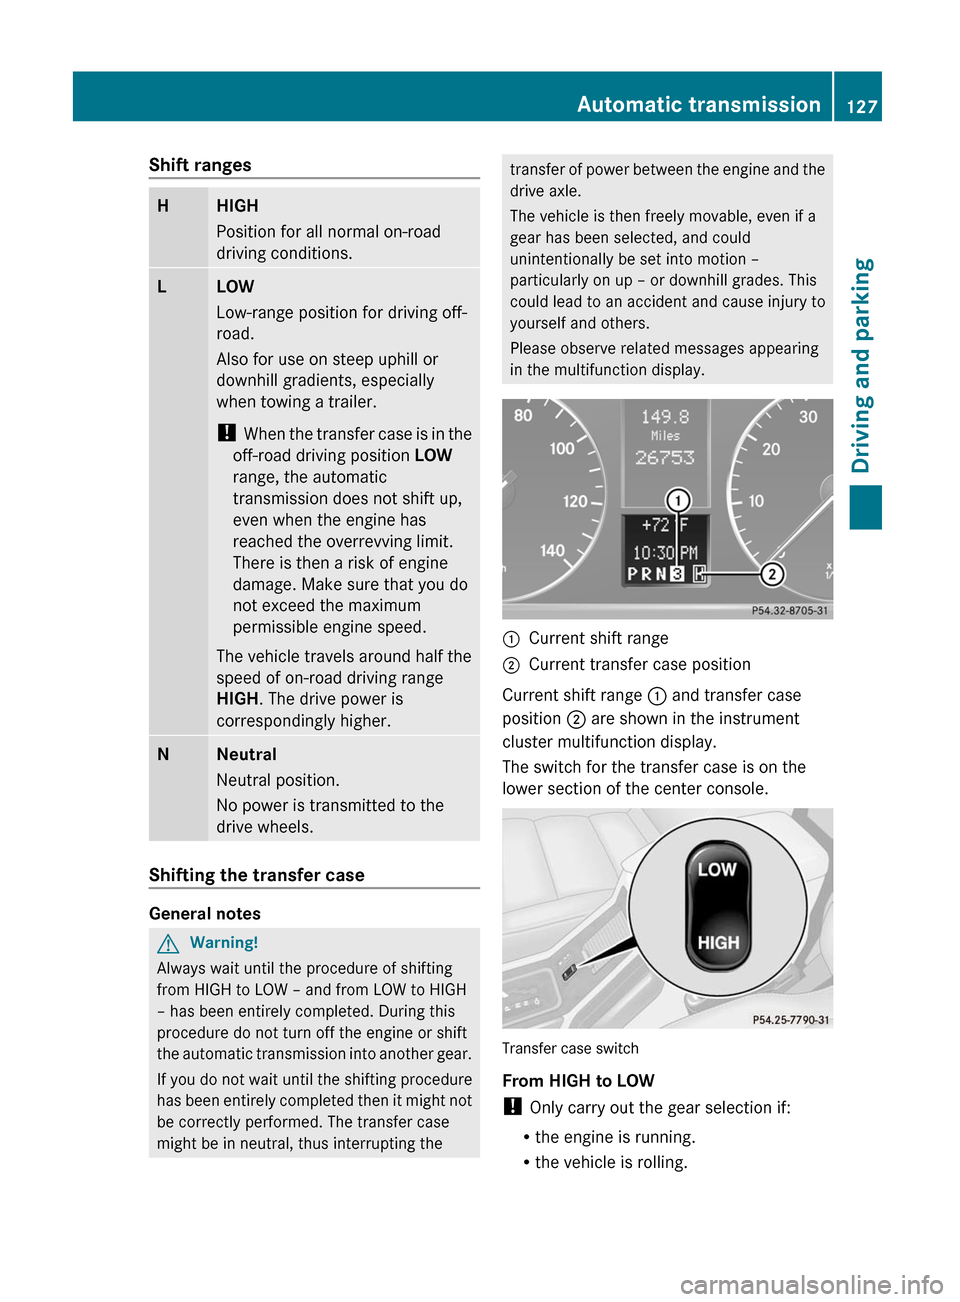
in the multifunction display.:Current shift range;Current transfer case position
Current shift range : and transfer case
position ; are shown in the instrument
cluster multifunction display.
The switch for the transfer case is on the
lower section of the center console.
Transfer case switch
From HIGH to LOW
! Only carry out the gear selection if:
R the engine is running.
R the vehicle is rolling.
Automatic transmission127Driving and parkingZ
Page 131 of 288
Differential locks
General notes
Differential locks improve the traction of the
vehicle.
GWarning!
Never drive on firm road surfaces with
differential locks engaged. Never drive on
narrow bends with front-axle differential locks
engaged. With differential locks engaged, the
vehicle's ability to steer is severely restricted
and the danger of accidents is therefore
higher.
Do not engage or disengage differential locks
while driving on a bend. The vehicle may
otherwise make a jerking movement. You
could thus lose control of the vehicle and
cause an accident.
If you select a differential lock, ABS, 4ETS,
ESP ®
and BAS will be deactivated.
Your vehicle is equipped with a differential
lock for:
R the transfer case: this controls the balance
between the front and rear axles.
R the rear axle: this controls the balance
between the wheels on the rear axle.
R the front axle: this controls the balance
between the wheels on the front axle.
! In order to avoid damage to the transfer
case, you must operate the vehicle on a
dynamometer (1-axle dynamometer) only
if:
R the axle not driven on is jacked up
or
R the corresponding propeller shaft is
disconnected
and
R the differential lock of the transfer case
is engaged.
Otherwise, the transfer case could be
damaged.
Information about differentials and
differential locks
When the vehicle is driving through a bend,
the wheels on the outside of the bend must
travel a longer distance and must thus turn
more quickly than the wheels on the inside.
The differential, a transmission in the
drivetrain, balances out the different
rotational speeds and therefore enables
driving through bends.
The disadvantage of differentials: the wheels
with the least road grip are driven the hardest.
Example: a wheel on a driven axle stands on
snow-covered ground and thus has no
traction. This wheel receives the strongest
driving power from the differential, as the
force progression takes the path of least
resistance. The opposite wheel on this axle,
however, which stands on firm ground and
could therefore allow traction, receives no
driving power. 4ETS eliminates this
disadvantage and provides good steerability
by automatically braking the spinning wheel,
thus directing more driving power to the
wheel standing on firm ground, which is
therefore able to provide traction.
ESP® and 4ETS are traction systems that are
ideal for road driving and suitable for light off-
road driving. Off-road gear LOW likewise
improves off-road capabilities.
Moreover, the more difficult conditions in off-
road driving require further measures such as
locking one or several differentials. Your
vehicle is equipped with three differential
locks: a central differential lock for the
transfer case, a differential lock for the front
axle, and a differential lock for the rear axle.
Each differential lock can be engaged with the
respective switch on the center console.
When the central differential lock for the
transfer case is locked, the speed of the front
wheels is equal to that of the rear wheels.
When the differential for the rear axle is
locked, both rear wheels turn equally fast,
independent of their respective torques.
Keep in mind that by engaging the differential
Automatic transmission129Driving and parkingZ
Page 132 of 288
locks, vehicle steerability is severely
restricted.
For your own safety, the safety of others, and
in order to avoid damage to the vehicle, the
differential locks must not be engaged when
driving on a firm road surface. Keep in mind
that when driving on firm road surfaces, the
unimpeded function of the differential is
necessary and must never be locked on firm
road surfaces. Vehicle steerability may
otherwise be lost and you may no longer be
able to steer the vehicle. For this reason, the
differential locks must be engaged
exclusively during off-road driving, and only
when activating the other driving systems
(4ETS, ESP ®
and off-road gear LOW) is no
longer sufficient.
Activating the differential lock
General notes
GWarning!
Never drive on firm road surfaces with
differential locks engaged. Never drive on
narrow bends with front-axle differential locks
engaged. With differential locks engaged, the
vehicle's ability to steer is severely restricted
and the danger of accidents is therefore
higher.
Do not engage or disengage differential locks
while driving on a bend. The vehicle may
otherwise make a jerking movement. You
could thus lose control of the vehicle and
cause an accident.
If you select a differential lock, ABS, 4ETS,
ESP ®
and BAS will be deactivated.
Activate the differential locks:
R off-road
R to deactivate ABS, 4ETS, ESP ®
and BAS
while off-road
R when fording
R on snow-covered, icy or dirty road surfaces
For further information on driving off-road,
see ( Y page 142).
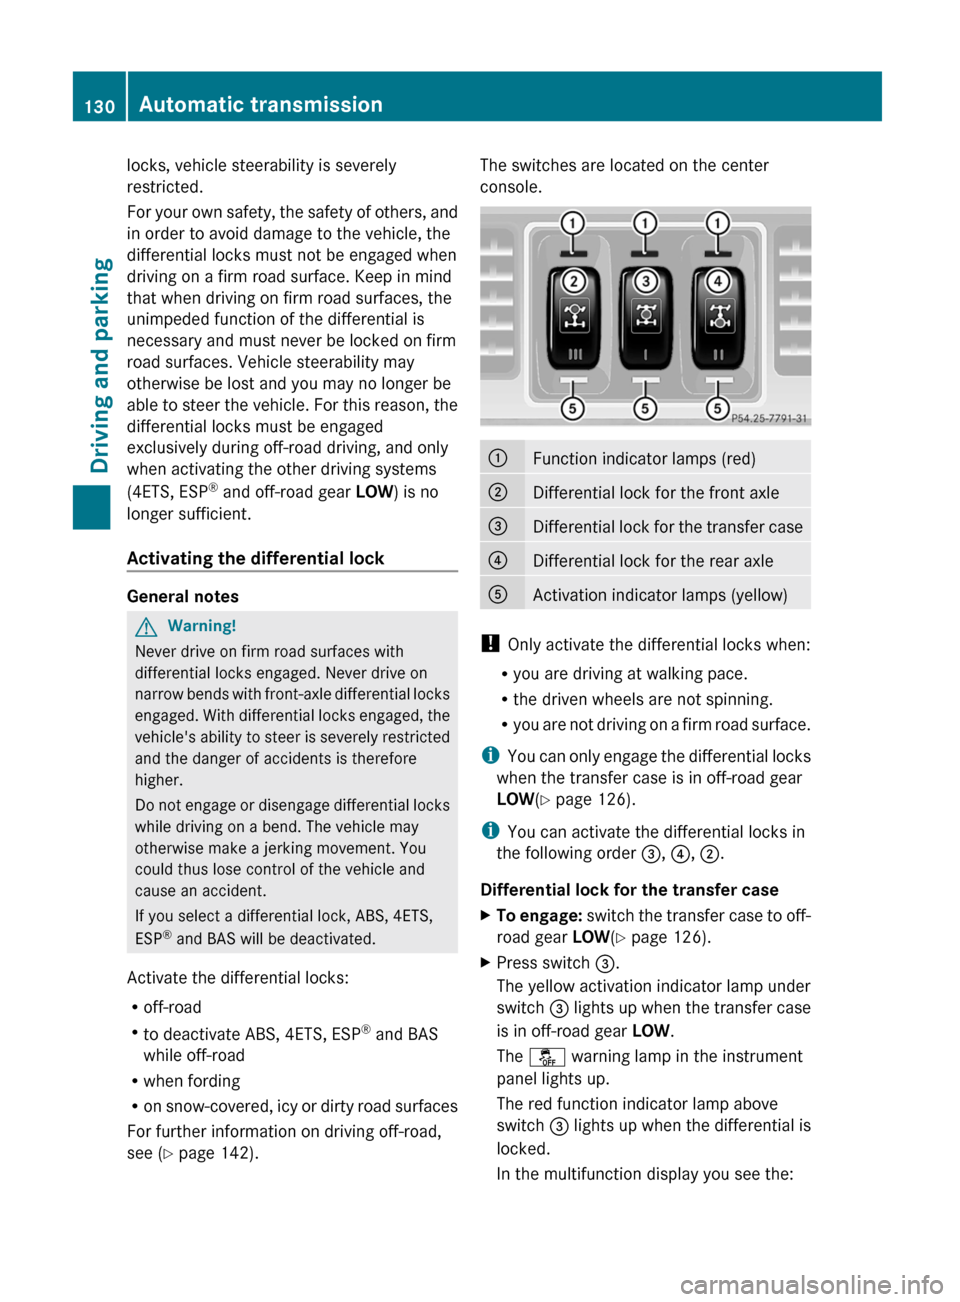
The switches are located on the center
console.:Function indicator lamps (red);Differential lock for the front axle=Differential lock for the transfer case?Differential lock for the rear axleAActivation indicator lamps (yellow)
! Only activate the differential locks when:
R you are driving at walking pace.
R the driven wheels are not spinning.
R you are not driving on a firm road surface.
i You can only engage the differential locks
when the transfer case is in off-road gear
LOW (Y page 126).
i You can activate the differential locks in
the following order =, ? , ; .
Differential lock for the transfer case
XTo engage: switch the transfer case to off-
road gear LOW(Y page 126).XPress switch =.
The yellow activation indicator lamp under
switch = lights up when the transfer case
is in off-road gear LOW.
The å warning lamp in the instrument
panel lights up.
The red function indicator lamp above
switch = lights up when the differential is
locked.
In the multifunction display you see the:130Automatic transmissionDriving and parking