headlamp MERCEDES-BENZ G55AMG 2011 W463 Owner's Manual
[x] Cancel search | Manufacturer: MERCEDES-BENZ, Model Year: 2011, Model line: G55AMG, Model: MERCEDES-BENZ G55AMG 2011 W463Pages: 288, PDF Size: 11.16 MB
Page 7 of 288
Brake fluid (notes) .........................280
Display messages ..........................171
High-performance brake system ....139
Important safety notes ..................137
Maintenance .................................. 138
Parking brake ........................ 135, 139
Warning lamp ................................. 183
Breakdown
see Accident (notes)
Brush guard ....................................... 207
Bulbs Backup lamp .................................. 101
Brake lamp .................................... 100
Cornering light function ...................98
fog lamps ......................................... 98
Overview .......................................... 97
rear fog lamp ................................. 101
Tail lamp ........................................ 100
Turn signal lamp .............................. 99
C
CAC (Customer Assistance Center) .........20
California
Important notice for retail
customers and lessees ....................18
Capacities
see Technical data
Care
Carpets .......................................... 226
Car wash ........................................ 221
Chrome parts ................................. 224
Display ........................................... 224
Gear or selector lever ....................225
Headlamps ..................................... 224
Matte finish ................................... 223
Notes ............................................. 220
Paint .............................................. 222
Plastic trim .................................... 225
Power washer ................................ 222
Rear view camera .......................... 224
Roof lining ...................................... 226
Seat belt ........................................ 226
Seat covers .................................... 225
Sensors ......................................... 224
Steering wheel ............................... 225
Tail pipes ....................................... 224
Trim strips ..................................... 225
Washing by hand ........................... 222
Wheels ........................................... 222
Windows ........................................ 223
Wiper blades .................................. 223
Wooden trim .................................. 225
Cargo compartment enlargement ... 194
Cargo tie down rings ......................... 196
CD player/CD changer Operating (on-board computer) .....161
Center console
Overview .......................................... 29
Central locking
Automatic locking (on-board
computer) ...................................... 165
SmartKey ......................................... 62
Changing bulbs
Headlamps ....................................... 96
Changing gears .................................. 123
Checklist After driving off-road ...................... 143
Before driving off-road ...................143
Checklist (off-road driving) .............. 143
Child-proof locks Rear doors ....................................... 54
Children
In the vehicle ................................... 49
Restraint systems ............................ 50
Child seat
Automatic recognition .....................39
Automatic recognition/air bag
deactivation, self-test ......................41
LATCH-type (ISOFIX ) child seat
anchors ............................................ 52
Special seat belt retractor ...............51
Top Tether ....................................... 53
Troubleshooting ............................... 42
Chrome parts (cleaning
instructions) ...................................... 224
Cigarette lighter ................................ 199
Climate control Activating/deactivating .................108
Activating/deactivating air-
recirculation mode .........................111
Controlling automatically ...............109
Cooling with air dehumidification ..108
Defrosting the windshield ..............110Index5
Page 10 of 288
Exterior viewOverview .......................................... 24
F
First-aid kit ......................................... 229
Flat tire Changing a wheel/mounting the
spare wheel ................................... 232
Preparing the vehicle .....................232
Raising the vehicle .........................233
Floormat ............................................. 211
Front fog lamp (display message) ... 173
Fuel Additives ........................................ 278
Notes ............................................. 277
Premium-grade unleaded gasoline . 278
Refueling ........................................ 131
Specifications ................................ 278
Troubleshooting ............................. 134
Fuel/water separator ....................... 220
Fuel consumption Notes ............................................. 136
Fuel filler cap (display message) ..... 178
Fuel filler flap Emergency release ........................133
Opening/closing ............................ 132
Fuel filter
Display message ............................ 178
Fuel level
Calling up the range (on-board
computer) ...................................... 167
Fuse allocation chart ........................ 243
Fuse box Battery case ................................... 244
Dashboard ..................................... 243
Front-passenger footwell ...............243
Transmission tunnel ....................... 244
Fuse extractor ................................... 243
Fuses Dashboard fuse box .......................243
Fuse allocation chart .....................243
Fuse box in the front-passenger
footwell .......................................... 243
Fuse box in the transmission
tunnel ............................................ 244
In the battery case .........................244
Notes ............................................. 242
G
Garage door opener Clearing the memory .....................211
Notes ............................................. 208
Opening/closing the garage door ..210
Programming the remote control ...209
Gear or selector lever (cleaning
guidelines) ......................................... 225
Genuine Mercedes-Benz parts ......... 274
Genuine wood trim and trim strips
(cleaning instructions) ...................... 225
Glove box ........................................... 193
Gradient-climbing capability
(maximum) ......................................... 146
GTW (Gross Trailer Weight)
(definition) ......................................... 267
H
Hazard warning lamps ........................ 93
Headlamp cleaning system ................ 93
Adding washer fluid .......................218
Notes ............................................. 281
Headlamp delayed switch-off
see Exterior lighting delayed switch-off
Headlamp protection grille .............. 100
Headlamps Cleaning ......................................... 224
Misting up ........................................ 94
Headlamps (automatic) ...................... 91
Head restraints Adjusting (angle) .............................. 79
Adjusting (rear) ................................ 80
Installing/removing (rear) ................80
Luxury .............................................. 80
Resetting (front) ............................... 80
see NECK-PRO head restraints
Heating
see Climate control ........................ 106
High beam flasher ............................... 93
high-mounted brake lamp Display message ............................ 173
Hill start assist .................................. 118
Hood Closing ........................................... 215
Display message ............................ 181
Opening ......................................... 214
8Index
Page 11 of 288
Hydroplaning ..................................... 140
I
Immobilizer .......................................... 59
Instrument cluster Overview .......................................... 26
Selecting the language (on-board
computer) ...................................... 163
Instrument cluster lighting .............. 163
Interior lighting Adjusting ......................................... 94
Automatic control ............................ 95
Cargo compartment lamp ................95
Delayed switch-off (on-board
computer) ...................................... 165
Manual control ................................. 95
Reading lamp ................................... 95
Rear interior lighting ........................96
J
Jack Storage location ............................ 229
Using ............................................. 233
Jump-starting ..................................... 238
K
Key positions SmartKey ....................................... 117
Kickdown ........................................... 123
L
Lamps Display message ............................ 172
LATCH-type (ISOFIX) child seat
anchors ................................................ 52
License plate lamp (display
message) ............................................ 173
Lighting see Lights ........................................ 90
Lights
Activating/deactivating the
interior lighting delayed switch-off
(on-board computer) ......................165
Cornering light function ...................94
Daytime running lamps ....................91
Display message ............................ 172
Driving abroad ................................. 90
Fog lamps ........................................ 92
Hazard warning lamps .....................93
High-beam headlamps .....................93
Light switch ..................................... 90
Low-beam headlamps ......................91
Rear fog lamp .................................. 92
Turn signals ..................................... 93
Limited Warranty ................................ 21
Load anchorage ................................. 196
Loading guidelines ............................ 192
Locking Automatic ........................................ 68
Emergency locking ........................... 68
From inside the vehicle (central
locking button) ................................. 67
Low-beam headlamp (display
message) ............................................ 172
Low-beam headlamps Automatic headlamps ......................91
Driving abroad ................................. 90
Lubricant additives
see Additives
Luggage compartment
Cover ............................................. 196
Luggage net ....................................... 194
Lumbar support 4-way lumbar support ......................81
Luxury head restraints ....................... 80
M
M+S tires ............................................ 248
Main-beam headlamps (display
message) ............................................ 173
Maintenance Battery ........................................... 235
Malfunction messages
see Display messages
Malfunctions
see Display messages
Malfunctions relevant to safety
Reporting ......................................... 20
Matte finish (cleaning
instructions) ...................................... 223
Index9
Page 26 of 288
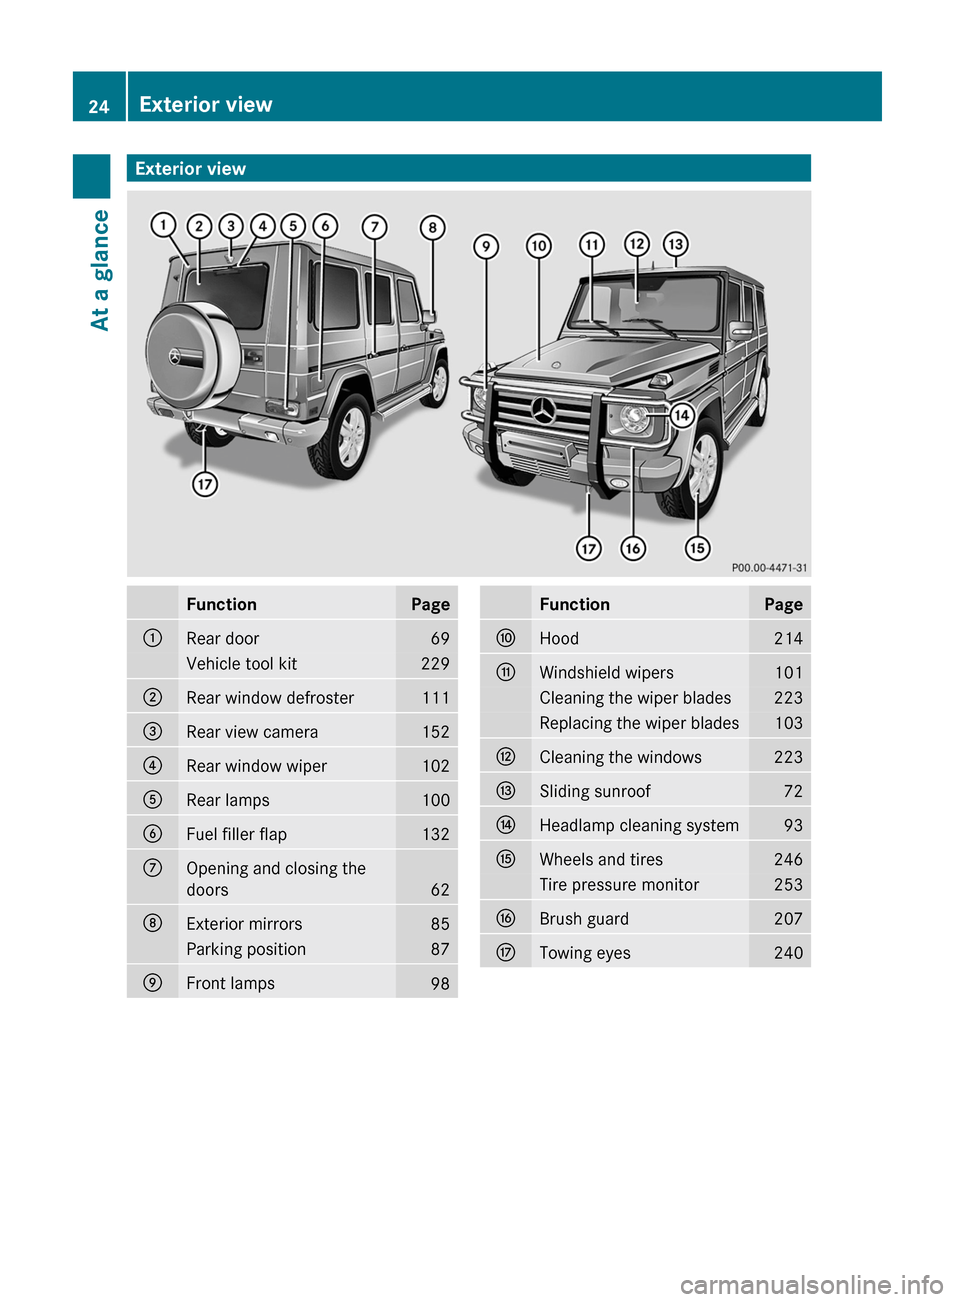
Exterior viewFunctionPage:Rear door69Vehicle tool kit229;Rear window defroster111=Rear view camera152?Rear window wiper102ARear lamps100BFuel filler flap132COpening and closing the
doors
62
DExterior mirrors85Parking position87EFront lamps98FunctionPageFHood214GWindshield wipers101Cleaning the wiper blades223Replacing the wiper blades103HCleaning the windows223ISliding sunroof72JHeadlamp cleaning system93KWheels and tires246Tire pressure monitor253LBrush guard207MTowing eyes24024Exterior viewAt a glance
Page 27 of 288
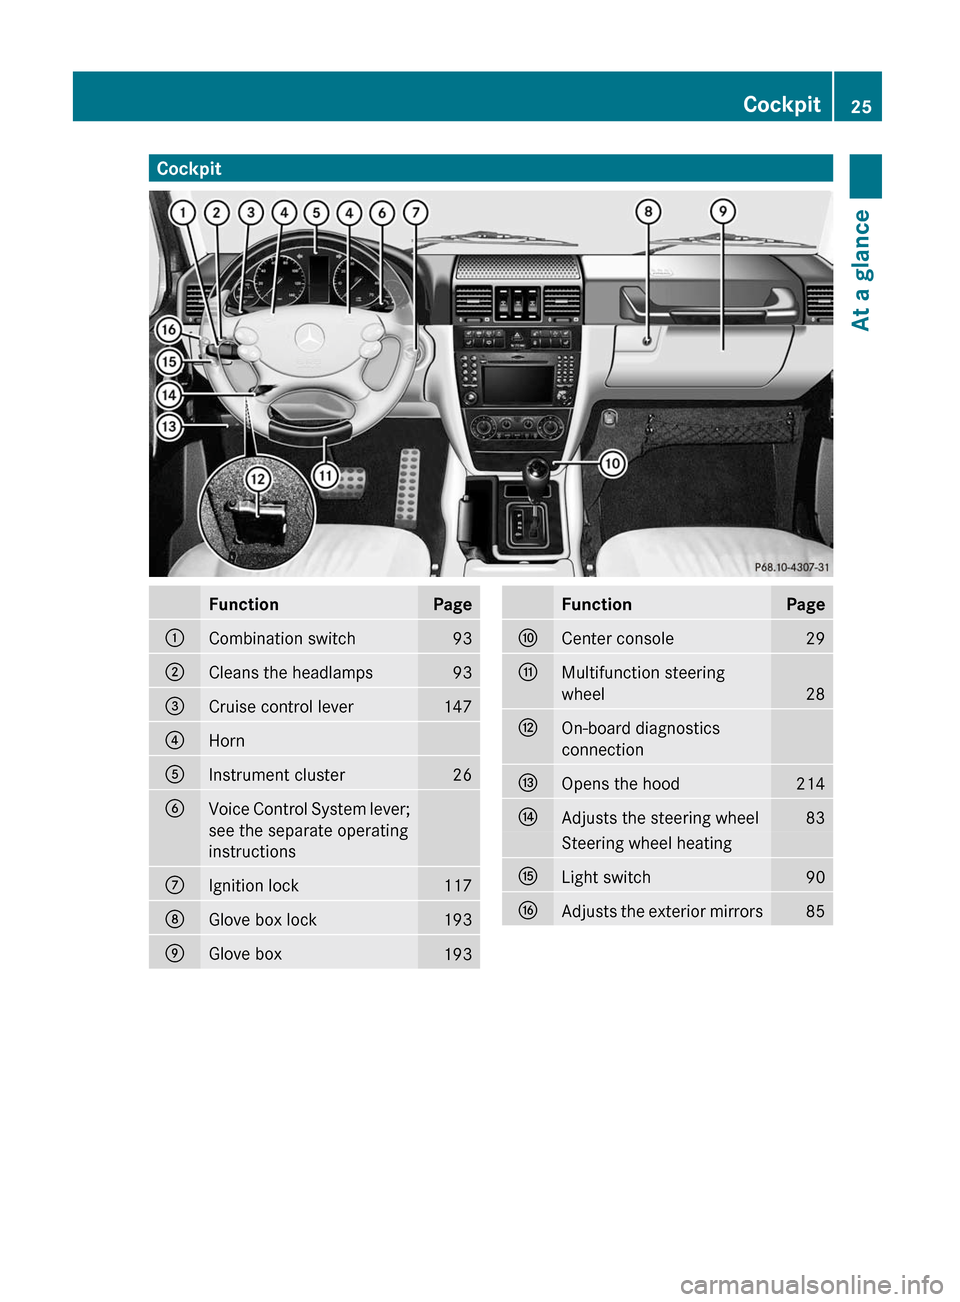
CockpitFunctionPage:Combination switch93;Cleans the headlamps93=Cruise control lever147?HornAInstrument cluster26BVoice Control System lever;
see the separate operating
instructionsCIgnition lock117DGlove box lock193EGlove box193FunctionPageFCenter console29GMultifunction steering
wheel
28
HOn-board diagnostics
connectionIOpens the hood214JAdjusts the steering wheel83Steering wheel heatingKLight switch90LAdjusts the exterior mirrors85Cockpit25At a glance
Page 29 of 288
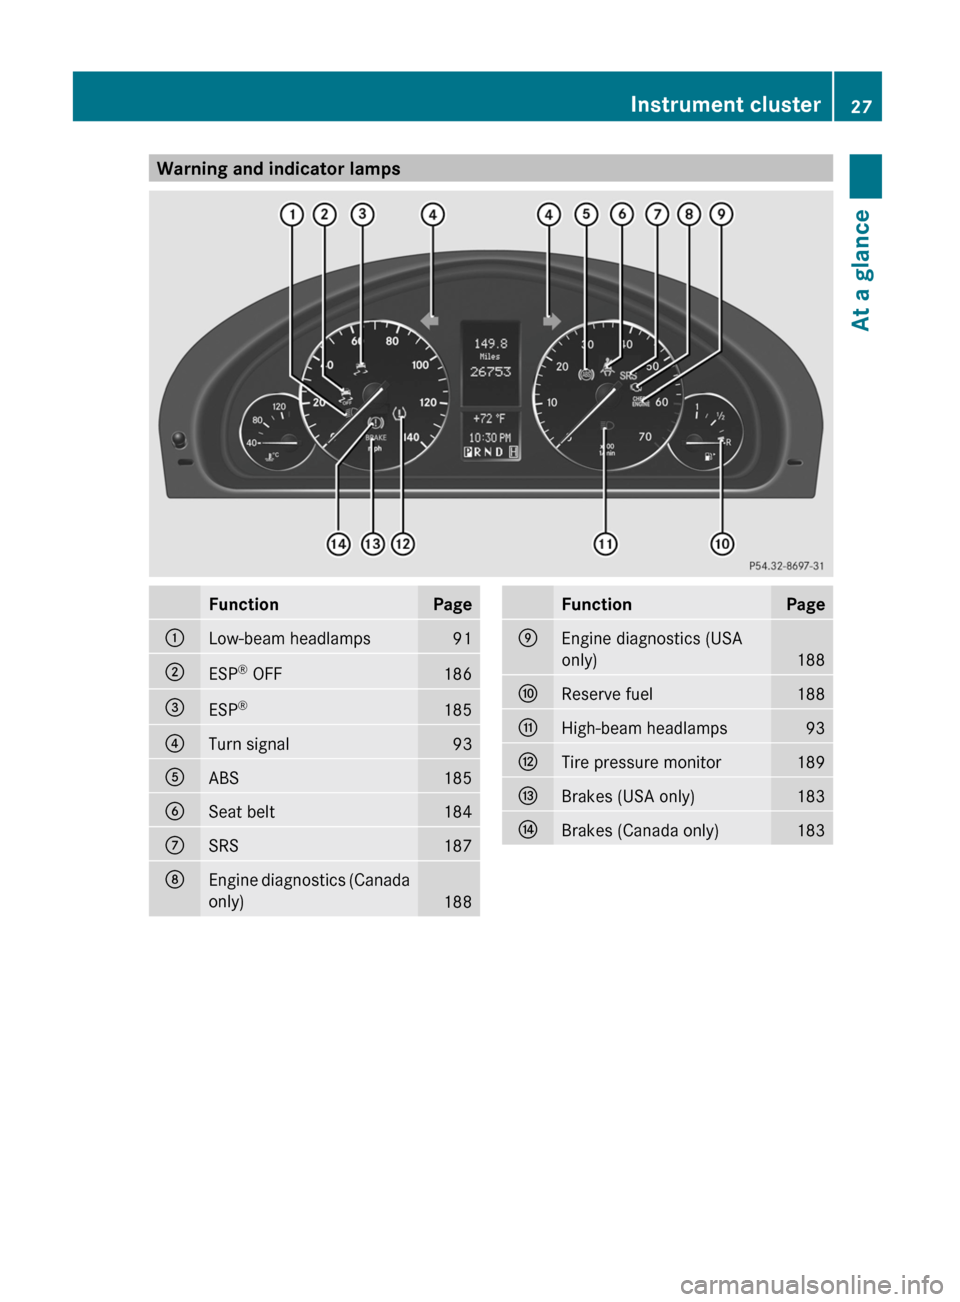
Warning and indicator lampsFunctionPage:Low-beam headlamps91;ESP®
OFF186=ESP ®185?Turn signal93AABS185BSeat belt184CSRS187DEngine diagnostics (Canada
only)
188
FunctionPageEEngine diagnostics (USA
only)
188
FReserve fuel188GHigh-beam headlamps93HTire pressure monitor189IBrakes (USA only)183JBrakes (Canada only)183Instrument cluster27At a glance
Page 89 of 288
Problems with the exterior mirrorsProblemPossible causes/consequences and M SolutionsAn exterior mirror has
been pushed out of
position.XMove the exterior mirror into the correct position manually.Automatic anti-glare mirrorsGWarning!
The auto-dimming function does not react if
incoming light is not aimed directly at sensors
in the interior rear view mirror.
The interior rear view mirror and the exterior
rear view mirror on the driver’s side do not
react, for example, when transporting cargo
which covers the rear window.
Light hitting the mirror(s) at certain angles
(incident light) could blind you. As a result,
you may not be able to observe traffic
conditions and could cause an accident.
The rear-view mirror and the exterior mirror
on the driver's side automatically go into anti-
glare mode if the ignition is switched on and
incident light from headlamps strikes the
sensor in the rear-view mirror.
The mirrors do not go into anti-glare mode if
reverse gear is engaged or the interior lighting
is switched on.
Parking position for the exterior
mirror on the front-passenger side
General notes
To make it easier to park, you can store the
front-passenger side exterior mirror position
in such a way that you can see the rear wheel
on that side as soon as you engage reverse
gear R.
Using the memory buttons on the driver's
side, you can store three parking positions
per key.
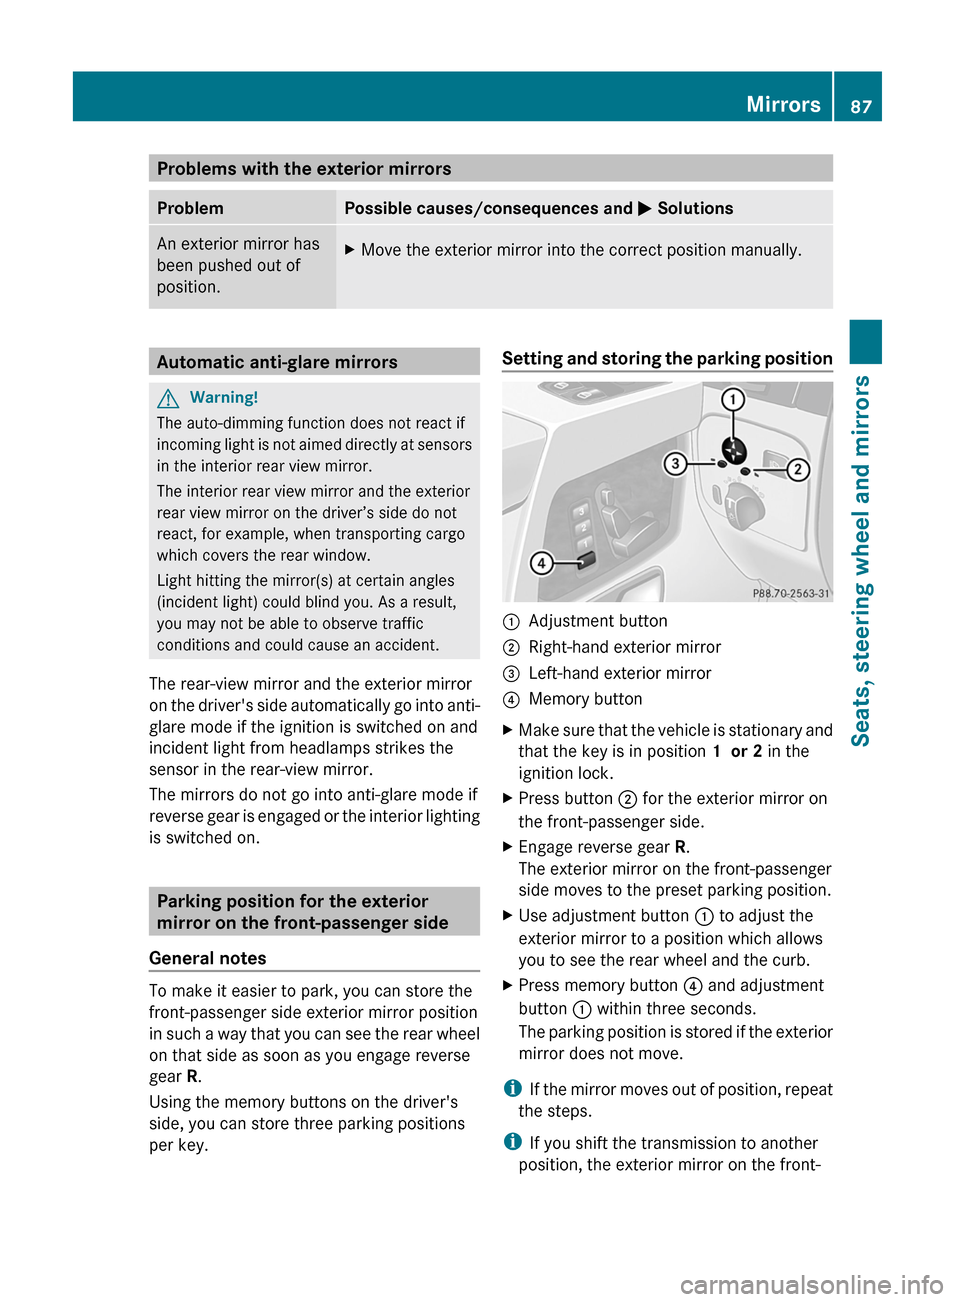
Setting and storing the parking position:Adjustment button;Right-hand exterior mirror=Left-hand exterior mirror?Memory buttonXMake sure that the vehicle is stationary and
that the key is in position 1 or 2 in the
ignition lock.XPress button ; for the exterior mirror on
the front-passenger side.XEngage reverse gear R.
The exterior mirror on the front-passenger
side moves to the preset parking position.XUse adjustment button : to adjust the
exterior mirror to a position which allows
you to see the rear wheel and the curb.XPress memory button ? and adjustment
button : within three seconds.
The parking position is stored if the exterior
mirror does not move.
i If the mirror moves out of position, repeat
the steps.
i If you shift the transmission to another
position, the exterior mirror on the front-
Mirrors87Seats, steering wheel and mirrorsZ
Page 92 of 288
Vehicle equipment
i This manual describes all the standard
and optional equipment of your vehicle
which was available at the time of
purchase. Country-specific differences are
possible. Please note that your vehicle may
not be equipped with all features
described. This also applies to safety-
relevant systems and functions.
Exterior lighting
Important safety notes
For reasons of safety, Mercedes-Benz
recommends that you drive with the lights
switched on even during the daytime. In some
countries, operation of the headlamps varies
due to legal requirements and self-imposed
obligations. In these countries, the daytime
running lamps are automatically switched on
when the engine is started.
Information about driving abroad
Converting to symmetrical low beam
when driving abroad: switch the headlamps
to symmetrical low beam in countries in
which traffic drives on the opposite side of the
road to the country where the vehicle is
registered. This prevents glare to oncoming
traffic. Symmetrical lights do not illuminate
as large an area of the edge of the road.
Have the headlamps converted at a qualified
specialist workshop, e.g. an authorized
Mercedes-Benz Center, as close to the border
as possible before driving in these countries.
Converting to asymmetrical low beam
after returning: have the headlamps
converted back to asymmetrical low beam at
a qualified specialist workshop, e.g. an
authorized Mercedes-Benz Center, as soon as
possible after crossing the border when
returning.
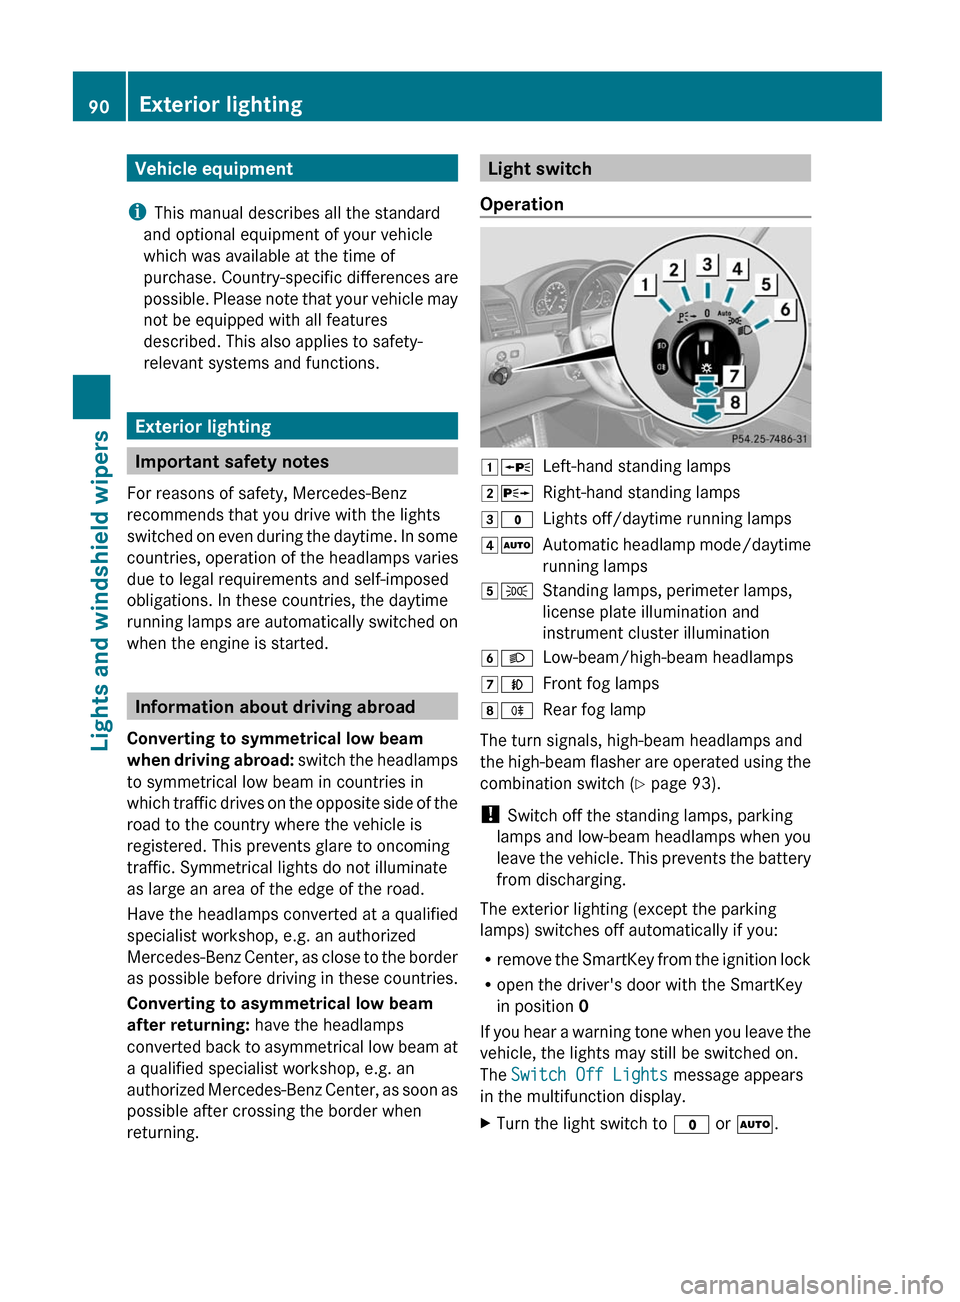
Light switch
Operation1 WLeft-hand standing lamps2XRight-hand standing lamps3$Lights off/daytime running lamps4ÃAutomatic headlamp mode/daytime
running lamps5 TStanding lamps, perimeter lamps,
license plate illumination and
instrument cluster illumination6 LLow-beam/high-beam headlamps7NFront fog lamps8RRear fog lamp
The turn signals, high-beam headlamps and
the high-beam flasher are operated using the
combination switch ( Y page 93).
! Switch off the standing lamps, parking
lamps and low-beam headlamps when you
leave the vehicle. This prevents the battery
from discharging.
The exterior lighting (except the parking
lamps) switches off automatically if you:
R remove the SmartKey from the ignition lock
R open the driver's door with the SmartKey
in position 0
If you hear a warning tone when you leave the
vehicle, the lights may still be switched on.
The Switch Off Lights message appears
in the multifunction display.
XTurn the light switch to $ or à .90Exterior lightingLights and windshield wipers
Page 93 of 288
XIf you see the Turn off lights or
remove key message in the multifunction
display, remove the SmartKey from the
ignition lock.
or
XTurn the light switch to $ or à .
Low-beam headlamps
XTo switch on: turn the SmartKey to
position 2 in the ignition lock or start the
engine.XTurn the light switch to L.
The L indicator lamp in the instrument
cluster lights up.XTo switch off: turn the light switch to
$ .
Daytime running lamps
Daytime running lamps in Canada
The "daytime running lamps" function is
required by law in Canada. It cannot therefore
be deactivated.
XTurn the light switch to $ or à .
When the engine is running: depending on
the ambient light, the low-beam headlamps
or the parking lamps are switched on.
When the low-beam headlamps are
switched on, the L indicator lamp in the
instrument cluster lights up.
If the light switch is set to $ or à , you
cannot activate the high-beam headlamps.
However, the high-beam flasher can always
be used. Turn the light switch to L when
driving at night. You can switch on the high-
beam headlamps in this position.
When the engine is running and the vehicle is
stationary: if you move the selector lever from
a driving position to N or P, the low-beam
headlamps go out after three minutes.
When the engine is running: if you turn the
light switch to T, you turn on the parking
lamps and low-beam headlamps.
When the engine is running: if you turn the
light switch to L, the manual settings take
precedence over the daytime running lamps.
Daytime running lamps in the USA
In the USA, the daytime running lamps are
deactivated upon delivery from the factory.XTo switch on: activate the daytime
running lamps function in the on-board
computer ( Y page 164).XTurn the light switch to $ or à .
When the engine is on: the low-beam
headlamps are switched on. The L
indicator lamp in the instrument cluster
lights up.
If the light switch is set to $ or à , you
cannot switch on the high-beam headlamps
in bright conditions. Turn the light switch to
L . You can switch on the high-beam
headlamps in this position.
If the light switch is set to $, Ã or
L , you can switch on the high-beam
headlamps in less bright conditions.
However, the high-beam flasher can always
be used.
Turn the light switch to L when driving at
night.
When the engine is running: if you turn the
light switch to T or L , the manual
settings take precedence over the daytime
running lamps.
Automatic headlamp mode
GWarning
If the exterior lamp switch is set to Ã, the
headlamps will not automatically come on
under foggy conditions.
To minimize risk to you and to others, activate
headlamps by turning exterior lamp switch to
L when traffic and/or ambient lighting
conditions require you to do so.
In low ambient lighting conditions, only switch
from position à to L with the vehicle
at a standstill in a safe location. Switching
Exterior lighting91Lights and windshield wipersZ
Page 94 of 288
from à to L will briefly switch off the
headlamps. Doing so while driving in low
ambient lighting conditions may result in an
accident.
The automatic headlamp feature is only an aid
to the driver. The driver is responsible for the
operation of the vehicle’s lights at all times.
The parking lamps, low-beam headlamps and
license plate lamp are switched on or off
automatically, depending on the brightness of
the ambient light.XTo switch on: turn the light switch to
à .
SmartKey in position 1 in the ignition lock:
the standing lamps are switched on or off
automatically depending on the brightness
of the ambient light.
When the engine is running: depending on
the ambient light, the parking lamps, the
low-beam headlamps and the license plate
lamp are switched on or off automatically.
When the low-beam headlamps are
switched on, the L indicator lamp in the
instrument cluster lights up.
Canada only: if the light switch is in position
$ or à , you cannot switch on the high-
beam headlamps. However, the high-beam
flasher can always be used. Turn the light
switch to L when driving at night. You can
switch on the high-beam headlamps in this
position.
Front fog lamps and rear fog lamp
Front fog lamps
GWarning
If you suspect that driving conditions will be
foggy, turn the light switch to L before you
start your journey. Your vehicle may
otherwise not be visible and you could
endanger yourself and others.
GWarning
In low ambient lighting or foggy conditions,
only switch from position à to L with
the vehicle at a standstill in a safe location.
Switching from à to L will briefly
switch off the headlamps. Doing so while
driving in low ambient lighting conditions may
result in an accident.
XTo switch on: turn the SmartKey to
position 2 in the ignition lock or start the
engine.XTurn the light switch to L or T . If the
light switch is set to Ã, you cannot
switch on the fog lamps.XPull the light switch out to the first detent.
The green N indicator lamp on the light
switch lights up.XTo switch off: press the light switch in as
far as it will go.
The green N indicator lamp on the light
switch goes out.
Rear fog lamp
XTo switch on: turn the SmartKey to
position 2 in the ignition lock or start the
engine.XTurn the light switch to L or T . When
the light switch is set to Ã, you cannot
switch on the rear fog lamp.XPull the light switch out to the second stop.
The yellow R indicator lamp on the light
switch lights up.XTo switch off: press the light switch in as
far as it will go.
The yellow R indicator lamp on the light
switch goes out.92Exterior lightingLights and windshield wipers