fuses MERCEDES-BENZ GL 2011 Owners Manual
[x] Cancel search | Manufacturer: MERCEDES-BENZ, Model Year: 2011, Model line: GL, Model: MERCEDES-BENZ GL 2011Pages: 376, PDF Size: 17.39 MB
Page 10 of 376
Driving over obstacles ...................176
Off-road driving .............................. 174
Off-road fording ............................. 171
Tire ruts ......................................... 176
Towing a trailer .............................. 209
Wet road surface ........................... 169
Winter ............................................ 173
DSR (Downhill Speed
Regulation) ......................................... 203
Display message ............................ 246
Setting (on-board computer) .......... 226
DVD audio (on-board computer) ...... 219
E
EASY-ENTRY feature ......................... 107
3rd row of seats ............................. 101
Activating/deactivating (on-
board computer) ............................ 225
EASY-EXIT feature ............................. 107
3rd row of seats ............................. 101
Crash-responsive ........................... 107
EASY-PACK cargo compartment
management system ........................ 271
EASY-PACK load-securing kit ........... 271
EBD (Electronic Brake force
Distribution) Display message ............................ 236
Function/notes ................................ 68
Electrical fuses
see Fuses
Electronic Brake-force
Distribution) see EBD
Electronic Stability Program
see ESP ®
Electronic Traction Support
see 4ETS
Emergency call
see mbrace
Emergency release
Fuel filler flap ................................. 161
Vehicle ............................................. 80
Emergency running mode
Automatic transmission .................157
Emergency spare wheel
Storage location ............................ 311
Emergency tensioning device
Function ........................................... 57
Safety guidelines ............................. 37
Emissions purification
Service and warranty information ....19
Engine
Irregular running ............................ 151
Starting problems ..........................151
Starting the engine with the key ....148
Starting with KEYLESS GO .............149
Switching off .................................. 165
Warning lamp (engine
diagnostics) ................................... 259
Engine electronics
Malfunction .................................... 151
Engine emergency stop .................... 331
Engine number .................................. 364
Engine oil Adding ........................................... 296
Checking the oil level ..................... 295
Display message ............................ 242
Lubricant additives ........................369
Notes about oil grades ................... 368
Viscosity ........................................ 369
ESP ®
(Electronic Stability
Program) Activating/deactivating ...................67
Display message ............................ 230
Important safety information ...........66
Trailer stabilization ........................... 68
Warning lamp ................................. 257
Exhaust check ................................... 168
Exhaust tail pipe (cleaning
instructions) ...................................... 303
Exterior lighting see Lights
Exterior mirrors
Adjusting ....................................... 108
Dipping (automatic) .......................109
Folding in/out (automatically) .......109
Folding in/out (electrically) ...........108
Folding in when locking (on-board
computer) ...................................... 226
Out of position ............................... 109
Setting ........................................... 1088IndexBA 164.8 USA, CA Edition B 2011; 1; 2, en-USd2sboikeVersion: 3.0.3.52010-04-21T15:08:44+02:00 - Seite 8
Page 11 of 376
Storing settings (memory
function) ........................................ 110
Storing the parking position ..........109
Exterior view ........................................ 26
F
Filling capacity see Technical data
First-aid kit ......................................... 309
Flat tire Changing a wheel/mounting the
spare wheel ................................... 316
MOExtended run-flat system .........321
Preparing the vehicle .....................311
Raising the vehicle .........................318
TIREFIT kit ...................................... 312
Floormat ............................................. 291
Front fog lamp (display
message) ............................................ 239
Fuel Additives ........................................ 367
Notes ............................................. 366
Premium-grade unleaded gasoline . 366
Refueling ........................................ 159
Specifications ................................ 366
Troubleshooting ............................. 162
Fuel consumption
Current (on-board computer) .........227
Notes ............................................. 167
Fuel filler cap (display message) ..... 243
Fuel filler flap Emergency release ........................161
Opening/closing ............................ 160
Fuel filter (display message) ............ 243
Fuel level Calling up the range (on-board
computer) ...................................... 227
Fuses
Dashboard fuse box .......................330
Engine emergency stop .................331
Fuse allocation chart .....................330
Fuse box in the cargo
compartment ................................. 331
Fuse box in the engine
compartment ................................. 330
Notes ............................................. 329
G
Garage door opener Clearing the memory .....................291
Notes ............................................. 288
Opening/closing the garage door ..291
Programming the remote control ...289
Gear or selector lever (cleaning
guidelines) ......................................... 304
Genuine Mercedes-Benz parts ......... 362
Genuine wood trim and trim strips
(cleaning instructions) ...................... 304
Glove box ........................................... 265
GTW (Gross Trailer Weight)
(definition) ......................................... 355
H
Headlamp cleaning system .............. 117
Adding washer fluid .......................297
Notes ............................................. 370
Headlamp delayed switch-off
see Delayed switch-off, exterior lighting
Headlamp mode (daytime driving)
see Daytime running lamps
Headlamps
Cleaning ......................................... 302
Misting up ...................................... 118
Setting ........................................... 124
Head restraint
Adjusting (electrically) .....................97
Head restraints
Adjusting (manually) ........................97
Adjusting (rear) ................................ 98
Installing/removing (rear) ................99
Luxury .............................................. 97
see NECK-PRO head restraints
Heating
see Climate control
High beam flasher ............................. 117
Hill start assist .................................. 150
Hood Closing ........................................... 295
Opening ......................................... 294
Hydroplaning ..................................... 170
Index9BA 164.8 USA, CA Edition B 2011; 1; 2, en-USd2sboikeVersion: 3.0.3.52010-04-21T15:08:44+02:00 - Seite 9
Page 283 of 376
12 V sockets
Points to observe before use
! If you are using all sockets in the vehicle,
make sure that you do not exceed the
maximum current draw of 55 A. Otherwise,
you will overload the fuses.
The socket can be used for accessories with
a maximum power consumption of 180 W,
e.g. lamps or chargers for mobile phones.
If you use the socket for long periods when
the engine is switched off, the battery may
discharge.
XTurn the key to position 2 in the ignition
lock.
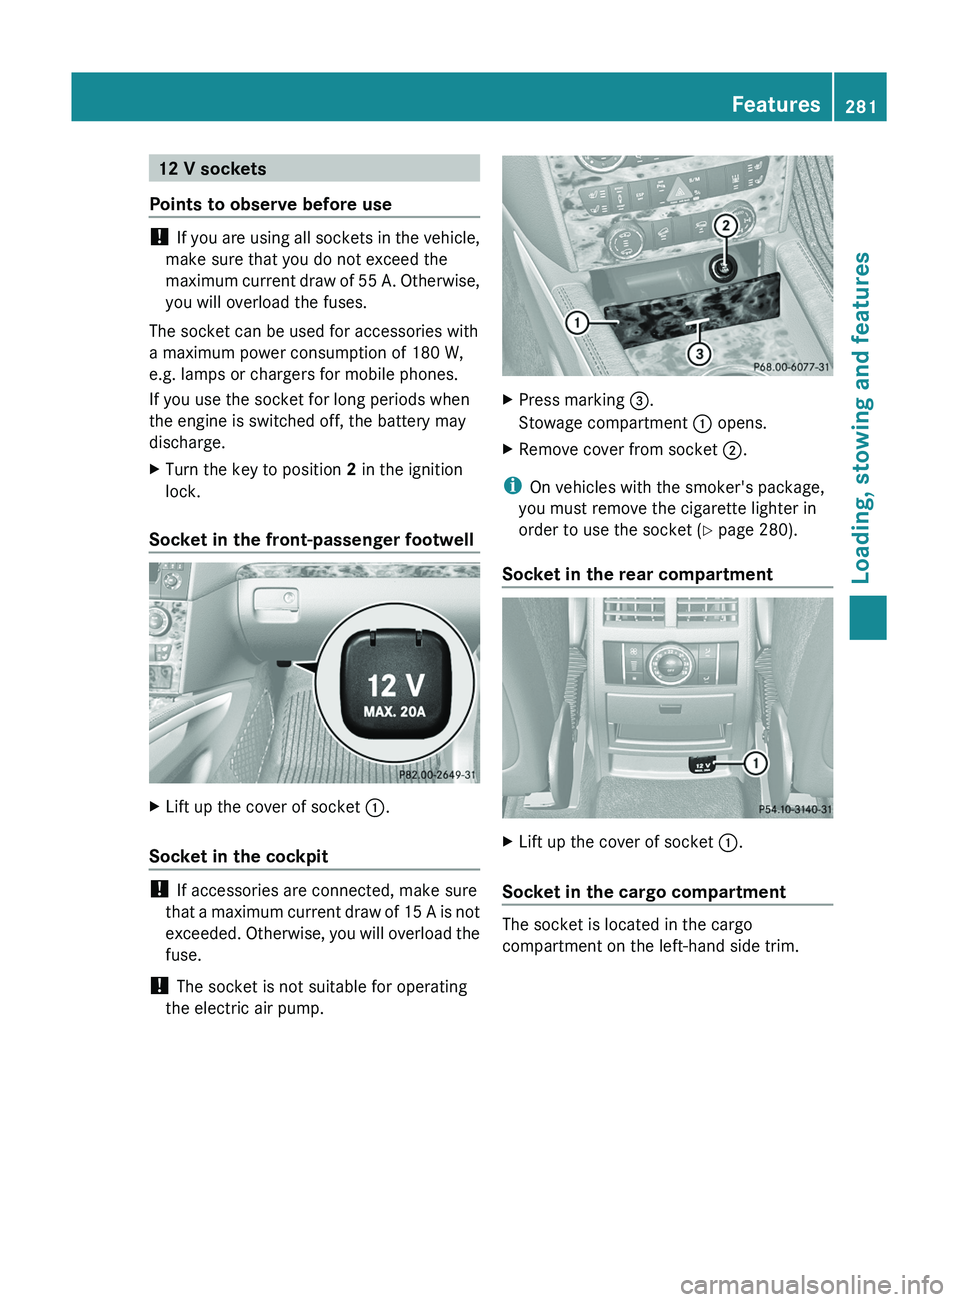
Socket in the front-passenger footwell
XLift up the cover of socket :.
Socket in the cockpit
!
If accessories are connected, make sure
that a maximum current draw of 15 A is not
exceeded. Otherwise, you will overload the
fuse.
! The socket is not suitable for operating
the electric air pump.
XPress marking =.
Stowage compartment : opens.XRemove cover from socket ;.
i
On vehicles with the smoker's package,
you must remove the cigarette lighter in
order to use the socket ( Y page 280).
Socket in the rear compartment
XLift up the cover of socket :.
Socket in the cargo compartment
The socket is located in the cargo
compartment on the left-hand side trim.
Features281Loading, stowing and featuresBA 164.8 USA, CA Edition B 2011; 1; 2, en-USd2sboikeVersion: 3.0.3.52010-04-21T15:08:44+02:00 - Seite 281Z
Page 309 of 376
Vehicle equipment ............................308
After an accident .............................. 309
Where will I find...? ...........................309
Flat tire .............................................. 311
Battery ............................................... 322
Jump-starting .................................... 325
Towing and tow-starting ..................327
Fuses .................................................. 329307Roadside assistanceBA 164.8 USA, CA Edition B 2011; 1; 2, en-USd2sboikeVersion: 3.0.3.52010-04-21T15:08:44+02:00 - Seite 307
Page 331 of 376
Transporting the vehicle
The towing eyes or trailer tow hitch can be
used to pull the vehicle onto a trailer or
transporter if you wish to transport it.XTurn the SmartKey to position 2 in the
ignition lock.XShift the automatic transmission to
position N.
As soon as the vehicle has been loaded:
XPrevent the vehicle from rolling away by
applying the parking brake.XShift the automatic transmission to
position P.XTurn the SmartKey to position 0 in the
ignition lock and remove the SmartKey.XSecure the vehicle.
! Only lash the vehicle down by the wheels
or wheel rims, not by parts of the vehicle
such as axle or steering components.
Otherwise, the vehicle could be damaged.
Notes on 4MATIC vehicles
! Vehicles with 4MATIC must not be towed
with either the front or the rear axle raised,
as doing so will damage the transmission.
If the vehicle's transmission, front, or rear
axle is damaged, have the vehicle transported
on a truck or trailer.
In the event of damage to the electrical
system
If the battery is defective, the automatic
transmission will be locked in position P. To
shift the automatic transmission to position
N , you must provide power to the vehicle's
electrical system in the same way as when
jump-starting ( Y page 325).
Have the vehicle transported on a transporter
or trailer.
Recovering a vehicle that has become
stuck
! Pull away smoothly, slowly, and in a
straight line when pulling out a vehicle that
has become stuck. Excessive tractive
power could damage the vehicles.
If the drive wheels have become stuck in
loose or muddy ground, pull the vehicle out
with extreme caution, particularly if it is
laden.
Never attempt to recover a stuck vehicle with
a trailer attached.
Pull out the vehicle backwards, if possible
using the tracks it made when it became
stuck.
Fuses
Important safety notes
The fuses in your vehicle serve to close down
faulty circuits. If a fuse blows, all the
components on the circuit and their functions
will fail.
GWarning
Only use fuses approved by Mercedes-Benz
with the specified amperage for the system in
question and do not attempt to repair or
bridge a blown fuse. Using other than
approved fuses or using repaired or bridged
fuses may cause an overload leading to a fire,
and/or cause damage to electrical
components and/or systems. Have the cause
determined and remedied by an authorized
Mercedes-Benz Center.
Blown fuses must be replaced with fuses of
the same rating, which you can recognize by
the color and value. The fuse ratings are listed
in the fuse allocation chart. An authorized
Mercedes-Benz Center will be happy to
advise you.
i If a fuse has blown, visit a breakdown
service or an authorized Mercedes-Benz
Center.
Fuses329Roadside assistanceBA 164.8 USA, CA Edition B 2011; 1; 2, en-USd2sboikeVersion: 3.0.3.52010-04-21T15:08:44+02:00 - Seite 329Z
Page 332 of 376
If the newly inserted fuse also blows, have the
cause traced and rectified at a qualified
specialist workshop, e.g. an authorized
Mercedes-Benz Center.
! Only use fuses that have been approved
for Mercedes-Benz vehicles and which
have the correct fuse rating for the system
concerned. Otherwise, components or
systems could be damaged.
Before changing a fuse
XPark the vehicle and apply the parking
brake.XSwitch off all electrical consumers.XRemove the key from the ignition lock.
The fuses are located in various fuse boxes:
R fuse box on the front-passenger side of the
dashboard
R fuse box in the engine compartment on the
right-hand side of the vehicle, when viewed
in the direction of travel
R fuse box in the cargo compartment on the
right-hand side of the vehicle, when viewed
in the direction of travel
The fuse allocation chart is located in the
vehicle tool kit ( Y page 310) in the stowage
compartment under the trunk floor.
Fuse box in the cockpit
! Do not use a pointed object such as a
screwdriver to open the cover in the
dashboard. You could damage the
dashboard or the cover.
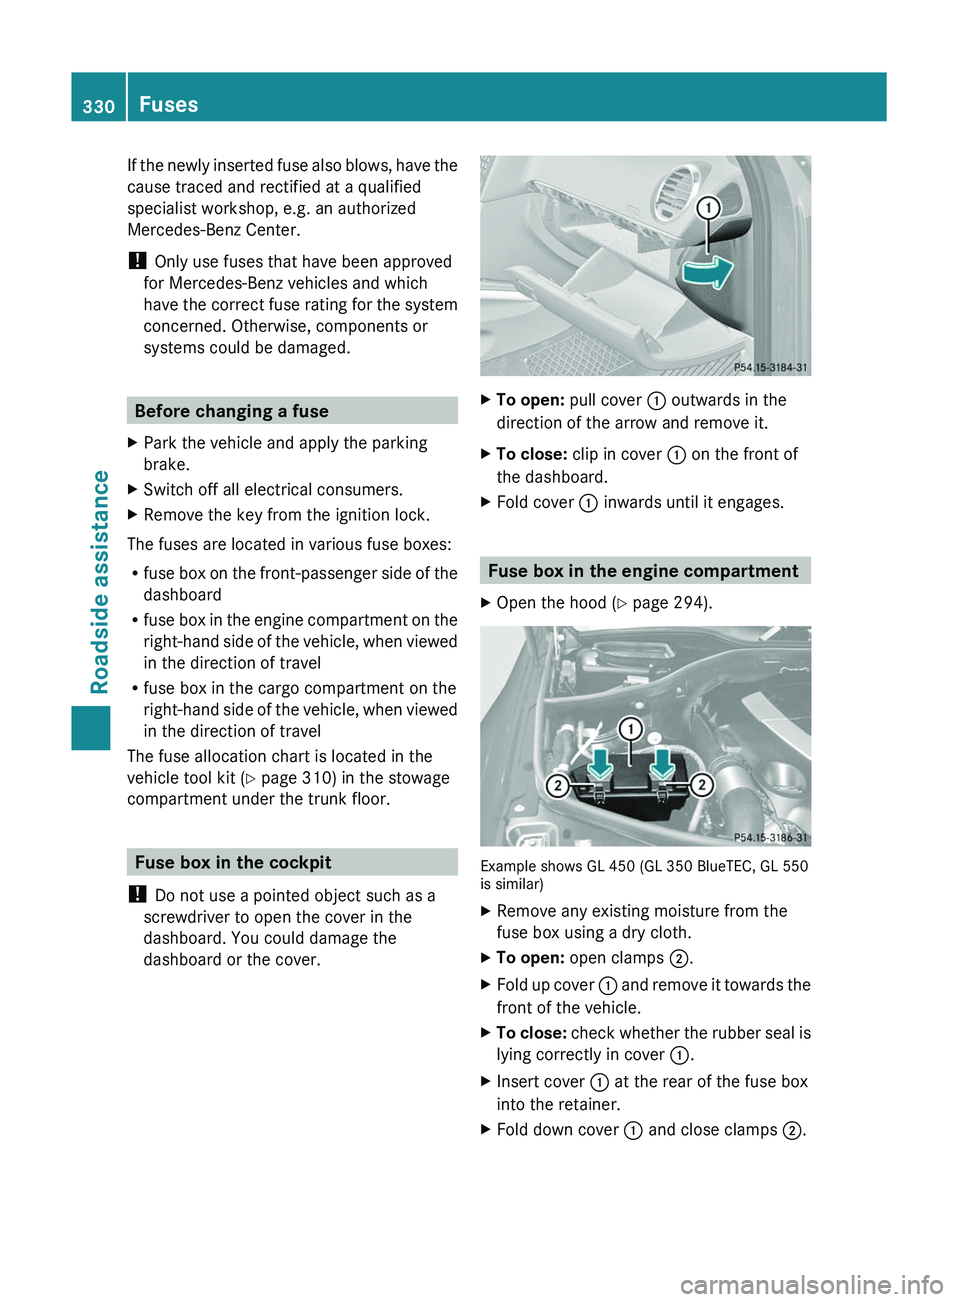
XTo open: pull cover : outwards in the
direction of the arrow and remove it.XTo close: clip in cover : on the front of
the dashboard.XFold cover : inwards until it engages.
Fuse box in the engine compartment
XOpen the hood ( Y page 294).
Example shows GL 450 (GL 350 BlueTEC, GL 550
is similar)
XRemove any existing moisture from the
fuse box using a dry cloth.XTo open: open clamps ;.XFold up cover : and remove it towards the
front of the vehicle.XTo close: check whether the rubber seal is
lying correctly in cover :.XInsert cover : at the rear of the fuse box
into the retainer.XFold down cover : and close clamps ;.330FusesRoadside assistance
BA 164.8 USA, CA Edition B 2011; 1; 2, en-USd2sboikeVersion: 3.0.3.52010-04-21T15:08:44+02:00 - Seite 330
Page 333 of 376
! The cover must be seated properly,
otherwise moisture or dirt could impair the
function of the fuses.XClose the hood ( Y page 295).
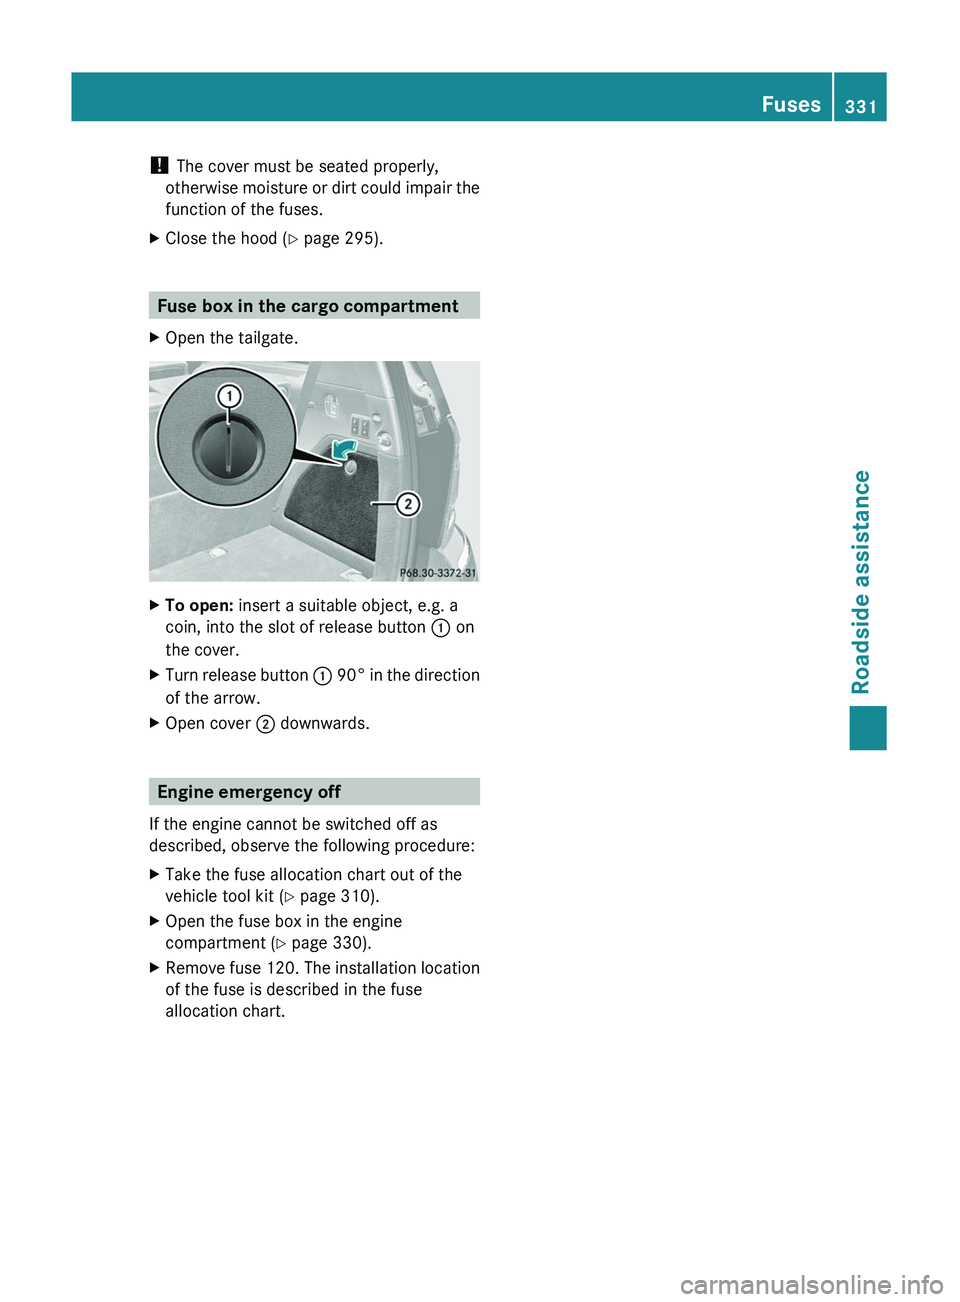
Fuse box in the cargo compartment
XOpen the tailgate.XTo open: insert a suitable object, e.g. a
coin, into the slot of release button : on
the cover.XTurn release button : 90 ° in the direction
of the arrow.XOpen cover ; downwards.
Engine emergency off
If the engine cannot be switched off as
described, observe the following procedure:
XTake the fuse allocation chart out of the
vehicle tool kit ( Y page 310).XOpen the fuse box in the engine
compartment ( Y page 330).XRemove fuse 120. The installation location
of the fuse is described in the fuse
allocation chart.Fuses331Roadside assistanceBA 164.8 USA, CA Edition B 2011; 1; 2, en-USd2sboikeVersion: 3.0.3.52010-04-21T15:08:44+02:00 - Seite 331Z