emergency towing MERCEDES-BENZ GL 2012 Owners Manual
[x] Cancel search | Manufacturer: MERCEDES-BENZ, Model Year: 2012, Model line: GL, Model: MERCEDES-BENZ GL 2012Pages: 384, PDF Size: 15.71 MB
Page 6 of 384
1, 2, 3 ...
115 V socket ...................................... 286
12 V socket see Sockets
4ETS (Electronic Traction System) .... 70
4MATIC (permanent four-wheel
drive) .................................................. 203
A
ABS (Anti-lock Braking System) Display message ............................ 233
Function/notes ................................ 68
Important safety notes ....................68
Warning lamp ................................. 260
Activating/deactivating cooling
with air dehumidification ................. 139
Active light function ......................... 122
Active Light System Display message ............................ 243
Active service system PLUS
see ASSYST PLUS service interval
display
Adaptive Damping System (ADS) ..... 195
Additives (engine oil) ........................ 375
ADS (Adaptive Damping System) ..... 195
Air bags Display message ............................ 239
Front air bag (driver, front
passenger) ....................................... 42
Important safety notes ....................40
Knee bag .......................................... 43
PASSENGER AIRBAG OFF
indicator lamp .................................. 45
PASSENGER AIR BAG OFF
indicator lamp (only Canada) ...........50
PASSENGER AIR BAG OFF
indicator lamp (only USA) ................45
Safety guidelines ............................. 39
Side impact air bag ..........................43
Window curtain air bag ....................44
Air-conditioning system
see Climate control
Air filter (display message) .............. 247
Air pressure see Tire pressure
Air vents
Important safety notes ..................145
Rear ............................................... 146
Setting ........................................... 145
Setting the center air vents ...........145
Setting the side air vents ...............145
Alarm system
see ATA (Anti-Theft Alarm system)
Ambient lighting (on-board
computer) .......................................... 225
Anti-lock Braking System see ABS (Anti-lock Braking System)
Anti-Theft Alarm system
see ATA (Anti-Theft Alarm system)
Anti-theft system
ATA (Anti-Theft Alarm system) .........72
Approach/departure angle .............. 178
Ashtray ............................................... 284
ASSYST PLUS see ASSYST PLUS service interval
display
ATA (Anti-Theft Alarm system)
Activating/deactivating ...................72
Function ........................................... 72
Switching off the alarm ....................72
Audio menu (on-board computer) .... 221
Audio system see separate operating instructions
Authorized Mercedes-Benz Center
see Qualified specialist workshop
AUTO lights
Display message ............................ 244
see Lights
Automatic headlamp mode .............. 119
Automatic transmission Changing gear ............................... 156
DIRECT SELECT lever .....................154
Display message ............................ 254
Driving tips .................................... 157
Emergency running mode ..............159
Kickdown ....................................... 157
Problem (malfunction) ...................159
Pulling away ................................... 151
Shift ranges ................................... 157
Starting the engine ........................150
Steering wheel paddle shifters ......157
Trailer towing ................................. 1574Index
Page 7 of 384
Transmission position display ........155
Transmission positions ..................156
Automatic transmission
emergency mode ............................... 159
B
Back support see Lumbar support
Backup lamp
Changing bulbs (LEDs) ...................127
Display message ............................ 243
BAS (Brake Assist System) ................. 69
Basic settings see Settings
Battery (key)
Checking .......................................... 80
Battery (SmartKey)
Important safety notes ....................80
Replacing ......................................... 80
Battery (vehicle)
Charging ........................................ 328
Display message ............................ 246
Important safety notes ..................326
Jump starting ................................. 329
Belt
see Seat belts
Blind Spot Assist
Activating/deactivating .................228
Display message ............................ 250
Notes/function .............................. 201
Trailer towing ................................. 203
BlueTEC
Adding DEF .................................... 164
BlueTEC (DEF) .................................... 374
Brake Assist System see BAS (Brake Assist System)
Brake fluid
Display message ............................ 236
Notes ............................................. 375
Brake fluid level ................................ 304
Brake lamps Display message ............................ 242
Brakes
ABS .................................................. 68
BAS .................................................. 69
Brake fluid (notes) .........................375
Display message ............................ 233
Driving tips .................................... 169
Important safety notes ..................169
Maintenance .................................. 170
Parking brake ........................ 167, 171
Warning lamp ................................. 259
Breakdown
see Flat tire
see Towing away
Bulbs
see Changing bulbs
C
California Important notice for retail
customers and lessees ....................22
Calling up a malfunction
see Display messages
Capacities
see Technical data
Car
see Vehicle
Care
Carpets .......................................... 312
Car wash ........................................ 306
Display ........................................... 310
Exterior lights ................................ 309
Gear or selector lever ....................311
Matte finish ................................... 308
Notes ............................................. 305
Paint .............................................. 308
Plastic trim .................................... 310
Power washer ................................ 307
Rear view camera .......................... 310
Roof lining ...................................... 312
Seat belt ........................................ 311
Seat cover ..................................... 311
Sensors ......................................... 309
Steering wheel ............................... 311
Tail pipes ....................................... 310
Trim pieces .................................... 311
Washing by hand ........................... 307
Wheels ........................................... 307
Windows ........................................ 309
Wiper blades .................................. 309
Wooden trim .................................. 311
Cargo compartment cover ............... 273
Cargo compartment enlargement ... 270
Index5
Page 10 of 384
Setting the specified minimum
distance ......................................... 186
Warning lamp ................................. 265
Door
Central locking/unlocking (key) ......76
Control panel ................................... 36
Important safety notes ....................83
Doors
Automatic locking (on-board
computer) ...................................... 226
Automatic locking (switch) ............... 84
Display message ............................ 255
Emergency locking ........................... 85
Emergency unlocking .......................85
Opening (from inside) ......................84
Downhill Speed Regulation
see DSR (Downhill Speed Regulation)
Drinking and driving ......................... 168
Drinks holder see Cup holders
Driver's door
see Doors
Driver's seat
see Seats
Driving abroad
Mercedes-Benz Service .................305
Symmetrical low beam ..................118
Driving in mountainous terrain
Approach/departure angle ............178
Driving off-road
see Off-road driving
Driving safety systems
4ETS (Electronic Traction System) ...70
ABS (Anti-lock Braking System) .......68
BAS (Brake Assist System) ..............69
Distance warning system
(vehicles with DISTRONIC) ...............72
Electronic brake force distribution ...71
ESP ®
(Electronic Stability
Program) .......................................... 69
Important safety information ...........68
Overview .......................................... 67
Driving systems
Blind Spot Assist ............................ 201
Cruise control ................................ 179
Display message ............................ 248
DISTRONIC .................................... 182Level control .................................. 189
PARKTRONIC ................................. 196
Rear view camera .......................... 199
Driving tips
Automatic transmission .................157
Brakes ........................................... 169
Break-in period .............................. 148
DISTRONIC .................................... 188
Downhill gradient ........................... 169
Drinking and driving .......................168
Driving abroad ............................... 118
Driving on flooded roads ................171
Driving on sand .............................. 176
Driving on wet roads ......................171
Driving over obstacles ...................177
Exhaust check ............................... 169
Fuel ................................................ 168
General .......................................... 168
Hydroplaning ................................. 171
Icy road surfaces ........................... 174
Limited braking efficiency on
salted roads ................................... 170
Off-road driving .............................. 175
Off-road fording ............................. 171
Pedals ............................................ 168
Snow chains .......................... 173, 341
Symmetrical low beam ..................118
Tire ruts ......................................... 177
Towing a trailer .............................. 210
Traveling uphill ............................... 178
Wet road surface ........................... 170
DSR (Downhill Speed Regulation)
Display message ............................ 250
Function/notes ............................. 204
Setting (on-board computer) .......... 228
DVD audio (on-board computer) ...... 221
E
EASY-ENTRY feature 3rd row of seats ............................. 105
Activating/deactivating .................227
Function/notes ............................. 111
EASY-EXIT feature
3rd row of seats ............................. 105
Crash-responsive ........................... 111
Function/notes ............................. 111
Switching on/off ........................... 227
8Index
Page 21 of 384

Lights display message ..................241
Power supply ................................. 213
Shift range ..................................... 157
Towing away
With both axles on the ground .......332
Tow-starting
Emergency engine starting ............333
Important safety notes ..................331
Trailer
Towing ........................................... 211
Trailer loads and drawbar
noseweights ...................................... 213
Trailer towing Blind Spot Assist ............................ 203
ESP ®
................................................ 71
PARKTRONIC ................................. 198
Permissible trailer loads and
drawbar noseweights .....................213
Towing a trailer .............................. 211
Transmission
see Automatic transmission
Transporting the vehicle .................. 332
Traveling uphill
Brow of hill ..................................... 179
Driving downhill ............................. 179
Maximum gradient-climbing
capability ....................................... 179
Trim pieces (cleaning instructions) . 311
Trip computer (on-board
computer) .......................................... 229
Trip meter see Trip odometer
Trip odometer
Calling up ....................................... 220
Resetting (on-board computer) ......229
Trunk
see Tailgate
Turn signals
Changing bulbs (front) ...................126
Display message ............................ 241
Switching on/off ........................... 121
see Turn signals
TWR (Tongue Weight Rating)
(definition) ......................................... 361
Type identification plate see Vehicle identification plate U
Unlocking Emergency unlocking .......................85
From inside the vehicle (central
unlocking button) ............................. 84
V
Vanity mirror (in sun visor) .............. 283
Vehicle Correct use ...................................... 24
Data acquisition ............................... 25
Display message ............................ 254
Equipment ....................................... 21
Individual settings ..........................223
Limited Warranty ............................. 25
Loading .......................................... 349
Locking (in an emergency) ...............85
Locking (SmartKey) .......................... 77
Lowering ........................................ 325
Maintenance .................................... 22
Parking for a long period ................ 167
Pulling away ................................... 151
Raising ........................................... 322
Reporting problems .........................24
Towing away .................................. 331
Transporting .................................. 332
Unlocking (in an emergency) ...........85
Unlocking (SmartKey) ......................77
Vehicle battery
see Battery (vehicle)
Vehicle dimensions
see Technical data
Vehicle emergency locking ................ 85
Vehicle identification number see VIN
Vehicle identification plate .............. 369
Vehicle level (display message) ....... 248
Vehicle tool kit .................................. 314
Vehicle weights see Technical data
Video (DVD) ........................................ 222
Video DVD (on-board computer) ...... 222
VIN ...................................................... 369
Index19
Page 287 of 384
Do not expose the child restraint system to
direct sunlight. The child restraint system's
metal parts, for example, could become very
hot, and the child could be burned on these
parts.GWARNING
Never touch the heating element or sides of
the lighter; they are extremely hot. Hold the
knob only.
Make sure any children traveling with you do
not injure themselves or start a fire with the
hot cigarette lighter.
! The 12 V socket in the cigarette lighter
can be used for accessories (up to a
maximum of 180 W) as long as they have
the standard socket type for cigarette
lighters. Note that the socket in the
cigarette lighter can be damaged when
connecting accessories, for example by
frequent insertion and removal or by
sockets that do not fit correctly. A damaged
socket can cause the cigarette lighter to
stop working.
! The cigarette lighter in the center console
in the front compartment is not intended
for operating the tire inflation compressor.
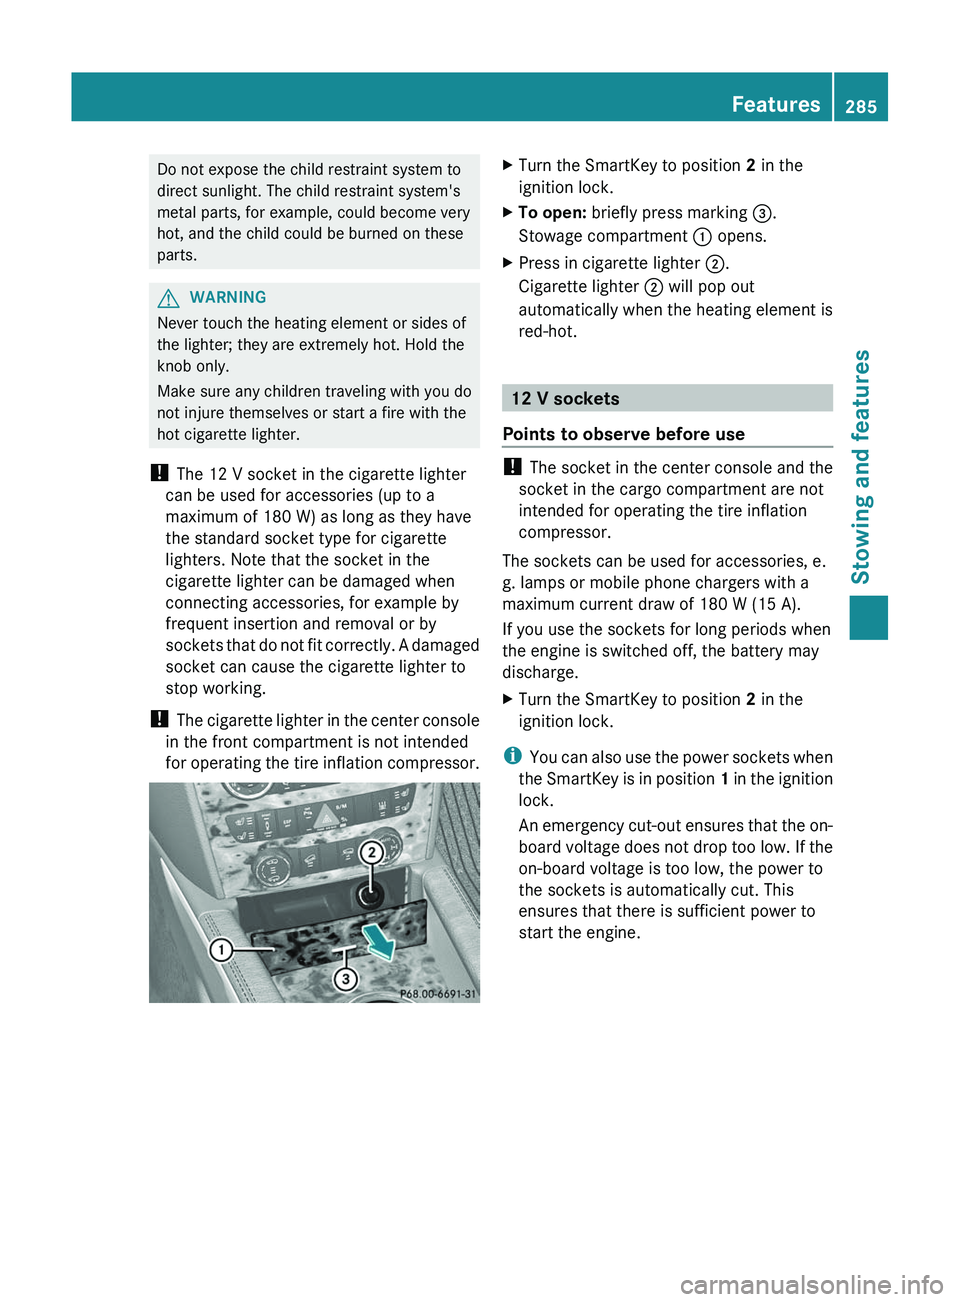
XTurn the SmartKey to position 2 in the
ignition lock.XTo open: briefly press marking =.
Stowage compartment : opens.XPress in cigarette lighter ;.
Cigarette lighter ; will pop out
automatically when the heating element is
red-hot.
12 V sockets
Points to observe before use
! The socket in the center console and the
socket in the cargo compartment are not
intended for operating the tire inflation
compressor.
The sockets can be used for accessories, e.
g. lamps or mobile phone chargers with a
maximum current draw of 180 W (15 A).
If you use the sockets for long periods when
the engine is switched off, the battery may
discharge.
XTurn the SmartKey to position 2 in the
ignition lock.
i You can also use the power sockets when
the SmartKey is in position 1 in the ignition
lock.
An emergency cut-out ensures that the on-
board voltage does not drop too low. If the
on-board voltage is too low, the power to
the sockets is automatically cut. This
ensures that there is sufficient power to
start the engine.
Features285Stowing and featuresZ
Page 290 of 384
Shortly after successfully registering with the
mbrace service, a user ID and password will
be sent to you by post. You can use this
password to log in to the mbrace section
under "Owners Online" at http://
www.mbusa.com 32
.
The mbrace system is available if:
R it has been activated and is operational.
R the corresponding mobile phone network
is available for transmitting data to the
Customer Center.
R a service subscription is available.
R the starter battery is sufficiently charged.
i Determining the location of the vehicle on
a map is only possible if there is sufficient
GPS reception and the vehicle position can
be forwarded to the Customer Center.
The mbrace system
The mbrace system provides different
services, e.g.:
R automatic and manual emergency call
R Roadside Assistance call
R MB Info call
To adjust the volume during an mbrace call,
proceed as follows:
XPress the W or X button on the
multifunction steering wheel.
or
XUse the volume controller of COMAND.
You can find further information and a
description of all available features under
"Owners Online" at http://
www.mbusa.com 33
.
System self-test
After you have switched on the ignition, the
system carries out a self-diagnosis.
GWARNING
A malfunction in the system has been
detected if one of the following conditions
occurs:
R the indicator lamp in the SOS button does
not light up during the system self-
diagnosis.
R the indicator lamp in the º Roadside
Assistance button does not light up during
the system self-diagnosis.
R The indicator lamp in the E information
button does not light up during self-
diagnosis of the system.
R the indicator lamp in the SOS button,
º Roadside Assistance button or E
information button continues to be lit red
after the system self-diagnosis.
R The Tele Aid Inoperative or Tele Aid
Not Activated message appears in the
multifunction display after the system self-
test.
If a malfunction is indicated as outlined above,
the system may not operate as expected. In
the event of an emergency, assistance must
be summoned by other means.
Have the system checked at the nearest
authorized Mercedes-Benz Center or contact
the following service hotlines:
R USA: Response Center under
888-990-9007
R Canada: Customer Service at
1-888-923-8367
Emergency call
Important safety notes
! A license agreement must exist in order
to activate the mbrace service. Ensure that
your system is activated and ready for use,
and press the E MB Info call button to
register. If any of the steps mentioned is
32 USA only.
33 USA only.288FeaturesStowing and features
Page 291 of 384
not carried out, the system may not be
activated.
If you have questions about the activation,
contact one of the following telephone
assistance services:
R USA: Mercedes-Benz Customer
Assistance Center under
1-888-990-9007
R Canada: Customer Service at
1-888-923-8367
An emergency call is dialed automatically if
an air bag or Emergency Tensioning Device is
triggered.
i An mbrace emergency call that has been
initiated automatically cannot be
terminated by the customer.
An emergency call can also be initiated
manually.
As soon as the emergency call has been
initiated, the indicator lamp in the SOS button
flashes. The Connecting Call message
appears on the multifunction display.
The audio output is muted.
Once a connection has been established, the
Call Connected message appears in the
multifunction display.
All important information on the emergency
is transmitted, for example:
R current location of the vehicle (as
determined by the GPS system)
R vehicle identification number
R information on the type of emergency
Shortly after the emergency call has been
initiated, a voice connection is automatically
established between the Mercedes-Benz
Customer Assistance Center and the vehicle
occupants. If the vehicle occupants respond,
the Mercedes-Benz Customer Assistance
Center attempts to get more information on
the emergency.
i If no vehicle occupant answers, an
ambulance is immediately sent to the
vehicle.GWARNING
If the indicator lamp in the SOS button is
flashing continuously and no voice
connection to the Mercedes-Benz Customer
Assistance Center was established, then the
mbrace system could not initiate an
emergency call (e.g. the relevant cellular
phone network is not available).
The message Call Failed appears in the
multifunction display for approximately
10 seconds.
Should this occur, assistance must be
summoned by other means.
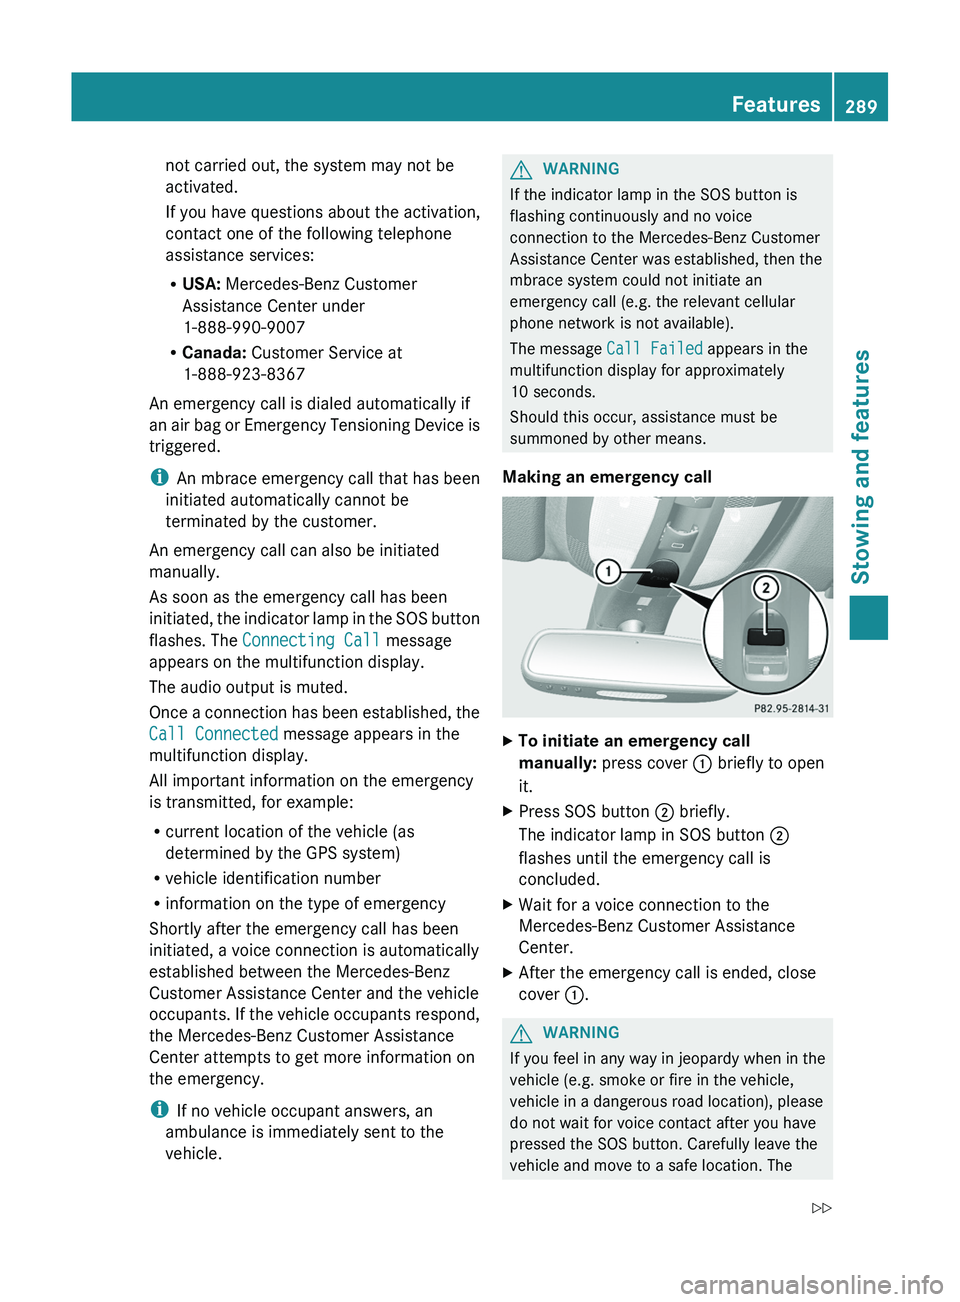
Making an emergency call
XTo initiate an emergency call
manually: press cover : briefly to open
it.XPress SOS button ; briefly.
The indicator lamp in SOS button ;
flashes until the emergency call is
concluded.XWait for a voice connection to the
Mercedes-Benz Customer Assistance
Center.XAfter the emergency call is ended, close
cover :.GWARNING
If you feel in any way in jeopardy when in the
vehicle (e.g. smoke or fire in the vehicle,
vehicle in a dangerous road location), please
do not wait for voice contact after you have
pressed the SOS button. Carefully leave the
vehicle and move to a safe location. The
Features289Stowing and featuresZ
Page 292 of 384
Mercedes-Benz Customer Assistance Center
will automatically contact local emergency
officials with the vehicle's approximate
location if they receive an automatic SOS
signal and cannot make voice contact with the
vehicle occupants.
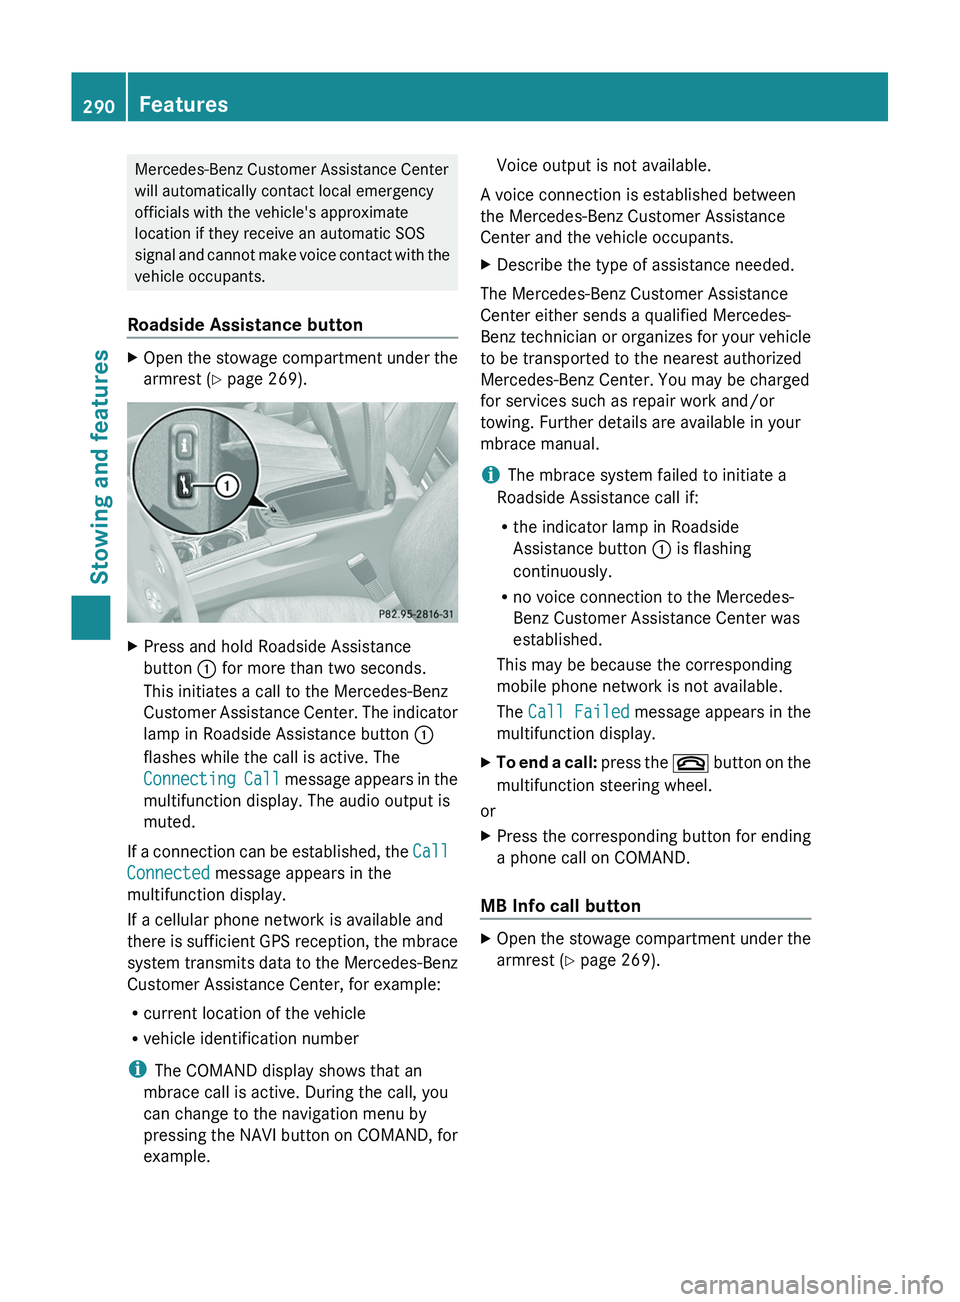
Roadside Assistance buttonXOpen the stowage compartment under the
armrest ( Y page 269).XPress and hold Roadside Assistance
button : for more than two seconds.
This initiates a call to the Mercedes-Benz
Customer Assistance Center. The indicator
lamp in Roadside Assistance button :
flashes while the call is active. The
Connecting Call message appears in the
multifunction display. The audio output is
muted.
If a connection can be established, the Call
Connected message appears in the
multifunction display.
If a cellular phone network is available and
there is sufficient GPS reception, the mbrace
system transmits data to the Mercedes-Benz
Customer Assistance Center, for example:
R current location of the vehicle
R vehicle identification number
i The COMAND display shows that an
mbrace call is active. During the call, you
can change to the navigation menu by
pressing the NAVI button on COMAND, for
example.
Voice output is not available.
A voice connection is established between
the Mercedes-Benz Customer Assistance
Center and the vehicle occupants.XDescribe the type of assistance needed.
The Mercedes-Benz Customer Assistance
Center either sends a qualified Mercedes-
Benz technician or organizes for your vehicle
to be transported to the nearest authorized
Mercedes-Benz Center. You may be charged
for services such as repair work and/or
towing. Further details are available in your
mbrace manual.
i The mbrace system failed to initiate a
Roadside Assistance call if:
R the indicator lamp in Roadside
Assistance button : is flashing
continuously.
R no voice connection to the Mercedes-
Benz Customer Assistance Center was
established.
This may be because the corresponding
mobile phone network is not available.
The Call Failed message appears in the
multifunction display.
XTo end a call: press the ~ button on the
multifunction steering wheel.
or
XPress the corresponding button for ending
a phone call on COMAND.
MB Info call button
XOpen the stowage compartment under the
armrest ( Y page 269).290FeaturesStowing and features
Page 293 of 384
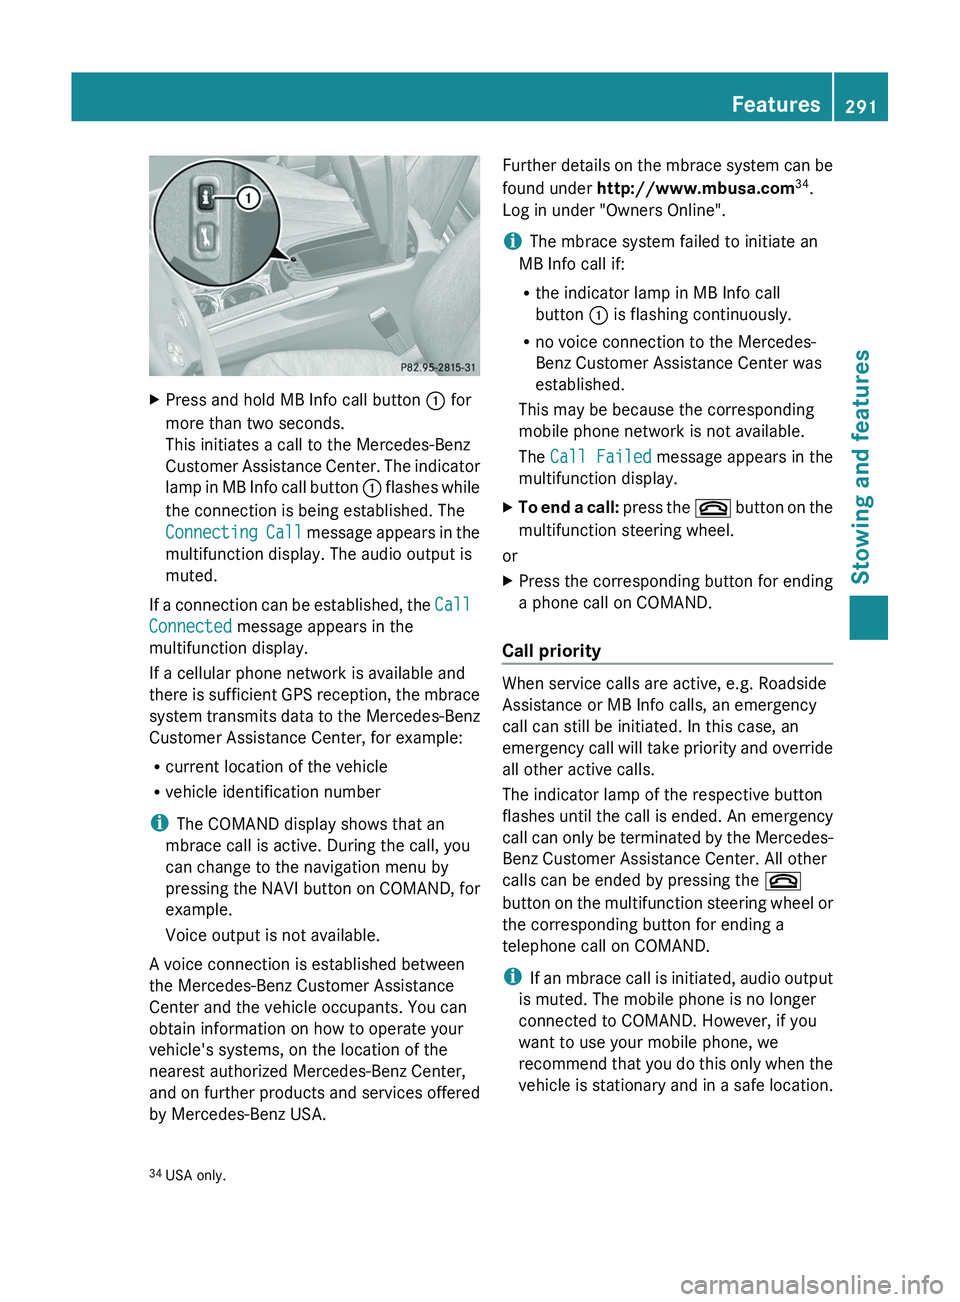
XPress and hold MB Info call button : for
more than two seconds.
This initiates a call to the Mercedes-Benz
Customer Assistance Center. The indicator
lamp in MB Info call button : flashes while
the connection is being established. The
Connecting Call message appears in the
multifunction display. The audio output is
muted.
If a connection can be established, the Call
Connected message appears in the
multifunction display.
If a cellular phone network is available and
there is sufficient GPS reception, the mbrace
system transmits data to the Mercedes-Benz
Customer Assistance Center, for example:
R current location of the vehicle
R vehicle identification number
i The COMAND display shows that an
mbrace call is active. During the call, you
can change to the navigation menu by
pressing the NAVI button on COMAND, for
example.
Voice output is not available.
A voice connection is established between
the Mercedes-Benz Customer Assistance
Center and the vehicle occupants. You can
obtain information on how to operate your
vehicle's systems, on the location of the
nearest authorized Mercedes-Benz Center,
and on further products and services offered
by Mercedes-Benz USA.
Further details on the mbrace system can be
found under http://www.mbusa.com 34
.
Log in under "Owners Online".
i The mbrace system failed to initiate an
MB Info call if:
R the indicator lamp in MB Info call
button : is flashing continuously.
R no voice connection to the Mercedes-
Benz Customer Assistance Center was
established.
This may be because the corresponding
mobile phone network is not available.
The Call Failed message appears in the
multifunction display.XTo end a call: press the ~ button on the
multifunction steering wheel.
or
XPress the corresponding button for ending
a phone call on COMAND.
Call priority
When service calls are active, e.g. Roadside
Assistance or MB Info calls, an emergency
call can still be initiated. In this case, an
emergency call will take priority and override
all other active calls.
The indicator lamp of the respective button
flashes until the call is ended. An emergency
call can only be terminated by the Mercedes-
Benz Customer Assistance Center. All other
calls can be ended by pressing the ~
button on the multifunction steering wheel or
the corresponding button for ending a
telephone call on COMAND.
i If an mbrace call is initiated, audio output
is muted. The mobile phone is no longer
connected to COMAND. However, if you
want to use your mobile phone, we
recommend that you do this only when the
vehicle is stationary and in a safe location.
34 USA only.Features291Stowing and featuresZ
Page 317 of 384
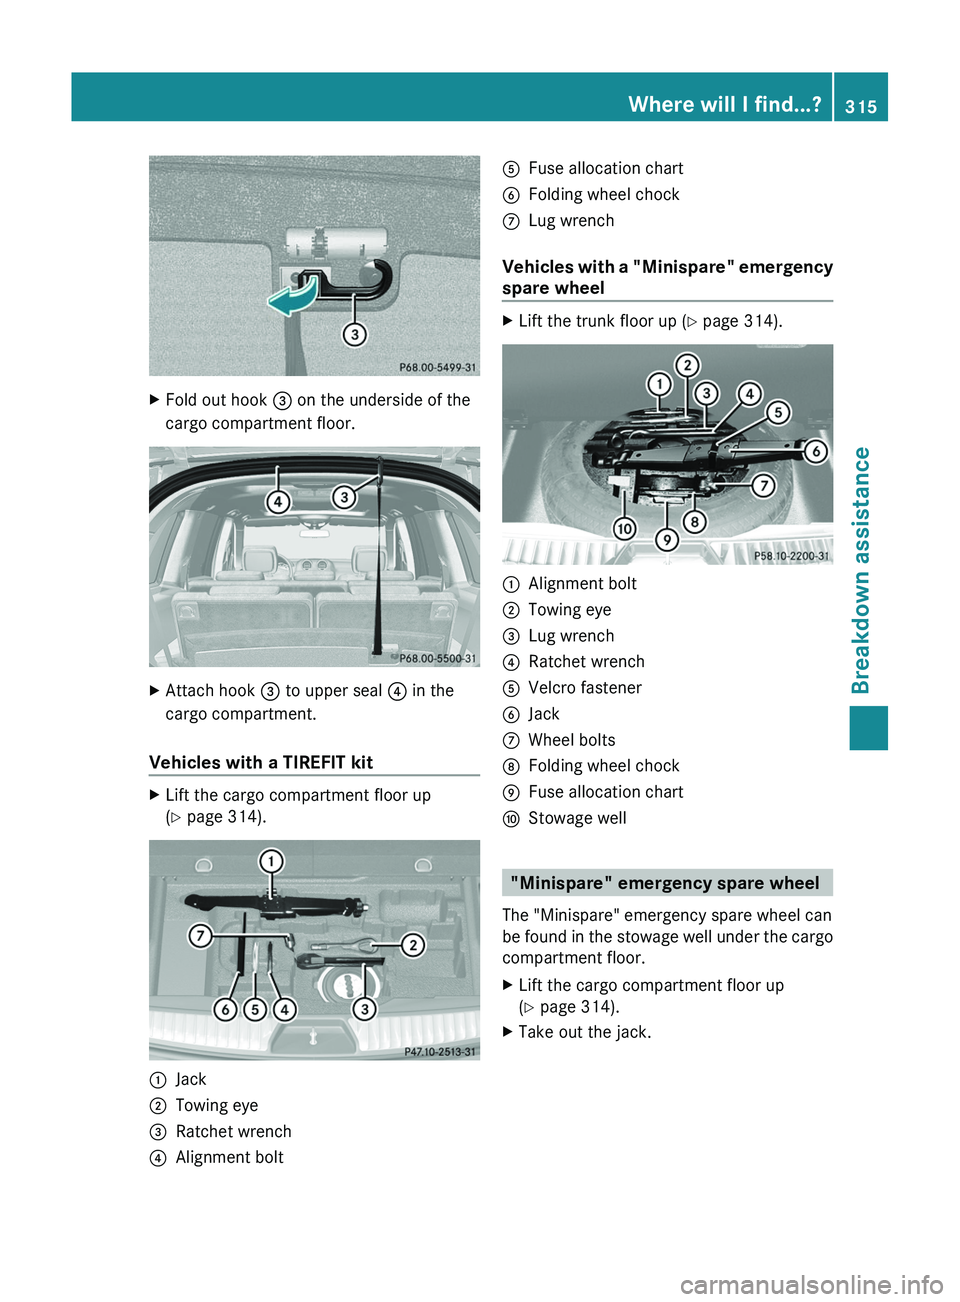
XFold out hook = on the underside of the
cargo compartment floor.XAttach hook = to upper seal ? in the
cargo compartment.
Vehicles with a TIREFIT kit
XLift the cargo compartment floor up
( Y page 314).:Jack;Towing eye=Ratchet wrench?Alignment boltAFuse allocation chartBFolding wheel chockCLug wrench
Vehicles with a "Minispare" emergency
spare wheel
XLift the trunk floor up ( Y page 314).:Alignment bolt;Towing eye=Lug wrench?Ratchet wrenchAVelcro fastenerBJackCWheel boltsDFolding wheel chockEFuse allocation chartFStowage well
"Minispare" emergency spare wheel
The "Minispare" emergency spare wheel can
be found in the stowage well under the cargo
compartment floor.
XLift the cargo compartment floor up
( Y page 314).XTake out the jack.Where will I find...?315Breakdown assistance