wiper blades MERCEDES-BENZ GL 2012 Owners Manual
[x] Cancel search | Manufacturer: MERCEDES-BENZ, Model Year: 2012, Model line: GL, Model: MERCEDES-BENZ GL 2012Pages: 384, PDF Size: 15.71 MB
Page 7 of 384
Transmission position display ........155
Transmission positions ..................156
Automatic transmission
emergency mode ............................... 159
B
Back support see Lumbar support
Backup lamp
Changing bulbs (LEDs) ...................127
Display message ............................ 243
BAS (Brake Assist System) ................. 69
Basic settings see Settings
Battery (key)
Checking .......................................... 80
Battery (SmartKey)
Important safety notes ....................80
Replacing ......................................... 80
Battery (vehicle)
Charging ........................................ 328
Display message ............................ 246
Important safety notes ..................326
Jump starting ................................. 329
Belt
see Seat belts
Blind Spot Assist
Activating/deactivating .................228
Display message ............................ 250
Notes/function .............................. 201
Trailer towing ................................. 203
BlueTEC
Adding DEF .................................... 164
BlueTEC (DEF) .................................... 374
Brake Assist System see BAS (Brake Assist System)
Brake fluid
Display message ............................ 236
Notes ............................................. 375
Brake fluid level ................................ 304
Brake lamps Display message ............................ 242
Brakes
ABS .................................................. 68
BAS .................................................. 69
Brake fluid (notes) .........................375
Display message ............................ 233
Driving tips .................................... 169
Important safety notes ..................169
Maintenance .................................. 170
Parking brake ........................ 167, 171
Warning lamp ................................. 259
Breakdown
see Flat tire
see Towing away
Bulbs
see Changing bulbs
C
California Important notice for retail
customers and lessees ....................22
Calling up a malfunction
see Display messages
Capacities
see Technical data
Car
see Vehicle
Care
Carpets .......................................... 312
Car wash ........................................ 306
Display ........................................... 310
Exterior lights ................................ 309
Gear or selector lever ....................311
Matte finish ................................... 308
Notes ............................................. 305
Paint .............................................. 308
Plastic trim .................................... 310
Power washer ................................ 307
Rear view camera .......................... 310
Roof lining ...................................... 312
Seat belt ........................................ 311
Seat cover ..................................... 311
Sensors ......................................... 309
Steering wheel ............................... 311
Tail pipes ....................................... 310
Trim pieces .................................... 311
Washing by hand ........................... 307
Wheels ........................................... 307
Windows ........................................ 309
Wiper blades .................................. 309
Wooden trim .................................. 311
Cargo compartment cover ............... 273
Cargo compartment enlargement ... 270
Index5
Page 22 of 384
W
Warning and indicator lamps ABS ................................................ 260
Brakes ........................................... 259
Check Engine ................................. 264
Cruise control ................................ 180
Distance warning ........................... 265
ESP ®
.............................................. 261
ESP ®
OFF ....................................... 262
Fuel tank ........................................ 264
LIM (DISTRONIC) ........................... 184
Overview .......................................... 30
PASSENGER AIRBAG OFF
indicator lamp .................................. 45
PASSENGER AIR BAG OFF
indicator lamp (only Canada) ...........50
PASSENGER AIR BAG OFF
indicator lamp (only USA) ................45
Reserve fuel ................................... 264
Seat belt ........................................ 258
SRS ................................................ 263
Tire pressure monitor ....................265
Warranty ............................................ 368
Washer fluid Display message ............................ 256
see Windshield washer system
Weight
see Technical data
Wheel bolt tightening torque ........... 325
Wheel chock ...................................... 321
Wheels Changing/replacing .......................362
Changing a wheel .......................... 321
Checking ........................................ 339
Cleaning ......................................... 307
Important safety notes ..................338
Mounting a wheel .......................... 324
Removing a wheel ..........................323
Storing ........................................... 363
Tightening torque ........................... 325
Wheel size/tire size .......................363
Window curtain air bag ....................... 44
Windows Cleaning ......................................... 309
see Side windows Windshield
Defrosting ...................................... 142
Infrared reflective .......................... 297
Windshield washer system .............. 303
Notes ............................................. 377
Windshield wipers
Problem (malfunction) ...................131
Rear window wiper ........................129
Replacing the wiper blades ............129
Switching on/off ........................... 128
Winter driving
Important safety notes ..................340
Slippery road surfaces ...................174
Snow chains .......................... 173, 341
Winter operation
Radiator cover ............................... 301
Winter tires
M+S tires ............................... 172, 340
Wiper blades
Cleaning ......................................... 309
Important safety notes ..................129
Replacing (rear window) ................130
Replacing (windshield) ...................130
Wooden trim (cleaning
instructions) ...................................... 31120Index
Page 130 of 384
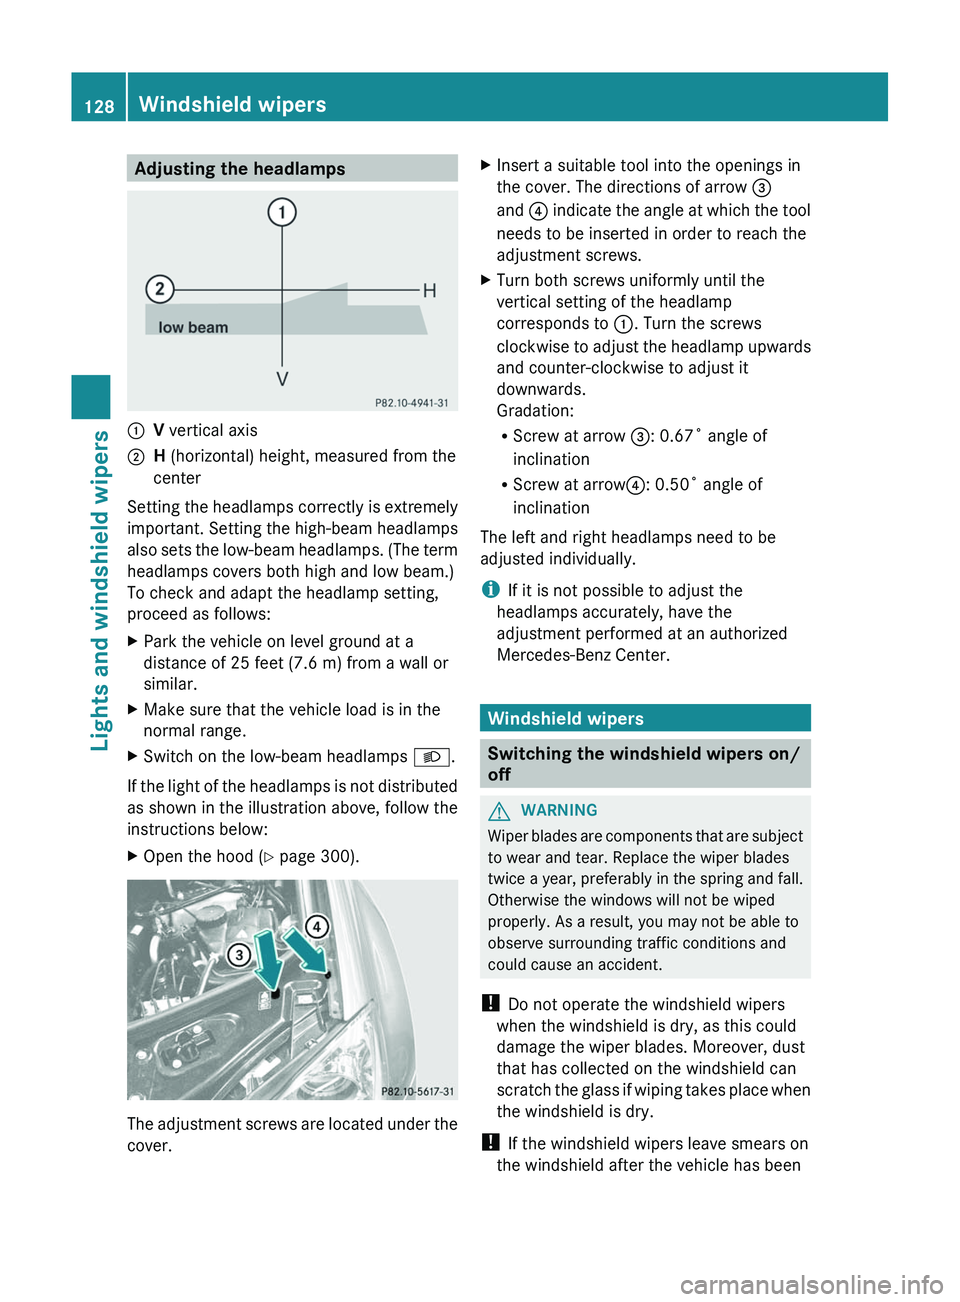
Adjusting the headlamps:V vertical axis;H (horizontal) height, measured from the
center
Setting the headlamps correctly is extremely
important. Setting the high-beam headlamps
also sets the low-beam headlamps. (The term
headlamps covers both high and low beam.)
To check and adapt the headlamp setting,
proceed as follows:
XPark the vehicle on level ground at a
distance of 25 feet (7.6 m) from a wall or
similar.XMake sure that the vehicle load is in the
normal range.XSwitch on the low-beam headlamps L.
If the light of the headlamps is not distributed
as shown in the illustration above, follow the
instructions below:
XOpen the hood ( Y page 300).
The adjustment screws are located under the
cover.
XInsert a suitable tool into the openings in
the cover. The directions of arrow =
and ? indicate the angle at which the tool
needs to be inserted in order to reach the
adjustment screws.XTurn both screws uniformly until the
vertical setting of the headlamp
corresponds to :. Turn the screws
clockwise to adjust the headlamp upwards
and counter-clockwise to adjust it
downwards.
Gradation:
R Screw at arrow =: 0.67˚ angle of
inclination
R Screw at arrow ?: 0.50˚ angle of
inclination
The left and right headlamps need to be
adjusted individually.
i If it is not possible to adjust the
headlamps accurately, have the
adjustment performed at an authorized
Mercedes-Benz Center.
Windshield wipers
Switching the windshield wipers on/
off
GWARNING
Wiper blades are components that are subject
to wear and tear. Replace the wiper blades
twice a year, preferably in the spring and fall.
Otherwise the windows will not be wiped
properly. As a result, you may not be able to
observe surrounding traffic conditions and
could cause an accident.
! Do not operate the windshield wipers
when the windshield is dry, as this could
damage the wiper blades. Moreover, dust
that has collected on the windshield can
scratch the glass if wiping takes place when
the windshield is dry.
! If the windshield wipers leave smears on
the windshield after the vehicle has been
128Windshield wipersLights and windshield wipers
Page 131 of 384
washed in an automatic car wash, wax or
other residues may be the reason for this.
Clean the windshield using washer fluid
after washing the vehicle in an automatic
car wash.
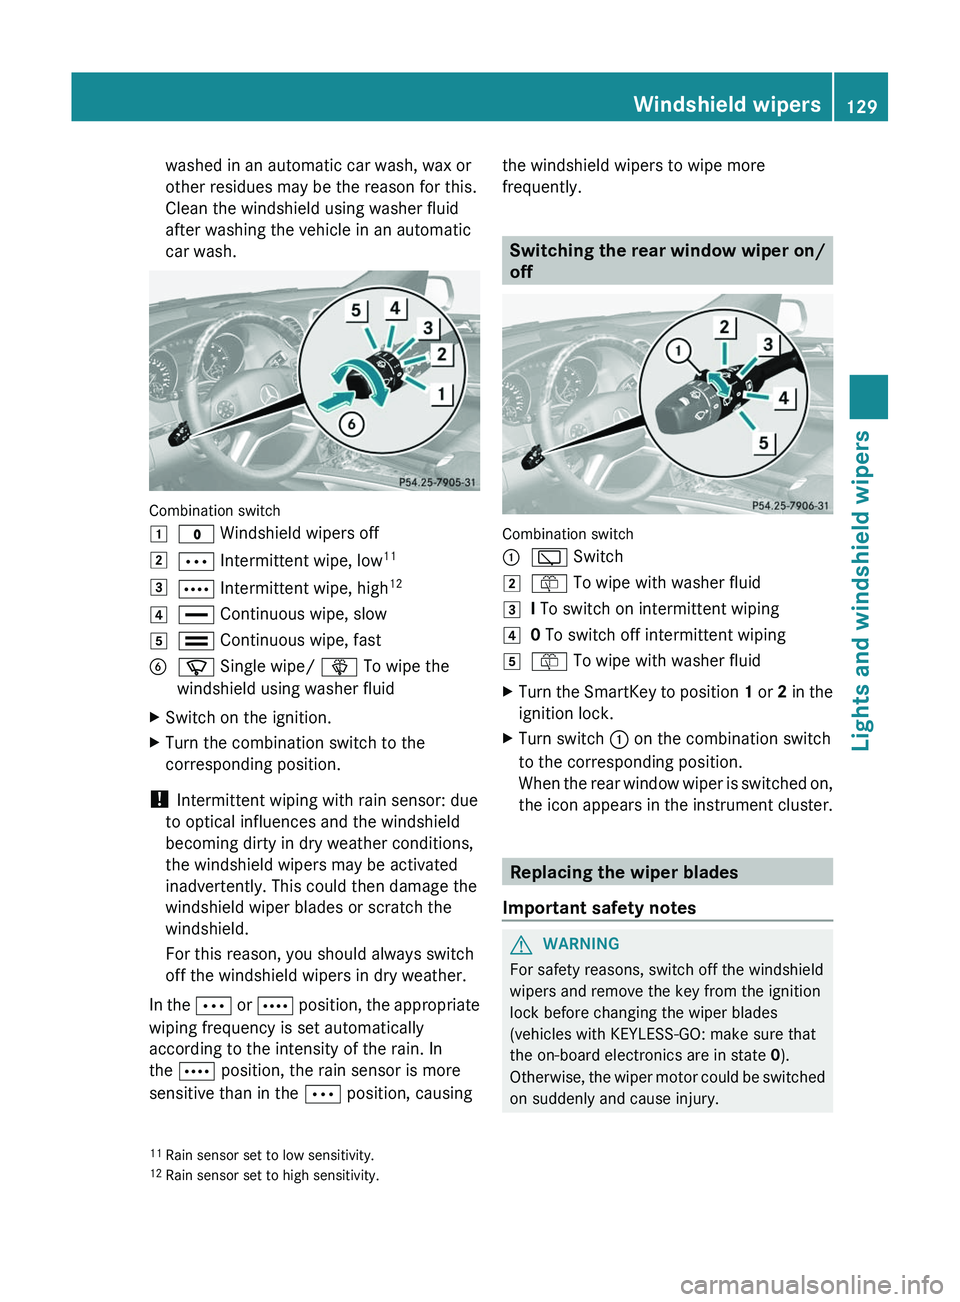
Combination switch
1$ Windshield wipers off2Ä Intermittent wipe, low 113Å
Intermittent wipe, high 124°
Continuous wipe, slow5¯ Continuous wipe, fastBí Single wipe/ î To wipe the
windshield using washer fluidXSwitch on the ignition.XTurn the combination switch to the
corresponding position.
! Intermittent wiping with rain sensor: due
to optical influences and the windshield
becoming dirty in dry weather conditions,
the windshield wipers may be activated
inadvertently. This could then damage the
windshield wiper blades or scratch the
windshield.
For this reason, you should always switch
off the windshield wipers in dry weather.
In the Ä or Å position, the appropriate
wiping frequency is set automatically
according to the intensity of the rain. In
the Å position, the rain sensor is more
sensitive than in the Ä position, causing
the windshield wipers to wipe more
frequently.
Switching the rear window wiper on/
off
Combination switch
:è Switch2ô To wipe with washer fluid3I To switch on intermittent wiping40 To switch off intermittent wiping5ô To wipe with washer fluidXTurn the SmartKey to position 1 or 2 in the
ignition lock.XTurn switch : on the combination switch
to the corresponding position.
When the rear window wiper is switched on,
the icon appears in the instrument cluster.
Replacing the wiper blades
Important safety notes
GWARNING
For safety reasons, switch off the windshield
wipers and remove the key from the ignition
lock before changing the wiper blades
(vehicles with KEYLESS-GO: make sure that
the on-board electronics are in state 0).
Otherwise, the wiper motor could be switched
on suddenly and cause injury.
11 Rain sensor set to low sensitivity.
12 Rain sensor set to high sensitivity.Windshield wipers129Lights and windshield wipersZ
Page 132 of 384
! To avoid damaging the wiper blades,
make sure that you touch only the wiper
arm of the wiper.
! Never open the hood if a windshield wiper
arm has been folded away from the
windshield.
Never fold a windshield wiper arm without
a wiper blade back onto the windshield/
rear window.
Hold the windshield wiper arm firmly when
you change the wiper blade. If you release
the windshield wiper arm without a wiper
blade and it falls onto the windshield, the
windshield may be damaged by the force of
the impact.
Mercedes-Benz recommends that you have
the wiper blades replaced by a qualified
specialist workshop, e.g. at an authorized
Mercedes-Benz Center.
Replacing the windshield wiper blades
Removing the wiper blades
XRemove the SmartKey from the ignition
lock.XFold the wiper arm away from the
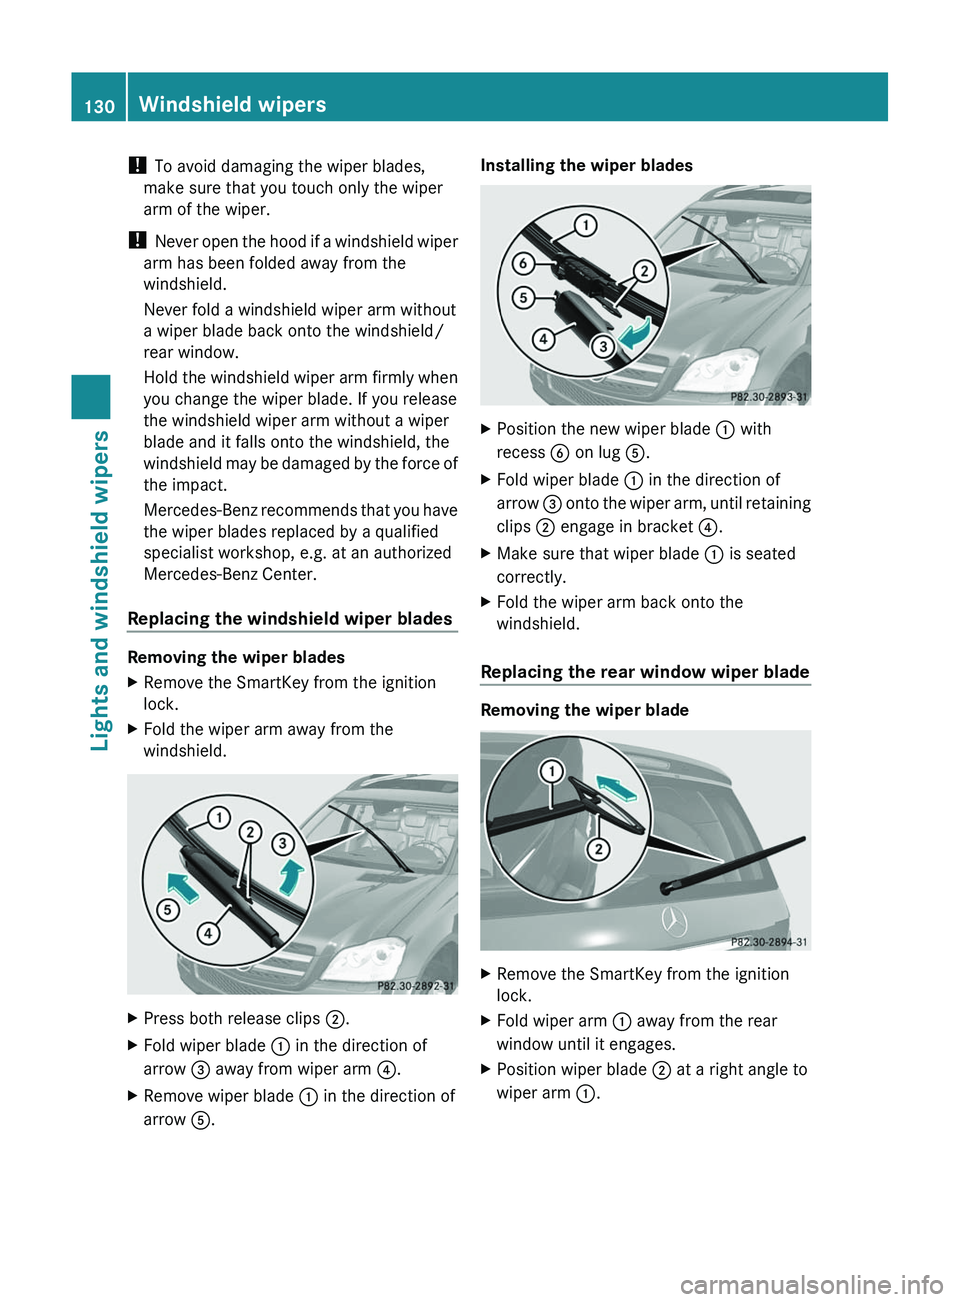
windshield.XPress both release clips ;.XFold wiper blade : in the direction of
arrow = away from wiper arm ?.XRemove wiper blade : in the direction of
arrow A.Installing the wiper bladesXPosition the new wiper blade : with
recess B on lug A.XFold wiper blade : in the direction of
arrow = onto the wiper arm, until retaining
clips ; engage in bracket ?.XMake sure that wiper blade : is seated
correctly.XFold the wiper arm back onto the
windshield.
Replacing the rear window wiper blade
Removing the wiper blade
XRemove the SmartKey from the ignition
lock.XFold wiper arm : away from the rear
window until it engages.XPosition wiper blade ; at a right angle to
wiper arm :.130Windshield wipersLights and windshield wipers
Page 302 of 384
Useful information
i This Operator's Manual describes all
models and all standard and optional
equipment of your vehicle available at the
time of publication of the Operator's
Manual. Country-specific differences are
possible. Please note that your vehicle may
not be equipped with all features
described. This also applies to safety-
related systems and functions.
i Please read the information on qualified
specialist workshops ( Y page 24).
Engine compartment
Hood
Opening the hood
GWARNING
Do not pull the release lever while the vehicle
is in motion. Otherwise, the hood could be
forced open by passing air flow.
This could cause the hood to come loose and
injure you and/or others.
GWARNING
Do not open the hood when the engine is
overheated. You could be seriously injured.
Observe the coolant temperature display to
determine whether the engine may be
overheated. If you see flames or smoke
coming from the engine compartment, move
away from the vehicle. Wait until the engine
has cooled. If necessary, call the fire
department.
GWARNING
There is a risk of injury if the hood is open,
even if the engine is not running.
Some engine components can become very
hot.
To avoid the risk of burns, only touch those
components described in the Operator's
Manual and observe the relevant safety notes.
GWARNING
To help prevent personal injury, stay clear of
moving parts when the hood is open and the
engine is running.
The radiator fan may continue to run for
approximately 30 seconds or may even
restart after the engine has been turned off.
Stay clear of fan blades.
GWARNING
Vehicles with gasoline engine:
The engine is equipped with a transistorized
ignition system. Because of the high voltage
it is dangerous to touch any components
(ignition coils, spark plug sockets, diagnostic
socket) of the ignition system
R with the engine running
R while starting the engine
R when the ignition is switched on and the
engine is turned manually
GWARNING
Vehicles with diesel engine:
The engine is equipped with a high-voltage
electronic control unit for the injection
system. Because of the high voltage it is
dangerous to touch any components of the
injection system (injectors, electrical wires)
R with the engine running
R while starting the engine
R when the ignition is switched on
XMake sure that the windshield wipers are
switched off.GWARNING
The windshield wipers and wiper linkage
could be set in motion.
When the hood is open, you or others could
be injured by the wiper linkage.
Make sure that the windshield wipers are
switched off. Remove the SmartKey or make
sure that no ignition position has been
selected with KEYLESS-GO. All indicator
lamps must be off in the instrument cluster.
300Engine compartmentMaintenance and care
Page 309 of 384
XMake sure the vehicle is stationary and the
ignition is switched off.XTurn the SmartKey to position
2 (Y page 149) in the ignition lock.
Use the SmartKey instead of the Start/
Stop button on vehicles with KEYLESS-GO.XDepress and hold the brake pedal.XShift the automatic transmission to
position N.XRelease the brake pedal.XRelease the parking brake.XSwitch off the ignition and leave the
SmartKey in the ignition lock.
! Make sure that:
R the side windows and the sliding sunroof
are fully closed.
R the ventilation/heating is switched off
(the OFF button has been pressed).
R the windshield wiper switch is in position
0 .
Otherwise, the vehicle might be damaged.
After using an automatic car wash, wipe off
wax from the windshield and the wiper
blades. This will prevent smears and reduce
wiping noises caused by residue on the
windshield.
Washing by hand
Carefully remove all deposits of road salt as
soon as possible when driving in winter.
Also, clean the insides of the wheels when
washing the underbody of the vehicle.
XDo not use hot water and do not wash the
vehicle in direct sunlight.XUse a soft car sponge for cleaning.XUse a gentle cleaning agent, e.g. a
Mercedes-Benz approved car shampoo.XWash down the vehicle with a gentle water
jet.XDo not point the water jet directly at the air
inlets.XUse plenty of water and rinse the sponge
frequently.XRinse the vehicle with clean water and dry
it thoroughly with a chamois.XDo not allow the cleaning agent to dry on
the paintwork.
Power washers
GWARNING
Do not use power washers with circular-jet
nozzles (dirt grinders) to clean your vehicle, in
particular the tires. You could otherwise
damage the tires and cause an accident.
! Always maintain a distance of at least
11.8 in (30 cm) between the vehicle and the
power washer nozzle. Information about
the correct distance is available from the
equipment manufacturer.
Move the power washer nozzle around
when cleaning your vehicle.
Do not aim directly at any of the following:
R tires
R door gaps, roof gaps, joints etc.
R electrical components
R battery
R connectors
R lights
R seals
R trim elements
R ventilation slots
Damaged seals or electrical components
can lead to leaks or failures.
Cleaning the wheels
! Do not use acidic wheel cleaning products
to remove brake dust. This could damage
wheel bolts and brake components.
! Do not park the vehicle for an extended
period straight after cleaning it, particularly
after having cleaned the wheels with wheel
cleaner. Wheel cleaners could cause
increased corrosion of the brake discs and
brake pads/linings. For this reason, you
should drive for a few minutes after
Care307Maintenance and careZ
Page 311 of 384
Cleaning the windowsGWARNING
Before cleaning the windshield or wiper
blades, switch off the windshield wipers and
remove the SmartKey from the ignition lock.
On vehicles with KEYLESS-GO, press the
Start/Stop button repeatedly until all
indicator lamps in the instrument cluster have
gone out. The windshield wipers could
otherwise move and injure you.
XClean the inside and outside of the
windows with a damp cloth and a cleaning
agent that is recommended and approved
by Mercedes-Benz.
! Do not use dry cloths, abrasive products,
solvents or cleaning agents containing
solvents to clean the inside of the windows.
Do not touch the insides of the windows
with hard objects, e.g. an ice scraper or
ring. There is otherwise a risk of damaging
the windows.
! Clean the water drainage channels of the
windshield and the rear window at regular
intervals. Deposits such as leaves, petals
and pollen may under certain
circumstances prevent water from draining
away. This can lead to corrosion damage
and damage to electronic components.
Cleaning the wiper blades
GWARNING
Before cleaning the windshield or wiper
blades, switch off the windshield wipers and
remove the SmartKey from the ignition lock.
On vehicles with KEYLESS-GO, press the
Start/Stop button repeatedly until all
indicator lamps in the instrument cluster have
gone out. The windshield wipers could
otherwise move and injure you.
! Do not pull the wiper blade. Otherwise,
the wiper blade could be damaged.
! Do not clean wiper blades too often and
do not rub them too hard. Otherwise, the
graphite coating could be damaged. This
could cause wiper noise.XFold the wiper arms away from the
windshield.XCarefully clean the wiper blades with a
damp cloth.XFold the windshield wipers back again
before switching on the ignition.
! Hold the wiper arm securely when folding
back. The windshield could be damaged if
the wiper arm smacks against it suddenly.
Cleaning the exterior lighting
XClean the plastic lenses of the exterior
lights with a wet sponge and a mild cleaning
agent, e.g. Mercedes-Benz car shampoo or
cleaning cloths.
! Only use cleaning agents or cleaning
cloths which are suitable for plastic light
lenses. Unsuitable cleaning agents or
cleaning cloths could scratch or damage
the plastic light lenses.
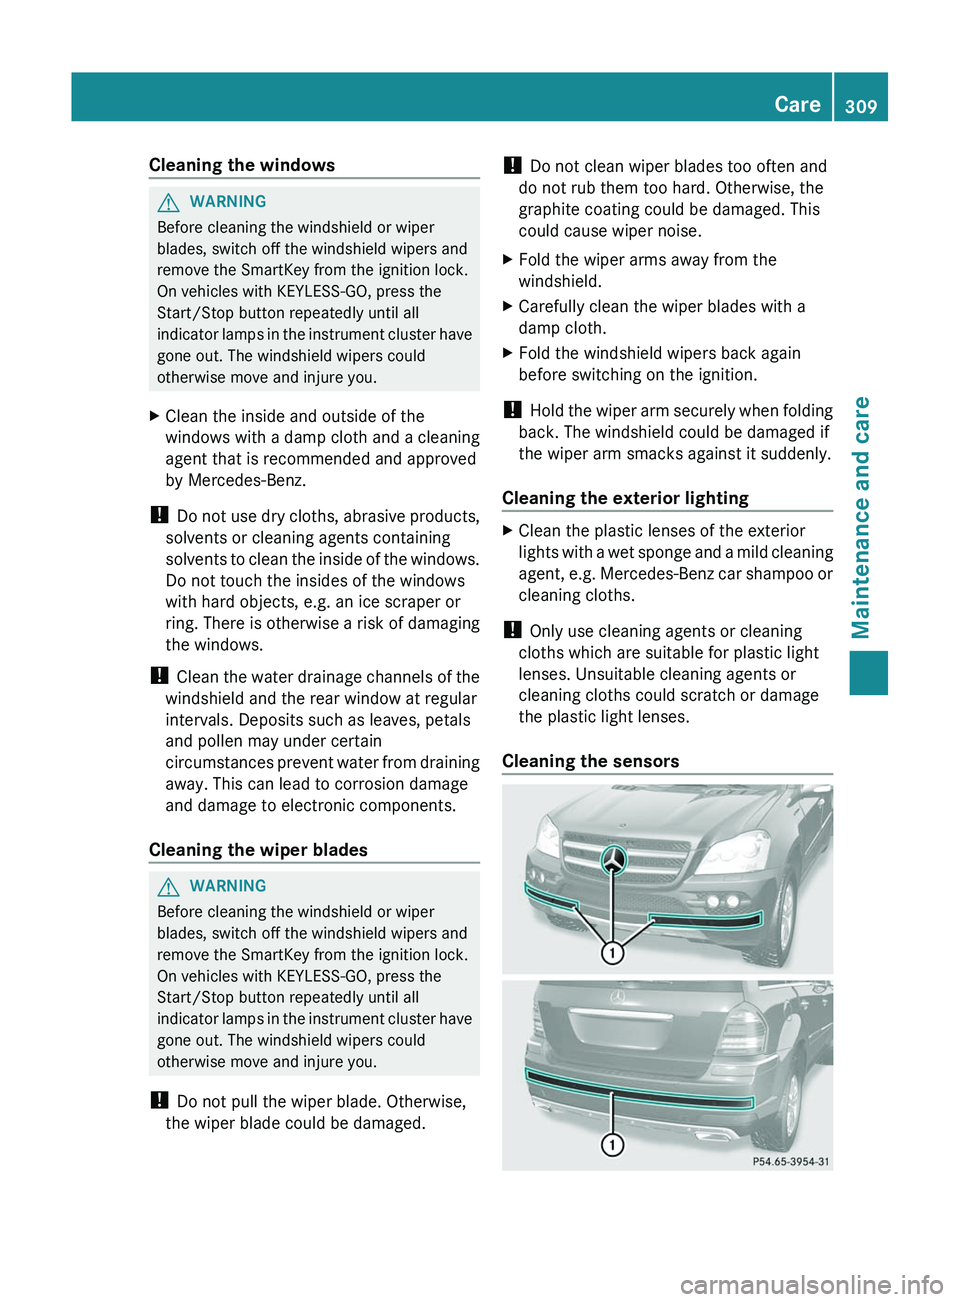
Cleaning the sensors
Care309Maintenance and careZ