tow MERCEDES-BENZ GL 2013 User Guide
[x] Cancel search | Manufacturer: MERCEDES-BENZ, Model Year: 2013, Model line: GL, Model: MERCEDES-BENZ GL 2013Pages: 454, PDF Size: 6.31 MB
Page 23 of 454
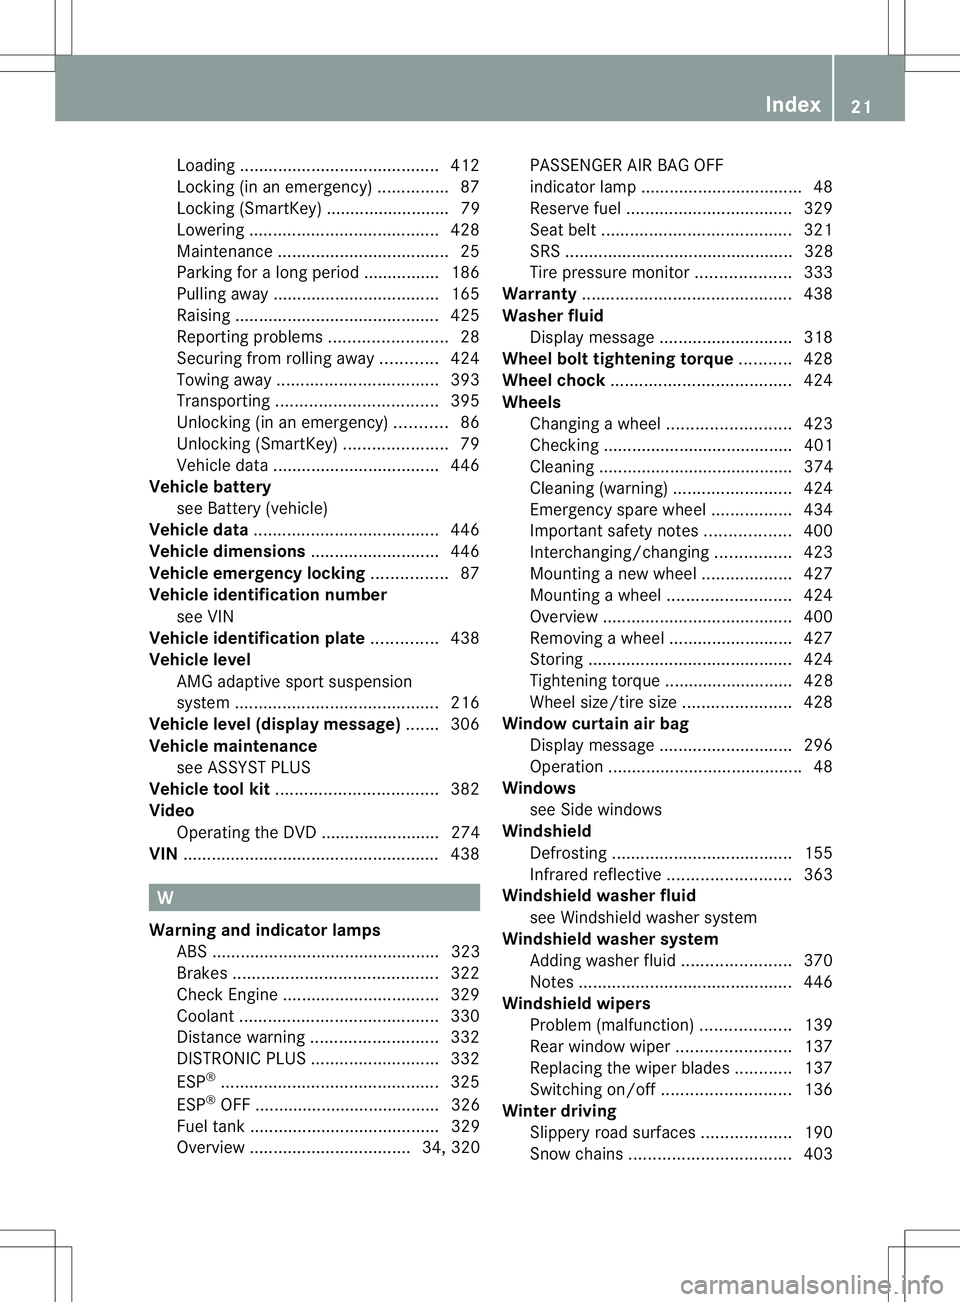
Loading
.......................................... 412
Locking (in an emergency) ...............87
Locking (SmartKey) .......................... 79
Lowering ........................................ 428
Maintenance .................................... 25
Parking for a long period ................ 186
Pulling away ................................... 165
Raising ........................................... 425
Reporting problems .........................28
Securing from rolling away ............424
Towing away .................................. 393
Transporting .................................. 395
Unlocking (in an emergency) ...........86
Unlocking (SmartKey) ......................79
Vehicle data ................................... 446
Vehicle battery
see Battery (vehicle)
Vehicle data ....................................... 446
Vehicle dimensions ...........................446
Vehicle emergency locking ................87
Vehicle identification number see VIN
Vehicle identification plate ..............438
Vehicle level AMG adaptive sport suspension
system ........................................... 216
Vehicle level (display message) .......306
Vehicle maintenance see ASSYST PLUS
Vehicle tool kit .................................. 382
Video Operating the DVD ......................... 274
VIN ...................................................... 438W
Warning and indicator lamps ABS ................................................ 323
Brakes ........................................... 322
Check Engine ................................. 329
Coolant .......................................... 330
Distance warning ........................... 332
DISTRONI CPLUS ........................... 332
ESP ®
.............................................. 325
ESP ®
OFF ....................................... 326
Fuel tank ........................................ 329
Overview .................................. 34, 320 PASSENGER AIR BAG OFF
indicator lamp
.................................. 48
Reserve fuel ................................... 329
Seat bel t........................................ 321
SRS ................................................ 328
Tire pressure monitor ....................333
Warranty ............................................ 438
Washer fluid Display message ............................ 318
Wheel bol ttightening torque ...........428
Wheel chock ...................................... 424
Wheels Changing awheel .......................... 423
Checking ........................................ 401
Cleaning ......................................... 374
Cleaning (warning) .........................424
Emergency spare wheel .................434
Important safety notes ..................400
Interchanging/changing ................423
Mounting anew wheel ................... 427
Mounting awheel .......................... 424
Overview ........................................ 400
Removing awheel .......................... 427
Storing ........................................... 424
Tightening torque ........................... 428
Whee lsize/tir esize ....................... 428
Window curtain air bag
Display message ............................ 296
Operation ........................................ .48
Windows
see Side windows
Windshield
Defrosting ...................................... 155
Infrared reflective .......................... 363
Windshiel dwasher fluid
see Windshield washer system
Windshiel dwasher system
Adding washer fluid .......................370
Notes ............................................. 446
Windshiel dwipers
Problem (malfunction) ...................139
Rea rwindow wiper ........................ 137
Replacing the wiper blades ............137
Switching on/off ........................... 136
Winte rdriving
Slippery roa dsurface s................... 190
Snow chains .................................. 403 Index
21
Page 29 of 454
Contac
tanauthorized Mercedes-Ben zCenter
for repairs or modifications to electronic
components.
Other improper work or modifications on the
vehicle could also have a negative impact on
the operating safety of the vehicle.
Some safety systems only function when the
engine is running. You should therefore never
turn off the engine while driving. G
WARNING
Heavy blows against the vehicle underbody or
tires/wheels may cause serious damage and
impair the operating safety of your vehicle.
Such blows can be caused, for example, by
running over an obstacle, road debris or a
pothole.
If you feel a sudden significant vibration or
ride disturbance, or you suspect that damage
to your vehicle has occurred:
R turn on your hazard warning flashers.
R slow down carefully.
R drive with caution to an area which is a safe
distance from the road.
Inspec tthe vehicle underbody and tires/
wheels for possible damage. If the vehicle
appears unsafe, have it towed to the nearest
authorized Mercedes-Ben zCenter or other
qualified maintenance or repair facility for
further inspection or repairs. Declarations of conformity
Vehicle components which receive
and/or transmit radio waves USA:
"The wireless devices of this vehicle
comply with Part 15 of the FCC Rules.
Operation is subject to the following two
conditions :1) These devices may not cause
harmful interference, and 2) These devices
must accept any interference received,
including interference that may cause
undesired operation. Changes or
modifications not expressly approved by the
party responsible for compliance could void the user’s authority to operate the
equipment."
Canada:
"The wireless devices of this vehicle
comply with Industry Canada license-exempt
RSS standard(s). Operation is subjec tto the
following two conditions: (1) These devices
may not cause interference, and (2) These
devices must accept any interference,
including interference that may cause
undesired operation of the device." Diagnostics connection
The diagnostics connection is only intended
for the connection of diagnostic equipment at
a qualified specialist workshop. G
WARNING
If you connect equipment to the diagnostics
connection in the vehicle, it may affect the
operation of the vehicle systems. As a result,
the operating safety of the vehicle could be
affected. There is a risk of an accident.
Do not connect any equipment to a
diagnostics connection in the vehicle. G
WARNING
Objects in the driver's footwell can restric tthe
pedal travel or obstruct adepressed pedal.
The operating and road safety of the vehicle
is jeopardized. There is a risk of an accident.
Make sure that all objects in the vehicle are
stowed correctly, and that they cannot enter
the driver's footwell. Install the floormats
securely and as specified in order to ensure
sufficien tclearance for the pedals. Do not use
loose floormats.
! If the engine is switched off and
equipmen tonthe diagnostics connection
is used, the starter battery may discharge.
Connecting equipment to the diagnostics
connection can lead to emissions monitoring
information being reset, for example. This
may lead to the vehicle failing to meet the
requirements of the next emissions test
during the main inspection. Introduction
27 Z
Page 39 of 454
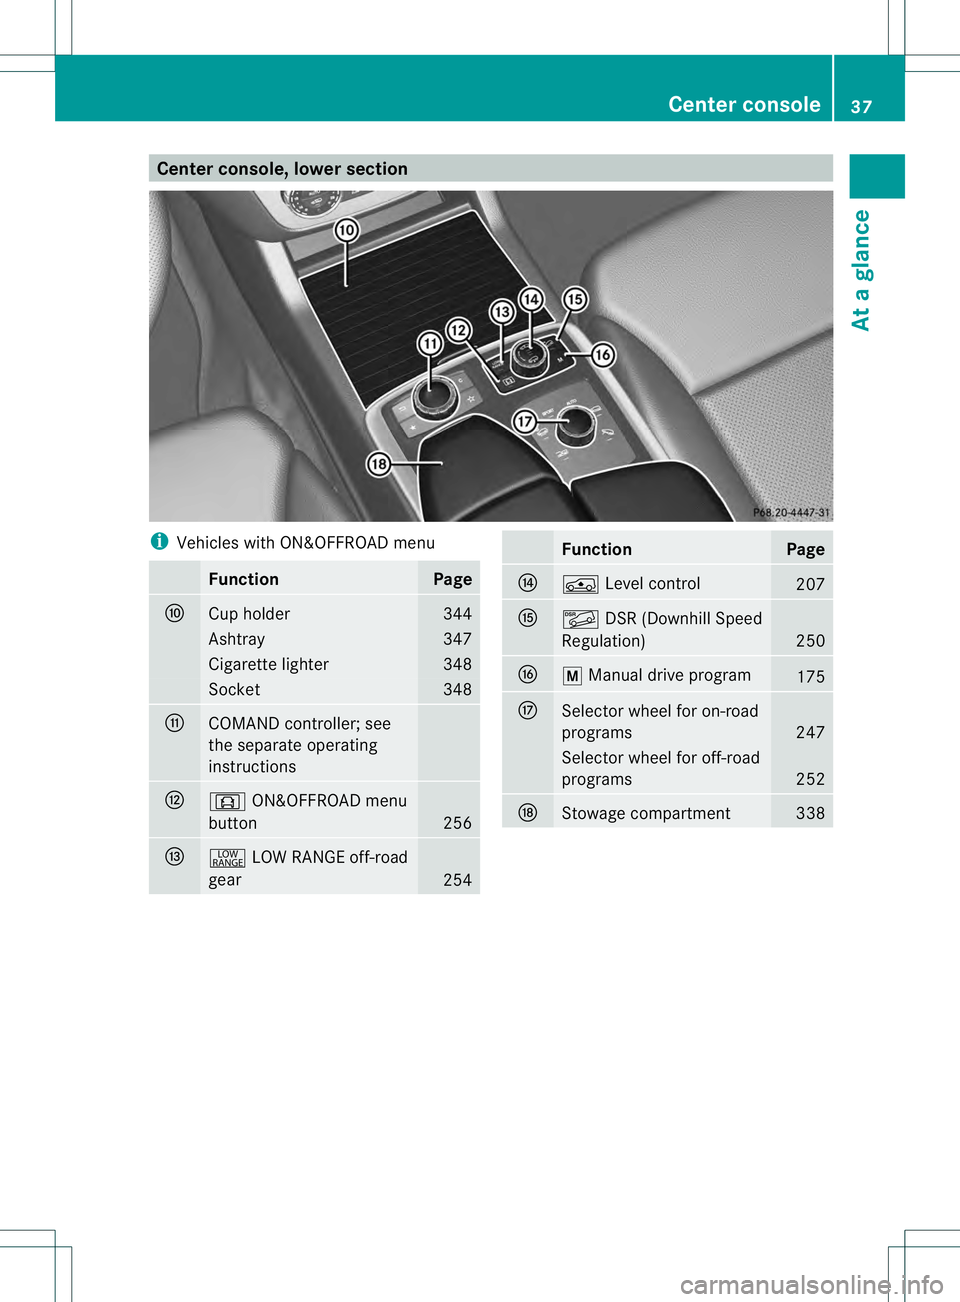
Center console, lower section
i
Vehicles with ON&OFFROAD menu Function Page
0016
Cup holder 344
Ashtray 347
Cigarette lighter 348
Socket 348
0017
COMAND controller; see
the separate operating
instructions
0018
0009
ON&OFFROAD menu
button 256
0019
0011
LOW RANGE off-road
gear 254 Function Page
001A
0002
Level control 207
001B
0001
DSR (Downhill Speed
Regulation) 250
001C
0012
Manual drive program 175
001D
Selector wheel for on-road
programs
247
Selector wheel for off-road
programs
252
0023
Stowage compartment 338Center console
37At a glance
Page 40 of 454
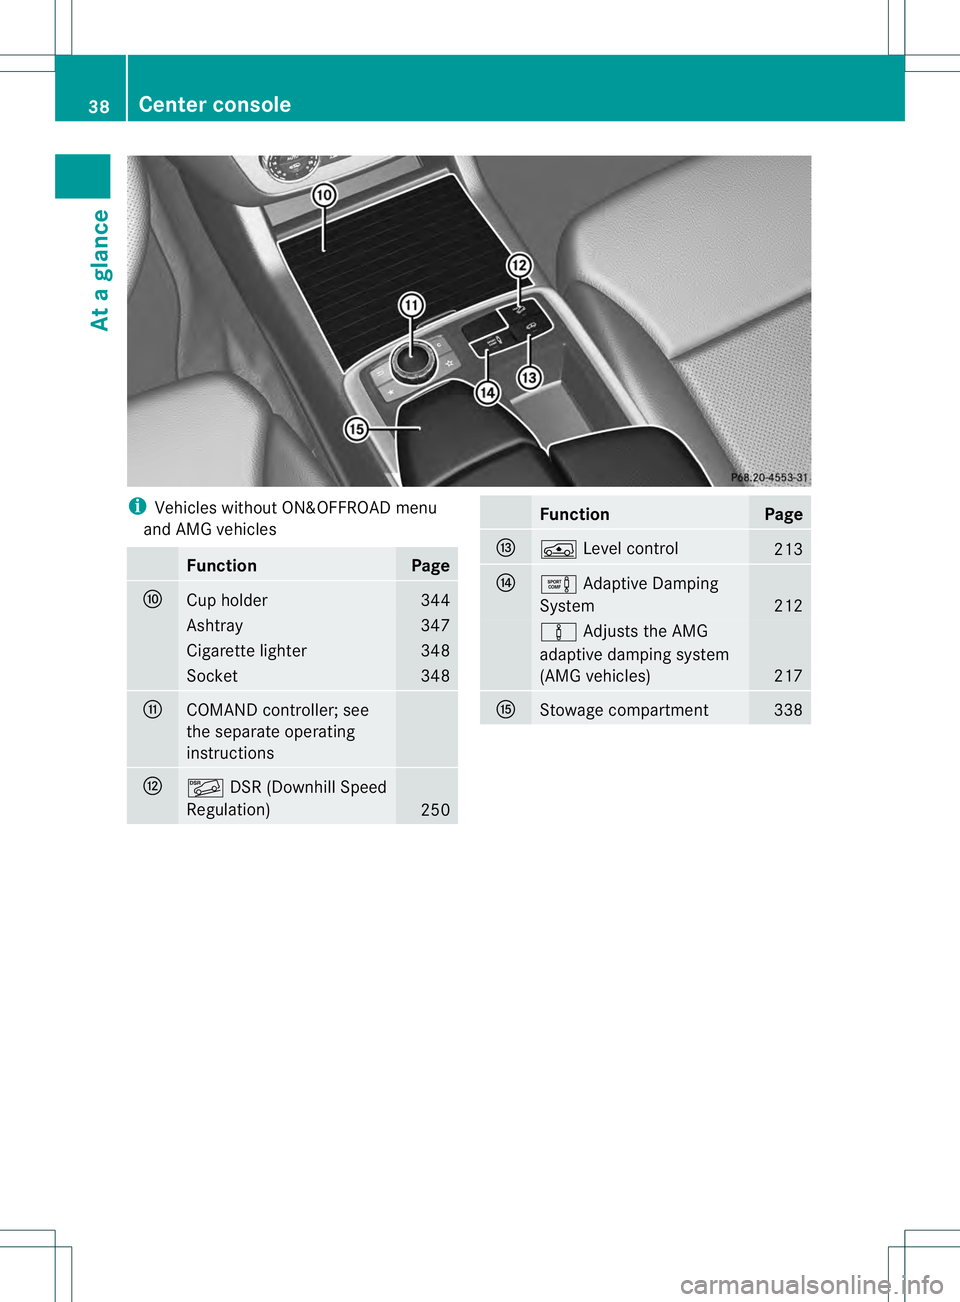
i
Vehicles without ON&OFFROAD menu
and AMG vehicles Function Page
0016
Cup holder 344
Ashtray 347
Cigarette lighter 348
Socket 348
0017
COMAND controller; see
the separate operating
instructions
0018
0001
DSR (Downhill Speed
Regulation) 250 Function Page
0019
0002
Level control 213
001A
000A
Adaptive Damping
System 212
000A
Adjusts the AMG
adaptive damping system
(AMG vehicles) 217
001B
Stowage compartment 33838
Center consoleAt a glance
Page 60 of 454
X
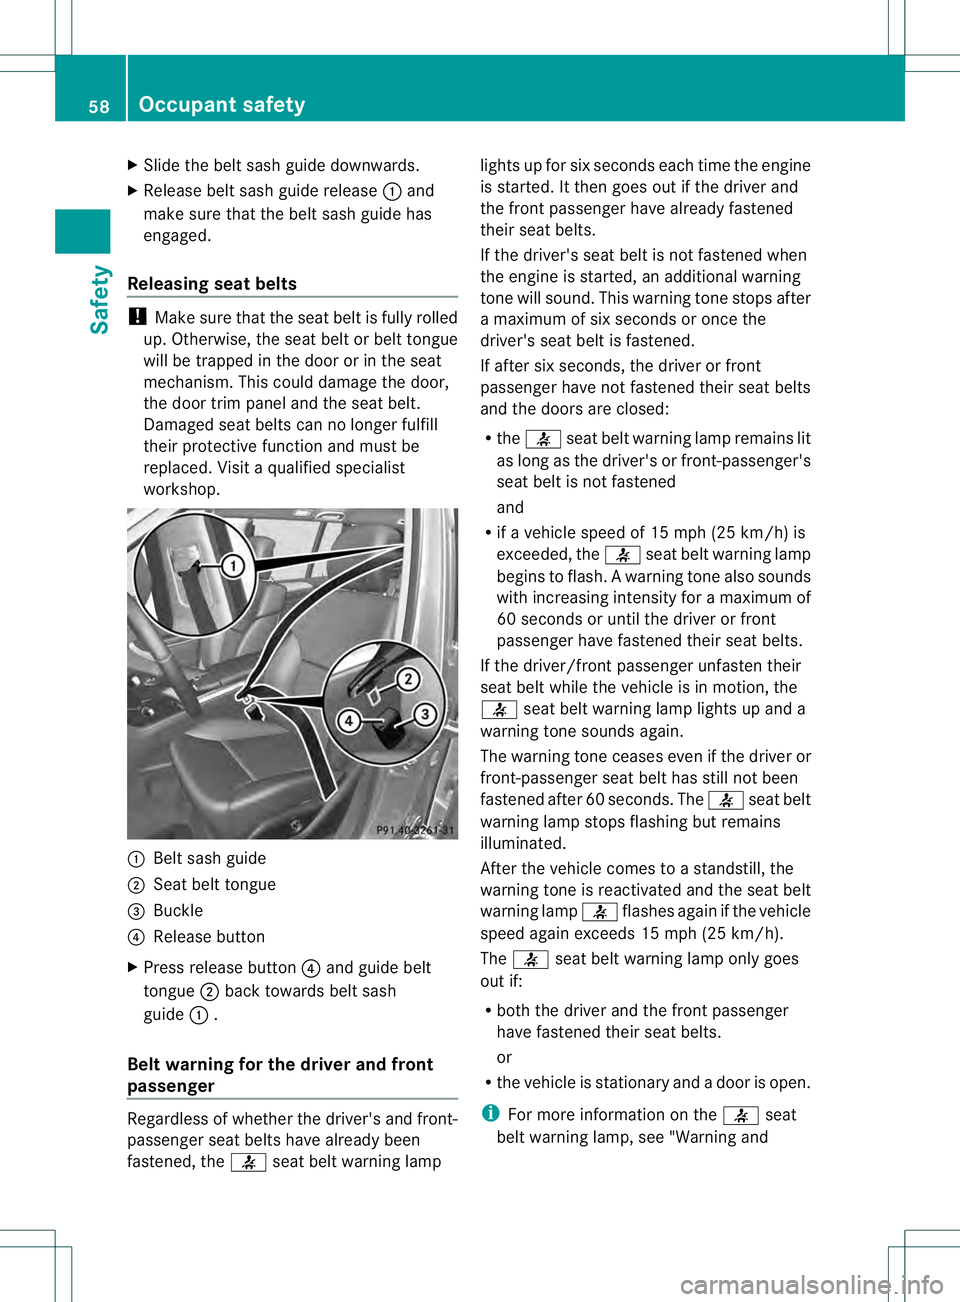
Slide the belt sash guide downwards.
X Release belt sash guide release 0002and
make sure tha tthe belt sash guide has
engaged.
Releasing seat belts !
Make sure that the seat belt is fully rolled
up. Otherwise, the seat belt or belt tongue
will be trapped in the door or in the seat
mechanism. This could damage the door,
the door trim panel and the seat belt.
Damaged seat belts can no longer fulfill
their protective function and must be
replaced. Visit a qualified specialist
workshop. 0002
Belt sash guide
0003 Seat belt tongue
0021 Buckle
0020 Release button
X Press release button 0020and guide belt
tongue 0003back towards belt sash
guide 0002.
Belt warning for the driver and front
passenger Regardless of whether the driver's and front-
passenger seat belts have already been
fastened, the
0020seat belt warning lamp lights up for six seconds each time the engine
is started. It then goes out if the driver and
the front passenger have already fastened
their seat belts.
If the driver's seat belt is not fastened when
the engine is started, an additional warning
tone will sound. This warning tone stops after
a maximum of six seconds or once the
driver's seat belt is fastened.
If after six seconds, the driver or front
passenger have not fastened their seat belts
and the doors are closed:
R the 0020 seat belt warning lamp remains lit
as long as the driver's or front-passenger's
seat belt is not fastened
and
R if a vehicle speed of 15 mph (25 km/h) is
exceeded, the 0020seat belt warning lamp
begins to flash. Awarning tone also sounds
with increasing intensity for a maximum of
60 seconds or until the driver or front
passenger have fastened their seat belts.
If the driver/front passenger unfasten their
seat belt while the vehicle is in motion, the
0020 seat belt warning lamp lights up and a
warning tone sounds again.
The warning tone ceases eve nifthe driver or
front-passenger seat belt has still not been
fastened after 60 seconds. The 0020seat belt
warning lamp stops flashing but remains
illuminated.
After the vehicle comes to a standstill, the
warning tone is reactivated and the seat belt
warning lamp 0020flashes again if the vehicle
speed again exceeds 15 mph (25 km/h).
The 0020 seat belt warning lamp only goes
out if:
R both the driver and the front passenger
have fastened their seat belts.
or
R the vehicle is stationary and a door is open.
i For more information on the 0020seat
belt warning lamp, see "Warning and 58
Occupant safetySafety
Page 61 of 454
indicator lamps in the instrument cluster,
seat belts" (Y page 321).
Emergency Tensioning Devices, seat
belt force limiters G
WARNING
Pyrotechnic Emergency Tensioning Devices
that have been deployed must be renewed.
For your safety, when disposing of Emergency
Tensioning Devices, always observe the
safety instructions .These are available from
any authorized Mercedes-Ben zCenter.
The PRE-SAFE ®
system has electrically
operated reversible pre-tensioners that do
not require replacement after activation.
! If the front-passenger seat is not
occupied, do not engage the seat belt
tongue in the buckle on the front-
passenger seat. Otherwise, the Emergency
Tensioning Device could be triggered in the
event of an accident.
X In order to ensure that the pyrotechnic
Emergency Tensioning Devices have not
been triggered, always have the seat belts
checked after an accident.
If the Emergency Tensioning Devices have
been triggered, they must be replaced.
The seat belts on the following seats have
Emergency Tensioning Devices and belt force
limiters:
R driver's and front-passenger seat
R the outer seats in the second row
R the seats in the third row
The ETDs tighten the seat belts in an accident,
pulling them close against the body.
The ETDs do not correct incorrect seat
positions or incorrectly fastened seat belts.
The ETDs do not pull vehicle occupants back
towards the backrest.
If the seat belt is also equipped with a seat
belt force limiter and this is triggered, the
force exerted by the seat belt on the vehicle
occupant is reduced. The belt force limiters for the front seats are
synchronized with the fron
tair bags, which
take on a part of the deceleration force. This
results in the force exerted on the occupant
being distributed over a greater area.
The ETDs can only be activated when:
R the ignition is switched on.
R the restraint systems are operational; see
"SRS warning lamp" (Y page 43).
R the belt tongue is engaged in the buckle on
each of the lap-shoulder belts in the front.
The belt tensioners on the outside seats in the
second row and on the seats in the third row
are triggered independently of the lock status
of the seat belts.
The ETDs are triggered depending on the type
and severity of an accident:
R if, in the event of a head-on or rear-end
collision, the vehicle decelerates or
accelerates rapidly in a longitudinal
direction during the initial stages of the
impact
R if, in the even tofaside impact, on the side
opposite the impact the vehicle
decelerates or accelerates rapidly in a
lateral direction
R if, in certain situations where the vehicle
overturns, the system determines that it
can provide additional protection
If the ETDs are deployed, you will hear a bang,
and a small amount of powder may also be
released.O nly in rare cases will the bang
affect your hearing .The powder that is
released generally does not constitute a
health hazard. The 001FSRS warning lamp
lights up. Occupant safety
59Safety Z
Page 63 of 454
in direction, the child may not be held
securely. The child could thus be seriously or
even fatally injured. For this reason, when
fitting a child restraint system, observe the
manufacturer's installation instructions and
the correct use of the child restraint system.
Child restraint systems should preferably be
fitted on the rear seats .The child is generally
better protected there.
The entire base of the child restraint system
must always rest on the seat cushion.
Therefore, never place objects, e.g. a cushion,
under the child restraint system.
Only use child restraint systems with the
original cover designed for them. Only replace
damaged covers with genuine covers.
We recommend that you use the child
restraint systems which have been
recommended for Mercedes-Benz. G
WARNING
Infants and small children should never share
a seat belt with another occupant. In the event
of an accident, they could be crushed
between the occupant and seat belt.
Ac hild's risk of serious or fatal injuries is
significantly increased if the child restraints
are not properly secured in the vehicle and/
or the child is not properly secured in the child
restraint.
Children that are too large for a child restraint
must travel in seats using normal seat belts.
Position the shoulder belt across the chest
and shoulder, not face or neck.Ab ooster seat
may be necessary to achieve proper seat belt
positioning for children over 41 lb (18 kg) until
they reach a height where a lap-shoulder belt
fits properly without a booster.
When the child restraint is not in use, remove
it from the vehicle or secure it with the seat
belt to prevent the child restraint from
becoming a projectile in the event of an
accident. G
WARNING
When leaving the vehicle, always remove the
SmartKey from the ignition lock. Always take
the SmartKey with you and lock the vehicle.
Do not leave children unattended in the
vehicle, even if they are secured in a child
restraint system, or with access to an
unlocked vehicle. Achild's unsupervised
access to a vehicle could result in an accident
and/or serious personal injury. The children
could:
R injure themselves on parts of the vehicle
R be seriously or fatally injured through
excessive exposure to extreme heat or cold
R injure themselves or cause an accident with
vehicle equipment that can be operated
even if the SmartKey is removed from the
ignition lock or removed from the vehicle,
such as seat adjustment, steering wheel
adjustment, or the memory function
If children open a door, they could injure other
persons or get out of the vehicle and injure
themselves or be injured by following traffic.
Do not expose the child restraint system to
direct sunlight. The child restraint system's
metal parts, for example, could become very
hot, and the child could be burned on these
parts. G
WARNING
Do not carry heavy or hard objects in the
passenger compartment or cargo
compartmentu nless they are firmly secured
in place.
Unsecured or improperly positioned cargo
increases a child's risk of injury in the event
of
R strong braking maneuvers
R sudden changes of direction
R an accident
Further informatio nonsecure stowage of
loads can be found under "Loading
guidelines". Children in the vehicle
61Safety Z
Page 88 of 454
If the vehicle has been locked using the
locking button for the central locking, or has
been locked automatically, and a door is
opened from the inside:
R
the vehicle will be fully unlocked if it had
previously been fully unlocked
R only the door which has been opened form
the inside is unlocked if only the driver's
door had been previously unlocked Automatic locking feature
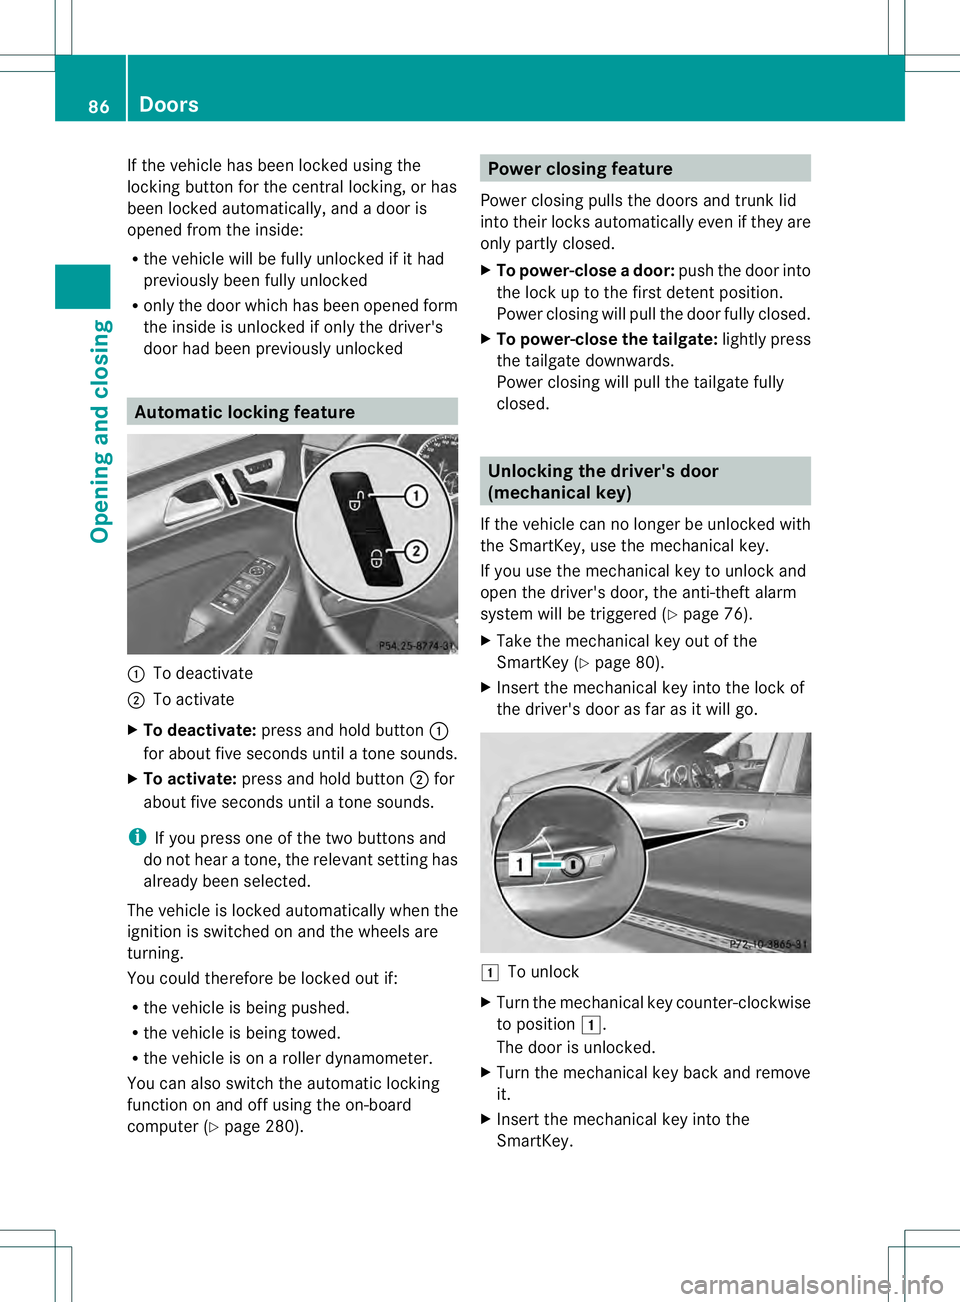
0002
To deactivate
0003 To activate
X To deactivate: press and hold button 0002
for aboutf ive seconds until a tone sounds.
X To activate: press and hold button 0003for
about five seconds until a tone sounds.
i If you press one of the two buttons and
do not hear a tone, the relevant setting has
already been selected.
The vehicle is locked automatically when the
ignition is switched on and the wheels are
turning.
You could therefore be locked out if:
R the vehicle is being pushed.
R the vehicle is being towed.
R the vehicle is on a roller dynamometer.
You can also switch the automatic locking
function on and off using the on-board
computer (Y page 280). Power closing feature
Power closing pulls the doors and trunk lid
into their locks automatically even if they are
only partly closed.
X To power-close adoor: push the door into
the lock up to the first detent position.
Power closing will pull the door fully closed.
X To power-close the tailgate: lightly press
the tailgate downwards.
Power closing will pull the tailgate fully
closed. Unlocking the driver's door
(mechanical key)
If the vehicle can no longer be unlocked with
the SmartKey, use the mechanical key.
If you use the mechanical key to unloc kand
open the driver's door, the anti-thef talarm
system will be triggered ( Ypage 76).
X Take the mechanical key out of the
SmartKey (Y page 80).
X Insert the mechanical key into the lock of
the driver's door as far as it will go. 0004
To unlock
X Turn the mechanical key counter-clockwise
to position 0004.
The door is unlocked.
X Turn the mechanical key back and remove
it.
X Insert the mechanical key into the
SmartKey. 86
DoorsOpening and closing
Page 163 of 454
Useful information
............................162
Notes on breaking-in anew vehicle 162
Driving ............................................... 162
Automatic transmission ...................169
Refueling ............................................ 177
Parking ............................................... 183
Driving tips ........................................ 186
Driving systems ................................ 195
Towing atrailer ................................. 257 161Driving and parking
Page 164 of 454
Useful information
i This Operator's Manual describes all
models and all standard and optional
equipment of your vehicle available at the
time of publication of the Operator's
Manual. Country-specific differences are
possible. Please note that your vehicle may
not be equipped with all features
described. This also applies to safety-
related systems and functions.
i Read the information on qualified
specialist workshops: (Y page 28).Notes on breaking-in
anew vehicle Important safety notes
New and replaced brake pads and discs only
reach their optimum braking effect after
several hundred kilometers of driving.
Compensate for this by applying greater force
to the brake pedal. The first 1,000miles (1,500 km)
The more you look after the engine when it is
new, the more satisfied you will be with its
performance in the future.
R You should therefore drive at varying
vehicle and engine speeds for the first
1,000 miles (1,500 km).
R Avoid heavy loads, e.g .driving at full
throttle, during this period.
R Change gearing ood time, before the
tachometer needle is 0001of the way to the
red area of the tachometer.
R Do not manually shift to a lower gear to
brake the vehicle.
R If possible, do not depress the accelerator
pedal past the point of resistance
(kickdown).
R Only select shift ranges 3,2or 1when
driving slowly, e.g. in mountainous terrain. After 1,000 miles (1,500 km), you can
increase the engine speed gradually and
accelerate the vehicle to full speed.
Additional breaking-in notes for AMG
vehicles:
R
Do not drive faster than 85 mph
(140 km/h) for the first 1,000 miles
(1,500 km).
R Only allow the engine to reach a maximum
engine speed of 4,500 rpm briefly.
R Change gear in good time.
R Ideally, for the first 1,000 miles (1,500 km),
drive in program C.
i You should also observe these notes on
breaking in if the engine or parts of the drive
train on your vehicle have been replaced.
i Always observe the respective speed
limits. Driving
Important safety notes
G
WARNING
Objects in the driver's footwell can restric tthe
pedal travel or obstruct adepressed pedal.
The operating and road safety of the vehicle
is jeopardized. There is a risk of an accident.
Make sure that all objects in the vehicle are
stowed correctly, and that they cannot enter
the driver's footwell. Install the floormats
securely and as specified in order to ensure
sufficien tclearance for the pedals. Do not use
loose floormats. G
WARNING
Unsuitable footwear can hinde rcorrect usage
of the pedals, e.g.:
R shoes with thick soles
R shoes with high heels
R slippers
There is a risk of an accident. 162
DrivingDriving and parking