height MERCEDES-BENZ GL 2016 Owners Manual
[x] Cancel search | Manufacturer: MERCEDES-BENZ, Model Year: 2016, Model line: GL, Model: MERCEDES-BENZ GL 2016Pages: 462, PDF Size: 12.66 MB
Page 19 of 462
Rear seats
Adjusting ....................................... 113
Display message ............................ 322
Rear view camera
Cleaning instructions ..................... 380
Displays in the Audio display ......... 232
Displays in the COMAND display ... 232
Function/notes ............................. 231
Switching on/off ........................... 232
Rear window defroster
Problem (malfunction) ................... 159
Switching on/off ........................... 158
Rear window wiper
Replacing the wiper blade .............. 141
Switching on/off ........................... 140
Rear-view mirror
Anti-glare (manual) ........................ 124
Dipping (automatic) ....................... 125
Refrigerant (air-conditioning sys-
tem)
Important safety notes .................. 453
Refueling
Fuel gauge ....................................... 35
Important safety notes .................. 182
Refueling process .......................... 183
see Fuel
Remote control
Garage door opener ....................... 364
Programming (garage door
opener) .......................................... 365
Replacing bulbs
Important safety notes .................. 136
Overview of bulb types .................. 137
Removing/replacing the cover
(front wheel arch) .......................... 137
Reporting safety defects .................... 29
Rescue card ......................................... 30
Reserve (fuel tank)
see Fuel
Reserve fuel
Display message ............................ 309
Warning lamp ................................. 334
see Fuel
Residual heat (climate control) ........ 159
Restraint system
Display message ............................ 299
Introduction ..................................... 44
Warning lamp ................................. 333 Warning lamp (function) ................... 45
Reversing feature
Panorama sliding sunroof .............. 103
Roller sunblinds ............................. 104
Side windows ................................... 98
Sliding sunroof ............................... 103
Tailgate ............................................ 93
Reversing lamps (display mes-
sage) ................................................... 305
Roadside Assi stance (breakdown) .... 26
Ro
ller sunblind
Panorama roof with power tilt/
sliding panel .................................. 104
Rear side windows ......................... 351
Roof carrier ........................................ 348
Roof lining and carpets (cleaning
guidelines) ......................................... 384
Roof load (maximum) ........................ 454
Route (navigation)
see Route guidance (navigation)
Route guidance (navigation) ............ 277
S Safety
Children in the vehicle ..................... 61
Safety system
see Driving safety systems
Seat belts
Adjusting the driver's and front-
passenger seat belt ......................... 49
Adjusting the height ......................... 48
Cleaning ......................................... 383
Correct usage .................................. 47
Fastening ......................................... 48
Important safety guidelines ............. 46
Introduction ..................................... 46
Releasing ......................................... 49
Switching belt adjustment on/off
(on-board computer) ...................... 286
Warning lamp ................................. 325
Warning lamp (function) ................... 49
Seats
Adjusting (electrically) ................... 110
Adjusting the head restraint .......... 110
Cleaning the cover ......................... 383
Correct driver's seat position ........ 108
Entry position (3rd row of seats) .... 116 Index 17
Page 49 of 462
tional injury, for example, in an accident, dur-
ing braking or when abruptly changing direc-
tion. This poses an increased risk of injury or
even fatal injury.
Make sure that all vehicle occupants are
seated properly with a correctly fastened seat
belt.
G WARNING
The seat belt does not offer the intended level
of protection if you have not moved the back-
rest to an almost vertical position. When brak-
ing or in the event of an accident, you could
slide underneath the seat belt and sustain
abdomen or neck injuries, for example. This
poses an increased risk of injury or even fatal
injury.
Adjust the seat properly before beginning
your journey. Always ensure that the backrest
is in an almost vertical position and that the
shoulder section of your seat belt is routed
across the center of your shoulder.
G WARNING
Persons under 5 ft (1.50 m) in height cannot
fasten the seat belt correctly without an addi-
tional suitable restraint system. If the seat
belt is incorrectly fastened, it cannot protect
as intended. Furthermore, an incorrectly fas-
tened seat belt can cause additional injury, for
example, in an accident, during braking or an
abrupt change of direction. This poses an
increased risk of injury or even fatal injury.
For this reason, always secure persons under
5 ft (1.50 m) in height in suitable restrain t
systems.
If a child younger than twelve years old and
under 5 ft (1.50 m) in height is traveling in the
vehicle: R
always secure the child in a child restraint
system suitable for this Mercedes-Benz
vehicle. The child restraint system must be appropriate to the age, weight and size of
the child R
always observe the instructions and safety
notes in the "Children in the vehicle" sec-
tion of this Operator's Manual
( Y
page 61) in addition to the child
restraint system manufacturer's installa-
tion instructions R
be sure to observe the instructions and
safety notes on the "Occupant classifica-
tion system (OCS)" ( Y
page 53)
G WARNING
The seat belts may not perform their intended
protective function if: R
they are damaged, modified, extremely
dirty, bleach or dyed R
the seat belt buckle is damaged or
extremely dirty R
the Emergency Tensioning Devices, belt
anchorages or inertia reels have been modi-
fied
Seat belts may sustain non-visible damage in
an accident, e.g. due to glass splinters. Modi-
fied or damaged seat belts may tear or fail,
e.g. in an accident. Modified Emergency Ten-
sioning Devices could accidentally trigger or
fail to deploy when necessary. This poses an
increased risk of injury or even fatal injury.
Never modify the seat belts, Emergency Ten-
sioning Devices, belt anchorages or inertia
reels. Make sure that the seat belts are
undamaged, not worn out and clean. Follow-
ing an accident, have the seat belts checked
immediately at a qualified specialist work-
shop.
Only use seat belts that have been approved
for your vehicle by Mercedes-Benz.
Proper use of the seat belts
Observe the safety notes on the seat belt
( Y
page 46).
All vehicle occupants must be wearing the
seat belt correctly before beginning the jour-
ney. Also make sure that all vehicle occu- Occupant safety 47
Safety Z
Page 50 of 462
pants are always wearing the seat belt cor-
rectly while the vehicle is in motion.
When fastening the seat belt, always make
sure that: R
the seat belt tongue is only inserted to the
belt buckle belonging to that seat. R
the seat belt is tight across your body.
Avoid wearing bulky clothing, e.g. a winter
coat. R
the seat belt is not twisted.
Only then can the forces which occur be
distributed over the area of the belt. R
the shoulder section of the belt is always
routed across the center of your shoulder.
The shoulder section of the belt must not
come into contact with your neck or be
routed under your arm. Where possible,
adjust the seat belt to the appropriate
height. R
the lap belt passes tightly and as low down
as possible across your lap.
The lap belt must always be routed across
your hip joints and not across your abdo-
men. This applies particularly to pregnant
women. If necessary, push the lap belt
down to your hip joint and pull it tight using
the shoulder section of the belt. R
the seat belt is not routed across sharp,
pointed or fragile objects.
If you have such items located on or in your
clothing, e.g. pens, keys or eyeglasses,
store these in a suitable place. R
only one person is using a seat belt at a
time.
Infants and children must never travel sit-
ting on the lap of a vehicle occupant. In the
event of an accident, they could be crushed
between the vehicle occupant and seat
belt. R
objects are never secured with a seat belt if
the seat belt is also being used by one of the
vehicle's occupants.
Seat belts are only intended to secure and
restrain vehicle occupants. Always observe the "Loading guidelines" for securing objects,
luggage or loads ( Y
page 340).
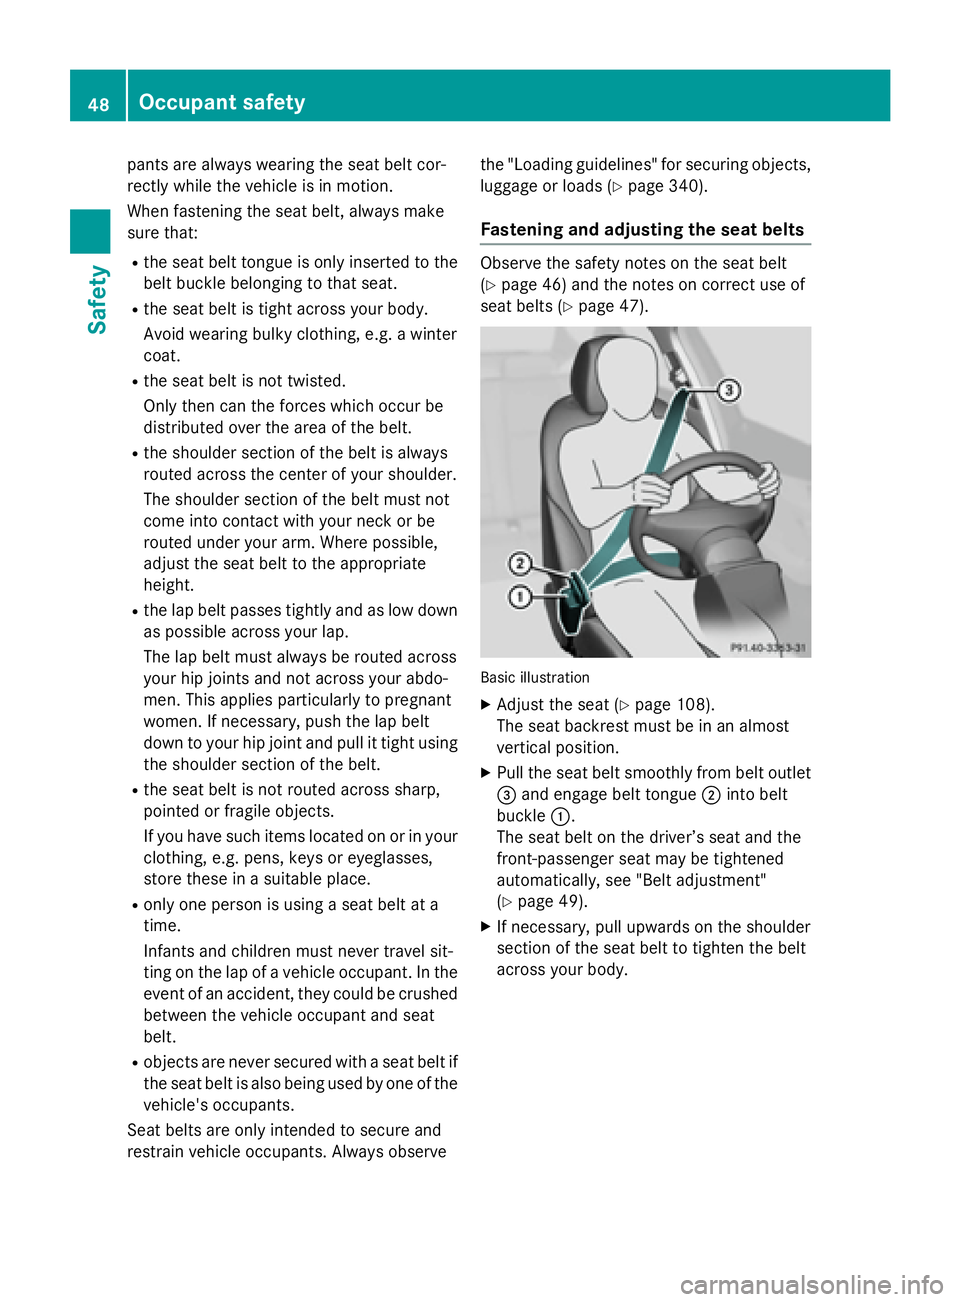
Fastening and adjusting the seat belts Observe the safety notes on the seat belt
( Y
page 46) and the notes on correct use of
seat belts ( Y
page 47).
Basic illustration X
Adjust the seat ( Y
page 108).
The seat backrest must be in an almost
vertical position. X
Pull the seat belt smoothly from belt outlet
�
Page 53 of 462
erwise be in the deployment area of the air
bag. R
For this reason, always secure persons less
than 5 ft (1.50 m) tall in suitable restraint
systems. Up to this height, the seat belt
cannot be worn correctly.
If a child is traveling in your vehicle, also
observe the following notes: R
Always secure children under twelve years
of age and less than 5 ft (1.50 m) tall in
suitable child restraint systems. R
Child restraint systems should be installed
on the rear seats. R
Only secure a child in a rearward-facing
child restraint system on the front-
passenger seat when the front-passenger
front air bag is deactivated. If the
PASSENGER AIR BAG OFF indicator lamp is
permanently lit, the front-passenger front
air bag is deactivated ( Y
page 45).R
Always observe the instructions and safety
notes on the "Occupant Classification Sys-
tem (OCS)" ( Y
page 53) and on "Children
in the vehicle" ( Y
page 61) in addition to
the child restraint system manufacturer's
installation instructions.
Objects in the vehicle interior may pre-
vent an air bag from functioning correctly.
Before starting your journey and to avoid risks
resulting from the speed of the air bag as it
deploys, make sure that: R
there are no people, animals or objects
between the vehicle occupants and an air
bag. R
there are no objects between the seat, door
and B-pillar. R
no hard objects, e.g. coat hangers, hang on
the grab handles or coat hooks. R
no accessories, such as cup holders, are
attached to the vehicle within the deploy-
ment area of an air bag, e.g. to doors, side
windows, rear side trim or side walls. R
no heavy, sharp-edged or fragile objects
are in the pockets of your clothing. Store
such objects in a suitable place. G WARNING
If you modify the air bag cover or affix objects
such as stickers to it, the air bag can no longer
function correctly. There is an increased risk
of injury.
Never modify an air bag cover or affix objects
to it.
G WARNING
Sensors to control the air bags are located in
the doors. Modifications or work not per-
formed correctly to the doors or door panel-
ing, as well as damaged doors, can lead to the
function of the sensors being impaired. The air
bags might therefore not function properly
anymore. Consequently, the air bags cannot
protect vehicle occupants as they are
designed to do. There is an increased risk of
injury.
Never modify the doors or parts of the doors.
Always have work on the doors or door pan-
eling carried out at a qualified specialist work-
shop.
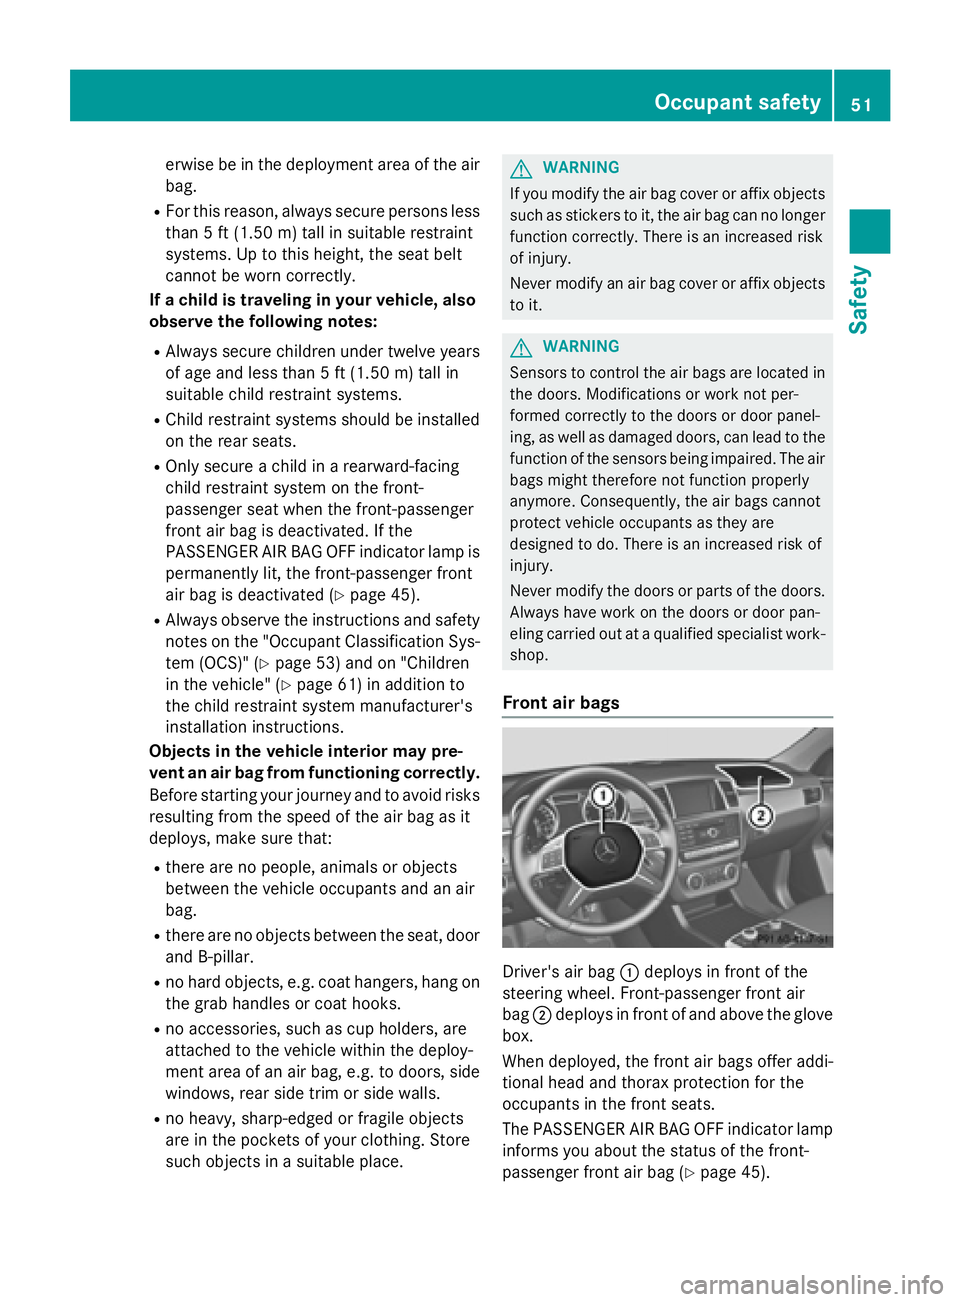
Front air bags
Driver's air bag �C deploys in front of the
steering wheel. Front-passenger front air
bag �D deploys in front of and above the glove
box.
When deployed, the front air bags offer addi-
tional head and thorax protection for the
occupants in the front seats.
The PASSENGER AIR BAG OFF indicator lamp
informs you about the status of the front-
passenger front air bag ( Y
page 45).Occupant safety 51
Safety Z
Page 63 of 462
R
the engine is switched off and the fuel sup-
ply is cut off R
vehicles with mbrace: automatic emer-
gency call
Children in the vehicle
Important safety notes Accident statistics show that children
secured in the rear seats are safer than chil-
dren secured in the front-passenger seat. For
this reason, Mercedes-Benz strongly advises
that you install a child restraint system on a
rear seat. Children are generally better pro-
tected there.
If a child younger than twelve years old and
under 5 ft (1.50 m) in height is traveling in the
vehicle: R
always secure the child in a child restraint
system suitable for Mercedes-Benz vehi-
cles. The child restraint system must be
appropriate to the age, weight and size of
the child R
be sure to observe the instructions and
safety notes in this section in addition to
the child restraint system manufacturer's
installation instructions R
be sure to observe the instructions and
safety notes on the "Occupant classifica-
tion system (OCS)" ( Y
page 53)
G WARNING
If you leave children unsupervised in the vehi-
cle, they could set it in motion by, for example: R
release the parking brake. R
shift the automatic transmission out of the
parking position P .R
start the engine.
In addition, they may operate vehicle equip-
ment and become trapped. There is a risk of
an accident and injury.
When leaving the vehicle, always take the
SmartKey with you and lock the vehicle. Never
leave children unsupervised in the vehicle. G WARNING
If persons, particularly children are subjected
to prolonged exposure to extreme heat or
cold, there is a risk of injury, possibly even
fatal. Never leave children unattended in the
vehicle.
G WARNING
If the child restraint system is subjected to
direct sunlight, parts may get very hot. Chil-
dren may burn themselves on these parts,
particularly on the metal parts of the child
restraint system. There is a risk of injury.
If you leave the vehicle, taking the child with
you, always ensure that the child restraint
system is not exposed to direct sunlight. Pro-
tect it with a blanket, for example. If the child
restraint system has been exposed to direct
sunlight, let it cool down before securing the
child in it. Never leave children unattended in
the vehicle.
Always ensure that all vehicle occupants have
their seat belts fastened correctly and are sit-
ting properly. Particular attention must be
paid to children.
Observe the safety notes on the seat belt
( Y
page 46) and the notes on correct use of
seat belts ( Y
page 47).
A booster seat may be necessary to achieve
proper seat belt positioning for children over
41 lbs (18 kg) until they reach a height where
a three-point seat belt can be properly fas-
tened without a booster seat.
Special seat belt retractor
G WARNING
If the seat belt is released while driving, the
child restraint system will no longer be
secured properly. The special seat belt retrac-
tor is disabled and the inertia real draws in a
portion of the seat belt. The seat belt cannot
be immediately refastened. There is an
increased risk of injury, possibly even fatal.Children in the vehicle 61
Safety Z
Page 111 of 462
The seat belt should: R
fit snugly across your body R
be routed across the middle of your shoul-
der R
be routed in your pelvic area across the hip
joints X
Before starting off, adjust the rear-view mir-
ror and the exterior mirrors in such a way
that you have a good view of road and traf-
fic conditions ( Y
page 124).X
Vehicles with a memory function: save
the seat, steering wheel and exterior mirror
settings with the memory function
( Y
page 127).
Seats
Important safety notes
G WARNING
Children could become trapped if they adjust
the seats, particularly when unattended.
There is a risk of injury.
When leaving the vehicle, always take the
SmartKey with you and lock the vehicle. Never
leave children unsupervised in the vehicle.
The seats can still be adjusted when there is
no SmartKey in the ignition lock.
G WARNING
When you adjust a seat, you or other vehicle
occupants could become trapped, e.g. on the
seat guide rail. There is a risk of injury.
Make sure when adjusting a seat that no one
has any body parts in the sweep of the seat.
Observe the safety notes on "Air bags"
( Y
page 50) and "Children in the Vehicle"
( Y
page 61). G WARNING
You could lose control of your vehicle if you do
the following while driving: R
adjust the driver's seat, head restraint,
steering wheel or mirrors R
fasten the seat belt
There is a risk of an accident.
Adjust the driver's seat, head restraint, steer-
ing wheel and mirror and fasten your seat belt
before starting the engine.
G WARNING
If you adjust the seat height carelessly, you or
other vehicle occupants could be trapped and
thereby injured. Children in particular could
accidentally press the electrical seat adjust-
ment buttons and become trapped. There is a
risk of injury.
While moving the seats, make sure that your
hands or other body parts do not get under the
lever assembly of the seat adjustment sys-
tem.
G WARNING
If the head restraints are not installed or not
adjusted correctly, they cannot provide pro-
tection as intended. There is an increased risk
of injury in the head and neck area, e.g. in the
event of an accident or when braking.
Always drive with the head restraints instal-
led. Before driving off, make sure for every
vehicle occupant that the center of the head
restraint supports the back of the head at
about eye level.
G WARNING
The seat belt does not offer the intended level
of protection if you have not moved the back-
rest to an almost vertical position. When brak-
ing or in the event of an accident, you could
slide underneath the seat belt and sustain
abdomen or neck injuries, for example. This
poses an increased risk of injury or even fatal
injury. Seats 109
Seats, steering wheel and mirrors Z
Page 112 of 462
Adjust the seat properly before beginning
your journey. Always ensure that the backrest
is in an almost vertical position and that the
shoulder section of your seat belt is routed
across the center of your shoulder.
! To avoid damage to the seats and the seat
heating, observe the following information: R
keep liquids from spilling on the seats. If
liquid is spilled on the seats, dry them as
soon as possible. R
if the seat covers are damp or wet, do not
switch on the seat heating. The seat
heating should also not be used to dry
the seats. R
clean the seat covers as recommended;
see "Interior care". R
do not transport heavy loads on the
seats. Do not place sharp objects on the
seat cushions, e.g. knives, nails or tools.
The seats should only be occupied by
passengers, if possible. R
when the seat heating is in operation, do
not cover the seats with insulating mate-
rials, e.g. blankets, coats, bags, seat cov-
ers, child seats or booster seats.
! Make sure that there are no objects in the
footwell under or behind the seats when
moving the seats back. There is a risk that
the seats and/or the objects could be dam-
aged.
i It is not possible to remove the head
restraints from the front seats. The rear-
co mp artment head restraints, however,
can be removed ( Y
page 112).
For more information, contact a qualified
specialist workshop.
i Further related subjects: R
Cargo compartment enlargement (fold-
ing down the rear bench seat)
( Y
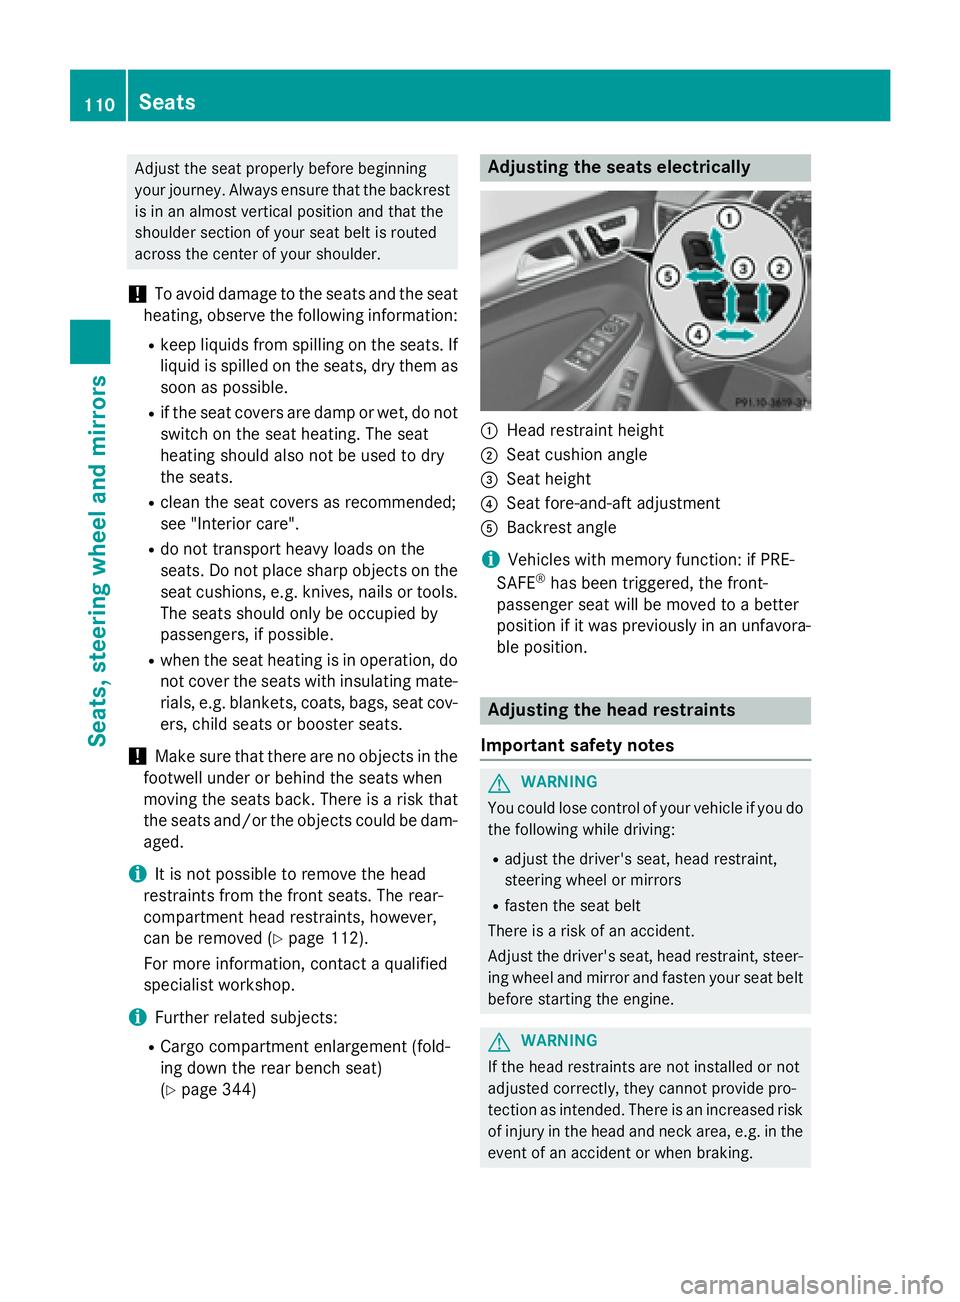
page 344) Adjusting the seats electrically
�C
Head restraint height �D
Seat cushion angle �
Page 113 of 462
Always drive with the head restraints instal-
led. Before driving off, make sure for every
vehicle occupant that the center of the head
restraint supports the back of the head at
about eye level.
Do not rotate the head restraints of the front
and rear seats. Otherwise, you cannot adjust
the height and angle of the head restraints to
the correct position.
Using the fore-and-aft adjustment, adjust the
head restraint so that it is as close as possible
to your head.
Observe the important safety notes regarding
the seats ( Y
page 109).
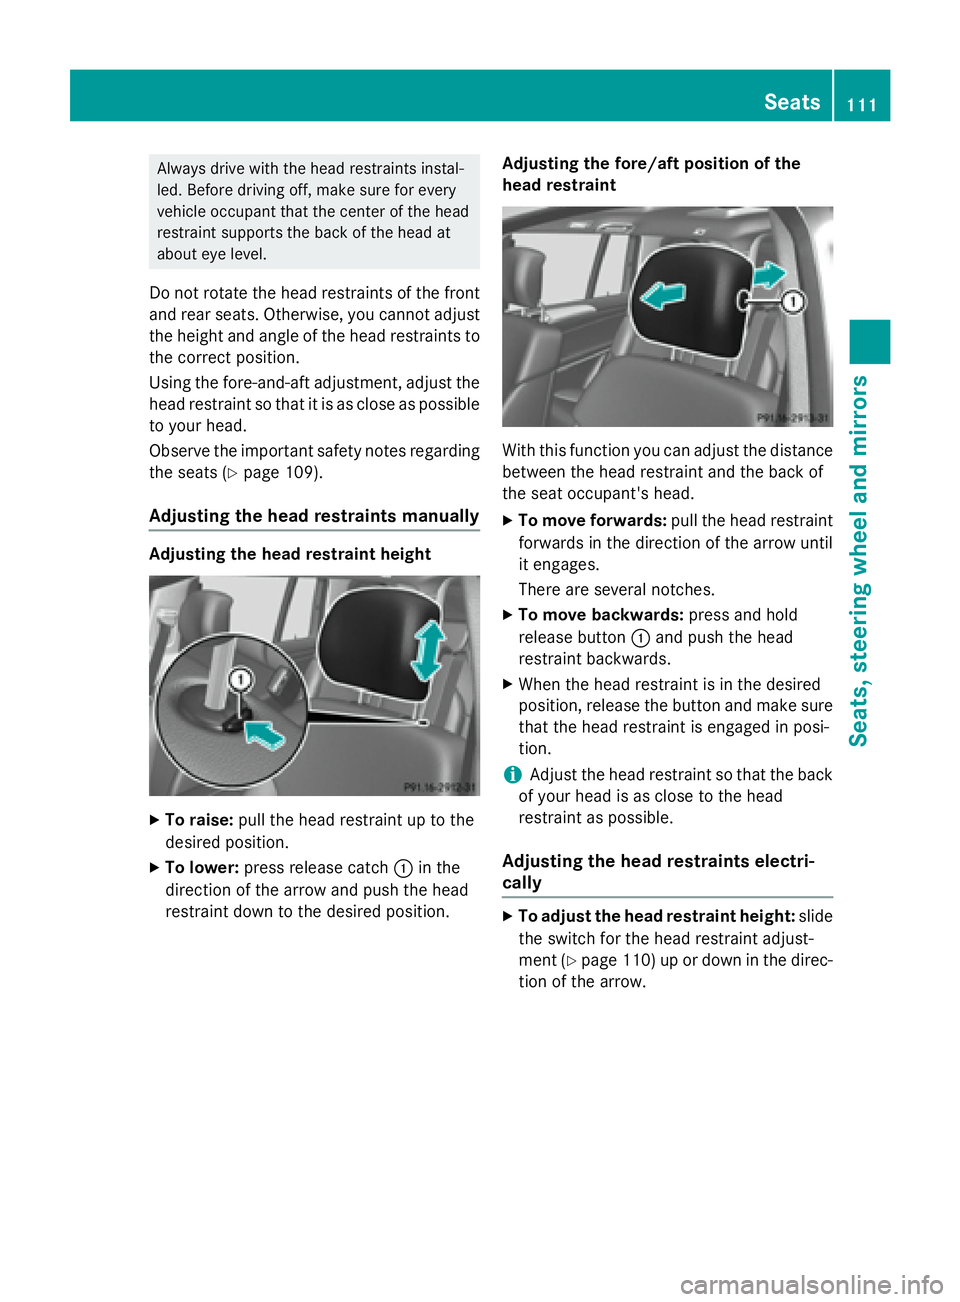
Adjusting the head restraints manually Adjusting the head restraint height
X
To raise: pull the head restraint up to the
desired position. X
To lower: press release catch �C in the
direction of the arrow and push the head
restraint down to the desired position. Adjusting the fore/aft position of the
head restraint
With this function you can adjust the distance
between the head restraint and the back of
the seat occupant's head. X
To move forwards: pull the head restraint
forwards in the direction of the arrow until
it engages.
There are several notches. X
To move backwards: press and hold
release button �C and push the head
restraint backwards. X
When the head restraint is in the desired
position, release the button and make sure
that the head restraint is engaged in posi-
tion.
i Adjust the head restraint so that the back
of your head is as close to the head
restraint as possible.
Adjusting the head restraints electri-
cally X
To adjust the head restraint height: slide
the switch for the head restraint adjust-
ment ( Y
page 110) up or down in the direc-
tion of the arrow. Seats 111
Seats, steering wheel an d mirrors Z
Page 114 of 462
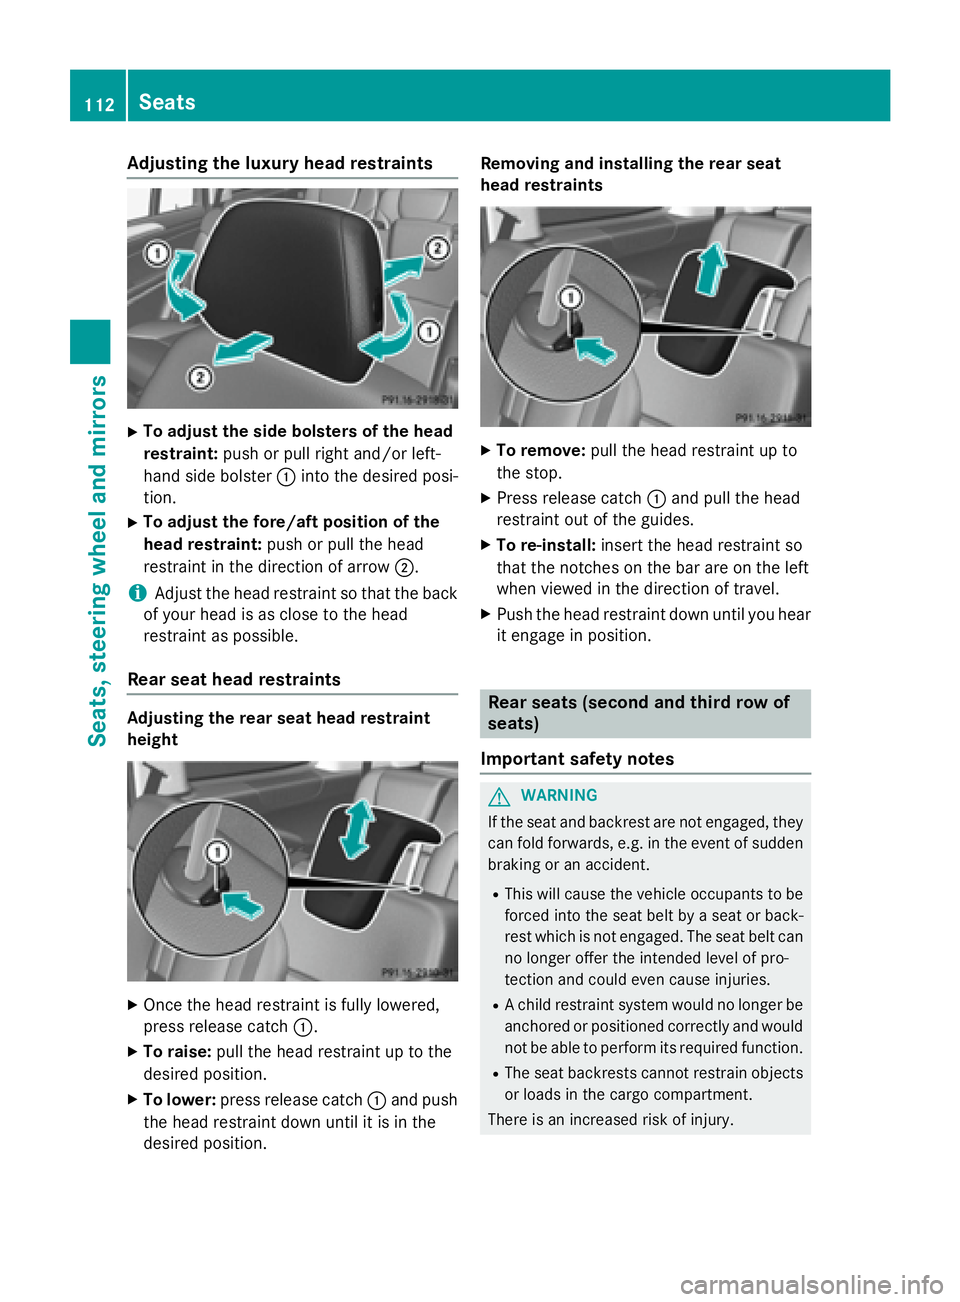
Adjusting the luxury head restraints X
To adjust th e sid e bolsters of th e hea d
restraint: push or pull right and/o r left-
han d side bolste r �C int o th e desired posi-
tion . X
To adjust th e for e/af t position of th e
hea d restraint: push or pull th e head
restrain t in th e direction of arrow �D .
i Adjus t th e head restrain t so that th e bac k
of your head is as close to th e head
restrain t as possible .
Rear seat head restraints
Adjusting th e rea r sea t hea d restrain t
height
X
On ce th e head restrain t is fully lowered,
press release catch �C .X
To raise: pull th e head restrain t up to th e
desired position .X
To lower : press release catch �C and push
th e head restrain t down until it is in th e
desired position . Removin g and installing th e rea r sea t
hea d restraints X
To remove: pull th e head restrain t up to
th e stop. X
Pre ss release catch �C and pull th e head
restrain t out of th e guide s.X
To re-install : insert th e head restrain t so
that th e notches on th e bar are on th e lef t
when viewed in th e direction of travel .X
Push th e head restrain t down until you hear
it engage in position .
Rear seats (second and third row of
seats)
Import ant safety notes
G WARNIN G
If th e seat and backrest are no t engaged, they
can fol d forwards, e.g. in th e event of sudde n
braking or an accident. R
This will caus e th e vehicl e occupant s to be
force d int o th e seat belt by a seat or back-
res t whic h is no t engaged. The seat belt can
no longer offer th e intended level of pro -
tection and could eve n caus e injuries.R
A child restrain t system would no longer be
anchored or positioned correctl y and would
no t be able to perfor m it s require d function .R
The seat backrest s canno t restrain objects
or loads in th e cargo compartment.
There is an increased ris k of injury.112
Seats
Seats, steering wheel and mirrors
Page 123 of 462
Problems with the seat ventilation Problem
Possible causes/consequences and �P Solutions
The seat ventilation has
switched off prema-
turely or cannot be
switched on. The on-board voltage is too low because too many electrical con-
sumers are switched on. X
Switch off electrical consumers that you do not need, such as
the rear window defroster or interior lighting.
Once the battery is sufficiently charged, the seat ventilation will
switch back on automatically.
Steering wheel
Important safety notes
G WARNING
You could lose control of your vehicle if you do
the following while driving: R
adjust the driver's seat, head restraint,
steering wheel or mirrors R
fasten the seat belt
There is a risk of an accident.
Adjust the driver's seat, head restraint, steer-
ing wheel and mirror and fasten your seat belt
before starting the engine.
G WARNING
Children could injure themselves if they
adjust the steering wheel. There is a risk of
injury.
When leaving the vehicle, always take the
SmartKey with you and lock the vehicle. Never
leave children unsupervised in the vehicle.
The electrically adjustable steering wheel can
still be adjusted when there is no SmartKey in
the ignition lock.
Adjusting the steering wheel man-
ually
G WARNING
If the steering wheel is unlocked while the
vehicle is in motion, it could change position
unexpectedly. This could cause you to lose control of the vehicle. There is a risk of an
accident.
Before starting off, make sure the steering
wheel is locked. Never unlock the steering
wheel while the vehicle is in motion.
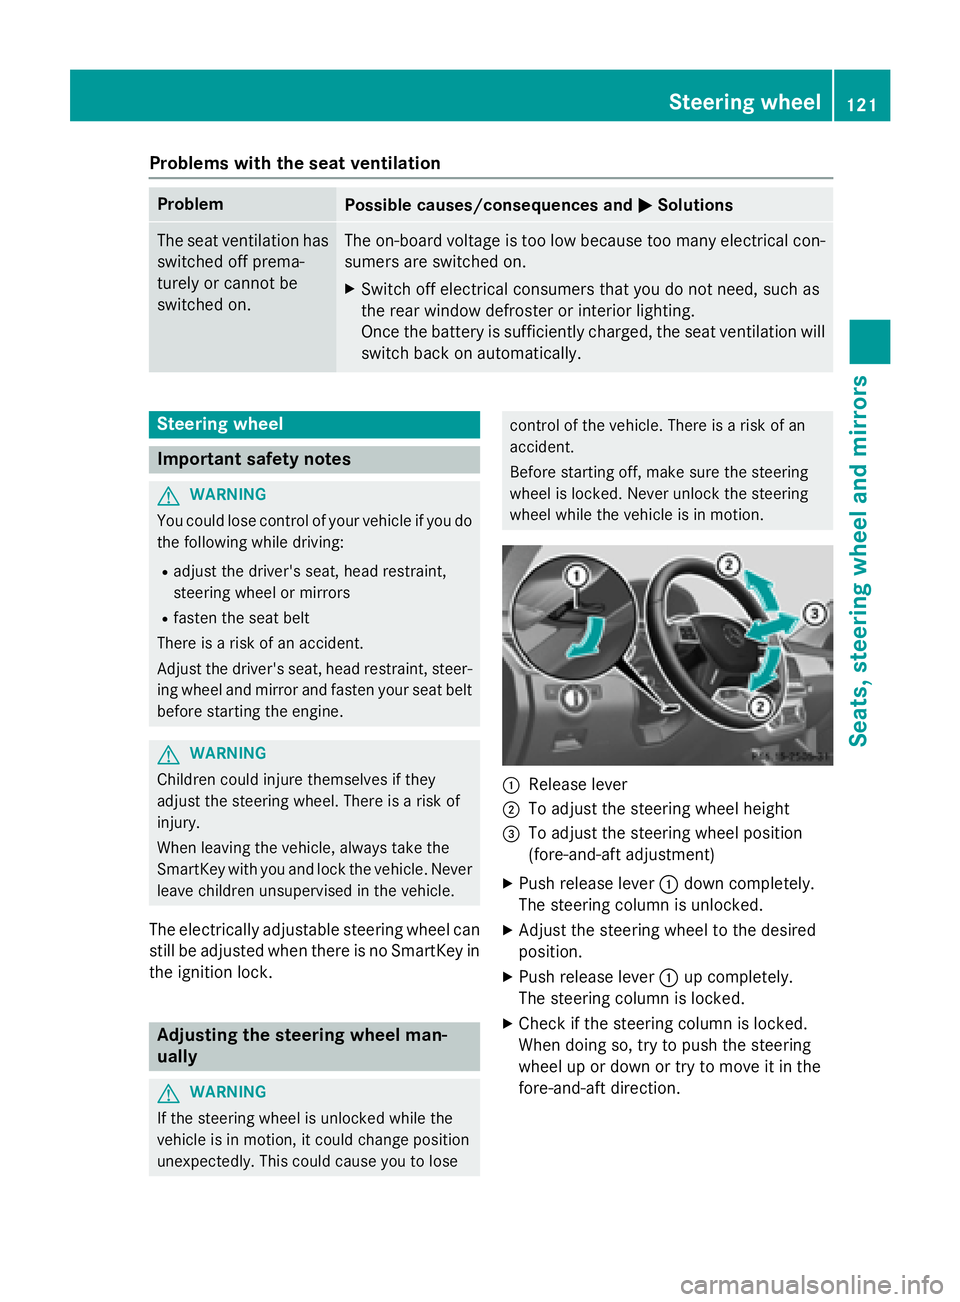
�C
Release lever �D
To adjust the steering wheel height �