ignition MERCEDES-BENZ GL-Class 2012 X164 Owner's Manual
[x] Cancel search | Manufacturer: MERCEDES-BENZ, Model Year: 2012, Model line: GL-Class, Model: MERCEDES-BENZ GL-Class 2012 X164Pages: 384, PDF Size: 15.71 MB
Page 13 of 384
I
Ignition lock see SmartKey positions
Immobilizer .......................................... 72
Indicator and warning lamps DISTRONIC .................................... 265
Indicator lamps
see Warning and indicator lamps
Insect protection on the radiator .... 301
Instrument cluster Overview .......................................... 29
Selecting the language (on-board
computer) ...................................... 224
Settings ......................................... 223
Warning and indicator lamps ...........30
Instrument cluster lighting ................ 29
Instrument lighting see Instrument cluster lighting
Interior lighting
Automatic control ..........................123
Delayed switch-off (on-board
computer) ...................................... 226
Emergency lighting ........................123
Manual control ............................... 123
Overview ........................................ 122
Reading lamp ................................. 122
Setting the brightness of the
ambient lighting (on-board
computer) ...................................... 225
see Interior lighting
J
Jack Storage location ............................ 314
Using ............................................. 322
Jump starting (engine) ...................... 329
K
Key see SmartKey
KEYLESS-GO
Convenience closing feature ............92
Display message ............................ 256
Locking ............................................ 77
Start/Stop button .......................... 149
Starting the engine ........................151
Unlocking ......................................... 77
Key positions
KEYLESS-GO .................................. 149
SmartKey ....................................... 149
Kickdown
Driving tips .................................... 157
Knee bag .............................................. 43
L
Lamps see Warning and indicator lamps
Lane-change assistant
see Blind Spot Assist
Language (on-board computer) ........ 224
LATCH-type (ISOFIX) child seat
anchors ................................................ 63
Level control Important safety notes ..................189
Level control (display message) ...... 248
License plate lamp Changing bulbs .............................. 127
Display message ............................ 242
Lighting
see Lights
Lights
Activating/deactivating the
exterior lighting delayed switch-
off .................................................. 225
Activating/deactivating the
interior lighting delayed switch-off . 226
Active light function .......................122
Automatic headlamp mode ............119
Display message ............................ 241
Driving abroad ............................... 118
Fog lamps ...................................... 120
Hazard warning lamps ...................121
High beam flasher .......................... 121
High-beam headlamps ...................121
Light switch ................................... 118
Low-beam headlamps ....................119
Parking lamps ................................ 118
Rear fog lamp ................................ 120
Setting the brightness of the
ambient lighting (on-board
computer) ...................................... 225
Index11
Page 18 of 384
Notes ............................................. 305
Service messages ..........................305
Service products
Brake fluid ..................................... 375
Capacities ...................................... 371
Coolant (engine) ............................ 376
DEF special additives .....................374
Engine oil ....................................... 375
Fuel ................................................ 372
Important safety notes ..................370
Refrigerant (air-conditioning
system) .......................................... 375
Washer fluid ................................... 377
Settings
Factory (on-board computer) .........223
On-board computer .......................223
Setting the air distribution ............... 142
Setting the airflow ............................ 142
Side impact air bag ............................. 43
Side marker lamp (display
message) ............................................ 243
Side marker lamps Changing bulbs (front) ...................126
Side windows
Convenience closing feature ............91
Convenience opening feature ..........91
Hinged side windows .......................91
Important safety information ...........90
Opening/closing .............................. 90
Problem (malfunction) .....................93
Resetting ......................................... 92
Sliding sunroof
Important safety notes ....................93
Opening/closing .............................. 94
Problem (malfunction) .....................94
Resetting ......................................... 94
SmartKey
Changing the battery .......................80
Changing the programming .............79
Checking the battery .......................80
Convenience closing feature ............91
Convenience opening feature ..........91
Display message ............................ 256
Door central locking/unlocking .......76
Important safety notes ....................76
Loss ................................................. 82
Mechanical key ................................ 79
Positions (ignition lock) .................149Problem (malfunction) .....................82
Starting the engine ........................150
Snow chains .............................. 173, 341
Sockets Center console .............................. 286
Front-passenger footwell ...............286
Luggage compartment ...................286
Points to observe before use .........285
Rear compartment .........................286
Spare wheel
Notes/data .................................... 365
Storage location ............................ 315
see Emergency spare wheel
Specialist workshop ............................ 24
Speed, controlling see Cruise control
Speedometer
Additional speedometer (on-
board computer) ............................ 220
In the Instrument cluster .................29
Segments ...................................... 217
Selecting the unit of
measurement ................................ 223
see Instrument cluster
SRS (Supplemental Restraint
System) Display message ............................ 237
Introduction ..................................... 38
Warning lamp ................................. 263
Warning lamp (function) ................... 38
Standing lamps
Changing bulbs .............................. 126
Display message ............................ 243
Switching on/off ........................... 118
Starting (engine) ................................ 150
Station see Radio
Steering (display message) .............. 255
Steering wheel Adjusting (electrically) ...................110
Adjusting (manually) ......................110
Button overview ............................... 31
Buttons (on-board
computer) ...................................... 217
Important safety notes ..................109
Paddle shifters ............................... 15716Index
Page 30 of 384
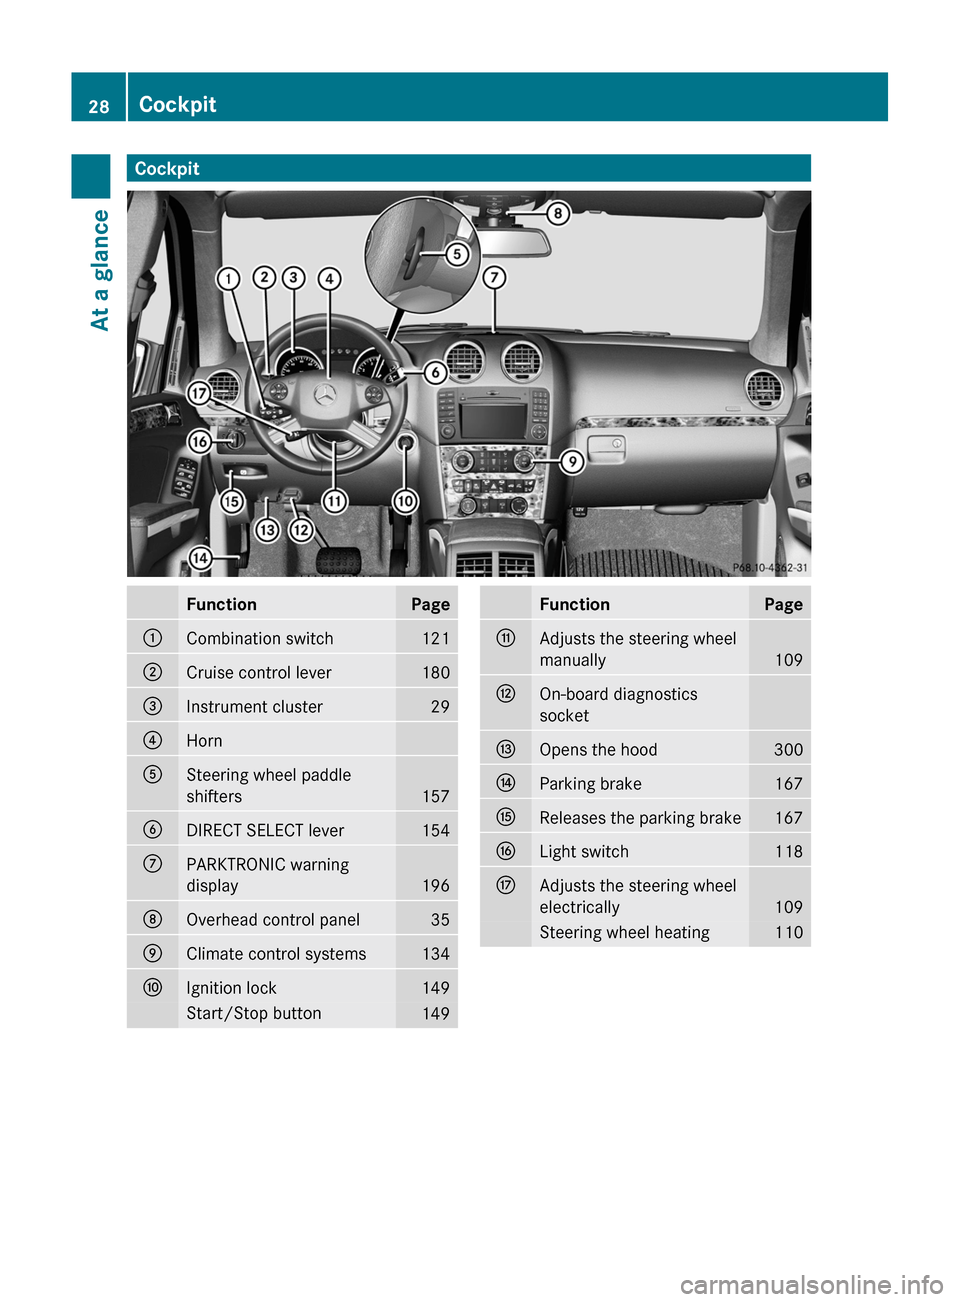
CockpitFunctionPage:Combination switch121;Cruise control lever180=Instrument cluster29?HornASteering wheel paddle
shifters
157
BDIRECT SELECT lever154CPARKTRONIC warning
display
196
DOverhead control panel35EClimate control systems134FIgnition lock149Start/Stop button149FunctionPageGAdjusts the steering wheel
manually
109
HOn-board diagnostics
socketIOpens the hood300JParking brake167KReleases the parking brake167LLight switch118MAdjusts the steering wheel
electrically
109
Steering wheel heating11028CockpitAt a glance
Page 40 of 384
Useful information
i This Operator's Manual describes all
models and all standard and optional
equipment of your vehicle available at the
time of publication of the Operator's
Manual. Country-specific differences are
possible. Please note that your vehicle may
not be equipped with all features
described. This also applies to safety-
related systems and functions.
i Please read the information on qualified
specialist workshops ( Y page 24).
Occupant safety
Overview of occupant safety
In this section, you will learn the most
important facts about the restraint system
components of the vehicle.
The restraint system consists of:
R seat belts
R child restraint systems
R LATCH-type (ISOFIX) child seat anchors
Additional protection is provided by:
R SRS (Supplemental Restraint System)
R NECK-PRO head restraints/NECK-PRO
luxury head restraints
R PRE-SAFE ®
R Air bag system components with:
- PASSENGER AIR BAG OFF indicator lamp
- USA only: front-passenger seat with
Occupant Classification System (OCS)
- Canada only: front-passenger seat with
BabySmart™ air bag deactivation system
The different air bag systems work
independently of each other. The protective
functions of the system work in conjunction
with each other. Not all air bags are deployed
in an accident.
GWARNING
Modifications to or work improperly
conducted on restraint system components
or their wiring, as well as tampering with
interconnected electronic systems, can lead
to the restraint systems no longer functioning
as intended.
Air bags or Emergency Tensioning Devices/
belt buckle tensioners, for example, could
deploy inadvertently or fail to deploy.
Therefore, never modify the restraint
systems. Do not tamper with electronic
components or their software.
i See "Children in the vehicle"
( Y page 61) for more information on
infants and children traveling with you in
the vehicle and restraints for infants and
children.
SRS (Supplemental Restraint System)
Introduction
SRS consists of:
R the + SRS warning lamp
R air bags
R air bag control unit (with crash sensors)
R Emergency Tensioning Devices/belt
buckle tensioners
R belt force limiters
SRS reduces the risk of occupants coming
into contact with the vehicle's interior in the
event of an accident. It can also reduce the
effect of the forces to which occupants are
subjected during an accident.
SRS warning lamps
SRS functions are checked regularly when
you switch on the ignition and when the
engine is running. Therefore, malfunctions
can be detected in good time.
The + SRS warning lamp in the instrument
cluster lights up when the ignition is switched
38Occupant safetySafety
Page 49 of 384
recommend that you always place a child
in a rear-facing child restraint on the rear
seat.
R If you install a rear-facing child restraint on
the front-passenger seat, make sure the
42 indicator lamp is
illuminated, indicating that the front-
passenger front air bag is deactivated.
Should the 42 indicator lamp
not illuminate or go out while the restraint
is installed, please check installation.
Periodically check the 42
indicator lamp while driving to make sure
the 42 indicator lamp is
illuminated. If the 42 indicator
lamp goes out or remains out, do not
transport a child on the front-passenger
seat until the system has been repaired.
A child in a rear-facing child restraint on the
front-passenger seat will be seriously
injured or even killed if the front-passenger
front air bag inflates.
R If you place a child in a forward-facing child
restraint on the front-passenger seat:
- move the seat as far back as possible
- use the proper child restraint
recommended for the age, size and
weight of the child
- secure child restraint with the vehicle's
seat belt according to the child seat
manufacturer's instructions
R For children larger than a typical 12-month-
old child, the front-passenger front air bag
can be activated or deactivated.
If the driver's air bag deploys, this does not
mean that the front-passenger front air bag
also has to deploy.
The OCS may have detected that the seat:
R was empty or occupied by a person with a
weight of up to or less than that of a typical12-month-old child seated in a standard
child restraint
R was occupied by a small individual, such as
a young teenager or a small adult
R was occupied by a child in a child restraint
system, whose weight is greater than that
of a typical 12-month-old child.
These are examples of when the OCS
deactivates the front-passenger front air bag.
Deactivation takes place although the
collision fulfills the criteria for deploying the
driver's air bag.
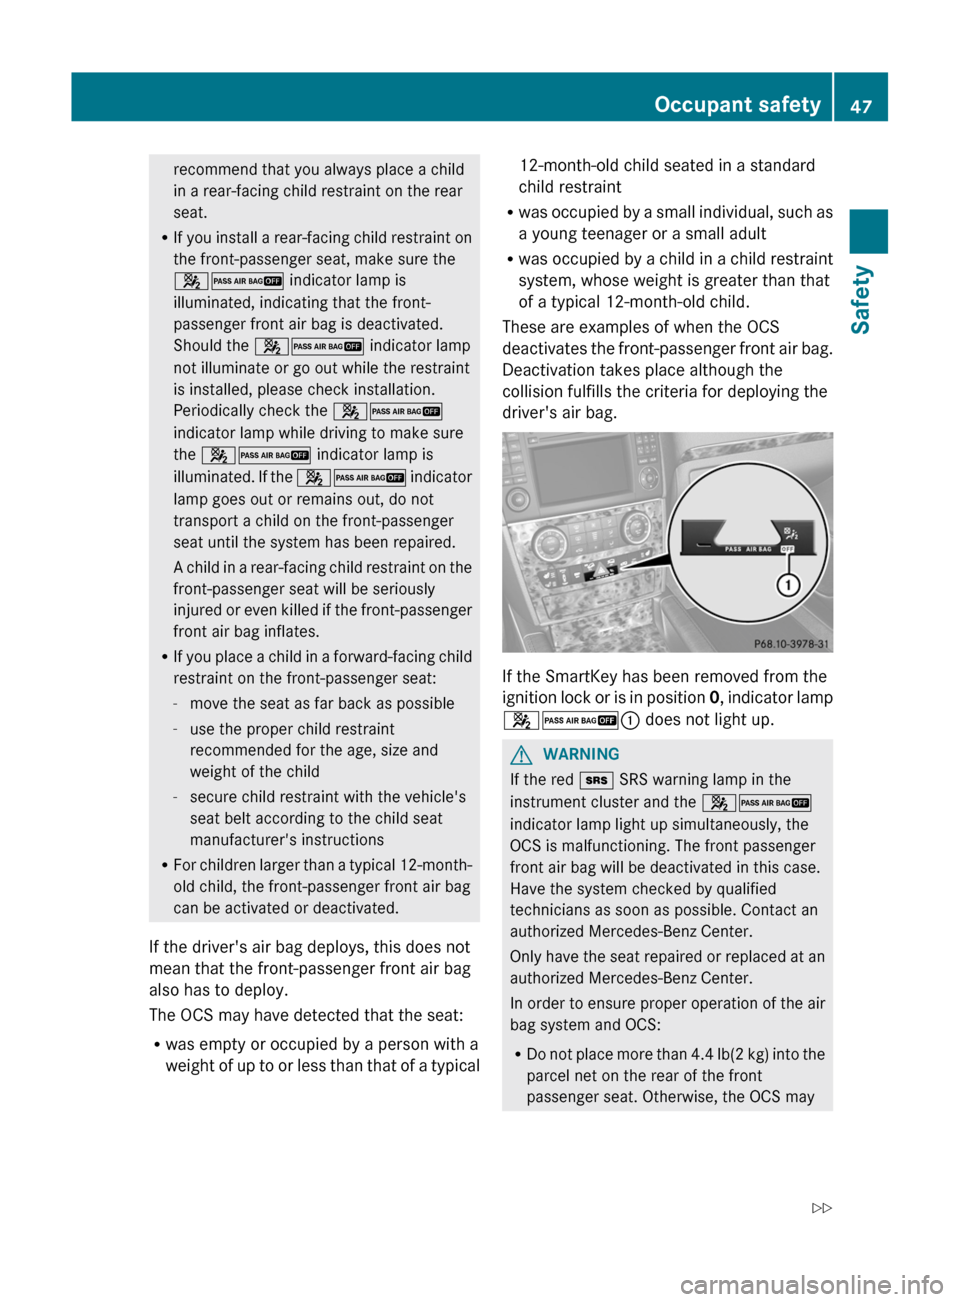
If the SmartKey has been removed from the
ignition lock or is in position 0, indicator lamp
42 : does not light up.
GWARNING
If the red + SRS warning lamp in the
instrument cluster and the 42
indicator lamp light up simultaneously, the
OCS is malfunctioning. The front passenger
front air bag will be deactivated in this case.
Have the system checked by qualified
technicians as soon as possible. Contact an
authorized Mercedes-Benz Center.
Only have the seat repaired or replaced at an
authorized Mercedes-Benz Center.
In order to ensure proper operation of the air
bag system and OCS:
R Do not place more than 4.4 lb (2 kg) into the
parcel net on the rear of the front
passenger seat. Otherwise, the OCS may
Occupant safety47SafetyZ
Page 50 of 384
not be able to properly approximate the
occupant weight category.
R Do not place objects under and/or around
the front passenger seat.
R Do not hang anything from or attach any
items to the seats.
R do not store any objects, such as books,
between the front passenger seat and the
center console or the front-passenger door.
R Do not move the front passenger seat
backwards against rigid objects.
R Sit with the seat belt properly fastened in a
position that is as upright as possible with
your back against the seat backrest.
R When seated, a passenger should not
position him/herself in such a way as to
cause the passenger's weight to be lifted
from the seat cushion as this may result in
the OCS being unable to correctly
approximate the passenger's weight
category.
R Read and observe all warnings in this
chapter.
System self-test
The 42 indicator lamp
illuminates when you:
R turn the SmartKey to position 1 or 2 in the
ignition lock
R press the KEYLESS-GO Start/Stop button
once or twice
If an adult occupant is properly sitting on the
passenger seat and the OCS classifies the
occupant as an adult, the 42
indicator lamp illuminates and goes out again
after approximately 6 seconds.
If the seat is not occupied and the OCS
classifies the front passenger seat as being
unoccupied, the 42 indicator
lamp will illuminate and not go out.
GWARNING
If the 4 2 indicator lamp does
not illuminate, the system is not functioning.
You must contact an authorized Mercedes-
Benz Center before seating any child on the
front passenger seat.
For more information, see "Problems with the
Occupant Classification System"
( Y page 49).GWARNING
Never place anything between seat cushion
and child seat (e.g. a pillow), since it reduces
the effectiveness of the OCS. The underside
and rear side child restraint system must be
placed entirely on the seat cushion and the
backrest of the front-passenger seat
backrest.
If necessary, adjust the tilt of the passenger
seat backrest.
An incorrectly mounted child seat could cause
injuries to the child in case of an accident,
instead of increasing protection for the child.
Follow the manufacturer's instructions for
installation of child restraint systems.
48Occupant safetySafety
Page 53 of 384
system is installed, check the anchorages
of the restraint system. Periodically check
the 42 indicator lamp while
driving to make sure the 42
indicator lamp is illuminated. If the
42 indicator lamp goes out or
remains out, you may only carry a child on
the front-passenger seat once the system
has been repaired.
A child in a rearward-facing child restraint
system on the front-passenger seat can be
seriously injured or even killed if the front-
passenger front air bag is deployed.
R When securing a child in a front-facing child
restraint system on the front-passenger
seat, you must:
- move the front-passenger seat as far
back as possible
- use a child restraint system that is
suitable for the age, size and weight of
the child
- observe the manufacturer's installation
instructions in order to install and secure
the child restraint system correctly.GWARNING
When using a BabySmart™-compatible child
restraint system on the front-passenger seat,
the front-passenger front air bag is only
disabled if the 42 indicator lamp
is illuminated.
Check the 42 indicator lamp
repeatedly, every time you use a
BabySmart™-compatible child restraint
system on the front-passenger seat. Should
the 42 indicator lamp not
illuminate or go out while the restraint is
installed, please check installation. If the
42 indicator lamp remains out,
do not use the BabySmart™ child restraint
system to carry a child on the front-passenger
seat until the system has been repaired.
GWARNING
The BabySmart™ air bag disabling system
ONLY works with specially adapted child
restraint systems. It does not work with child
restraint systems that are not compatible with
BabySmart™.
Never place anything between the seat
cushion and the child restraint system (e.g. a
cushion), as this reduces the effectiveness of
the BabySmart™ air bag deactivation system.
The underside of the child restraint system
must lie against the seat cushion of the front-
passenger seat. In the event of an accident,
an incorrectly installed child restraint system
could injure the child instead of offering
protection.
Observe the manufacturer's instructions
when installing special child restraint
systems.
Special child restraint systems which are
compatible with BabySmart™ are necessary
for deactivating the front-passenger front air
bag. When the special child restraint system
which is compatible with BabySmart™ is
installed correctly and is recognized by the
sensor system in the front-passenger seat,
the front-passenger front air bag is
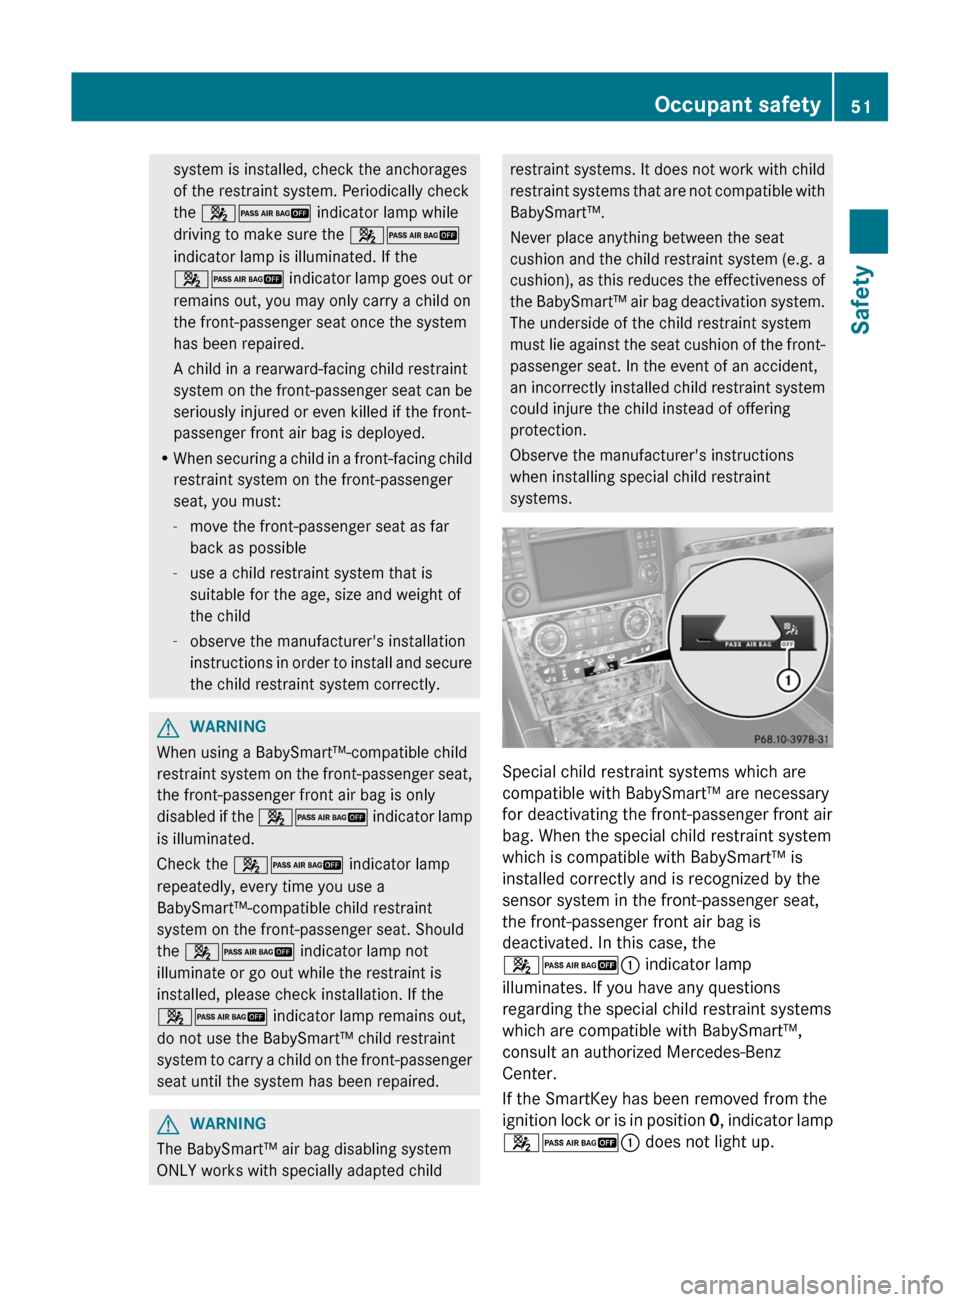
deactivated. In this case, the
42 : indicator lamp
illuminates. If you have any questions
regarding the special child restraint systems
which are compatible with BabySmart™,
consult an authorized Mercedes-Benz
Center.
If the SmartKey has been removed from the
ignition lock or is in position 0, indicator lamp
42 : does not light up.
Occupant safety51SafetyZ
Page 54 of 384
The system does not disable:
R the side impact air bag
R the window curtain air bag
R the Emergency Tensioning Devices/belt
buckle tensioners
System self-test
The 42 indicator lamp
illuminates when you:
R turn the SmartKey to position 1 or 2 in the
ignition lock
R on vehicles with KEYLESS-GO, press the
Start/Stop button once or twice
The 42 indicator lamp goes out
again after approximately six seconds.
If the 42 indicator lamp does not
illuminate or is lit continuously, the system is
malfunctioning. Have the BabySmart™
system checked at an authorized Mercedes-
Benz Center before transporting a child on
the front-passenger seat.
For further information, see "Problems with
air bag deactivation system" ( Y page 53).
GWARNING
Do not place powered-on laptops, mobile
phones, electronic tags such as those used in
ski passes or similar electronic devices on the
front passenger seat. Signals from such
devices may interfere with the BabySmart™
air bag deactivation system. Such signal
interference may cause the 42
indicator lamp not to come on during self-test.
The + SRS indicator lamp and/or the
42 indicator lamp could be
continuously lit, indicating that the system is
not functioning. The front-passenger front air
bag could deploy inadvertently or fail to
deploy in an accident.
52Occupant safetySafety
Page 60 of 384
XAdjust the seat and move the backrest to
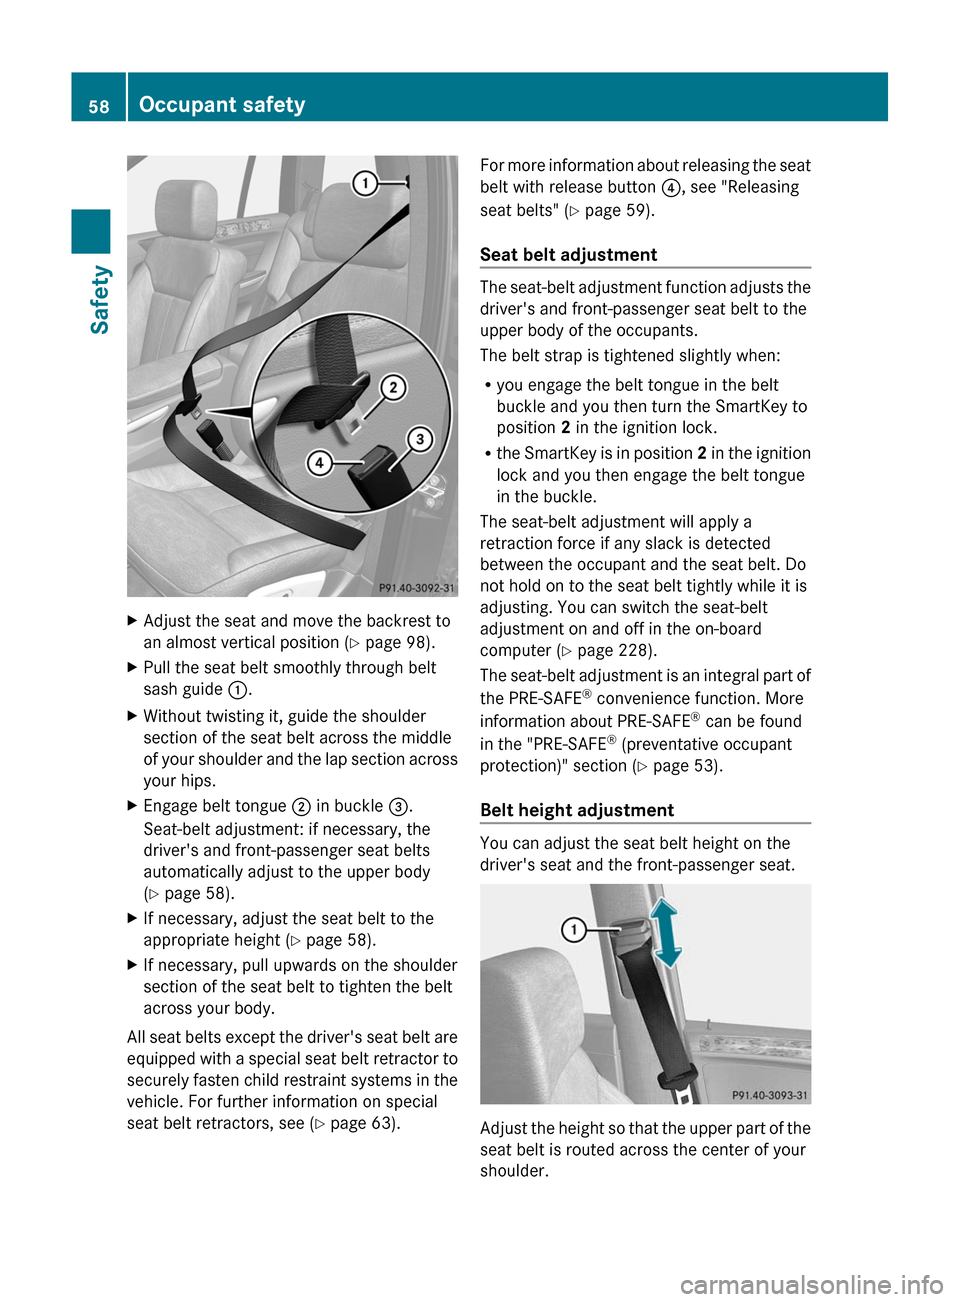
an almost vertical position ( Y page 98).XPull the seat belt smoothly through belt
sash guide :.XWithout twisting it, guide the shoulder
section of the seat belt across the middle
of your shoulder and the lap section across
your hips.XEngage belt tongue ; in buckle =.
Seat-belt adjustment: if necessary, the
driver's and front-passenger seat belts
automatically adjust to the upper body
( Y page 58).XIf necessary, adjust the seat belt to the
appropriate height ( Y page 58).XIf necessary, pull upwards on the shoulder
section of the seat belt to tighten the belt
across your body.
All seat belts except the driver's seat belt are
equipped with a special seat belt retractor to
securely fasten child restraint systems in the
vehicle. For further information on special
seat belt retractors, see ( Y page 63).
For more information about releasing the seat
belt with release button ?, see "Releasing
seat belts" ( Y page 59).
Seat belt adjustment
The seat-belt adjustment function adjusts the
driver's and front-passenger seat belt to the
upper body of the occupants.
The belt strap is tightened slightly when:
R you engage the belt tongue in the belt
buckle and you then turn the SmartKey to
position 2 in the ignition lock.
R the SmartKey is in position 2 in the ignition
lock and you then engage the belt tongue
in the buckle.
The seat-belt adjustment will apply a
retraction force if any slack is detected
between the occupant and the seat belt. Do
not hold on to the seat belt tightly while it is
adjusting. You can switch the seat-belt
adjustment on and off in the on-board
computer ( Y page 228).
The seat-belt adjustment is an integral part of
the PRE-SAFE ®
convenience function. More
information about PRE-SAFE ®
can be found
in the "PRE-SAFE ®
(preventative occupant
protection)" section ( Y page 53).
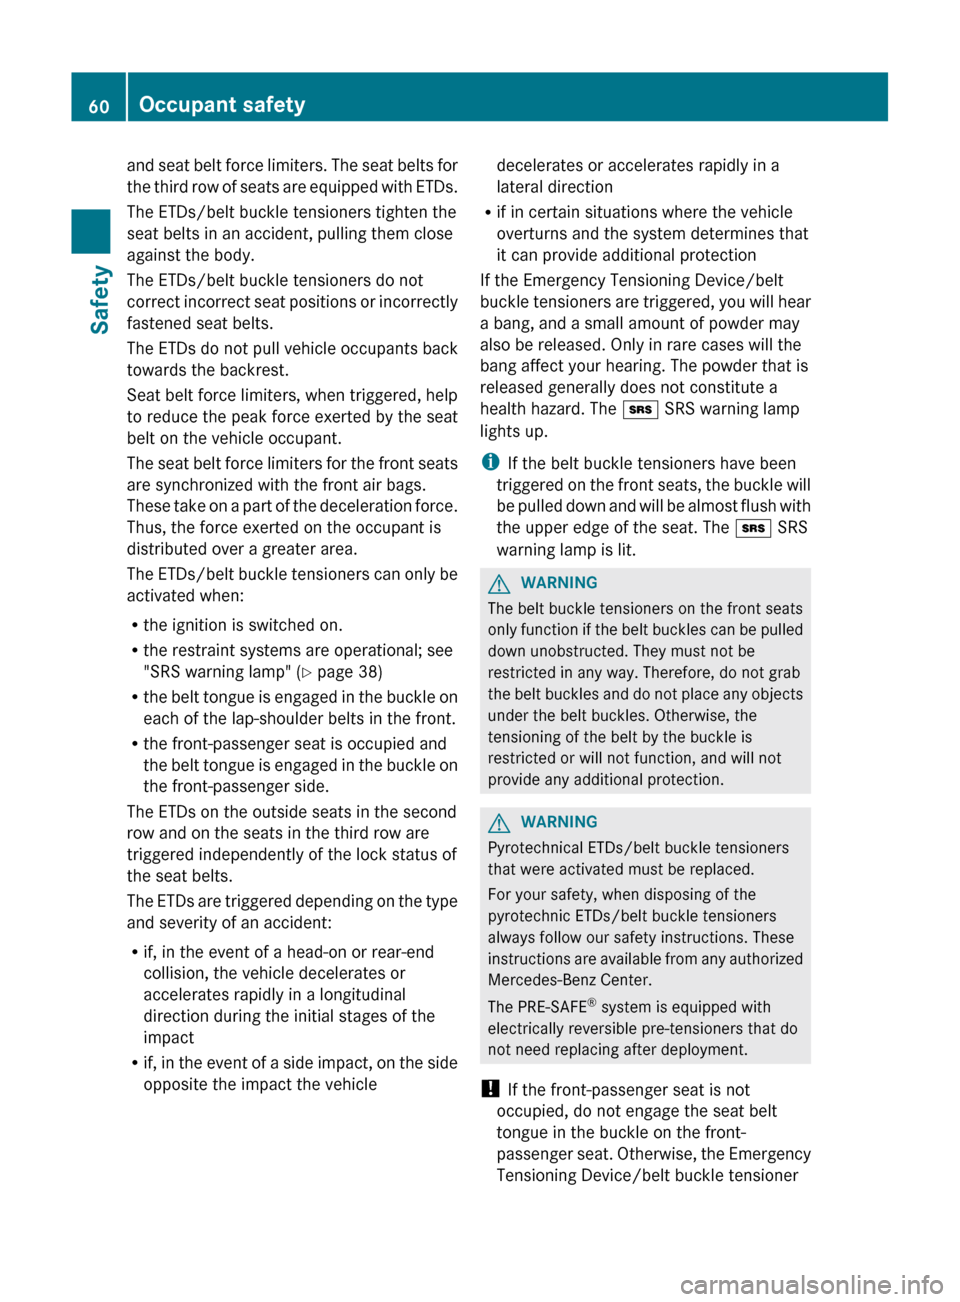
Belt height adjustment
You can adjust the seat belt height on the
driver's seat and the front-passenger seat.
Adjust the height so that the upper part of the
seat belt is routed across the center of your
shoulder.
58Occupant safetySafety
Page 62 of 384
and seat belt force limiters. The seat belts for
the third row of seats are equipped with ETDs.
The ETDs/belt buckle tensioners tighten the
seat belts in an accident, pulling them close
against the body.
The ETDs/belt buckle tensioners do not
correct incorrect seat positions or incorrectly
fastened seat belts.
The ETDs do not pull vehicle occupants back
towards the backrest.
Seat belt force limiters, when triggered, help
to reduce the peak force exerted by the seat
belt on the vehicle occupant.
The seat belt force limiters for the front seats
are synchronized with the front air bags.
These take on a part of the deceleration force.
Thus, the force exerted on the occupant is
distributed over a greater area.
The ETDs/belt buckle tensioners can only be
activated when:
R the ignition is switched on.
R the restraint systems are operational; see
"SRS warning lamp" ( Y page 38)
R the belt tongue is engaged in the buckle on
each of the lap-shoulder belts in the front.
R the front-passenger seat is occupied and
the belt tongue is engaged in the buckle on
the front-passenger side.
The ETDs on the outside seats in the second
row and on the seats in the third row are
triggered independently of the lock status of
the seat belts.
The ETDs are triggered depending on the type
and severity of an accident:
R if, in the event of a head-on or rear-end
collision, the vehicle decelerates or
accelerates rapidly in a longitudinal
direction during the initial stages of the
impact
R if, in the event of a side impact, on the side
opposite the impact the vehicledecelerates or accelerates rapidly in a
lateral direction
R if in certain situations where the vehicle
overturns and the system determines that
it can provide additional protection
If the Emergency Tensioning Device/belt
buckle tensioners are triggered, you will hear
a bang, and a small amount of powder may
also be released. Only in rare cases will the
bang affect your hearing. The powder that is
released generally does not constitute a
health hazard. The + SRS warning lamp
lights up.
i If the belt buckle tensioners have been
triggered on the front seats, the buckle will
be pulled down and will be almost flush with
the upper edge of the seat. The + SRS
warning lamp is lit.GWARNING
The belt buckle tensioners on the front seats
only function if the belt buckles can be pulled
down unobstructed. They must not be
restricted in any way. Therefore, do not grab
the belt buckles and do not place any objects
under the belt buckles. Otherwise, the
tensioning of the belt by the buckle is
restricted or will not function, and will not
provide any additional protection.
GWARNING
Pyrotechnical ETDs/belt buckle tensioners
that were activated must be replaced.
For your safety, when disposing of the
pyrotechnic ETDs/belt buckle tensioners
always follow our safety instructions. These
instructions are available from any authorized
Mercedes-Benz Center.
The PRE-SAFE ®
system is equipped with
electrically reversible pre-tensioners that do
not need replacing after deployment.
! If the front-passenger seat is not
occupied, do not engage the seat belt
tongue in the buckle on the front-
passenger seat. Otherwise, the Emergency
Tensioning Device/belt buckle tensioner
60Occupant safetySafety