check engine MERCEDES-BENZ GL-Class 2013 X166 User Guide
[x] Cancel search | Manufacturer: MERCEDES-BENZ, Model Year: 2013, Model line: GL-Class, Model: MERCEDES-BENZ GL-Class 2013 X166Pages: 454, PDF Size: 6.31 MB
Page 75 of 454
If yourv
ehicle with trailer (vehicle/trailer
combination) begins to lurch, you can only
stabilize the vehicle/trailer combination by
depressing the brake firmly.
In this situation, ESP ®
assists you and can
detec tifthe vehicle/trailer combination
begins to lurch. ESP ®
slows the vehicle down
by braking and limiting the engine output until
the vehicle/trailer combination has
stabilized.
Trailer stabilization is active above speeds of
about 37 mph (60 km/h).
Trailer stabilization does not work if ESP ®
is
deactivated because of a malfunction.
Crosswindd riving assistance Strong crosswinds ca
ncause your vehicle to
deviate from a straigh tcourse. The crosswind
driving assistance function integrated into
ESP ®
significantly reduces these effects.
ESP ®
intervenes automatically according to
the direction and intensity of the crosswinds
affecting your vehicle.
When driving on straight roads or gentle
bends, your vehicle is kept safely on course
by a stabilizing brake intervention.
Crosswind driving assistance is active above
a vehicle speed of 80 km/h.
Crosswind driving assistance does not work
if ESP ®
is deactivated or disabled because of
a malfunction. EBD (electronic brake force
distribution)
i Observe the "Important safety notes"
section (Y page 66). G
WARNING
If EBD has malfunctioned, the rear wheels can
still lock, e.g. under full braking. This
increases the risk of skidding and an accident.
You should therefore adapt your driving style
to the different handling characteristics. Have the brake system checked at a qualified
specialist workshop.
Observe information regarding indicator and
warning lamps (Y page 323) as well as
display messages (Y page 289).
EBD monitors and controls the brake
pressure on the rear wheels to improve
driving stability while braking. ADAPTIVE BRAKE
ADAPTIVE BRAKE enhances braking safety
and offers increased braking comfort. In
addition to the braking function, ADAPTIVE
BRAKE also has the HOLD function
(Y page 211) and hill start assist
(Y page 166). PRE-SAFE
®
Brake
i Observe the "Important safety notes"
section (Y page 66).
PRE-SAFE ®
Brake is only available in vehicles
with DISTRONIC PLUS.
If PRE-SAFE ®
Brake is to aid you, the radar
sensor system must be:
R activated (Y page 281)
R operational
With the help of the radar sensor system,
PRE-SAFE ®
Brake can detect obstacles that
are in front of your vehicle for an extended
period of time.
PRE-SAFE ®
Brake can help you to minimize
the risk of a collision with a vehicle ahead or
reduce the effects of such a collision. If PRE-
SAFE ®
Brake has detected a risk of collision,
you will be warned visually and acoustically
as well as by automatic braking. PRE-SAFE ®
Brake cannot prevent a collision without your
intervention.
Starting at a speed of around
4 mph (7 km/h), this function warns you if
you very quickly approach a vehicle in front. Driving safety systems
73Safety Z
Page 77 of 454
R
a narrow vehicle traveling in front, e.g. a
motorbike
R a vehicle traveling in fron tonadifferent line
relative to the center of your vehicle G
WARNING
PRE-SAFE ®
Brake does not react:
R to people or animals
R to oncoming vehicles
R to crossing traffic
R when cornering
As a result, PRE-SAFE ®
Brake may neither
give warnings nor intervene in all critical
situations. There is a risk of an accident.
Always pay careful attention to the traffic
situation and be ready to brake.
In order to maintain an appropriate distance
from the vehicle in front and thus prevent a
collision, you must apply the brakes yourself.
X To activate/deactivate: activate or
deactivate PRE-SAFE ®
Brake in the on-
board computer (Y page 276).
When PRE-SAFE ®
Brake is activated, the
0003 symbol appears in the multifunction
display as long as the HOLD function is
deactivated (Y page 211). On vehicles with
Active Parking Assist, the 0003symbol is
displayed when Pis engaged or you are
driving faster than 22 mph (35 km/h).
Following damage to the fron tend of the
vehicle, have the configuratio nand operation
of the rada rsensors checked at a qualified
specialist workshop. This also applies to
collisions at low speeds where there is no
visible damage to the fron tofthe vehicle. STEER CONTROL
i Observe the "Important safety notes"
section (Y page 66).
STEER CONTROL helps you by transmitting a
noticeable steering force to the steering
wheel in the direction required for vehicle
stabilization. This steering assistance is provided in
particular if:
R
both right wheels or both left wheels are on
a wet or slippery road surface when you
brake
R the vehicle starts to skid
If ESP ®
is malfunctioning, you will not receive
steering support from STEER CONTROL.
Power steering will, however, continue to
function. Theft deterrent locking system
Immobilizer
X To activate with the SmartKey: remove
the SmartKey from the ignition lock.
X To activate with KEYLESS-GO: switch the
ignition off and open the driver's door.
X To deactivate: switch on the ignition.
The immobilizer prevents your vehicle from
being started without the correct SmartKey.
When leaving the vehicle, always take the
SmartKey with you and lock the vehicle.
Anyone can start the engine if a valid
SmartKey has been left inside the vehicle.
i The immobilizer is always deactivated
when you start the engine.
In the event that the engine cannot be
started when the starter battery is fully
charged, the immobilizer may be faulty.
Contact an authorized Mercedes-Benz
Center or call 1-800-FOR-MERCedes (in the
USA) or 1-800-387-0100 (in Canada). Theft deterrent locking system
75Safety Z
Page 81 of 454
Strong magnetic fields can occur in the
vicinity of powerful electrical installations.
R Do not keep the SmartKey:
- with electronic devices, e.g. a mobile
phone or another SmartKey
- with metallic objects, e.g. coins or metal
foil
- inside metallic objects, e.g. a metal case
This can affect the functionality of the
SmartKey.
Do not keep the KEYLESS-GO key in the
temperature-controlled cup holder.
Otherwise, the KEYLESS-GO key will not be
recognized. SmartKey functions
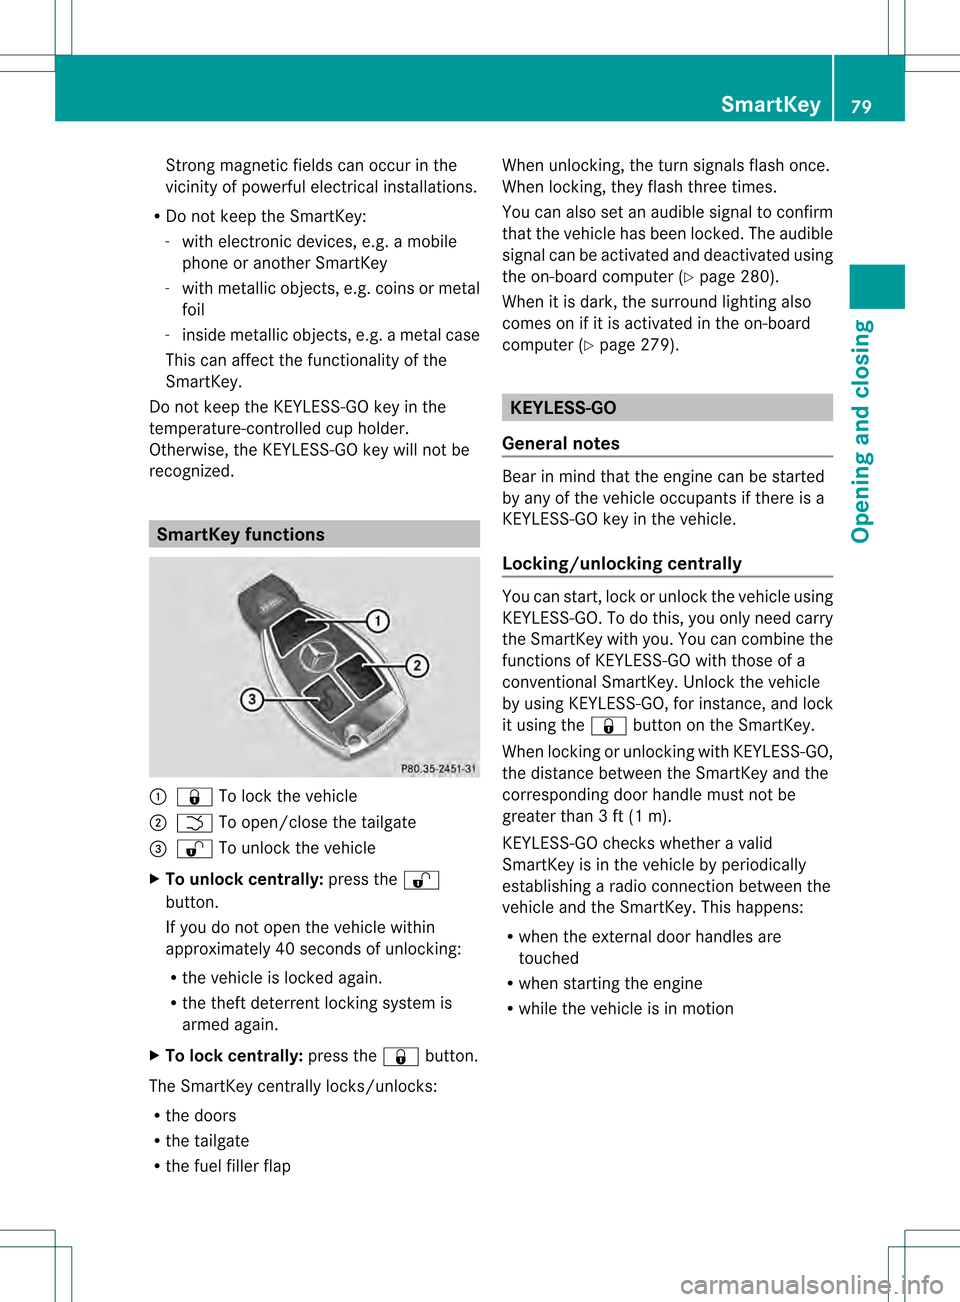
0002
000C To lock the vehicle
0003 0004 To open/close the tailgate
0021 000D To unlock the vehicle
X To unloc kcentrally: press the 000D
button.
If you do not open th evehicle within
approximately 40 seconds of unlocking:
R the vehicle is locked again.
R the theft deterrent locking system is
armed again.
X To lock centrally: press the000Cbutton.
The SmartKey centrally locks/unlocks:
R the doors
R the tailgate
R the fuel filler flap When unlocking, the turn signals flash once.
When locking, they flash three times.
You can also set an audible signal to confirm
that the vehicle has been locked. The audible
signal can be activated and deactivated using
the on-board computer (Y
page 280).
When it is dark, the surround lighting also
comes on if it is activated in the on-board
computer (Y page 279). KEYLESS-GO
General notes Bear in mind that the engine can be started
by any of the vehicle occupants if there is a
KEYLESS-GO key in the vehicle.
Locking/unlocking centrally
You can start, lock or unlock the vehicle using
KEYLESS-GO. To do this, you only need carry
the SmartKey with you. You can combine the
functions of KEYLESS-GO with those of a
conventional SmartKey. Unlock the vehicle
by using KEYLESS-GO, for instance, and lock
it using the
000Cbutton on the SmartKey.
When locking or unlocking with KEYLESS-GO,
the distance between the SmartKey and the
corresponding door handle must not be
greater than 3 ft (1 m).
KEYLESS-GO checks whether a valid
SmartKey is in the vehicle by periodically
establishing a radio connection between the
vehicle and the SmartKey. This happens:
R when the external door handles are
touched
R when starting the engine
R while the vehicle is in motion SmartKey
79Opening and closing Z
Page 86 of 454
Problem Possible causes/consequences and
0001 Solutions
The engine cannot be
started using the
SmartKey. The on-board voltage is too low.
X
Switch off non-essential consumers, e.g. seat heating or interior
lighting, and try to start the engine again.
If this does not work:
X Check the starter battery and charge it if necessary
(Y page 390).
or
X Jump-start the vehicle (Y page 391).
or
X Consult a qualified specialist workshop. The engine cannot be
started using KEYLESS-
GO. The SmartKey is in
the vehicle. Ad
oor is open. Therefore, the SmartKey cannot be detected as
easily.
X Close the door and try to start the vehicle again. There is interference from a powerful source of radio waves.
X
Start your vehicle with the SmartKey in the ignition lock. Doors
Important safety notes
G
WARNING
If children are left unsupervised in the vehicle,
they could:
R open the doors, thus endangering other
people or road users.
R get out and disrupt traffic.
R operate the vehicle's equipment.
Additionally, children could set the vehicle in
motion if, for example, they:
R release the parking brake.
R shift the automatic transmission out of
parking position P.
R starting the engine.
There is a risk of an accident and injury.
When leaving the vehicle, always take the
SmartKey with you and lock the vehicle. Never
leave children or animals unattended in the
vehicle. Always keep the SmartKey out of
reach of children. G
WARNING
When leaving the vehicle, always remove the
SmartKey from the ignition lock. Always take
the SmartKey with you and lock the vehicle.
Do not leave children unsupervised in the
vehicle, even if they are secured in a child
restraint system, and do not give them access
to an unlocked vehicle. Achild's unsupervised
access to a vehicle could result in an accident
and/or serious personal injury. They could:
R injure themselves on vehicle parts
R be seriously or fatally injured by extreme
heat or cold
R injure themselves or have an accident with
vehicle equipment that may still be in
operation even after the SmartKey has
been removed from the ignition, such as the
seat adjustment, steering wheel
adjustment or memory function.
If children open a door, they could cause
severe or even fatal injury to other persons; if
they get out of the vehicle, they could injure 84
DoorsOpening and closing
Page 104 of 454
Useful information
i This Operator's Manual describes all
models and all standard and optional
equipment of your vehicle available at the
time of publication of the Operator's
Manual. Country-specific differences are
possible. Please note that your vehicle may
not be equipped with all features
described. This also applies to safety-
related systems and functions.
i Read the information on qualified
specialist workshops: (Y page 28).Correct driver's seat position
G
WARNING
You could lose control of your vehicle if you
do the following while driving:
R adjust the driver's seat, head restraint,
steering wheel or mirrors
R faste nthe seat belt
There is a risk of an accident.
Adjust the driver's seat, head restraint,
steering wheel and mirror and fasten your
seat belt before starting the engine. X
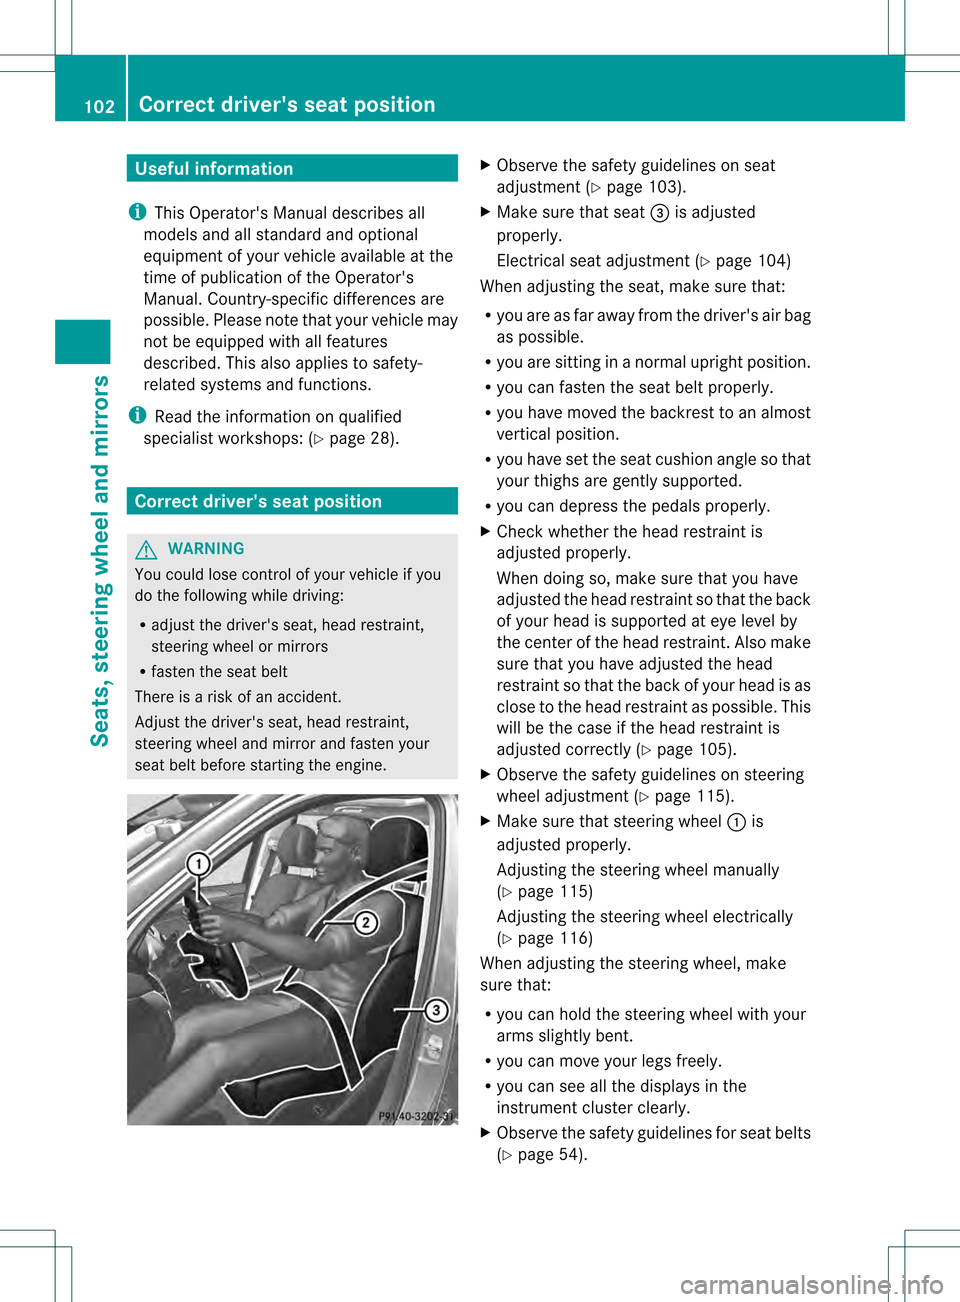
Observe the safety guidelines on seat
adjustment (Y page 103).
X Make sure that seat 0021is adjusted
properly.
Electrical seat adjustment (Y page 104)
When adjusting the seat, make sure that:
R you are as far away from the driver's air bag
as possible.
R you are sitting in a normal upright position.
R you can fasten the seat belt properly.
R you have moved the backrest to an almost
vertical position.
R you have set the seat cushion angle so that
your thighs are gently supported.
R you can depress the pedals properly.
X Check whether the head restraint is
adjusted properly.
When doing so, make sure that you have
adjusted the head restraint so that the back
of your head is supported at eye level by
the center of the head restraint.A lso make
sure that you have adjusted the head
restraint so that the back of your head is as
close to the head restraint as possible .This
will be the case if the head restraint is
adjusted correctly (Y page 105).
X Observe the safety guidelines on steering
wheel adjustment (Y page 115).
X Make sure that steering wheel 0002is
adjusted properly.
Adjusting the steering wheel manually
(Y page 115)
Adjusting the steering wheel electrically
(Y page 116)
When adjusting the steering wheel, make
sure that:
R you can hold the steering wheel with your
arms slightly bent.
R you can move your legs freely.
R you can see all the displays in the
instrumentc luster clearly.
X Observe the safety guidelines for seat belts
(Y page 54). 102
Correct driver's seat positionSeats, steering wheel and mirrors
Page 117 of 454

Problems with the seat ventilation
Problem Possible causes/consequences and
0001 Solutions
The seat ventilation has
switched off
prematurely or cannot
be switched on. The on-board voltage is too low because too many electrical
consumers are switched on.
X
Switch off electrical consumers that you do not need, such as
the rear window defroster or interior lighting.
Once the battery is sufficiently charged, the seat ventilation will
switch back on automatically. Steering wheel
Important safety notes
G
WARNING
You could lose control of your vehicle if you
do the following while driving:
R adjust the driver's seat, head restraint,
steering wheel or mirrors
R fasten the seat belt
There is a risk of an accident.
Adjust the driver's seat, head restraint,
steering wheel and mirror and fasten your
seat belt before starting the engine. G
WARNING
Children could injure themselves if they
adjust the steering wheel. There is a risk of
injury.
When leaving the vehicle, always take the
SmartKey with you and lock the vehicle. Never
leave children unsupervised in the vehicle. Adjusting the steering wheel
manually
G
WARNING
If the steering wheel is unlocked while the
vehicle is in motion, it could change position
unexpectedly. This could cause you to lose
control of the vehicle. There is a risk of an
accident. Before starting off, make sure the steering
wheel is locked. Never unlock the steering
wheel while the vehicle is in motion.
0002
Release lever
0003 To adjust the steering wheel height
0021 To adjust the steering wheel position
(fore-and-aft adjustment)
X Push release lever 0002down completely.
The steering column is unlocked.
X Adjust the steering wheel to the desired
position.
X Push release lever 0002up completely.
The steering column is locked.
X Check if the steering column is locked.
When doing so, try to push the steering
wheel up or down or try to move it in the
fore-and-aft direction. Steering wheel
115Seats, steering wheel and mirrors Z
Page 135 of 454
Crash-responsive emergency lighting
The interio rlighting is activated automatically
if the vehicle is involved in an accident.
X To switch off the crash-responsive
emergency lighting: press the hazard
warning lamp button.
or
X Loc kand then unlock the vehicle using the
SmartKey. Replacing bulbs
Important safety notes
Xenon bulbs G
DANGER
Xeno nbulbs carry a high voltage. You can get
an electric shock if you remove the cover of
the Xenon bulb and touch the electrical
contacts. There is a risk of fatal injury.
Never touch the parts or the electrical
contacts of the Xenon bulb. Always have work
on the Xenon bulbs carried out at a qualified
specialist workshop.
If your vehicle is equipped with Xenon bulbs,
you can recognize this by the following: the
cone of light from the Xenon bulbs moves
from the top to the bottom and back again
when you start the engine. For this to be
observed, the lights must be switched on
before starting the engine.
Bulbs and lamps are an important aspec tof
vehicle safety .You must therefore make sure
that these function correctly at all times.
Have the headlamp setting checked regularly.
Other bulbs G
WARNING
Bulbs, lamps and connectors can get very hot
when operating. If you change a bulb, you
could burn yourself on these components.
There is a risk of injury. Allow these components to cool down before
changing a bulb.
There are bulbs other than the Xenon bulbs
that you cannot replace. Replace only the
bulbs listed (Y page 133). Have the bulbs that
you cannot replace yourself changed at a
qualified specialist workshop.
If you require assistance changing bulbs,
consult a qualified specialist workshop.
Do not touch the glass tube of new bulbs with
your bare hands. Even minor contamination
can burn into the glass surface and reduce
the service life of the bulbs. Always use a lint-
free cloth or only touch the base of the bulb
when installing.
Only use bulbs of the correc ttype.
If the new bulb still does no tlight up, consult
a qualified specialist workshop.
Bulbs and lamps are an importan taspect of
vehicle safety. You must therefore make sure
that these function correctly at all times.
Have the headlamp setting checked regularly. Overview:c
hanging bulbs/bulb types
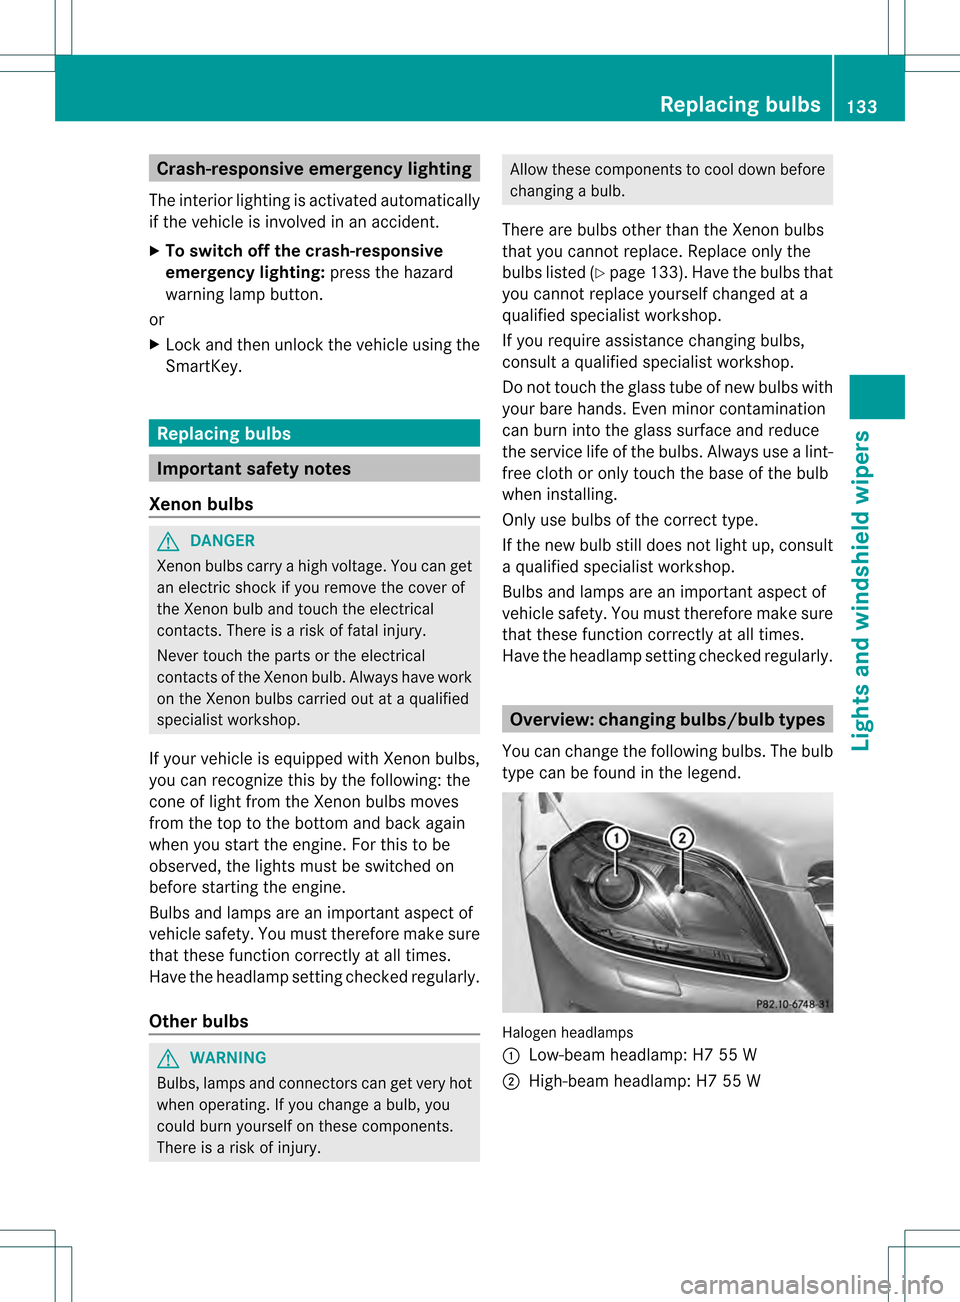
You can change the following bulbs. The bulb
type can be found in the legend. Halogen headlamps
0002
Low-beam headlamp: H7 55 W
0003 High-beam headlamp: H7 55 W Replacing bulbs
133Lights and windshield wipers Z
Page 141 of 454
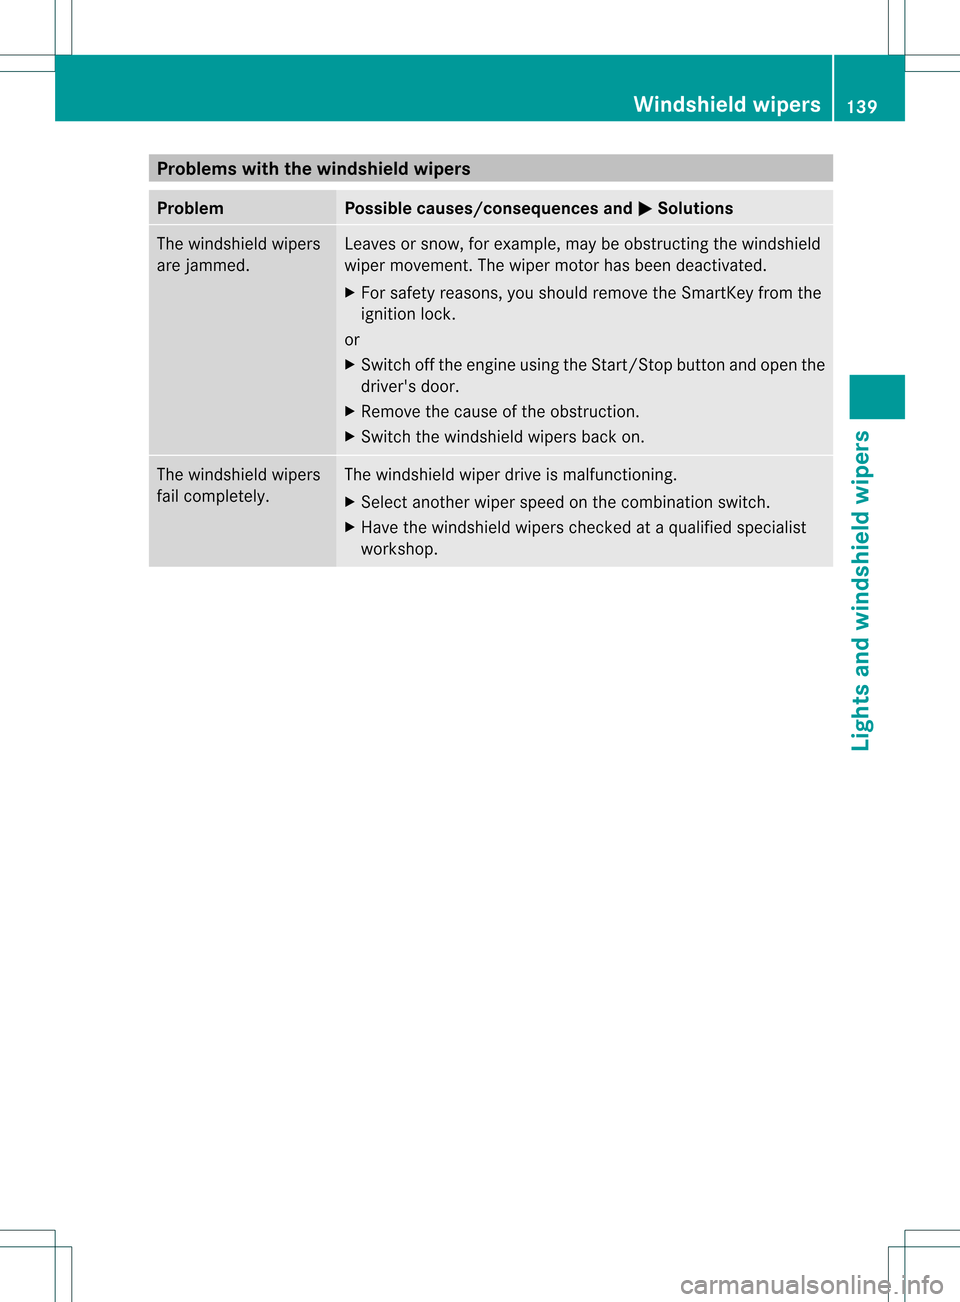
Problems with the windshield wipers
Problem Possible causes/consequences and
0001 Solutions
The windshield wipers
are jammed. Leaves or snow, for example, may be obstructing the windshield
wiper movement.T
he wiper motor has been deactivated.
X For safety reasons, you should remove the SmartKey from the
ignition lock.
or
X Switch off the engine using the Start/Stop button and open the
driver's door.
X Remove the cause of the obstruction.
X Switch the windshield wipers back on. The windshield wipers
fail completely. The windshield wiper drive is malfunctioning.
X
Select another wiper speed on the combination switch.
X Have the windshield wipers checked at a qualified specialist
workshop. Windshield wipers
139Lights and windshield wipers Z
Page 170 of 454
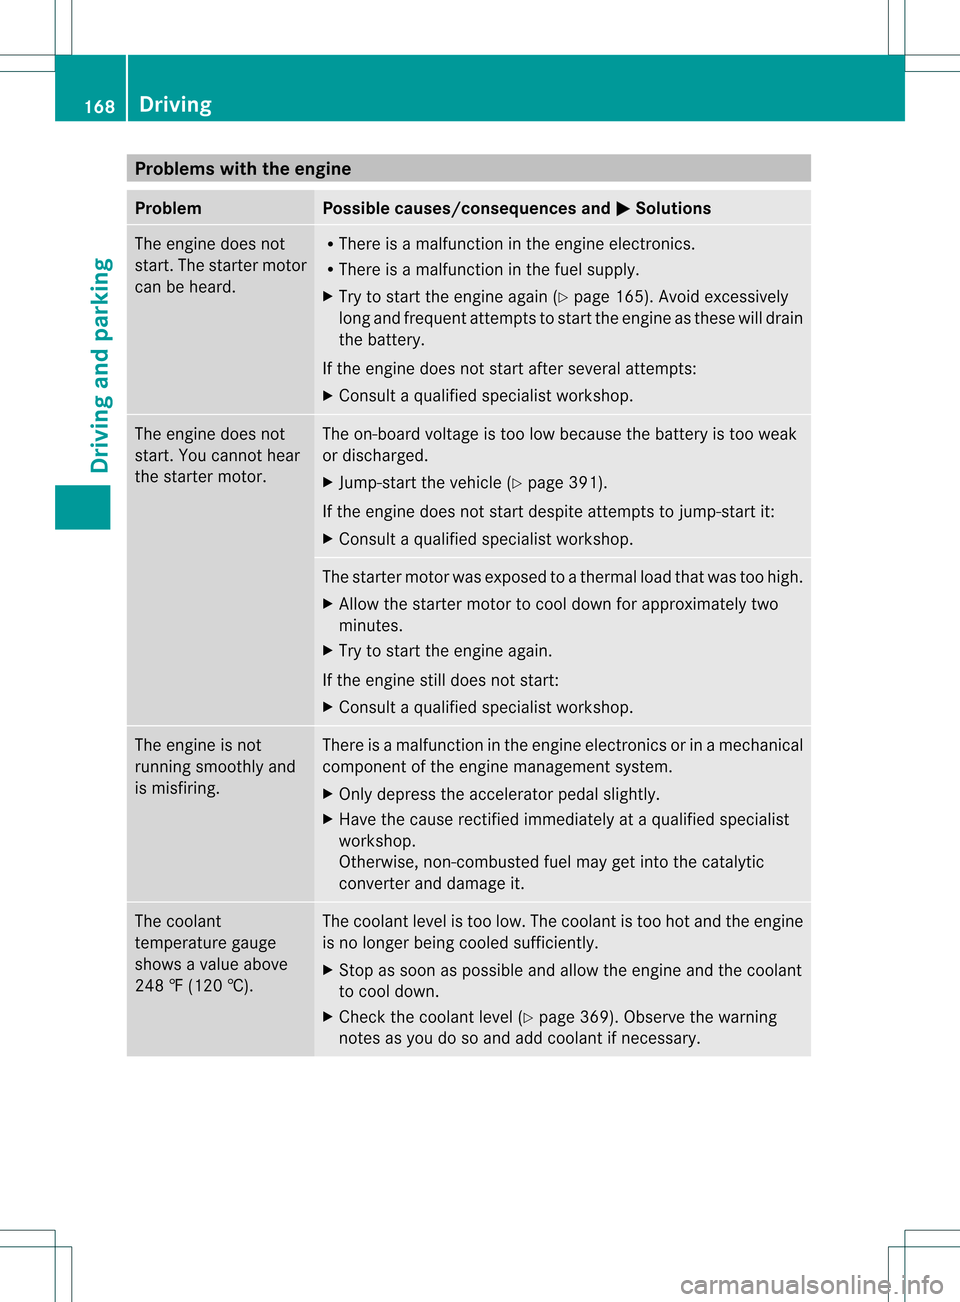
Problems with the engine
Problem Possible causes/consequences and
0001 Solutions
The engine does not
start. The starter motor
can be heard. R
There is a malfunction in the engine electronics.
R There is a malfunction in the fuel supply.
X Try to start the engine again (Y page 165). Avoid excessively
long and frequent attempts to start the engine as these will drain
the battery.
If the engine does not start after several attempts:
X Consult a qualified specialist workshop. The engine does not
start. You cannot hear
the starter motor. The on-board voltage is too low because the battery is too weak
or discharged.
X
Jump-start the vehicle (Y page 391).
If the engine does not start despite attempts to jump-start it:
X Consult a qualified specialist workshop. The starter motor was exposed to a thermal load that was too high.
X
Allow the starter motor to cool down for approximately two
minutes.
X Try to start the engine again.
If the engine still does not start:
X Consult a qualified specialist workshop. The engine is not
running smoothly and
is misfiring. There is a malfunction in the engine electronics or in a mechanical
component of the engine management system.
X
Only depress the accelerator pedal slightly.
X Have the cause rectified immediately at a qualified specialist
workshop.
Otherwise, non-combusted fuel may get into the catalytic
converter and damage it. The coolant
temperature gauge
shows a value above
248 ‡ (120 †). The coolant level is too low. The coolant is too hot and the engine
is no longer being cooled sufficiently.
X
Stop as soon as possible and allow the engine and the coolant
to cool down.
X Check the coolant level (Y page 369). Observe the warning
notes as you do so and add coolant if necessary. 168
DrivingDriving and parking
Page 171 of 454

Automatic transmission
Important safety notes
G
WARNING
If the engine speed is above the idling speed
and you engage transmission position Dor
R, the vehicle could pull away suddenly. There
is a risk of an accident.
When engaging transmission position Dor R,
always firmly depress the brake pedal and do
no tsimultaneously accelerate. G
WARNING
The automatic transmission switches to
neutral position Nwhen you switch off the
engine. The vehicle may roll away. There is a
risk of an accident.
After switching off the engine, always switch
to parking position P. Prevent the parked
vehicle fro mrolling away by applying the
parking brake. DIRECT SELECTl
ever
Overview of transmission positions 0011
Park position with parking lock
000E Reverse gear
000F Neutral
0010 Drive
The DIRECT SELECT lever is on the righ tofthe
steering column.
i The DIRECT SELECT lever always returns
to its original position. The current transmission position
P,R, Nor Dappears
in the transmission position display
(Y page 169) in the multifunction display.
Transmission position and drive
program display !
If the transmission position display in the
multifunction display is not working, you
should pull away carefully to check whether
the desired transmission position is
engaged. Ideally, you should select
transmission position Dand, in AMG
vehicles, drive program Cor S. Do not
restrict the shift range. Transmission position and drive program display
0002
Transmission position display
0003 Drive program display
The current transmission position and drive
program appearint he multifunction display.
i The arrows in the transmission position
display show how and into which
transmission positions you can change
using the DIRECT SELECT lever.
Engaging parkp osition P !
If the engine speed is to ohigh or the
vehicle is moving, do not shift the
automatic transmission directly from Dto
R, from Rto Dor directly to P.The
automatic transmission could otherwise be
damaged. Automatic transmission
169Driving and parking Z