MERCEDES-BENZ GL-Class 2013 X166 Owner's Manual
Manufacturer: MERCEDES-BENZ, Model Year: 2013, Model line: GL-Class, Model: MERCEDES-BENZ GL-Class 2013 X166Pages: 454, PDF Size: 6.31 MB
Page 231 of 454
"Coupling up a trailer" function
!
The following distance specifications
refer to trailer tow hitches with ball
coupling that have been approved for this
vehicle by Mercedes-Benz.D istances may
differ if you use other ball couplings. In this
case, take into account that actual
distances will not match the following
distance specifications. Otherwise you
could damage the trailer and vehicle. 0002
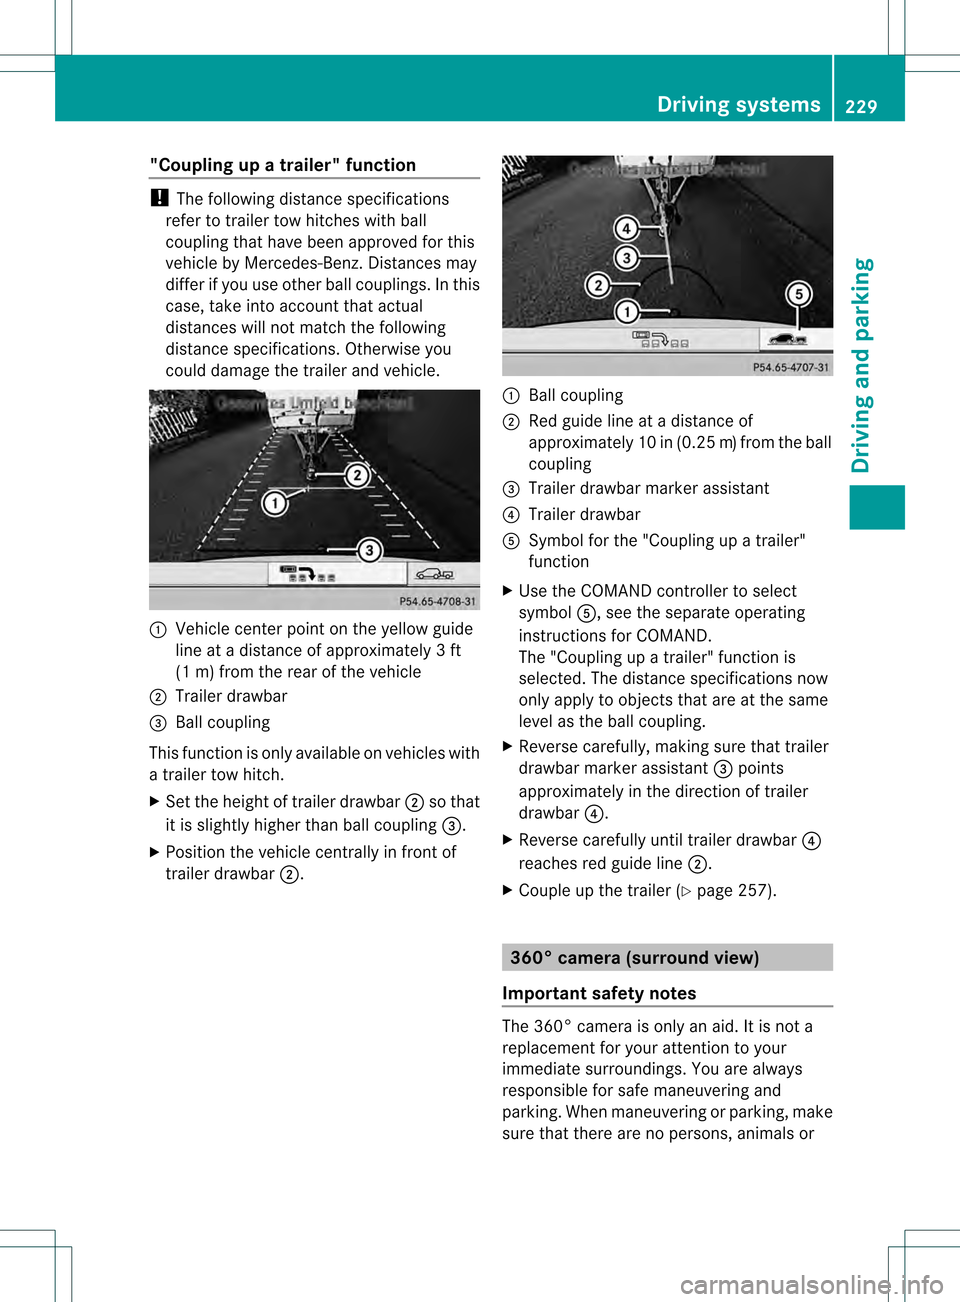
Vehicle center point on the yellow guide
line at a distance of approximately 3ft
(1 m) from the rear of the vehicle
0003 Trailer drawbar
0021 Ball coupling
This function is only available on vehicles with
a trailer tow hitch.
X Set the height of trailer drawbar 0003so that
it is slightly higher than ball coupling 0021.
X Position the vehicle centrally in fron tof
trailer drawbar 0003. 0002
Ball coupling
0003 Red guide line at a distance of
approximately 10 in (0.25 m)from the ball
coupling
0021 Trailer drawbar marker assistant
0020 Trailer drawbar
001E Symbol for the "Coupling up a trailer"
function
X Use the COMAND controlle rto select
symbol 001E, see the separate operating
instructions for COMAND.
The "Coupling up a trailer" function is
selected. The distance specifications now
only apply to objects that are at the same
level as the ball coupling.
X Reverse carefully, making sure that trailer
drawbar marker assistant 0021points
approximately in the direction of trailer
drawbar 0020.
X Reverse carefully until trailer drawbar 0020
reaches red guide line 0003.
X Couple up the trailer (Y page 257). 360° camera (surround view)
Important safety notes The 360° camera is only an aid. It is not a
replacement for your attention to your
immediate surroundings. You are always
responsible for safe maneuvering and
parking. When maneuvering or parking, make
sure that there are no persons, animals or Driving systems
229Driving and parking Z
Page 232 of 454
objects in the area in which you are
maneuvering.
The 360° camera may show a distorted view
of obstacles, show them incorrectly or not at
all. It cannot show objects in the following
areas:
R
under the front bumper
R very close to the front bumper
R very close to the rear bumper
R under the rear bumper
R in close range above the handle on the
trunk lid
R very close to the exterior mirrors
You are always responsible for safety, and
must always pay attention to your
surroundings when parking and
maneuvering. This applies to the areas
behind, in front of and beside the vehicle. You
could otherwise endanger yourself and
others.
The rear view camera will not function or will
function in a limited manner:
R if the doors are open
R if the exterior mirrors are folded in
R if the trunk lid is open
R in heavy rain, snow or fog
R at night or in very dark places
R if the cameras are exposed to very bright
light
R if the area is lit by fluorescent light or LED
lighting (the display may flicker)
R if you exit a heated garage in winter,
resulting in a rapid change in temperature
R if the camera lenses are dirty or covered
R if the vehicle components in which the
cameras are installed are damaged. In this
event, have the camera position and setting
checked at a qualified specialist workshop.
Do not use the 360° camera in this case. You
can otherwise injure others or cause damage
to objects or the vehicle. General notes The 360° camera is a system consisting of
four cameras.
The system analyzes images from the
following cameras:
R
Rear view camera
R Front camera
R Two cameras in the exterior rear view
mirrors
The cameras capture the immediate
surroundings of the vehicle. The system
supports you, e.g. when parking or if vision is
restricted at an exit.
The 360° camera images can be shown in full
screen mode or in seven different split-screen
views on the COMAND display .Asplit-screen
view also includes a top view of the vehicle.
This view is calculated from the data supplied
by the installed cameras (virtual camera).
The seven split-scree nviews are:
R top view and picture from the rear view
camera (130° viewin gangle)
R top view and picture from the front camera
(withou tdisplaying the maximum steering
wheel angle)
R top view and enlarged rear view
R top view and enlarged front view
R top view and trailer view (vehicles with
trailer tow hitch)
R top view and pictures fro mthe rearward
facing mirror cameras (rear wheel view)
R top view and pictures from the forward
facing mirror cameras (front wheel view)
i The top view and trailer view are available
for vehicles equipped with a trailer tow
hitch.
When the function is active and you shift the
transmission from position Dor Rto N, you
see the previous view in the COMAND
display. The dynamic guidelines are hidden.
When you change between transmission
positions Dand R, you see the previously
selected front or rear view. 230
Driving systemsDriving and parking
Page 233 of 454
Activation conditions
The 360° camera imag
ecan be displayed if:
R your vehicle is equipped with a 360°
camera
R COMAND is switched on, see the separate
COMAND operating instructions
R the 360° camera function is activated
Activating the 360° camera using the
SYS button X
Press and hold the 0003button for longer
than 2seconds, see the separate COMAND
operating instructions.
Depending on whether position Dor Ris
engaged, the following is shown:
R full screen display with the image from
the front camera
R full screen display with the image from
the rear camera
Activating the 360° camer awith
COMAND X
Press the 0003button, see the separate
COMAN Doperating instructions.
X Select System by turning
000E0002000Fthe
COMAND controller and press 000Cto
confirm.
X Select 360° camera and press
000Cto
confirm.
Depending on whether position Dor Ris
engaged, the following is shown:
R a split screen with top view and the
image from the front camera or
R a split screen with top view and the
image from the rear view camera
For further information about the COMAND
Controller, see the separate COMAND
operating instructions. Activating the 360° camer
ausing
reverse gear The 360° camera images can be
automatically displayed by engaging reverse
gear.
X
Make sure that the SmartKey is in position
2in the ignition lock.
X Make sure that the Activation by R gear setting is active in COMAND, see the
separate COMAND operating instructions.
X To show the 360° camer aimage: engage
reverse gear.
The COMAND display shows the area
behind the vehicle in spli tscreen:
R vehicle with guide lines
R top view of the vehicle
Selecting the split-screen and full
screen displays X
To switc hbetween spli tscreen views:
switch to the line with the vehicle icons by
sliding 000B0002the COMAND controller.
X Turn 000E0002000F the COMAND controller and
selec tone of the vehicle symbols.
X To switc hto full screen mode: select
Full screen by turning
000E0002000Fthe
COMAND controller and press 000Cto
confirm.
Displays in the COMAND display Important safety notes
!
Objects not at ground level may appear to
be further away than they actually are, e.g.:
R the bumper of a parked vehicle
R the drawbar of a trailer
R the ball coupling of a trailer tow hitch
R the rear section of an HGV
R a slanted post
Use the guidelines only for orientation.
Approach objects no further than the
bottom-mos tguideline. Driving systems
231Driving and parking Z
Page 234 of 454
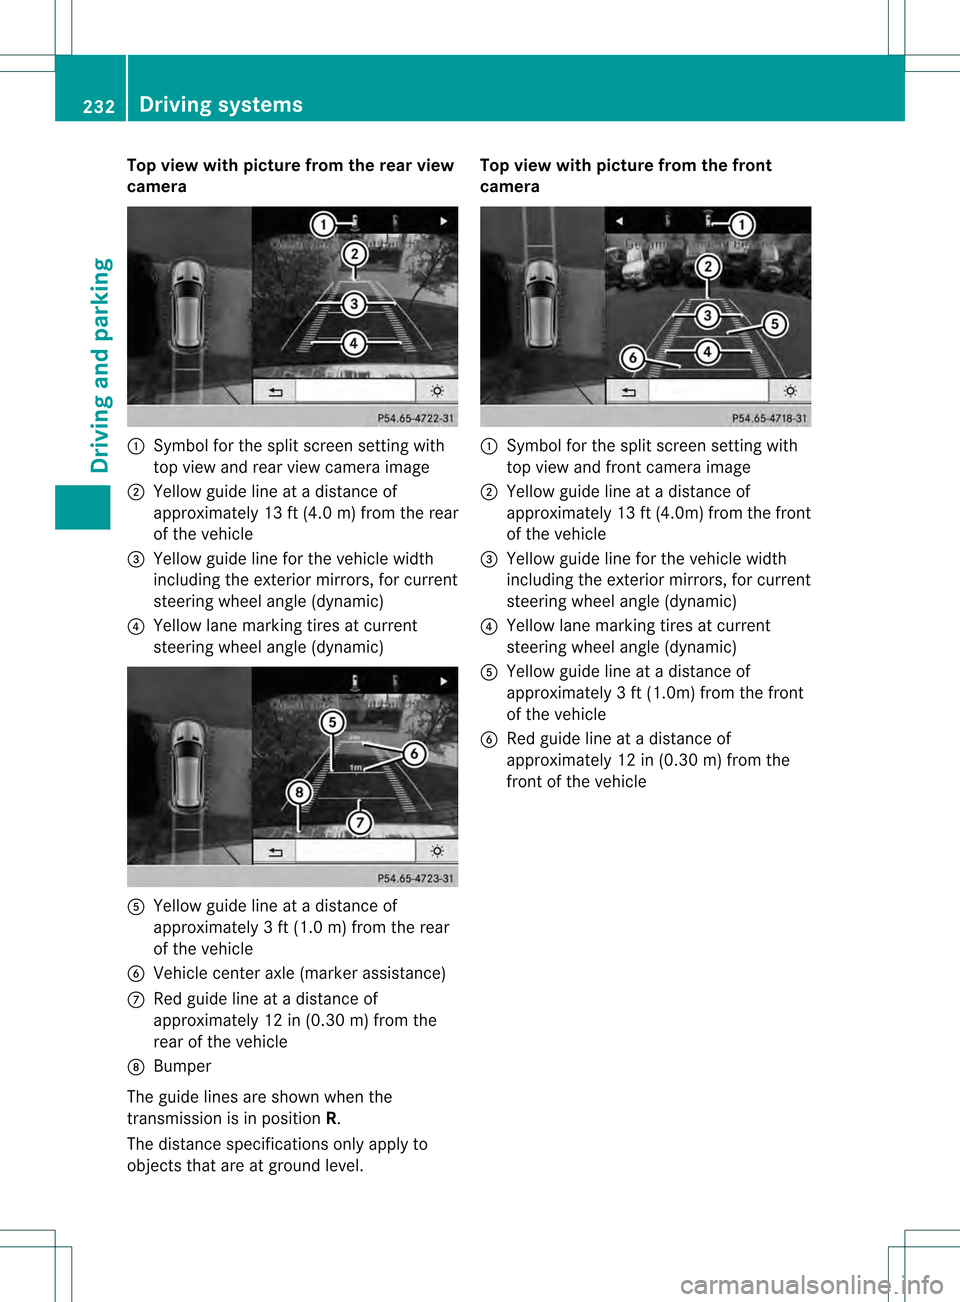
Top view with picture from the rear view
camera
0002
Symbol for the split screen setting with
top view and rea rview camera image
0003 Yellow guide line at a distance of
approximately 13 ft (4.0 m) from the rear
of the vehicle
0021 Yellow guide line for the vehicle width
including the exterior mirrors, for current
steering wheel angle (dynamic)
0020 Yellow lane marking tires at current
steering wheel angle (dynamic) 001E
Yellow guide line at a distance of
approximately 3 ft (1.0 m) from the rear
of the vehicle
001F Vehicle center axle (marker assistance)
0013 Red guide line at a distance of
approximately 12 in (0.30 m) from the
rear of the vehicle
0014 Bumper
The guide lines are show nwhen the
transmission is in position R.
The distance specifications only apply to
objects that are at ground level. Top view with picture from the front
camera
0002
Symbol for the split screen setting with
top view and front camera image
0003 Yellow guide line at a distance of
approximately 13 ft (4.0m) from the front
of the vehicle
0021 Yellow guide line for the vehicle width
including the exterior mirrors, for current
steering wheel angle (dynamic)
0020 Yellow lane marking tires at current
steering wheel angle (dynamic)
001E Yellow guide line at a distance of
approximatel y3ft (1.0m) from the front
of the vehicle
001F Red guide line at a distance of
approximately 12 in (0.30 m) from the
front of the vehicle 232
Driving systemsDriving and parking
Page 235 of 454
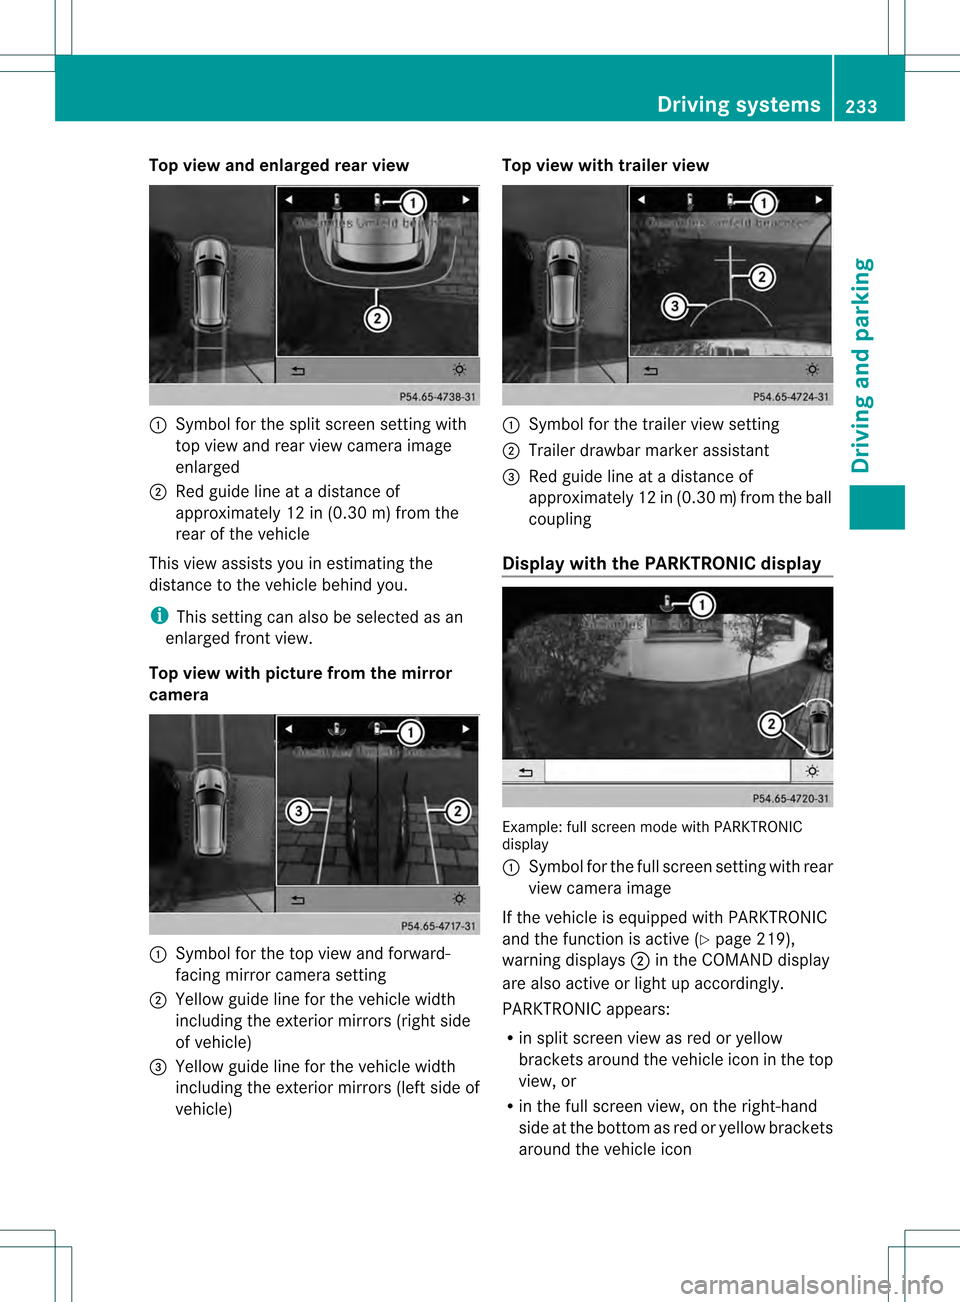
Top view and enlarged rear view
0002
Symbol for the split screen setting with
top view and rea rview camera image
enlarged
0003 Red guide line at a distanc eof
approximately 12 in (0.30 m) from the
rear of the vehicle
This view assists you in estimating the
distance to the vehicle behind you.
i This setting can also be selected as an
enlarged fron tview.
Top view with picture from the mirror
camera 0002
Symbol for the top view and forward-
facing mirror camera setting
0003 Yellow guide line for the vehicle width
including the exterior mirrors (right side
of vehicle)
0021 Yellow guide line for the vehicle width
including the exterior mirrors (left side of
vehicle) Top view with trailer view
0002
Symbol for the trailer view setting
0003 Trailer drawbar marker assistant
0021 Red guide line at a distanc eof
approximately 12 in (0.30 m)from the ball
coupling
Display with the PARKTRONIC display Example
:full screen mode with PARKTRONIC
display
0002 Symbol for the full screen setting with rear
view camera image
If the vehicle is equipped with PARKTRONIC
and the function is active (Y page 219),
warning displays 0003in the COMAND display
are also active or light up accordingly.
PARKTRONIC appears:
R in split screen view as red or yellow
brackets around the vehicle ico ninthe top
view, or
R in the full screen view, on the right-hand
side at the bottom as red or yellow brackets
around the vehicle icon Driving systems
233Driving and parking Z
Page 236 of 454
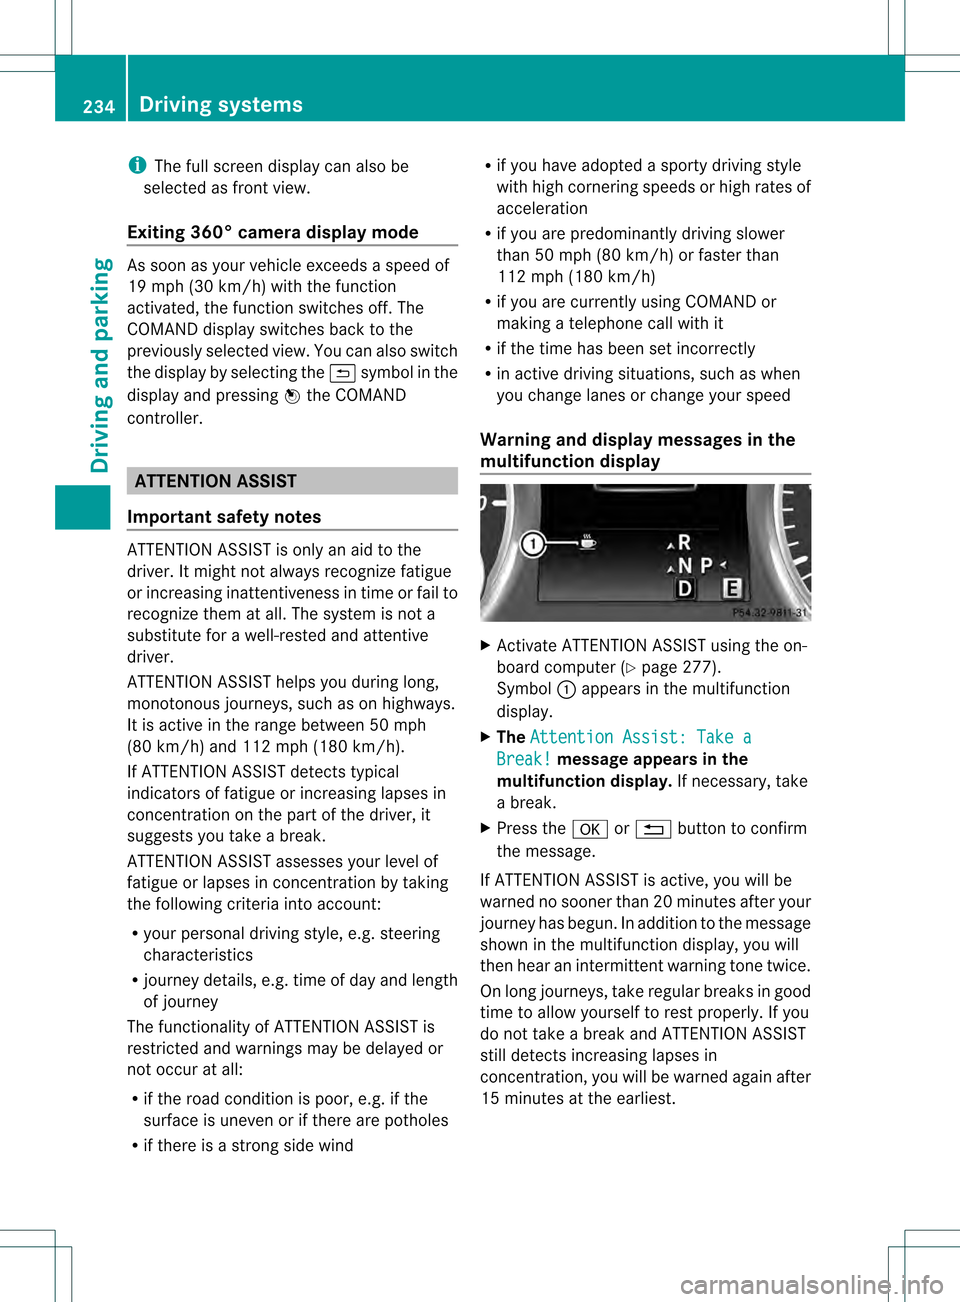
i
The full screen display can also be
selected as frontv iew.
Exiting 360° camera display mode As soon as your vehicle exceeds a speed of
19 mph (30 km/h) with the function
activated, the function switches off .The
COMAND display switches back to the
previously selected view. You can also switch
the display by selecting the 0008symbol in the
display and pressing 000Cthe COMAND
controller. ATTENTION ASSIST
Important safety notes ATTENTION ASSIST is only an aid to the
driver. It might not always recognize fatigue
or increasing inattentiveness in time or fail to
recognize them at all. The system is not a
substitute for a well-rested and attentive
driver.
ATTENTION ASSIST helps you during long,
monotonous journeys, such as on highways.
It is active in the range between 50 mph
(80 km/h) and 112 mph (180 km/h).
If ATTENTION ASSIST detects typical
indicators of fatigue or increasing lapses in
concentration on the part of the driver, it
suggests you take a break.
ATTENTION ASSIST assesses your level of
fatigue or lapses in concentration by taking
the following criteria into account:
R
your personal driving style, e.g. steering
characteristics
R journey details, e.g. time of day and length
of journey
The functionality of ATTENTION ASSIST is
restricted and warnings may be delayed or
not occur at all:
R if the road condition is poor, e.g. if the
surface is uneven or if there are potholes
R if there is a strong side wind R
if you have adopted a sporty driving style
with high cornering speeds or high rates of
acceleration
R if you are predominantly driving slower
than 50 mph (80 km/h) or faster than
112 mph (180 km/h)
R if you are currently using COMAND or
making a telephone call with it
R if the time has been set incorrectly
R in active driving situations, such as when
you change lanes or change your speed
Warning and display messages in the
multifunction display X
Activate ATTENTION ASSIST using the on-
board computer (Y page 277).
Symbol 0002appears in the multifunction
display.
X The Attention Assist: Take a Break! message appears in the
multifunction display. If necessary, take
a break.
X Press the 000Bor0007 button to confirm
the message.
If ATTENTION ASSIST is active, you will be
warned no sooner than 20 minutes after your
journey has begun. In addition to the message
shown in the multifunction display, you will
then hear an intermittent warning tone twice.
On long journeys, take regular breaks in good
time to allow yourself to rest properly. If you
do not take a break and ATTENTION ASSIST
still detects increasing lapses in
concentration, you will be warned again after
15 minutes at the earliest. 234
Driving systemsDriving and parking
Page 237 of 454
ATTENTION ASSIST is reset when you
continue your journey and starts assessing
your tiredness agai nif:
R you switch off the engine.
R you take off you rseat belt and open the
driver's door, e.g. for a change of drivers or
to take a break. Night View Assist Plus
Important safety notes Night View Assist Plus is only an aid and is not
a substitute for attentive driving. Do not rely
on the Night View Assist Plus display. You are
responsible for the distance to the vehicle in
front, for vehicle speed and for braking in
good time. Drive carefully and always adapt
your driving style to suit the prevailing road
and traffic conditions.
The system may be impaired or may not
function if:
R there is poor visibility, e.g. due to snow,
rain, fog or spray
R the windshield is dirty, fogged up or
covered, for instance by a sticker, in the
vicinity of the camera
R on bends, on uphill gradient sordownhill
gradients
Pedestrian recognition may be impaired or
inoperative if:
R pedestrians are partially or entirely
obscured by objects, e.g. parked vehicles
R the silhouette of the pedestrian in the Night
View Assist Plus display is incomplete or
interrupted, e.g. by powerful light
reflections
R pedestrians do not contrast adequately
from the background
R pedestrians are not in an upright position,
e.g. sitting, squatting or lying General notes
In addition to the illumination provided by the
normal headlamps, Night View Assist Plus
uses infrared light to illuminate the road.
Night View Assist Plus camera
0002picks up
the infrared light and displays a monochrome
image in COMAND. The image displayed in
COMAND corresponds to a road lit up by high-
beam headlamps. This enables you to see the
road's course and any obstacles in good time.
If pedestrian recognition is activated,
pedestrians recognized by the system are
highlighted in the Night View Assist Plus
display.
Light from the headlamps of oncoming
vehicles does not affect the Night View Assist
Plus display in the multifunction display .This
is also the case if you cannot switch on the
high-beam headlamps due to oncoming
traffic.
i Infrared light is not visible to the human
eye and therefore does not glare. Night
View Assist Plus can therefore remain
switched on even if there is oncoming
traffic.
Activating Night View Assist Plus Activation conditions
You can only activate Night View Assist Plus
if:
R
the SmartKey is in position 2in the ignition
lock.
R it is dark. Driving systems
235Driving and parking Z
Page 238 of 454
R
the ligh tswitch is in the 0006or000D
position.
R reverse gear has not been engaged.
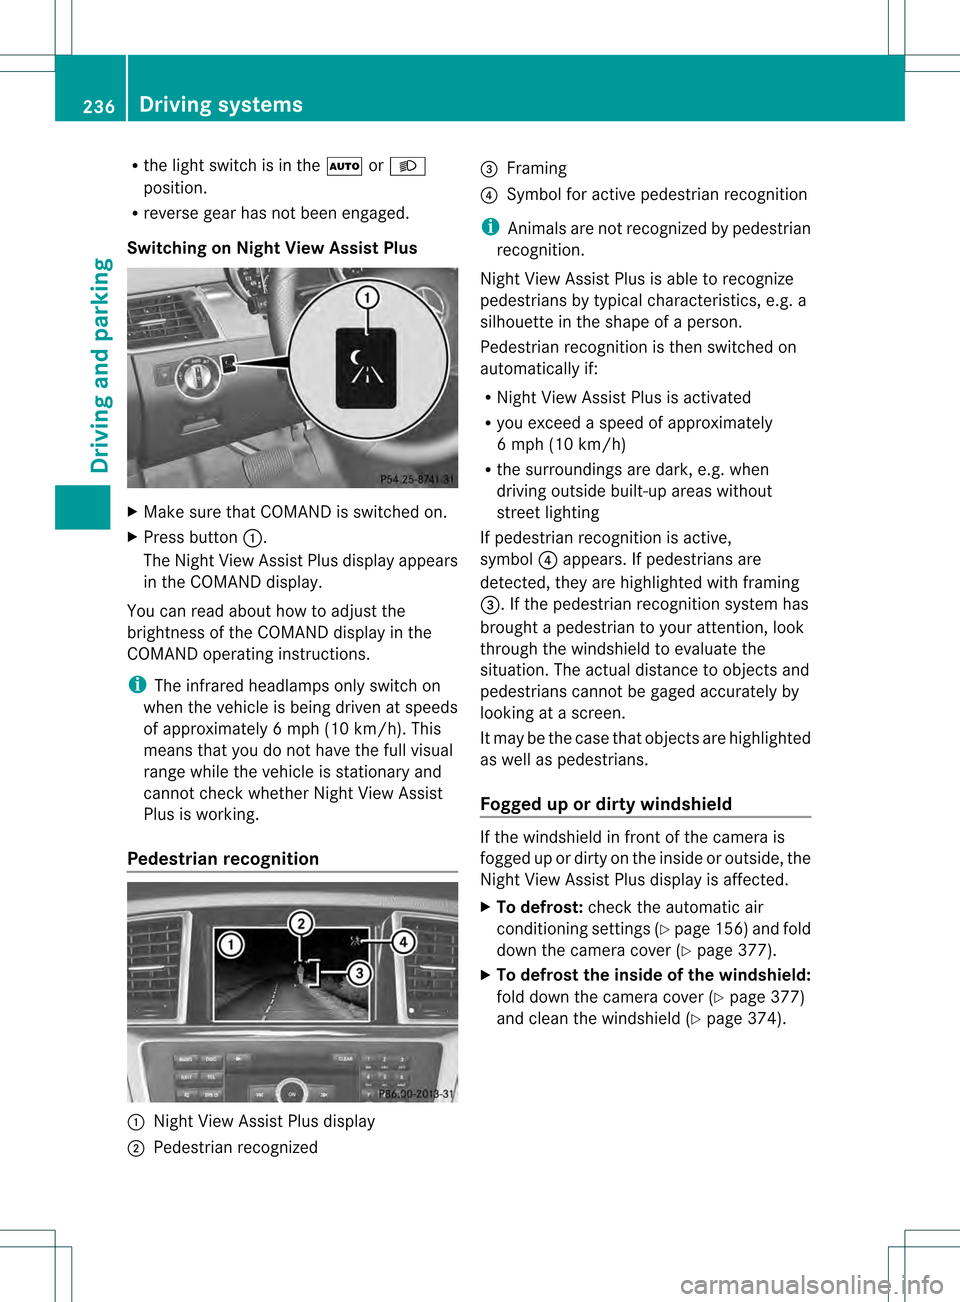
Switching on Nigh tView Assist Plus X
Make sure that COMAN Dis switched on.
X Press button 0002.
The Night View Assist Plus display appears
in the COMAND display.
You can read abouth ow to adjust the
brightness of the COMAND display in the
COMAND operating instructions.
i The infrared headlamps only switch on
when the vehicle is being driven at speeds
of approximately 6 mph (10 km/h). This
means that you do not have the full visual
range while the vehicle is stationary and
cannot check whether Night View Assist
Plus is working.
Pedestrian recognition 0002
Night View Assist Plus display
0003 Pedestrian recognized 0021
Framing
0020 Symbol for active pedestrian recognition
i Animals are not recognized by pedestrian
recognition.
Night View Assist Plus is able to recognize
pedestrians by typical characteristics, e.g. a
silhouette in the shape of aperson.
Pedestrian recognition is then switched on
automatically if:
R Night View Assist Plus is activated
R you exceed a speed of approximately
6 mph (10 km/h)
R the surroundings are dark, e.g. when
driving outside built-up areas without
street lighting
If pedestrian recognition is active,
symbol 0020appears. If pedestrians are
detected, they are highlighted with framing
0021.Ift he pedestrian recognition system has
brought a pedestrian to your attention, look
through the windshield to evaluate the
situation. The actual distance to objects and
pedestrians cannot be gaged accurately by
looking at a screen.
It may be the case that objects are highlighted
as well as pedestrians.
Fogged up or dirtyw indshield If the windshield in front of the camera is
fogged up or dirty on the inside or outside, the
Night View Assist Plus display is affected.
X
To defrost: check the automatic air
conditioning settings (Y page 156)and fold
down the camera cover (Y page 377).
X To defrost the inside of the windshield:
fold down the camera cover (Y page 377)
and clean the windshield (Y page 374).236
Driving systemsDriving an
d parking
Page 239 of 454
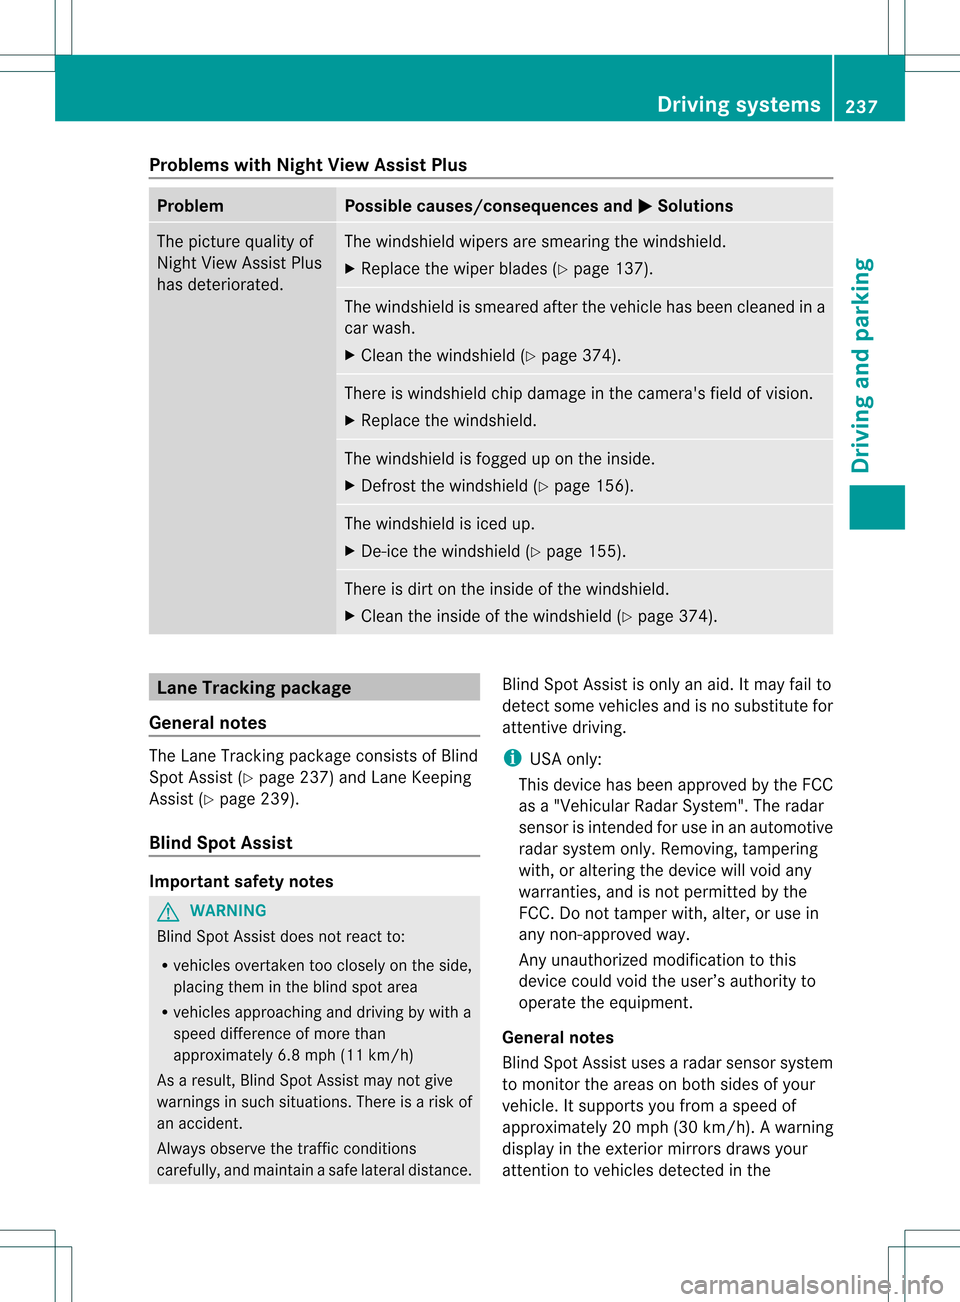
Problems with Night View Assist Plus
Problem Possible causes/consequences and
0001 Solutions
The picture quality of
Night View Assist Plus
has deteriorated. The windshield wipers are smearing the windshield.
X
Replace the wiper blades (Y page 137). The windshield is smeared after the vehicle has been cleaned in a
car wash.
X
Cleant he windshield (Y page 374). There is windshield chip damage in the camera's field of vision.
X
Replace the windshield. The windshield is fogged up on the inside.
X
Defrost the windshield (Y page 156). The windshield is iced up.
X
De-ice the windshield (Y page 155). There is dirt on the inside of the windshield.
X
Cleant he inside of the windshield (Y page 374).Lane Tracking package
General notes The Lane Tracking package consists of Blind
Spot Assist (Y page 237) and Lane Keeping
Assist (Y page 239).
Blind Spot Assist Important safety notes
G
WARNING
Blind Spot Assist does not react to:
R vehicles overtaken too closely on the side,
placing them in the blind spot area
R vehicles approaching and driving by with a
speed difference of more than
approximately 6.8 mph (11 km/h)
As a result, Blind Spot Assist may not give
warnings in such situations. There is a risk of
an accident.
Always observe the traffic conditions
carefully, and maintain a safe lateral distance. Blind Spot Assist is only an aid. It may fail to
detect some vehicles and is no substitute for
attentive driving.
i
USA only:
This device has been approved by the FCC
as a "VehicularR adar System". The radar
sensor is intended for use in an automotive
radar system only. Removing, tampering
with, or altering the device will void any
warranties, and is no tpermitted by the
FCC. Do not tamper with, alter, or use in
any non-approved way.
Any unauthorized modification to this
device could void the user’s authority to
operate the equipment.
General notes
Blind Spot Assist uses a radar sensor system
to monitor the areas on both sides of your
vehicle. It supports you from a speed of
approximately 20 mph (30 km/h). A warning
display in the exterio rmirrors draws your
attention to vehicles detected in the Driving systems
237Driving and parking Z
Page 240 of 454
monitored area. If you then switch on the
corresponding turn signal to change lanes,
you will also receive a visual and audible
collision warning. Blind Spot Assist uses
sensors in the rear bumper for monitoring
purposes.
For Blind Spot Assist to assist you when
driving, the rada rsensor system must be:
R activated (Y page 281)
R operational
Monitoring range of the sensors
In particular, the detection of obstacles can
be impaired if:
R dirt on the sensors or anything else
covering the sensors
R poor visibility, e.g. due to fog, heavy rain,
snow or spray
R narrow vehicles, e.g. motorcycles or
bicycles
R the road has very wide lanes
R the road has narrow lanes
R you are not driving in the middle of the lane
R there are barriers or similar lane borders
Vehicles in the monitoring range are then not
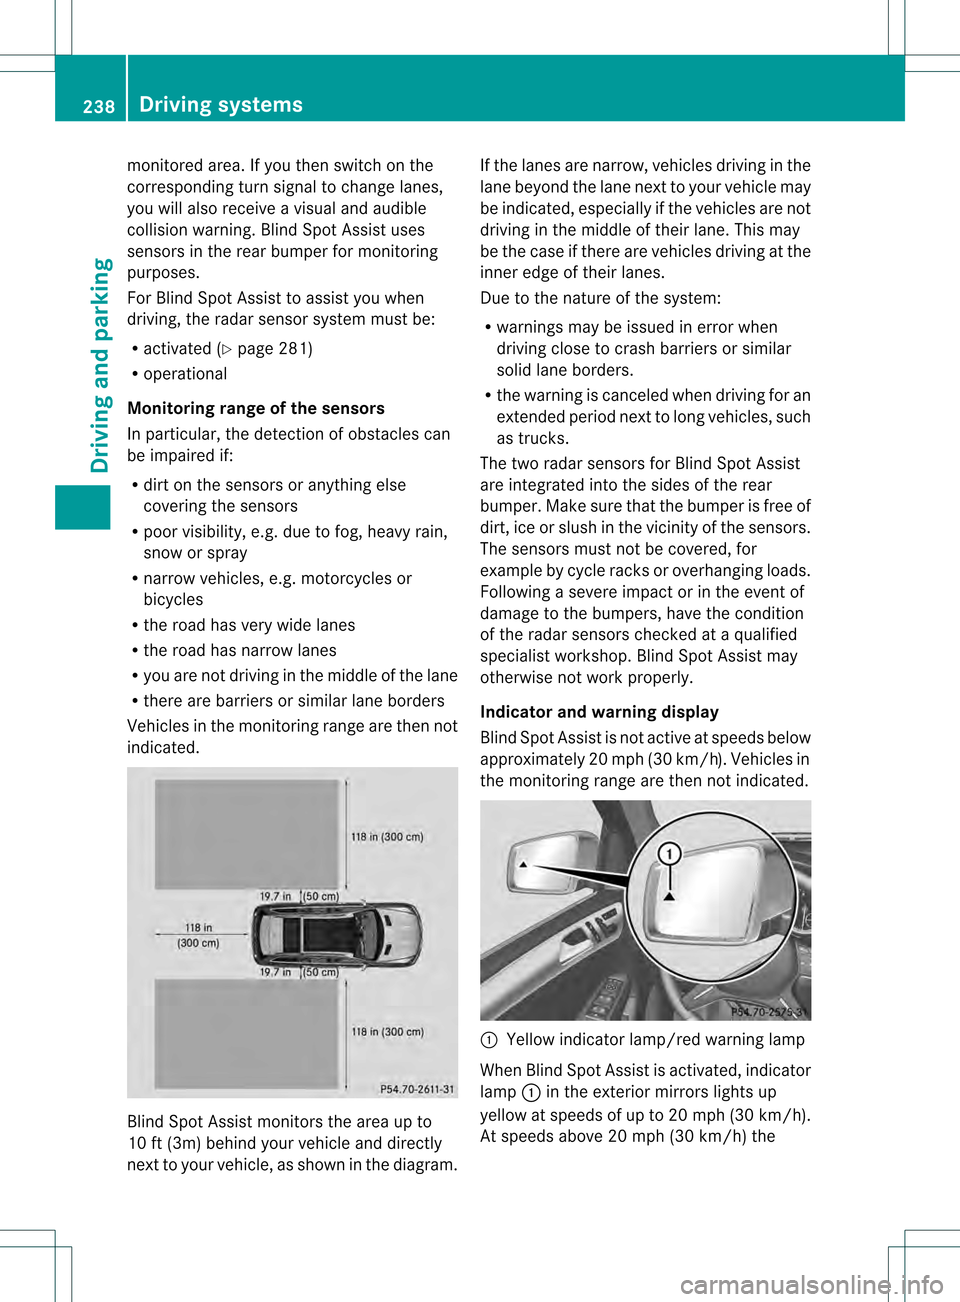
indicated. Blind Spot Assist monitors the area up to
10 ft (3m) behind your vehicle and directly
nextt
o your vehicle, as shown in the diagram. If the lanes are narrow, vehicles driving in the
lane beyond the lane next to your vehicle may
be indicated, especially if the vehicles are not
driving in the middle of their lane. This may
be the case if there are vehicles driving at the
inner edge of their lanes.
Due to the nature of the system:
R warnings may be issued in error when
driving close to crash barriers or similar
solid lane borders.
R the warning is canceled when driving for an
extended period next to long vehicles, such
as trucks.
The two radar sensors for Blind Spot Assist
are integrated into the sides of the rear
bumper. Make sure that the bumper is free of
dirt, ice or slush in the vicinity of the sensors.
The sensors must not be covered, for
example by cycle racks or overhanging loads.
Following a severe impact or in the event of
damage to the bumpers, have the condition
of the radar sensors checked at a qualified
specialist workshop. Blind Spot Assist may
otherwise not work properly.
Indicator and warning display
Blind Spot Assist is not active at speeds below
approximately 20 mph (30 km/h) .Vehicles in
the monitoring range are then not indicated. 0002
Yellow indicator lamp/red warning lamp
When Blind Spot Assist is activated, indicator
lamp 0002in the exterior mirrors lights up
yellow at speeds of up to 20 mph (30k m/h).
At speeds above 20 mph (30 km/h) the 238
Driving systemsDriving and parking