reset MERCEDES-BENZ GL-Class 2014 X166 User Guide
[x] Cancel search | Manufacturer: MERCEDES-BENZ, Model Year: 2014, Model line: GL-Class, Model: MERCEDES-BENZ GL-Class 2014 X166Pages: 462, PDF Size: 32.46 MB
Page 98 of 462

Proceed as follows if someone is trapped:
R
Release the &button to interrupt the
closing procedure.
R Press and hold the %button to open.
Vehicles with KEYLESS-GO:
R Release the sensor surfaces on the exterior
door handle to interrupt the closing
procedure.
R To open, pull the same door handle
immediately and hold it firmly. The door
windows and the sliding sunroof will open
for as long as the door handle is held but
the door is not opened.
i Notes on the automatic reversing feature
for:
R the side window (Y page 94)
R the sliding sunroof (Y page 99)
Using the SmartKey The SmartKey must be in the vicinity of the
vehicle, on vehicles without KEYLESS-GO the
SmartKey must be near the door handle.
X Vehicles without KEYLESS-GO: point the
tip of the SmartKey at the door handle on
the driver's door.
X Press and hold the &button until the
side windows and the sliding sunroof or the
panorama roof with power tilt/sliding
panel are fully closed.
X Make sure that all the side windows and the
sliding sunroof or panorama roof with
power tilt/sliding panel are closed.
On vehicles with a panorama roof with power
tilt/sliding panel:
X Press and hold the &button again until
the roller sunblinds of the panorama roof
with power tilt/sliding panel close.
X To interrupt convenience closing:
release the &button. Using KEYLESS-GO The KEYLESS-GO key must be outside the
vehicle. All the doors must be closed.
X
Touch recessed sensor surface :on the
door handle until the side windows and the
sliding sunroof or the panorama roof with
power tilt/sliding panel are fully closed.
i Make sure you only touch recessed
sensor surface :.
X Make sure that all the side windows and the
sliding sunroof or panorama roof with
power tilt/sliding panel are closed.
On vehicles with a panorama roof with power
tilt/sliding panel:
X Touch recessed sensor surface :on the
door handle again until the roller sunblinds
of the panorama roof with power tilt/
sliding panel close.
X To interrupt convenience closing:
release recessed sensor surface :on the
door handle. Resetting the side windows
If a side window can no longer be closed fully,
you must reset it.
X Close all the doors.
X Turn the SmartKey to position 1or 2in the
ignition lock. 96
Side windowsOpening and closing
Page 99 of 462

X
Pull the corresponding switch on the door
control panel until the side window is
completely closed. (Y page 94)
X Hold the switch for an additional second.
If the side window opens again slightly:
X Immediately pull the corresponding switch
on the door control panel until the side
window is completely closed (Y page 94).
X Hold the switch for an additional second.
X If the corresponding side window remains
closed after the button has been released,
the side window has been reset correctly.
If this is not the case, repeat the steps
above again. Side windows
97Opening and closing Z
Page 100 of 462

Problems with the side windows
G
WARNING
If you close a side window again immediately after it has been blocked or reset, the side window
closes with increased or maximum force. The reversing feature is then not active. Parts of the
body could be trapped in the closing area in the process. This poses an increased risk of injury
or even fatal injury.
Make sure that no parts of the body are in the closing area. To stop the closing process, release
the switch or push the switch again to reopen the side window. Problem Possible causes/consequences and
M MSolutions A side window cannot
be closed because it is
blocked by objects, e.g.
leaves in the window
guide. X
Remove the objects.
X Close the side window. A side window cannot
be closed and you
cannot see the cause. If a side window is obstructed during closing and reopens again
slightly:
X
Immediately after the window blocks, pull the corresponding
switch again until the side window has closed.
The side window is closed with increased force.
If a side window is obstructed again during closing and reopens
again slightly:
X Immediately after the window blocks, pull the corresponding
switch again until the side window has closed.
The side window is closed without the anti-entrapment feature. Sliding sunroof
Important safety notes
Your vehicle may be equipped with a sliding
sunroof or a panorama roof with power tilt/
sliding panel. In this section, the term "sliding
sunroof" refers to both types of sliding
sunroof. G
WARNING
While opening and closing the sliding sunroof,
body parts in close proximity could become
trapped. There is a risk of injury.
Make sure that no body parts are in close
proximity during the opening and closing
procedures. If somebody becomes trapped:
R
release the switch immediately, or
R during automatic operation, push the
switch briefly in any direction
The opening or closing procedure will be
stopped. G
WARNING
If children operate the sliding sunroof they
could become trapped, particularly if they are
left unsupervised. There is a risk of injury.
When leaving the vehicle, always take the
SmartKey with you and lock the vehicle. Never
leave children unsupervised in the vehicle. 98
Sliding sunroofOpening and closing
Page 101 of 462

!
Only open the sliding sunroof if it is free
of snow and ice. Otherwise, malfunctions
may occur.
Do not allow anything to protrude from the
sliding sunroof. Otherwise, the seals could
be damaged.
i Resonance noises can occur in addition
to the usual airflow noises when the sliding
sunroof is open. They are caused by minor
pressure fluctuations in the vehicle interior.
Change the position of the sliding sunroof
or open a side window. The noise will be
reduced or eliminated. Sliding sunroof reversing feature
The sliding sunroof is equipped with an
automatic reversing feature. If a solid object
blocks or restricts the sliding sunroof during
the closing process, the sliding sunroof opens
again automatically. However, the automatic
reversing feature is only an aid and does not
relieve you of the responsibility of paying
attention when closing the sliding sunroof. G
WARNING
The reversing feature does not react:
R to soft, light and thin objects, e.g. small
fingers
R over the last 1/6 in(4 mm) of the closing
movement
R during resetting
R when closing the sliding sunroof again
manually immediately after automatic
reversing
This means that the reversing feature cannot
prevent someone being trapped in these
situations. There is a risk of injury.
Make sure that no body parts are in close
proximity during the closing procedure.
If somebody becomes trapped:
R release the switch immediately, or
R during automatic operation, push the
switch briefly in any direction The closing process is stopped.
Operating the sliding sunroof
Opening and closing Overhead control panel
:
To raise
; To open
= To close/lower
X Turn the SmartKey to position 1or 2in the
ignition lock.
X Press or pull the 2switch in the
corresponding direction.
i If you press the 2switch beyond the
point of resistance, an automatic opening/
closing process is started in the
corresponding direction. You can stop
automatic operation by operating the
switch again.
When opening and raising the roof,
automatic operation is only available if the
sliding sunroof is in the closed position.
The sun protection cover automatically opens
along with the sliding sunroof. You can open
or close the sun protection cover manually
when the sliding sunroof is raised or closed.
i You can continue to operate the sliding
sunroof after switching off the engine or
removing the SmartKey from the ignition
lock. This function is available for up to five
minutes or until the driver's or front-
passenger door is opened. Sliding sunroof
99Opening and closing Z
Page 102 of 462

Resetting
!
If the sliding sunroof still cannot be
opened or closed fully after resetting,
contact a qualified specialist workshop.
Reset the sliding sunroof if it does not move
smoothly.
X Turn the SmartKey to position 1or 2in the
ignition lock.
X Raise the sliding sunroof fully at the rear
(Y page 99).
X Keep the 2switch pressed for another
second.
X Make sure that the sliding sunroof can be
fully opened and closed again (Y page 99).
X If this is not the case, repeat the steps
above again. Operating the panorama roof with
power tilt/sliding panel Overhead control panel
:
To raise
; To open
= To close/lower
The panorama roof with power tilt/sliding
panel can only be operated when the roller
sunblind is open (Y page 101).
X To open and close: turn the SmartKey to
position 1or 2in the ignition lock.
X Press or pull the 2switch in the
corresponding direction.
i If you press the 2switch beyond the
point of resistance, an automatic opening/ closing process is started in the
corresponding direction. You can stop
automatic operation by operating the
switch again.
The automatic raising feature is available
only when the sliding sunroof is closed.
Operating the roller sunblinds for the
panorama roof with power tilt/sliding
panel
Important safety notes G
WARNING
When opening or closing the roller sunblind,
parts of the body could be trapped between
the roller sunblind and the frame or sliding
sunroof. There is a risk of injury.
When opening or closing make sure that no
parts of the body are in the sweep of the roller
sunblind.
If somebody becomes trapped:
R release the switch immediately, or
R during automatic operation, push the
switch briefly in any direction
The opening or closing procedure will be
stopped.
The roller sunblinds shield the vehicle interior
from sunlight. The roller sunblinds can only
be opened and closed together when the
panorama roof with power tilt/sliding panel
is closed.
Roller sunblind reversing feature The roller sunblinds are equipped with an
automatic reversing feature. If a solid object
blocks or restricts a roller sunblind during the
closing process, the roller sunblind opens
again automatically. However, the automatic
reversing feature is only an aid and does not
relieve you of the responsibility of paying
attention when closing the roller sunblinds. 100
Sliding sunroofOpening and closing
Page 103 of 462

G
WARNING
The reversing feature especially does not
react to soft, light and thin objects such as
small fingers. This means that the reversing
feature cannot prevent someone being
trapped in these situations. There is a risk of
injury.
When closing make sure that no parts of the
body are in the sweep of the roller sunblind.
If somebody becomes trapped:
R release the switch immediately, or
R during automatic operation, push the
switch briefly in any direction
The closing process is stopped.
Opening and closing the roller
sunblinds Overhead control panel
:
To open
; To open
= To close
X Turn the SmartKey to position 1or 2in the
ignition lock.
X Press or pull the 2switch in the
corresponding direction.
i If you press the 2switch beyond the
point of resistance, an automatic opening/
closing process is started in the
corresponding direction. You can stop
automatic operation by operating the
switch again. Resetting the panorama roof with
power tilt/sliding panel and the roller
sunblinds !
If the panorama roof with power tilt/
sliding panel and the roller sunblinds
cannot be fully opened or closed after
resetting, contact a qualified specialist
workshop. Overhead control panel
:
To open
; To open
= To close
Reset the panorama roof with power tilt/
sliding panel and the roller sunblinds if the
panorama roof with power tilt/sliding panel
or the roller sunblinds do not move smoothly.
X Turn the SmartKey to position 1or 2in the
ignition lock.
X Pull the 2switch repeatedly to the point
of resistance in the direction of arrow =
until the panorama roof with power tilt/
sliding panel is fully closed.
X Keep the 2switch pulled for an
additional second.
X Pull the 2switch repeatedly to the point
of resistance in the direction of arrow =
until the roller sunblinds are fully closed.
X Keep the 2switch pulled for an
additional second.
X Make sure that the panorama roof with
power tilt/sliding panel (Y page 100) and Sliding sunroof
101Opening and closing Z
Page 105 of 462

Problems with the sliding sunroof
Your vehicle may be equipped with a sliding sunroof or a panorama roof with power tilt/sliding
panel. In this section, the term "sliding sunroof" refers to both types of sliding sunroof. G
WARNING
If you close the sliding sunroof again immediately after it has been blocked or reset, the sliding
sunroof closes with increased or maximum force. The reversing feature is then not active. Parts
of the body could be trapped in the closing area in the process. This poses an increased risk of
injury or even fatal injury.
Make sure that no parts of the body are in the closing area.
If somebody becomes trapped:
R release the switch immediately, or
R during automatic operation, push the switch briefly in any direction
The closing process is stopped.
! If the sliding sunroof still cannot be opened or closed as a result of a malfunction, contact
a qualified specialist workshop. Problem Possible causes/consequences and
M MSolutions The sliding sunroof
cannot be closed and
you cannot see the
cause. If the sliding sunroof is obstructed during closing and reopens
again slightly:
X
Immediately after the sliding sunroof blocks, pull the 2
switch in the overhead control panel down to the point of
resistance and hold it until the sliding sunroof is closed.
The sliding sunroof is closed with increased force.
If the sliding sunroof is obstructed again during closing and then
reopens slightly:
X Immediately after the sliding sunroof blocks, pull the 2
switch in the overhead control panel down to the point of
resistance and hold it until the sliding sunroof is closed.
The sliding sunroof is closed without the anti-entrapment
feature. i
Note on the automatic reversing feature of the sliding sunroof (Y page 99). Sliding sunroof
103Opening and closing Z
Page 110 of 462
we strongly recommend that children be
placed in the rear seat whenever possible.
Regardless of seating position, children 12
years old and under must be seated and
properly secured in an appropriately sized
child restraint system or booster seat
recommended for the size and weight of the
child. For additional information, see the
"Children in the vehicle" section.
A child's risk of serious or fatal injuries is
significantly increased if the child restraints
are not properly secured in the vehicle and/
or the child is not properly secured in the child
restraint.
! To avoid damage to the seats and the seat
heating, observe the following information:
R keep liquids from spilling on the seats. If
liquid is spilled on the seats, dry them as
soon as possible.
R if the seat covers are damp or wet, do not
switch on the seat heating. The seat
heating should also not be used to dry
the seats.
R clean the seat covers as recommended;
see "Interior care".
R do not transport heavy loads on the
seats. Do not place sharp objects on the
seat cushions, e.g. knives, nails or tools.
The seats should only be occupied by
passengers, if possible.
R when the seat heating is in operation, do
not cover the seats with insulating
materials, e.g. blankets, coats, bags,
seat covers, child seats or booster seats.
! Make sure that there are no objects in the
footwell or behind the seats when resetting
the seats. There is a risk that the seats
and/or the objects could be damaged.
i It is not possible to remove the head
restraints from the front seats. The rear-
compartment head restraints, however,
can be removed (Y page 110).
For more information, contact a qualified
specialist workshop. i
Further related subjects:
R Important safety notes on air bags
(Y page 44)
R Cargo compartment enlargement
(folding down the rear bench seat)
(Y page 344)
R Securing children in the vehicle
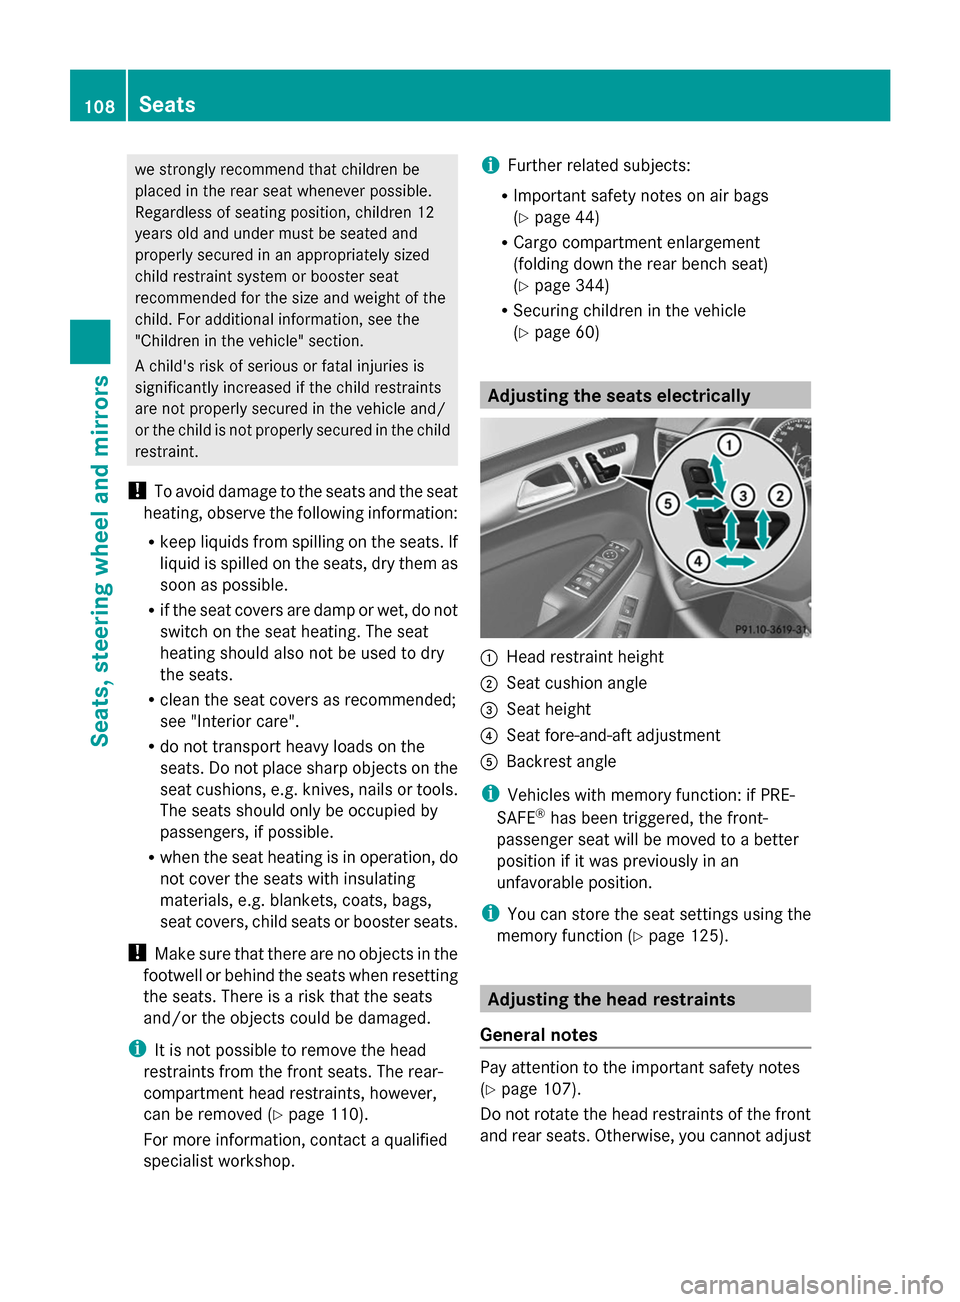
(Y page 60) Adjusting the seats electrically
:
Head restraint height
; Seat cushion angle
= Seat height
? Seat fore-and-aft adjustment
A Backrest angle
i Vehicles with memory function: if PRE-
SAFE ®
has been triggered, the front-
passenger seat will be moved to a better
position if it was previously in an
unfavorable position.
i You can store the seat settings using the
memory function (Y page 125). Adjusting the head restraints
General notes Pay attention to the important safety notes
(Y
page 107).
Do not rotate the head restraints of the front
and rear seats. Otherwise, you cannot adjust 108
SeatsSeats, steering wheel and mirrors
Page 125 of 462

Folding the exterior mirrors in or out
electrically X
Make sure that the SmartKey is in position
1or 2in the ignition lock.
X Briefly press button :.
Both exterior mirrors fold in or out.
i Make sure that the exterior mirrors are
always folded out fully while driving. They
could otherwise vibrate.
i If you are driving faster than 30 mph
(47 km/h), you can no longer fold in the
exterior mirrors.
Setting the exterior mirrors If the battery has been disconnected or
completely discharged, the exterior mirrors
must be reset. The exterior mirrors will
otherwise not fold in when you select the
"Fold in mirrors when locking" function in the
on-board computer (Y page 286).
X Make sure that the SmartKey is in
position 1in the ignition lock.
X Briefly press button :.
Folding the exterior mirrors in or out
automatically If the "Fold in mirrors when locking" function
is activated in the on-board computer:
(Y
page 286) R
the exterior mirrors fold in automatically as
soon as you lock the vehicle from the
outside.
R the exterior mirrors fold out again
automatically as soon as you unlock the
vehicle and then open the driver's or front-
passenger door.
Exterior mirror pushed out of position If an exterior mirror has been pushed out of
position, proceed as follows:
X
Vehicles without electrically folding
exterior mirrors: move the exterior mirror
into the correct position manually.
X Vehicles with electrically folding
exterior mirrors: press and hold button for
folding the mirrors :(Ypage 123) until
you hear a click and then the mirror engage
in position.
The mirror housing is engaged again and
you can adjust the exterior mirrors as usual
(Y page 122). Automatic anti-glare mirrors
The rear-view mirror and the exterior mirror
on the driver's side automatically go into anti-
glare mode if the following conditions are met
simultaneously:
R the ignition is switched on and
R incident light from headlamps strikes the
sensor in the rear-view mirror.
i The mirrors do not go into anti-glare mode
if reverse gear is engaged or if the interior
lighting is switched on. Mirrors
123Seats, steering wheel and mirrors Z
Page 126 of 462
Parking position for the exterior
mirror on the front-passenger side
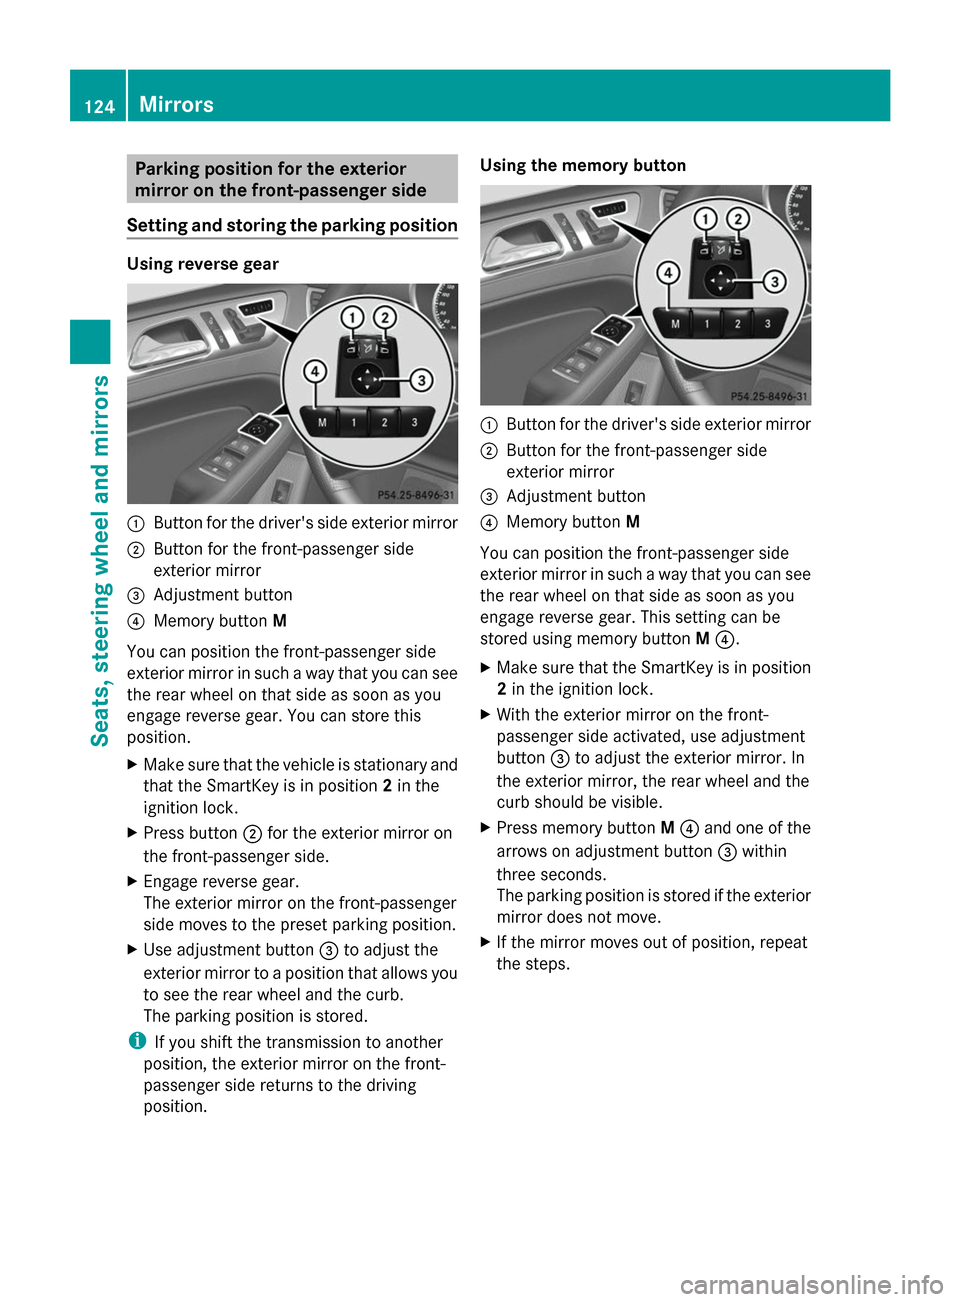
Setting and storing the parking position Using reverse gear
:
Button for the driver's side exterior mirror
; Button for the front-passenger side
exterior mirror
= Adjustment button
? Memory button M
You can position the front-passenger side
exterior mirror in such a way that you can see
the rear wheel on that side as soon as you
engage reverse gear. You can store this
position.
X Make sure that the vehicle is stationary and
that the SmartKey is in position 2in the
ignition lock.
X Press button ;for the exterior mirror on
the front-passenger side.
X Engage reverse gear.
The exterior mirror on the front-passenger
side moves to the preset parking position.
X Use adjustment button =to adjust the
exterior mirror to a position that allows you
to see the rear wheel and the curb.
The parking position is stored.
i If you shift the transmission to another
position, the exterior mirror on the front-
passenger side returns to the driving
position. Using the memory button
:
Button for the driver's side exterior mirror
; Button for the front-passenger side
exterior mirror
= Adjustment button
? Memory button M
You can position the front-passenger side
exterior mirror in such a way that you can see
the rear wheel on that side as soon as you
engage reverse gear. This setting can be
stored using memory button M?.
X Make sure that the SmartKey is in position
2in the ignition lock.
X With the exterior mirror on the front-
passenger side activated, use adjustment
button =to adjust the exterior mirror. In
the exterior mirror, the rear wheel and the
curb should be visible.
X Press memory button M? and one of the
arrows on adjustment button =within
three seconds.
The parking position is stored if the exterior
mirror does not move.
X If the mirror moves out of position, repeat
the steps. 124
MirrorsSeats, steering wheel and mirrors