automatic transmission MERCEDES-BENZ GL-Class 2014 X166 Service Manual
[x] Cancel search | Manufacturer: MERCEDES-BENZ, Model Year: 2014, Model line: GL-Class, Model: MERCEDES-BENZ GL-Class 2014 X166Pages: 462, PDF Size: 32.46 MB
Page 258 of 462
X
Selector wheel :
:engaged: briefly press
selector wheel :.
Selector wheel :extends.
X To select: turn selector wheel :until
indicator lamp ;comes on.
Trailer indicator =appears in the
multifunction display.
R Highway level is set.
R ADS (Adaptive Damping System) adapts
comfortable damping characteristics to
the current operating and driving
conditions.
R The automatic transmission selects the
automatic drive program for a
comfortable driving style that provides
for optimum fuel consumption, changing
gear at optimum points.
R While pulling away, the differential locks
are engaged. Off-road driving systems
4MATIC (permanent four-wheel drive) If you fail to adapt your driving style, 4MATIC
can neither reduce the risk of accident nor
override the laws of physics. 4MATIC cannot
take account of road, weather and traffic
conditions. 4MATIC is only an aid. You are
responsible for the distance to the vehicle in
front, for vehicle speed, for braking in good
time and for staying in your lane.
! Never tow the vehicle with one axle
raised. This may damage the transfer case.
Damage of this sort is not covered by the
Mercedes-Benz Limited Warranty. All
wheels must remain either on the ground
or be fully raised. Observe the instructions
for towing the vehicle with all wheels in full
contact with the ground.
! A function or performance test should
only be carried out on a two-axle
dynamometer. Before you operate the
vehicle on such a dynamometer, please
consult a qualified workshop. You could otherwise damage the drive train or the
brake system.
4MATIC ensures that all four wheels are
permanently driven. Together with ESP ®
and
4ETS, it improves the traction of your vehicle
whenever a drive wheel spins due to
insufficient grip.
i In wintry driving conditions, the maximum
effect of 4MATIC can only be achieved if
you use winter tires (M+S tires), with snow
chains if necessary.
Further information about "Driving off-road"
(Y page 197).
DSR (Downhill Speed Regulation) Important safety notes
DSR assists you when driving downhill. It
keeps the speed of travel at the speed set on
the on-board computer. The steeper the
downhill gradient, the greater the DSR
braking effect on the vehicle. When driving on
flat stretches of road or on an uphill gradient,
the DSR braking effect is minimal or
nonexistent.
DSR controls the set speed when it is active
and the automatic transmission is in the D,
R or Nposition. By accelerating or braking,
you can always drive at a higher or a lower
speed than that set on the on-board
computer.
Further information about "Driving off-road"
(Y page 197).
If you fail to adapt your driving style, DSR can
neither reduce the risk of accident nor
override the laws of physics. DSR cannot take
account of road, weather and traffic
conditions. DSR is only an aid. You are
responsible for the distance to the vehicle in
front, for vehicle speed, for braking in good
time and for staying in your lane.
You are always responsible for keeping
control of the vehicle and for assessing
whether the downhill gradient can be
managed. DSR may not always be able to
keep to the set speed, depending on road 256
Driving systemsDriving and parking
Page 260 of 462
X
To increase or decrease in 1 mph
increments (Canada: 1 km/h
increments): briefly press the cruise
control lever up :for a higher set speed
or down ;for a lower set speed.
The set speed appears in the multifunction
display with the ÃDSR symbol. It is also
displayed in status indicator =.
When DSR is activated, you can change the
set speed to a value between 1 mph and
11 mph (Canada: between 2 km/h and
18 km/h).
i The DSR set speed is always changed in
1 mph increments (Canada: 1 km/h
increments). This is regardless of whether
you press the cruise control lever to or
beyond the pressure point.
Off-road programs (vehicles with the
ON&OFFROAD package) General notes
The off-road programs assist you in driving
off-road. The engine's performance
characteristics and the gearshifting
characteristics of the automatic transmission
are adapted for this purpose. ABS, ESP ®
and
4ETS programs especially adapted to off-road
driving are activated. An accelerator pedal
curve suitable for the terrain is selected, i.e.
the accelerator pedal must be depressed
further to accelerate.
Do not use the off-road programs on roads
that are snow-covered or icy or if you have
mounted snow chains on your vehicle.
For information on driving off-road, see
(Y page 197).
The following program messages are shown
in the multifunction display until the
applicable vehicle level is set. Up to off-road
level 2, you can hide the program messages
using the %or the abutton on the
multifunction steering wheel. Off-road program 1
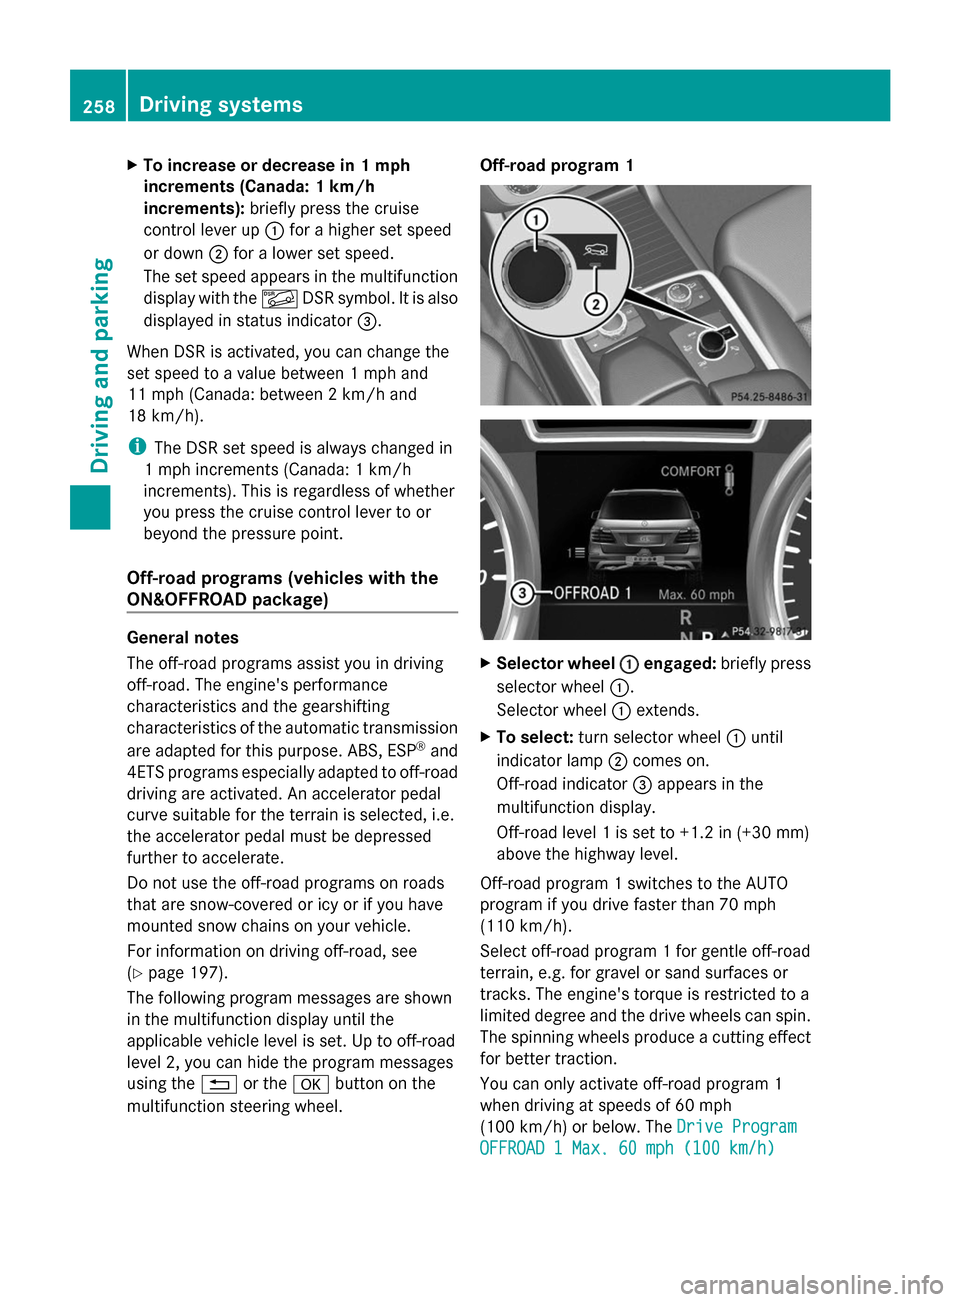
X
Selector wheel : :engaged: briefly press
selector wheel :.
Selector wheel :extends.
X To select: turn selector wheel :until
indicator lamp ;comes on.
Off-road indicator =appears in the
multifunction display.
Off-road level 1 is set to +1.2 in (+30 mm)
above the highway level.
Off-road program 1 switches to the AUTO
program if you drive faster than 70 mph
(110 km/h).
Select off-road program 1 for gentle off-road
terrain, e.g. for gravel or sand surfaces or
tracks. The engine's torque is restricted to a
limited degree and the drive wheels can spin.
The spinning wheels produce a cutting effect
for better traction.
You can only activate off-road program 1
when driving at speeds of 60 mph
(100 km/h) or below. The Drive Program Drive Program
OFFROAD 1 Max. 60 mph (100 km/h)
OFFROAD 1 Max. 60 mph (100 km/h) 258
Driving systemsDriving an
d parking
Page 261 of 462
message appears in the multifunction
display.
Off-road program 2
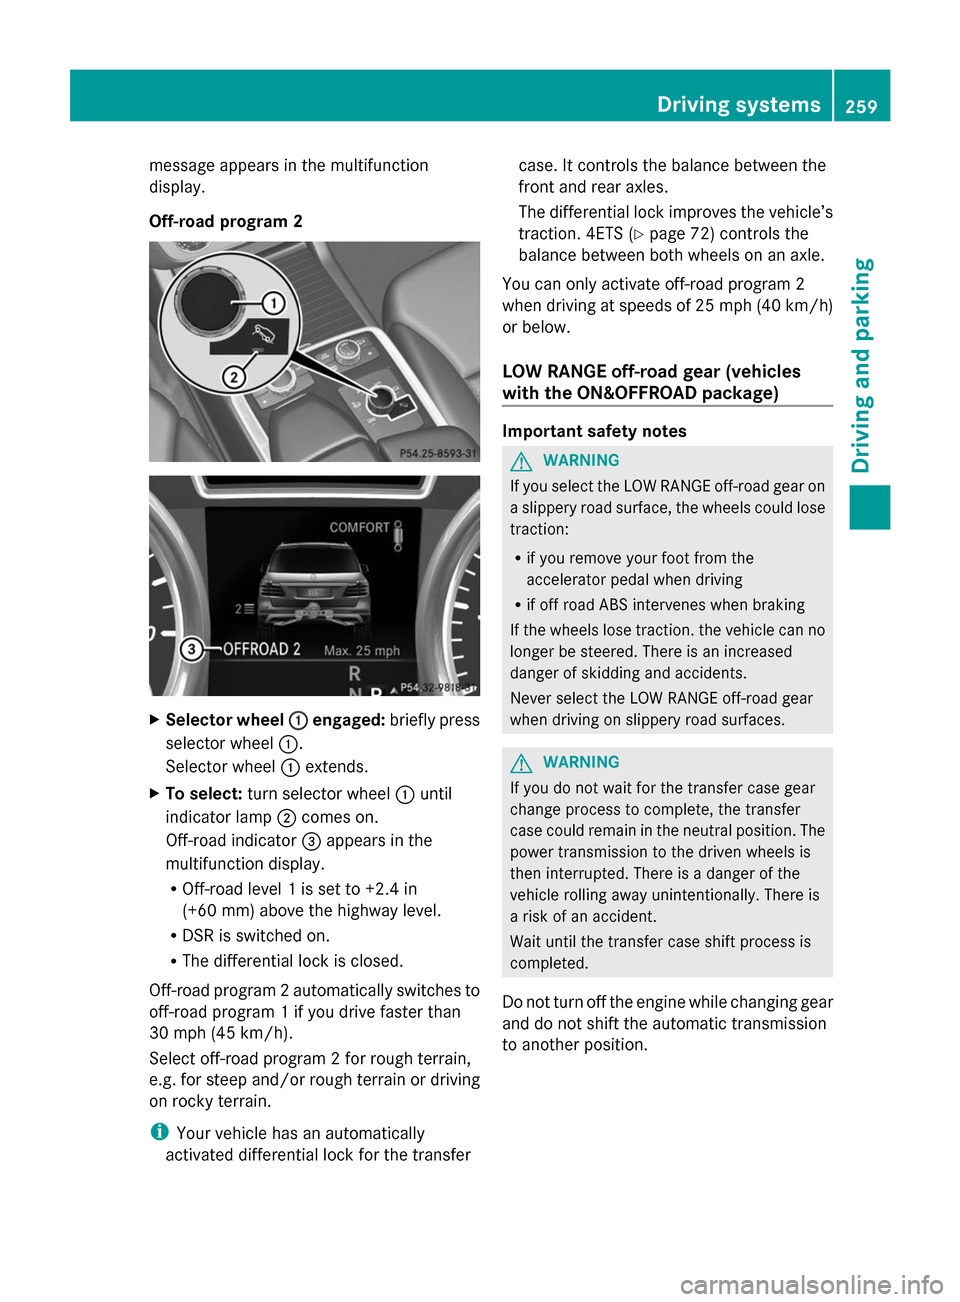
X
Selector wheel : :engaged: briefly press
selector wheel :.
Selector wheel :extends.
X To select: turn selector wheel :until
indicator lamp ;comes on.
Off-road indicator =appears in the
multifunction display.
R Off-road level 1 is set to +2.4 in
(+60 mm) above the highway level.
R DSR is switched on.
R The differential lock is closed.
Off-road program 2 automatically switches to
off-road program 1 if you drive faster than
30 mph (45 km/h).
Select off-road program 2 for rough terrain,
e.g. for steep and/or rough terrain or driving
on rocky terrain.
i Your vehicle has an automatically
activated differential lock for the transfer case. It controls the balance between the
front and rear axles.
The differential lock improves the vehicle’s
traction. 4ETS (Y
page 72) controls the
balance between both wheels on an axle.
You can only activate off-road program 2
when driving at speeds of 25 mph (40 km/h)
or below.
LOW RANGE off-road gear (vehicles
with the ON&OFFROAD package) Important safety notes
G
WARNING
If you select the LOW RANGE off-road gear on
a slippery road surface, the wheels could lose
traction:
R if you remove your foot from the
accelerator pedal when driving
R if off road ABS intervenes when braking
If the wheels lose traction. the vehicle can no
longer be steered. There is an increased
danger of skidding and accidents.
Never select the LOW RANGE off-road gear
when driving on slippery road surfaces. G
WARNING
If you do not wait for the transfer case gear
change process to complete, the transfer
case could remain in the neutral position. The
power transmission to the driven wheels is
then interrupted. There is a danger of the
vehicle rolling away unintentionally. There is
a risk of an accident.
Wait until the transfer case shift process is
completed.
Do not turn off the engine while changing gear
and do not shift the automatic transmission
to another position. Driving systems
259Driving and parking Z
Page 262 of 462
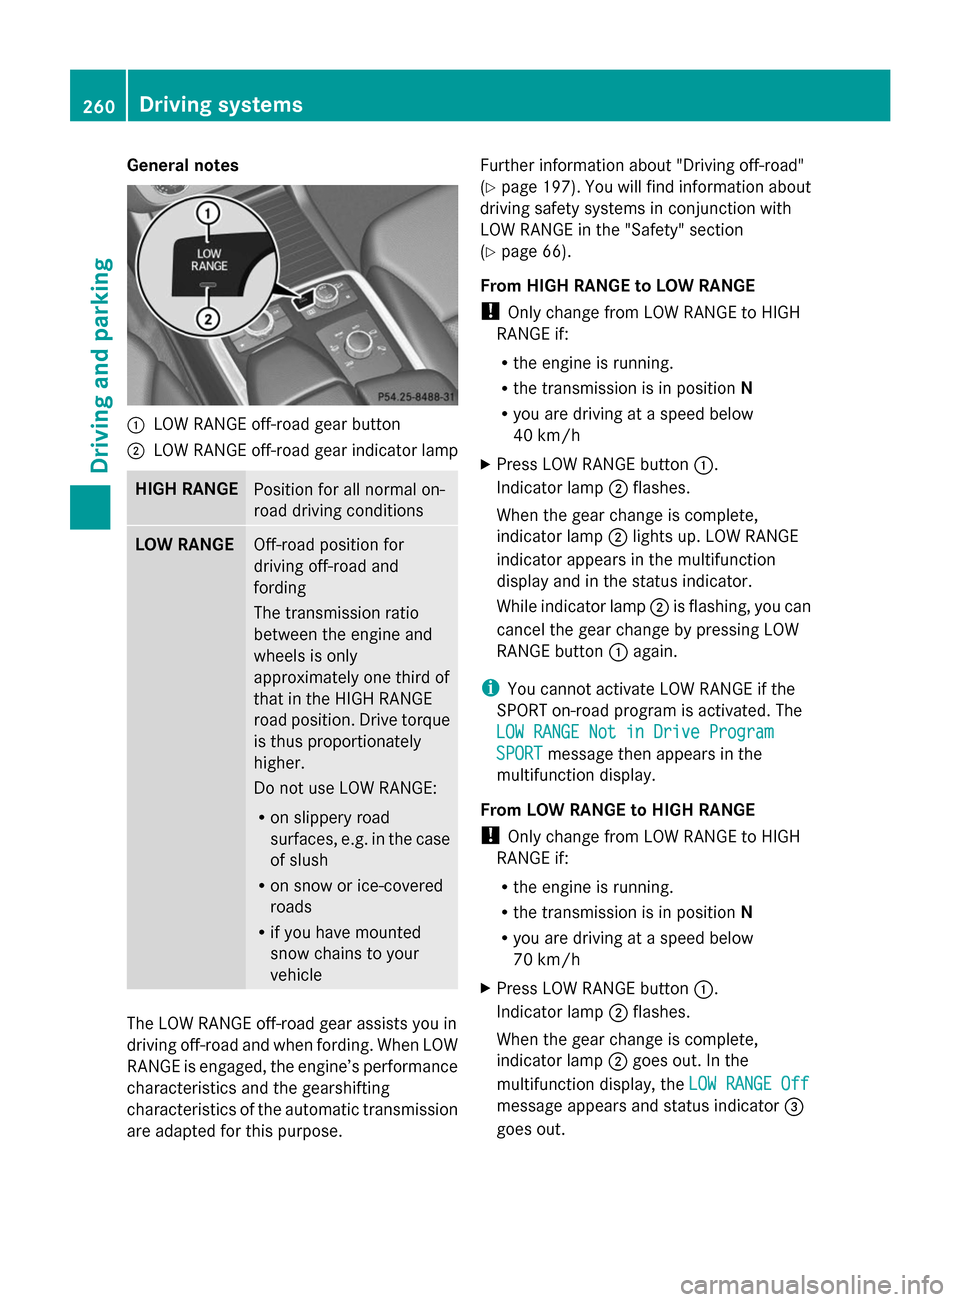
General notes
:
LOW RANGE off-road gear button
; LOW RANGE off-road gear indicator lamp HIGH RANGE
Position for all normal on-
road driving conditions
LOW RANGE
Off-road position for
driving off-road and
fording
The transmission ratio
between the engine and
wheels is only
approximately one third of
that in the HIGH RANGE
road position. Drive torque
is thus proportionately
higher.
Do not use LOW RANGE:
R on slippery road
surfaces, e.g. in the case
of slush
R on snow or ice-covered
roads
R if you have mounted
snow chains to your
vehicle The LOW RANGE off-road gear assists you in
driving off-road and when fording. When LOW
RANGE is engaged, the engine’s performance
characteristics and the gearshifting
characteristics of the automatic transmission
are adapted for this purpose. Further information about "Driving off-road"
(Y
page 197). You will find information about
driving safety systems in conjunction with
LOW RANGE in the "Safety" section
(Y page 66).
From HIGH RANGE to LOW RANGE
! Only change from LOW RANGE to HIGH
RANGE if:
R the engine is running.
R the transmission is in position N
R you are driving at a speed below
40 km/h
X Press LOW RANGE button :.
Indicator lamp ;flashes.
When the gear change is complete,
indicator lamp ;lights up. LOW RANGE
indicator appears in the multifunction
display and in the status indicator.
While indicator lamp ;is flashing, you can
cancel the gear change by pressing LOW
RANGE button :again.
i You cannot activate LOW RANGE if the
SPORT on-road program is activated. The
LOW RANGE Not in Drive Program LOW RANGE Not in Drive Program
SPORT SPORT message then appears in the
multifunction display.
From LOW RANGE to HIGH RANGE
! Only change from LOW RANGE to HIGH
RANGE if:
R the engine is running.
R the transmission is in position N
R you are driving at a speed below
70 km/h
X Press LOW RANGE button :.
Indicator lamp ;flashes.
When the gear change is complete,
indicator lamp ;goes out. In the
multifunction display, the LOW RANGE Off
LOW RANGE Off
message appears and status indicator =
goes out. 260
Driving systemsDriving and parking
Page 269 of 462
of the towing vehicle, as the latter is
equipped with an anti-lock brake system.
Doing so will result in a loss of function of
the brake systems of both the vehicle and
the trailer.
X Make sure that the automatic transmission
is set to position P.
X Apply the vehicle's electric parking brake.
X Start the engine.
X Vehicles with the AIRMATIC package:
select highway level.
X Vehicles with ADS: set ADS toAUTOor
COMF.
X Switch off the engine.
X Close all doors and the tailgate.
X Couple up the trailer.
X Establish all electrical connections.
X Check that the trailer lighting system is
working.
i Vehicles with the AIRMATIC package:
with a trailer attached, the vehicle will
always remain at highway level. When
coupling up a trailer, please observe the
following:
R Unless highway level has been set
manually, the vehicle is automatically
lowered to highway level. This is the case
if a speed of 5 mph (8km/h) is reached.
R High-speed level is not available.
These restrictions apply to all accessories
powered through a connection to the trailer
power socket of your vehicle, e.g. a bicycle
carrier.
Observe the maximum permissible trailer
dimensions (width and length).
Most U.S. states and all Canadian provinces
require by law:
R Safety chains between the towing vehicle
and the trailer. The chains should be cross-
wound under the trailer drawbar. They must
be fastened to the vehicle's trailer
coupling, not to the bumper or the axle. Leave enough play in the chains to make
tight cornering possible.
R A separate brake system for certain types
of trailer.
R A safety switch for braked trailers. Check
the specific legal requirements applicable
to your state.
If the trailer detaches from the towing
vehicle, the safety switch applies the
trailer's brakes. Towing a trailer
There are numerous legal requirements
concerning the towing of a trailer, e.g. speed
restrictions. Make sure that your vehicle/
trailer combination complies with the local
requirements not only in your area of
residence but also at any location to which
you are traveling. The police and local
authorities can provide reliable information.
Please observe the following when towing a
trailer:
R In order to accumulate driving experience
and accustom yourself to the new handling
characteristics, practice the following at a
location where there is no traffic:
-Cornering
- Stopping
- Backing up
R Before driving, check:
-the trailer tow hitch
- the safety switch for braked trailers
- the safety chains
- electrical connections
- the lights
- the wheels
R Adjust the exterior mirrors to provide an
unobstructed view of the rear section of the
trailer.
R If the trailer has electronically controlled
brakes, pull away carefully. Brake manually
using the brake controller and check
whether the brakes function correctly. Towing a trailer
267Driving and parking Z
Page 270 of 462
R
Secure any objects on the trailer to prevent
the cargo from slipping when the vehicle is
in motion.
R If you couple up a trailer, regularly check
that the cargo is securely fastened and
make sure that the trailer lamps and (if
applicable) the trailer brakes are
functioning correctly.
R Bear in mind that the handling will be less
stable when towing a trailer than when
driving without one. Avoid sudden steering
movements.
R The vehicle/trailer combination is heavier,
accelerates more slowly, has a decreased
gradient climbing capability and a longer
braking distance.
It is more susceptible to side winds and
requires more careful steering.
R If possible, avoid abrupt braking. Depress
the brake pedal moderately at first, so that
the trailer can activate its own brakes. Then
increase the pressure on the brake pedal.
R If the automatic transmission repeatedly
shifts between gears on uphill or downhill
gradients, shift to a lower gear using the
left-hand steering wheel paddle shifter.
A lower gear and lower speed reduce the
risk of engine failure.
R When driving downhill, shift to a lower gear
to utilize the engine's braking effect.
Avoid continuous brake application as this
may overheat the vehicle brakes and, if
installed, the trailer brakes.
R If the coolant temperature increases
dramatically while the air-conditioning
system is switched on, switch off the air-
conditioning system.
Coolant heat can additionally be dissipated
by opening the windows and by setting the
blower fan and the interior temperature to
maximum.
R When overtaking, pay particular attention
to the extended length of your vehicle/
trailer combination. Due to the length of your vehicle/trailer
combination, you will have to travel an
additional distance beyond the vehicle you
are overtaking before returning to the
previous lane. Decoupling a trailer
G
WARNING
If you uncouple a trailer with the overrun
brake engaged, you could trap your hand
between the vehicle and the trailer drawbar.
There is a risk of injury.
Do not uncouple a trailer if the overrun brake
is engaged. G
WARNING
Vehicles with level control:
The vehicle is lowered as soon as you
disconnect the trailer cable. This could result
in your limbs or those of other people that are
between the vehicle body and tires or
underneath the vehicle being trapped. There
is a risk of injury.
Make sure that nobody is in the immediate
vicinity of the wheel housings or under the
vehicle when you disconnect the trailer cable.
! Do not disconnect a trailer with an
engaged overrun brake. Otherwise, your
vehicle could be damaged by the
rebounding of the overrun brake.
X Make sure that the automatic transmission
is set to position P.
X Apply the vehicle's electric parking brake.
X Start the engine.
X Close all doors and the tailgate.
X Apply the trailer's parking brake.
X Detach the trailer cable and decouple the
trailer.
X Switch off the engine. 268
Towing a trailerDriving and parking
Page 277 of 462
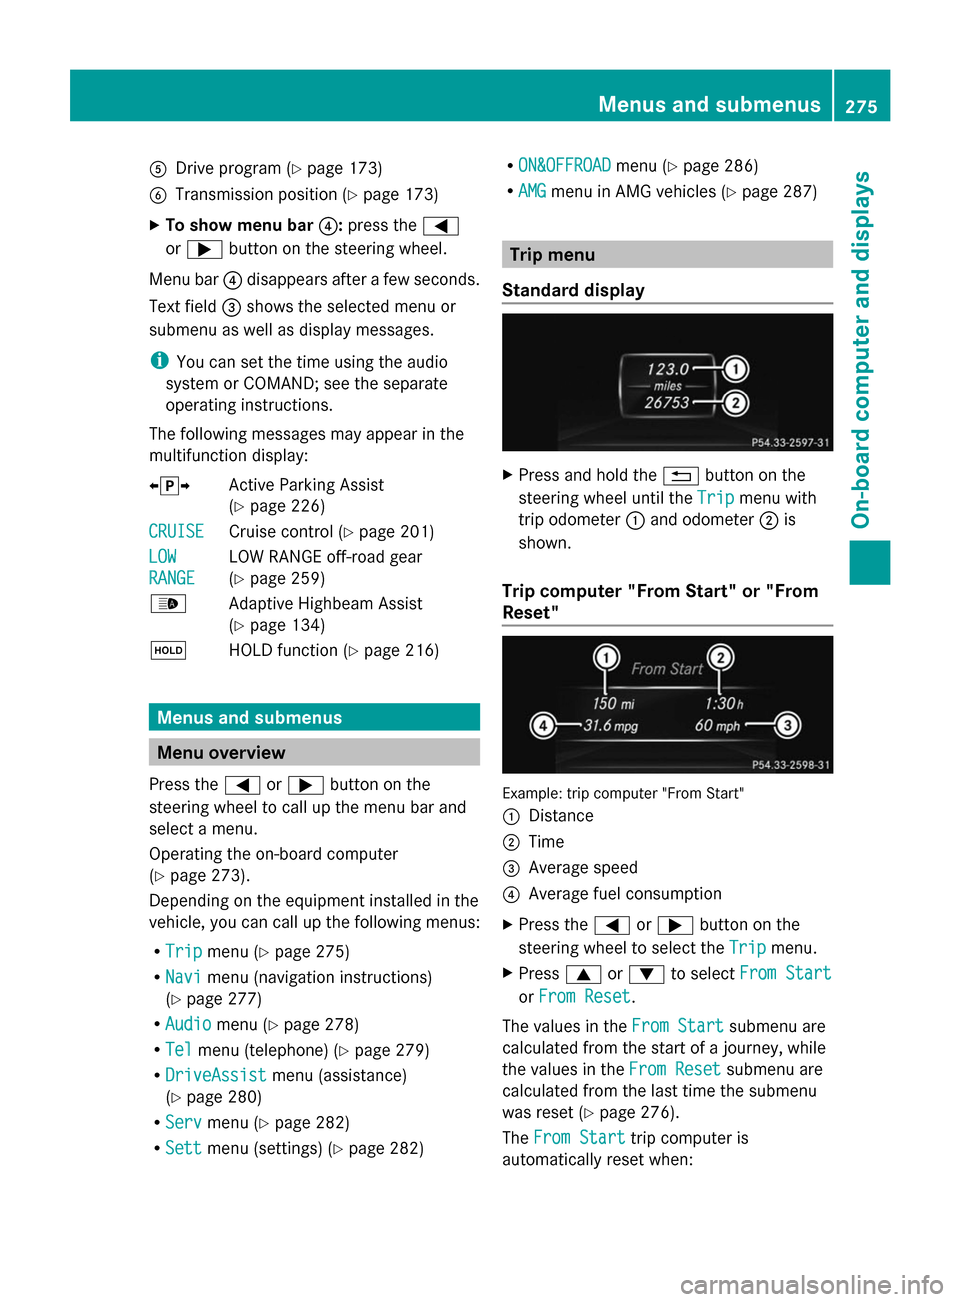
A
Drive program (Y page 173)
B Transmission position (Y page 173)
X To show menu bar ?:press the =
or ; button on the steering wheel.
Menu bar ?disappears after a few seconds.
Text field =shows the selected menu or
submenu as well as display messages.
i You can set the time using the audio
system or COMAND; see the separate
operating instructions.
The following messages may appear in the
multifunction display:
XjY Active Parking Assist
(Y page 226)
CRUISE
CRUISE Cruise control (Y
page 201)
LOW LOW
RANGE RANGE LOW RANGE off-road gear
(Y
page 259)
_ Adaptive Highbeam Assist
(Ypage 134)
ë HOLD function ( Ypage 216) Menus and submenus
Menu overview
Press the =or; button on the
steering wheel to call up the menu bar and
select a menu.
Operating the on-board computer
(Y page 273).
Depending on the equipment installed in the
vehicle, you can call up the following menus:
R Trip
Trip menu (Y page 275)
R Navi Navi menu (navigation instructions)
(Y page 277)
R Audio
Audio menu (Y page 278)
R Tel
Tel menu (telephone) (Y page 279)
R DriveAssist
DriveAssist menu (assistance)
(Y page 280)
R Serv
Serv menu (Y page 282)
R Sett
Sett menu (settings) (Y page 282) R
ON&OFFROAD
ON&OFFROAD menu (Ypage 286)
R AMG
AMG menu in AMG vehicles (Y page 287) Trip menu
Standard display X
Press and hold the %button on the
steering wheel until the Trip
Tripmenu with
trip odometer :and odometer ;is
shown.
Trip computer "From Start" or "From
Reset" Example: trip computer "From Start"
:
Distance
; Time
= Average speed
? Average fuel consumption
X Press the =or; button on the
steering wheel to select the Trip
Trip menu.
X Press 9or: to select From Start From Start
or From Reset
From Reset.
The values in the From Start
From Startsubmenu are
calculated from the start of a journey, while
the values in the From Reset From Resetsubmenu are
calculated from the last time the submenu
was reset (Y page 276).
The From Start From Start trip computer is
automatically reset when: Menus and submenus
275On-board computer and displays Z
Page 296 of 462
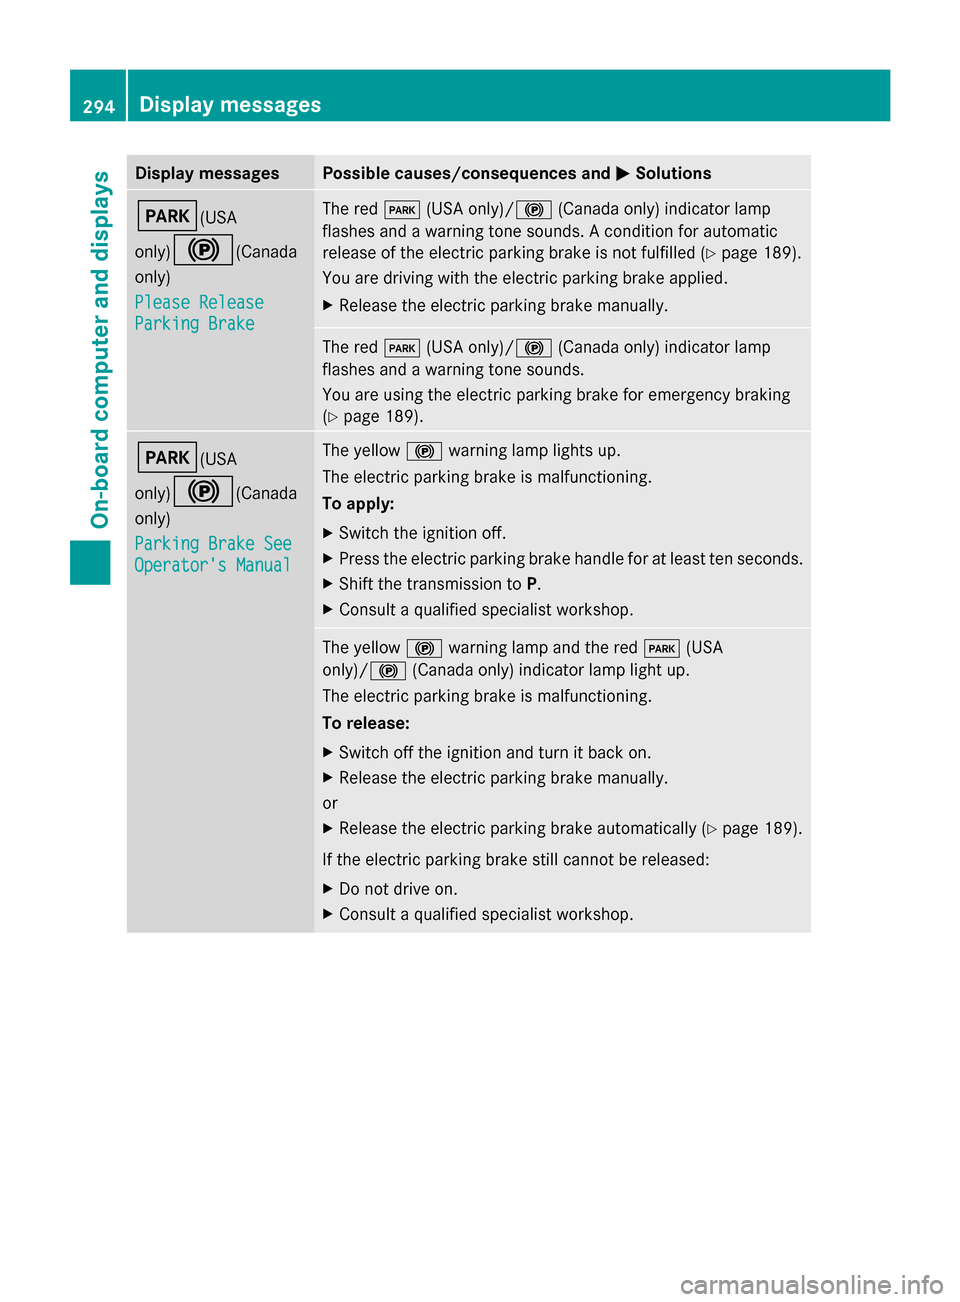
Display messages Possible causes/consequences and
M
MSolutions F(USA
only)
!(Canada
only)
Please Release Please Release
Parking Brake Parking Brake The red
F(USA only)/ !(Canada only) indicator lamp
flashes and a warning tone sounds. A condition for automatic
release of the electric parking brake is not fulfilled ( Ypage 189).
You are driving with the electric parking brake applied.
X Release the electric parking brake manually. The red
F(USA only)/ !(Canada only) indicator lamp
flashes and a warning tone sounds.
You are using the electric parking brake for emergency braking
(Y page 189). F(USA
only)
!(Canada
only)
Parking Brake See Parking Brake See
Operator's Manual Operator's Manual The yellow
!warning lamp lights up.
The electric parking brake is malfunctioning.
To apply:
X Switch the ignition off.
X Press the electric parking brake handle for at least ten seconds.
X Shift the transmission to P.
X Consult a qualified specialist workshop. The yellow
!warning lamp and the red F(USA
only)/ !(Canada only) indicator lamp light up.
The electric parking brake is malfunctioning.
To release:
X Switch off the ignition and turn it back on.
X Release the electric parking brake manually.
or
X Release the electric parking brake automatically ( Ypage 189).
If the electric parking brake still cannot be released:
X Do not drive on.
X Consult a qualified specialist workshop. 294
Display
messagesOn-board computer and displays
Page 297 of 462
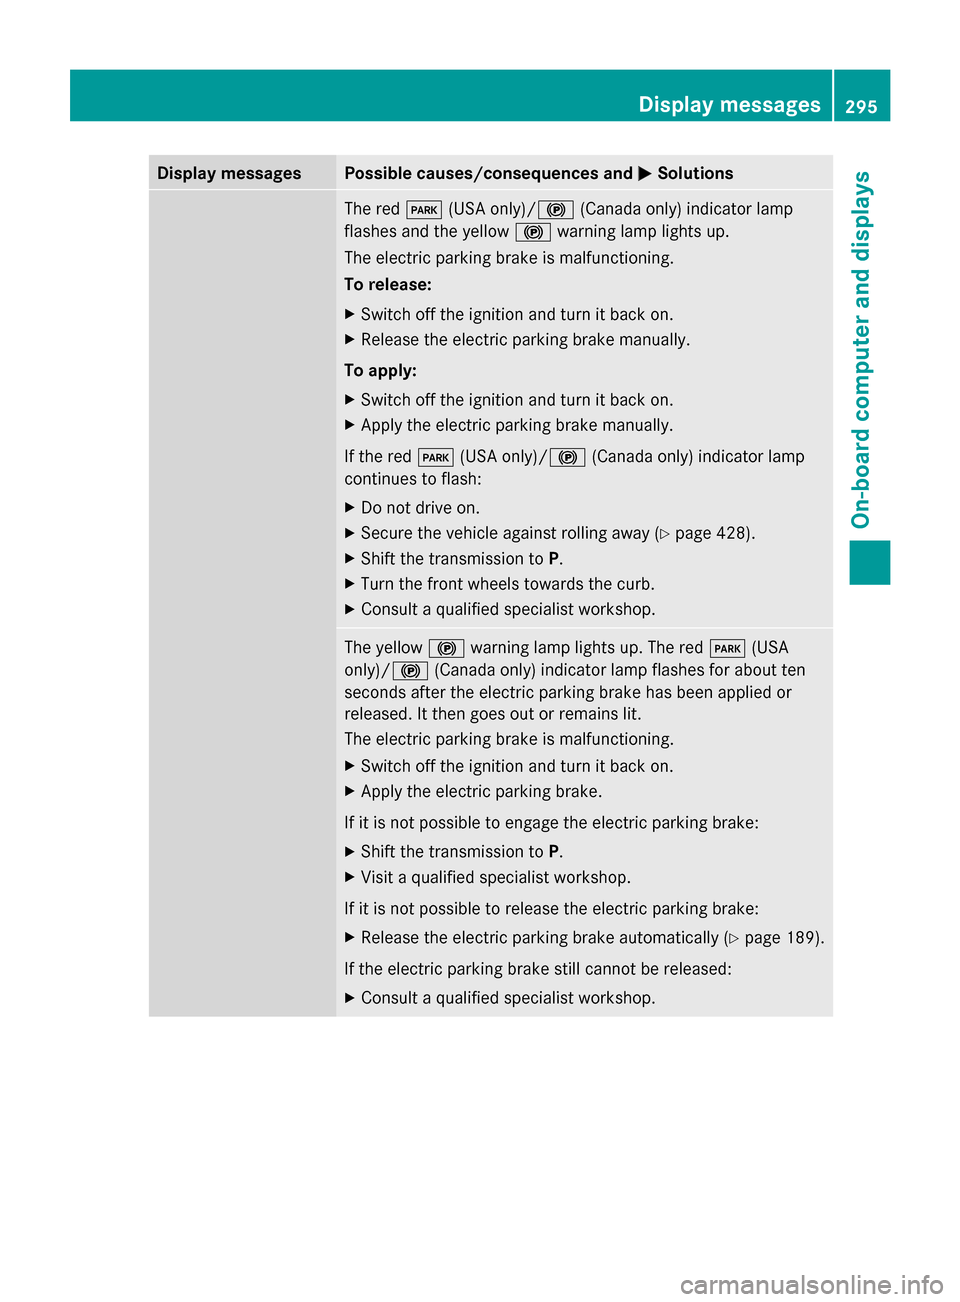
Display messages Possible causes/consequences and
M
MSolutions The red
F(USA only)/ !(Canada only) indicator lamp
flashes and the yellow !warning lamp lights up.
The electric parking brake is malfunctioning.
To release:
X Switch off the ignition and turn it back on.
X Release the electric parking brake manually.
To apply:
X Switch off the ignition and turn it back on.
X Apply the electric parking brake manually.
If the red F(USA only)/ !(Canada only) indicator lamp
continues to flash:
X Do not drive on.
X Secure the vehicle against rolling away ( Ypage 428).
X Shift the transmission to P.
X Turn the front wheels towards the curb.
X Consult a qualified specialist workshop. The yellow
!warning lamp lights up. The red F(USA
only)/ !(Canada only) indicator lamp flashes for about ten
seconds after the electric parking brake has been applied or
released. It then goes out or remains lit.
The electric parking brake is malfunctioning.
X Switch off the ignition and turn it back on.
X Apply the electric parking brake.
If it is not possible to engage the electric parking brake:
X Shift the transmission to P.
X Visit a qualified specialist workshop.
If it is not possible to release the electric parking brake:
X Release the electric parking brake automatically ( Ypage 189).
If the electric parking brake still cannot be released:
X Consult a qualified specialist workshop. Display
messages
295On-board computer and displays Z
Page 314 of 462
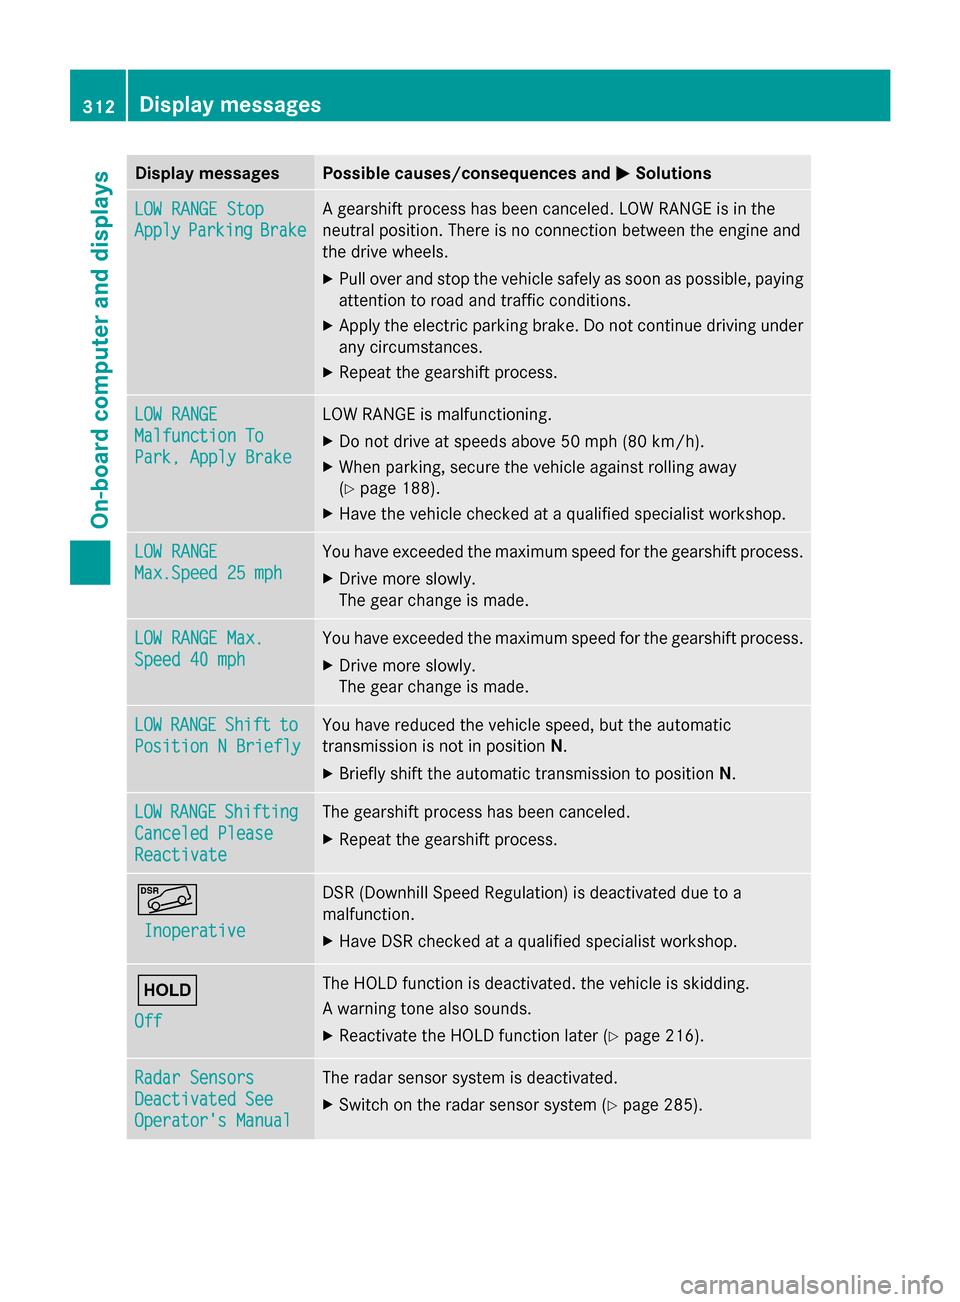
Display messages Possible causes/consequences and
M
MSolutions LOW RANGE Stop
LOW RANGE Stop
Apply Apply
Parking
Parking Brake
Brake A gearshift process has been canceled. LOW RANGE is in the
neutral position. There is no connection between the engine and
the drive wheels.
X
Pull over and stop the vehicle safely as soon as possible, paying
attention to road and traffic conditions.
X Apply the electric parking brake. Do not continue driving under
any circumstances.
X Repeat the gearshift process. LOW RANGE LOW RANGE
Malfunction To Malfunction To
Park, Apply Brake Park, Apply Brake LOW RANGE is malfunctioning.
X
Do not drive at speeds above 50 mph (80 km/h).
X When parking, secure the vehicle against rolling away
(Y page 188).
X Have the vehicle checked at a qualified specialist workshop. LOW RANGE LOW RANGE
Max.Speed 25 mph Max.Speed 25 mph You have exceeded the maximum speed for the gearshift process.
X
Drive more slowly.
The gear change is made. LOW RANGE Max. LOW RANGE Max.
Speed 40 mph Speed 40 mph You have exceeded the maximum speed for the gearshift process.
X
Drive more slowly.
The gear change is made. LOW LOW
RANGE
RANGE Shift
Shiftto
to
Position N Briefly
Position N Briefly You have reduced the vehicle speed, but the automatic
transmission is not in position
N.
X Briefly shift the automatic transmission to position N.LOW LOW
RANGE
RANGE Shifting
Shifting
Canceled Please
Canceled Please
Reactivate Reactivate The gearshift process has been canceled.
X
Repeat the gearshift process. Ã
Inoperative Inoperative DSR (Downhill Speed Regulation) is deactivated due to a
malfunction.
X
Have DSR checked at a qualified specialist workshop. ë
Off Off The HOLD function is deactivated. the vehicle is skidding.
A warning tone also sounds.
X
Reactivate the HOLD function later (Y page 216).Radar Sensors Radar Sensors
Deactivated See Deactivated See
Operator's Manual Operator's Manual The radar sensor system is deactivated.
X
Switch on the radar sensor system (Y page 285).312
Display
messagesOn-board computer and displays