ECO mode MERCEDES-BENZ GL-Class 2014 X166 Owner's Manual
[x] Cancel search | Manufacturer: MERCEDES-BENZ, Model Year: 2014, Model line: GL-Class, Model: MERCEDES-BENZ GL-Class 2014 X166Pages: 462, PDF Size: 32.46 MB
Page 21 of 462
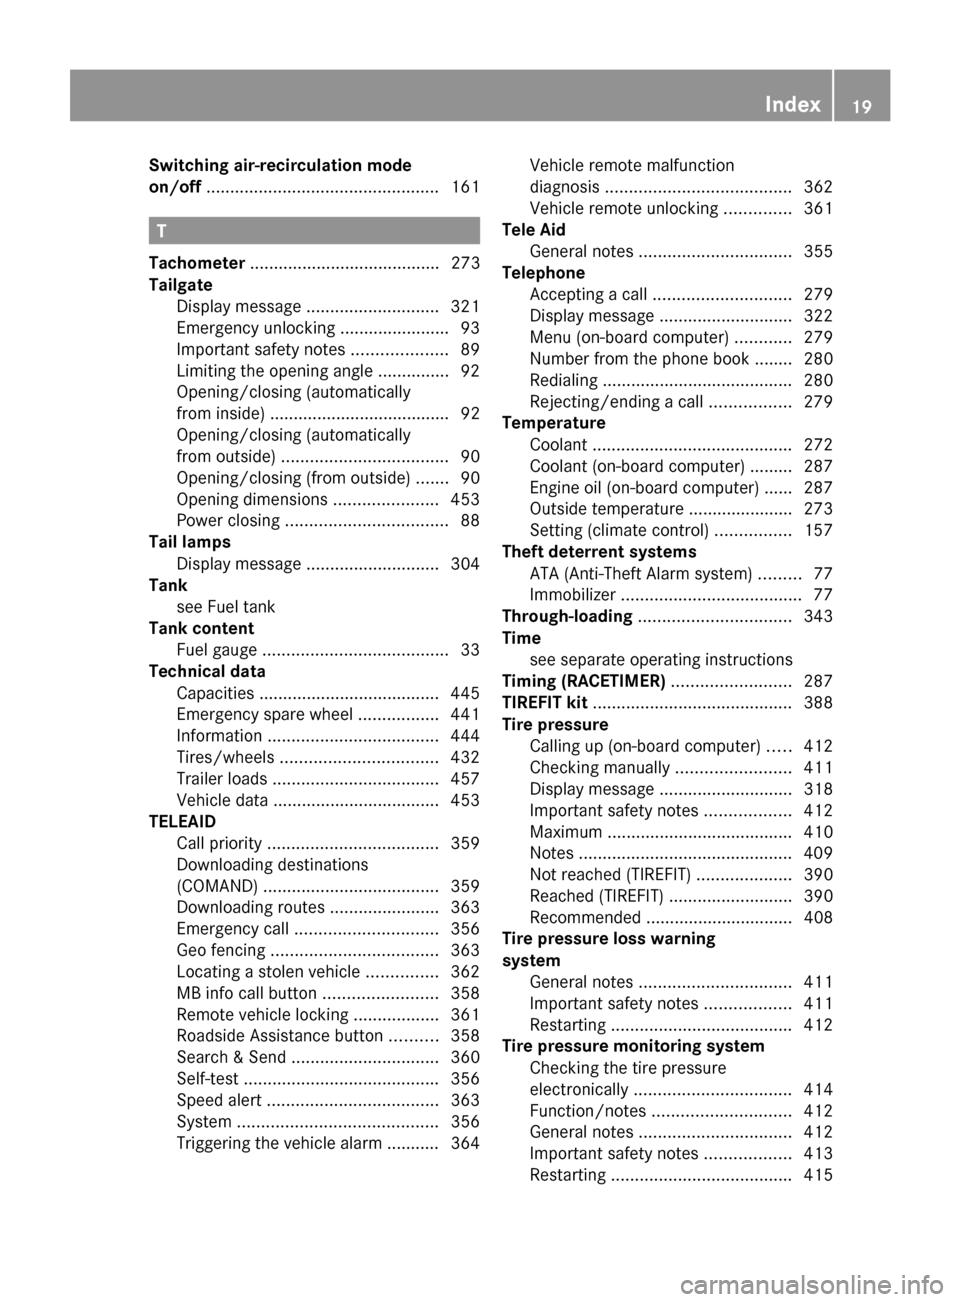
Switching air-recirculation mode
on/off
................................................. 161T
Tachometer ........................................ 273
Tailgate Display message ............................ 321
Emergency unlocking .......................93
Important safety notes ....................89
Limiting the opening angle ...............92
Opening/closing (automatically
from inside) ...................................... 92
Opening/closing (automatically
from outside) ................................... 90
Opening/closing (from outside) .......90
Opening dimensions ......................453
Power closing .................................. 88
Tail lamps
Display message ............................ 304
Tank
see Fuel tank
Tank content
Fuel gauge ....................................... 33
Technical data
Capacities ...................................... 445
Emergency spare wheel .................441
Information .................................... 444
Tires/wheels ................................. 432
Trailer loads ................................... 457
Vehicle data ................................... 453
TELEAID
Call priority .................................... 359
Downloading destinations
(COMAND) ..................................... 359
Downloading routes .......................363
Emergency call .............................. 356
Geo fencing ................................... 363
Locating a stolen vehicle ...............362
MB info call button ........................358
Remote vehicle locking ..................361
Roadside Assistance button ..........358
Search & Send ............................... 360
Self-test ......................................... 356
Speed alert .................................... 363
System .......................................... 356
Triggering the vehicle alarm ........... 364 Vehicle remote malfunction
diagnosis
....................................... 362
Vehicle remote unlocking ..............361
Tele Aid
General notes ................................ 355
Telephone
Accepting a call ............................. 279
Display message ............................ 322
Menu (on-board computer) ............279
Number from the phone book ....... .280
Redialing ........................................ 280
Rejecting/ending a call .................279
Temperature
Coolant .......................................... 272
Coolant (on-board computer) ......... 287
Engine oil (on-board computer) ...... 287
Outside temperature ..................... .273
Setting (climate control) ................157
Theft deterrent systems
ATA (Anti-Theft Alarm system) .........77
Immobilizer ...................................... 77
Through-loading ................................ 343
Time see separate operating instructions
Timing (RACETIMER) .........................287
TIREFIT kit .......................................... 388
Tire pressure Calling up (on-board computer) .....412
Checking manually ........................411
Display message ............................ 318
Important safety notes ..................412
Maximum ....................................... 410
Notes ............................................. 409
Not reached (TIREFIT) ....................390
Reached (TIREFIT) ..........................390
Recommended ............................... 408
Tire pressure loss warning
system General notes ................................ 411
Important safety notes ..................411
Restarting ...................................... 412
Tire pressure monitoring system
Checking the tire pressure
electronically ................................. 414
Function/notes ............................. 412
General notes ................................ 412
Important safety notes ..................413
Restarting ...................................... 415 Index
19
Page 44 of 462
Useful information
i This Operator's Manual describes all
models and all standard and optional
equipment of your vehicle available at the
time of publication of the Operator's
Manual. Country-specific differences are
possible. Please note that your vehicle may
not be equipped with all features
described. This also applies to safety-
related systems and functions.
i Read the information on qualified
specialist workshops: (Y page 28).Panic alarm
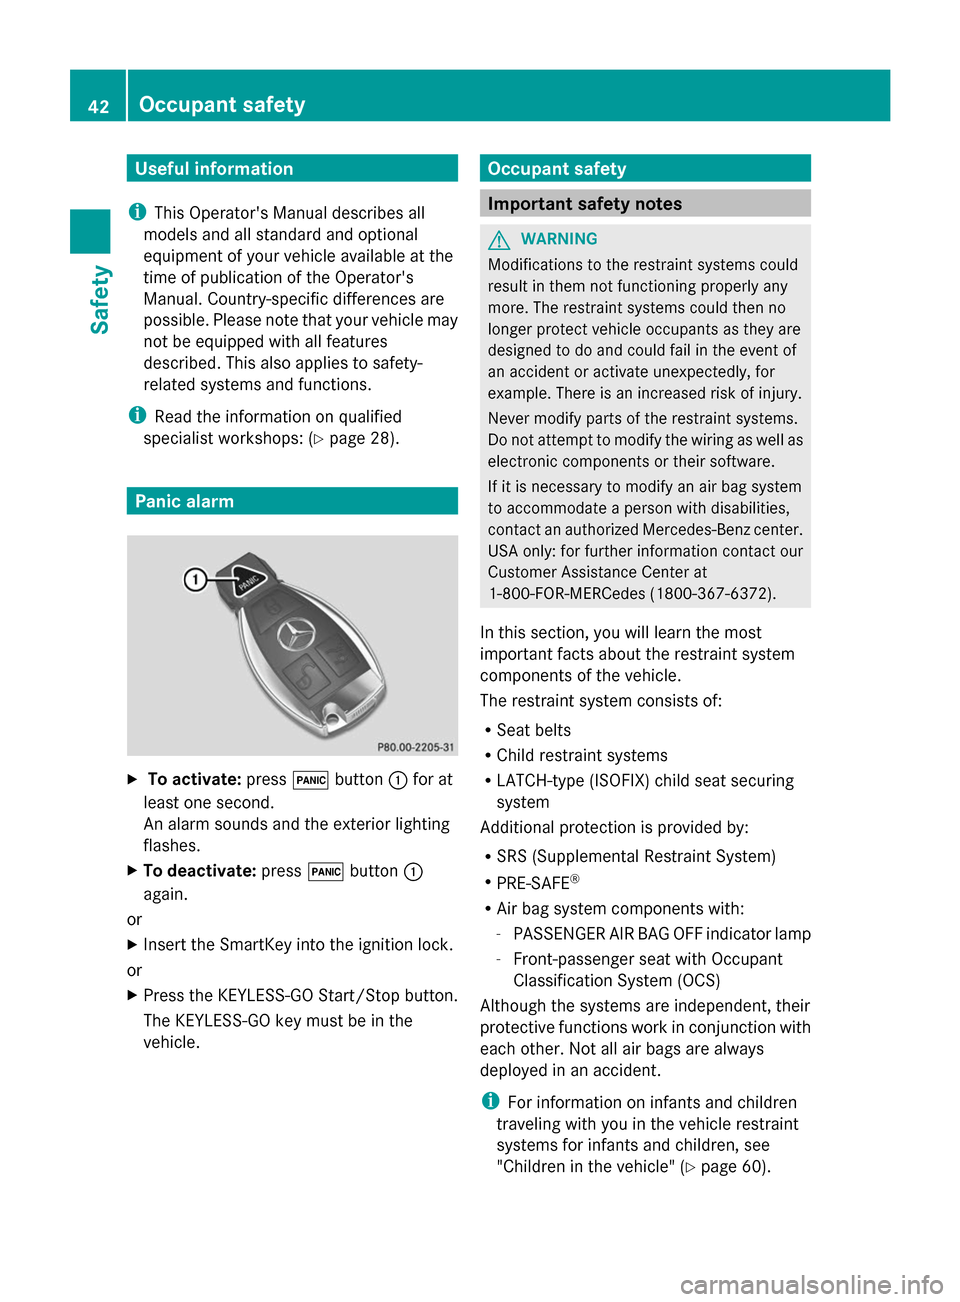
X
To activate: press!button :for at
least one second.
An alarm sounds and the exterior lighting
flashes.
X To deactivate: press!button :
again.
or
X Insert the SmartKey into the ignition lock.
or
X Press the KEYLESS-GO Start/Stop button.
The KEYLESS-GO key must be in the
vehicle. Occupant safety
Important safety notes
G
WARNING
Modifications to the restraint systems could
result in them not functioning properly any
more. The restraint systems could then no
longer protect vehicle occupants as they are
designed to do and could fail in the event of
an accident or activate unexpectedly, for
example. There is an increased risk of injury.
Never modify parts of the restraint systems.
Do not attempt to modify the wiring as well as
electronic components or their software.
If it is necessary to modify an air bag system
to accommodate a person with disabilities,
contact an authorized Mercedes-Benz center.
USA only: for further information contact our
Customer Assistance Center at
1-800-FOR-MERCedes (1800-367-6372).
In this section, you will learn the most
important facts about the restraint system
components of the vehicle.
The restraint system consists of:
R Seat belts
R Child restraint systems
R LATCH-type (ISOFIX) child seat securing
system
Additional protection is provided by:
R SRS (Supplemental Restraint System)
R PRE-SAFE ®
R Air bag system components with:
-PASSENGER AIR BAG OFF indicator lamp
- Front-passenger seat with Occupant
Classification System (OCS)
Although the systems are independent, their
protective functions work in conjunction with
each other. Not all air bags are always
deployed in an accident.
i For information on infants and children
traveling with you in the vehicle restraint
systems for infants and children, see
"Children in the vehicle" (Y page 60).42
Occupant safetySafety
Page 82 of 462
Useful information
i This Operator's Manual describes all
models and all standard and optional
equipment of your vehicle available at the
time of publication of the Operator's
Manual. Country-specific differences are
possible. Please note that your vehicle may
not be equipped with all features
described. This also applies to safety-
related systems and functions.
i Read the information on qualified
specialist workshops: (Y page 28).SmartKey
Important safety notes
G
WARNING
If children are left unsupervised in the vehicle,
they could:
R open the doors, thus endangering other
people or road users.
R get out and disrupt traffic.
R operate the vehicle's equipment.
Additionally, children could set the vehicle in
motion if, for example, they:
R release the parking brake.
R shifting the automatic transmission out of
park position P
R Start the engine.
There is a risk of an accident and injury.
When leaving the vehicle, always take the
SmartKey with you and lock the vehicle. Never
leave children or animals unattended in the
vehicle. Always keep the SmartKey out of
reach of children. G
WARNING
If persons, particularly children are subjected
to prolonged exposure to extreme heat or
cold, there is a risk of injury, possibly even
fatal. Never leave children unattended in the
vehicle. G
WARNING
If you attach heavy or large objects to the
SmartKey, the SmartKey could be
unintentionally turned in the ignition lock. This
could cause the engine to be switched off.
There is a risk of an accident.
Do not attach any heavy or large objects to
the SmartKey. Remove any bulky key rings
before inserting the SmartKey into the
ignition lock.
! Keep the SmartKey away from strong
magnetic fields. Otherwise, the remote
control function could be affected.
Strong magnetic fields can occur in the
vicinity of powerful electrical installations.
Do not keep the SmartKey:
R with electronic devices, e.g. a mobile
phone or another SmartKey
R with metallic objects, e.g. coins or metal
foil
R inside metallic objects, e.g. a metal case
This can affect the functionality of the
SmartKey.
Do not keep the KEYLESS-GO key in the
temperature-controlled cup holder.
Otherwise, the KEYLESS-GO key will not be
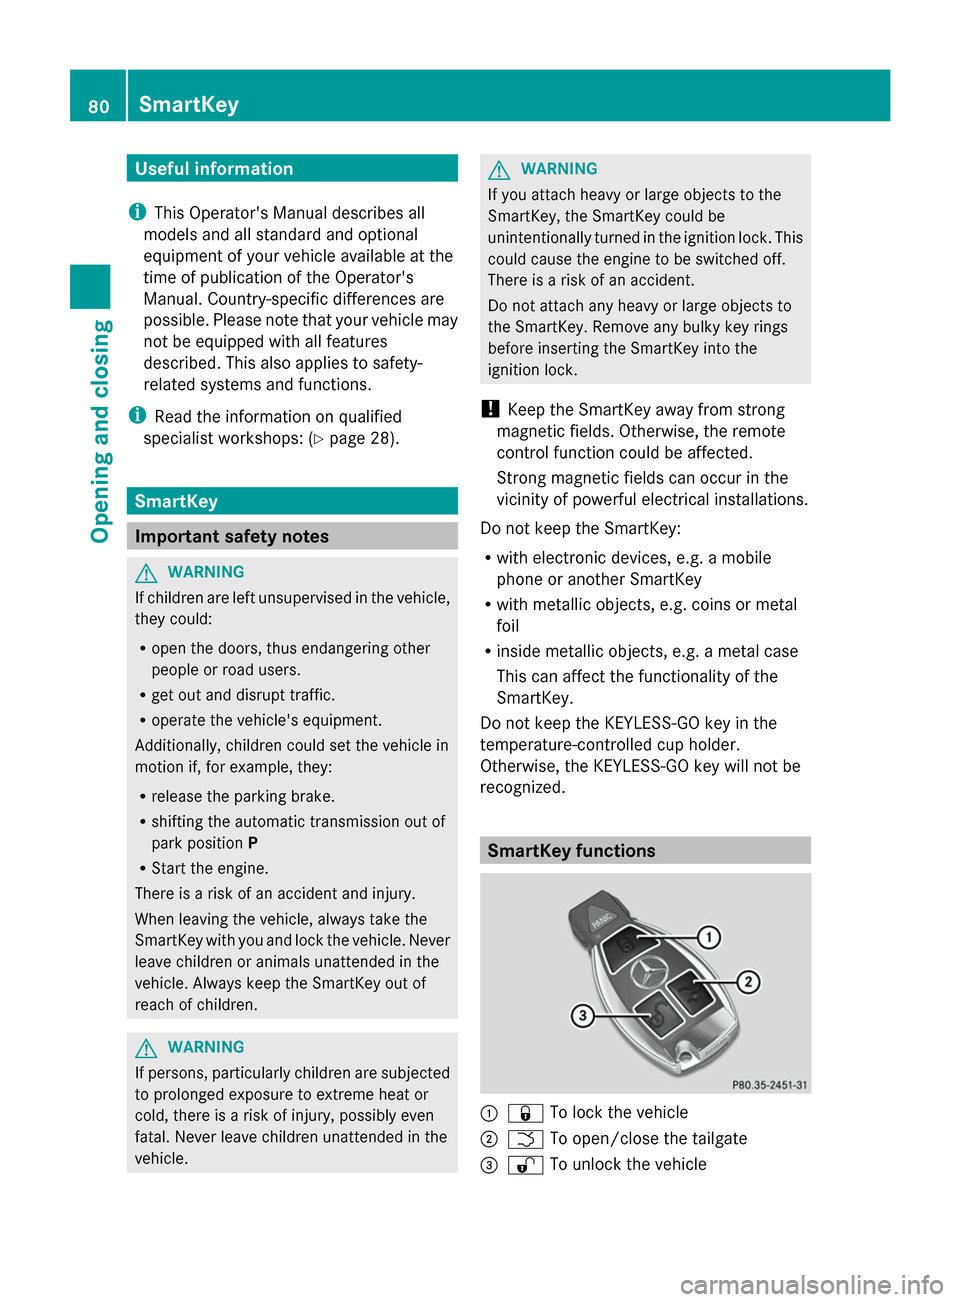
recognized. SmartKey functions
:
& To lock the vehicle
; F To open/close the tailgate
= % To unlock the vehicle 80
SmartKeyOpening and closing
Page 130 of 462
Useful information
i This Operator's Manual describes all
models and all standard and optional
equipment of your vehicle available at the
time of publication of the Operator's
Manual. Country-specific differences are
possible. Please note that your vehicle may
not be equipped with all features
described. This also applies to safety-
related systems and functions.
i Read the information on qualified
specialist workshops: (Y page 28).Exterior lighting
General notes
For reasons of safety, Mercedes-Benz
recommends that you drive with the lights
switched on even during the daytime. In some
countries, operation of the headlamps varies
due to legal requirements and self-imposed
obligations. Driving abroad
Conversion to symmetrical low beam Switch the headlamps to symmetrical low
beam in countries in which traffic drives on
the opposite side of the road from the country
where the vehicle is registered. This prevents
glare to oncoming traffic. When using
symmetrical lights, the edge of the road is not
lit as widely and as far ahead as normal.
Have the headlamps converted at a qualified
specialist workshop as close to the border as
possible before driving in these countries.
Conversion to asymmetrical low beam
after returning Have the headlamps converted back to
asymmetrical low-beam headlamps at a
qualified specialist workshop as soon as
possible after crossing the border again. Setting the exterior lighting
Setting options Exterior lighting can be set using:
R
the light switch
R the combination switch (Y page 131)
R the on-board computer (Y page 283)
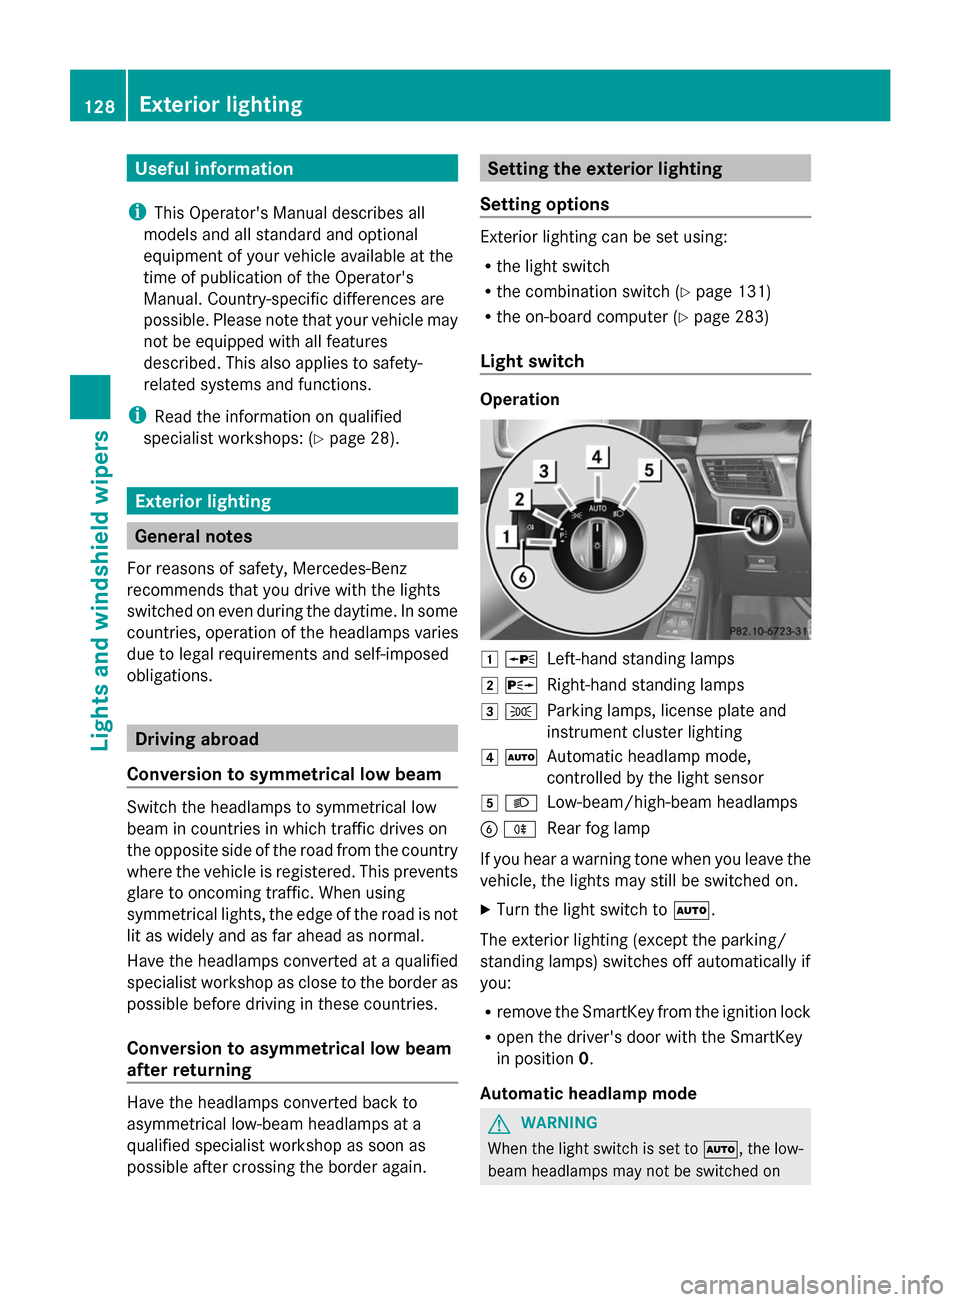
Light switch Operation
1
W
Left-hand standing lamps
2 X
Right-hand standing lamps
3 T
Parking lamps, license plate and
instrument cluster lighting
4 Ã
Automatic headlamp mode,
controlled by the light sensor
5 L
Low-beam/high-beam headlamps
B R
Rear fog lamp
If you hear a warning tone when you leave the
vehicle, the lights may still be switched on.
X Turn the light switch to Ã.
The exterior lighting (except the parking/
standing lamps) switches off automatically if
you:
R remove the SmartKey from the ignition lock
R open the driver's door with the SmartKey
in position 0.
Automatic headlamp mode G
WARNING
When the light switch is set to Ã, the low-
beam headlamps may not be switched on 128
Exterior lightingLights and windshield wipers
Page 148 of 462
Useful information
i This Operator's Manual describes all
models and all standard and optional
equipment of your vehicle available at the
time of publication of the Operator's
Manual. Country-specific differences are
possible. Please note that your vehicle may
not be equipped with all features
described. This also applies to safety-
related systems and functions.
i Read the information on qualified
specialist workshops: (Y page 28).Overview of climate control systems
Important safety notes
Observe the settings recommended on the
following pages. The windows could
otherwise fog up.
To prevent the windows from fogging up:
R switch off climate control only briefly
R switch on air-recirculation mode only
briefly
R switch on the cooling with air
dehumidification function
R switch on the defrost windshield function
briefly, if required
Climate control regulates the temperature
and the humidity in the vehicle interior and
filters undesirable substances out of the air.
Climate control can only be operated when
the engine is running. Optimum operation is
only achieved with the side windows and roof
closed.
The residual heat function can only be
activated or deactivated with the ignition
switched off (Y page 161).
i Ventilate the vehicle for a brief period
during warm weather, e.g. using the
convenience opening feature (Y page 95).
This will speed up the cooling process and
the desired interior temperature will be
reached more quickly. i
The integrated filter filters out most
particles of dust and soot and completely
filters out pollen. It also reduces gaseous
pollutants and odors. A clogged filter
reduces the amount of air supplied to the
vehicle interior. For this reason, you should
always observe the interval for replacing
the filter, which is specified in the
Maintenance Booklet. As it depends on
environmental conditions, e.g. heavy air
pollution, the interval may be shorter than
stated in the Maintenance Booklet.
i It is possible that the residual heat
function may be activated automatically an
hour after the SmartKey has been removed
in order to dry the automatic climate
control. The vehicle is then ventilated for
30 minutes. 146
Overview of climate control systemsClimate control
Page 151 of 462
=
To direct the airflow through the rear air vents
? To direct the airflow through the footwell vents Information about using 2-zone
automatic climate control
The following contains notes and
recommendations on optimum use of dual-
zone automatic climate control.
R Activate climate control using the Ãand
¿/Á buttons. The indicator lamps in
the à and¿/Á buttons light up.
R Set the temperature to 72 ‡ (22 †).
R Only use the "Windshield defrosting"
function briefly until the windshield is clear
again.
R Only use air-recirculation mode briefly, e.g.
if there are unpleasant outside odors or
when in a tunnel. The windows could
otherwise fog up, since no fresh air is drawn
into the vehicle in air-recirculation mode.
R Use the ZONE function to adopt the
temperature settings on the driver's side
for the front-passenger side as well. The
indicator lamp above the ábutton goes
out.
R Vehicles with COMAND: if you change the
settings of the climate control system, the
climate status display appears for
approximately three seconds at the bottom
of the screen in the COMAND display. See
also the separate COMAND operating
instructions. You will see the current
settings of the various climate control
functions. Overview of climate control systems
149Climate control
Page 156 of 462
L
To increase the airflow (Y page 158)
M To set the temperature (Y page 157)
N To set rear-compartment climate control to automatic (Y page 156)
O To direct the airflow through the rear air vents (Y page 158)
P To direct the airflow through the footwell vents (Y page 158)
Q To switch rear-compartment climate control on/off (Y page 154)
R To reduce the airflow (Y page 158)Information about using 3-zone
automatic climate control
The following contains instructions and
recommendations to enable you to get the
most out of your automatic climate control.
R Activate climate control using the Ãand
¿/Á buttons. The indicator lamps
above the Ãand¿/Á buttons
light up.
R In automatic mode, you can also use the
ñ button to set a climate mode
(FOCUS/MEDIUM/DIFFUSE). The
MEDIUM level is recommended.
R Set the temperature to 72 ‡ (22 †).
R Only use the "Windshield defrosting"
function briefly until the windshield is clear
again.
R Only use air-recirculation mode briefly, e.g.
if there are unpleasant outside odors or
when in a tunnel. The windows could
otherwise fog up, since no fresh air is drawn
into the vehicle in air-recirculation mode.
R Use the ZONE function to adopt the
temperature settings on the driver's side
for the front-passenger side and the rear
compartment as well. The indicator lamp
above the ábutton goes out.
R Use the residual heat function if you want
to heat or ventilate the vehicle interior
when the ignition is switched off. The
residual heat function can only be activated
or deactivated with the ignition switched
off.
R Vehicles with COMAND: if you change the
settings of the climate control system, the climate status display appears for
approximately three seconds at the bottom
of the screen in the COMAND display. See
also the separate COMAND operating
instructions. You will see the current
settings of the various climate control
functions.
Operating the climate control
systems
Switching climate control on/off
General notes When the climate control is switched off, the
air supply and air circulation are also
switched off. The windows could fog up.
Therefore, switch off climate control only
briefly
i
Switch on climate control primarily using
the à button (Y page 156).
In the rear compartment, you can also switch
climate control on and off using the Ãand
^ buttons. 154
Operating the climate control systemsClimate control
Page 184 of 462
Problems with the transmission
Problem Possible causes/consequences and
M
MSolutions The transmission has
problems shifting gear. The transmission is losing oil.
X
Have the transmission checked at a qualified specialist
workshop immediately. The acceleration ability
is deteriorating.
The transmission no
longer changes gear. The transmission is in emergency mode.
It is only possible to shift into
secondgear and reverse gear.
X Stop the vehicle.
X Shift the transmission to position P.
X Switch off the engine.
X Wait at least ten seconds before restarting the engine.
X Shift the transmission to position Dor R.
If D is selected, the transmission shifts into secondgear; ifRis
selected, the transmission shifts into reverse gear.
X Have the transmission checked at a qualified specialist
workshop immediately. Transfer case
! Performance tests may only be carried
out on a 2-axle dynamometer. The brake
system or transfer case could otherwise be
damaged. Contact a qualified specialist
workshop for a performance test.
! Because ESP ®
is an automatic system,
the engine and ignition must be switched
off (SmartKey in position 0or 1or Start/
Stop button in position 0or 1) when the
electric parking brake is being tested on a
brake dynamometer (maximum
10 seconds).
Braking triggered automatically by ESP ®
may seriously damage the brake system.
! Vehicles with 4MATIC must not be towed
with either the front or the rear axle raised,
as doing so will damage the transmission.
This section is only valid for vehicles with 4-
wheel drive (4MATIC). Power is always
transmitted to both axles. Refueling
Important safety notes
G
WARNING
Fuel is highly flammable. If you handle fuel
incorrectly, there is a risk of fire and
explosion.
You must avoid fire, open flames, creating
sparks and smoking. Switch off the engine
and, if applicable, the auxiliary heating before
refueling. G
WARNING
Fuel is poisonous and hazardous to health.
There is a risk of injury.
You must make sure that fuel does not come
into contact with your skin, eyes or clothing
and that it is not swallowed. Do not inhale fuel
vapors. Keep fuel away from children. 182
RefuelingDriving and parking
Page 195 of 462
in the ECO display does not indicate a fixed
consumption.
Apart from driving style, consumption is
dependent on many factors such as, e.g.:
R Load
R Tire pressure
R Cold start
R Choice of route
R Electrical consumers switched on
These factors are not included in the ECO
display.
The evaluation of your driving style is carried
out using the following three categories:
R Acceleration
Acceleration (evaluation of all
acceleration processes):
- The bar fills up: moderate acceleration,
especially at higher speeds
- The bar empties: sporty acceleration
R Constant Constant (assessment of driving behavior
at all times):
- The bar fills up: constant speed and
avoidance of unnecessary acceleration
and deceleration
- The bar empties: fluctuations in speed
R Coasting
Coasting (assessment of all deceleration
processes):
- The bar fills up: anticipatory driving,
keeping your distance and early release
of the accelerator. The vehicle can coast
without use of the brakes.
- The bar empties: frequent braking
i An economical driving style specially
requires driving at moderate engine
speeds.
To achieve a higher value in the categories
Acceleration
Acceleration andConstant Constant , observe the
gearshift recommendations.
i On long journeys at a constant speed, e.g.
on the highway, only the bar for Constant
Constant
will change.
i The ECO display summarizes the driving
characteristics from the start of the journey
to its completion. For this reason, the bars change dynamically at the beginning of the
journey. On longer journeys, there are
fewer changes. For more dynamic changes,
carry out a manual reset.
For further information on the ECO display,
see (Y page 276). Braking
Important safety notes G
WARNING
If you shift down on a slippery road surface in
an attempt to increase the engine's braking
effect, the drive wheels could lose their grip.
There is an increased danger of skidding and
accidents.
Do not shift down for additional engine
braking on a slippery road surface.
Downhill gradients !
On long and steep gradients, you must
reduce the load on the brakes by shifting
early to a lower gear. This allows you to take
advantage of the engine braking effect and
helps avoid overheating and excessive
wear of the brakes.
When you take advantage of the engine
braking effect, a drive wheel may not turn
for some time, e.g. on a slippery road
surface. This could cause damage to the
drive train. This type of damage is not
covered by the Mercedes-Benz warranty.
Do not depress the brake pedal continuously
while the vehicle is in motion, e.g. causing the
brakes to rub by constantly applying light
pressure to the pedal. This results in
excessive and premature wear to the brake
pads.
Heavy and light loads G
WARNING
If you rest your foot on the brake pedal while
driving, the braking system can overheat. This Driving tips
193Driving and parking
Z
Page 196 of 462
increases the stopping distance and can even
cause the braking system to fail. There is a
risk of an accident.
Never use the brake pedal as a footrest. Never
depress the brake pedal and the accelerator
pedal at the same time.
! Depressing the brake pedal constantly
results in excessive and premature wear to
the brake pads.
If the brakes have been subjected to a heavy
load, do not stop the vehicle immediately.
Drive on for a short while. This allows the
airflow to cool the brakes more quickly.
Wet roads If you have driven for a long time in heavy rain
without braking, there may be a delayed
reaction from the brakes when braking for the
first time. This may also occur after the
vehicle has been washed or driven through
deep water.
You then have to depress the brake pedal
more firmly. Maintain a greater distance from
the vehicle in front.
After driving on a wet road or having the
vehicle washed, brake firmly while paying
attention to the traffic conditions. This will
warm up the brake discs, thereby drying them
more quickly and protecting them against
corrosion.
Limited braking performance on salt-
treated roads If you drive on salted roads, a layer of salt
residue may form on the brake discs and
brake pads. This can result in a significantly
longer braking distance.
R Brake occasionally to remove any possible
salt residue. Make sure that you do not
endanger other road users when doing so.
R Carefully depress the brake pedal and the
beginning and end of a journey.
R Maintain a greater distance to the vehicle
ahead. Servicing the brakes !
If the red brake warning lamp lights up in
the instrument cluster and you hear a
warning tone while the engine is running,
the brake fluid level may be too low.
Observe additional warning messages in
the multifunction display.
The brake fluid level may be too low due to
brake pad wear or leaking brake lines.
Have the brake system checked
immediately. This work should be carried
out at a qualified specialist workshop.
! A function or performance test should
only be carried out on a 2-axle
dynamometer. If you are planning to have
the vehicle tested on such a dynamometer,
contact an authorized Mercedes-Benz
Center to obtain further information first.
Otherwise, you could damage the drive
train or the brake system.
! Because ESP ®
is an automatic system,
the engine and ignition must be switched
off (SmartKey in position 0or 1or Start/
Stop button in position 0or 1) when the
electric parking brake is being tested on a
brake dynamometer (maximum
10 seconds).
Braking triggered automatically by ESP ®
may seriously damage the brake system.
All checks and maintenance work on the
brake system must be carried out at a
qualified specialist workshop. Consult a
qualified specialist workshop to arrange this.
Have brake pads installed and brake fluid
replaced at a qualified specialist workshop.
If the brake system has only been subject to
moderate loads, you should test the
functionality of your brakes at regular
intervals. To do so, press firmly on the brake
pedal when driving at a high speed. This
improves the grip of the brake pads.
You can find a description of Brake Assist
(BAS) on (Y page 68) or of BAS PLUS on
(Y page 68). 194
Driving tipsDriving and parking