fuel cap MERCEDES-BENZ GL-Class 2014 X166 Owner's Manual
[x] Cancel search | Manufacturer: MERCEDES-BENZ, Model Year: 2014, Model line: GL-Class, Model: MERCEDES-BENZ GL-Class 2014 X166Pages: 462, PDF Size: 32.46 MB
Page 13 of 462
Folding in/out (automatically
)....... 123
Folding in/out (electrically). ..........123
Folding in when locking (on-board
computer) ...................................... 286
Out of position (troubleshooting) ...123
Setting ........................................... 123
Storing settings (memory function) 125
Storing the parking position ..........124
Eyeglasses compartment .................342 F
Filler cap see Fuel filler flap
Flat tire
MOExtended tires ..........................387
Preparing the vehicle .....................387
TIREFIT kit ...................................... 388
see Emergency spare wheel
Floormats ........................................... 367
Folding the rear bench seat
forwards/back .................................. 344
Fording Off-road ......................................... 195
On flooded roads ........................... 195
Front windshield
see Windshield
Fuel
Additives ........................................ 447
Consumption statistics ..................275
Displaying the current
consumption .................................. 276
Displaying the range ......................276
Driving tips .................................... 192
Fuel gauge ....................................... 33
Grade (gasoline) ............................ 446
Important safety notes ..................446
Low outside temperatures .............448
Premium-grade unleaded gasoline .446
Problem (malfunction) ...................185
Quality (diesel )............................... 447
Refueling ........................................ 182
Tank content/reserve fuel .............446
Fuel filler flap
Opening ......................................... 184
Fuel filter (display message) ............309Fuel level
Calling up the range (on-board
computer) ...................................... 276
Fuel tank
Capacity ........................................ 446
Problem (malfunction) ...................185
Fuses
Allocation chart ............................. 400
Before changing ............................. 400
Dashboard fuse box .......................401
Fuse box in the engine
compartment ................................. 401
Fuse box under rear bench seat ....402
Important safety notes ..................400 G
Garage door opener Clearing the memory .....................367
General notes ................................ 364
Important safety notes ..................364
Opening/closing the garage door ..367
Programming (button in the rear-
view mirror) ................................... 364
Gear indicator (on-board computer) 287
Genuine parts ...................................... 23
Glove box ........................................... 341
GTW (Gross Trailer Weight)
(definition) ......................................... 425 H
Handbrake see Parking brake
Hazard warning lamps ......................132
Headlamps Fogging up ..................................... 135
see Automatic headlamp mode
Head restraints
Adjusting ....................................... 108
Adjusting (electrically) ...................109
Adjusting (manually). .....................109
Adjusting (rear) .............................. 110
Installing/removing (rear) ..............110
Luxury ............................................ 109
Heating
see Climate control Index
11
Page 21 of 462
Switching air-recirculation mode
on/off
................................................. 161T
Tachometer ........................................ 273
Tailgate Display message ............................ 321
Emergency unlocking .......................93
Important safety notes ....................89
Limiting the opening angle ...............92
Opening/closing (automatically
from inside) ...................................... 92
Opening/closing (automatically
from outside) ................................... 90
Opening/closing (from outside) .......90
Opening dimensions ......................453
Power closing .................................. 88
Tail lamps
Display message ............................ 304
Tank
see Fuel tank
Tank content
Fuel gauge ....................................... 33
Technical data
Capacities ...................................... 445
Emergency spare wheel .................441
Information .................................... 444
Tires/wheels ................................. 432
Trailer loads ................................... 457
Vehicle data ................................... 453
TELEAID
Call priority .................................... 359
Downloading destinations
(COMAND) ..................................... 359
Downloading routes .......................363
Emergency call .............................. 356
Geo fencing ................................... 363
Locating a stolen vehicle ...............362
MB info call button ........................358
Remote vehicle locking ..................361
Roadside Assistance button ..........358
Search & Send ............................... 360
Self-test ......................................... 356
Speed alert .................................... 363
System .......................................... 356
Triggering the vehicle alarm ........... 364 Vehicle remote malfunction
diagnosis
....................................... 362
Vehicle remote unlocking ..............361
Tele Aid
General notes ................................ 355
Telephone
Accepting a call ............................. 279
Display message ............................ 322
Menu (on-board computer) ............279
Number from the phone book ....... .280
Redialing ........................................ 280
Rejecting/ending a call .................279
Temperature
Coolant .......................................... 272
Coolant (on-board computer) ......... 287
Engine oil (on-board computer) ...... 287
Outside temperature ..................... .273
Setting (climate control) ................157
Theft deterrent systems
ATA (Anti-Theft Alarm system) .........77
Immobilizer ...................................... 77
Through-loading ................................ 343
Time see separate operating instructions
Timing (RACETIMER) .........................287
TIREFIT kit .......................................... 388
Tire pressure Calling up (on-board computer) .....412
Checking manually ........................411
Display message ............................ 318
Important safety notes ..................412
Maximum ....................................... 410
Notes ............................................. 409
Not reached (TIREFIT) ....................390
Reached (TIREFIT) ..........................390
Recommended ............................... 408
Tire pressure loss warning
system General notes ................................ 411
Important safety notes ..................411
Restarting ...................................... 412
Tire pressure monitoring system
Checking the tire pressure
electronically ................................. 414
Function/notes ............................. 412
General notes ................................ 412
Important safety notes ..................413
Restarting ...................................... 415 Index
19
Page 185 of 462
If you or others come into contact with fuel,
observe the following:
R Wash away fuel from skin immediately
using soap and water.
R If fuel comes into contact with your eyes,
immediately rinse them thoroughly with
clean water. Seek medical assistance
without delay.
R If fuel is swallowed, seek medical
assistance without delay. Do not induce
vomiting.
R Immediately change out of clothing which
has come into contact with fuel. G
WARNING
Electrostatic buildup can create sparks and
ignite fuel vapors. There is a risk of fire and
explosion.
Always touch the vehicle body before opening
the fuel filler flap or touching the fuel pump
nozzle. Any existing electrostatic buildup is
thereby discharged. G
WARNING
Vehicles with a diesel engine:
If you mix diesel fuel with gasoline, the flash
point is lower than that of pure diesel fuel.
When the engine is running, exhaust system
components could overheat without being
noticed. There is a risk of fire.
Never refuel with gasoline. Never mix gasoline
with diesel fuel.
! Do not use gasoline to refuel vehicles with
a diesel engine. Do not use diesel to refuel
vehicles with a gasoline engine. Do not
switch on the ignition if you accidentally
refuel with the wrong fuel. Otherwise, the
fuel will enter the fuel system. Even small
amounts of the wrong fuel could result in
damage to the fuel system and the engine.
The repair costs are high. Notify a qualified
specialist workshop and have the fuel tank
and fuel lines drained completely. !
Do not use diesel to refuel vehicles with a
gasoline engine. Do not switch on the
ignition if you accidentally refuel with the
wrong fuel. Otherwise, the fuel will enter
the fuel system. Even small amounts of the
wrong fuel could result in damage to the
fuel system and the engine. Notify a
qualified specialist workshop and have the
fuel tank and fuel lines drained completely.
! Overfilling the fuel tank could damage the
fuel system.
! Take care not to spill any fuel on painted
surfaces. You could otherwise damage the
paintwork.
! Use a filter when refueling from a fuel can.
Otherwise, the fuel lines and/or injection
system could be blocked by particles from
the fuel can.
Do not get into the vehicle again during the
refueling process. Otherwise, electrostatic
charge could build up again.
If you overfill the fuel tank, fuel could spray
out when the fuel pump nozzle is removed.
For further information on fuel and fuel quality
(Y page 446).
You will find further information on fuel and
fuel quality in the printed Operator's Manual
under "Technical data". Refueling
General information Pay attention to the important safety notes
(Y
page 182).
The fuel filler flap is unlocked or locked
automatically when you open or close the
vehicle with the SmartKey or with KEYLESS-
GO.
The position of the fuel filler cap is displayed
8 in the instrument cluster. The arrow
next to the filling pump indicates the side of
the vehicle. Refueling
183Driving and parking Z
Page 186 of 462
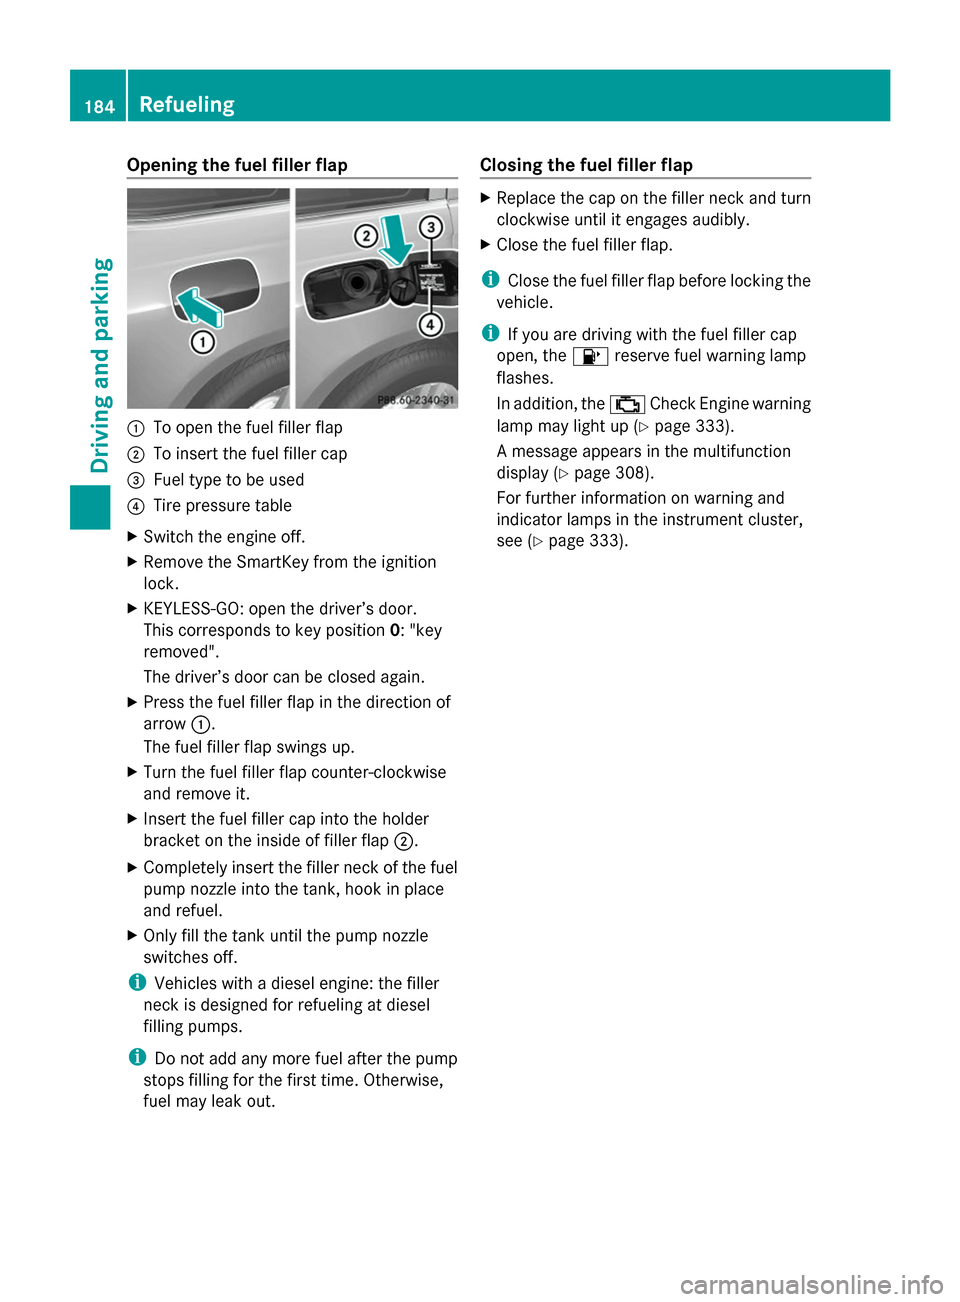
Opening the fuel filler flap
:
To open the fuel filler flap
; To insert the fuel filler cap
= Fuel type to be used
? Tire pressure table
X Switch the engine off.
X Remove the SmartKey from the ignition
lock.
X KEYLESS-GO: open the driver’s door.
This corresponds to key position 0: "key
removed".
The driver’s door can be closed again.
X Press the fuel filler flap in the direction of
arrow :.
The fuel filler flap swings up.
X Turn the fuel filler flap counter-clockwise
and remove it.
X Insert the fuel filler cap into the holder
bracket on the inside of filler flap ;.
X Completely insert the filler neck of the fuel
pump nozzle into the tank, hook in place
and refuel.
X Only fill the tank until the pump nozzle
switches off.
i Vehicles with a diesel engine: the filler
neck is designed for refueling at diesel
filling pumps.
i Do not add any more fuel after the pump
stops filling for the first time. Otherwise,
fuel may leak out. Closing the fuel filler flap X
Replace the cap on the filler neck and turn
clockwise until it engages audibly.
X Close the fuel filler flap.
i Close the fuel filler flap before locking the
vehicle.
i If you are driving with the fuel filler cap
open, the 8reserve fuel warning lamp
flashes.
In addition, the ;Check Engine warning
lamp may light up (Y page 333).
A message appears in the multifunction
display ( Ypage 308).
For further information on warning and
indicator lamps in the instrument cluster,
see (Y page 333). 184
RefuelingDriving and parking
Page 189 of 462
water. Seek medical assistance without
delay.
R Change out of clothing contaminated with
DEF immediately.
! Only use DEF in accordance with
ISO 22241. Do not mix any additives with
DEF, and do not dilute DEF with water. This
may destroy the BlueTEC exhaust gas
aftertreatment system.
! The vehicle must be parked on level
ground to fill the DEF tank. The DEF tank
can only be filled as intended with the
vehicle parked on a level surface. This
avoids false level readings. Filling the tank
is not permitted if the vehicle is not parked
on a level surface. There is a danger of
overfilling, which could result in damage to
components of the BlueTEC exhaust gas
aftertreatment.
! Rinse surfaces that have come into
contact with DEF immediately with water or
remove DEF using a damp cloth and cold
water. If the DEF has already crystallized,
use a sponge and cold water to clean it. DEF
residues crystallize after time and
contaminate the affected surfaces.
! DEF is not a fuel additive and must not be
added to the fuel tank. If DEF is added to
the fuel tank, this can lead to engine
damage.
For further information on DEF, see
(Y page 448).
You will find further information on DEF in the
printed Operator's Manual under "Technical
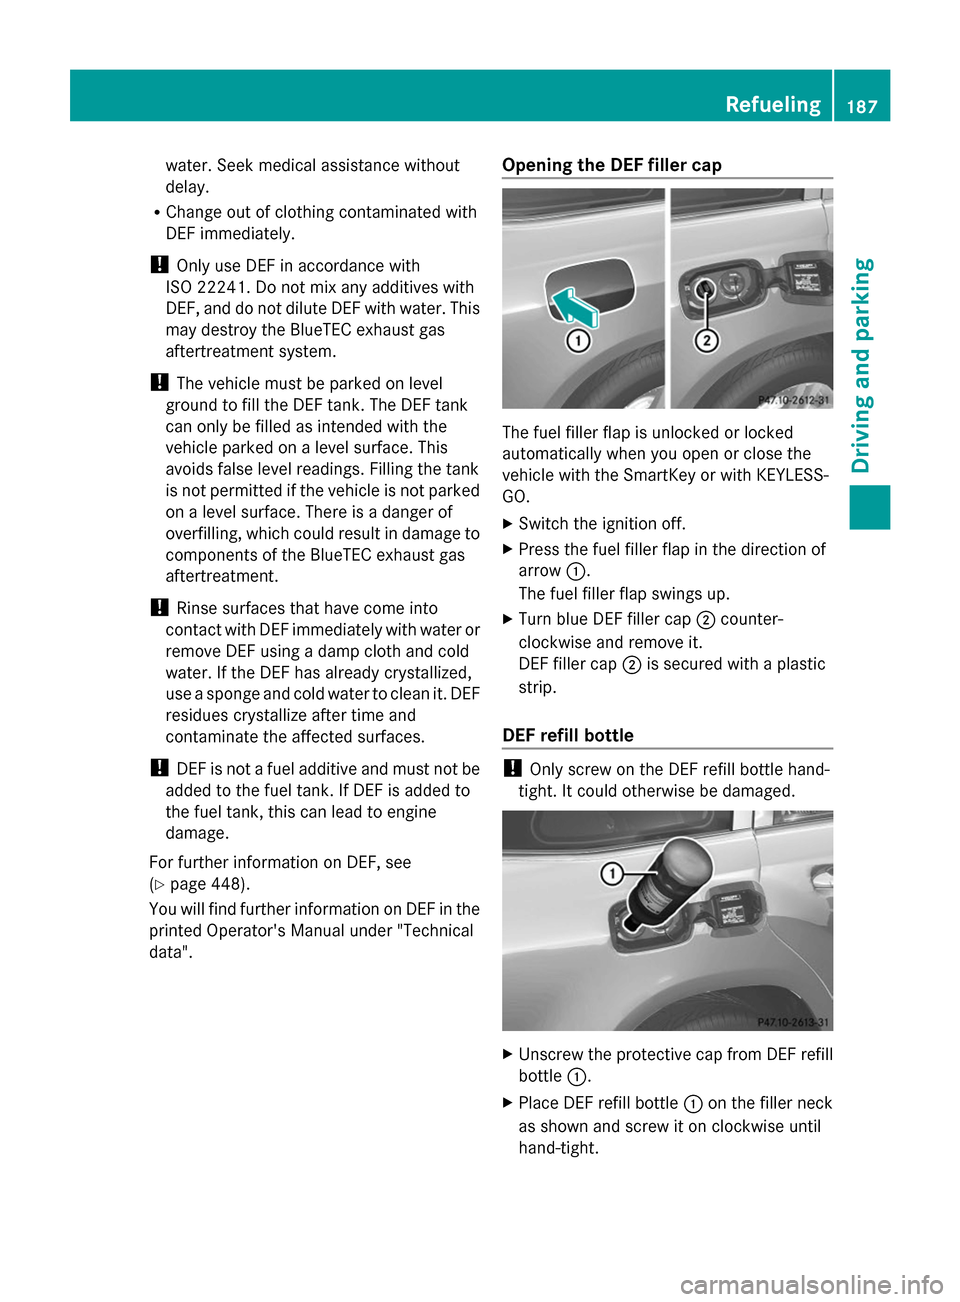
data". Opening the DEF filler cap The fuel filler flap is unlocked or locked
automatically when you open or close the
vehicle with the SmartKey or with KEYLESS-
GO.
X
Switch the ignition off.
X Press the fuel filler flap in the direction of
arrow :.
The fuel filler flap swings up.
X Turn blue DEF filler cap ;counter-
clockwise and remove it.
DEF filler cap ;is secured with a plastic
strip.
DEF refill bottle !
Only screw on the DEF refill bottle hand-
tight. It could otherwise be damaged. X
Unscrew the protective cap from DEF refill
bottle :.
X Place DEF refill bottle :on the filler neck
as shown and screw it on clockwise until
hand-tight. Refueling
187Driving and parking Z
Page 190 of 462

X
Press DEF refill bottle :towards the filler
neck.
The DEF tank is filled. This may take up to
one minute.
i When DEF refill bottle :is no longer
pressed, filling stops and the bottle may be
taken off again after being only partially
emptied.
X Release DEF refill bottle :.
X Turn DEF refill bottle :counter-clockwise
and remove it.
X Screw the protective cap onto DEF refill
bottle :again.
DEF refill bottles can be obtained at many gas
stations or at an authorized Mercedes-Benz
Center. Refill bottles without a threaded cap
do not provide overfill protection. DEF may
leak if overfilled. Mercedes Benz offers
special refill bottles with a threaded seal.
These are available at any authorized
Mercedes-Benz Center.
Closing the DEF filler cap X
Mount DEF filler cap ;on the filler neck
and turn it clockwise.
X To close the fuel filler flap, press it in the
direction of arrow :.
X Drive faster than 10 mph (16 km/h).
The Check Additive See Operator's
Check Additive See Operator's
Manual
Manual message goes out after
approximately one minute.
i If the Check Additive See Check Additive See
Operator's Manual
Operator's Manual message continues to be shown in the multifunction display,
you must add more DEF. Parking
Important safety notes
G
WARNING
Flammable material such as leaves, grass or
twigs may ignite if they come into contact with
hot parts of the exhaust system or exhaust
gas flow. There is a risk of fire.
Park the vehicle so that no flammable
materials come into contact with parts of the
vehicle which are hot. Take particular care not
to park on dry grassland or harvested grain
fields. G
WARNING
If you switch off the ignition while driving,
safety-relevant functions are only available
with limitations, or not at all. This could affect,
for example, the power steering and the brake
boosting effect. You will require considerably
more effort to steer and brake. There is a risk
of an accident.
Do not switch off the ignition while driving. G
WARNING
If you leave children unsupervised in the
vehicle, they could set it in motion by, for
example:
R release the parking brake.
R shift the automatic transmission out of the
parking position P.
R start the engine.
In addition, they may operate vehicle
equipment and become trapped. There is a
risk of an accident and injury.
When leaving the vehicle, always take the
SmartKey with you and lock the vehicle. Never
leave children unsupervised in the vehicle.
! Always secure the vehicle correctly
against rolling away. Otherwise, the vehicle
or its drivetrain could be damaged. 188
ParkingDriving and parking
Page 266 of 462
When towing a trailer, your vehicle's handling
characteristics will be different in comparison
with when driving without a trailer.
The vehicle/trailer combination:
R is heavier
R is restricted in its acceleration and
gradient-climbing capability
R has an increased braking distance
R is affected more by strong crosswinds
R demands more sensitive steering
R has a larger turning radius
This could impair the handling
characteristics.
When towing a trailer, always adjust your
speed to the current road and weather
conditions. Do not exceed the maximum
permissible speed for your vehicle/trailer
combination. Notes on towing a trailer
General notes R
Do not exceed the legally prescribed
maximum speed for vehicle/trailer
combinations in the relevant country.
This lowers the risk of an accident.
R Only install an approved trailer coupling on
your vehicle.
Further information on availability and on
installation is available from any authorized
Mercedes-Benz Center.
R The bumpers of your vehicle are not
suitable for installing detachable trailer
couplings.
R Do not install hired trailer couplings or
other detachable trailer couplings on the
bumpers of your vehicle.
R If you no longer need the ball coupling,
remove it from the ball coupling recess.
This will reduce the risk of damage to the
ball coupling.
i When towing a trailer, set the tire
pressure on the rear axle of the towing vehicle for a maximum load; see the tire
pressure table in the fuel filler flap
(Y
page 425).
Please note that when towing a trailer,
PARKTRONIC ( Ypage 222) and Blind Spot
Assist (Y page 243) are only available with
limitations, or not at all.
You will find installing dimensions and loads
under "Technical data" (Y page 456).
Driving tips i
Observe the information on ESP ®
trailer
stabilization (Y page 74) and on pulling
away with a trailer (Y page 170).
The maximum permissible speed for vehicle/
trailer combinations depends on the type of
trailer. Before beginning the journey, check
the trailer's documents to see what the
maximum permissible speed is. Observe the
legally prescribed maximum speed in the
relevant country.
For certain Mercedes-Benz vehicles, the
maximum permissible rear axle load is
increased when towing a trailer. See
"Technical data" to find out whether this
applies to your vehicle (Y page 457). If you
utilize any of the added maximum rear axle
load when towing a trailer, the vehicle/trailer
combination may not exceed a maximum
speed of 60 mph (100 km/h) for reasons
concerning the operating permit. This also
applies in countries in which the permissible
maximum speed for vehicle/trailer
combinations is above 60 mph (100 km/h).
When towing a trailer, your vehicle's handling
characteristics will be different in comparison
with when driving without a trailer.
Use the left-hand paddle shifter to shift into
a lower gear in good time on long and steep
downhill gradients.
i This also applies if you have activated
cruise control or DISTRONIC PLUS.
This will use the braking effect of the engine,
so that less braking will be required to
maintain the speed. This relieves the load on 264
Towing a trailerDriving and parking
Page 310 of 462
Display messages Possible causes/consequences and
M
MSolutions 4
Check Engine Oil Check Engine Oil
At Next Refueling At Next Refueling The engine oil level has dropped to the minimum level.
A warning tone also sounds.
X
Check the oil level when next refueling, at the latest
(Y page 371).
X If necessary, add engine oil ( Ypage 372).
X Have the engine checked at a qualified specialist workshop if
engine oil needs to be added more often than usual.
! Avoid long journeys with too little engine oil. The engine will
otherwise be damaged.
Information on approved engine oils can be obtained from any
qualified specialist workshop or on the Internet at http://
bevo.mercedes-benz.com. 4
Check Engine Oil Check Engine Oil
Level Level
(Add
(Add1
1 quart)
quart) AMG vehicles: the engine oil level is too low.
X
Check the oil level when next refueling, at the latest
(Y page 371).
X If necessary, add engine oil ( Ypage 372).
X Have the engine checked at a qualified specialist workshop if
engine oil needs to be added more often than usual.
! Avoid long journeys with too little engine oil. The engine will
otherwise be damaged.
Information on approved engine oils can be obtained from any
qualified specialist workshop or on the Internet at http://
bevo.mercedes-benz.com. 8
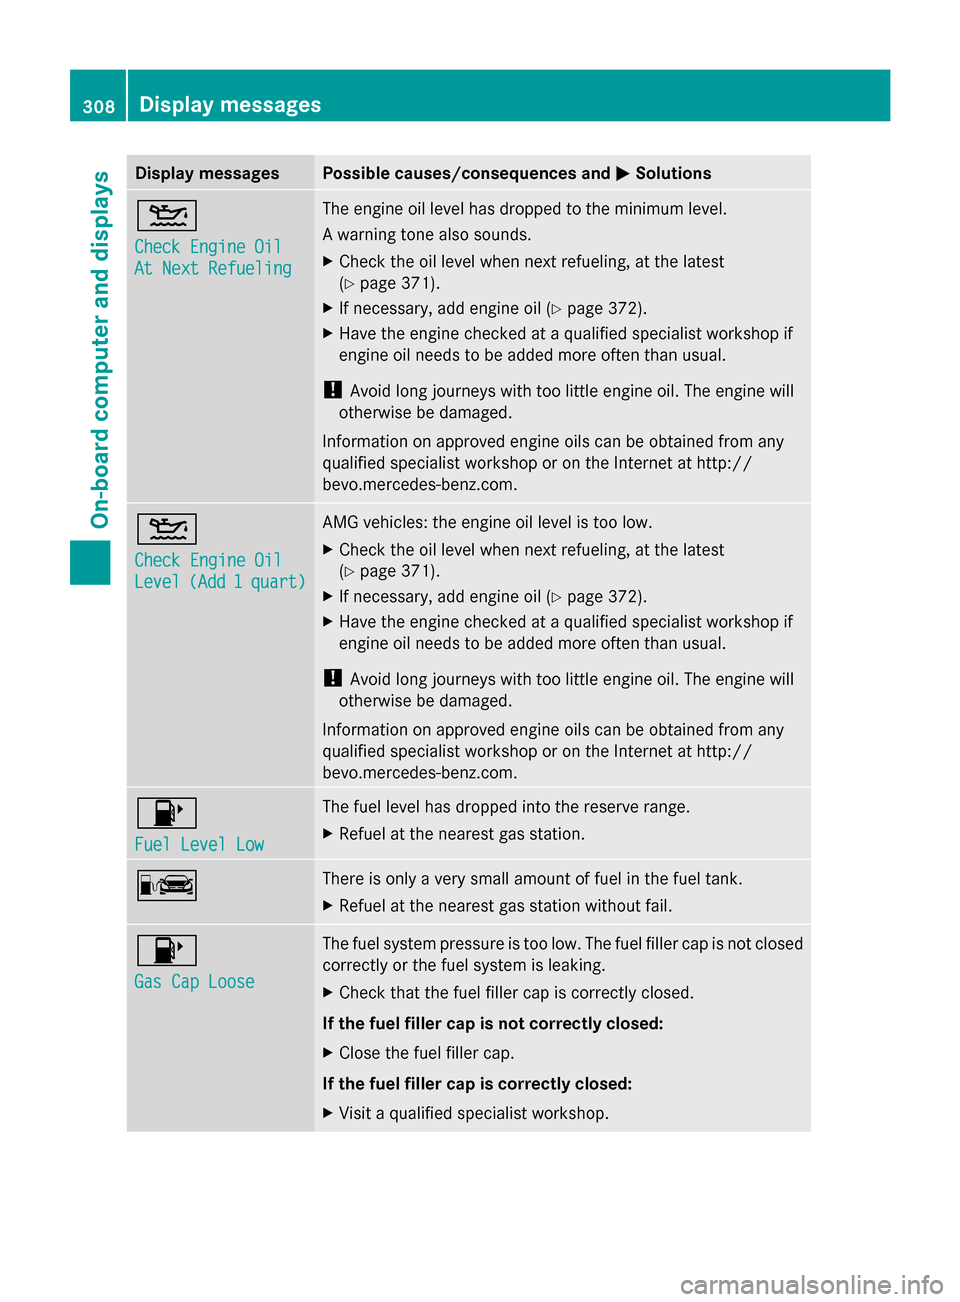
Fuel Level Low Fuel Level Low The fuel level has dropped into the reserve range.
X
Refuel at the nearest gas station. C There is only a very small amount of fuel in the fuel tank.
X
Refuel at the nearest gas station without fail. 8
Gas Cap Loose Gas Cap Loose The fuel system pressure is too low. The fuel filler cap is not closed
correctly or the fuel system is leaking.
X
Check that the fuel filler cap is correctly closed.
If the fuel filler cap is not correctly closed:
X Close the fuel filler cap.
If the fuel filler cap is correctly closed:
X Visit a qualified specialist workshop. 308
Display
messagesOn-board computer and displays
Page 335 of 462
Engine
Problem Possible causes/consequences and
M
MSolutions ;
The yellow Check
Engine warning lamp
lights up while the
engine is running.
There may be a malfunction, for example:
R
in the engine management
R in the fuel injection system
R in the exhaust system
R in the ignition system (for vehicles with gasoline engines)
R in the fuel system
The emission limit values may be exceeded and the engine may
be in emergency mode.
X Have the vehicle checked as soon as possible at a qualified
specialist workshop.
i In some states, you must immediately visit a qualified
specialist workshop as soon as the yellow Check Engine warning
lamp lights up. This is due to the legal requirements in effect in
these states. If in doubt, check whether such legal regulations
apply in the state in which you are currently driving. Vehicles with a diesel engine: the fuel tank has been run dry
(Y
page 185).
X Start the engine three to four times after refueling.
If the yellow Check Engine warning lamp goes out, emergency
running mode is canceled. The vehicle need not be checked. 8
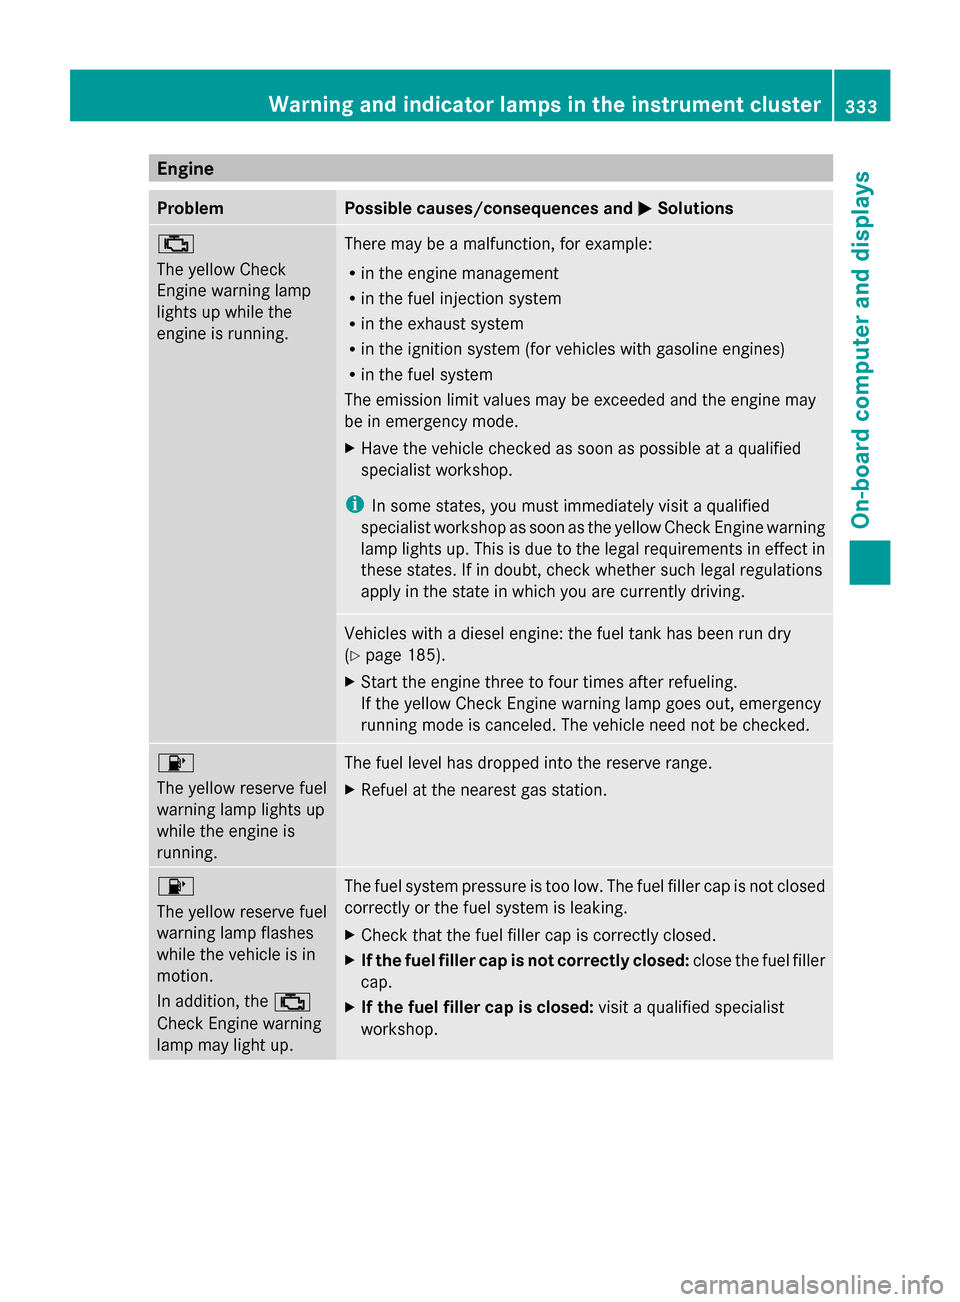
The yellow reserve fuel
warning lamp lights up
while the engine is
running.
The fuel level has dropped into the reserve range.
X
Refuel at the nearest gas station. 8
The yellow reserve fuel
warning lamp flashes
while the vehicle is in
motion.
In addition, the
;
Check Engine warning
lamp may light up. The fuel system pressure is too low. The fuel filler cap is not closed
correctly or the fuel system is leaking.
X
Check that the fuel filler cap is correctly closed.
X If the fuel filler cap is not correctly closed: close the fuel filler
cap.
X If the fuel filler cap is closed: visit a qualified specialist
workshop. Warning and indicator lamps in the instrument cluster
333On-board computer and displays Z
Page 397 of 462

Jump-starting
For the jump-starting procedure, use only the jump-starting connection point, consisting of a
positive terminal and a ground point, in the engine compartment. G
WARNING
Battery acid is caustic. There is a risk of injury.
Avoid contact with the skin, eyes or clothing. Do not inhale any battery gases. Do not lean over
the battery. Keep children away from batteries. Wash battery acid immediately with water and
seek medical attention. G
WARNING
During charging and jump-starting, explosive gases can escape from the battery. There is a risk
of an explosion.
Particularly avoid fire, open flames, creating sparks and smoking. Ensure there is sufficient
ventilation while charging and jump-starting. Do not lean over a battery. G
WARNING
During the charging process, a battery produces hydrogen gas. If a short circuit occurs or sparks
are created, the hydrogen gas can ignite. There is a risk of an explosion.
R Make sure that the positive terminal of a connected battery does not come into contact with
vehicle parts.
R Never place metal objects or tools on a battery.
R It is important that you observe the described order of the battery terminals when connecting
and disconnecting a battery.
R When jump-starting, make sure that the battery poles with identical polarity are connected.
R It is particularly important to observe the described order when connecting and disconnecting
the jumper cables.
R Never connect or disconnect the battery terminals while the engine is running. G
WARNING
A discharged battery can freeze at temperatures below freezing point. When jump-starting the
vehicle or charging the battery, gases can escape from the battery. There is a risk of an explosion.
Allow the frozen battery to thaw out before charging it or jump-starting.
! Vehicles with a gasoline engine: avoid repeated and lengthy starting attempts.
Otherwise, the catalytic converter could be damaged by non-combusted fuel.
If, at low temperatures, the indicator lamps/warning lamps in the instrument cluster do not
light up, it is highly likely that the discharged battery has frozen. In this case you may neither
jump-start the vehicle nor charge the battery. The service life of a thawed-out battery may be
shorter. The starting characteristics can be impaired, particularly at low temperatures. Have
the thawed-out battery checked at a qualified specialist workshop. Jump-starting
395Breakdown assistance Z