oil level MERCEDES-BENZ GL-Class 2014 X166 Owner's Manual
[x] Cancel search | Manufacturer: MERCEDES-BENZ, Model Year: 2014, Model line: GL-Class, Model: MERCEDES-BENZ GL-Class 2014 X166Pages: 462, PDF Size: 32.46 MB
Page 6 of 462
1, 2, 3 ...
115 V socket ...................................... 353
12 V socket see Sockets
360° camera
Cleaning .........................................3 80
Function/notes ............................. 235
4ETS (Electronic Traction System) ....72
4MATIC (permanent four-wheel
drive) .................................................. 256A
ABS (Anti-lock Braking System) Display message ............................ 291
Function/notes ................................ 67
Important safety notes ....................67
Warning lamp ................................. 327
Activating/deactivating cooling
with air dehumidification .................155
Active Blind Spot Assist Activating/deactivating (on-
board computer) ............................ 281
Display message ............................ 314
Function/informatio n.................... 247
Trailer towing ................................. 250
Active Curve System
Display message ............................ 311
Function/notes ............................. 218
Active Driving Assistance package .247
Active Lane Keeping Assist Activating/deactivating (on-
board computer) ............................ 282
Display message ............................ 313
Function/informatio n.................... 251
Trailer towing ................................. 253
Active light function .........................133
Active Parking Assist Display message ............................ 314
Exiting a parking space ..................229
Function/notes ............................. 226
Important safety notes ..................226
Parking .......................................... 228
Towing a trailer .............................. 230
ADAPTIVE BRAKE ................................. 75 Adaptive Brake Assist
Display message ............................ 298
Function/notes ................................ 71
Adaptive Highbeam Assist
Display message ............................ 306
Function/notes ............................. 134
Switching on/off ........................... 134
Additives (engine oil) ........................450
ADS (Adaptive Damping System) Function/notes ............................. 217
Air bags
Display message ............................ 301
Front air bag (driver, front
passenger) ....................................... 46
Important safety notes ....................44
Knee bag .......................................... 47
PASSENGER AIR BAG OFF
indicator lamp .................................. 49
Safety guidelines ............................. 43
Side impact air bag ..........................47
Window curtain air bag ....................48
Air-conditioning system
see Climate control
Air filter (display message) ..............309
AIR FLOW ........................................... 157
AIRMATIC package ADS (Adaptive Damping System) ...217
Function/notes ............................. 217
Level control .................................. 218
Air vents
Glove box ...................................... .163
Important safety notes ..................162
Rear ............................................... 163
Setting ........................................... 162
Setting the center air vents ...........162
Setting the side air vents ...............163
Alarm
ATA (Anti-Theft Alarm system) .........77
Switching off (ATA) ..........................77
Switching the function on/off
(ATA) ................................................ 77
Alarm system
see ATA (Anti-Theft Alarm system)
Ambient lighting
Setting the brightness (on-board
computer) ...................................... 283
Setting the color (on-board
computer) ...................................... 2834
Index
Page 12 of 462
Symmetrical low beam
..................128
Tire ruts ......................................... 199
Towing a trailer .............................. 264
Traveling uphill ............................... 200
Wet road surface ........................... 194
DSR (Downhill Speed Regulation)
Display message ............................ 312
Function/notes ............................. 256
DVD audio
Operating (on-board computer) .....278
DVD video
Operating (on-board computer) .....279 E
EASY-ENTRY feature Activating/deactivating .................285
Function/notes ............................. 121
EASY-EXIT feature
Crash-responsive ........................... 122
Function/notes ............................. 121
Switching on/off ........................... 285
EBD (electronic brake force
distribution)
Display message ............................ 293
Function/notes ................................ 74
ECO display
Function/notes ............................. 192
On-board computer .......................276
Electronic Stability Program
see ESP ®
(Electronic Stability Program)
Emergency release
Driver's door .................................... 88
Vehicle ............................................. 88
Emergency spare wheel
General notes ................................ 439
Important safety notes ..................439
Removing ....................................... 440
Storage location ............................ 440
Technical data ............................... 441
Emergency Tensioning Devices
Function .......................................... .59
Safety guideline s............................. 43
Emergency unlocking
Tailgate ............................................ 93
Emissions control
Service and warranty information ....24 Engine
Check Engine warning lamp ........... 333
Display message ............................ 306
Engine number ...................... 444, 445
Irregular running ............................ 172
Jump-starting ................................. 395
Starting problems ..........................172
Starting the engine with the
SmartKey ....................................... 169
Starting with KEYLESS-GO .............170
Switching off .................................. 189
Tow-starting (vehicle) ..................... 400
Engine electronics
Problem (malfunction) ...................172
Engine jump starting
see Jump starting (engine)
Engine oil
Adding ........................................... 372
Additives ........................................ 450
Checking the oil level ..................... 371
Checking the oil level using the
dipstick .......................................... 371
Display message ............................ 308
Filling capacity ............................... 449
Notes about oil grades ................... 449
Notes on oil level/consumption ....371
Temperature (on-board computer) .287
Viscosity ........................................ 450
ESP ®
(Electronic Stability
Program) 4ETS ................................................ 72
AMG menu (on-board computer) ...287
Characteristics ................................. 73
Deactivating/activating ...................73
Display message ............................ 291
Function/notes ................................ 72
General notes .................................. 72
Important safety information ...........72
Trailer stabilization ........................... 74
Warning lamp ................................. 329
Exhaust check ................................... 192
Exhaust pipe (cleaning instructions) 381
Exterior lighting see Lights
Exterior mirrors
Adjusting ....................................... 122
Dipping (automatic) .......................12310
Index
Page 199 of 462
conditions when temperatures are around
the freezing point.
For more information on driving with snow
chains, see (Y page 407).
For more information on driving with summer
tires, see (Y page 406).
Observe the notes in the "Winter operation"
section (Y page 406). Off-road driving
Important safety notes G
WARNING
If you drive on a steep incline at an angle or
turn when driving on an incline, the vehicle
could slip sideways, tip and rollover. There is
a risk of an accident.
Always drive on a steep incline in the line of
fall (straight up or down) and do not turn the
vehicle. G
WARNING
If the vehicle level is high, the vehicle center
of gravity is raised. This could cause the
vehicle to tip over more easily on uphill or
downhill gradients. There is a risk of an
accident.
Select the lowest possible vehicle level.
When driving off-road, sand, mud and water,
possibly mixed with oil, for example, could get
into the brakes. This could result in a reduced
braking effect or in total brake failure and also
in increased wear and tear. The braking
characteristics change depending on the
material ingressing the brakes. Clean the
brakes after driving off-road. If you detect a
reduced braking effect or grinding noises,
have the brake system checked in a qualified
specialist workshop as soon as possible.
Adapt your driving style to the different
braking characteristics.
Driving off-road increases the likelihood of
damage to the vehicle, which, in turn, can lead
to failure of the mechanical assembly or systems. Adapt your driving style to suit the
terrain conditions. Drive carefully. Have
damage to the vehicle rectified immediately
at a qualified specialist workshop.
Do not switch to transmission position N
when driving off-road. You could lose control
of the vehicle if you attempt to brake using
the service brake. If the gradient is too steep,
drive backwards in reverse gear.
General notes Read this section carefully before driving your
vehicle off-road. Practice by driving over more
gentle off-road terrain first.
Familiarize yourself with the characteristics
of your vehicle and the gear shift operation
before driving through difficult terrain.
The following driving systems are specially
adapted to off-road driving:
R
Off-road program 1 and 2 (vehicles with the
ON&OFFROAD package) (Y page 258)
R LOW RANGE off-road gear (vehicles with
the ON&OFFROAD package)
(Y page 259)
R Differential lock (vehicles with the
ON&OFFROAD package) (Y page 259)
R Off-road ABS (Y page 68)
R AIRMATIC package (vehicle level)
(Y page 217)
R DSR (Downhill Speed Regulation)
(Y page 256)
Observe the following notes:
R Stop the vehicle before starting to drive
along an off-road route.
R For vehicles with the AIRMATIC
package: select a vehicle level that is
suitable for the off-road terrain. To avoid
damaging the vehicle, make sure there is
always sufficient ground clearance.
R Check that items of luggage and loads are
stowed safely and are well secured
(Y page 345). Driving tips
197Driving and parking Z
Page 200 of 462
R
Always keep the engine running and in gear
when driving on a downhill gradient.
Activate DSR (Y page 256).
R Always keep the doors, tailgate, windows
and sliding sunroof closed while driving.
R Adapt your speed to the terrain. The
rougher, steeper or more ruts on the
terrain, the slower your speed should be.
R Drive slowly and at an even speed through
the water. Ensure that a bow wave does not
form as you drive.
R Drive with extreme care on unfamiliar off-
road routes where visibility is poor. For
safety reasons, get out of the vehicle first
and survey the off-road route.
R Look out for obstacles, such as rocks,
holes, tree stumps and furrows.
R Check the depth of water before fording
rivers and streams.
R When fording, do not stop and do not
switch off the engine.
R On sand, drive quickly to overcome the
rolling resistance. Otherwise the vehicle's
wheels could become stuck in loose
ground.
R Do not jump with the vehicle as this will
interrupt the vehicle's propulsion.
R Always keep the engine running and in gear
when driving on a slope.
R Do not shift the automatic transmission to
transmission position N.
i Do not use the HOLD function when
driving off-road, on steep uphill or downhill
gradients or on slippery or loose surfaces.
The HOLD function cannot hold the vehicle
on such surfaces.
Checklist before driving off-road !
If the engine oil warning lamp lights up
while the vehicle is in motion, stop the
vehicle in a safe place as soon as possible.
Check the engine oil level. The engine oil
warning lamp warning must not be ignored.
Continuing the journey while the symbol is
displayed could lead to engine damage. X
Engine oil level: check the engine oil level
and add oil if necessary.
When driving on steep gradients, the
engine oil level must be sufficiently high to
ensure a correct oil supply in the vehicle.
X DEF tank (BlueTEC vehicles): check the
level and top up if necessary (Y page 186).
X Tire-changing tool kit: check that the jack
is working and make sure you have the lug
wrench, a robust tow cable and a folding
spade in the vehicle.
X Wheels and tires: check the tire tread
depth and tire pressure.
X Check for damage and remove any foreign
objects, e.g. small stones, from the
wheels/tires.
X Replace any missing valve caps.
X Replace dented or damaged wheels.
X Rims: dented or bent rims can result in a
loss of tire pressure and damage the tire
bead. Therefore, check your rims before
driving off-road and replace them as
required.
Checklist after driving off-road !
If you detect damage to the vehicle after
driving off-road, have the vehicle checked
immediately at a qualified specialist
workshop.
X Vehicles with the ON&OFFROAD
package: activate the on-road program
(Y page 258).
X Deactivate the LOW RANGE off-road gear
(Y page 259).
X Deactivate DSR ( Ypage 256).
X Vehicles with the AIRMATIC package:
lower the vehicle to a ride height suitable
for the road conditions, e.g. to the
highway/high-speed level.
X Clean the headlamps and rear lights and
check for damage.
X Clean the front and rear license plates.
X Clean the wheels/tires with a water jet and
remove any foreign objects. 198
Driving tipsDriving an
d parking
Page 310 of 462
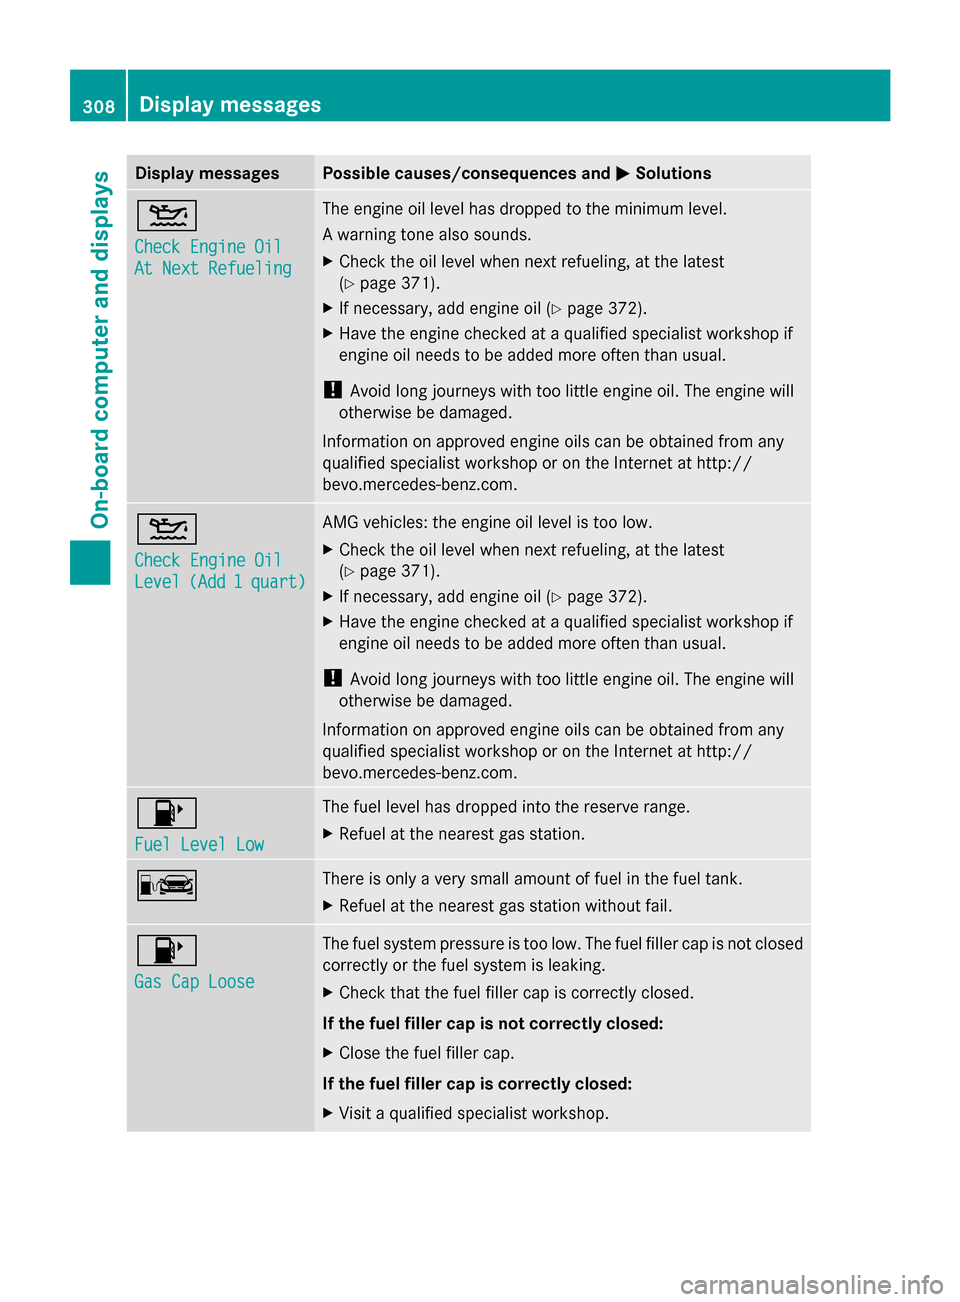
Display messages Possible causes/consequences and
M
MSolutions 4
Check Engine Oil Check Engine Oil
At Next Refueling At Next Refueling The engine oil level has dropped to the minimum level.
A warning tone also sounds.
X
Check the oil level when next refueling, at the latest
(Y page 371).
X If necessary, add engine oil ( Ypage 372).
X Have the engine checked at a qualified specialist workshop if
engine oil needs to be added more often than usual.
! Avoid long journeys with too little engine oil. The engine will
otherwise be damaged.
Information on approved engine oils can be obtained from any
qualified specialist workshop or on the Internet at http://
bevo.mercedes-benz.com. 4
Check Engine Oil Check Engine Oil
Level Level
(Add
(Add1
1 quart)
quart) AMG vehicles: the engine oil level is too low.
X
Check the oil level when next refueling, at the latest
(Y page 371).
X If necessary, add engine oil ( Ypage 372).
X Have the engine checked at a qualified specialist workshop if
engine oil needs to be added more often than usual.
! Avoid long journeys with too little engine oil. The engine will
otherwise be damaged.
Information on approved engine oils can be obtained from any
qualified specialist workshop or on the Internet at http://
bevo.mercedes-benz.com. 8
Fuel Level Low Fuel Level Low The fuel level has dropped into the reserve range.
X
Refuel at the nearest gas station. C There is only a very small amount of fuel in the fuel tank.
X
Refuel at the nearest gas station without fail. 8
Gas Cap Loose Gas Cap Loose The fuel system pressure is too low. The fuel filler cap is not closed
correctly or the fuel system is leaking.
X
Check that the fuel filler cap is correctly closed.
If the fuel filler cap is not correctly closed:
X Close the fuel filler cap.
If the fuel filler cap is correctly closed:
X Visit a qualified specialist workshop. 308
Display
messagesOn-board computer and displays
Page 365 of 462
about various special offers at your
workshop.
R monthly status information e-mail on oil
level, air pressure, maintenance, brakes,
etc. If applicable, you will receive
information on special offers in the e-mail.
USA only: this information can also be
called up under "Owners Online" at http://
www.mbusa.com.
Information on the data stored in the vehicle
(Y page 29).
Information on Roadside Assistance
(Y page 25).
Downloading routes Downloading routes allows you to transfer
and save predefined routes in the navigation
system. To do this, an SD memory card must
be inserted into the COMAND system. If no
SD memory card is inserted, you must insert
the card into the card slot on the COMAND
system before saving.
A route can be prepared and sent either by a
customer service representative or via the
mbrace portal on the Internet.
Each route can include up to 20 way points.
Once a route has been received by the
navigation system, you will see the
name> has hasbeen
been saved
saved to
tomemory
memory card.
card.
Do you want to start route
Do you want to start route
guidance? guidance? message in the COMAND display.
The route is saved to the SD memory card.
X To start route guidance: selectYes
Yes .
An overview of the route is shown in the
display.
i If you select No
No, the saved route can be
called up later via the navigation menu.
X Select Start
Start.
Route guidance is started.
i Downloaded and saved data can be called
up again in COMAND.
You can find further information in the
separate COMAND Operating Instructions. Speed alert You can define the upper speed limit, which
must not be exceeded by the vehicle.
If this selected speed is exceeded by the
vehicle, a message will be sent to the
Customer Assistance center. The Customer
Assistance center then forwards this
information to you.
You can select the way in which you receive
this information beforehand. Possible options
include text message, e-mail or an automated
call.
The data you receive contains the following
information:
R
the location where the speed limit was
exceeded
R the time at which the speed limit was
exceeded
R the selected speed limit which was
exceeded
Geo fencing Geo fencing allows you to select areas which
the vehicle should not enter or leave. You will
be informed if the vehicle crosses the
boundaries of the selected areas. You can
select the way in which you receive this
information beforehand. Possible options
include text message, e-mail or an automated
call.
The area can be determined as either a circle
or a polygon with a maximum of ten corners.
You can specify up to ten areas
simultaneously. Different settings are
possible for each area.
USA only: these settings can be called up
under "Owners Online" at http://
www.mbusa.com.
Alternatively, you can trigger an MB Info call
and inform the customer service
representative that you wish to activate geo
fencing.
Currently inactive areas can be activated by
text message. Features
363Stowage and features Z
Page 373 of 462
!
Make sure that the windshield wipers are
not folded away from the windshield. You
could otherwise damage the windshield
wipers or the hood. X
Make sure that the windshield wipers are
turned off.
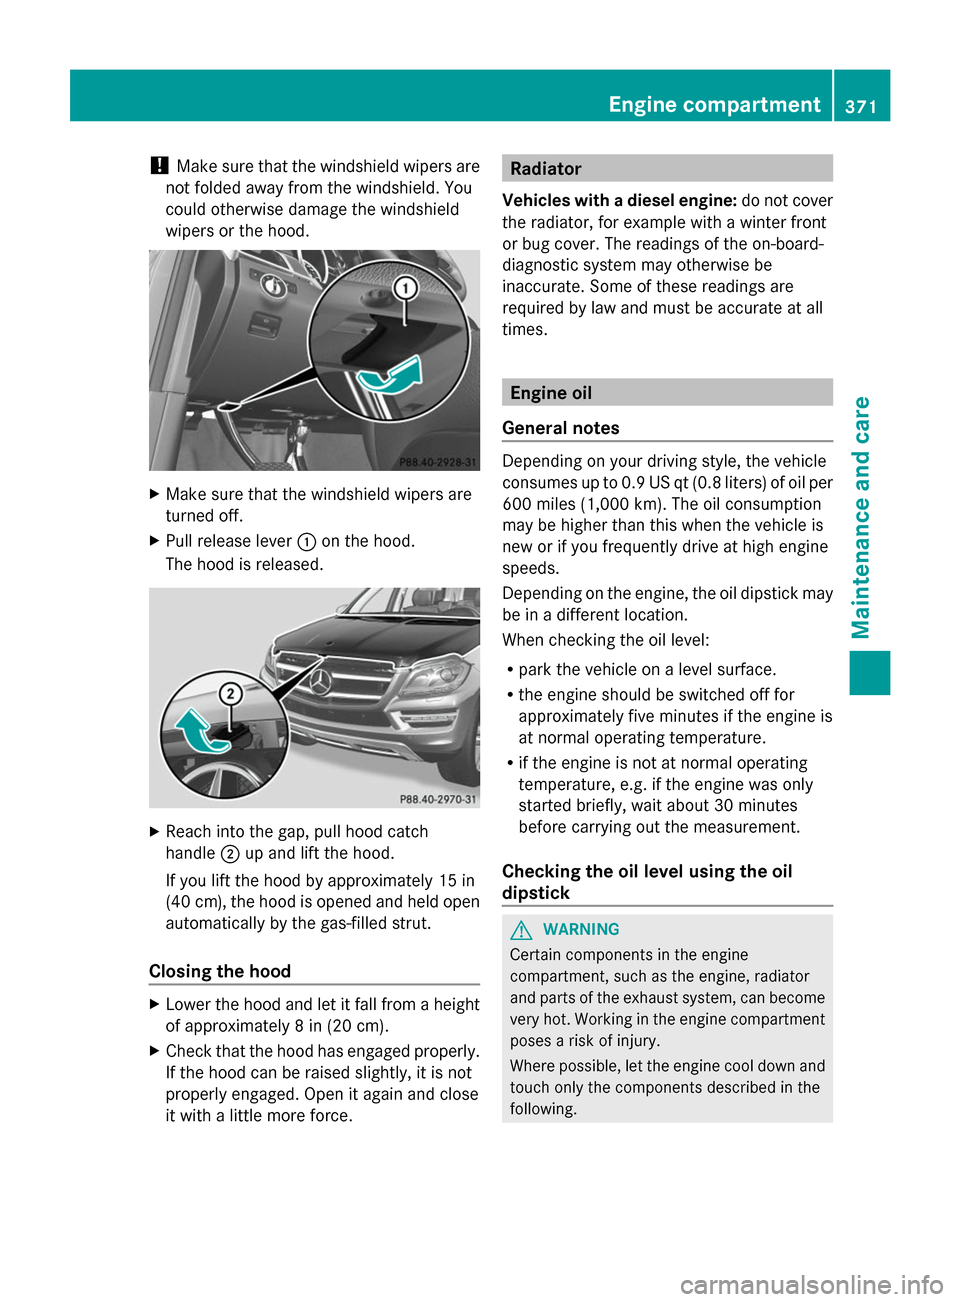
X Pull release lever :on the hood.
The hood is released. X
Reach into the gap, pull hood catch
handle ;up and lift the hood.
If you lift the hood by approximately 15 in
(40 cm), the hood is opened and held open
automatically by the gas-filled strut.
Closing the hood X
Lower the hood and let it fall from a height
of approximately 8 in (20 cm).
X Check that the hood has engaged properly.
If the hood can be raised slightly, it is not
properly engaged. Open it again and close
it with a little more force. Radiator
Vehicles with a diesel engine: do not cover
the radiator, for example with a winter front
or bug cover. The readings of the on-board-
diagnostic system may otherwise be
inaccurate. Some of these readings are
required by law and must be accurate at all
times. Engine oil
General notes Depending on your driving style, the vehicle
consumes up to 0.9 US qt (0.8 liters) of oil per
600 miles (1,000 km). The oil consumption
may be higher than this when the vehicle is
new or if you frequently drive at high engine
speeds.
Depending on the engine, the oil dipstick may
be in a different location.
When checking the oil level:
R
park the vehicle on a level surface.
R the engine should be switched off for
approximately five minutes if the engine is
at normal operating temperature.
R if the engine is not at normal operating
temperature, e.g. if the engine was only
started briefly, wait about 30 minutes
before carrying out the measurement.
Checking the oil level using the oil
dipstick G
WARNING
Certain components in the engine
compartment, such as the engine, radiator
and parts of the exhaust system, can become
very hot. Working in the engine compartment
poses a risk of injury.
Where possible, let the engine cool down and
touch only the components described in the
following. Engine compartment
371Maintenance and care Z
Page 374 of 462
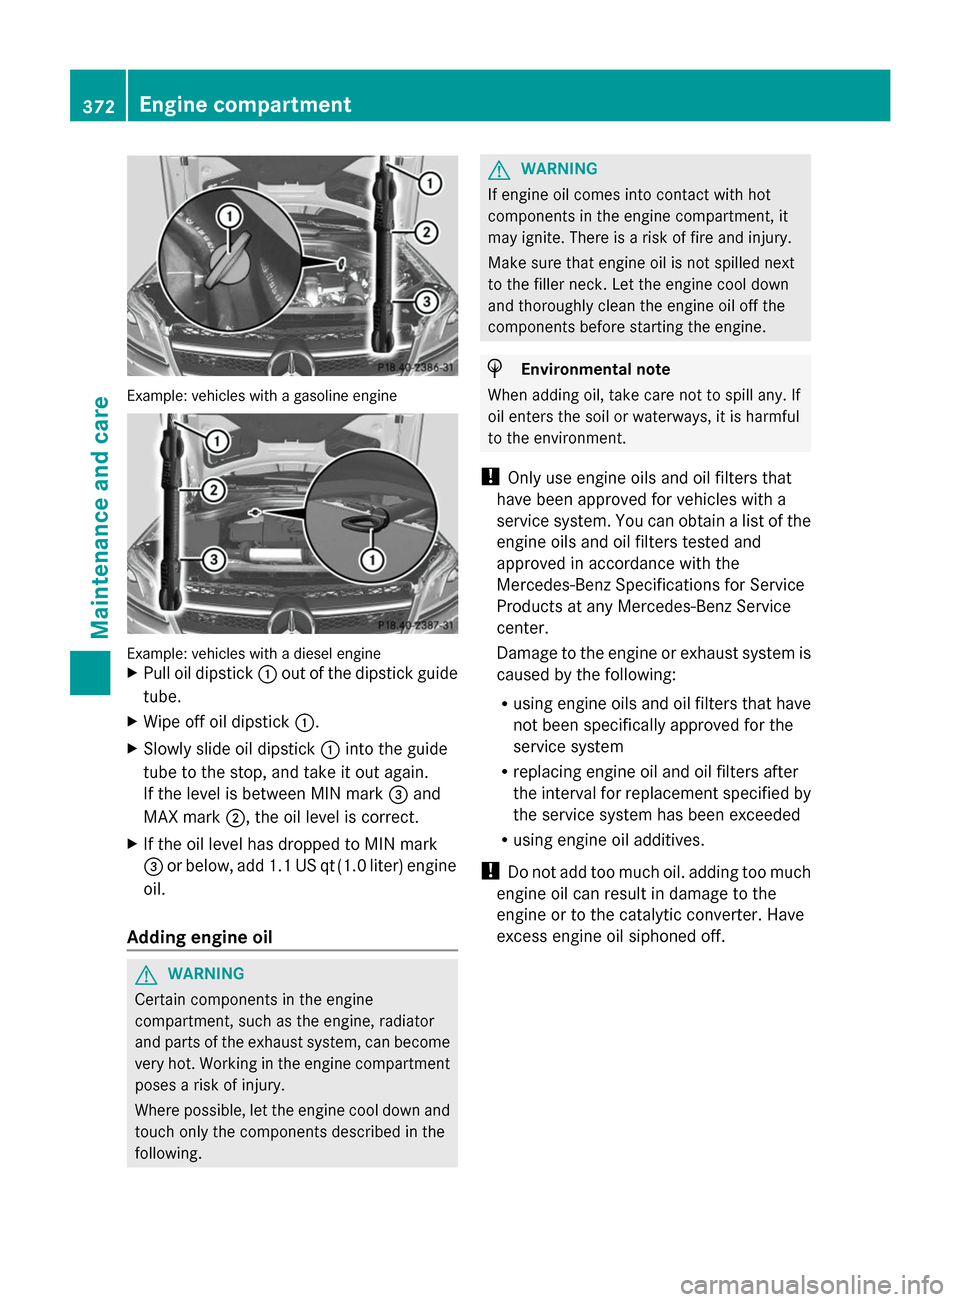
Example: vehicles with a gasoline engine
Example: vehicles with a diesel engine
X
Pull oil dipstick :out of the dipstick guide
tube.
X Wipe off oil dipstick :.
X Slowly slide oil dipstick :into the guide
tube to the stop, and take it out again.
If the level is between MIN mark =and
MAX mark ;, the oil level is correct.
X If the oil level has dropped to MIN mark
= or below, add 1.1 US qt (1.0 liter) engine
oil.
Adding engine oil G
WARNING
Certain components in the engine
compartment, such as the engine, radiator
and parts of the exhaust system, can become
very hot. Working in the engine compartment
poses a risk of injury.
Where possible, let the engine cool down and
touch only the components described in the
following. G
WARNING
If engine oil comes into contact with hot
components in the engine compartment, it
may ignite. There is a risk of fire and injury.
Make sure that engine oil is not spilled next
to the filler neck. Let the engine cool down
and thoroughly clean the engine oil off the
components before starting the engine. H
Environmental note
When adding oil, take care not to spill any. If
oil enters the soil or waterways, it is harmful
to the environment.
! Only use engine oils and oil filters that
have been approved for vehicles with a
service system. You can obtain a list of the
engine oils and oil filters tested and
approved in accordance with the
Mercedes-Benz Specifications for Service
Products at any Mercedes-Benz Service
center.
Damage to the engine or exhaust system is
caused by the following:
R using engine oils and oil filters that have
not been specifically approved for the
service system
R replacing engine oil and oil filters after
the interval for replacement specified by
the service system has been exceeded
R using engine oil additives.
! Do not add too much oil. adding too much
engine oil can result in damage to the
engine or to the catalytic converter. Have
excess engine oil siphoned off. 372
Engine compartmentMaintenance and care
Page 375 of 462
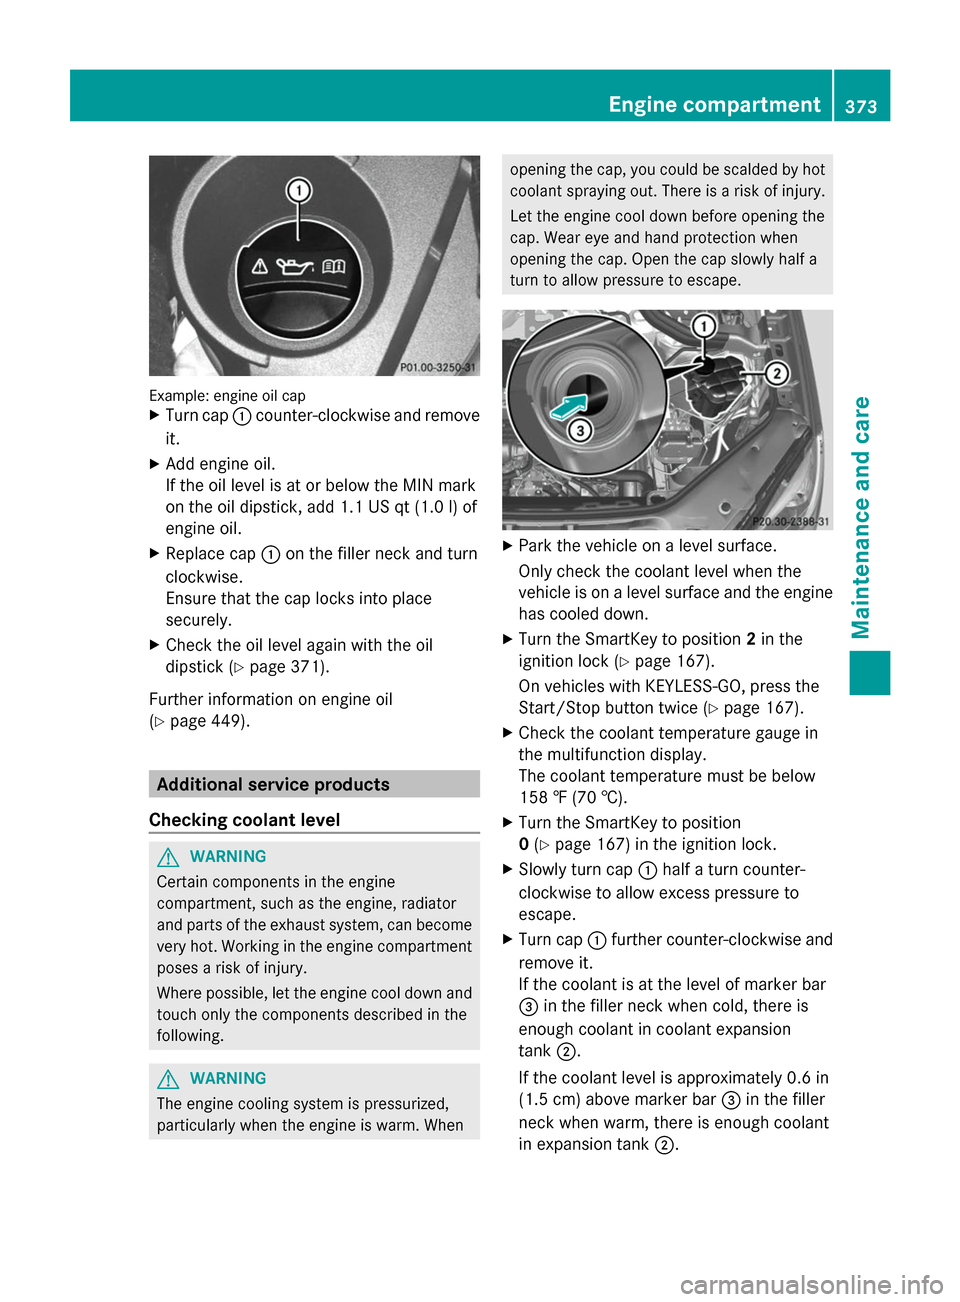
Example: engine oil cap
X
Turn cap :counter-clockwise and remove
it.
X Add engine oil.
If the oil level is at or below the MIN mark
on the oil dipstick, add 1.1 US qt (1.0 l) of
engine oil.
X Replace cap :on the filler neck and turn
clockwise.
Ensure that the cap locks into place
securely.
X Check the oil level again with the oil
dipstick (Y page 371).
Further information on engine oil
(Y page 449). Additional service products
Checking coolant level G
WARNING
Certain components in the engine
compartment, such as the engine, radiator
and parts of the exhaust system, can become
very hot. Working in the engine compartment
poses a risk of injury.
Where possible, let the engine cool down and
touch only the components described in the
following. G
WARNING
The engine cooling system is pressurized,
particularly when the engine is warm. When opening the cap, you could be scalded by hot
coolant spraying out. There is a risk of injury.
Let the engine cool down before opening the
cap. Wear eye and hand protection when
opening the cap. Open the cap slowly half a
turn to allow pressure to escape.
X
Park the vehicle on a level surface.
Only check the coolant level when the
vehicle is on a level surface and the engine
has cooled down.
X Turn the SmartKey to position 2in the
ignition lock (Y page 167).
On vehicles with KEYLESS-GO, press the
Start/Stop button twice (Y page 167).
X Check the coolant temperature gauge in
the multifunction display.
The coolant temperature must be below
158 ‡ (70 †).
X Turn the SmartKey to position
0(Y page 167) in the ignition lock.
X Slowly turn cap :half a turn counter-
clockwise to allow excess pressure to
escape.
X Turn cap :further counter-clockwise and
remove it.
If the coolant is at the level of marker bar
= in the filler neck when cold, there is
enough coolant in coolant expansion
tank ;.
If the coolant level is approximately 0.6 in
(1.5 cm) above marker bar =in the filler
neck when warm, there is enough coolant
in expansion tank ;. Engine compartment
373Maintenance and care Z
Page 377 of 462
You can obtain further information from an
authorized Mercedes-Benz Center or at
http://www.mbusa.com (USA only).
i The ASSYST PLUS service interval display
does not show any information on the
engine oil level. Observe the notes on the
engine oil level (Y page 371).
The multifunction display shows a service
message for several seconds, e.g.:
R Service A in .. Days
Service A in .. Days
R Service A Due Service A Due
R Service A Exceeded by .. Days
Service A Exceeded by .. Days
Depending on the operating conditions of the
vehicle, the remaining time or distance until
the next service due date is displayed.
The letter A Aor B
B, possibly in connection with
a number or another letter, shows the type of
service. A
A stands for a minor service and B
Bfor
a major service.
You can obtain further information from an
authorized Mercedes-Benz Center.
The ASSYST PLUS service interval display
does not take into account any periods of
time during which the battery is
disconnected.
Maintaining the time-dependent service
schedule:
X Note down the service due date displayed
in the multifunction display before
disconnecting the battery.
or
X After reconnecting the battery, subtract
the battery disconnection periods from the
service date shown on the display. Hiding a service message
X Press the %ora button on the
steering wheel. Displaying service messages
X Switch on the ignition.
X Press the =or; button on the
steering wheel to select the Serv.
Serv. menu.
X Press the 9or: button to select the
ASSYST PLUS ASSYST PLUS submenu and confirm by
pressing the abutton.
The service due date appears in the
multifunction display. Information about Service
Resetting the ASSYST PLUS service
interval display !
If the ASSYST PLUS service interval
display has been inadvertently reset, this
setting can be corrected at a qualified
specialist workshop.
Have service work carried out as described
in the Maintenance Booklet. This may
otherwise lead to increased wear and
damage to the major assemblies or the
vehicle.
A qualified specialist workshop, e.g. an
authorized Mercedes-Benz Center, will reset
the ASSYST PLUS service interval display
after the service work has been carried out.
You can also obtain further information on
maintenance work, for example.
Special service requirements The specified maintenance interval takes only
the normal operation of the vehicle into
account. Under arduous operating conditions
or increased load on the vehicle,
maintenance work must be carried out more
frequently, for example:
R
regular city driving with frequent
intermediate stops
R if the vehicle is primarily used to travel
short distances ASSYST PLUS
375Maintenance and care Z