key MERCEDES-BENZ GL-Class 2015 X166 Owners Manual
[x] Cancel search | Manufacturer: MERCEDES-BENZ, Model Year: 2015, Model line: GL-Class, Model: MERCEDES-BENZ GL-Class 2015 X166Pages: 462, PDF Size: 9.09 MB
Page 240 of 462
R
if the tailgate is open
R in heavy rain, snow or fog
R at night or in very dark places
R if the cameras are exposed to very bright
light
R if the area is lit by fluorescent bulbs or LED
lighting (the display may flicker)
R if there is a sudden change in temperature,
e.g. when driving into a heated garage in
winter
R if the camera lenses are dirty or covered
R if the vehicle components in which the
cameras are installed are damaged. In this
event, have the camera position and setting
checked at a qualified specialist workshop.
Do not use the 360° camera in this case. You
can otherwise injure others or cause damage to objects or the vehicle.
Activation conditions The 360° camera image can be displayed if:
R your vehicle is equipped with a 360° cam-
era
R COMAND is switched on, see the separate
COMAND operating instructions
R the 360° Camera
360° Camera function is activated
Activating the 360° camera using the
SYS button X
Press and hold the 0066button for longer
than 2 seconds, see the separate COMAND
operating instructions.
Depending on whether position Dor Ris
engaged, the following is shown:
R full screen display with the image from
the front camera
R full screen display with the image from
the rear view camera Activating the 360° camera with
COMAND X
Press the 0066button, see the separate
COMAND operating instructions.
X Select System System by turning 00790052007Athe
COMAND controller and press 0098to con-
firm.
X Select 360° camera 360° camera and press0098to con-
firm.
Depending on whether position Dor Ris
engaged, the following is shown:
R a split screen with top view and the
image from the front camera or
R a split screen with top view and the
image from the rear view camera
For further information about the COMAND
controller, see the separate COMAND oper-
ating instructions.
Activating the 360° camera using
reverse gear The 360° camera images can be automati-
cally displayed by engaging reverse gear.
X Make sure that the SmartKey is in position
2 in the ignition lock.
X Make sure that the Activation by R Activation by R
gear
gear function is selected in COMAND, see
the separate COMAND operating instruc-
tions.
X To show the 360° camera image: engage
reverse gear.
The COMAND display shows the area
behind the vehicle in split screen:
R vehicle with guide lines
R top view of the vehicle
Selecting the split-screen and full
screen displays X
To switch between split screen views:
switch to the line with the vehicle icons by
sliding 00970052the COMAND controller.
X Turn 00790052007A the COMAND controller and
select one of the vehicle symbols. 238
Driving systemsDriving an
d parking
Page 245 of 462
Pedestrian recognition may be impaired or
inoperative if:
R pedestrians are partially or entirely
obscured by objects, e.g. parked vehicles
R the silhouette of the pedestrian in the Night
View Assist Plus display is incomplete or
interrupted, e.g. by powerful light reflec-
tions
R pedestrians do not contrast adequately
from the background
R pedestrians are not in an upright position,
e.g. sitting, squatting or lying
Activating Night View Assist Plus Activation conditions
You can only activate Night View Assist Plus
if:
R the SmartKey is in position 2in the ignition
lock.
R it is dark.
R the light switch is in the 0058or0058 posi-
tion.
R reverse gear has not been engaged.
Activating Night View Assist Plus X
Make sure that COMAND is switched on.
X Press button 0043.
The Night View Assist Plus display appears in the COMAND display.
You can read about how to adjust the bright- ness of the COMAND display in the COMAND
operating instructions. i
The infrared headlamps only switch on
when the vehicle is being driven at speeds
of approximately 6 mph (10 km/h). This
means that you do not have the full visual
range while the vehicle is stationary and
cannot check whether Night View Assist
Plus is working.
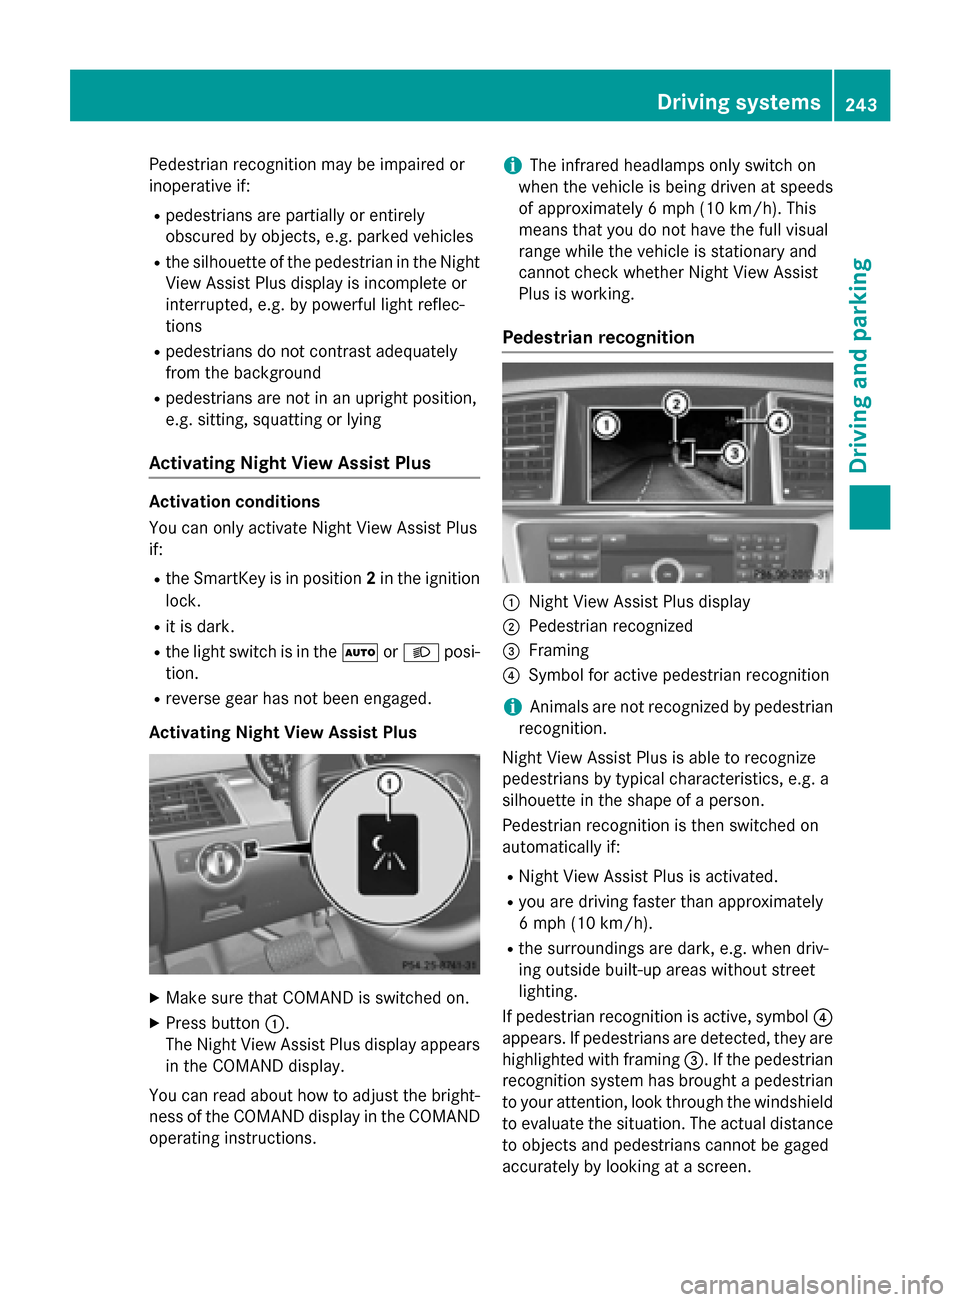
Pedestrian recognition 0043
Night View Assist Plus display
0044 Pedestrian recognized
0087 Framing
0085 Symbol for active pedestrian recognition
i Animals are not recognized by pedestrian
recognition.
Night View Assist Plus is able to recognize
pedestrians by typical characteristics, e.g. a
silhouette in the shape of a person.
Pedestrian recognition is then switched on
automatically if:
R Night View Assist Plus is activated.
R you are driving faster than approximately
6 mph (10 km/h).
R the surroundings are dark, e.g. when driv-
ing outside built-up areas without street
lighting.
If pedestrian recognition is active, symbol 0085
appears. If pedestrians are detected, they are
highlighted with framing 0087. If the pedestrian
recognition system has brought a pedestrian to your attention, look through the windshield
to evaluate the situation. The actual distance to objects and pedestrians cannot be gaged
accurately by looking at a screen. Driving systems
243Driving and parking Z
Page 249 of 462
sponding side lights up red. This warning is
always emitted when a vehicle enters the
blind spot monitoring range from behind or
from the side. When you overtake a vehicle,
the warning only occurs if the difference in
speed is less than 7 mph (12 km/h).
The yellow indicator lamp goes out if reverse gear is engaged. In this event, Blind Spot
Assist is no longer active.
The brightness of the indicator/warning
lamps is adjusted automatically according to
the ambient light.
Collision warning
If a vehicle is detected in the monitoring range
of Blind Spot Assist and you switch on the
corresponding turn signal, a double warning
tone sounds. Red warning lamp 0043flashes. If
the turn signal remains on, detected vehicles
are indicated by the flashing of red warning
lamp 0043. There are no further warning tones.
Switching on Blind Spot Assist
X Make sure that the radar sensor system
(Y page 287) and Blind Spot Assist
(Y page 284) are activated in the on-board
computer.
X Turn the SmartKey to position 2in the igni-
tion lock.
Warning lamps 0043in the exterior mirrors
light up red for approximately 1.5 seconds
and then turn yellow.
Towing a trailer
When you attach a trailer, make sure you have correctly established the electrical connec-
tion. This can be accomplished by checking
the trailer lighting. In this event, Blind Spot
Assist is deactivated. The indicator lamp in
the exterior mirrors lights up yellow, and the
Blind
Blind Spot SpotAssist
Assist Currently
Currently Unavail‐
Unavail‐
able See Operator's Manual
able See Operator's Manual message
appears in the multifunction display.
i You can deactivate the indicator lamps in
the exterior mirrors. To do so, switch off Blind Spot Assist when:
R the SmartKey is in position 2in the igni-
tion lock
R the engine is not running
R the electrical connection to the trailer
has been established
Lane Keeping Assist General notes
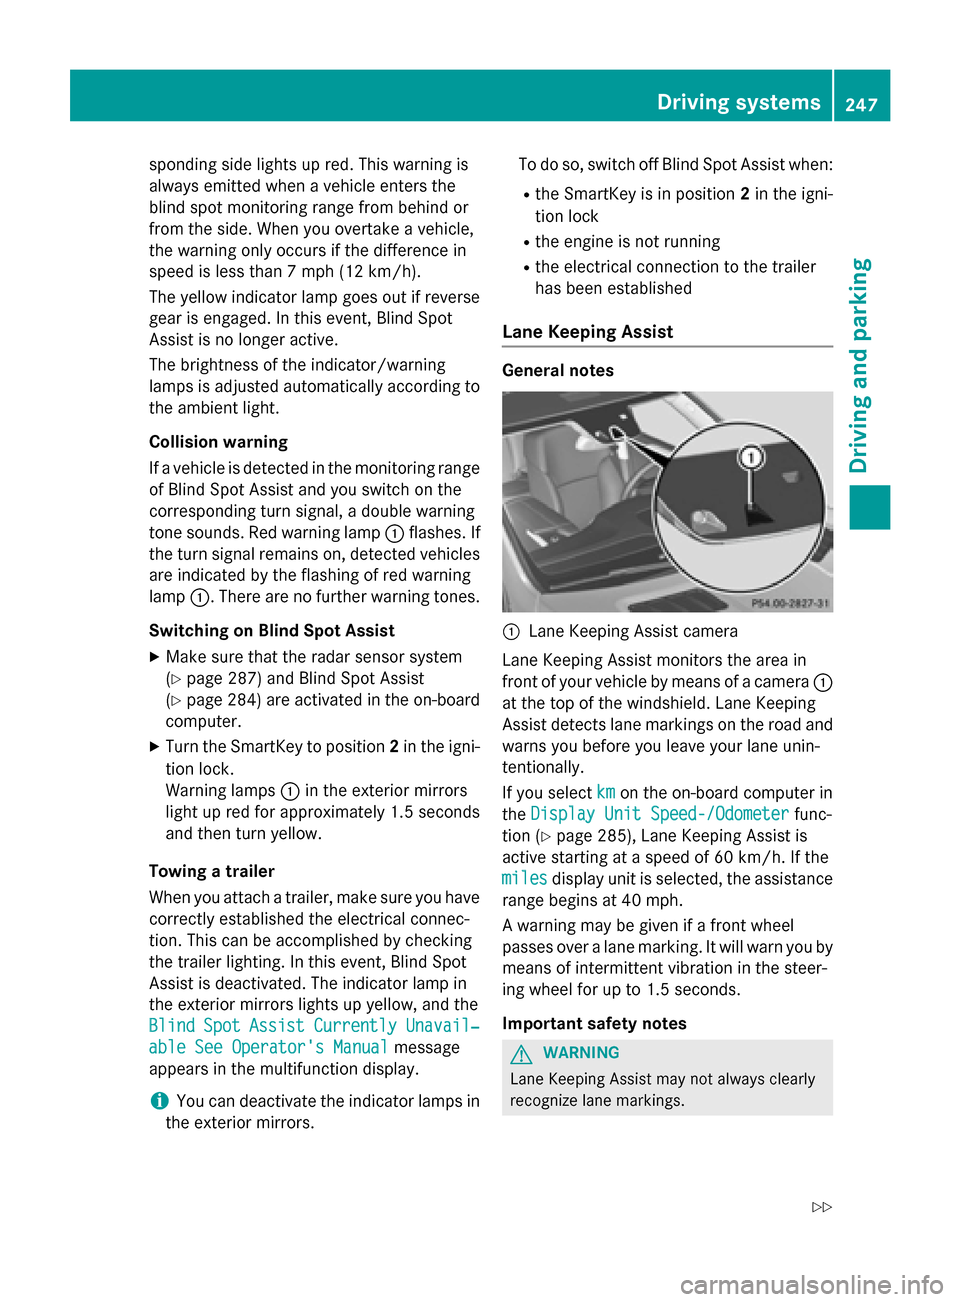
0043
Lane Keeping Assist camera
Lane Keeping Assist monitors the area in
front of your vehicle by means of a camera 0043
at the top of the windshield. Lane Keeping
Assist detects lane markings on the road and
warns you before you leave your lane unin-
tentionally.
If you select km kmon the on-board computer in
the Display Unit Speed-/Odometer
Display Unit Speed-/Odometer func-
tion (Y page 285), Lane Keeping Assist is
active starting at a speed of 60 km/h. If the
miles miles display unit is selected, the assistance
range begins at 40 mph.
A warning may be given if a front wheel
passes over a lane marking. It will warn you by means of intermittent vibration in the steer-
ing wheel for up to 1.5 seconds.
Important safety notes G
WARNING
Lane Keeping Assist may not always clearly
recognize lane markings. Driving systems
247Driving and parking
Z
Page 254 of 462
R
the LOW RANGE off-road gear is activated
(vehicles with the ON&OFFROAD package).
R a loss of tire pressure or a defective tire is
detected.
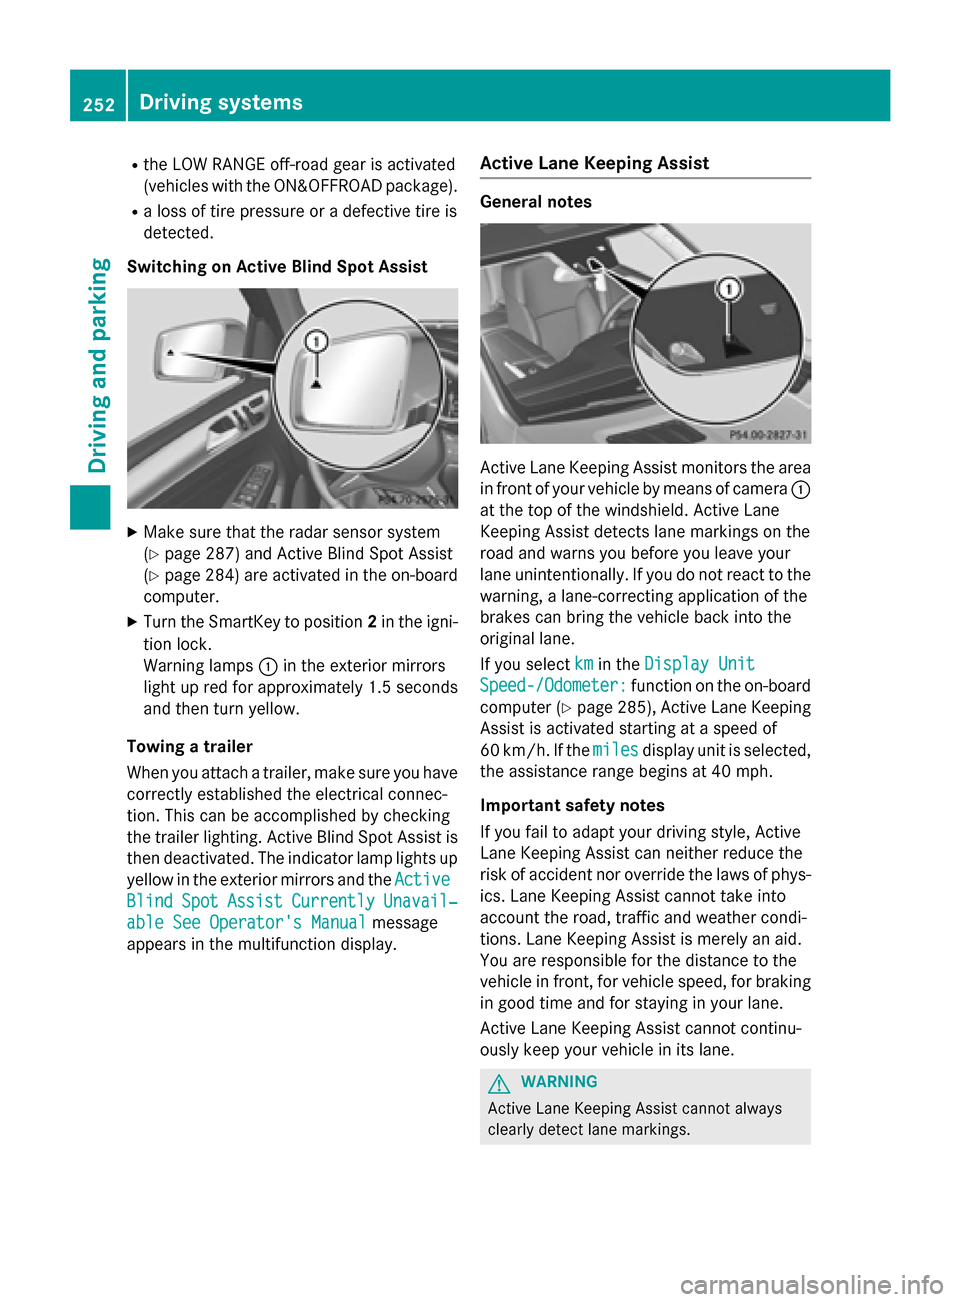
Switching on Active Blind Spot Assist X
Make sure that the radar sensor system
(Y page 287) and Active Blind Spot Assist
(Y page 284 )are activated in the on-board
computer.
X Turn the SmartKey to position 2in the igni-
tion lock.
Warning lamps 0043in the exterior mirrors
light up red for approximately 1.5 seconds
and then turn yellow.
Towing a trailer
When you attach a trailer, make sure you have correctly established the electrical connec-
tion. This can be accomplished by checking
the trailer lighting. Active Blind Spot Assist isthen deactivated. The indicator lamp lights up
yellow in the exterior mirrors and the Active
Active
Blind Blind Spot
SpotAssist
Assist Currently
Currently Unavail‐
Unavail‐
able See Operator's Manual
able See Operator's Manual message
appears in the multifunction display. Active Lane Keeping Assist General notes
Active Lane Keeping Assist monitors the area
in front of your vehicle by means of camera 0043
at the top of the windshield. Active Lane
Keeping Assist detects lane markings on the
road and warns you before you leave your
lane unintentionally. If you do not react to the warning, a lane-correcting application of the
brakes can bring the vehicle back into the
original lane.
If you select km kmin the Display Unit
Display Unit
Speed-/Odometer:
Speed-/Odometer: function on the on-board
computer (Y page 285), Active Lane Keeping
Assist is activated starting at a speed of
60 km/h. If the miles milesdisplay unit is selected,
the assistance range begins at 40 mph.
Important safety notes
If you fail to adapt your driving style, Active
Lane Keeping Assist can neither reduce the
risk of accident nor override the laws of phys- ics. Lane Keeping Assist cannot take into
account the road, traffic and weather condi-
tions. Lane Keeping Assist is merely an aid.
You are responsible for the distance to the
vehicle in front, for vehicle speed, for braking in good time and for staying in your lane.
Active Lane Keeping Assist cannot continu-
ously keep your vehicle in its lane. G
WARNING
Active Lane Keeping Assist cannot always
clearly detect lane markings. 252
Driving systemsDriving and parking
Page 257 of 462
R
you switch on the turn signals. In this
event, the warnings are suppressed for a
certain period of time.
R a driving safety system intervenes, e.g.
ABS, BAS or ESP ®
.
R you accelerate hard, e.g. kickdown.
R you brake hard.
R you steer actively, e.g. swerve to avoid an
obstacle or change lanes quickly.
R you cut the corner on a sharp bend.
Towing a trailer
When you attach a trailer, make sure you have correctly established the electrical connec-
tion. This can be accomplished by checking
the trailer lighting. On-road programs (vehicles with the
ON&OFFROAD package)
General notes The on-road programs assist you during on-
road driving and the off-road programs when
driving off-road (Y page 259).
The following program messages remain in
the multifunction display until the corre-
sponding vehicle level has been set. Up to off-
road level 2, you can hide the program mes-
sages using the 0038or0076 button on the
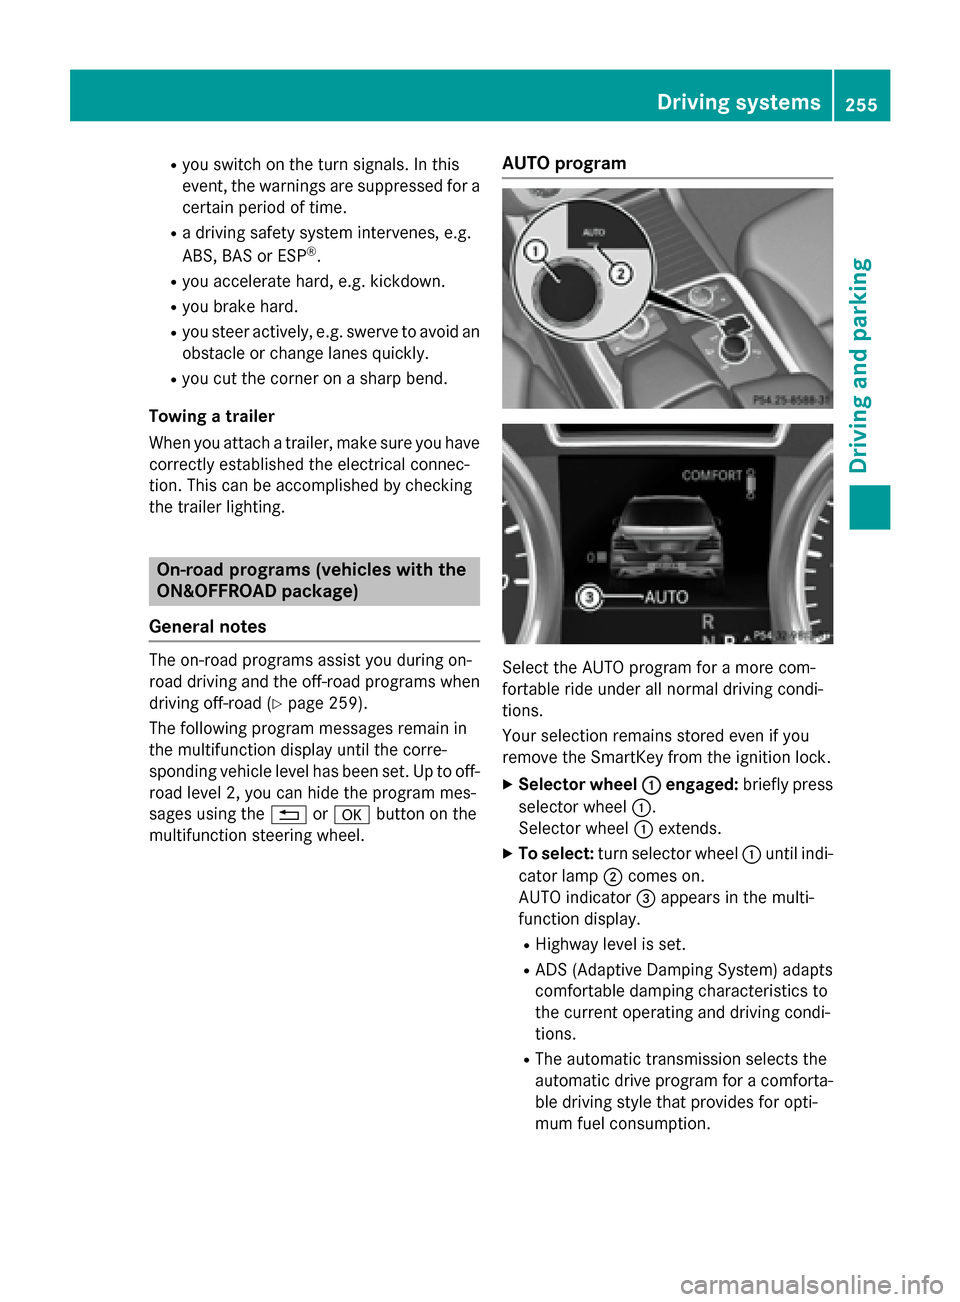
multifunction steering wheel. AUTO program
Select the AUTO program for a more com-
fortable ride under all normal driving condi-
tions.
Your selection remains stored even if you
remove the SmartKey from the ignition lock.
X Selector wheel 0043 0043engaged: briefly press
selector wheel 0043.
Selector wheel 0043extends.
X To select: turn selector wheel 0043until indi-
cator lamp 0044comes on.
AUTO indicator 0087appears in the multi-
function display.
R Highway level is set.
R ADS (Adaptive Damping System) adapts
comfortable damping characteristics to
the current operating and driving condi-
tions.
R The automatic transmission selects the
automatic drive program for a comforta-
ble driving style that provides for opti-
mum fuel consumption. Driving syste
ms
255Driving an d parking Z
Page 258 of 462
SPORT program
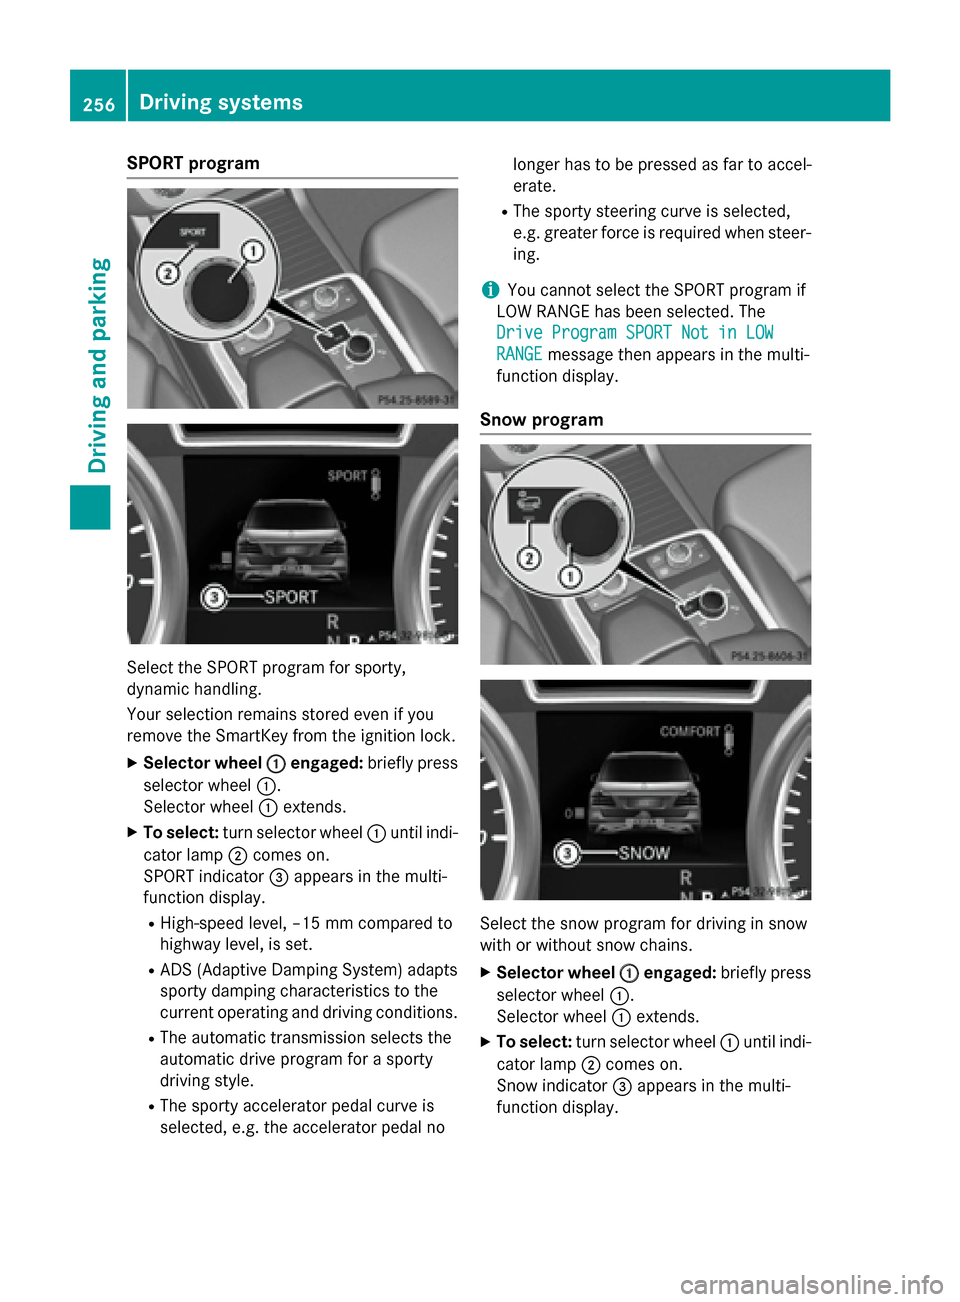
Select the SPORT program for sporty,
dynamic handling.
Your selection remains stored even if you
remove the SmartKey from the ignition lock.
X Selector wheel 0043
0043 engaged: briefly press
selector wheel 0043.
Selector wheel 0043extends.
X To select: turn selector wheel 0043until indi-
cator lamp 0044comes on.
SPORT indicator 0087appears in the multi-
function display.
R High-speed level, –15 mm compared to
highway level, is set.
R ADS (Adaptive Damping System) adapts
sporty damping characteristics to the
current operating and driving conditions.
R The automatic transmission selects the
automatic drive program for a sporty
driving style.
R The sporty accelerator pedal curve is
selected, e.g. the accelerator pedal no longer has to be pressed as far to accel-
erate.
R The sporty steering curve is selected,
e.g. greater force is required when steer-
ing.
i You cannot select the SPORT program if
LOW RANGE has been selected. The
Drive Program SPORT Not in LOW
Drive Program SPORT Not in LOW
RANGE RANGE message then appears in the multi-
function display.
Snow program Select the snow program for driving in snow
with or without snow chains.
X Selector wheel 0043 0043engaged: briefly press
selector wheel 0043.
Selector wheel 0043extends.
X To select: turn selector wheel 0043until indi-
cator lamp 0044comes on.
Snow indicator 0087appears in the multi-
function display. 256
Driving systemsDriving and parking
Page 265 of 462
Messages in the multifunction display
If a gear change process has not been successful, the following messages may be displayed in
the multifunction display: Display messages
Possible causes/consequences and
0050 0050Solutions LOW RANGE Max.
LOW RANGE Max.
Speed 40 km/h Speed 40 km/h You have been driving faster than 40 km/h. Additionally, the indi-
cator lamp on the button in the center console blinks.
X Drive more slowly to carry out the gear change process. LOW
LOW
RANGE
RANGE Shift
Shiftto
to
Position N Briefly
Position N Briefly The transmission is in position
Dand you are driving at below
40 km/h.
X Shift the transmission to Nto complete the gear change proc-
ess. LOW
LOW
RANGE
RANGE Shifting
Shifting
Canceled Please
Canceled Please
Reactivate Reactivate The gear change process was not carried out.
X Ensure that all gear change conditions are fulfilled and carry out
the gear change process again. LOW RANGE Stop
LOW RANGE Stop
Apply Apply
Parking
Parking Brake
Brake A warning tone also sounds. The gear change process has not been
completed. LOW RANGE is in the neutral position. There is no
connection between the engine and the drive wheels.
! Do not drive any further. You could otherwise damage the
vehicle's drive train.
X Stop the vehicle. Take into account the road and traffic condi-
tions when doing this.
X Depress the electric parking brake (Y page 192).
X Carry out the gear change process again.
If the gear change process has been carried out, the LOW LOWRANGE
RANGE
Stop Apply Parking Brake
Stop Apply Parking Brake message disappears.ON&OFFROAD menu in the COMAND
display (vehicles with the ON&OFF-
ROAD package) You can display some driving systems, driving
programs and additional information in the
COMAND display.
X Make sure that the SmartKey is in position
2 in the ignition lock.
X Make sure that COMAND is activated, see
the separate COMAND operating instruc-
tions.
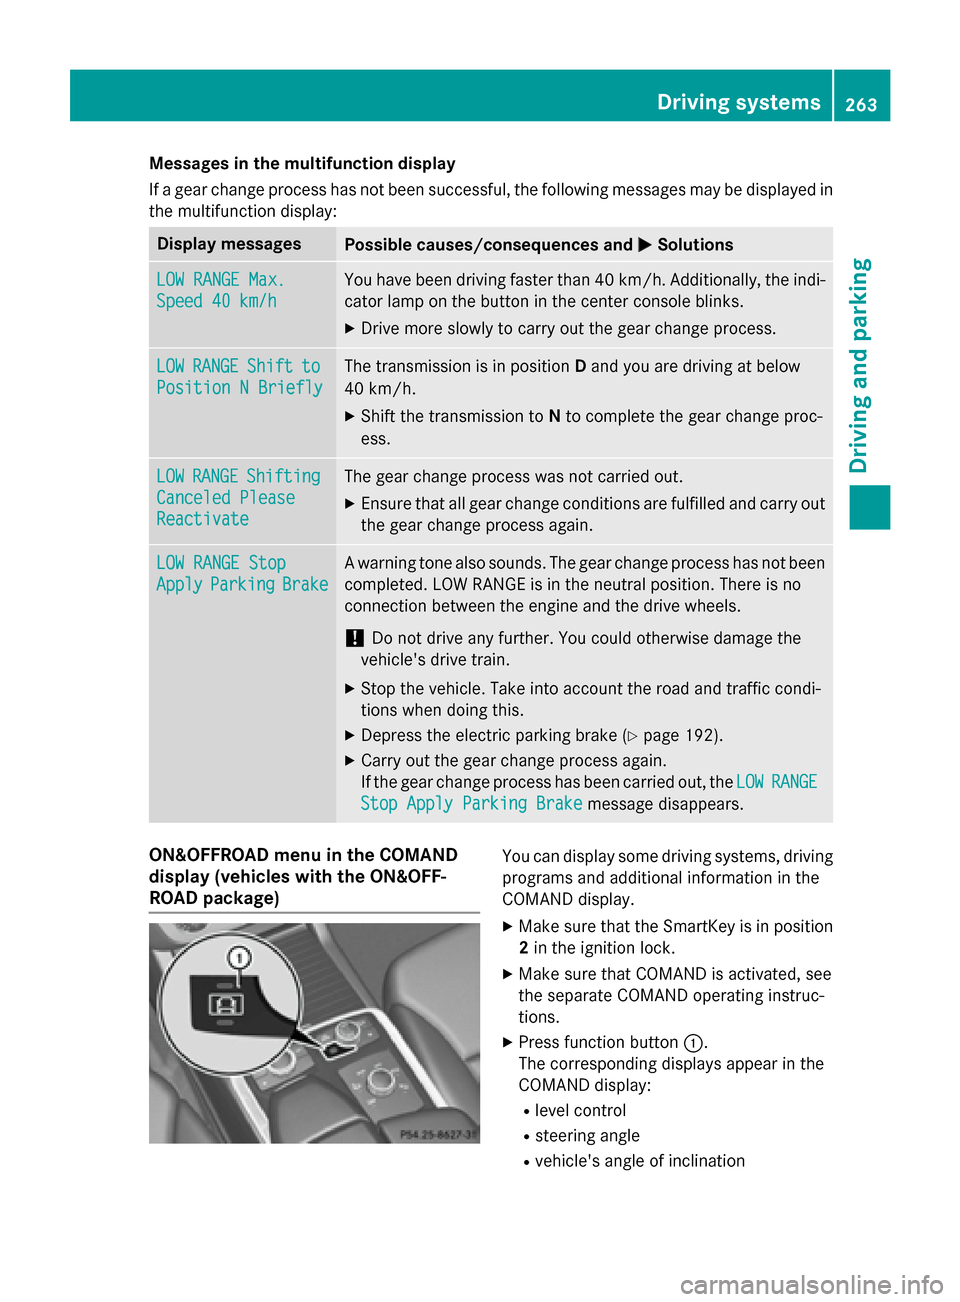
X Press function button 0043.
The corresponding displays appear in the
COMAND display:
R level control
R steering angle
R vehicle's angle of inclination Driving systems
263Driving and parking Z
Page 269 of 462
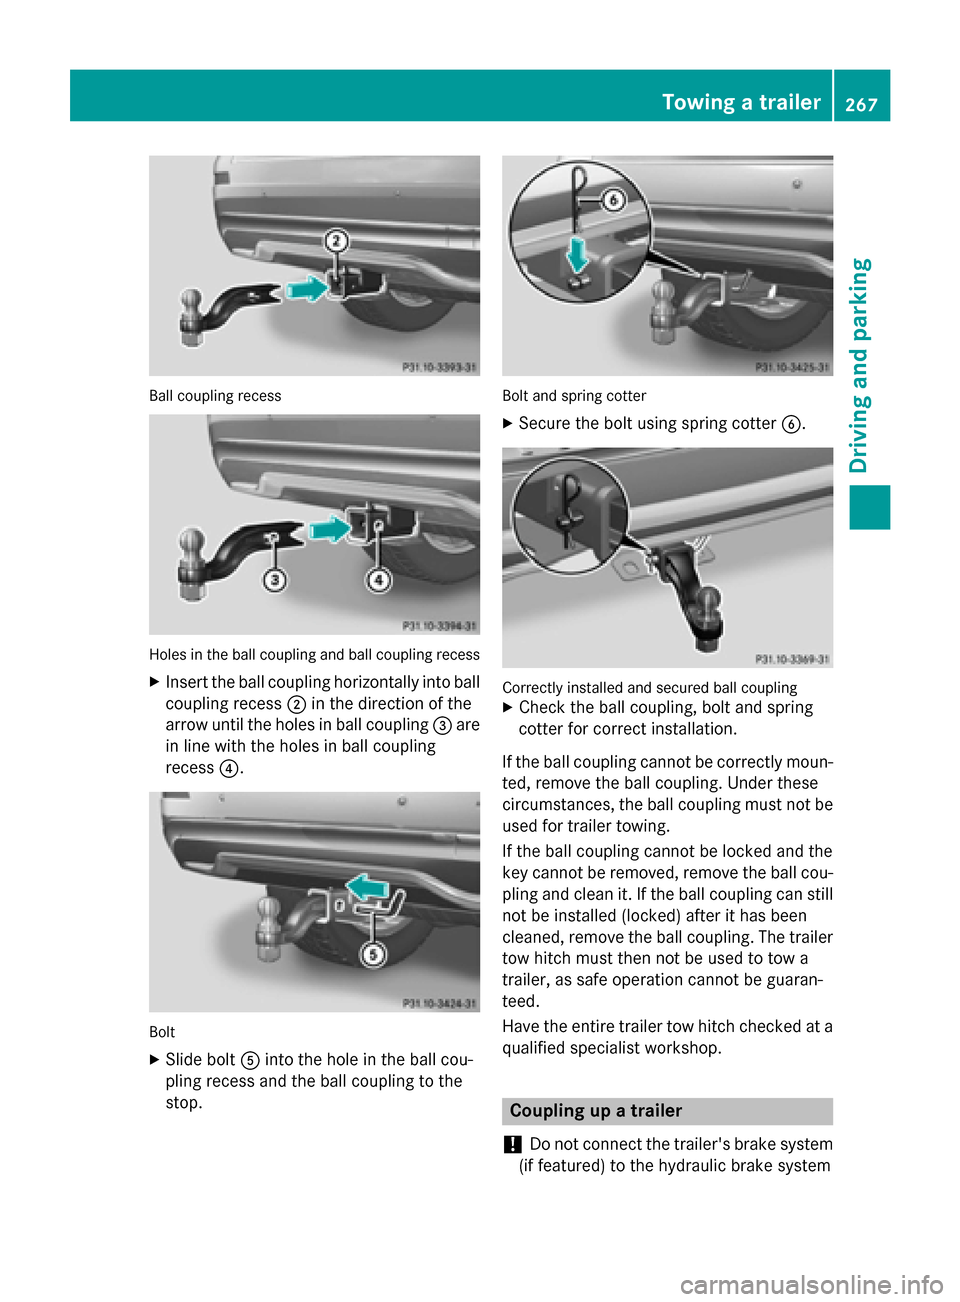
Ball coupling recess
Holes in the ball coupling and ball coupling recess
X Insert the ball coupling horizontally into ball
coupling recess 0044in the direction of the
arrow until the holes in ball coupling 0087are
in line with the holes in ball coupling
recess 0085. Bolt
X Slide bolt 0083into the hole in the ball cou-
pling recess and the ball coupling to the
stop. Bolt and spring cotter
X Secure the bolt using spring cotter 0084. Correctly installed and secured ball coupling
X Check the ball coupling, bolt and spring
cotter for correct installation.
If the ball coupling cannot be correctly moun-
ted, remove the ball coupling. Under these
circumstances, the ball coupling must not be used for trailer towing.
If the ball coupling cannot be locked and the
key cannot be removed, remove the ball cou-
pling and clean it. If the ball coupling can still
not be installed (locked) after it has been
cleaned, remove the ball coupling. The trailer tow hitch must then not be used to tow a
trailer, as safe operation cannot be guaran-
teed.
Have the entire trailer tow hitch checked at aqualified specialist workshop. Coupling up a trailer
! Do not connect the trailer's brake system
(if featured) to the hydraulic brake system Towing a trailer
267Driving and parking Z
Page 277 of 462
The coolant temperature gauge is in the
instrument cluster on the right-hand side
(Y page 35).
Under normal operating conditions and with
the specified coolant level, the coolant tem-
perature may rise to 248 ‡ (120 †). Tachometer
! Do not drive in the overrevving range, as
this could damage the engine.
The red band in the tachometer indicates the
engine's overrevving range.
The fuel supply is interrupted to protect the
engine when the red band is reached. Outside temperature display
You should pay special attention to road con-
ditions when temperatures are around freez-
ing point.
Bear in mind that the outside temperature
display indicates the temperature measured
and does not record the road temperature.
The outside temperature display is in the mul- tifunction display (Y page 276).
Changes in the outside temperature are dis-
played after a short delay. Speedometer with segments
The segments in the speedometer indicate
which speed range is available.
R Cruise control activated (Y page 203):
The segments light up from the stored
speed to the maximum speed.
R DISTRONIC PLUS activated (Y page 206):
One or two segments in the set speed
range light up.
R DISTRONIC PLUS detects a vehicle in front:
The segments between the speed of the
vehicle in front and the stored speed light
up. Operating the on-board computer
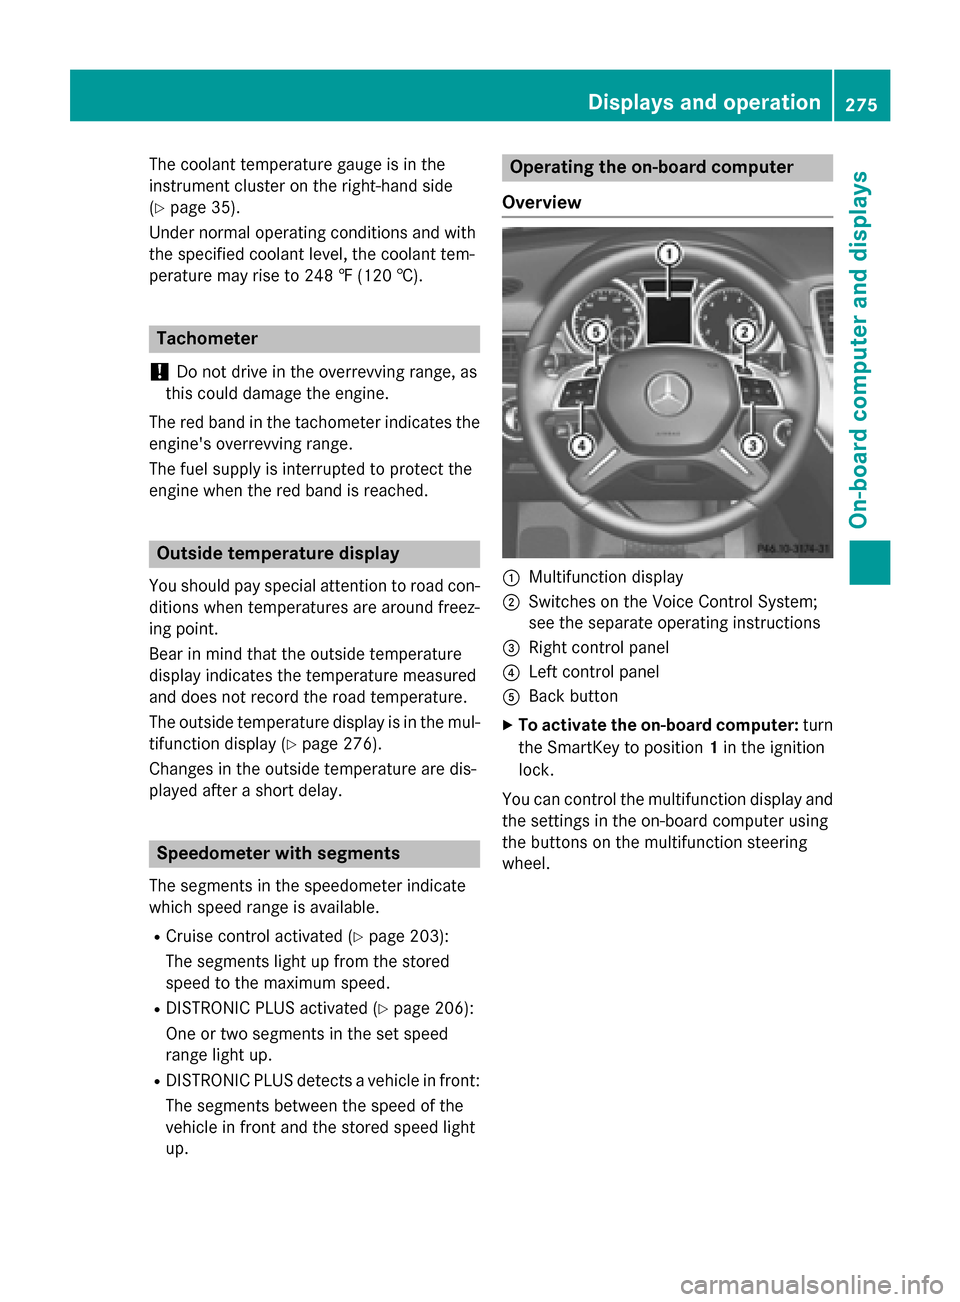
Overview 0043
Multifunction display
0044 Switches on the Voice Control System;
see the separate operating instructions
0087 Right control panel
0085 Left control panel
0083 Back button
X To activate the on-board computer: turn
the SmartKey to position 1in the ignition
lock.
You can control the multifunction display and
the settings in the on-board computer using
the buttons on the multifunction steering
wheel. Displays and operation
275On-board computer and displays Z
Page 288 of 462
X
Press 0076to confirm.
X Press 0064or0063 to select the Daytime
Daytime
Running Lights
Running Lights function.
If the Daytime Running Lights
Daytime Running Lights function
has been switched on, the cone of light and
the 0086 symbol in the multifunction dis-
play are shown in orange.
X Press the 0076button to save the setting.
Further information on daytime running
lamps (Y page 128).
Setting the brightness of the ambient
lighting
X Press the 0059or0065 button on the steer-
ing wheel to select the Sett Settmenu.
X Press the 0064or0063 button to select the
Light
Light submenu.
X Press 0076to confirm.
X Press the 0064or0063 button to select the
Amb. Light +/-.
Amb. Light +/-. function.
You will see the selected setting.
X Press 0076to confirm.
X Press the 0064or0063 button to adjust the
brightness to any level from Off
OfftoLevel 5
Level 5
(bright).
X Press the 0076or0038 button to save the
setting.
Setting the ambient lighting color X Press the 0059or0065 button on the steer-
ing wheel to select the Sett.
Sett.menu.
X Press the 0064or0063 button to select the
Lights
Lights submenu.
X Press 0076to confirm.
X Press the 0064or0063 button to select the
Ambient Light Color
Ambient Light Color function.
X Press 0076to confirm.
X Press the 0064or0063 button to set the
color to SOLAR
SOLAR,NEUTRAL
NEUTRAL orPOLAR
POLAR.
X Press the 0076or0038 button to save the
setting. Surround lighting and exterior lighting
delayed switch-off
X Press the 0059or0065 button on the steer-
ing wheel to select the Sett.
Sett. menu.
X Press the 0064or0063 button to select the
Lights
Lights submenu.
X Press 0076to confirm.
X Press 0064or0063 to select the Sur‐
Sur‐
round Lighting
round Lighting function.
When the Surround Lighting
Surround Lighting function is
activated, the light cone and the area
around the vehicle are displayed in orange
in the multifunction display.
X Press the 0076button to save the setting.
Deactivating delayed switch-off of the exte-
rior lighting temporarily: X Before leaving the vehicle, turn the Smart-
Key to position 0in the ignition lock.
X Turn the SmartKey to position 2in the igni-
tion lock.
The exterior lighting delayed switch-off is
deactivated.
Delayed switch-off of the exterior lighting is
reactivated the next time you start the
engine.
If you have activated the Surround Light‐ Surround Light‐
ing
ing function and the light switch is set to
0058, the following functions are activated
when it is dark:
R surround lighting: the exterior lighting
remains lit for 40 seconds after unlocking
with the SmartKey. If you start the engine,
the surround lighting is switched off and
automatic headlamp mode is activated
(Y page 128).
R exterior lighting delayed switch-off: the
exterior lighting remains lit for 60 seconds
after the engine is switched off. If you close all the doors and the tailgate, the exterior
lighting goes off after 5 seconds.
i Depending on your vehicle's equipment,
when the surround lighting and delayed
switch-off exterior lighting are on, the fol-
lowing light up: 286
Menus and submenusOn-board computer and displays