Instrument cluster MERCEDES-BENZ GL-Class 2015 X166 User Guide
[x] Cancel search | Manufacturer: MERCEDES-BENZ, Model Year: 2015, Model line: GL-Class, Model: MERCEDES-BENZ GL-Class 2015 X166Pages: 462, PDF Size: 9.09 MB
Page 47 of 462
See “Children in the vehicle” for information
on children traveling with you as well as vehi-
cle restraint systems (Y page 61).Important safety notes
G
WARNING
Modifications to the restraint system may
cause it to no longer work as intended. The
restraint system may then not perform its
intended protective function and may fail in an accident or trigger unexpectedly, for example.
This poses an increased risk of injury or even fatal injury.
Never modify parts of the restraint system.
Never tamper with the wiring, the electronic
components or their software.
If it is necessary to modify an air bag system to
accommodate a person with disabilities, con- tact an authorized Mercedes-Benz Center for
details. USA only: for further information con- tact our Customer Assistance Center at
1-800-FOR-MERCedes (1‑800‑ 367‑6372). Restraint system warning lamp
The functions of the restraint system are
checked after the ignition is switched on and
at regular intervals while the engine is run-
ning. Therefore, malfunctions can be detec-
ted in good time.
The 0075 restraint system warning lamp in
the instrument cluster lights up when the igni- tion is switched on. It goes out no later than afew seconds after the engine is started. The
components of the restraint system are in
operational readiness.
A malfunction has occurred if the 0075
restraint system warning lamp:
R does not light up after the ignition is
switched on
R does not go out after a few seconds with
the engine running
R lights up again while the engine is running G
WARNING
If restraint system is malfunctioning, restraint system components may be triggered unin-
tentionally or might not be triggered at all in
the event of an accident with a high rate of
vehicle deceleration. This can affect the Emer- gency Tensioning Device or air bag, for exam-
ple. This poses an increased risk of injury or
even fatal injury.
Have the restraint system checked and
repaired in a qualified specialist workshop as
soon as possible. PASSENGER AIR BAG OFF indicator
lamp
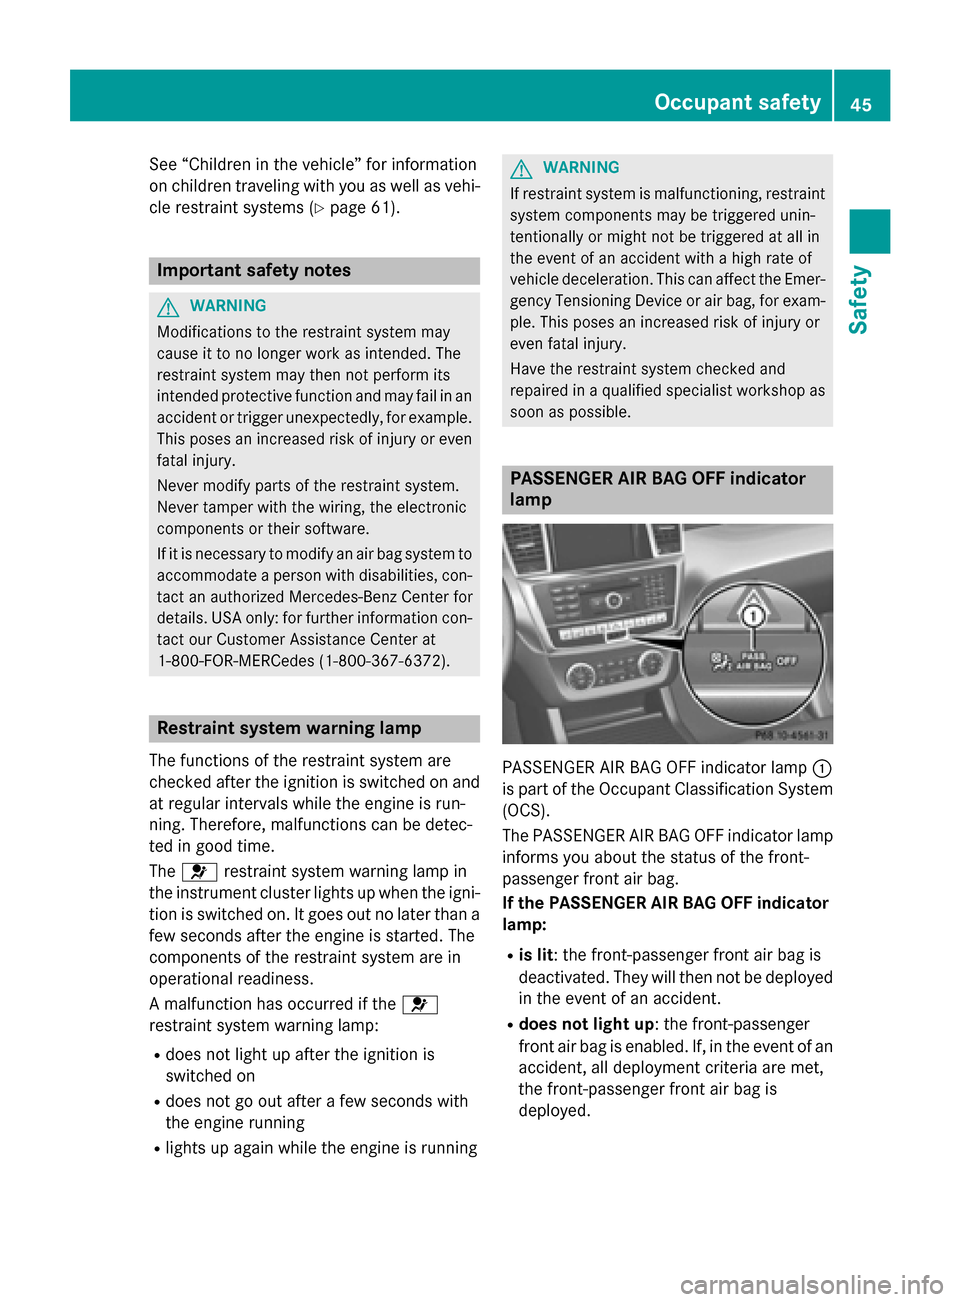
PASSENGER AIR BAG OFF indicator lamp
0043
is part of the Occupant Classification System (OCS).
The PASSENGER AIR BAG OFF indicator lamp
informs you about the status of the front-
passenger front air bag.
If the PASSENGER AIR BAG OFF indicator
lamp:
R is lit : the front-passenger front air bag is
deactivated. They will then not be deployed
in the event of an accident.
R does not light up: the front-passenger
front air bag is enabled. If, in the event of an
accident, all deployment criteria are met,
the front-passenger front air bag is
deployed. Occupant safety
45Safety Z
Page 52 of 462
continuously or flash. In addition, there may
be a warning tone.
Regardless of whether the driver's and front- passenger seat belts have already been fas-
tened, the 0076seat belt warning lamp lights
up for six seconds each time the engine is
started. If, after six seconds, the driver or
front-passenger seat belt has not been fas-
tened and the doors are closed, the 0076seat
belt warning lamp lights up. As soon as the
driver's and front-passenger seat belts are
fastened or a front door is opened again, the
0076 seat belt warning lamp goes out.
If the driver's seat belt is not fastened after
the engine is started, an additional warning
tone will sound. This warning tone stops after six seconds or when the driver's seat belt is
fastened.
If the vehicle's speed exceeds 15 mph
(25 km/h) once and the driver's and front-
passenger seat belts are not fastened, a
warning tone sounds. A warning tone also
sounds with increasing intensity for
60 seconds or until the driver or front
passenger have fastened their seat belts.
If the driver or front passenger unfasten their
seat belts during the journey, the seat belt
warning is activated again.
i For more information on the
0076seat
belt warning lamp, see "Warning and indi-
cator lamps in the instrument cluster, seat
belts" (Y page 327). Air bags
Introduction The installation point of an air bag can be rec-
ognized by the AIR BAG symbol.
An air bag complements the correctly fas-
tened seat belt. It is no substitute for the seat
belt. The air bag provides additional protec-
tion in applicable accident situations.
Not all air bags are deployed in an accident.
The different air bag systems function inde-
pendently from one another (Y page 58).However, no system available today can com-
pletely eliminate injuries and fatalities.
It is also not possible to rule out a risk of injury
caused by an air bag due to the high speed at which the air bag must be deployed.
Important safety notes G
WARNING
If you do not sit in the correct seat position,
the air bag cannot protect as intended and
could even cause additional injury when
deployed. This poses an increased risk of
injury or even fatal injury.
To avoid hazardous situations, always make
sure that all of the vehicle's occupants:
R have fastened their seat belts correctly,
including pregnant women
R are sitting correctly and maintain the great-
est possible distance to the air bags
R follow the following instructions
Always make sure that there are no objects
between the air bag and the vehicle's occu-
pants.
R Adjust the seats properly before beginning
your journey. Always make sure that the
seat is in an almost upright position. The
center of the head restraint must support
the head at about eye level.
R Move the driver's and front-passenger
seats as far back as possible. The driver's
seat position must allow the vehicle to be
driven safely.
R Only hold the steering wheel on the out-
side. This allows the air bag to be fully
deployed.
R Always lean against the backrest while driv-
ing. Do not lean forwards or lean against
the door or side window. You may other-
wise be in the deployment area of the air
bags.
R Always keep your feet in the footwell in
front of the seat. Do not put your feet on the
dashboard, for example. Your feet may oth- 50
Occupant safetySafety
Page 66 of 462
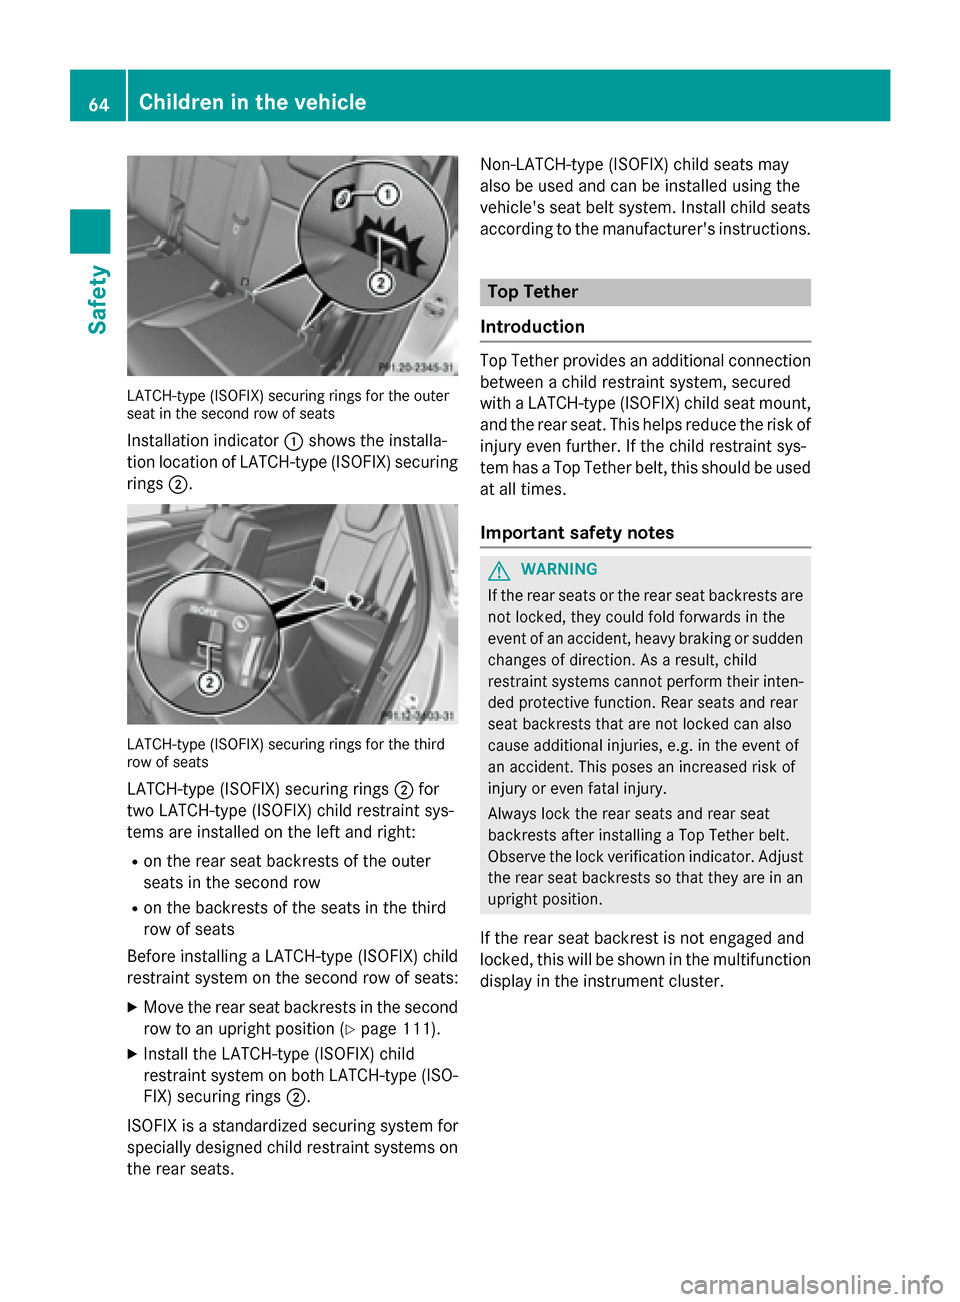
LATCH-type (ISOFIX) securing rings for the outer
seat in the second row of seats
Installation indicator 0043shows the installa-
tion location of LATCH-type (ISOFIX) securing rings 0044. LATCH-type (ISOFIX) securing rings for the third
row of seats
LATCH-type (ISOFIX) securing rings 0044for
two LATCH-type (ISOFIX) child restraint sys-
tems are installed on the left and right:
R on the rear seat backrests of the outer
seats in the second row
R on the backrests of the seats in the third
row of seats
Before installing a LATCH-type (ISOFIX) child
restraint system on the second row of seats:
X Move the rear seat backrests in the second
row to an upright position (Y page 111).
X Install the LATCH-type (ISOFIX) child
restraint system on both LATCH-type (ISO-
FIX) securing rings 0044.
ISOFIX is a standardized securing system for
specially designed child restraint systems on
the rear seats. Non-LATCH-type (ISOFIX) child seats may
also be used and can be installed using the
vehicle's seat belt system. Install child seats
according to the manufacturer's instructions. Top Tether
Introduction Top Tether provides an additional connection
between a child restraint system, secured
with a LATCH-type (ISOFIX) child seat mount,
and the rear seat. This helps reduce the risk of
injury even further. If the child restraint sys-
tem has a Top Tether belt, this should be used at all times.
Important safety notes G
WARNING
If the rear seats or the rear seat backrests are not locked, they could fold forwards in the
event of an accident, heavy braking or suddenchanges of direction. As a result, child
restraint systems cannot perform their inten-
ded protective function. Rear seats and rear
seat backrests that are not locked can also
cause additional injuries, e.g. in the event of
an accident. This poses an increased risk of
injury or even fatal injury.
Always lock the rear seats and rear seat
backrests after installing a Top Tether belt.
Observe the lock verification indicator. Adjust the rear seat backrests so that they are in an
upright position.
If the rear seat backrest is not engaged and
locked, this will be shown in the multifunction
display in the instrument cluster. 64
Children in the vehicleSafety
Page 70 of 462
Driving safety systems
Overview of driving safety systems
In this section, you will find information about the following driving safety systems:
R ABS (Anti-lock BrakingSystem)
(Y page 68)
R BAS (Brake Assist System) (Y page 69)
R BAS PLUS (Brake Assist System Plus)
(Y page 69)
R COLLISION PREVENTION ASSIST (distance
warning function and adaptive Brake
Assist) (Y page 70)
R ESP ®
(E lectronic StabilityProgram)
(Y page 73)
R EBD (Electronic Brake forceDistribution)
(Y page 75)
R ADAPTIVE BRAKE (Y page 76)
R PRE-SAFE ®
Brake (Y page 76)
R STEER CONTROL (Y page 77)Important safety notes
If you fail to adapt your driving style or
become distracted, the driving safety sys-
tems can neither reduce the risk of accident
nor override the laws of physics. Driving
safety systems are merely aids designed to
assist driving. You are responsible for the dis-
tance to the vehicle in front, for vehicle speed and for braking in good time. Always adapt
your driving style to suit the prevailing road
and weather conditions and maintain a safe
distance from the vehicle in front. Drive care-
fully.
i The driving safety systems described only
work as effectively as possible when there
is adequate contact between the tires and
the road surface. Please pay special atten- tion to the notes on tires, recommended
minimum tire tread depths, etc.
(Y page 406).
In wintry driving conditions, always use
winter tires (M+S tires) and if necessary, snow chains. Only in this way will the driv-
ing safety systems described in this section
work as effectively as possible. ABS (Anti-lock Braking System)
General information ABS regulates brake pressure in such a way
that the wheels do not lock when you brake.
This allows you to continue steering the vehi- cle when braking.
The 0025 ABS warning lamp in the instrument
cluster lights up when the ignition is switched on. It goes out when the engine is running.
Important safety notes i
Observe the "Important safety notes" sec-
tion (Y page 68). G
WARNING
If ABS is faulty, the wheels could lock when
braking. The steerability and braking charac-
teristics may be severely impaired. Addition-
ally, further driving safety systems are deac-
tivated. There is an increased danger of skid- ding and accidents.
Drive on carefully. Have ABS checked imme-
diately at a qualified specialist workshop.
When ABS is malfunctioning, other systems,
including driving safety systems, will also
become inoperative. Observe the information on the ABS warning lamp (Y page 328) and
display messages which may be shown in the
instrument cluster (Y page 293).
ABS works from a speed of about 5 mph
(8 km/ h), regardless of road-surface condi-
tions. ABS works on slippery surfaces, even
when you only brake gently. 68
Driving safety systemsSafety
Page 73 of 462
G
WARNING
The distance warning function does not react:
R to people or animals
R to oncoming vehicles
R to crossing traffic
R when cornering
Thus, the distance warning function cannot
provide a warning in all critical situations.
There is a risk of an accident.
Always pay careful attention to the traffic sit-
uation and be ready to brake. G
WARNING
The distance warning function cannot always
clearly identify objects and complex traffic
situations.
In such cases, the distance warning function
may:
R give an unnecessary warning
R not give a warning
There is a risk of an accident.
Always pay careful attention to the traffic sit-
uation and do not rely solely on the distance
warning function.
Function X To activate/deactivate: activate or deac-
tivate the distance warning function in the
on-board computer (Y page 283).
If the distance warning function is not activa-
ted, the 00D4symbol appears in the assis-
tance graphics display.
The distance warning function can help you to minimize the risk of a front-end collision with
a vehicle ahead or reduce the effects of such
a collision. If the distance warning function
detects that there is a risk of a collision, you
will be warned visually and acoustically. The
distance warning function cannot prevent a
collision without your intervention.
Starting at a speed of around 4 mph (7 km/h),
the distance warning function warns you if
you rapidly approach a vehicle in front. An
intermittent warning tone will then sound, and the
00BAdistance warning lamp will light
up in the instrument cluster.
X Brake immediately in order to increase the
distance from the vehicle in front.
or
X Take evasive action, provided it is safe to do
so.
Due to the nature of the system, particularly
complicated but non-critical driving condi-
tions may also cause the system to display a
warning.
With the help of the radar sensor system, the
distance warning function can detect obsta-
cles that are in the path of your vehicle for an extended period of time.
Up to a speed of about 40 mph (70 km/h), the
distance warning function can also react to
stationary obstacles, such as stopped or
parked vehicles.
If you approach an obstacle and the distance
warning function detects a risk of a collision, the system will initially alert you both visually
and acoustically.
In particular, the detection of obstacles can
be impaired if:
R dirt on the sensors or anything else cover-
ing the sensors
R there is snow or heavy rain
R there is interference by other radar sources
R there are strong radar reflections, for
example in parking garages
R a narrow vehicle traveling in front, e.g. a
motorbike
R a vehicle traveling in front on a different line
relative to the center of your vehicle
R new vehicles or after the COLLISION PRE-
VENTION ASSIST system has been serv-
iced
Observe the notes in the section on break-
ing-in (Y page 166).
Following damage to the front end of the vehi- cle, have the configuration and operation of
the radar sensor checked at a qualified spe-
cialist workshop. This also applies to colli- Driving safety systems
71Safety Z
Page 75 of 462
R
a vehicle traveling in front on a different line
relative to the center of your vehicle
R new vehicles or after the COLLISION PRE-
VENTION ASSIST system has been serv-
iced
Observe the notes in the section on break- ing-in (Y page 166).
Following damage to the front end of the vehi-
cle, have the configuration and operation of
the radar sensor checked at a qualified spe-
cialist workshop. This also applies to colli-
sions at low speeds where there is no visible
damage to the front of the vehicle. ESP
®
(Electronic Stability Program)
General notes i
Observe the "Important safety notes" sec-
tion (Y page 68).
ESP ®
monitors driving stability and traction,
i.e. power transmission between the tires and
the road surface.
If ESP ®
detects that the vehicle is deviating
from the direction desired by the driver, one
or more wheels are braked to stabilize the
vehicle. The engine output is also modified to keep the vehicle on the desired course within
physical limits. ESP ®
assists the driver when
pulling away on wet or slippery roads. ESP ®
can also stabilize the vehicle during braking.
ETS/4ETS (Electronic Traction System) 4ETS traction control is part of ESP
®
.
Traction control brakes the drive wheels indi-
vidually if they spin. This enables you to pull
away and accelerate on slippery surfaces, for
example if the road surface is slippery on one
side. In addition, more drive torque is trans-
ferred to the wheel or wheels with traction.
Traction control remains active, even if you
deactivate ESP ®
.
In appropriate driving situations, activate the
off-road program (Y page 259). Off-road 4ETS (Electronic Traction Sys-
tem) A 4ETS system specifically suited to off-road
terrain is activated automatically once the off-
road program is activated (Y page 259).
Important safety notes G
WARNING
If ESP ®
is malfunctioning, ESP ®
is unable to
stabilize the vehicle. Additionally, further driv- ing safety systems are deactivated. This
increases the risk of skidding and an accident.
Drive on carefully. Have ESP ®
checked at a
qualified specialist workshop.
! Only operate the vehicle for a maximum of
ten seconds on a brake test dynamometer.
Switch off the ignition.
Application of the brakes by ESP ®
may oth-
erwise destroy the brake system.
! A function or performance test should
only be carried out on a two-axle dyna-
mometer. Before you operate the vehicle
on such a dynamometer, please consult a
qualified workshop. You could otherwise
damage the drive train or the brake system.
ESP ®
is deactivated if the 00BBwarning lamp
in the instrument cluster lights up continu-
ously when the engine is running.
If the 00E5 warning lamp and the 00BBwarn-
ing lamp are lit continuously, ESP ®
is not
available due to a malfunction.
Observe the information on warning lamps
(Y page 331) and display messages which
may be shown in the instrument cluster
(Y page 293).
i Only use wheels with the recommended
tire sizes. Only then will ESP ®
function
properly. Driving safety systems
73Safety Z
Page 76 of 462
Characteristics of ESP
®General information
If the
00E5 ESP warning lamp goes out before
beginning the journey, ESP ®
is automatically
active.
If ESP ®
intervenes, the 00E5ESP®
warning
lamp flashes in the instrument cluster.
If ESP ®
intervenes:
X Do not deactivate ESP ®
under any circum-
stances.
X Only depress the accelerator pedal as far as
necessary when pulling away.
X Adapt your driving style to suit the prevail-
ing road and weather conditions.
ECO start/stop function
The ECO start/stop function switches the
engine off automatically when the vehicle
stops moving. The engine starts automati-
cally when the driver wants to pull away again.
ESP ®
remains in its previously selected sta-
tus. Example: if ESP®
was deactivated before
the engine was switched off, ESP ®
remains
deactivated when the engine is switched on
again.
Deactivating/activating ESP ®Important safety notes
You can select between the following states
of ESP ®
:
R ESP ®
is activated.
R ESP ®
is deactivated. G
WARNING
If you deactivate ESP ®
, ESP ®
no longer sta-
bilizes the vehicle. There is an increased risk
of skidding and an accident.
Only deactivate ESP ®
in the situations descri-
bed in the following. It may be best to deactivate ESP
®
in the fol-
lowing situations:
R when using snow chains
R in deep snow
R on sand or gravel
i Activate ESP ®
as soon as the situations
described above no longer apply. ESP ®
will
otherwise not be able to stabilize the vehi-
cle if the vehicle starts to skid or a wheel
starts to spin.
! Avoid spinning the driven wheels for an
extended period with ESP ®
deactivated.
You could otherwise damage the drivetrain.
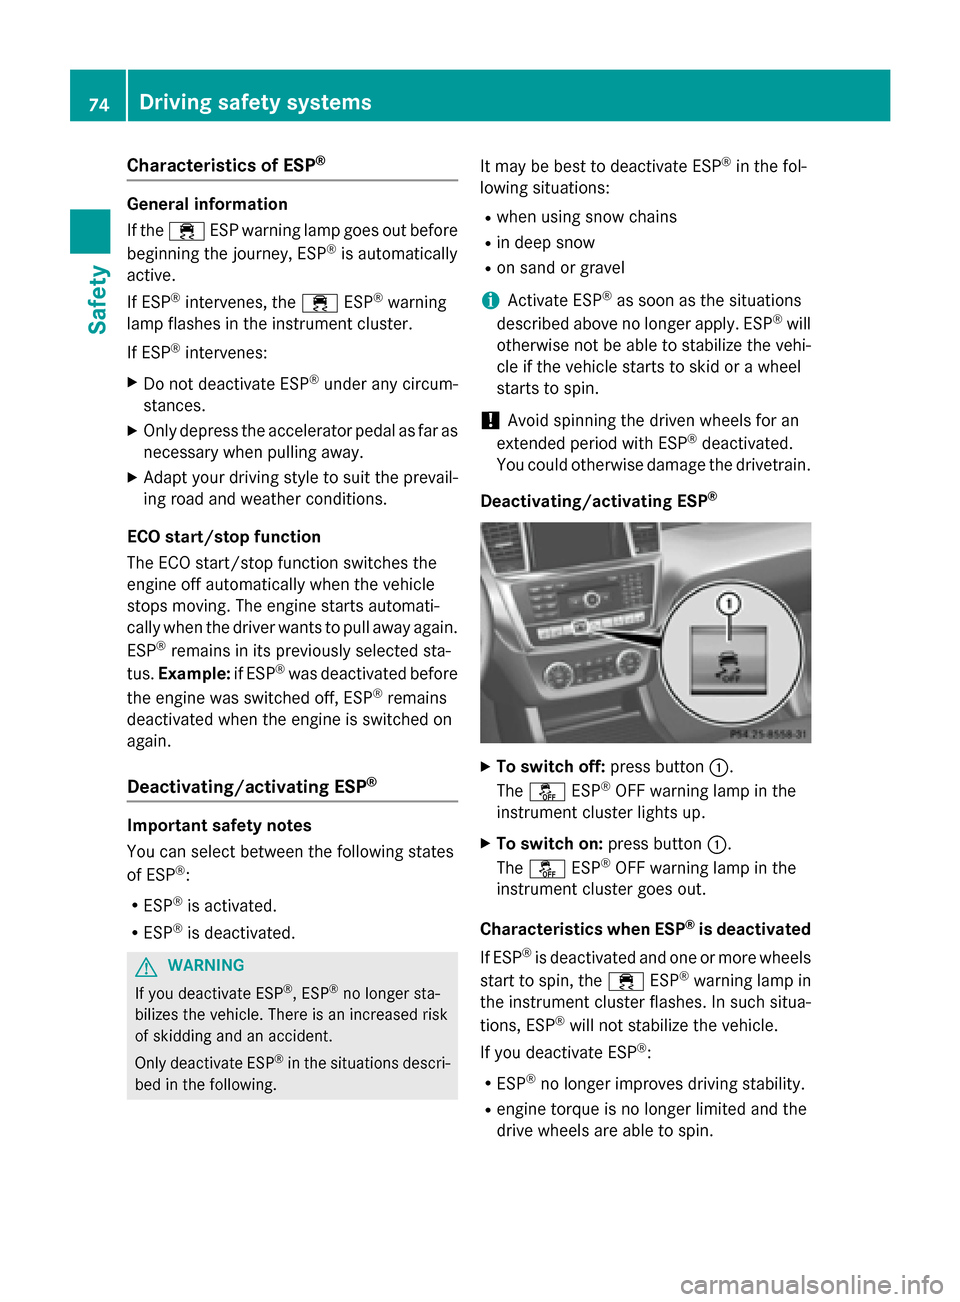
Deactivating/activating ESP ® X
To switch off: press button0043.
The 00BB ESP®
OFF warning lamp in the
instrument cluster lights up.
X To switch on: press button0043.
The 00BB ESP®
OFF warning lamp in the
instrument cluster goes out.
Characteristics when ESP ®
is deactivated
If ESP ®
is deactivated and one or more wheels
start to spin, the 00E5ESP®
warning lamp in
the instrument cluster flashes. In such situa-
tions, ESP ®
will not stabilize the vehicle.
If you deactivate ESP ®
:
R ESP ®
no longer improves driving stability.
R engine torque is no longer limited and the
drive wheels are able to spin. 74
Driving safety systemsSafety
Page 79 of 462
R
a narrow vehicle traveling in front, e.g. a
motorbike
R a vehicle traveling in front on a different line
relative to the center of your vehicle
Following damage to the front end of the vehi-
cle, have the configuration and operation of
the radar sensors checked at a qualified spe-
cialist workshop. This also applies to colli-
sions at low speeds where there is no visible
damage to the front of the vehicle.
Function X
To activate/deactivate: activate or deac-
tivate PRE-SAFE ®
Brake in the on-board
computer (Y page 284).
If the PRE-SAFE ®
Brake is not activated, the
00D4 symbol appears in the multifunction
display.
Starting at a speed of around 4 mph (7 km/h),
this function warns you if you rapidly
approach a vehicle in front. An intermittent
warning tone will then sound and the 00BA
distance warning lamp will light up in the
instrument cluster.
X Brake immediately to defuse the situation.
or X Take evasive action provided it is safe to do
so.
PRE-SAFE ®
Brake can also brake the vehicle
automatically under the following conditions:
R the driver and front-passenger have their
seat belts fastened
and
R the vehicle speed is between approx-
imately 4 mph (7 km/h) and 124 mph
(200 km/h)
At speeds of up to approximately 40 mph
(70 km/h) PRE-SAFE ®
Brake can also detect
stationary objects. Examples of stationary
objects are stopped or parked vehicles.
i If there is an increased risk of collision,
preventive passenger protection measures
(PRE-SAFE ®
) are activated. If the risk of collision with the vehicle in front
remains and you do not brake, take evasive
action or accelerate significantly, the vehicle
may perform automatic emergency braking,
up to the point of full brake application. Auto-
matic emergency braking is not performed
until immediately prior to an imminent acci-
dent.
You can prevent the intervention of the PRE-
SAFE ®
Brake at any time by:
R depressing the accelerator pedal further.
R activating kickdown.
R releasing the brake pedal.
The braking action of PRE-SAFE ®
Brake is
ended automatically if:
R you maneuver to avoid the obstacle.
R there is no longer any danger of a collision.
R there is no longer an obstacle detected in
front of your vehicle.
If you have activated DSR (Y page 258), PRE-
SAFE ®
Brake is deactivated. STEER CONTROL
General information STEER CONTROL helps you by transmitting a
noticeable steering force to the steering
wheel in the direction required for vehicle
stabilization.
This steering assistance is provided in partic-
ular if:
R both right wheels or both left wheels are on
a wet or slippery road surface when you
brake.
R the vehicle starts to skid.
Important safety notes i
Observe the "Important safety notes" sec-
tion (Y page 68). Driving safety systems
77Safety Z
Page 130 of 462
Useful information
i This Operator's Manual describes all
models and all standard and optional equip- ment of your vehicle available at the time of
publication of the Operator's Manual.
Country-specific differences are possible.
Please note that your vehicle may not be
equipped with all features described. This
also applies to safety-related systems and
functions.
i Read the information on qualified special-
ist workshops (Y page 29). Exterior lighting
General notes
For reasons of safety, Mercedes-Benz recom- mends that you drive with the lights switchedon even during the daytime. In some coun-
tries, operation of the headlamps varies due
to legal requirements and self-imposed obli-
gations. Driving abroad
Conversion to symmetrical low beam Switch the headlamps to symmetrical low
beam in countries in which traffic drives on
the opposite side of the road from the country
where the vehicle is registered. This prevents glare to oncoming traffic. When using sym-
metrical lights, the edge of the road is not lit
as widely and as far ahead as normal.
Have the headlamps converted at a qualified
specialist workshop as close to the border as
possible before driving in these countries.
Conversion to asymmetrical low beam
after returning Have the headlamps converted back to asym-
metrical low-beam headlamps at a qualified
specialist workshop as soon as possible after crossing the border again. Setting the exterior lighting
Setting options Exterior lighting can be set using:
R the light switch
R the combination switch (Y page 131)
R the on-board computer (Y page 285)
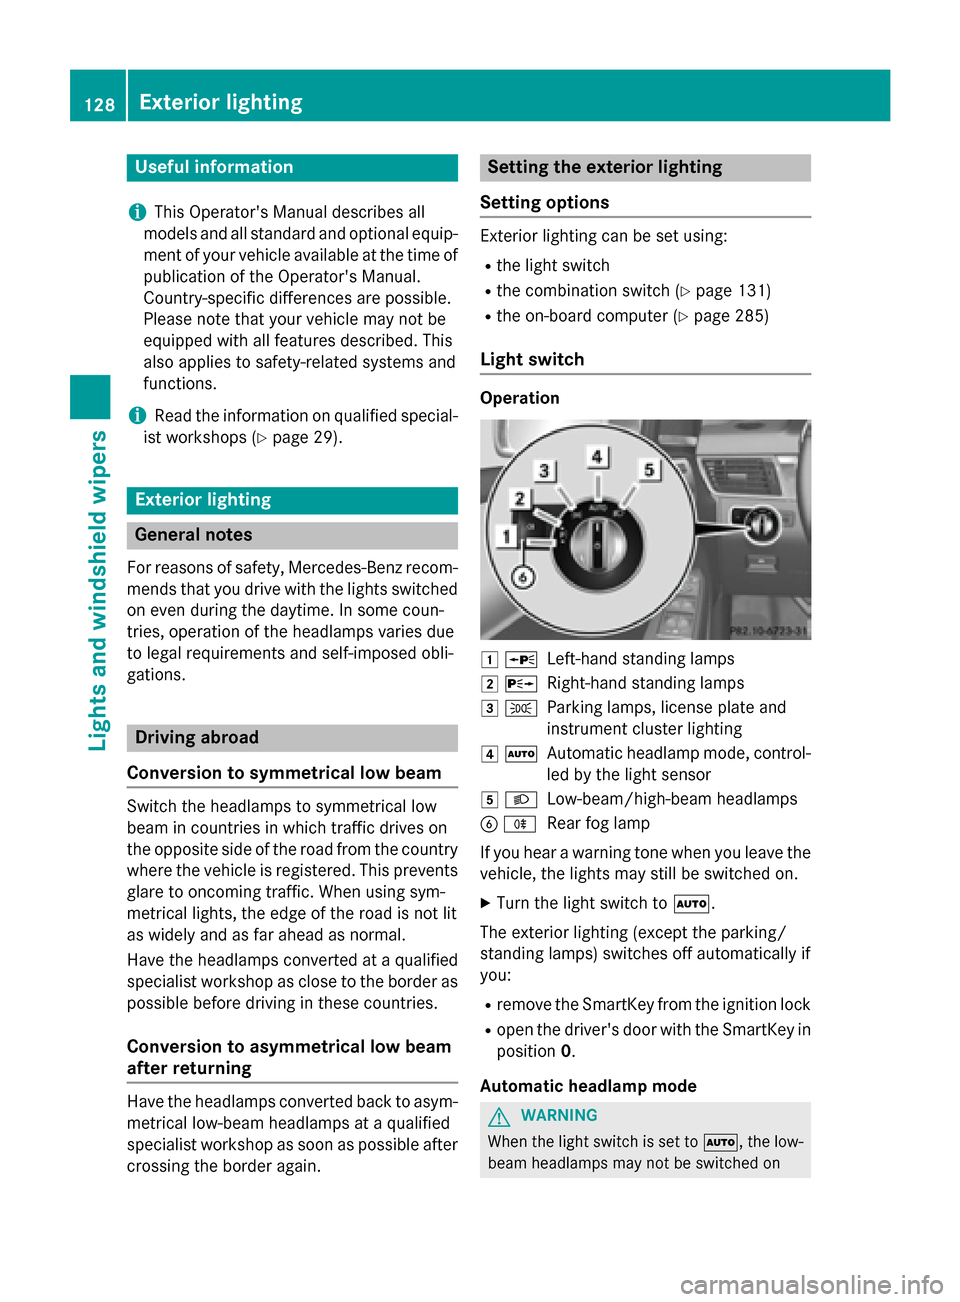
Light switch Operation
0047
0063
Left-hand standing lamps
0048 0064
Right-hand standing lamps
0049 0060
Parking lamps, license plate and
instrument cluster lighting
004A 0058
Automatic headlamp mode, control-
led by the light sensor
004B 0058
Low-beam/high-beam headlamps
0084 005E
Rear fog lamp
If you hear a warning tone when you leave the
vehicle, the lights may still be switched on.
X Turn the light switch to 0058.
The exterior lighting (except the parking/
standing lamps) switches off automatically if
you: R remove the SmartKey from the ignition lock
R open the driver's door with the SmartKey in
position 0.
Automatic headlamp mode G
WARNING
When the light switch is set to 0058, the low-
beam headlamps may not be switched on 128
Exterior lightingLights and windshield wipers
Page 131 of 462
automatically if there is fog, snow or other
causes of poor visibility due to the weather
conditions such as spray. There is a risk of an
accident.
In such situations, turn the light switch to
0058.
The automatic headlamp feature is only an
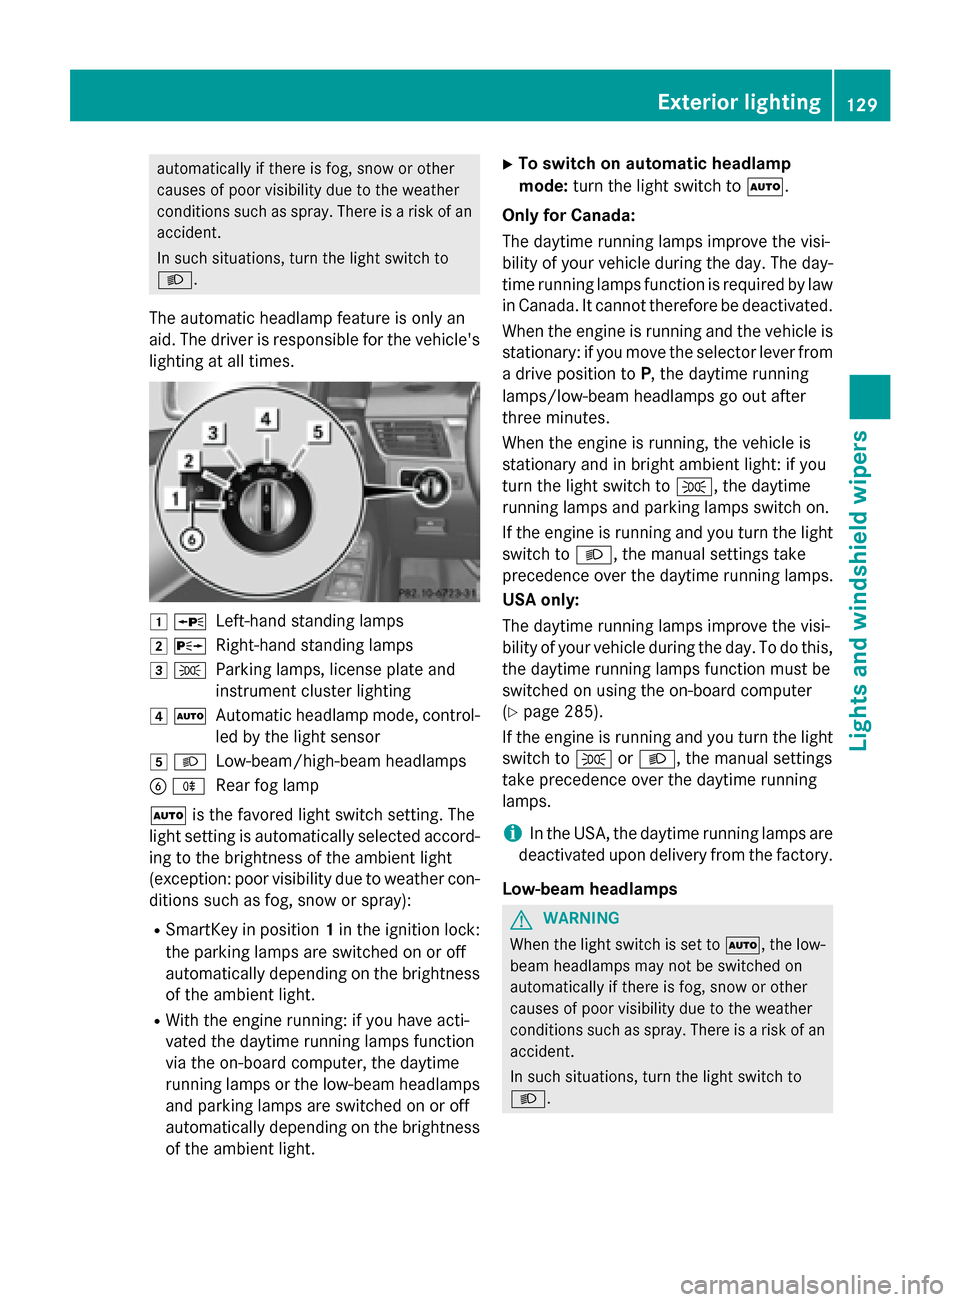
aid. The driver is responsible for the vehicle's lighting at all times. 0047
0063
Left-hand standing lamps
0048 0064
Right-hand standing lamps
0049 0060
Parking lamps, license plate and
instrument cluster lighting
004A 0058
Automatic headlamp mode, control-
led by the light sensor
004B 0058
Low-beam/high-beam headlamps
0084 005E
Rear fog lamp
0058 is the favored light switch setting. The
light setting is automatically selected accord- ing to the brightness of the ambient light
(exception: poor visibility due to weather con-
ditions such as fog, snow or spray):
R SmartKey in position 1in the ignition lock:
the parking lamps are switched on or off
automatically depending on the brightness of the ambient light.
R With the engine running: if you have acti-
vated the daytime running lamps function
via the on-board computer, the daytime
running lamps or the low-beam headlamps and parking lamps are switched on or off
automatically depending on the brightnessof the ambient light. X
To switch on automatic headlamp
mode: turn the light switch to 0058.
Only for Canada:
The daytime running lamps improve the visi-
bility of your vehicle during the day. The day- time running lamps function is required by lawin Canada. It cannot therefore be deactivated.
When the engine is running and the vehicle is
stationary: if you move the selector lever from a drive position to P, the daytime running
lamps/low-beam headlamps go out after
three minutes.
When the engine is running, the vehicle is
stationary and in bright ambient light: if you
turn the light switch to 0060, the daytime
running lamps and parking lamps switch on.
If the engine is running and you turn the light
switch to 0058, the manual settings take
precedence over the daytime running lamps.
USA only:
The daytime running lamps improve the visi-
bility of your vehicle during the day. To do this,
the daytime running lamps function must be
switched on using the on-board computer
(Y page 285).
If the engine is running and you turn the light
switch to 0060or0058, the manual settings
take precedence over the daytime running
lamps.
i In the USA, the daytime running lamps are
deactivated upon delivery from the factory.
Low-beam headlamps G
WARNING
When the light switch is set to 0058, the low-
beam headlamps may not be switched on
automatically if there is fog, snow or other
causes of poor visibility due to the weather
conditions such as spray. There is a risk of an
accident.
In such situations, turn the light switch to
0058. Exterior lighting
129Lights and windshield wipers Z