Trailer MERCEDES-BENZ GL-Class 2015 X166 User Guide
[x] Cancel search | Manufacturer: MERCEDES-BENZ, Model Year: 2015, Model line: GL-Class, Model: MERCEDES-BENZ GL-Class 2015 X166Pages: 462, PDF Size: 9.09 MB
Page 22 of 462
Telephone
Accepting a call ............................. 282
Display message ............................ 325
Menu (on-board computer) ............ 281
Number from the phone book ........ 282
Redialing ........................................ 282
Rejecting/ending a call ................. 282
Temperature
Coolant .......................................... 274
Coolant (on-board computer) ......... 289
Engine oil (on-board computer) ...... 289
Outside temperature ...................... 275
Setting (climate control) ................ 157
Theft deterrent systems
ATA (Anti-Theft Alarm system )......... 78
Immobilizer ...................................... 78
Through-loading ................................ 345
Time see separate operating instructions
Timing (RACETIMER) ......................... 290
TIREFIT kit .......................................... 390
Tire pressure Calling up (on-board computer) ..... 414
Checking manually ........................ 413
Display message ............................ 320
Important safety notes .................. 414
Maximum ....................................... 412
Notes ............................................. 411
Not reached (TIREFIT) .................... 392
Reached (TIREFIT) .......................... 392
Recommended ............................... 410
Tire pressure loss warning sys-
tem
General notes ................................ 413
Important safety notes .................. 413
Restarting ...................................... 414
Tire pressure monitor
Checking the tire pressure elec-
tronically ........................................ 416
Function/note s............................. 414
General notes ................................ 414
Important safety notes .................. 415
Radio type approval for the tire
pressure monitor ........................... 417
Restarting ...................................... 417
Warning lamp ................................. 339
Warning message .......................... 416 Tires
Aspect ratio (definition) ................. 428
Average weight of the vehicle
occupants (definition) .................... 427
Bar (definition) ............................... 426
Changing a whee l.......................... 429
Characteristics .............................. 426
Checking ........................................ 407
Curb weight (definition) ................. 428
Definition of terms ......................... 426
Direction of rotation ...................... 429
Display message ............................ 320
Distribution of the vehicle occu-
pants (definition) ............................ 429
DOT, Tire Identification Number
(TIN) ............................................... 426
DOT (Department of Transporta-
tion) (definition) ............................. 427
GAWR (Gross Axle Weight Rating)
(definition) ..................................... 427
GTW (Gross Trailer Weight) (defi-
nition) ............................................ 427
GVW (Gross Vehicle Weight) (def-
inition) ........................................... 427
GVWR (Gross Vehicle Weight Rat-
ing) (definition) .............................. 427
Important safety notes .................. 406
Increased vehicle weight due to
optional equipment (definition) ...... 427
Kilopascal (kPa) (definition) ........... 427
Labeling (overview) ........................ 423
Load bearing index (definition) ...... 428
Load index ..................................... 425
Load index (definition) ................... 427
M+S tire s....................................... 408
Maximum loaded vehicle weight
(definition) ..................................... 427
Maximum load on a tire (defini-
tion) ............................................... 428
Maximum permissible tire pres-
sure (definition) ............................. 428
Maximum tire load ......................... 425
Maximum tire load (definition) ....... 428
MOExtended tire s.......................... 408
Optional equipment weight (defi-
nition) ............................................ 428
PSI (pounds per square inch) (def-
inition) ........................................... 428 20
Index
Page 23 of 462
Replacin
g ...................................... .429
Service life ..................................... 408
Sidewall (definition) ....................... 428
Speed rating (definition) ................ 427
Storing .......................................... .430
Structure and characteristics
(definition) ..................................... 426
Temperature .................................. 422
TIN (Tire Identification Number)
(definition) ..................................... 428
Tire bead (definition) ..................... .428
Tire pressure (definition) ................ 428
Tire pressures (recommended) ...... 427
Tire size (data) ............................... 434
Tire size designation, load-bearing capacity, speed rating .................... 423
Tire tread ....................................... 407
Tire tread (definition) ..................... 428
Total load limit (definition) ............. 429
Traction ......................................... 422
Traction (definition) ....................... 428
Tread wea r..................................... 422
TWR (permissible trailer drawbar
noseweight) (definition) ................. 428
Uniform Tire Quality Grading
Standards ...................................... 421
Uniform Tire Quality Grading
Standards (definition) .................... 427
Wear indicator (definition) ............. 429
Wheel and tire combination ........... 436
Wheel rim (definition) .................... 427
see Flat tire
Tool
see Vehicle tool kit
Top Tether ............................................ 64
Towing a trailer Active Parking Assist ..................... 232
Axle load, permissibl e.................... 459
Cleaning the trailer tow hitch ......... 382
Coupling up a traile r...................... 267
Decoupling a traile r....................... 269
Driving tips .................................... 265
ESP ®
(Electronic Stability Pro-
gram) ............................................... 75
Important safety notes .................. 264
Installing the ball coupling ............. 266
Mounting dimensions .................... 458 Power supply ................................. 271
Pulling away with a traile
r.............. 171
Removing the ball coupling ............ 270
Storing the ball coupling ................ 270
Trailer drive progra m..................... 257
Trailer load s................................... 459
Towing away
Important safety guidelines ........... 399
Installing the towing eye ................ 400
Removing the towing eye ............... 401
With both axles on the ground ....... 401
With the rear axle raised ................ 401
Tow-starting
Emergency engine starting ............ 402
Important safety notes .................. 399
Trailer coupling
see Towing a trailer
Trailer loads and drawbar nose-
weights ............................................... 270
Trailer towing Active Blind Spot Assist ................. 252
Active Lane Keeping Assist ............ 255
Blind Spot Assist ............................ 247
PARKTRONIC ................................. 227
Permissible trailer loads and
drawbar noseweights ..................... 270
Transfer case ..................................... 185
Transmission see Automatic transmission
Transmission position display ......... 176
Transmission position display
(DIRECT SELECT lever) ...................... 176
Transporting the vehicle .................. 401
Traveling uphill Brow of hill ..................................... 203
Driving downhill ............................. 203
Maximum gradient-climbing capa-
bility ............................................... 203
Trim pieces (cleaning instruc-
tions) .................................................. 384
Trip computer (on-board com-
puter) .................................................. 277
Trip odometer Calling up ....................................... 277
Resetting (on-board computer) ...... 278
Trunk
see Tailgate Index
21
Page 77 of 462
The spinning of the wheels results in a cut-
ting action for better traction on loose sur-faces.
R traction control is still activated.
R ESP ®
still provides support when you
brake.
Off-road ESP ®
(vehicles with Off-Road
Engineering package) An ESP
®
system specifically suited to off-road
terrain is activated automatically once the off-
road program is activated (Y page 259).
Off-road ESP ®
intervenes with a delay if there
is oversteering or understeering, thus improv- ing traction.
ESP ®
trailer stabilization General information
ESP
®
trailer stabilization is not available in
AMG vehicles.
If your vehicle/trailer combination begins to
swerve, ESP ®
assists you in this situation.
ESP ®
slows the vehicle down by braking and
limiting the engine output until the vehicle/
trailer combination has stabilized.
Important safety notes G
WARNING
If road and weather conditions are poor,
trailer stabilization will not be able to prevent the vehicle/trailer combination from swerv-
ing. Trailers with a high center of gravity can
tip over before ESP ®
can detect this. There is
a risk of an accident.
Always adapt your driving style to the prevail- ing road and weather conditions.
If your vehicle with trailer (vehicle/trailer
combination) begins to lurch, you can only
stabilize the vehicle/trailer combination by
depressing the brake firmly.
Trailer stabilisation is active above speeds of
about 37 mph (60 km/h). ESP
®
trailer stabilization does not work if
ESP ®
is deactivated or disabled because of a
malfunction.
Crosswind Assist General information
Strong crosswinds can cause your vehicle to
deviate from a straight course. The crosswind
driving assistance function integrated into
ESP ®
significantly reduces these effects.
ESP ®
intervenes automatically according to
the direction and intensity of the crosswinds
affecting your vehicle.
ESP stabilities the vehicle with braking inter-
ventions to assist you in keeping the vehicle
in the lane.
Crosswind Assist is active at vehicle speeds
above 50 mph (80 km/h) when driving
straight ahead or cornering gently.
Important safety notes
Crosswind Assist does not work if ESP ®
is
deactivated or disabled because of a mal-
function. EBD (Electronic Brake force Distribu-
tion)
General information EBD monitors and controls the brake pres-
sure on the rear wheels to improve driving
stability while braking.
Important safety notes i
Observe the "Important safety notes" sec-
tion for driving safety systems (Y page 68). G
WARNING
If EBD has malfunctioned, the rear wheels can still lock, e.g. under full braking. This increa-
ses the risk of skidding and an accident.
You should therefore adapt your driving style
to the different handling characteristics. Have Driving safety systems
75Safety
Z
Page 167 of 462
Useful information
............................166
Notes on breaking-in a new vehicle ............................................................. 166
Driving ............................................... 166
Automatic transmission ...................176
Refueling ............................................ 185
Parking ............................................... 190
Driving tips ........................................ 194
Driving systems ................................ 203
Towing a trailer ................................. 264 165Driving and parking
Page 173 of 462
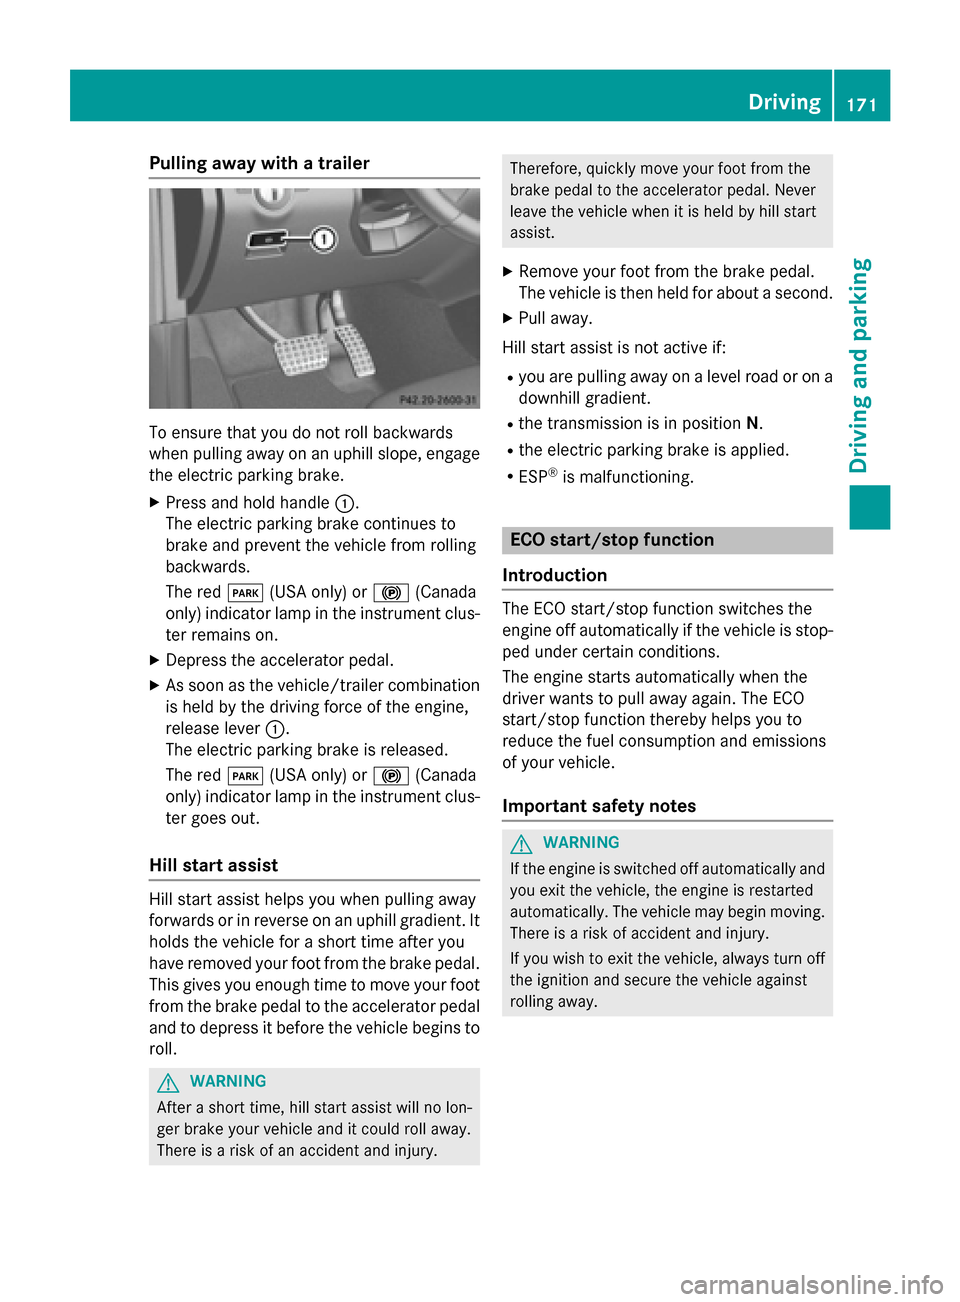
Pulling away with a trailer
To ensure that you do not roll backwards
when pulling away on an uphill slope, engage
the electric parking brake.
X Press and hold handle 0043.
The electric parking brake continues to
brake and prevent the vehicle from rolling
backwards.
The red 0049(USA only) or 0024(Canada
only) indicator lamp in the instrument clus-
ter remains on.
X Depress the accelerator pedal.
X As soon as the vehicle/trailer combination
is held by the driving force of the engine,
release lever 0043.
The electric parking brake is released.
The red 0049(USA only) or 0024(Canada
only) indicator lamp in the instrument clus-
ter goes out.
Hill start assist Hill start assist helps you when pulling away
forwards or in reverse on an uphill gradient. It
holds the vehicle for a short time after you
have removed your foot from the brake pedal. This gives you enough time to move your foot
from the brake pedal to the accelerator pedal and to depress it before the vehicle begins to
roll. G
WARNING
After a short time, hill start assist will no lon-
ger brake your vehicle and it could roll away.
There is a risk of an accident and injury. Therefore, quickly move your foot from the
brake pedal to the accelerator pedal. Never
leave the vehicle when it is held by hill start
assist.
X Remove your foot from the brake pedal.
The vehicle is then held for about a second.
X Pull away.
Hill start assist is not active if: R you are pulling away on a level road or on a
downhill gradient.
R the transmission is in position N.
R the electric parking brake is applied.
R ESP ®
is malfunctioning. ECO start/stop function
Introduction The ECO start/stop function switches the
engine off automatically if the vehicle is stop-
ped under certain conditions.
The engine starts automatically when the
driver wants to pull away again. The ECO
start/stop function thereby helps you to
reduce the fuel consumption and emissions
of your vehicle.
Important safety notes G
WARNING
If the engine is switched off automatically and you exit the vehicle, the engine is restarted
automatically. The vehicle may begin moving. There is a risk of accident and injury.
If you wish to exit the vehicle, always turn off
the ignition and secure the vehicle against
rolling away. Driving
171Driving and parking Z
Page 181 of 462
0044 Neutral
Do not shift the transmission to
N
while driving. Otherwise, the auto-
matic transmission could be dam-
aged.
No power is transmitted from the
engine to the drive wheels.
Releasing the brake pedal will allow
you to move the vehicle freely, e.g. to push it or tow it.
If ESP ®
is deactivated or faulty:
only shift the transmission to posi-
tion Nif the vehicle is in danger of
skidding, e.g. on icy roads.
If you switch off the engine using
the SmartKey or the Start/Stop
button, the automatic transmission shifts to neutral Nautomatically.
! Rolling in neutral
Ncan damage
the drive train. 003A Drive
The automatic transmission
changes gear automatically. All
forward gears are available.
Driving tips
Changing gear The automatic transmission shifts to the indi-
vidual gears automatically when it is in trans-
mission position D. This automatic gear shift-
ing behavior is determined by:
R the selected drive program (Y page 180)
R the position of the accelerator pedal
(Y page 179)
R the road speed
Accelerator pedal position Your style of driving influences how the auto-
matic transmission shifts gear:
R little throttle: early upshifts
R more throttle: late upshifts Kickdown Use kickdown for maximum acceleration.
X Depress the accelerator pedal beyond the
pressure point.
The automatic transmission shifts to a
lower gear depending on the engine speed.
X Ease off the accelerator pedal once the
desired speed is reached.
The automatic transmission shifts back up.
Rocking the vehicle free Shifting the transmission repeatedly between
gears Dand Rmay help to free the vehicle if it
has become stuck in slush or snow. The vehi-
cle's engine management system limits the
speed to a maximum of 5 mph (9 km/h) when shifting back and forth. To shift back and forth
between transmission positions Dand R,
move the DIRECT SELECT lever up and down past the point of resistance.
Towing a trailer X
Drive in the middle of the engine speed
range on uphill gradients.
X Depending on the uphill or downhill gradi-
ent, use left-hand steering wheel paddle
shifter (Y page 180) to select a lower gear,
even if cruise control or DISTRONIC PLUS
are activated. Automatic transmission
179Driving and parking Z
Page 205 of 462
R
When driving down an incline, make use of
the engine's braking effect. Observe the
engine speed; do not overrev the engine.
R Before driving on extreme uphill and down-
hill gradients, select the LOW RANGE off-
road gear (Y page 261).
R Drive slowly.
R Avoid high engine speeds. Drive at appro-
priate engine speeds (maximum
3,000 rpm).
R Use the left-hand paddle shifter to shift into
a lower gear in good time on long and steep
downhill gradients.
R Check the brakes after prolonged off-road
driving.
i Hill start assist will aid you when pulling
away on a hill.
For further information about hill start
assist, see (Y page 171).
Do not switch to transmission position N
when driving off-road. If you try to brake the
vehicle using the service brake, you could
lose control of the vehicle. If the gradient is
too steep for your vehicle, drive back down in
reverse gear.
Always observe the approach/departure
angle values (Y page 457).
Maximum gradient-climbing capability Always observe the maximum gradient climb-
ing ability values (Y page 457).
Hilltops When driving up an uphill gradient, slightly
reduce pressure on the accelerator immedi-
ately before reaching the brow of the hill. Use
the vehicle's own impetus to drive over the
top of the hill.
This style of driving prevents:
R the vehicle from lifting off the ground on the
brow of a hill
R the vehicle from traveling too quickly down
the other side Driving downhill R
Drive slowly.
R Do not drive at an angle down steep
inclines. Steer into the line of fall and drive
with the front wheels aligned straight. Oth- erwise, the vehicle could slip sideways, tip
and rollover.
R Shift to a lower gear using the left-hand
paddle shifter before tackling steep down-
hill gradients.
R Activate DSR. If this is not sufficient, brake
gently. When doing so, make sure that the
vehicle is facing in the direction of the line
of fall.
R Check that the brakes are working normally
after a long downhill stretch.
i The special off-road ABS setting enables a
precise, brief and repeated locking of the
front wheels. This causes them to dig into
loose earth. Be aware that the front wheels easily skid across the ground surface if
completely braked and therefore lose their
ability to steer. Driving systems
Cruise control
General notes Cruise control maintains a constant road
speed for you. It brakes automatically in order
to avoid exceeding the set speed. You must
select a lower gear in good time on long and
steep downhill gradients, especially if the
vehicle is laden or towing a trailer. By doing
so, you will make use of the braking effect of
the engine. This relieves the load on the brake
system and prevents the brakes from over-
heating and wearing too quickly.
Use cruise control only if road and traffic con-
ditions make it appropriate to maintain a
steady speed for a prolonged period. You can store any road speed above 20 mph
(30 km/h). Driving systems
203Driving and parking Z
Page 208 of 462
Cruise control is automatically deactivated if:
R you engage the electric parking brake
R you are driving at less than 20 mph
(30 km/h)
R ESP ®
intervenes or you deactivate ESP ®
R you activate DSR
R you activate off-road program 2 on vehicles
with the ON&OFFROAD package
R you shift the transmission to position N
while driving
If cruise control is deactivated, you will hear a warning tone. You will see the Cruise Con‐
Cruise Con‐
trol Off
trol Off message in the multifunction dis-
play for approximately five seconds.
i When you switch off the engine, the last
speed stored is cleared. DISTRONIC PLUS
General notes DISTRONIC PLUS regulates the speed and
automatically helps you maintain the dis-
tance to the vehicle detected in front. DIS-
TRONIC PLUS brakes automatically so that
the set speed is not exceeded.
You must select a lower gear in good time on
long and steep downhill gradients, especially
if the vehicle is laden or towing a trailer. By
doing so, you will make use of the braking
effect of the engine. This relieves the load on
the brake system and prevents the brakes
from overheating and wearing too quickly.
If DISTRONIC PLUS detects a slower-moving
vehicle in front, your vehicle is braked in order
to maintain the preset distance to the vehicle in front.
If DISTRONIC PLUS detects that there is a risk
of a collision, you will be warned visually and acoustically. DISTRONIC PLUS cannot pre-
vent a collision without your intervention. An
intermittent warning tone will then sound and
the distance warning lamp will light up in the instrument cluster. Brake immediately in
order to increase the distance to the vehicle in front or take evasive action provided it is
safe to do so.
For DISTRONIC PLUS to assist you, the radar
sensor system must be operational.
If there is no vehicle in front, DISTRONIC
PLUS operates in the same way as cruise
control in the speed range between 20 mph
(Canada: 30 km/h) and 120 mph (Canada:
200 km/h). If a vehicle is driving in front of
you, it operates in the speed range between
0 mph (0 km/h) and 120 mph (Canada:
200 km/h).
Do not use DISTRONIC PLUS while driving on roads with steep gradients.
As DISTRONIC PLUS transmits radar waves, it
can resemble the radar detectors of the
responsible authorities. You can refer to the
relevant chapter in the Operator's Manual if
questions are asked about this.
i USA only:
This device has been approved by the FCC as a "Vehicular Radar System". The radar
sensor is intended for use in an automotiveradar system only. Removing, tampering
with, or altering the device will void any
warranties, and is not permitted by the
FCC. Do not tamper with, alter, or use in
any non-approved way.
Any unauthorized modification to this
device could void the user’s authority to
operate the equipment.
i Canada only: This device complies with
RSS-210 of Industry Canada. Operation is
subject to the following two conditions:
1. This device may not cause harmful inter-
ference, and
2. this device must accept any interference received, including interference that may
cause undesired operation of the device.
Removal, tampering, or altering of the
device will void any warranties, and is not
permitted. Do not tamper with, alter, or use in any non-approved way. 206
Driving systemsDriving and pa
rking
Page 221 of 462
!
If DISTRONIC PLUS or the HOLD function
is activated, the vehicle brakes automati-
cally in certain situations. To prevent dam-
age to the vehicle, deactivate DISTRONIC
PLUS and the HOLD function in the follow-
ing or other similar situations:
R when towing the vehicle
R in the car wash
Deactivating the HOLD function
(Y page 219).
Activation conditions You can activate the HOLD function if:
R
the vehicle is stationary
R the engine is running
R the driver's door is closed or your seat belt
is fastened
R the electric parking brake is released
R the transmission is in position D,Ror N
R DISTRONIC PLUS is deactivated
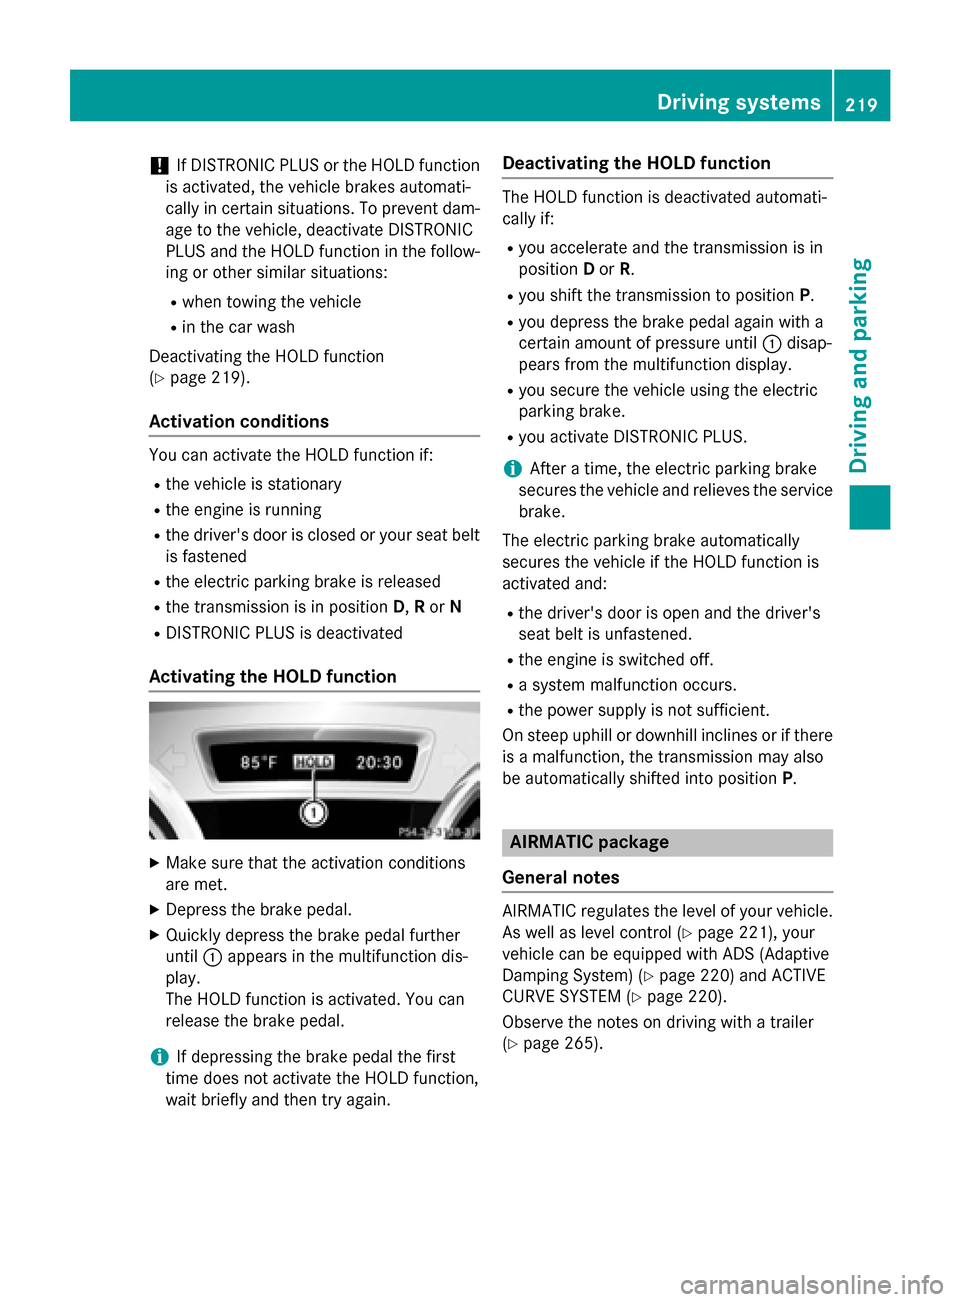
Activating the HOLD function X
Make sure that the activation conditions
are met.
X Depress the brake pedal.
X Quickly depress the brake pedal further
until 0043appears in the multifunction dis-
play.
The HOLD function is activated. You can
release the brake pedal.
i If depressing the brake pedal the first
time does not activate the HOLD function,
wait briefly and then try again. Deactivating the HOLD function The HOLD function is deactivated automati-
cally if:
R you accelerate and the transmission is in
position Dor R.
R you shift the transmission to position P.
R you depress the brake pedal again with a
certain amount of pressure until 0043disap-
pears from the multifunction display.
R you secure the vehicle using the electric
parking brake.
R you activate DISTRONIC PLUS.
i After a time, the electric parking brake
secures the vehicle and relieves the service brake.
The electric parking brake automatically
secures the vehicle if the HOLD function is
activated and:
R the driver's door is open and the driver's
seat belt is unfastened.
R the engine is switched off.
R a system malfunction occurs.
R the power supply is not sufficient.
On steep uphill or downhill inclines or if there
is a malfunction, the transmission may also
be automatically shifted into position P. AIRMATIC package
General notes AIRMATIC regulates the level of your vehicle.
As well as level control (Y page 221), your
vehicle can be equipped with ADS (Adaptive
Damping System) (Y page 220) and ACTIVE
CURVE SYSTEM (Y page 220).
Observe the notes on driving with a trailer
(Y page 265). Driving systems
219Driving and parking Z
Page 227 of 462
Comfort mode
In comfort mode, the driving characteristics
of your vehicle are more comfortable. Select
this mode if you prefer a comfortable driving
style. Select comfort mode also when driving
fast on straight roads, e.g. on straight
stretches of freeway.
X Press button 0043repeatedly until indicator
lamps 0087and 0044go out.
You have selected Comfort mode. The vehi- cle is raised by 10 mm compared with Sport
+ suspension tuning.
The AMG Suspension System COMFORT
AMG Suspension System COMFORT
message appears in the multifunction dis-
play. PARKTRONIC
Important safety notes PARKTRONIC is an electronic parking aid with
ultrasonic sensors. It indicates visually and
audibly the distance between your vehicle
and an object.
PARKTRONIC is only an aid. It is not a replace-
ment for your attention to your immediate
surroundings. You are always responsible for
safe maneuvering, parking and exiting a park- ing space. When maneuvering, parking or
pulling out of a parking space, make sure thatthere are no persons, animals or objects in
the area in which you are maneuvering.
! When parking, pay particular attention to
objects above or below the sensors, such
as flower pots or trailer drawbars. PARK-
TRONIC does not detect such objects when they are in the immediate vicinity of the
vehicle. You could damage the vehicle or
the objects.
The sensors may not detect snow and other
objects that absorb ultrasonic waves.
Ultrasonic sources such as an automatic
car wash, the compressed-air brakes on a
truck or a pneumatic drill could cause
PARKTRONIC to malfunction. PARKTRONIC may not function correctly on
uneven terrain.
PARKTRONIC is activated automatically when you:
R switch on the ignition
R shift the transmission to position D,Ror N
R Release the electric parking brake
PARKTRONIC is deactivated at speeds above
11 mph (18 km/ h). It is reactivated at lower
speeds.
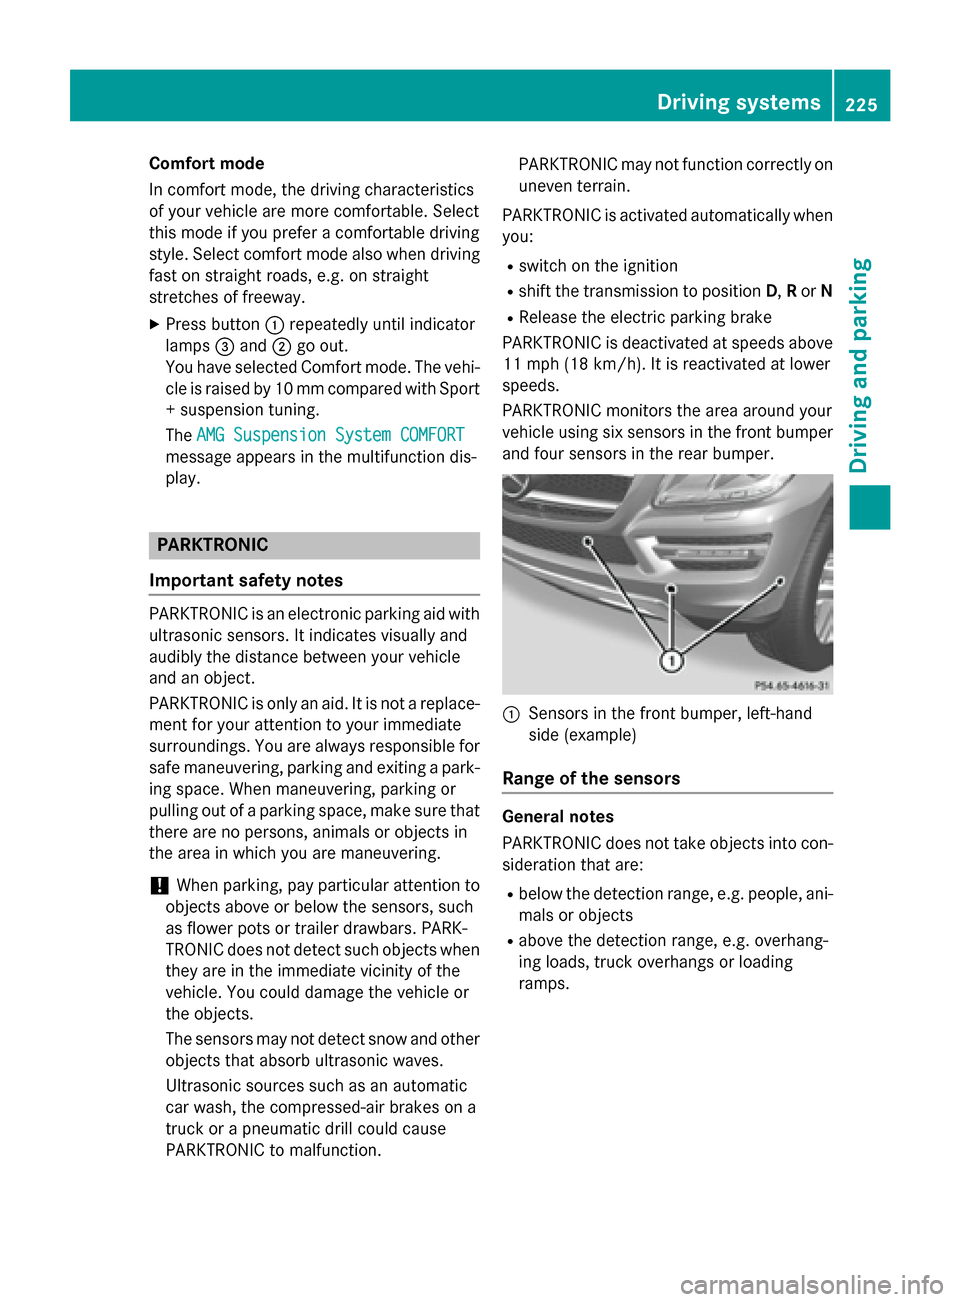
PARKTRONIC monitors the area around your
vehicle using six sensors in the front bumper and four sensors in the rear bumper. 0043
Sensors in the front bumper, left-hand
side (example)
Range of the sensors General notes
PARKTRONIC does not take objects into con-
sideration that are:
R below the detection range, e.g. people, ani-
mals or objects
R above the detection range, e.g. overhang-
ing loads, truck overhangs or loading
ramps. Driving systems
225Driving and parking Z