fuel MERCEDES-BENZ GL-Class 2015 X166 Owner's Guide
[x] Cancel search | Manufacturer: MERCEDES-BENZ, Model Year: 2015, Model line: GL-Class, Model: MERCEDES-BENZ GL-Class 2015 X166Pages: 462, PDF Size: 9.09 MB
Page 188 of 462

If you or others come into contact with fuel,
observe the following:
R Wash away fuel from skin immediately
using soap and water.
R If fuel comes into contact with your eyes,
immediately rinse them thoroughly with
clean water. Seek medical assistance with- out delay.
R If fuel is swallowed, seek medical assis-
tance without delay. Do not induce vomit-
ing.
R Immediately change out of clothing which
has come into contact with fuel. G
WARNING
Electrostatic buildup can create sparks and
ignite fuel vapors. There is a risk of fire and
explosion.
Always touch the vehicle body before opening the fuel filler flap or touching the fuel pump
nozzle. Any existing electrostatic buildup is
thereby discharged. G
WARNING
Vehicles with a diesel engine:
If you mix diesel fuel with gasoline, the flash
point is lower than that of pure diesel fuel.
When the engine is running, exhaust system
components could overheat without being
noticed. There is a risk of fire.
Never refuel with gasoline. Never mix gasoline with diesel fuel.
! Do not use gasoline to refuel vehicles with
a diesel engine. Do not use diesel to refuel
vehicles with a gasoline engine. Do not
switch on the ignition if you accidentally
refuel with the wrong fuel. Otherwise, the
fuel will enter the fuel system. Even small
amounts of the wrong fuel could result in
damage to the fuel system and the engine. The repair costs are high. Notify a qualified
specialist workshop and have the fuel tank and fuel lines drained completely. !
Do not use diesel to refuel vehicles with a
gasoline engine. Do not switch on the igni-
tion if you accidentally refuel with the
wrong fuel. Otherwise, the fuel will enter
the fuel system. Even small amounts of the wrong fuel could result in damage to the
fuel system and the engine. Notify a quali-
fied specialist workshop and have the fuel
tank and fuel lines drained completely.
! Overfilling the fuel tank could damage the
fuel system.
! Take care not to spill any fuel on painted
surfaces. You could otherwise damage the
paintwork.
! Use a filter when refueling from a fuel can.
Otherwise, the fuel lines and/or injection
system could be blocked by particles from
the fuel can.
Do not get into the vehicle again during the
refueling process. Otherwise, electrostatic
charge could build up again.
If you overfill the fuel tank, fuel could spray
out when the fuel pump nozzle is removed.
For further information on fuel and fuel quality
(Y page 448). Refueling
General information Pay attention to the important safety notes
(Y
page 185).
The fuel filler flap is unlocked or locked auto-
matically when you open or close the vehicle
with the SmartKey or with KEYLESS-GO.
The position of the fuel filler cap is displayed
00B6 in the instrument cluster. The arrow
next to the filling pump indicates the side of
the vehicle. 186
RefuelingDriving and parking
Page 189 of 462
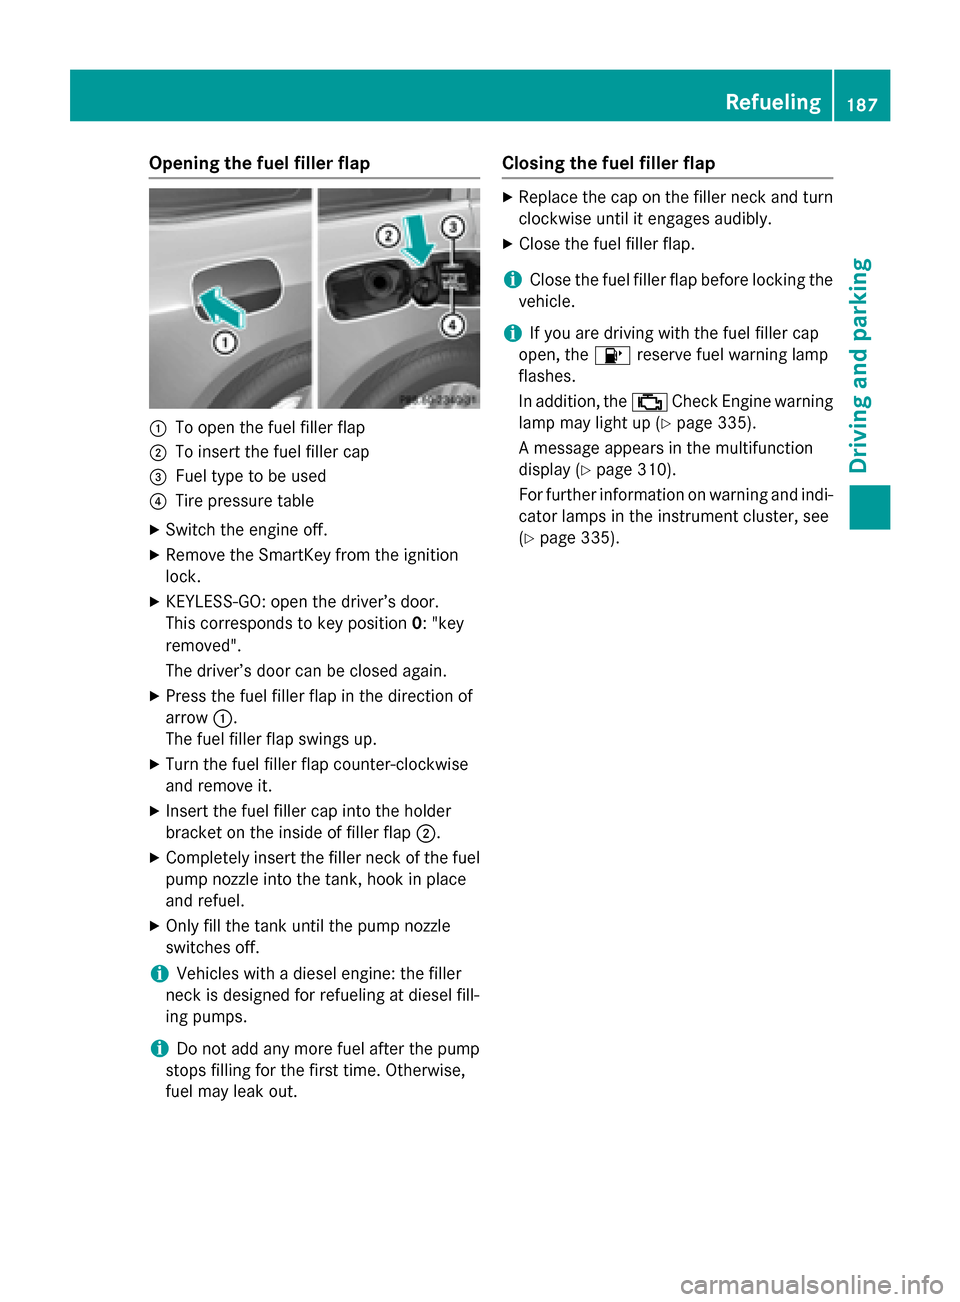
Opening the fuel filler flap
0043
To open the fuel filler flap
0044 To insert the fuel filler cap
0087 Fuel type to be used
0085 Tire pressure table
X Switch the engine off.
X Remove the SmartKey from the ignition
lock.
X KEYLESS-GO: open the driver’s door.
This corresponds to key position 0: "key
removed".
The driver’s door can be closed again.
X Press the fuel filler flap in the direction of
arrow 0043.
The fuel filler flap swings up.
X Turn the fuel filler flap counter-clockwise
and remove it.
X Insert the fuel filler cap into the holder
bracket on the inside of filler flap 0044.
X Completely insert the filler neck of the fuel
pump nozzle into the tank, hook in place
and refuel.
X Only fill the tank until the pump nozzle
switches off.
i Vehicles with a diesel engine: the filler
neck is designed for refueling at diesel fill-
ing pumps.
i Do not add any more fuel after the pump
stops filling for the first time. Otherwise,
fuel may leak out. Closing the fuel filler flap X
Replace the cap on the filler neck and turn
clockwise until it engages audibly.
X Close the fuel filler flap.
i Close the fuel filler flap before locking the
vehicle.
i If you are driving with the fuel filler cap
open, the 00B6reserve fuel warning lamp
flashes.
In addition, the 00B9Check Engine warning
lamp may light up (Y page 335).
A message appears in the multifunction
display (Y page 310).
For further information on warning and indi-
cator lamps in the instrument cluster, see
(Y page 335). Refueling
187Driving and parking Z
Page 190 of 462
Problems with fuel and the fuel tank
This section provides descriptions of and solutions to safety-relevant problems. Descriptions
of and solutions to further problems can be found in the Digital Operator's Manual. Problem
Possible causes/consequences and
0050
0050Solutions Fuel is leaking from the
vehicle. The fuel line or the fuel tank is faulty.
G WARNING
Risk of explosion or fire. X Turn the SmartKey to position 0in the ignition lock and remove
it immediately (Y page 167).
X Do not restart the engine under any circumstances.
X Consult a qualified specialist workshop. DEF (BlueTEC vehicles only)
Important notes on use To function properly, BlueTEC exhaust gas
aftertreatment must be operated with the
reducing agent DEF. Adding DEF is one of the
tasks performed during maintenance. Under
normal operating conditions, a tank of DEF
lasts until the next service due date.
When the supply of DEF is almost used up, the
Check
Check Additive
Additive See SeeOperator's
Operator's Manual
Manual
message is shown in the multifunction dis-
play.
If you drive the vehicle faster than 10 mph
(16 km/h), the Check
Check Additive Additive See
SeeOper‐
Oper‐
ator's Manual
ator's Manual message goes out after
approximately one minute.
When the supply of DEF is down to a reserve
of approximately 1 gal (3.8 l) the Refill Refill
AdBlue/DEF
AdBlue/DEF See
SeeOperator's
Operator's Manual
Manualmes-
sage is shown in the multifunction display.
When the DEF supply drops to a minimum, the Remaining Starts: 16
Remaining Starts: 16 message is shown
in the multifunction display.
If the Refill AdBlue/DEF No Start in Refill AdBlue/DEF No Start in
XXXX km XXXX km message is shown in the multifunc-
tion display, you can still drive the vehicle
over the distance shown. If DEF is not refilled,
you will subsequently be unable to start the
engine. If the Refill AdBlue/DEF Eng.
Refill AdBlue/DEF Eng. Start Not Poss Start Not Poss
message appears in the
multifunction display and the engine does not
start, you must add DEF.
X Add at least 1 gal (3.8 l)of DEF.
X Switch on the ignition for at least 60 sec-
onds.
X Start the engine.
i Have the DEF tank refilled at a qualified
specialist workshop.
Use the special DEF refill bottle when adding DEF between maintenance intervals. Contact
an authorized Mercedes-Benz Center with
any questions or, if necessary, contact Road-
side Assistance (Y page 26).
If the outside temperature is below 12 ‡
(00F811 †) it may be difficult to top up. If DEF is
frozen and there is an active warning indica-
tor, it may not be possible to add DEF. Park
the vehicle in a warmer place, e.g. in a garage,
until DEF has become fluid again. It will then
be possible to add DEF again. Alternatively,
have the DEF tank refilled at a qualified spe-
cialist workshop.
Further information about BlueTEC exhaust
gas aftertreatment and DEF is available at any
authorized Mercedes-Benz Center. 188
RefuelingDriving and parking
Page 191 of 462
Important safety notes on the refilling
procedure DEF is a water-soluble fluid for the exhaust
gas aftertreatment of diesel engines. It is:
R not poisonous
R colorless and odorless
R not flammable
When you open the DEF container, small
amounts of ammonia vapor may be released. Ammonia vapors have a pungent odor and are
particularly irritating to the skin, to mucous
membranes and to the eyes. You may expe-
rience a burning sensation in your eyes, nose and throat. Coughing and watering of the
eyes are possible.
Do not inhale ammonia vapors. Fill the DEF
tank only in well-ventilated areas.
DEF must not come into contact with your
skin, eyes or clothing and must not be swal-
lowed. Keep DEF away from children.
If you or other persons come into contact with
DEF, observe the following:
R Rinse DEF from your skin immediately with
soap and water.
R If DEF comes into contact with your eyes,
immediately rinse them thoroughly with
clean water. Seek medical assistance with-
out delay.
R If DEF has been swallowed, rinse your
mouth out immediately. Drink plenty of
water. Seek medical assistance without
delay.
R Change out of clothing contaminated with
DEF immediately.
! Only use DEF in accordance with
ISO 22241. Do not mix any additives with
DEF, and do not dilute DEF with water. This
may destroy the BlueTEC exhaust gas after- treatment system.
! The vehicle must be parked on level
ground to fill the DEF tank. The DEF tank
can only be filled as intended with the vehi-
cle parked on a level surface. This avoids
false level readings. Filling the tank is not permitted if the vehicle is not parked on a
level surface. There is a danger of overfill-
ing, which could result in damage to com-
ponents of the BlueTEC exhaust gas after-
treatment.
! Rinse surfaces that have come into con-
tact with DEF immediately with water or
remove DEF using a damp cloth and cold
water. If the DEF has already crystallized,
use a sponge and cold water to clean it. DEF
residues crystallize after time and contam- inate the affected surfaces.
! DEF is not a fuel additive and must not be
added to the fuel tank. If DEF is added to
the fuel tank, this can lead to engine dam-
age.
For further information on DEF, see
(Y page 450).
You will find further information on DEF in the printed Operator's Manual under "Technical
data".
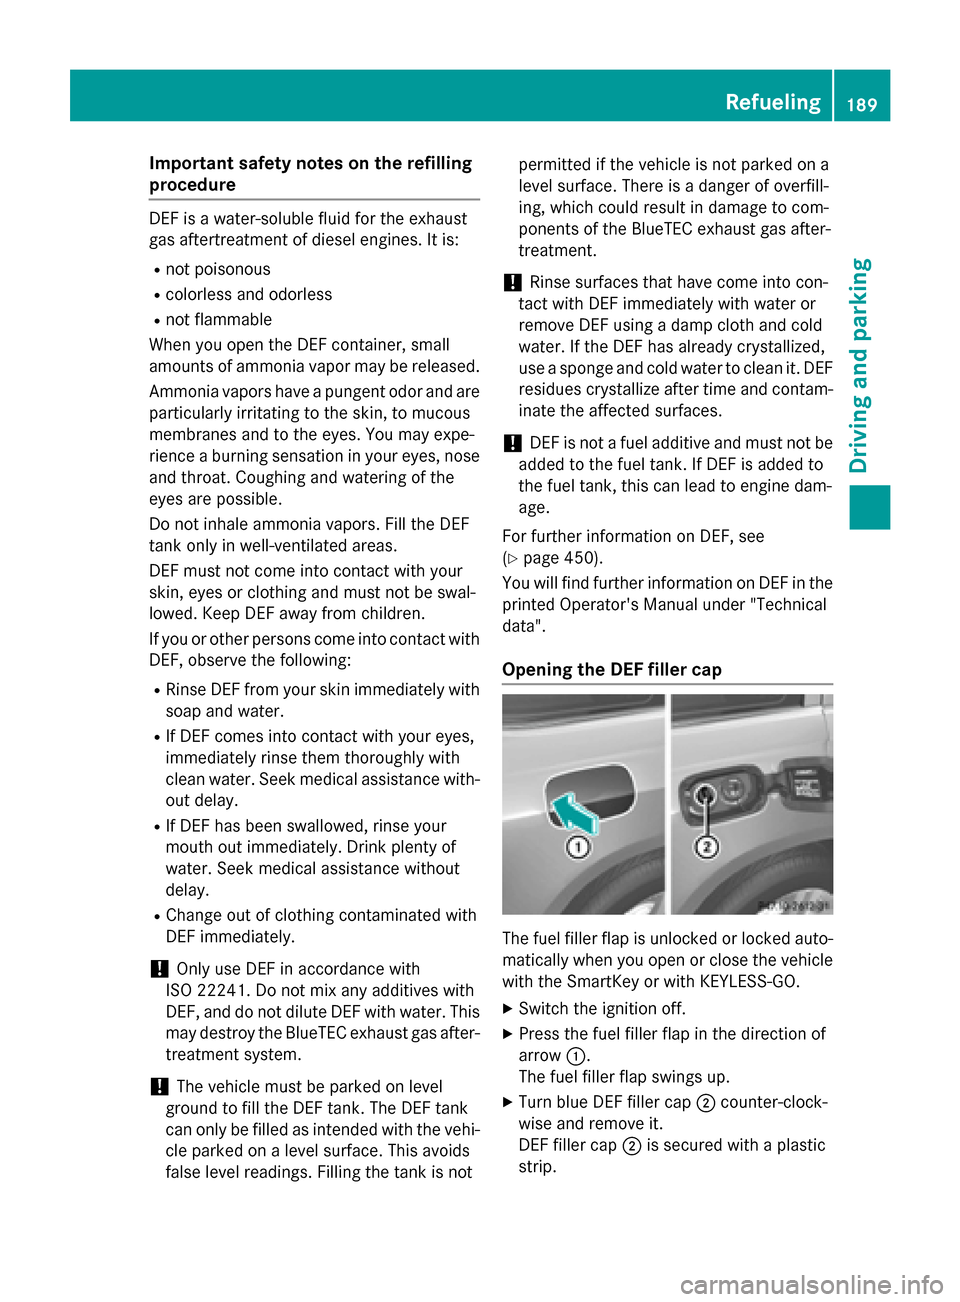
Opening the DEF filler cap The fuel filler flap is unlocked or locked auto-
matically when you open or close the vehicle
with the SmartKey or with KEYLESS-GO.
X Switch the ignition off.
X Press the fuel filler flap in the direction of
arrow 0043.
The fuel filler flap swings up.
X Turn blue DEF filler cap 0044counter-clock-
wise and remove it.
DEF filler cap 0044is secured with a plastic
strip. Refueling
189Driving and pa rking Z
Page 192 of 462
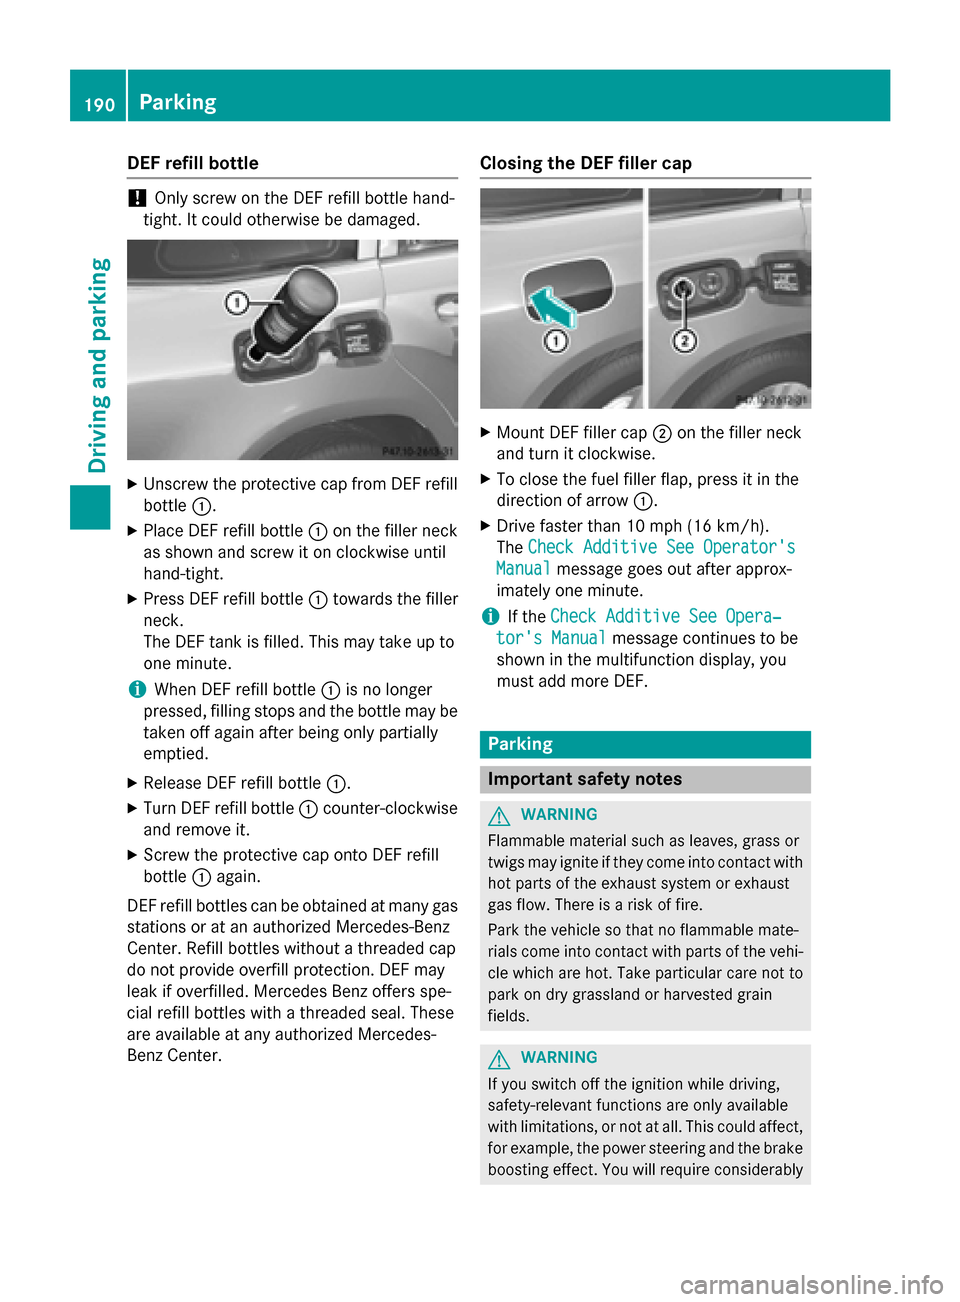
DEF refill bottle
!
Only screw on the DEF refill bottle hand-
tight. It could otherwise be damaged. X
Unscrew the protective cap from DEF refill
bottle 0043.
X Place DEF refill bottle 0043on the filler neck
as shown and screw it on clockwise until
hand-tight.
X Press DEF refill bottle 0043towards the filler
neck.
The DEF tank is filled. This may take up to
one minute.
i When DEF refill bottle
0043is no longer
pressed, filling stops and the bottle may be
taken off again after being only partially
emptied.
X Release DEF refill bottle 0043.
X Turn DEF refill bottle 0043counter-clockwise
and remove it.
X Screw the protective cap onto DEF refill
bottle 0043again.
DEF refill bottles can be obtained at many gas
stations or at an authorized Mercedes-Benz
Center. Refill bottles without a threaded cap
do not provide overfill protection. DEF may
leak if overfilled. Mercedes Benz offers spe-
cial refill bottles with a threaded seal. These
are available at any authorized Mercedes-
Benz Center. Closing the DEF filler cap
X
Mount DEF filler cap 0044on the filler neck
and turn it clockwise.
X To close the fuel filler flap, press it in the
direction of arrow 0043.
X Drive faster than 10 mph (16 km/h).
The Check Additive See Operator's
Check Additive See Operator's
Manual Manual message goes out after approx-
imately one minute.
i If the
Check Additive See Opera‐
Check Additive See Opera‐
tor's Manual
tor's Manual message continues to be
shown in the multifunction display, you
must add more DEF. Parking
Important safety notes
G
WARNING
Flammable material such as leaves, grass or
twigs may ignite if they come into contact with hot parts of the exhaust system or exhaust
gas flow. There is a risk of fire.
Park the vehicle so that no flammable mate-
rials come into contact with parts of the vehi-cle which are hot. Take particular care not to
park on dry grassland or harvested grain
fields. G
WARNING
If you switch off the ignition while driving,
safety-relevant functions are only available
with limitations, or not at all. This could affect, for example, the power steering and the brake
boosting effect. You will require considerably 190
Pa
rkingDriving an d parking
Page 196 of 462
X
Visit a qualified specialist workshop and
seek advice. Driving tips
General notes
Important safety notes G
WARNING
If you switch off the ignition while driving,
safety-relevant functions are only available
with limitations, or not at all. This could affect, for example, the power steering and the brake
boosting effect. You will require considerably
more effort to steer and brake. There is a risk of an accident.
Do not switch off the ignition while driving. G
WARNING
If you operate mobile communication equip-
ment while driving, you will be distracted from traffic conditions. You could also lose controlof the vehicle. There is a risk of an accident.
Only operate this equipment when the vehicleis stationary.
Observe the legal requirements for the coun- try in which you are driving. Some jurisdic-
tions prohibit the driver from using a mobile
phone while driving a vehicle.
If you make a call while driving, always use
hands-free mode. Only operate the telephone
when the traffic situation permits. If you are
unsure, pull over to a safe location and stop
before operating the telephone.
Bear in mind that at a speed of only 30 mph
(approximately 50 km/h) the vehicle covers a
distance of 44 ft (approximately 14 m) per
second. Drive sensibly – save fuel Observe the following tips to save fuel:
X The tires should always be inflated to the
recommended tire pressure.
X Remove unnecessary loads.
X Remove roof carriers when they are not
needed.
X Warm up the engine at low engine speeds.
X Avoid frequent acceleration or braking.
X Have all maintenance work carried out as
indicated by the service intervals in the
Maintenance Booklet or by the service
interval display.
Fuel consumption also increases when driv-
ing in cold weather, in stop-start traffic and in
hilly terrain.
Drinking and driving G
WARNING
Drinking and driving and/or taking drugs and driving are very dangerous combinations.
Even a small amount of alcohol or drugs can
affect your reflexes, perceptions and judg-
ment.
The possibility of a serious or even fatal acci-
dent is greatly increased when you drink or
take drugs and drive.
Do not drink or take drugs and drive or allow
anyone to drive who has been drinking or tak-
ing drugs.
Emission control G
WARNING
Combustion engines emit poisonous exhaust
gases such as carbon monoxide. Inhaling
these exhaust gases leads to poisoning. There is a risk of fatal injury. Therefore never leave
the engine running in enclosed spaces with-
out sufficient ventilation.
Certain engine systems are designed to keep
the level of poisonous components in exhaust fumes within legal limits. 194
Driving tipsDriving and parking
Page 197 of 462
These systems only work at peak efficiency if
they are serviced exactly in accordance with
the manufacturer's specifications. For this
reason, all work on the engine must be carried out by qualified and authorized Mercedes-
Benz technicians.
The engine settings must not be changed
under any circumstances. Furthermore, all
specific service work must be carried out at
regular intervals and in accordance with the
Mercedes-Benz service requirements. Details
can be found in the Maintenance Booklet. ECO display
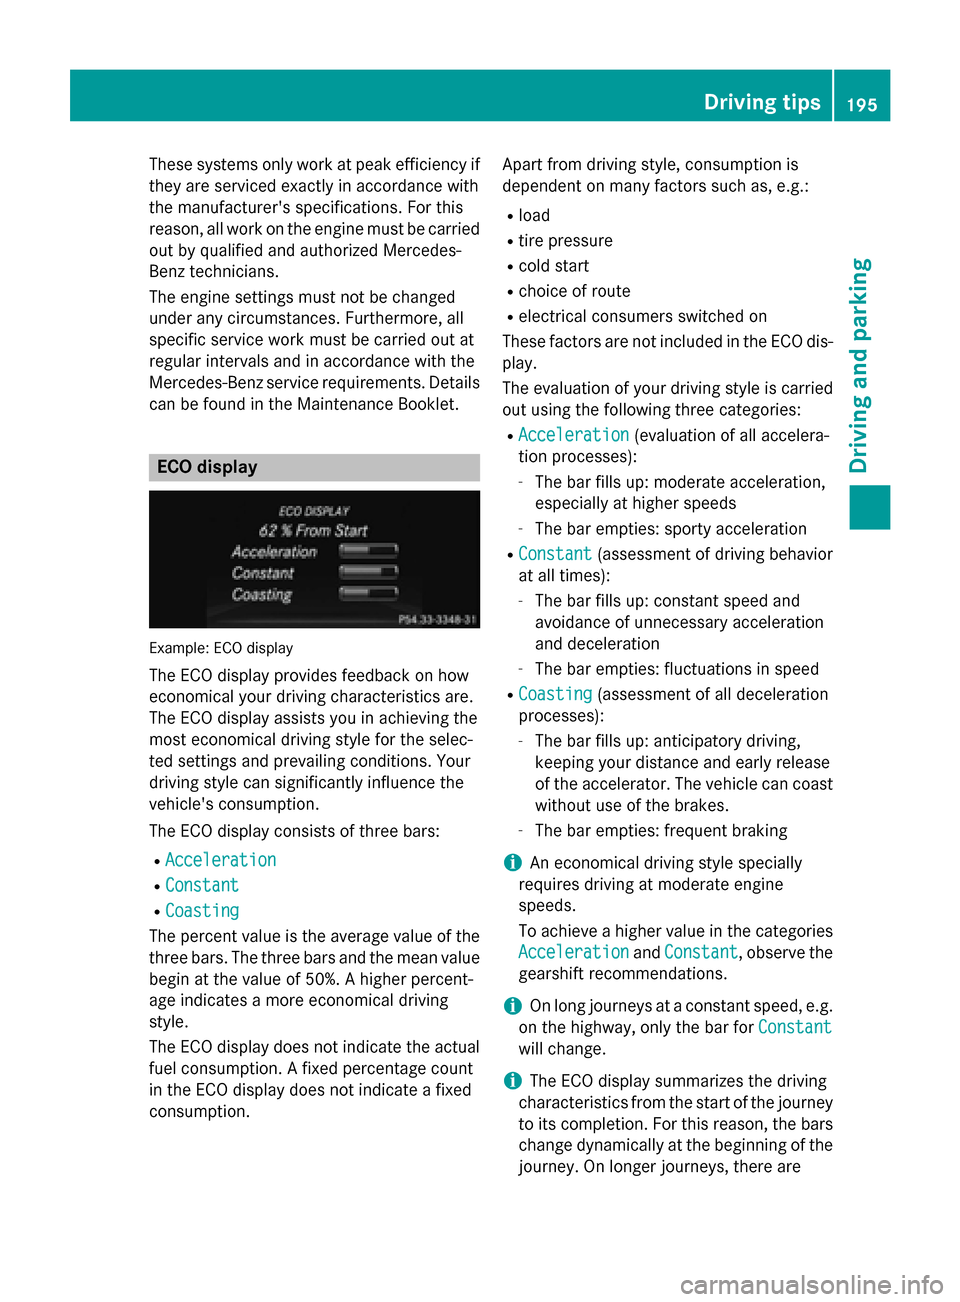
Example: ECO display
The ECO display provides feedback on how
economical your driving characteristics are.
The ECO display assists you in achieving the
most economical driving style for the selec-
ted settings and prevailing conditions. Your
driving style can significantly influence the
vehicle's consumption.
The ECO display consists of three bars:
R Acceleration
Acceleration
R Constant Constant
R Coasting
Coasting
The percent value is the average value of the three bars. The three bars and the mean value
begin at the value of 50%. A higher percent-
age indicates a more economical driving
style.
The ECO display does not indicate the actual fuel consumption. A fixed percentage count
in the ECO display does not indicate a fixed
consumption. Apart from driving style, consumption is
dependent on many factors such as, e.g.:
R load
R tire pressure
R cold start
R choice of route
R electrical consumers switched on
These factors are not included in the ECO dis-
play.
The evaluation of your driving style is carried
out using the following three categories:
R Acceleration
Acceleration (evaluation of all accelera-
tion processes):
- The bar fills up: moderate acceleration,
especially at higher speeds
- The bar empties: sporty acceleration
R Constant Constant (assessment of driving behavior
at all times):
- The bar fills up: constant speed and
avoidance of unnecessary acceleration
and deceleration
- The bar empties: fluctuations in speed
R Coasting Coasting (assessment of all deceleration
processes):
- The bar fills up: anticipatory driving,
keeping your distance and early release
of the accelerator. The vehicle can coast
without use of the brakes.
- The bar empties: frequent braking
i An economical driving style specially
requires driving at moderate engine
speeds.
To achieve a higher value in the categories
Acceleration
Acceleration andConstant Constant, observe the
gearshift recommendations.
i On long journeys at a constant speed, e.g.
on the highway, only the bar for Constant
Constant
will change.
i The ECO display summarizes the driving
characteristics from the start of the journey
to its completion. For this reason, the bars
change dynamically at the beginning of the
journey. On longer journeys, there are Driving tips
195Driving and parking Z
Page 203 of 462
Check the engine oil level. The engine oil
warning lamp warning must not be ignored. Continuing the journey while the symbol is
displayed could lead to engine damage.
X Engine oil level: check the engine oil level
and add oil if necessary.
When driving on steep gradients, the
engine oil level must be sufficiently high to
ensure a correct oil supply in the vehicle.
X DEF tank (BlueTEC vehicles): check the
level and top up if necessary (Y page 188).
X Tire-changing tool kit: check that the jack
is working and make sure you have the lug
wrench, a robust tow cable and a folding
spade in the vehicle.
X Wheels and tires: check the tire tread
depth and tire pressure.
X Check for damage and remove any foreign
objects, e.g. small stones, from the
wheels/tires.
X Replace any missing valve caps.
X Replace dented or damaged wheels.
X Rims: dented or bent rims can result in a
loss of tire pressure and damage the tire
bead. Therefore, check your rims before
driving off-road and replace them as
required.
Checklist after driving off-road !
If you detect damage to the vehicle after
driving off-road, have the vehicle checked
immediately at a qualified specialist work-
shop.
X Vehicles with the ON&OFFROAD pack-
age: activate the on-road program
(Y page 259).
X Deactivate the LOW RANGE off-road gear
(Y page 261).
X Deactivate DSR (Y page 258).
X Vehicles with the AIRMATIC package:
lower the vehicle to a ride height suitable
for the road conditions, e.g. to the high-
way/high-speed level. X
Clean the headlamps and rear lights and
check for damage.
X Clean the front and rear license plates.
X Clean the wheels/tires with a water jet and
remove any foreign objects.
X Clean the wheels, wheel housings and the
vehicle underside with a water jet; check
for any foreign objects and damage.
X Check whether twigs or other parts of
plants have become trapped. These
increase the risk of fire and can damage
fuel pipes, brake hoses or the rubber bel-
lows of the axle joints and propeller shafts.
X After the trip, examine without fail the
entire undercarriage, wheels, tires, brakes,
bodywork structure, steering, chassis and
exhaust system for damage.
X After driving for extended periods across
sand, mud, gravel, water or in similarly dirty
conditions, have the brake discs, wheels,
brake pads/linings and axle joints checked
and cleaned.
X If you detect strong vibrations after off-road
travel, check for foreign objects in the
wheels and drive train and remove them if
necessary. Foreign objects can disturb the
balance and cause vibrations.
Driving over rough terrain places greater
demands on your vehicle than driving on nor-
mal roads. After driving off-road, check the
vehicle. This allows you to detect damage
promptly and reduce the risk of an accident to
yourself and other road users.
Driving on sand Observe the following rules when driving on
sand:
R Vehicles with the ON&OFFROAD pack-
age: select off-road program 1
(Y page 259).
R Vehicles with the AIRMATIC package:
select a raised vehicle level.
R Avoid high engine speeds. Driving tips
201Driving and pa rking Z
Page 216 of 462

Vehicles traveling on a different line
DISTRONIC PLUS may not detect vehicles
traveling on a different line. The distance to
the vehicle in front will be too short.
Other vehicles changing lanes DISTRONIC PLUS has not detected the vehi-
cle cutting in yet. The distance to this vehicle will be too short.
Narrow vehicles DISTRONIC PLUS has not yet detected the
vehicle in front on the edge of the road, because of its narrow width. The distance to
the vehicle in front will be too short.
Obstructions and stationary vehicles
DISTRONIC PLUS does not brake for obsta-
cles or stationary vehicles. If, for example, the
detected vehicle turns a corner and reveals
an obstacle or stationary vehicle, DISTRONIC PLUS will not brake for these.
Crossing vehicles DISTRONIC PLUS may mistakenly detect
vehicles that are crossing your lane. Activat-
ing DISTRONIC PLUS at traffic lights with
crossing traffic, for example, could cause
your vehicle to pull away unintentionally. Level control (vehicles with the
ON&OFFROAD package)
Important safety notes Level control adapts the vehicle level auto-
matically to the current operating and driving
situation. This results in reduced fuel con-
sumption and improved handling. 214
Driving systemsDriving and parking
Page 219 of 462
Only select an off-road level when this is
appropriate for road conditions. Otherwise,
fuel consumption increases and handling may
be affected.
X Start the engine.
X Selector wheel 0043
0043 engaged: briefly press
selector wheel 0043.
Selector wheel 0043extends.
X To raise: turn selector wheel 0043clock-
wise 0044.
The vehicle is raised.
or
X To lower: turn selector wheel 0043counter-
clockwise 0085.
The vehicle is lowered.
Indicator lamps 0087for the desired off-road
level flash:
R Off-road level 1: the lower indicator lamp
flashes
R Off-road level 2: the lower and center indi-
cator lamps flash
R Off-road level 3: all three indicator lamps
flash
The vehicle adjusts to the off-road level selec-
ted. As soon as an off-road level is reached,
the corresponding indicator lamp stops flash- ing and lights up constantly.
Raising the vehicle
During the adjustment, the Vehicle Rising
Vehicle Rising
message, for example, appears in the multi-
function display.
The vehicle rises from highway level to off-
road level 1.
If you press the 0038or0076 button on the
multifunction steering wheel, the message
will disappear.
i Up to off-road level 2, you can hide the
messages using the 0038or0076 button
on the multifunction steering wheel.
Once off-road level 2 has been reached, the
lower and center indicator lamps of the selec- tor wheel are on. While the adjustment from off-road level 2 to
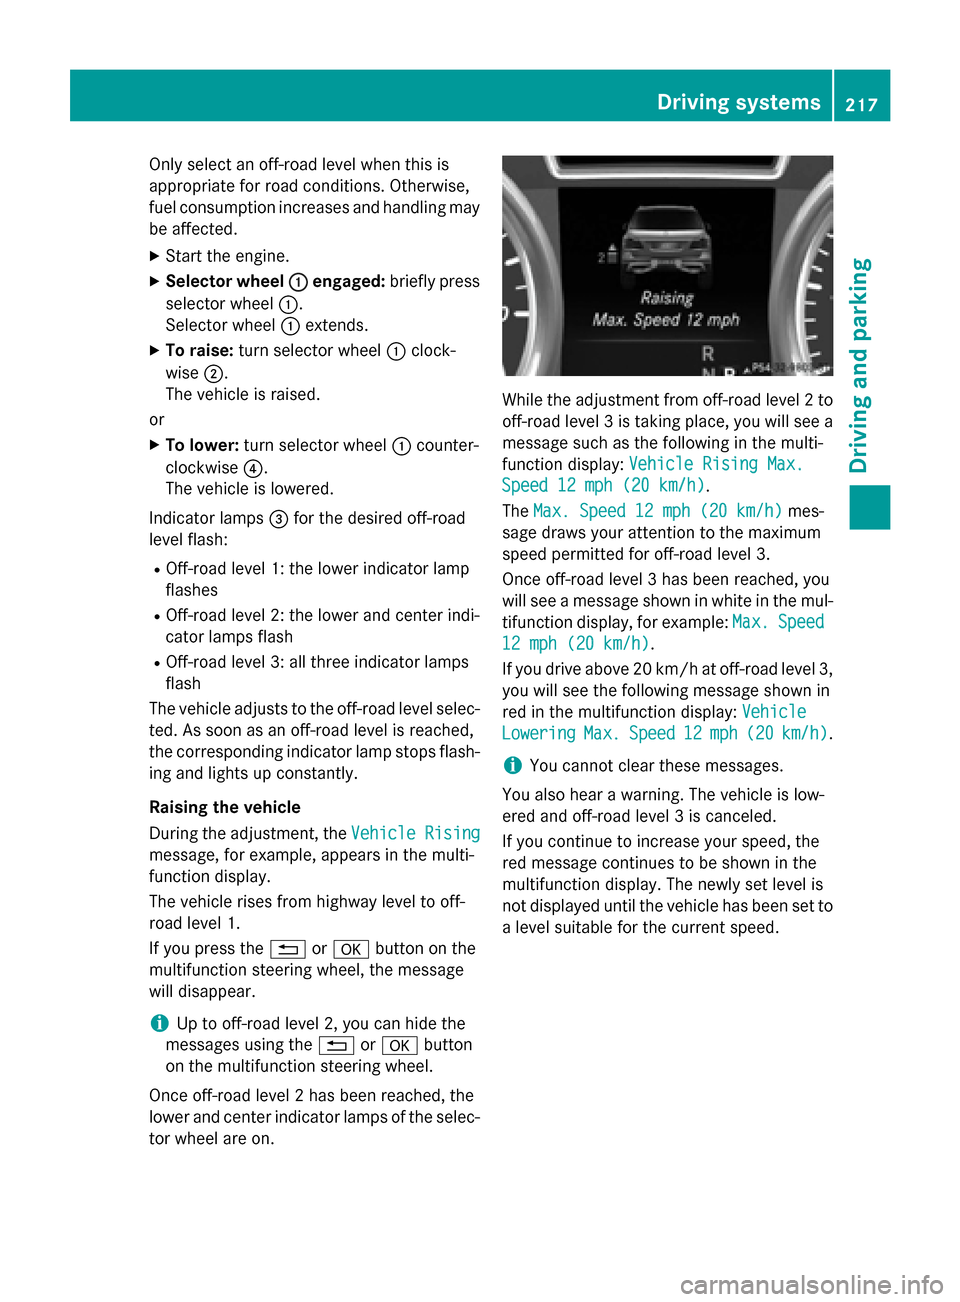
off-road level 3 is taking place, you will see a message such as the following in the multi-
function display: Vehicle Rising Max. Vehicle Rising Max.
Speed 12 mph (20 km/h)
Speed 12 mph (20 km/h).
The Max. Speed 12 mph (20 km/h) Max. Speed 12 mph (20 km/h) mes-
sage draws your attention to the maximum
speed permitted for off-road level 3.
Once off-road level 3 has been reached, you
will see a message shown in white in the mul-
tifunction display, for example: Max. Max.Speed
Speed
12 mph (20 km/h)
12 mph (20 km/h).
If you drive above 20 km/h at off-road level 3, you will see the following message shown in
red in the multifunction display: Vehicle Vehicle
Lowering
Lowering Max.
Max.Speed
Speed 12
12mph (
mph (20 20km/h)
km/h).
i You cannot clear these messages.
You also hear a warning. The vehicle is low-
ered and off-road level 3 is canceled.
If you continue to increase your speed, the
red message continues to be shown in the
multifunction display. The newly set level is
not displayed until the vehicle has been set to
a level suitable for the current speed. Driving systems
217Driving and parking Z