buttons MERCEDES-BENZ GL-Class 2015 X166 Owner's Manual
[x] Cancel search | Manufacturer: MERCEDES-BENZ, Model Year: 2015, Model line: GL-Class, Model: MERCEDES-BENZ GL-Class 2015 X166Pages: 462, PDF Size: 9.09 MB
Page 21 of 462
Standing lamps
Display message ............................3 07
Switching on/off ........................... 131
Start/stop function
see ECO start/stop function
Starting (engine) ................................ 169
STEER CONTROL .................................. 77
Steering (display message) .............. 325
Steering wheel Adjusting (electrically) ................... 120
Adjusting (manually) ...................... 119
Button overview ............................... 37
Buttons (on-board computer) ......... 275
Cleaning ......................................... 384
Important safety notes .................. 119
Paddle shifters ............................... 180
Steering wheel heating .................. 120
Storing settings (memory func-
tion) ............................................... 124
Steering wheel heating
Problem (malfunction) ................... 121
Switching on/of f........................... 120
Steering wheel paddle shifters ........ 180
Stopwatch (RACETIMER) ................... 290
Stowage areas ................................... 342
Stowage compartments Armrest (under) ............................. 344
Center console .............................. 344
Center console (rear) ..................... 344
Cup holders ................................... 350
Eyeglasses compartment ............... 344
Glove box ....................................... 343
Important safety information ......... 343
Stowage net ................................... 345
Stowage net ....................................... 345
Summer tires ..................................... 408
Sun visor ............................................ 352
Surround lighting (on-board com-
puter) .................................................. 286
Suspension tuning AMG adaptive sport suspension
system ........................................... 224
SETUP (on-board computer) .......... 289
SUV
(Sport Utility Vehicle) ....................... 27
Switching air-recirculation mode
on/off ................................................. 161 T
Tachometer ........................................ 275
Tailgate Display message ............................ 324
Emergency unlocking ....................... 95
Important safety notes .................... 91
Limiting the opening angle ............... 94
Opening/closing (automatically
from inside) ...................................... 94
Opening/closing (automatically
from outside) ................................... 92
Opening/closing (from outside) ....... 92
Opening dimensions ...................... 455
Power closing .................................. 90
Tail lamps
Display message ............................ 306
Tank
see Fuel tank
Tank content
Fuel gauge ....................................... 35
Technical data
Capacities ...................................... 447
Emergency spare wheel ................. 443
Information .................................... 446
Tires/wheels ................................. 434
Trailer load s................................... 459
Vehicle data ................................... 455
TELEAID
Call priority .................................... 361
Downloading destinations
(COMAND) ..................................... 361
Downloading routes ....................... 364
Emergency call .............................. 358
General notes ................................ 357
Geo fencing ................................... 365
Locating a stolen vehicle ............... 363
MB info call button ........................ 360
Remote vehicle locking .................. 363
Roadside Assistance button .......... 359
Search & Send ............................... 362
Self-test ......................................... 358
Speed alert .................................... 365
System .......................................... 358
Triggering the vehicle alarm ........... 365
Vehicle remote malfunction diag-
nosis .............................................. 364
Vehicle remote unlocking .............. 363 Index
19
Page 43 of 462
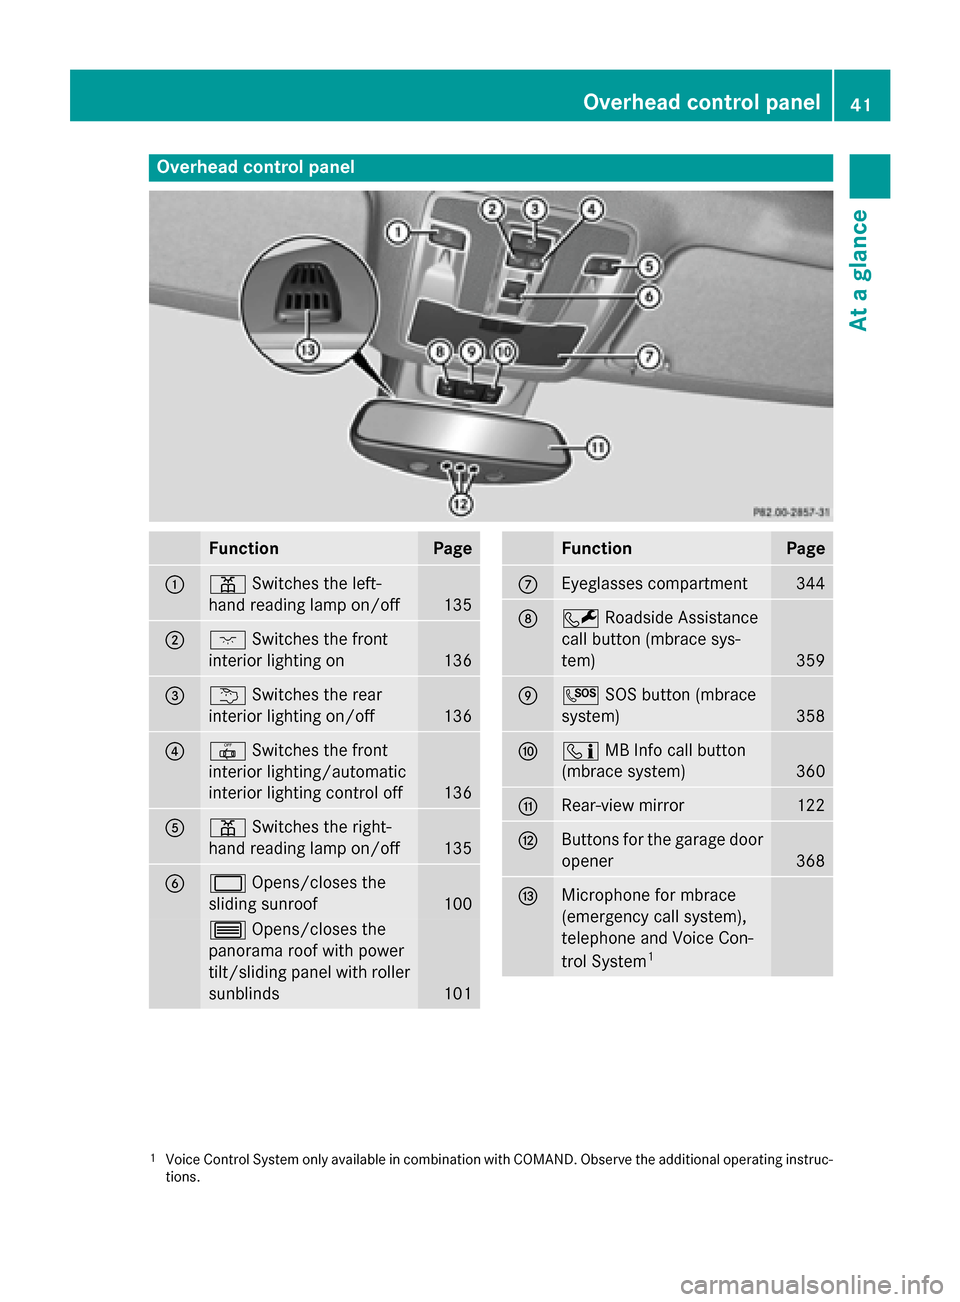
Overhead control panel
Function Page
0043
003D
Switches the left-
hand reading lamp on/off 135
0044
004A
Switches the front
interior lighting on 136
0087
0042
Switches the rear
interior lighting on/off 136
0085
0033
Switches the front
interior lighting/automatic
interior lighting control off 136
0083
003D
Switches the right-
hand reading lamp on/off 135
0084
0056
Opens/closes the
sliding sunroof 100
0057
Opens/closes the
panorama roof with power
tilt/sliding panel with roller sunblinds 101 Function Page
006B
Eyeglasses compartment 344
006C
0052
Roadside Assistance
call button (mbrace sys-
tem) 359
006D
0053
SOS button (mbrace
system) 358
006E
00D9
MB Info call button
(mbrace system) 360
006F
Rear-view mirror 122
0070
Buttons for the garage door
opener 368
0071
Microphone for mbrace
(emergency call system),
telephone and Voice Con-
trol System
1 1
Voice Control System only available in combination with COMAND. Observe the additional operating instruc-
tions. Overhead control panel
41At a glance
Page 69 of 462
G
WARNING
If the child restraint system is subjected to
direct sunlight, parts may get very hot. Chil-
dren may burn themselves on these parts,
particularly on the metal parts of the child
restraint system. There is a risk of injury.
If you leave the vehicle, taking the child with
you, always ensure that the child restraint
system is not exposed to direct sunlight. Pro- tect it with a blanket, for example. If the child
restraint system has been exposed to direct
sunlight, let it cool down before securing the
child in it. Never leave children unattended in the vehicle.
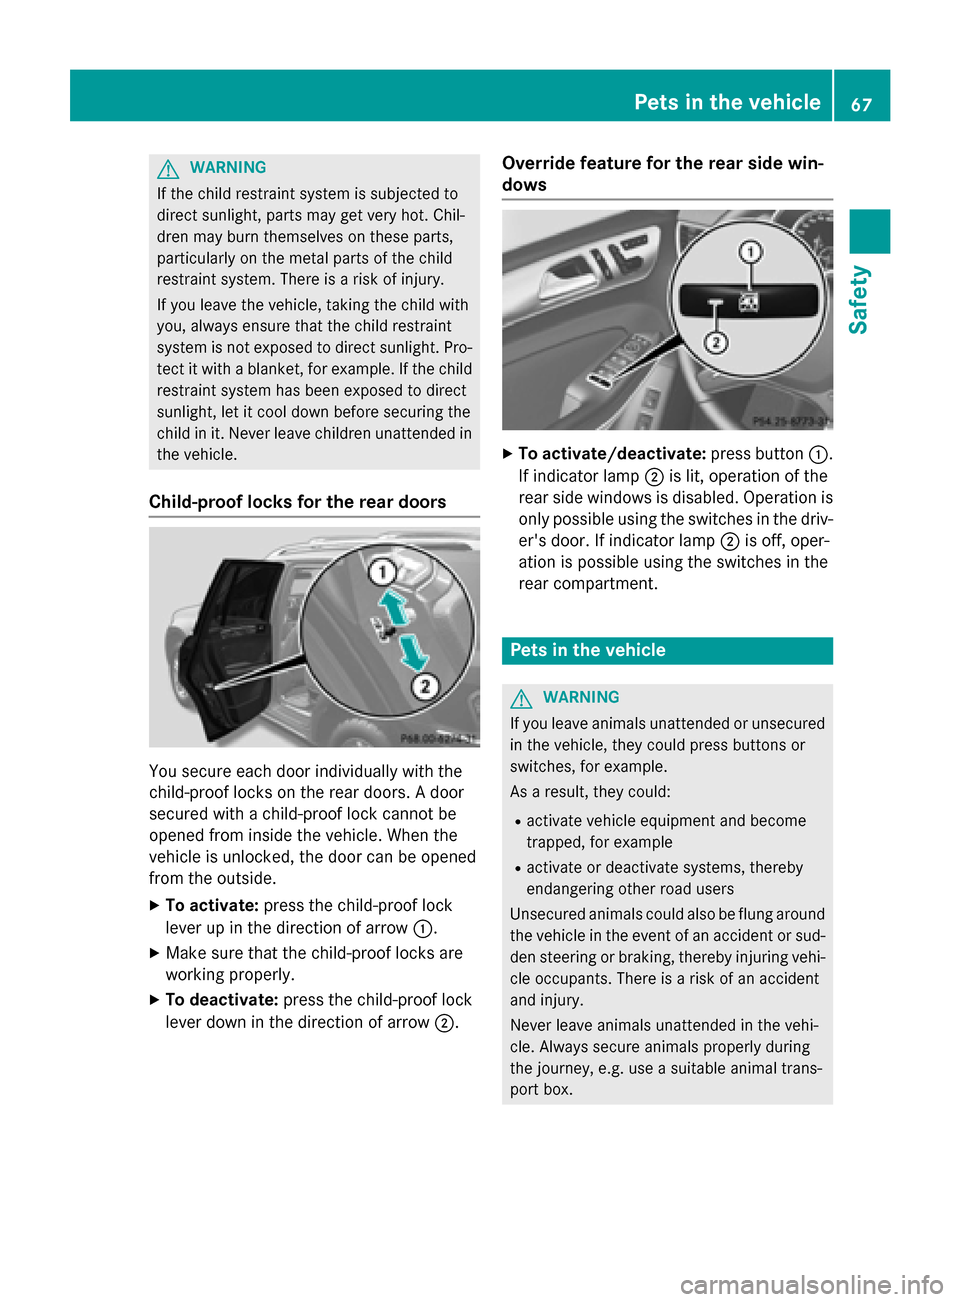
Child-proof locks for the rear doors You secure each door individually with the
child-proof locks on the rear doors. A door
secured with a child-proof lock cannot be
opened from inside the vehicle. When the
vehicle is unlocked, the door can be opened
from the outside.
X To activate: press the child-proof lock
lever up in the direction of arrow 0043.
X Make sure that the child-proof locks are
working properly.
X To deactivate: press the child-proof lock
lever down in the direction of arrow 0044.Override feature for the rear side win-
dows
X
To activate/deactivate: press button0043.
If indicator lamp 0044is lit, operation of the
rear side windows is disabled. Operation is
only possible using the switches in the driv- er's door. If indicator lamp 0044is off, oper-
ation is possible using the switches in the
rear compartment. Pets in the vehicle
G
WARNING
If you leave animals unattended or unsecured in the vehicle, they could press buttons or
switches, for example.
As a result, they could:
R activate vehicle equipment and become
trapped, for example
R activate or deactivate systems, thereby
endangering other road users
Unsecured animals could also be flung around
the vehicle in the event of an accident or sud- den steering or braking, thereby injuring vehi-
cle occupants. There is a risk of an accident
and injury.
Never leave animals unattended in the vehi-
cle. Always secure animals properly during
the journey, e.g. use a suitable animal trans-
port box. Pets in the vehicle
67Safety Z
Page 85 of 462
If you do not open the vehicle within
approximately 40 seconds of unlocking:
R the vehicle is locked again.
R the theft deterrent locking system is
armed again.
X To lock centrally: press button0043.
The SmartKey centrally locks/unlocks:
R the doors
R the tailgate
R the fuel filler flap
The turn signals flash once when unlocking
and three times when locking.
You can also set an audible signal to confirm that the vehicle has been locked. The audiblesignal can be activated and deactivated using
the on-board computer (Y page 287).
When it is dark, the surround lighting also
comes on if it is activated in the on-board
computer (Y page 286). KEYLESS-GO
General notes Bear in mind that the engine can be started by
any of the vehicle occupants if there is a KEY- LESS-GO key in the vehicle.
Locking/unlocking centrally You can start, lock or unlock the vehicle using
KEYLESS-GO. To do this, you only need carry
the SmartKey with you. You can combine the functions of KEYLESS-GO with those of a con-
ventional SmartKey. Unlock the vehicle by
using KEYLESS-GO, for instance, and lock it
using the 0037button on the SmartKey.
When locking or unlocking with KEYLESS-GO,
the distance between the SmartKey and the
corresponding door handle must not be
greater than 3 ft (1 m). KEYLESS-GO checks whether a valid Smart-
Key is in the vehicle by periodically establish- ing a radio connection between the vehicle
and the SmartKey. This happens:
R when the external door handles are
touched
R when starting the engine
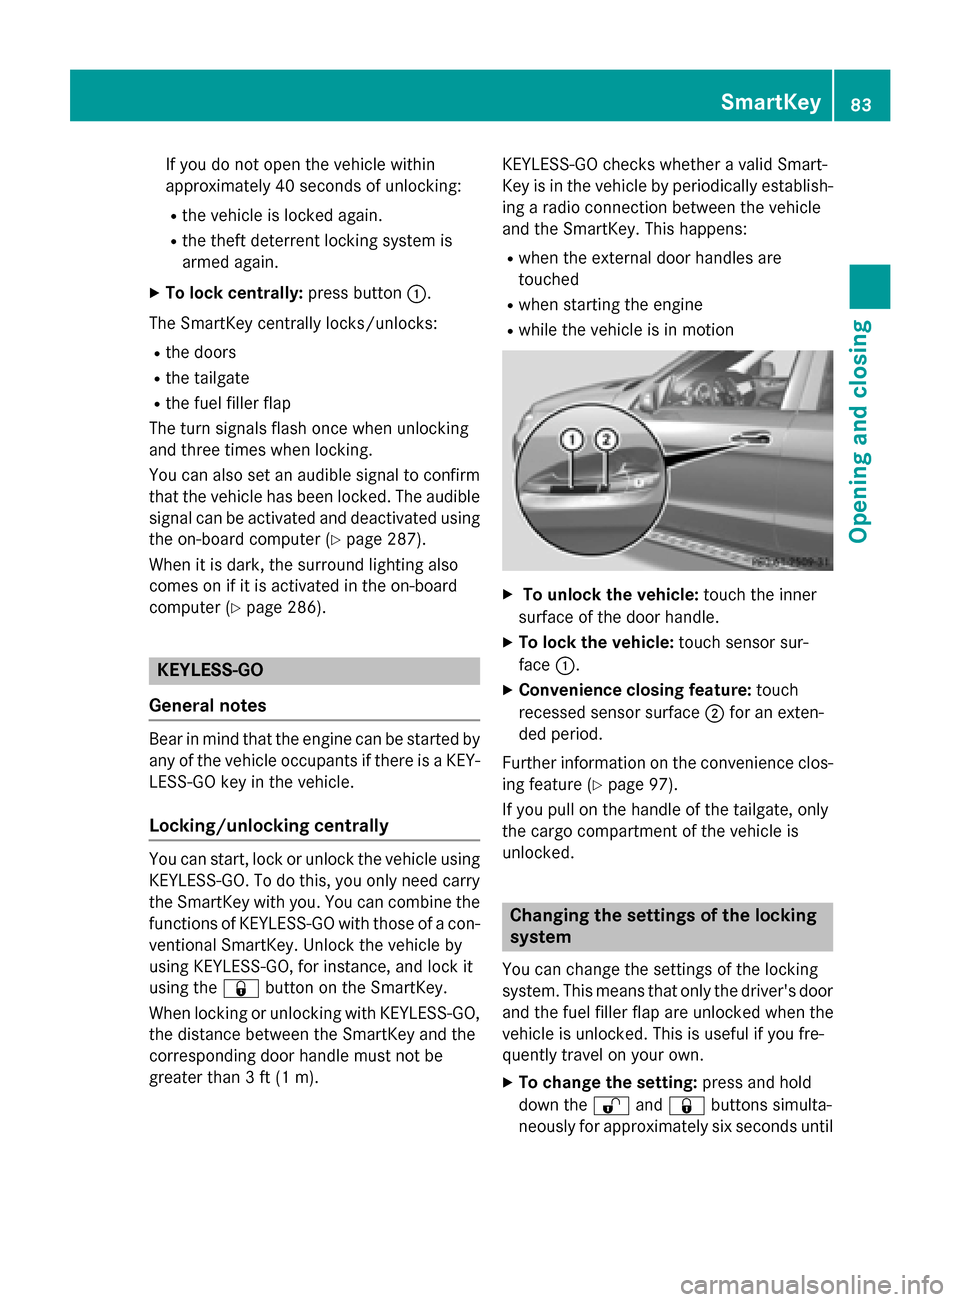
R while the vehicle is in motion X
To unlock the vehicle: touch the inner
surface of the door handle.
X To lock the vehicle: touch sensor sur-
face 0043.
X Convenience closing feature: touch
recessed sensor surface 0044for an exten-
ded period.
Further information on the convenience clos-
ing feature (Y page 97).
If you pull on the handle of the tailgate, only
the cargo compartment of the vehicle is
unlocked. Changing the settings of the locking
system
You can change the settings of the locking
system. This means that only the driver's door and the fuel filler flap are unlocked when the
vehicle is unlocked. This is useful if you fre-
quently travel on your own.
X To change the setting: press and hold
down the 0036and0037 buttons simulta-
neously for approximately six seconds until SmartKey
83Opening and closing Z
Page 86 of 462
the battery check lamp flashes twice
(Y page 85).
i If the setting of the locking system is
changed within the signal range of the vehi- cle, pressing the 0037or0036 button:
R locks or
R unlocks the vehicle
The SmartKey now functions as follows:
X To unlock the driver's door: press the
0036 button once.
X To unlock centrally: press the0036but-
ton twice.
X To lock centrally: press the0037button.
The KEYLESS-GO function is changed as fol-
lows:
X To unlock the driver's door: touch the
inner surface of the door handle on the
driver's door.
X To unlock centrally: touch the inner sur-
face of the door handle on the front-
passenger door or the rear door.
X To lock centrally: touch the outer sensor
surface on one of the door handles
(Y page 83).
X To restore the factory settings: press
and hold down the 0036and0037 buttons
simultaneously for approximately six sec-
onds until the battery check lamp flashes
twice (Y page 85). Mechanical key
General notes If the vehicle can no longer be locked or
unlocked with the SmartKey, use the
mechanical key.
If you use the mechanical key to unlock and
open the driver's door, the anti-theft alarm
system will be triggered (Y page 78).There are several ways to turn off the alarm:
X To deactivate the alarm with the Smart-
Key: press the 0036or0037 button on the
SmartKey.
or
X Insert the SmartKey into the ignition lock.
or
X To deactivate the alarm with KEYLESS-
GO: press the Start/Stop button in the igni-
tion lock. The SmartKey must be in the
vehicle.
or
X Lock or unlock the vehicle using KEYLESS-
GO. The SmartKey must be outside the
vehicle.
If you unlock the vehicle using the mechanical key, the fuel filler flap will not be unlocked
automatically.
X To unlock the fuel filler flap: insert the
SmartKey into the ignition lock.
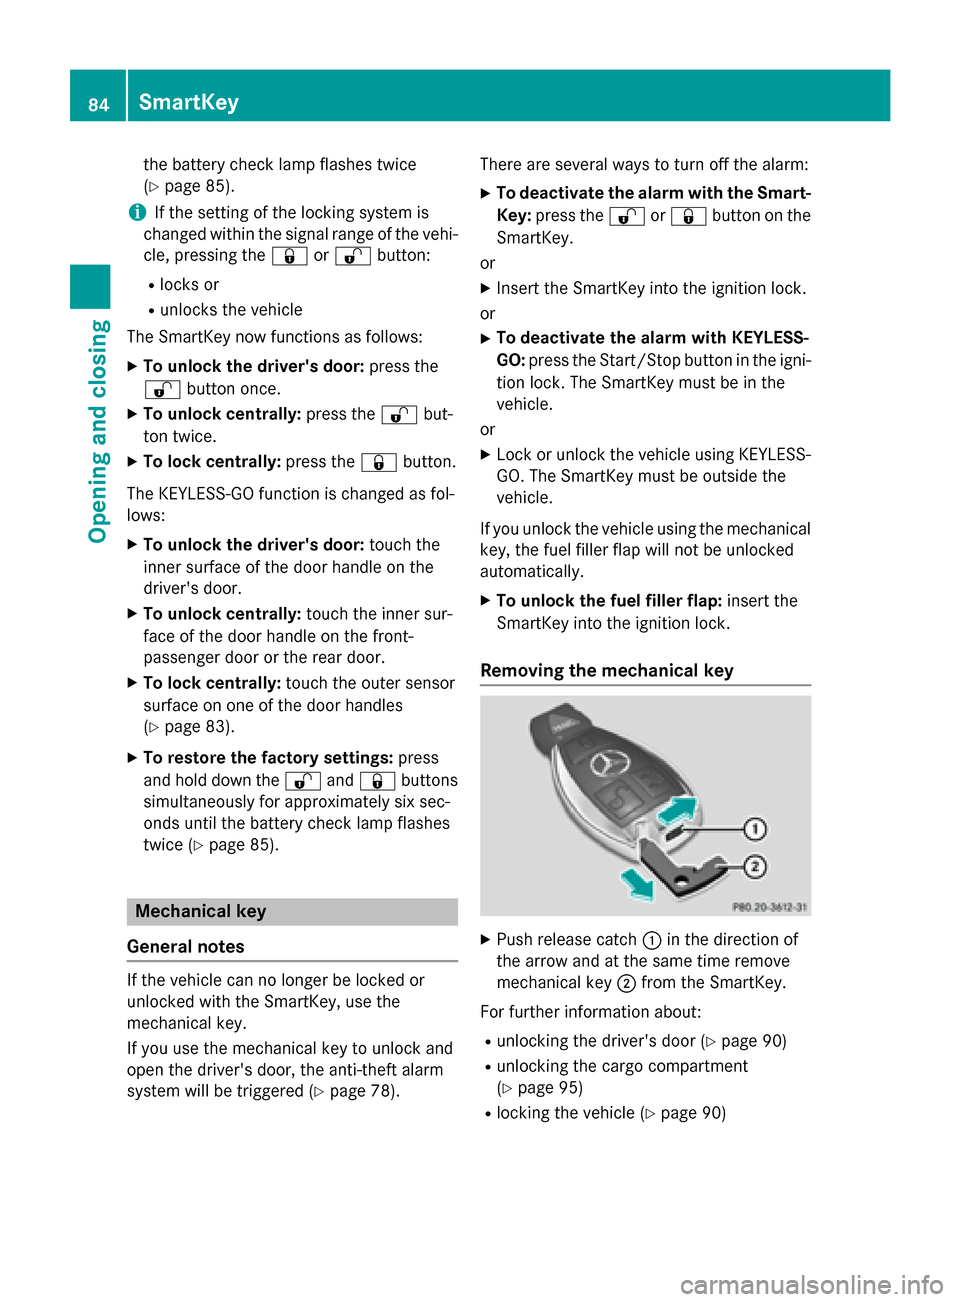
Removing the mechanical key X
Push release catch 0043in the direction of
the arrow and at the same time remove
mechanical key 0044from the SmartKey.
For further information about: R unlocking the driver's door (Y page 90)
R unlocking the cargo compartment
(Y page 95)
R locking the vehicle (Y page 90)84
SmartKeyOpening and closing
Page 88 of 462
X
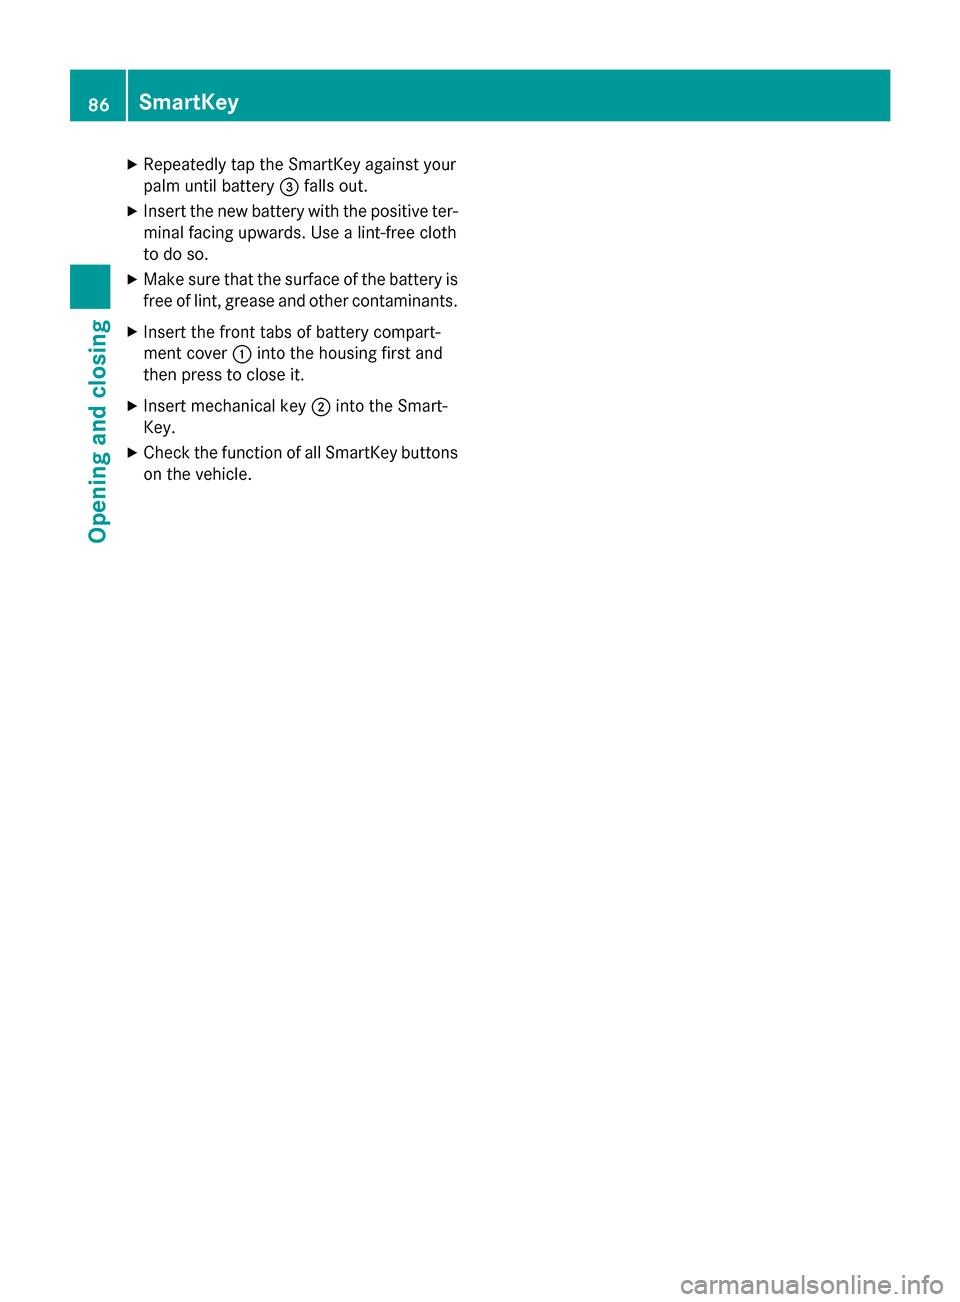
Repeatedly tap the SmartKey against your
palm until battery 0087falls out.
X Insert the new battery with the positive ter-
minal facing upwards. Use a lint-free cloth
to do so.
X Make sure that the surface of the battery is
free of lint, grease and other contaminants.
X Insert the front tabs of battery compart-
ment cover 0043into the housing first and
then press to close it.
X Insert mechanical key 0044into the Smart-
Key.
X Check the function of all SmartKey buttons
on the vehicle. 86
SmartKeyOpening and closing
Page 91 of 462
Unlocking and opening doors from
the inside
You can open a door from inside the vehicle
even if it has been locked. You can only open
the rear doors from inside the vehicle if they
are not secured by the child-proof locks
(Y page 67).
If the vehicle has been locked with the Smart-
Key or with KEYLESS-GO, opening a door from the inside will trigger the anti-theft alarm sys-
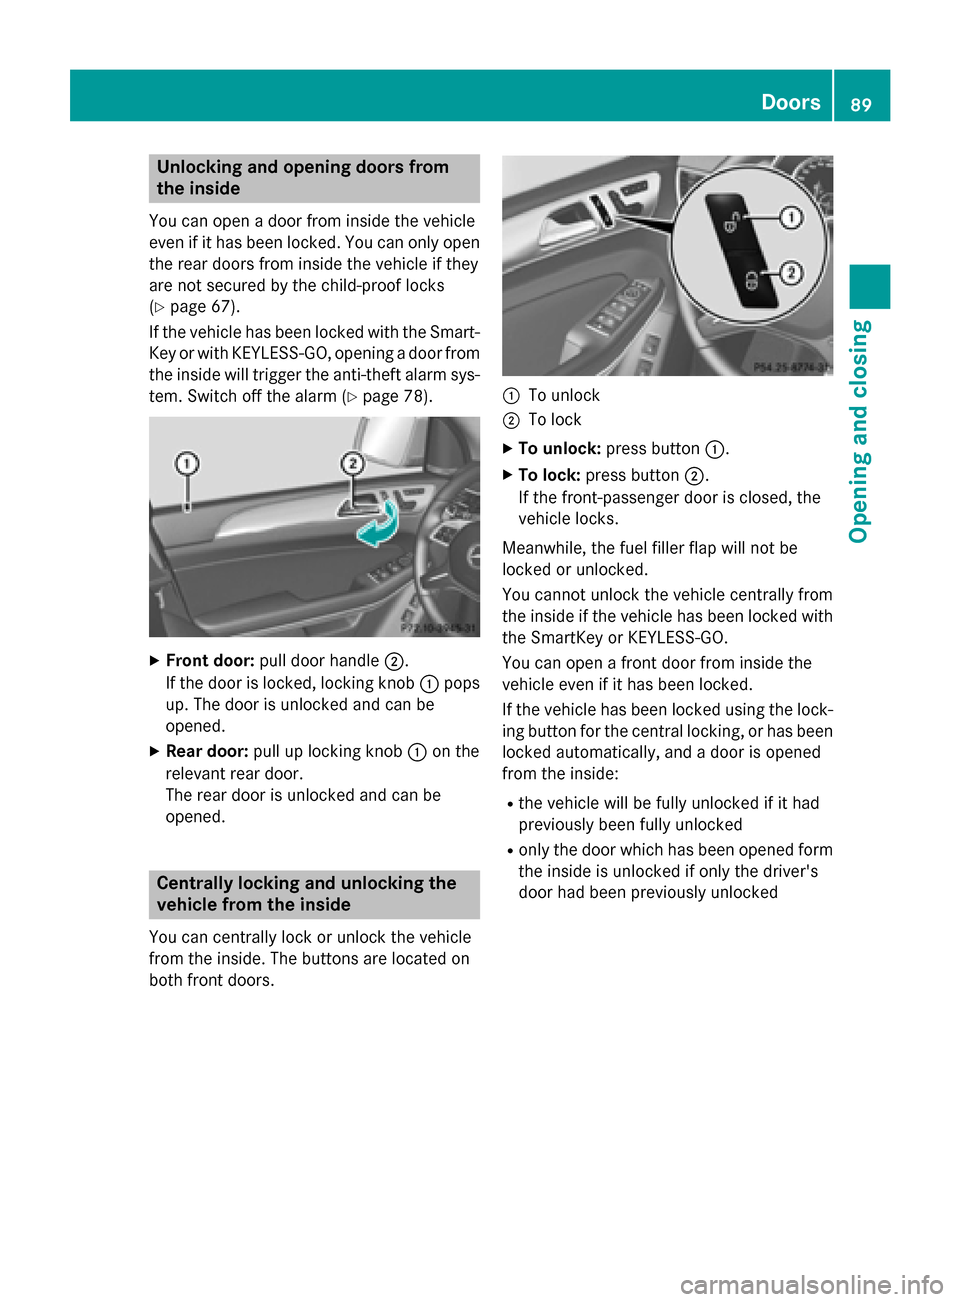
tem. Switch off the alarm (Y page 78).X
Front door: pull door handle 0044.
If the door is locked, locking knob 0043pops
up. The door is unlocked and can be
opened.
X Rear door: pull up locking knob 0043on the
relevant rear door.
The rear door is unlocked and can be
opened. Centrally locking and unlocking the
vehicle from the inside
You can centrally lock or unlock the vehicle
from the inside. The buttons are located on
both front doors. 0043
To unlock
0044 To lock
X To unlock: press button 0043.
X To lock: press button 0044.
If the front-passenger door is closed, the
vehicle locks.
Meanwhile, the fuel filler flap will not be
locked or unlocked.
You cannot unlock the vehicle centrally from
the inside if the vehicle has been locked with the SmartKey or KEYLESS-GO.
You can open a front door from inside the
vehicle even if it has been locked.
If the vehicle has been locked using the lock-
ing button for the central locking, or has been
locked automatically, and a door is opened
from the inside:
R the vehicle will be fully unlocked if it had
previously been fully unlocked
R only the door which has been opened form
the inside is unlocked if only the driver's
door had been previously unlocked Doors
89Opening and closing Z
Page 92 of 462
Automatic locking feature
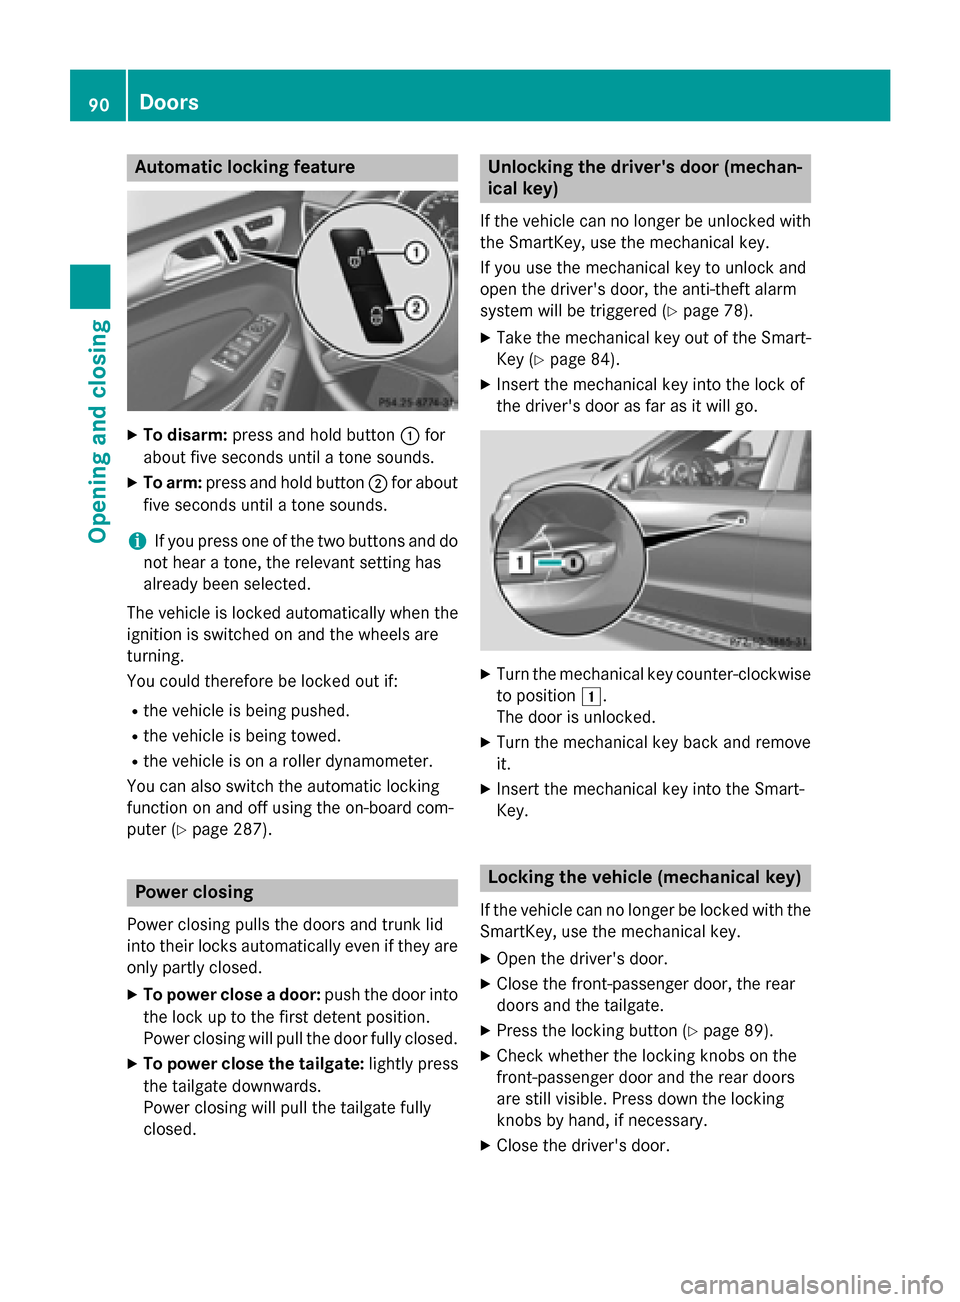
X
To disarm: press and hold button 0043for
about five seconds until a tone sounds.
X To arm: press and hold button 0044for about
five seconds until a tone sounds.
i If you press one of the two buttons and do
not hear a tone, the relevant setting has
already been selected.
The vehicle is locked automatically when the
ignition is switched on and the wheels are
turning.
You could therefore be locked out if:
R the vehicle is being pushed.
R the vehicle is being towed.
R the vehicle is on a roller dynamometer.
You can also switch the automatic locking
function on and off using the on-board com-
puter (Y page 287). Power closing
Power closing pulls the doors and trunk lid
into their locks automatically even if they are only partly closed.
X To power close a door: push the door into
the lock up to the first detent position.
Power closing will pull the door fully closed.
X To power close the tailgate: lightly press
the tailgate downwards.
Power closing will pull the tailgate fully
closed. Unlocking the driver's door (mechan-
ical key)
If the vehicle can no longer be unlocked with
the SmartKey, use the mechanical key.
If you use the mechanical key to unlock and
open the driver's door, the anti-theft alarm
system will be triggered (Y page 78).
X Take the mechanical key out of the Smart-
Key (Y page 84).
X Insert the mechanical key into the lock of
the driver's door as far as it will go. X
Turn the mechanical key counter-clockwise
to position 0047.
The door is unlocked.
X Turn the mechanical key back and remove
it.
X Insert the mechanical key into the Smart-
Key. Locking the vehicle (mechanical key)
If the vehicle can no longer be locked with the
SmartKey, use the mechanical key.
X Open the driver's door.
X Close the front-passenger door, the rear
doors and the tailgate.
X Press the locking button (Y page 89).
X Check whether the locking knobs on the
front-passenger door and the rear doors
are still visible. Press down the locking
knobs by hand, if necessary.
X Close the driver's door. 90
DoorsOpening and closing
Page 109 of 462
X
Check whether you have fastened seat
belt 0044properly (Y page 48).
The seat belt should:
R fit snugly across your body
R be routed across the middle of your shoul-
der
R be routed in your pelvic area across the hip
joints
X Before starting off, adjust the rear-view mir-
ror and the exterior mirrors in such a way
that you have a good view of road and traf-
fic conditions (Y page 122).
X Vehicles with a memory function: save
the seat, steering wheel and exterior mirror settings with the memory function
(Y page 124). Seats
Important safety notes
G
WARNING
Children could become trapped if they adjust the seats, particularly when unattended.
There is a risk of injury.
When leaving the vehicle, always take the
SmartKey with you and lock the vehicle. Never leave children unsupervised in the vehicle. G
WARNING
You could lose control of your vehicle if you do the following while driving:
R adjust the driver's seat, head restraint,
steering wheel or mirrors
R fasten the seat belt
There is a risk of an accident.
Adjust the driver's seat, head restraint, steer-
ing wheel and mirror and fasten your seat belt before starting the engine. G
WARNING
If you adjust the seat height carelessly, you or other vehicle occupants could be trapped andthereby injured. Children in particular could accidentally press the electrical seat adjust-
ment buttons and become trapped. There is a
risk of injury.
While moving the seats, make sure that your
hands or other body parts do not get under the
lever assembly of the seat adjustment sys-
tem. G
WARNING
When you adjust a seat, you or other vehicle
occupants could become trapped, e.g. on the seat guide rail. There is a risk of injury.
Make sure when adjusting a seat that no one
has any body parts in the sweep of the seat. G
WARNING
If head restraints are not installed and adjus-
ted correctly, they cannot provide protection
as intended. There is an increased risk of
injury in the head and neck area, e.g. in the
event of an accident or when braking.
Always drive with the head restraints instal-
led. Before driving off, make sure for every
vehicle occupant that the center of the head
restraint supports the back of the head at
about eye level. G
WARNING
The seat belt does not offer the intended level of protection if you have not moved the back-
rest to an almost vertical position. When brak-
ing or in the event of an accident, you could
slide underneath the seat belt and sustain
abdomen or neck injuries, for example. This
poses an increased risk of injury or even fatal injury.
Adjust the seat properly before beginning
your journey. Always ensure that the backrest
is in an almost vertical position and that the
shoulder section of your seat belt is routed
across the center of your shoulder. G
WARNING
According to accident statistics, children are
safer when properly restrained on the rear
seats than on the front-passenger seat. Thus, Seats
107Seats, steering wheel and mirrors
Z
Page 116 of 462
Entry position
Exit position G
WARNING
When you adjust a seat, you or other vehicle
occupants could become trapped, e.g. on the seat guide rail. There is a risk of injury.
Make sure when adjusting a seat that no one
has any body parts in the sweep of the seat.
i Further related subjects:
R Important safety notes on air bags
(Y page 50)
R Securing children in the vehicle
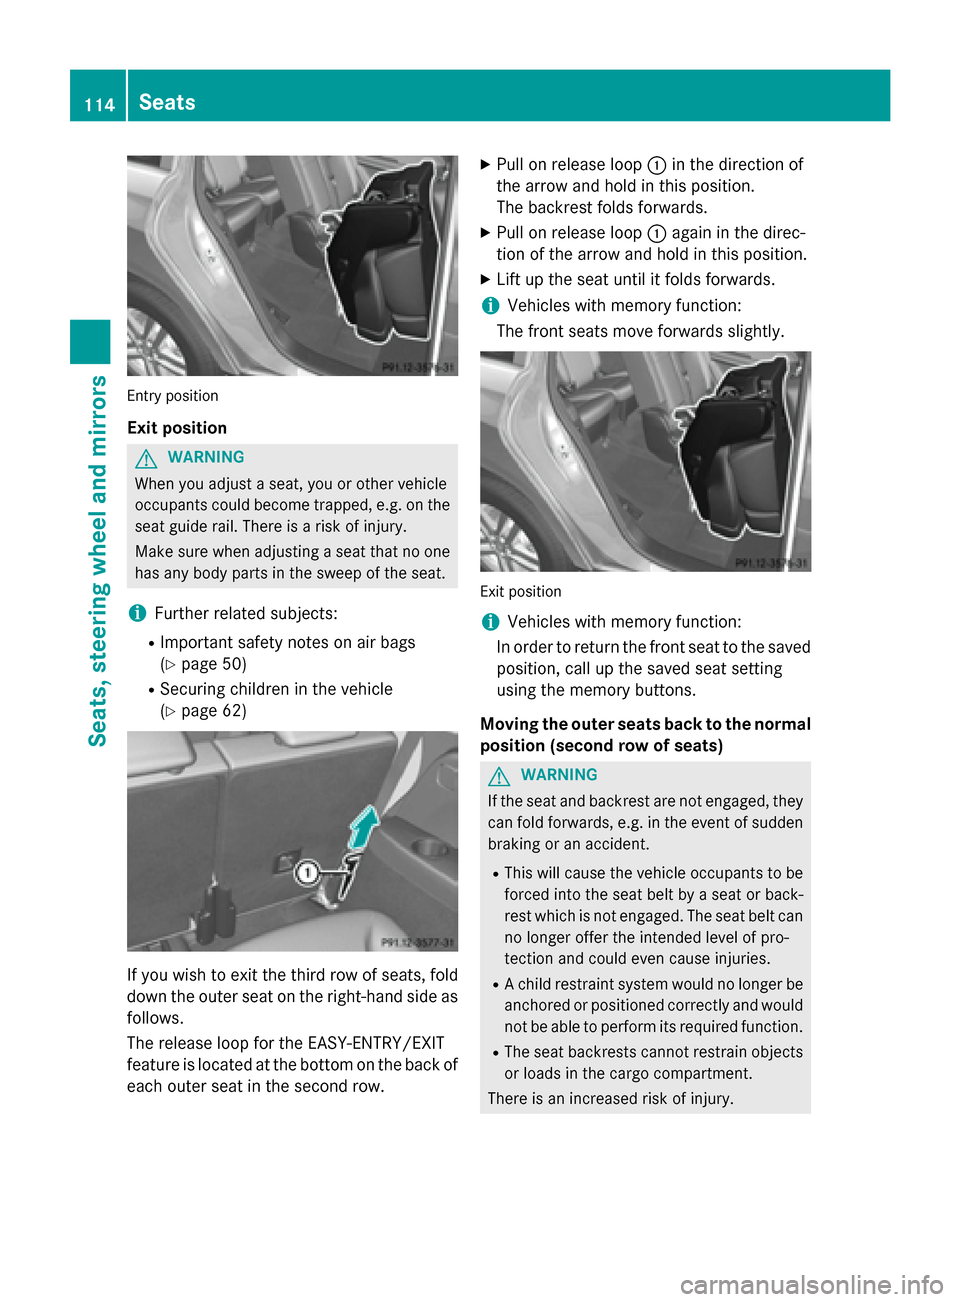
(Y page 62) If you wish to exit the third row of seats, fold
down the outer seat on the right-hand side as
follows.
The release loop for the EASY-ENTRY/EXIT
feature is located at the bottom on the back of each outer seat in the second row. X
Pull on release loop 0043in the direction of
the arrow and hold in this position.
The backrest folds forwards.
X Pull on release loop 0043again in the direc-
tion of the arrow and hold in this position.
X Lift up the seat until it folds forwards.
i Vehicles with memory function:
The front seats move forwards slightly. Exit position
i
Vehicles with memory function:
In order to return the front seat to the saved position, call up the saved seat setting
using the memory buttons.
Moving the outer seats back to the normal
position (second row of seats) G
WARNING
If the seat and backrest are not engaged, they can fold forwards, e.g. in the event of sudden
braking or an accident.
R This will cause the vehicle occupants to be
forced into the seat belt by a seat or back-
rest which is not engaged. The seat belt can no longer offer the intended level of pro-
tection and could even cause injuries.
R A child restraint system would no longer be
anchored or positioned correctly and would not be able to perform its required function.
R The seat backrests cannot restrain objects
or loads in the cargo compartment.
There is an increased risk of injury. 114
SeatsSeats, steering
wheel and mirrors