ECU MERCEDES-BENZ GL-Class 2016 X166 Owner's Manual
[x] Cancel search | Manufacturer: MERCEDES-BENZ, Model Year: 2016, Model line: GL-Class, Model: MERCEDES-BENZ GL-Class 2016 X166Pages: 462, PDF Size: 10.44 MB
Page 16 of 462
Emergency call .............................. 357
General notes ................................ 356
Geo fencing ................................... 364
Locating a stolen vehicle ............... 362
MB info call button ........................ 359
Remote fault diagnosis .................. 363
Remote vehicle locking .................. 362
Roadside Assistance button .......... 358
Search & Send ............................... 361
Self-test ......................................... 357
Speed alert .................................... 364
System .......................................... 357
Triggering the vehicle alarm ........... 364
Vehicle remote unlocking .............. 362
Mechanical key
Function/notes ................................ 84
Inserting .......................................... 85
Locking vehicle ................................ 92
Removing ......................................... 85
Unlocking the driver's door .............. 92
Media Interface
USB port in the armrest of the
center console ............................... 342
see Separate operating instructions
Memory card (audio) ......................... 279
Memory function ............................... 127
Mercedes-Benz Intelligent Drive
Active Blind Spot Assist ................. 248
Active Parking Assist ..................... 227
Blind Spot Assist ............................ 244
DISTRONIC PLUS ........................... 205
General notes ................................ 202
Lane Keeping Assist ...................... 246
PARKTRONIC ................................. 224
Message memory (on-board com-
puter) .................................................. 290
Mirrors
see Exterior mirrors
see Rear-view mirror
see Vanity mirror (in the sun visor)
Mobile phone
Frequencies ................................... 444
Installation ..................................... 444
Menu (on-board computer) ............ 279
Transmission output (maximum) .... 444
Modifying the programming
(SmartKey) ........................................... 84 MOExtended tires
.............................. 387
Mounting wheels
Lowering the vehicle ...................... 431
Mounting a new wheel ................... 431
Preparing the veh icle ..................... 428
R
aising the vehicle ......................... 429
Removing a wheel .......................... 430
Securing the vehicle against roll-
ing away ........................................ 428
MP3
Operation ....................................... 279
see separate operating instructions
Multifunction display
Function/notes ............................. 275
Permanent display ......................... 283
Multifunction steering wheel
Operating the on-board compute r..2 73
Overview .......................................... 37
N
Navigation
Menu (on-board computer) ............ 277
see separate operating instructions
Night View Assist Plus
Activating/deactivating ................. 242
Cleaning ......................................... 382
Problem (malfunction) ................... 244
Notes on breaking-in a new vehi-
cle ....................................................... 164
O
Occupant Classification System
(OCS)
Conditions ....................................... 53
Faults ............................................... 57
Operation ......................................... 54
System self-test ............................... 56
Occupant safety
Automatic measures after an acci-
dent ................................................. 60
Children in the vehicle ..................... 61
Important safety notes .................... 45
Introduction to the restraint sys-
tem ..................................................4 4
Occupant Classification System
(OCS) ............................................... 53
14Index
Page 24 of 462
Trim pieces (cleaning instruc-
tions).................................................. 382
Trip computer (on-board com-
puter) .................................................. 276
Trip odometer
Calling up ....................................... 275
Resetting (on-board computer) ...... 277
Trunk
see Tailgate
Turn signals
Display message ............................ 304
Switching on/off ........................... 132
Two-way radio
Frequencies ................................... 444
Installation ..................................... 444
Transmission output (maximum) .... 444
TWR (Tongue Weight Rating) (defi-
nition) ................................................. 426
Type identification plate
see Vehicle identification plate
U
UnlockingEmergency unlocking ....................... 92
From inside the vehicle (central
unlocking button) ............................. 91
Upshift indicator (on-board com-
puter, Mercedes-AMG vehicles) ....... 287
V
Vanity mirror (in the sun visor)........ 351
Vehicle
Correct use ...................................... 29
Data acquisition ............................... 30
Display message ............................ 320
Equipment ....................................... 25
Individual settings .......................... 283
Limited Warranty ............................. 30
Loading .......................................... 416
Locking (in an emergency) ............... 92
Locking (SmartKey) .......................... 82
Lowering ........................................ 431
Maintenance .................................... 26
Parking for a long period ................ 192
Pulling away ................................... 168
Raising ........................................... 429 Reporting problems .........................2
9
Securing from rolling away ............ 428
Towing away .................................. 397
Transporting .................................. 399
Unlocking (in an emergency) ........... 92
Unlocking (SmartKey) ...................... 82
Vehicle data ................................... 454
Vehicle battery
see Battery (vehicle)
Vehicle data ....................................... 454
Vehicle data (off-road driving)
Approach/departure angle ............ 456
Fording depth ................................ 455
Maximum gradient climbing abil-
ity .................................................. 456
Vehicle dimensions ........................... 454
Vehicle emergency locking ................ 92
Vehicle identification number
see VIN
Vehicle identification plate .............. 446
Vehicle level
AMG adaptive sport suspension
system ........................................... 222
Vehicle level (display message) ....... 310
Vehicle tool kit .................................. 386
Video
Operating the DVD ......................... 279
VIN ...................................................... 446
W
Warning and indicator lamps
ABS ................................................ 327
Brakes ........................................... 326
Check Engine ................................. 334
Coolant .......................................... 335
Distance warning ........................... 337
DISTRONIC PLUS ........................... 337
ESP
®.............................................. 330
ESP®OFF ....................................... 331
Fuel tank ........................................ 334
Overview .......................................... 36
PASSENGER AIR BAG OFF ............... 45
Reserve fuel ................................... 334
Restraint system ............................ 333
Seat belt ........................................ 325
Tire pressure monitor .................... 338
Warranty .............................................. 25
22Index
Page 31 of 462
the driver's footwell. Install the floormats
securely and as specified in order to ensure
sufficient clearance for the pedals. Do not use
loose floormats and do not place floormats on
top of one another.
!If the engine is switched off and equip-
ment on the diagnostics connection is
used, the starter battery may discharge.
Connecting equipment to the diagnostics
connection can lead to emissions monitoring
information being reset, for example. This
may lead to the vehicle failing to meet the
requirements of the next emissions test dur-
ing the main inspection.
Qualified specialist workshop
An authorized Mercedes-Benz Center is a
qualified specialist workshop. It has the nec-
essary specialist knowledge, tools and quali-
fications to correctly carry out the work
required on your vehicle. This is especially the
case for work relevant to safety.
Observe the notes in the Maintenance Book-
let.
Always have the following work carried out at an authorized Mercedes-Benz Center:
Rwork relevant to safety
Rservice and maintenance work
Rrepair work
Ralterations, installation work and modifica-
tions
Rwork on electronic components
Correct use
If you remove any warning stickers, you or
others could fail to recognize certain dangers.
Leave warning stickers in position.
Observe the following information when driv-
ing your vehicle:
Rthe safety notes in this manual
Rthe vehicle technical data
Rtraffic rules and regulations
Rlaws and safety standards pertaining to
motor vehicles
Problems with your vehicle
If you should experience a problem with your
vehicle, particularly one that you believe mayaffect its safe operation, we urge you to con-
tact an authorized Mercedes-Benz Center
immediately to have the problem diagnosed
and rectified. If the problem is not resolved to
your satisfaction, please discuss the problem
again with a Mercedes-Benz Center or con-
tact us at one of the following addresses.
In the USA
Customer Assistance Center
Mercedes-Benz USA, LLC
One Mercedes Drive
Montvale, NJ 07645-0350
In Canada
Customer Relations Department
Mercedes-Benz Canada, Inc.
98 Vanderhoof Avenue
Toronto, Ontario M4G 4C9
Reporting safety defects
USA only:
The following text is published as required ofmanufacturers under Title 49, Code of U.S.
Federal Regulations, Part 575 pursuant to the
"National Traffic and Motor Vehicle Safety Act
of 1966".
If you believe that your vehicle has a defect
which could cause a crash or could cause
injury or death, you should immediately
inform the National Highway Traffic Safety
Administration (NHTSA) in addition to notify-
ing Mercedes-Benz USA, LLC.
If NHTSA receives similar complaints, it may
open an investigation, and if it finds that a
safety defect exists in a group of vehicles, it
may order a recall and remedy campaign.
Introduction29
Z
Page 32 of 462
However, NHTSA cannot become involved in
individual problems between you, your
dealer, or Mercedes-Benz USA, LLC.
To contact NHTSA, you may call the Vehicle
Safety Hotline toll-free at
1-888-327-4236(TTY: 1-800-424-9153); go
tohttp://www.safercar.gov ; or write to:
Administrator, NHTSA, 400 Seventh Street,
SW., Washington, DC 20590.
You can also obtain other information about
motor vehicle safety from
http://www.safercar.gov
Limited Warranty
!
Follow the instructions in this manual
about the proper operation of your vehicle
as well as about possible vehicle damage.
Damage to your vehicle that arises from
culpable contraventions against these
instructions is not covered either by the
Mercedes-Benz Limited Warranty or by the New or Used-Vehicle Warranty.
QR codes for the rescue card
The QR codes are secured in the fuel filler flap
and on the opposite side on the B-pillar. In the event of an accident, rescue services can use
the QR code to quickly find the appropriate
rescue card for your vehicle. The current res-
cue card contains the most important infor-
mation about your vehicle in a compact form,
e.g. the routing of the electric cables.
You can find more information under http://
portal.aftersales.i.daimler.com/public/
content/asportal/en/communication/
informationen_fuer/QRCode.html.
Data stored in the vehicle
Data recording
This vehicle is capable of recording diagnostic
information relating to vehicle operation, mal- functions, and user settings. This may include
information about the performance or status
of various systems, including but not limited
to, engine, throttle, steering or brake sys-
tems, that is stored and can be read out with
suitable devices, particularly when the vehi-
cle is serviced. The data obtained is used to
properly diagnose and service your vehicle or
to further optimize and develop vehicle func-
tions.
COMAND/mbrace (Canada: TELEAID)
If the vehicle is equipped with COMAND or
mbrace, additional data about the vehicle’s
operation, the use of the vehicle in certain
situations, and the location of the vehicle may
be compiled through COMAND or the mbrace
system.
For additional information please refer to the
COMAND User Manual and/or the mbrace
Terms and Conditions.
Event data recorders
This vehicle is equipped with an event data
recorder (EDR). The main purpose of an EDR
is to record data that will assist in under-
standing how a vehicle’s systems performed
in certain crash or near crash-like situations,
such as during air bag deployment or when
hitting a road obstacle. The EDR is designed
to record data related to vehicle dynamics
and safety systems for a short period of time,
typically 30 seconds or less.
The EDR in this vehicle is designed to record
such data as:
Rhow various systems in your vehicle are
operating
Rwhether or not the driver and passenger
seat belts are fastened
Rhow far (if at all) the driver is depressing the
accelerator and/or brake pedal and
Rhow fast the vehicle is traveling
30Introduction
Page 46 of 462
Useful information
i
This Operator's Manual describes all
models and all standard and optional equip-
ment of your vehicle available at the time of
publication of the Operator's Manual.
Country-specific differences are possible.
Please note that your vehicle may not be
equipped with all features described. This
also applies to safety-related systems and
functions.
iRead the information on qualified special-
ist workshops (
Ypage 29).
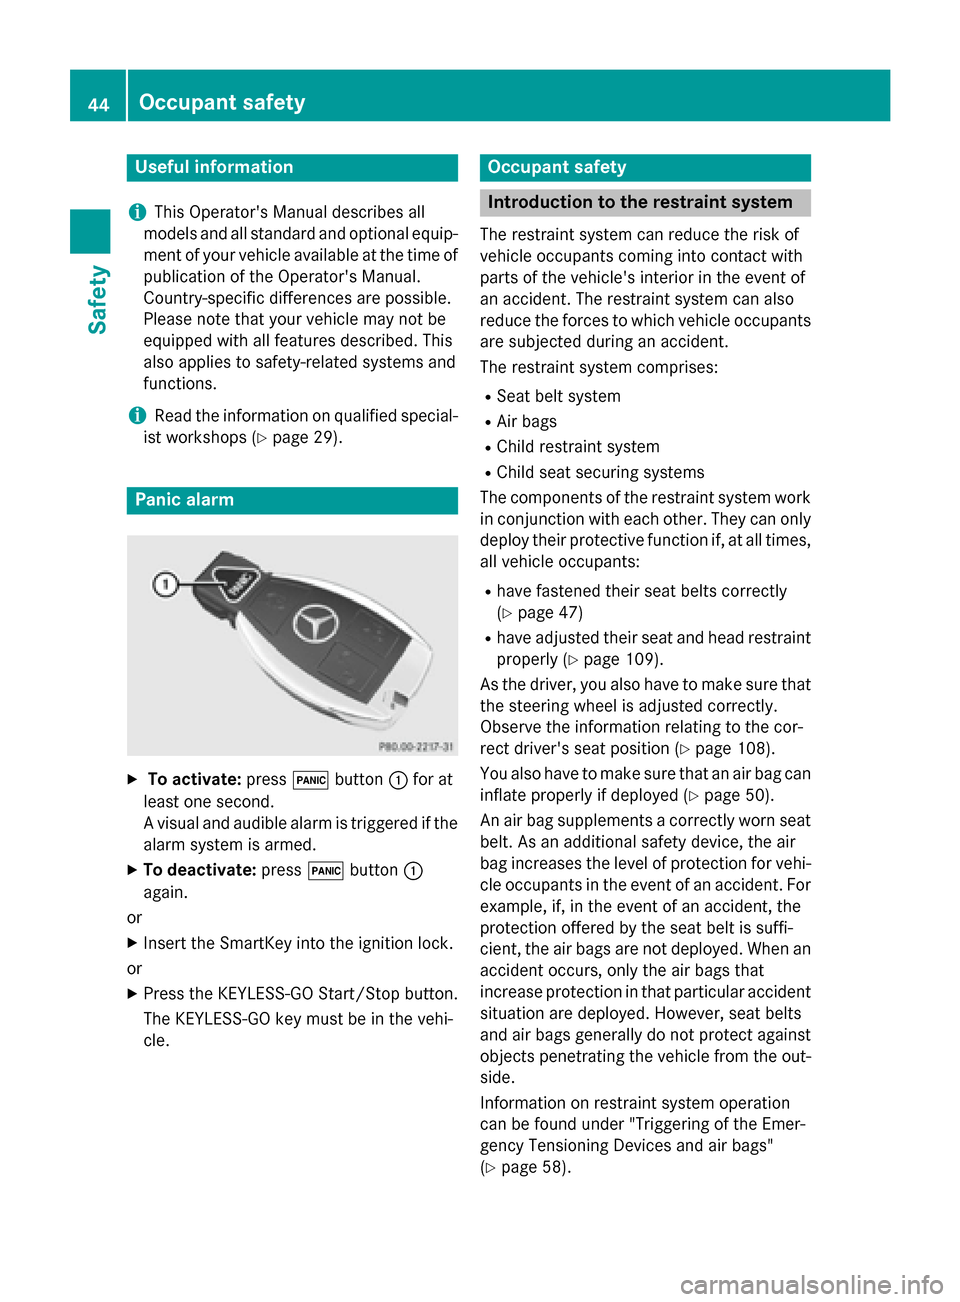
Panic alarm
XTo activate: press!button :for at
least one second.
A visual and audible alarm is triggered if the
alarm system is armed.
XTo deactivate: press!button :
again.
or
XInsert the SmartKey into the ignition lock.
or
XPress the KEYLESS-GO Start/Stop button.
The KEYLESS-GO key must be in the vehi-
cle.
Occupant safety
Introduction to the restraint system
The restraint system can reduce the risk of
vehicle occupants coming into contact with
parts of the vehicle's interior in the event of
an accident. The restraint system can also
reduce the forces to which vehicle occupants
are subjected during an accident.
The restraint system comprises:
RSeat belt system
RAir bags
RChild restraint system
RChild seat securing systems
The components of the restraint system work in conjunction with each other. They can only
deploy their protective function if, at all times,
all vehicle occupants:
Rhave fastened their seat belts correctly
(
Ypage 47)
Rhave adjusted their seat and head restraint
properly (
Ypage 109).
As the driver, you also have to make sure that
the steering wheel is adjusted correctly.
Observe the information relating to the cor-
rect driver's seat position (
Ypage 108).
You also have to make sure that an air bag can inflate properly if deployed (
Ypage 50).
An air bag supplements a correctly worn seat
belt. As an additional safety device, the air
bag increases the level of protection for vehi-
cle occupants in the event of an accident. For
example, if, in the event of an accident, the
protection offered by the seat belt is suffi-
cient, the air bags are not deployed. When an
accident occurs, only the air bags that
increase protection in that particular accident
situation are deployed. However, seat belts
and air bags generally do not protect against objects penetrating the vehicle from the out-
side.
Information on restraint system operation
can be found under "Triggering of the Emer-
gency Tensioning Devices and air bags"
(
Ypage 58).
44Occupant safety
Safety
Page 49 of 462

tional injury, for example, in an accident, dur-ing braking or when abruptly changing direc-
tion. This poses an increased risk of injury or
even fatal injury.
Make sure that all vehicle occupants are
seated properly with a correctly fastened seat
belt.
GWARNING
The seat belt does not offer the intended level of protection if you have not moved the back-
rest to an almost vertical position. When brak-
ing or in the event of an accident, you could
slide underneath the seat belt and sustain
abdomen or neck injuries, for example. This
poses an increased risk of injury or even fatal injury.
Adjust the seat properly before beginning
your journey. Always ensure that the backrest
is in an almost vertical position and that the
shoulder section of your seat belt is routed
across the center of your shoulder.
GWARNING
Persons under 5 ft (1.50 m) in heightcannot
fasten the seat belt correctly without an addi- tional suitable restraint system. If the seat
belt is incorrectly fastened, it cannot protect
as intended. Furthermore, an incorrectly fas-
tened seat belt can cause additional injury, for
example, in an accident, during braking or an
abrupt change of direction. This poses an
increased risk of injury or even fatal injury.
For this reason, always secure persons under
5 ft (1.50 m) in height in suitable restrain t
systems.
If a child younger than twelve years old and
under 5 ft (1.50 m) in height istraveling in the
vehicle:
Ralways secure the child in a child restraint
system suitable for this Mercedes-Benz
vehicle. The child restraint system must be appropriate to the age, weight and size of
the child
Ralways observe the instructions and safety
notes in the "Children in the vehicle" sec-
tion of this Operator's Manual
(
Ypage 61) in addition to the child
restraint system manufacturer's installa-
tion instructions
Rbe sure to observe the instructions and
safety notes on the "Occupant classifica-
tion system (OCS)" (
Ypage 53)
GWARNING
The seat belts may not perform their intended protective function if:
Rthey are damaged, modified, extremely
dirty, bleach or dyed
Rthe seat belt buckle is damaged or
extremely dirty
Rthe Emergency Tensioning Devices, belt
anchorages or inertia reels have been modi-
fied
Seat belts may sustain non-visible damage in an accident, e.g. due to glass splinters. Modi-
fied or damaged seat belts may tear or fail,
e.g. in an accident. Modified Emergency Ten-
sioning Devices could accidentally trigger or
fail to deploy when necessary. This poses an
increased risk of injury or even fatal injury.
Never modify the seat belts, Emergency Ten-
sioning Devices, belt anchorages or inertia
reels. Make sure that the seat belts are
undamaged, not worn out and clean. Follow-
ing an accident, have the seat belts checked
immediately at a qualified specialist work-
shop.
Only use seat belts that have been approved
for your vehicle by Mercedes-Benz.
Proper use of the seat belts
Observe the safety notes on the seat belt
(
Ypage 46).
All vehicle occupants must be wearing the
seat belt correctly before beginning the jour-
ney. Also make sure that all vehicle occu-
Occupant safety47
Safety
Z
Page 50 of 462

pants are always wearing the seat belt cor-
rectly while the vehicle is in motion.
When fastening the seat belt, always make
sure that:
Rthe seat belt tongue is only inserted to thebelt buckle belonging to that seat.
Rthe seat belt is tight across your body.
Avoid wearing bulky clothing, e.g. a winter
coat.
Rthe seat belt is not twisted.
Only then can the forces which occur be
distributed over the area of the belt.
Rthe shoulder section of the belt is always
routed across the center of your shoulder.
The shoulder section of the belt must not
come into contact with your neck or be
routed under your arm. Where possible,
adjust the seat belt to the appropriate
height.
Rthe lap belt passes tightly and as low down
as possible across your lap.
The lap belt must always be routed across
your hip joints and not across your abdo-
men. This applies particularly to pregnant
women. If necessary, push the lap belt
down to your hip joint and pull it tight using
the shoulder section of the belt.
Rthe seat belt is not routed across sharp,
pointed or fragile objects.
If you have such items located on or in yourclothing, e.g. pens, keys or eyeglasses,
store these in a suitable place.
Ronly one person is using a seat belt at a
time.
Infants and children must never travel sit-
ting on the lap of a vehicle occupant. In the
event of an accident, they could be crushed
between the vehicle occupant and seat
belt.
Robjects are never secured with a seat belt if the seat belt is also being used by one of the
vehicle's occupants.
Seat belts are only intended to secure and
restrain vehicle occupants. Always observe the "Loading guidelines" for securing objects,
luggage or loads (
Ypage 340).
Fastening and adjusting the seat belts
Observe the safety notes on the seat belt
(
Ypage 46) and the notes on correct use of
seat belts (
Ypage 47).
Basic illustration
XAdjust the seat (Ypage 108).
The seat backrest must be in an almost
vertical position.
XPull the seat belt smoothly from belt outlet
= and engage belt tongue ;into belt
buckle :.
The seat belt on the driver’s seat and the
front-passenger seat may be tightened
automatically, see "Belt adjustment"
(
Ypage 49).
XIf necessary, pull upwards on the shoulder
section of the seat belt to tighten the belt
across your body.
48Occupant safety
Safety
Page 51 of 462
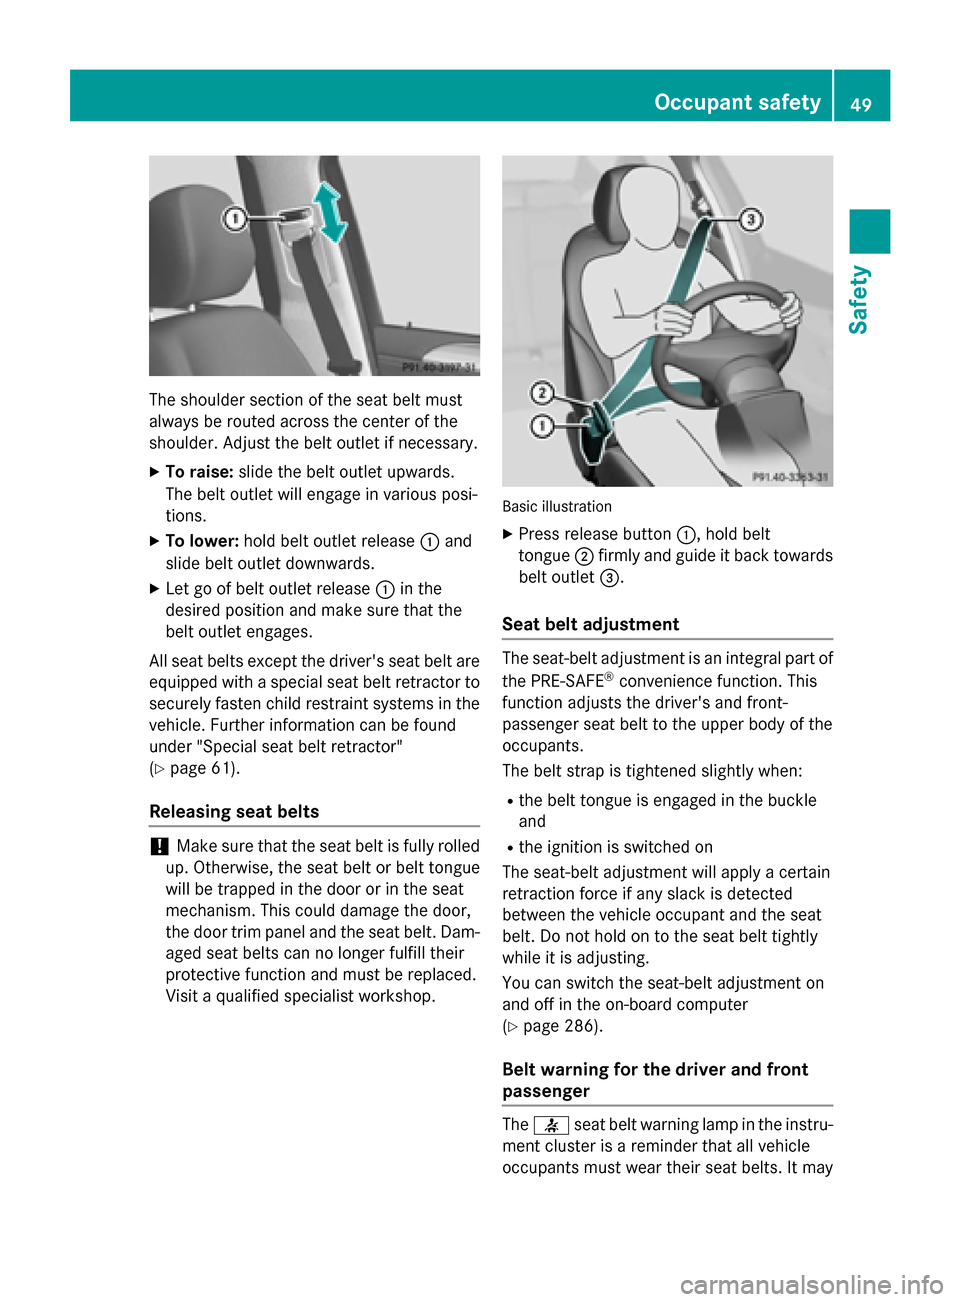
The shoulder section of the seat belt must
always be routed across the center of the
shoulder. Adjust the belt outlet if necessary.
XTo raise:slide the belt outlet upwards.
The belt outlet will engage in various posi-
tions.
XTo lower: hold belt outlet release :and
slide belt outlet downwards.
XLet go of belt outlet release :in the
desired position and make sure that the
belt outlet engages.
All seat belts except the driver's seat belt are
equipped with a special seat belt retractor to
securely fasten child restraint systems in the
vehicle. Further information can be found
under "Special seat belt retractor"
(
Ypage 61).
Releasing seat belts
!Make sure that the seat belt is fully rolled
up. Otherwise, the seat belt or belt tongue
will be trapped in the door or in the seat
mechanism. This could damage the door,
the door trim panel and the seat belt. Dam-
aged seat belts can no longer fulfill their
protective function and must be replaced.
Visit a qualified specialist workshop.
Basic illustration
XPress release button :, hold belt
tongue ;firmly and guide it back towards
belt outlet =.
Seat belt adjustment
The seat-belt adjustment is an integral part of
the PRE-SAFE®convenience function. This
function adjusts the driver's and front-
passenger seat belt to the upper body of the
occupants.
The belt strap is tightened slightly when:
Rthe belt tongue is engaged in the buckle
and
Rthe ignition is switched on
The seat-belt adjustment will apply a certain
retraction force if any slack is detected
between the vehicle occupant and the seat
belt. Do not hold on to the seat belt tightly
while it is adjusting.
You can switch the seat-belt adjustment on
and off in the on-board computer
(
Ypage 286).
Belt warning for the driver and front
passenger
The 7 seat belt warning lamp in the instru-
ment cluster is a reminder that all vehicle
occupants must wear their seat belts. It may
Occupant safety49
Safety
Z
Page 53 of 462
erwise be in the deployment area of the air
bag.
RFor this reason, always secure persons less
than 5 ft (1.50 m) tall in suitable restraint
systems. Up to this height, the seat belt
cannot be worn correctly.
If a child is traveling in your vehicle, also
observe the following notes:
RAlways secure children under twelve years
of age and less than 5 ft (1.50 m) tall in
suitable child restraint systems.
RChild restraint systems should be installed on the rear seats.
ROnly secure a child in a rearward-facing
child restraint system on the front-
passenger seat when the front-passenger
front air bag is deactivated. If the
PASSENGER AIR BAG OFF indicator lamp ispermanently lit, the front-passenger front
air bag is deactivated (
Ypage 45).
RAlways observe the instructions and safetynotes on the "Occupant Classification Sys-
tem (OCS)" (
Ypage 53) and on "Children
in the vehicle" (
Ypage 61) in addition to
the child restraint system manufacturer's
installation instructions.
Objects in the vehicle interior may pre-
vent an air bag from functioning correctly.
Before starting your journey and to avoid risks
resulting from the speed of the air bag as it
deploys, make sure that:
Rthere are no people, animals or objects
between the vehicle occupants and an air
bag.
Rthere are no objects between the seat, door
and B-pillar.
Rno hard objects, e.g. coat hangers, hang on
the grab handles or coat hooks.
Rno accessories, such as cup holders, are
attached to the vehicle within the deploy-
ment area of an air bag, e.g. to doors, side
windows, rear side trim or side walls.
Rno heavy, sharp-edged or fragile objects
are in the pockets of your clothing. Store
such objects in a suitable place.
GWARNING
If you modify the air bag cover or affix objects
such as stickers to it, the air bag can no longer
function correctly. There is an increased risk
of injury.
Never modify an air bag cover or affix objects
to it.
GWARNING
Sensors to control the air bags are located in
the doors. Modifications or work not per-
formed correctly to the doors or door panel-
ing, as well as damaged doors, can lead to the
function of the sensors being impaired. The air
bags might therefore not function properly
anymore. Consequently, the air bags cannot
protect vehicle occupants as they are
designed to do. There is an increased risk of
injury.
Never modify the doors or parts of the doors.
Always have work on the doors or door pan-
eling carried out at a qualified specialist work-
shop.
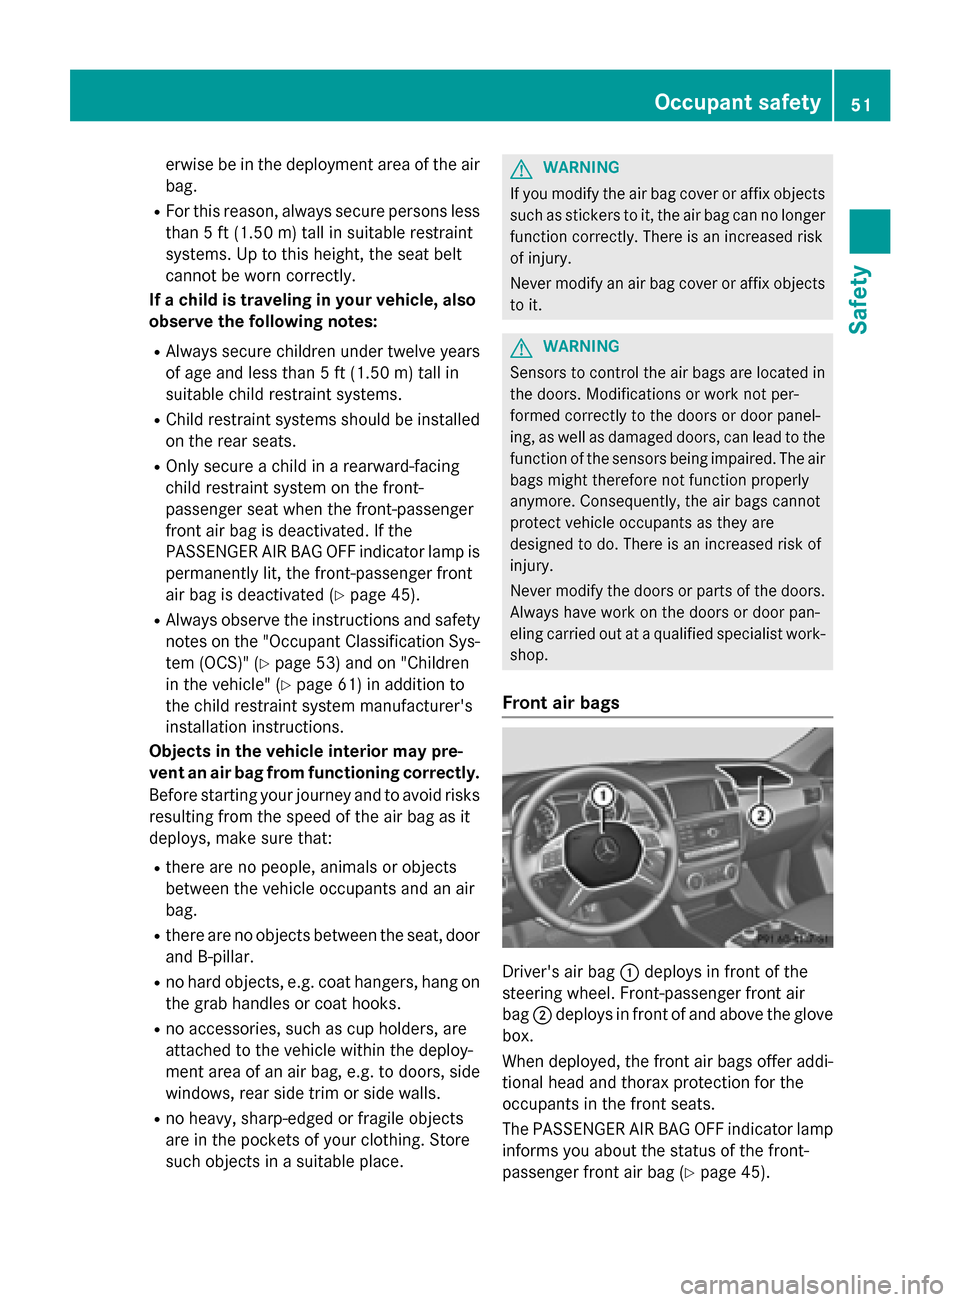
Front air bags
Driver's air bag :deploys in front of the
steering wheel. Front-passenger front air
bag ;deploys in front of and above the glove
box.
When deployed, the front air bags offer addi-
tional head and thorax protection for the
occupants in the front seats.
The PASSENGER AIR BAG OFF indicator lamp
informs you about the status of the front-
passenger front air bag (
Ypage 45).
Occupant safety51
Safety
Z
Page 56 of 462
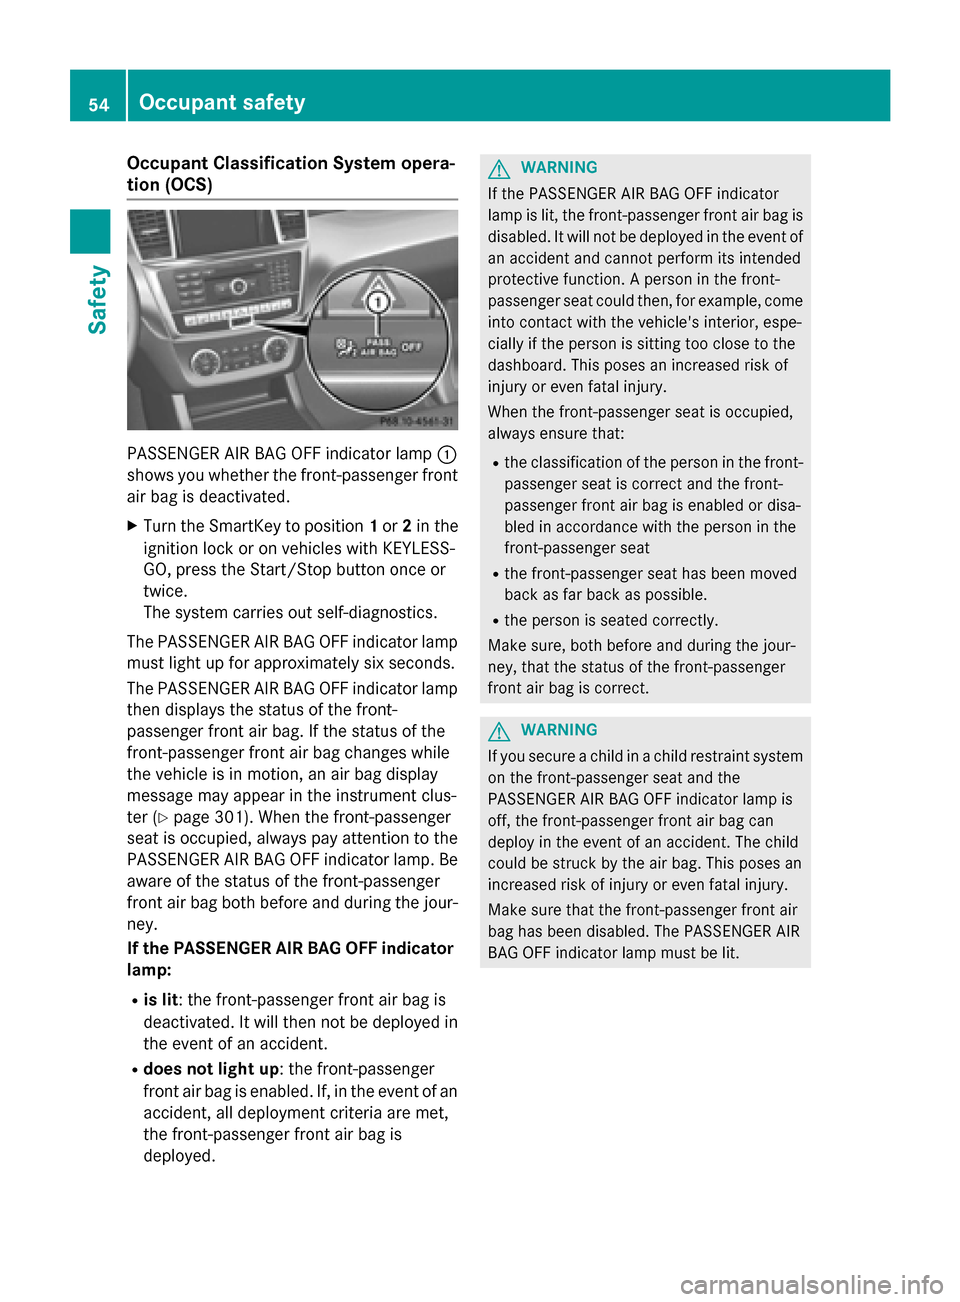
Occupant Classification System opera-
tion (OCS)
PASSENGER AIR BAG OFF indicator lamp:
shows you whether the front-passenger front
air bag is deactivated.
XTurn the SmartKey to position 1or 2in the
ignition lock or on vehicles with KEYLESS-
GO, press the Start/Stop button once or
twice.
The system carries out self-diagnostics.
The PASSENGER AIR BAG OFF indicator lamp
must light up for approximately six seconds.
The PASSENGER AIR BAG OFF indicator lamp
then displays the status of the front-
passenger front air bag. If the status of the
front-passenger front air bag changes while
the vehicle is in motion, an air bag display
message may appear in the instrument clus-
ter (
Ypage 301). When the front-passenger
seat is occupied, always pay attention to the
PASSENGER AIR BAG OFF indicator lamp. Be
aware of the status of the front-passenger
front air bag both before and during the jour-
ney.
If the PASSENGER AIR BAG OFF indicator
lamp:
Ris lit: the front-passenger front air bag is
deactivated. It will then not be deployed in
the event of an accident.
Rdoes not light up: the front-passenger
front air bag is enabled. If, in the event of an
accident, all deployment criteria are met,
the front-passenger front air bag is
deployed.
GWARNING
If the PASSENGER AIR BAG OFF indicator
lamp is lit, the front-passenger front air bag is
disabled. It will not be deployed in the event of
an accident and cannot perform its intended
protective function. A person in the front-
passenger seat could then, for example, come
into contact with the vehicle's interior, espe-
cially if the person is sitting too close to the
dashboard. This poses an increased risk of
injury or even fatal injury.
When the front-passenger seat is occupied,
always ensure that:
Rthe classification of the person in the front- passenger seat is correct and the front-
passenger front air bag is enabled or disa-
bled in accordance with the person in the
front-passenger seat
Rthe front-passenger seat has been moved
back as far back as possible.
Rthe person is seated correctly.
Make sure, both before and during the jour-
ney, that the status of the front-passenger
front air bag is correct.
GWARNING
If you secure a child in a child restraint system on the front-passenger seat and the
PASSENGER AIR BAG OFF indicator lamp is
off, the front-passenger front air bag can
deploy in the event of an accident. The child
could be struck by the air bag. This poses an
increased risk of injury or even fatal injury.
Make sure that the front-passenger front air
bag has been disabled. The PASSENGER AIR
BAG OFF indicator lamp must be lit.
54Occupant safety
Safety