traction control MERCEDES-BENZ GL-Class 2016 X166 Owner's Manual
[x] Cancel search | Manufacturer: MERCEDES-BENZ, Model Year: 2016, Model line: GL-Class, Model: MERCEDES-BENZ GL-Class 2016 X166Pages: 462, PDF Size: 10.44 MB
Page 6 of 462
1, 2, 3 ...
4ETS (Electronic Traction System)see ETS/4ETS (Electronic Trac-
tion System)
4MATIC (permanent four-wheel
drive) .................................................. 256
12 V socket
see Sockets
115 V socket ...................................... 354
360° camera
Cleaning ........................................ .380
Function/notes .............................2 36
A
ABS (Anti-lock Braking System)
Display message ............................ 291
Function/notes ................................ 68
Important safety notes .................... 68
Warning lamp ................................. 327
Accident
Automatic measures after an acci-
dent ................................................. 60
Activating/deactivating cooling
with air dehumidification ................. 153
Active Blind Spot Assist
Activating/deactivating (on-
board computer) ............................ 282
Display message ............................ 314
Function/information .................... 248
Trailer towing ................................. 251
Active Curve System
Display message ............................ 311
Function/notes ............................. 219
Active Driving Assistance package .. 248
Active Lane Keeping Assist
Activating/deactivating (on-
board computer) ............................ 282
Display message ............................ 314
Function/information .................... 251
Trailer towing ................................. 254
Active Parking Assist
Display message ............................ 315
Exiting a parking space .................. 230
Function/notes ............................. 227
Important safety notes .................. 227
Parking .......................................... 229 Towing a trailer .............................. 231
ADAPTIVE BRAKE ................................. 76
Adaptive Brake Assist
Display message ............................ 298
Function/notes ................................ 72
Adaptive Highbeam Assist
Display message ............................ 306
Function/notes ............................. 134
Switching on/off ........................... 134
Additives (engine oil) ........................ 451
ADS (Adaptive Damping System)
Function/notes ............................. 218
Air bags
Deployment ..................................... 58
Display message ............................ 301
Front air bag (driver, front
passenger) ....................................... 51
Important safety notes .................... 50
Introduction ..................................... 50
Knee bag .......................................... 52
Occupant Classification System
(OCS) ............................................... 53
PASSENGER AIR BAG OFF indica-
torlamp ........................................... 45
Si
de impact air bag .......................... 52
Window curtain air bag .................... 53
Air filter (display message) .............. 309
AIR FLOW ........................................... 155
Air vents
Glove box ....................................... 161
Important safety notes .................. 160
Rear ............................................... 161
Setting ........................................... 160
Setting the center air vents ........... 160
Setting the side air vents ............... 161
Air-conditioning system
see Climate control
AIRMATIC package
ADS (Adaptive Damping System) ... 218
Function/notes ............................. 218
Level control .................................. 219
Alarm
ATA (Anti-Theft Alarm system) ......... 78
Switching off (ATA) .......................... 78
Switching the function on/off
(ATA) ................................................ 78
Alarm system
see ATA (Anti-Theft Alarm system)
4Index
Page 75 of 462
Observe the notes in the section on break-ing-in (
Ypage 164).
Following damage to the front end of the vehi-
cle, have the configuration and operation of
the radar sensor checked at a qualified spe-
cialist workshop. This also applies to colli-
sions at low speeds where there is no visible
damage to the front of the vehicle.
ESP®(Electronic Stability Program)
General notes
iObserve the "Important safety notes" sec-
tion (
Ypage 68).
ESP
®monitors driving stability and traction,
i.e. power transmission between the tires and
the road surface.
If ESP
®detects that the vehicle is deviating
from the direction desired by the driver, one
or more wheels are braked to stabilize the
vehicle. The engine output is also modified to
keep the vehicle on the desired course within
physical limits. ESP
®assists the driver when
pulling away on wet or slippery roads. ESP®
can also stabilize the vehicle during braking.
ETS/4ETS (Electronic Traction System)
4ETS traction control is part of ESP®.
Traction control brakes the drive wheels indi-
vidually if they spin. This enables you to pull
away and accelerate on slippery surfaces, for
example if the road surface is slippery on one
side. In addition, more drive torque is trans-
ferred to the wheel or wheels with traction.
Traction control remains active, even if you
deactivate ESP
®.
In appropriate driving situations, activate the
off-road program (
Ypage 258).
Off-road 4ETS (Electronic Traction Sys-
tem)
A 4ETS system specifically suited to off-road
terrain is activated automatically once the off-
road program is activated (
Ypage 258).
Important safety notes
GWARNING
If ESP
®is malfunctioning, ESP®is unable to
stabilize the vehicle. Additionally, further driv-
ing safety systems are deactivated. This
increases the risk of skidding and an accident.
Drive on carefully. Have ESP
®checked at a
qualified specialist workshop.
!Only operate the vehicle for a maximum of
ten seconds on a brake test dynamometer.
Switch off the ignition.
Application of the brakes by ESP
®may oth-
erwise destroy the brake system.
!A function or performance test should
only be carried out on a two-axle dyna-
mometer. Before you operate the vehicle
on such a dynamometer, please consult a
qualified workshop. You could otherwise
damage the drive train or the brake system.
ESP
®is only deactivated if the åwarning
lamp is lit continuously.
If the ÷ warning lamp and the åwarn-
ing lamp are lit continuously, ESP
®is not
available due to a malfunction.
Observe the information on warning lamps
(
Ypage 330) and display messages which
may be shown in the instrument cluster
(
Ypage 291).
iOnly use wheels with the recommended
tire sizes. Only then will ESP®function
properly.
Driving safety systems73
Safety
Z
Page 77 of 462
The spinning of the wheels results in a cut-
ting action for better traction on loose sur-
faces.
Rtraction control is still activated.
RESP®still provides support when you
brake.
Off-road ESP®(vehicles with ON&OFF-
ROAD package)
An ESP®system specifically suited to off-road
terrain is activated automatically once the off-
road program is activated (
Ypage 258).
Off-road ESP
®intervenes with a delay if there
is oversteering or understeering, thus improv-
ing traction.
ESP®trailer stabilization
General information
If your vehicle/trailer combination begins to
swerve, ESP
®assists you in this situation.
ESP®slows the vehicle down by braking and
limiting the engine output until the vehicle/
trailer combination has stabilized.
Important safety notes
GWARNING
If road and weather conditions are poor,
trailer stabilization will not be able to prevent
the vehicle/trailer combination from swerv-
ing. Trailers with a high center of gravity can
tip over before ESP
®can detect this. There is
a risk of an accident.
Always adapt your driving style to the prevail-
ing road and weather conditions.
If your vehicle with trailer (vehicle/trailer
combination) begins to lurch, you can only
stabilize the vehicle/trailer combination by
depressing the brake firmly.
Trailer stabilization is active above speeds of
about 37 mph (60 km/h).
ESP
®trailer stabilization does not work if
ESP®is deactivated or disabled because of a
malfunction.
Crosswind Assist
General information
Strong crosswinds can cause your vehicle to
deviate from a straight course. The crosswind
driving assistance function integrated into
ESP
®significantly reduces these effects.
ESP
®intervenes automatically according to
the direction and intensity of the crosswinds
affecting your vehicle.
ESP intervenes with stabilizing braking to
assist you in keeping the vehicle in the lane.
Crosswind Assist is active at vehicle speeds
above 50 mph (80 km/h) when driving
straight ahead or cornering gently.
Important safety notes
Crosswind Assist does not work if ESP
®is
deactivated or disabled because of a mal-
function.
EBD (electronic brake force distribu-
tion)
General information
EBD monitors and controls the brake pres-
sure on the rear wheels to improve driving
stability while braking.
Important safety notes
iObserve the "Important safety notes" sec-
tion for driving safety systems (
Ypage 68).
GWARNING
If EBD is malfunctioning, the rear wheels can
lock, e.g. under full braking. This increases the
risk of skidding and an accident.
You should therefore adapt your driving style
to the different handling characteristics. Have
the brake system checked at a qualified spe-
cialist workshop.
Observe information regarding indicator and
warning lamps (
Ypage 327) as well as dis-
play messages (
Ypage 293).
Driving safety systems75
Safety
Z
Page 205 of 462
select a lower gear in good time on long and
steep downhill gradients, especially if the
vehicle is laden or towing a trailer. By doing
so, you will make use of the braking effect of
the engine. This relieves the load on the brake
system and prevents the brakes from over-
heating and wearing too quickly.
Use cruise control only if road and traffic con-
ditions make it appropriate to maintain a
steady speed for a prolonged period. You can
store any road speed above 20 mph
(30 km/h).
iCruise control should not be activated
when driving off-road.
Important safety notes
If you fail to adapt your driving style, cruise
control can neither reduce the risk of an acci-
dent nor override the laws of physics. Cruise
control cannot take into account the road,
traffic and weather conditions. Cruise control
is only an aid. You are responsible for the dis-
tance to the vehicle in front, for vehicle speed,
for braking in good time and for staying in
your lane.
Do not use cruise control:
Rin road and traffic conditions which do not
allow you to maintain a constant speed e.g.
in heavy traffic or on winding roads
Ron slippery road surfaces. Braking or accel- erating could cause the drive wheels to lose
traction and the vehicle could then skid
Rwhen there is poor visibility, e.g. due to fog,
heavy rain or snow
If there is a change of drivers, advise the new
driver of the speed stored.
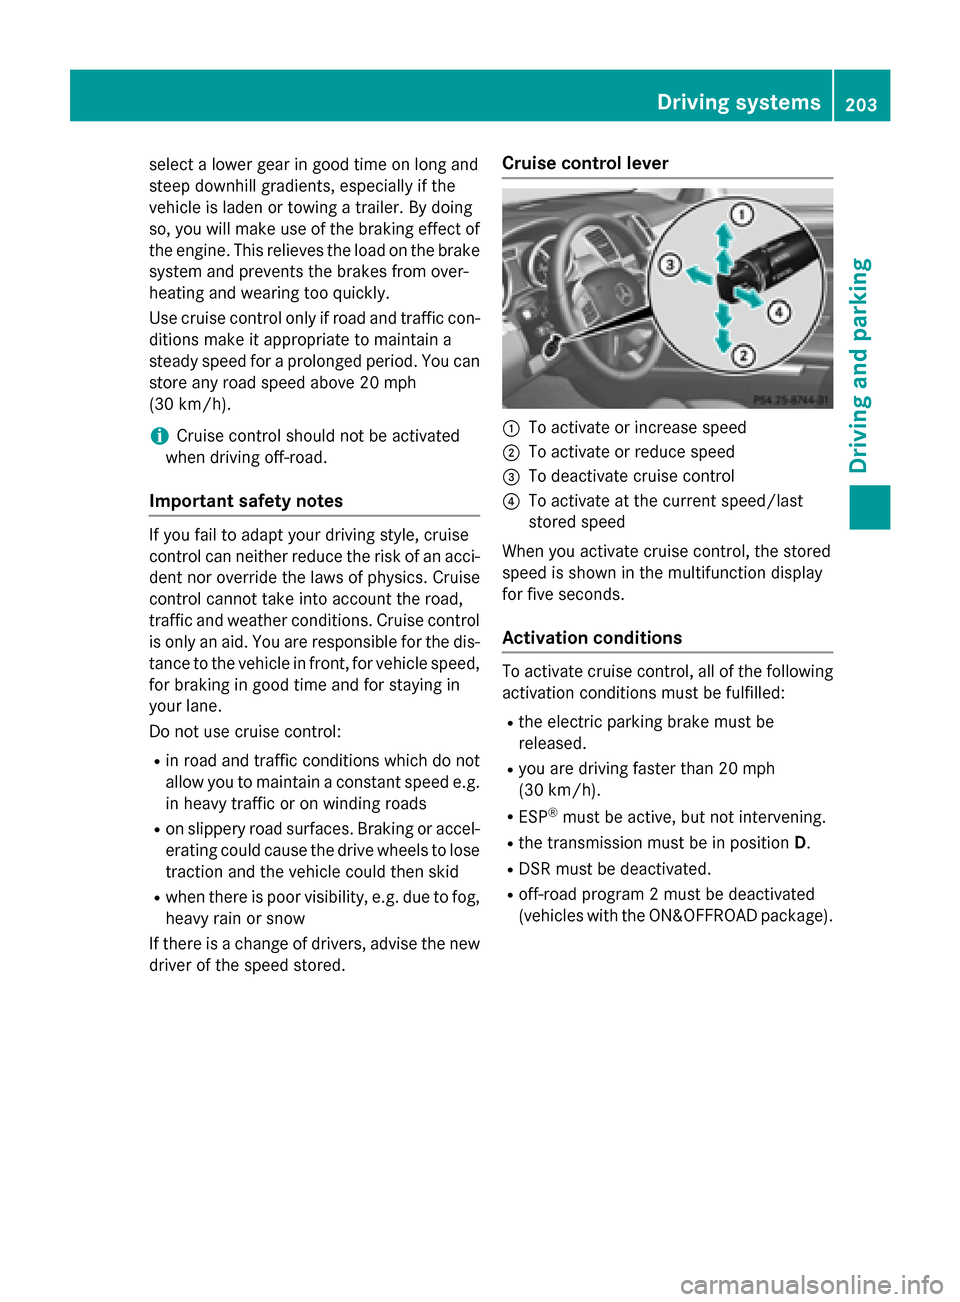
Cruise control lever
:To activate or increase speed
;To activate or reduce speed
=To deactivate cruise control
?To activate at the current speed/last
stored speed
When you activate cruise control, the stored
speed is shown in the multifunction display
for five seconds.
Activation conditions
To activate cruise control, all of the following
activation conditions must be fulfilled:
Rthe electric parking brake must be
released.
Ryou are driving faster than 20 mph
(30 km/h).
RESP®must be active, but not intervening.
Rthe transmission must be in position D.
RDSR must be deactivated.
Roff-road program 2 must be deactivated
(vehicles with the ON&OFFROAD package).
Driving systems203
Driving and parking
Z
Page 209 of 462
Do not use DISTRONIC PLUS:
Rin road and traffic conditions which do not
allow you to maintain a constant speed e.g.
in heavy traffic or on winding roads
Ron slippery road surfaces. Braking or accel-erating could cause the drive wheels to lose
traction and the vehicle could then skid
Rwhen there is poor visibility, e.g. due to fog,
heavy rain or snow
DISTRONIC PLUS may not detect narrow
vehicles driving in front, e.g. motorcycles, or
vehicles driving on a different line.
In particular, the detection of obstacles can
be impaired if:
Rthere is dirt on the sensors or anything else covering the sensors
Rthere is snow or heavy rain
Rthere is interference by other radar sources
Rthere are strong radar reflections, for
example, in parking garages
If DISTRONIC PLUS no longer detects a vehi- cle in front, DISTRONIC PLUS may unexpect-
edly accelerate the vehicle to the stored
speed.
This speed may:
Rbe too high if you are driving in a filter lane
or an exit lane
Rbe so high when driving in the right-hand
lane that you overtake vehicles in the left-
hand lane
Rbe so high when driving in the left-hand lane
that you overtake vehicles in the right-hand
lane
If there is a change of drivers, advise the new
driver of the speed stored.
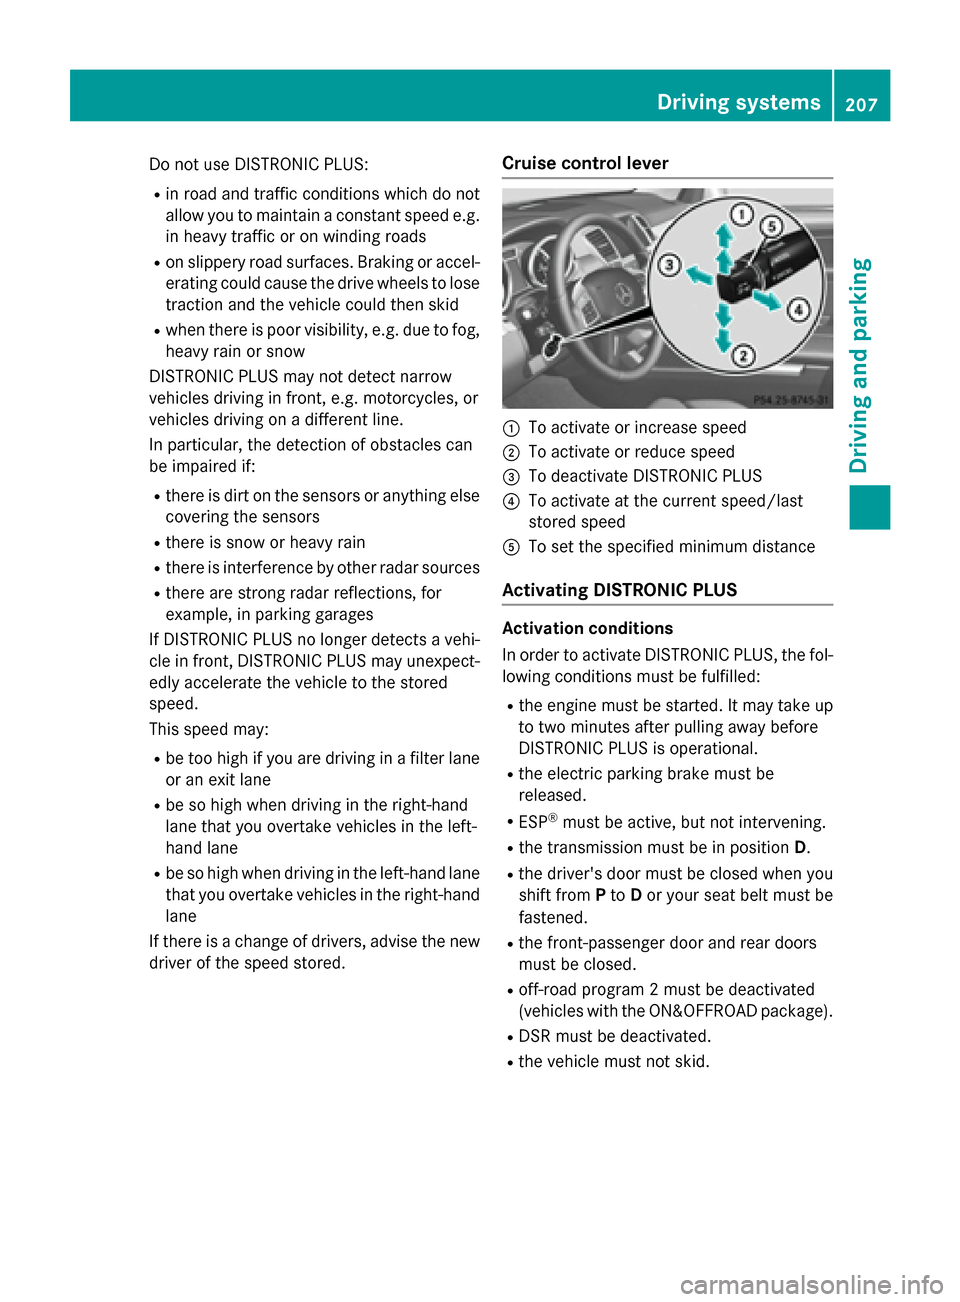
Cruise control lever
:To activate or increase speed
;To activate or reduce speed
=To deactivate DISTRONIC PLUS
?To activate at the current speed/last
stored speed
ATo set the specified minimum distance
Activating DISTRONIC PLUS
Activation conditions
In order to activate DISTRONIC PLUS, the fol-
lowing conditions must be fulfilled:
Rthe engine must be started. It may take up
to two minutes after pulling away before
DISTRONIC PLUS is operational.
Rthe electric parking brake must be
released.
RESP®must be active, but not intervening.
Rthe transmission must be in position D.
Rthe driver's door must be closed when you
shift from Pto Dor your seat belt must be
fastened.
Rthe front-passenger door and rear doors
must be closed.
Roff-road program 2 must be deactivated
(vehicles with the ON&OFFROAD package).
RDSR must be deactivated.
Rthe vehicle must not skid.
Driving system s207
Driving an d parking
Z
Page 259 of 462
!A function or performance test should
only be carried out on a two-axle dyna-
mometer. Before you operate the vehicle
on such a dynamometer, please consult a
qualified workshop. You could otherwise
damage the drive train or the brake system.
iIn wintry driving conditions, the maximum
effect of 4MATIC can only be achieved if
you use winter tires (M+S tires), with snow
chains if necessary.
Further information about "Driving off-road"
(
Ypage 198).
DSR (Downhill Speed Regulation)
General notes
DSR is an aid to assist you when driving down-
hill. It keeps the speed of travel at the speed
selected on the on-board computer. The
steeper the downhill gradient, the greater the
DSR braking effect on the vehicle. When driv-
ing on flat stretches of road or on an uphill
gradient, the DSR braking effect is minimal or
nonexistent.
DSR controls the vehicle’s speed when it is
activated and the transmission is in position
D ,R or N. You can drive at a higher or a lower
speed than that set on the on-board computer
at any time by accelerating or braking.
Important safety notes
GWARNING
If the speed driven and the set speed deviate and you activate DSR on a slippery road sur-
face, the wheels may lose traction. There is an
increased danger of skidding and accidents.
Before switching DSR on, please take into
consideration the road surface and the differ- ence between driving speed and the set
speed.
If you fail to adapt your driving style, DSR can
neither reduce the risk of accident nor over-
ride the laws of physics. DSR cannot take
account of road, weather and traffic condi-
tions. DSR is only an aid. You are responsible for the distance to the vehicle in front, for
vehicle speed, for braking in good time and for
staying in your lane.
You are always responsible for keeping con-
trol of the vehicle and for assessing whether
the downhill gradient can be managed. DSR
may not always be able to keep to the set
speed, depending on road surface and tire
conditions. Select a set speed suitable for the
prevailing conditions and when necessary,
apply the brakes manually.
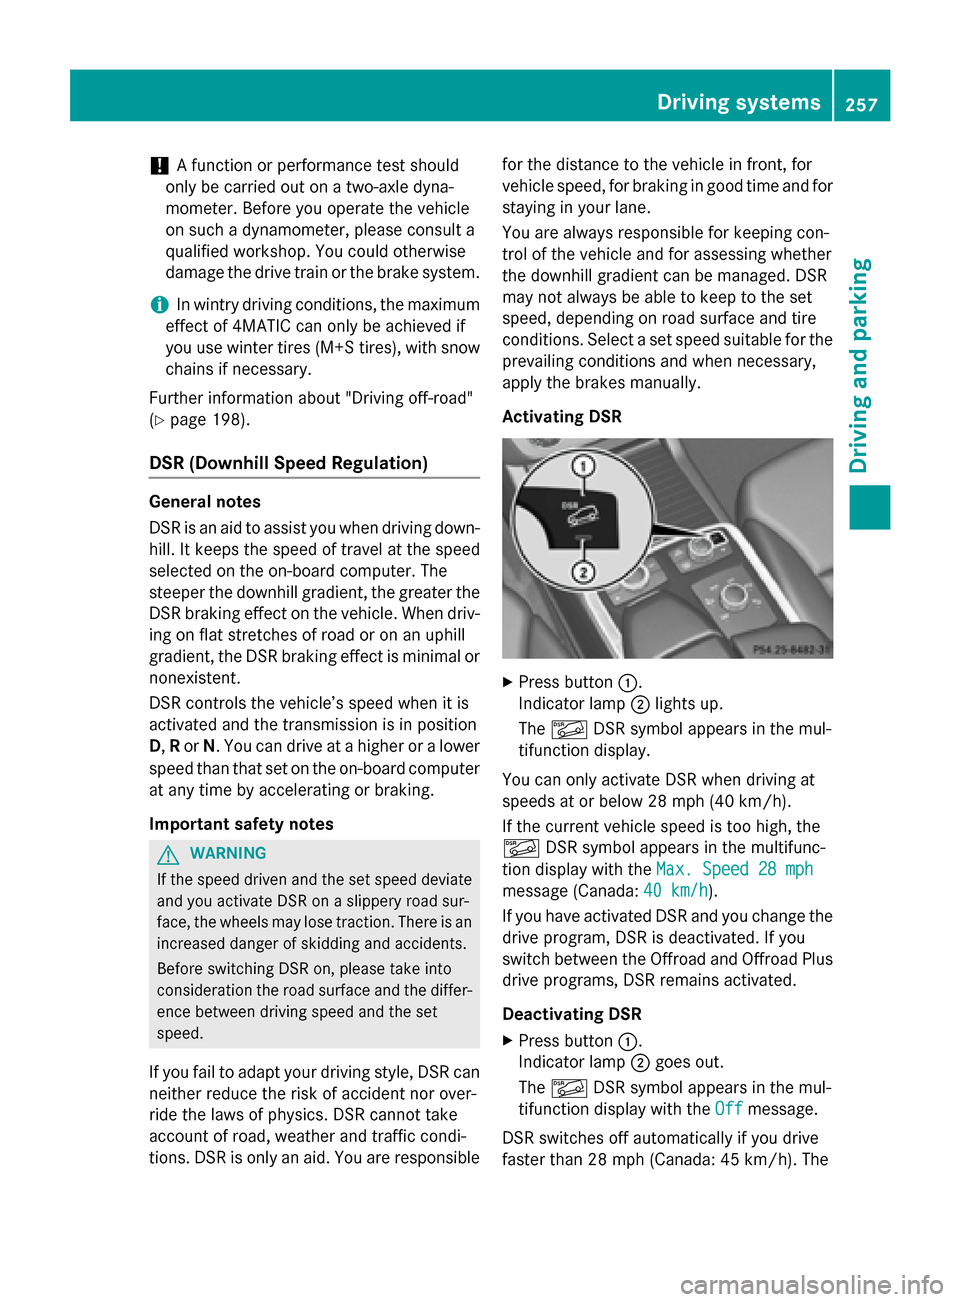
Activating DSR
XPress button
:.
Indicator lamp ;lights up.
The à DSR symbol appears in the mul-
tifunction display.
You can only activate DSR when driving at
speeds at or below 28 mph (40 km/h).
If the current vehicle speed is too high, the
à DSR symbol appears in the multifunc-
tion display with the Max. Speed 28 mph
message (Canada:40 km/h).
If you have activated DSR and you change the drive program, DSR is deactivated. If you
switch between the Offroad and Offroad Plus
drive programs, DSR remains activated.
Deactivating DSR
XPress button :.
Indicator lamp ;goes out.
The à DSR symbol appears in the mul-
tifunction display with the Off
message.
DSR switches off automatically if you drive
faster than 28 mph (Canada: 45 km/h). The
Driving systems257
Driving and parking
Z
Page 261 of 462
Off-road level 1 is set to +1.2 in (+30 mm)
above the vehicle's "highway" level.
Off-road program 1 switches to the AUTO
program if you drive faster than 70 mph
(110 km/h).
Select off-road program 1 for gentle off-road
terrain, e.g. for gravel or sand surfaces or
tracks. The engine's torque is restricted to a
limited degree and the drive wheels can spin.
The spinning wheels produce a cutting effect
for better traction.
You can only activate off-road program 1
when driving at speeds of 60 mph (100 km/h)
or below. The Drive Program OFFROAD 1
Max.60mph (100km/h)message appears
in the multifunction display.
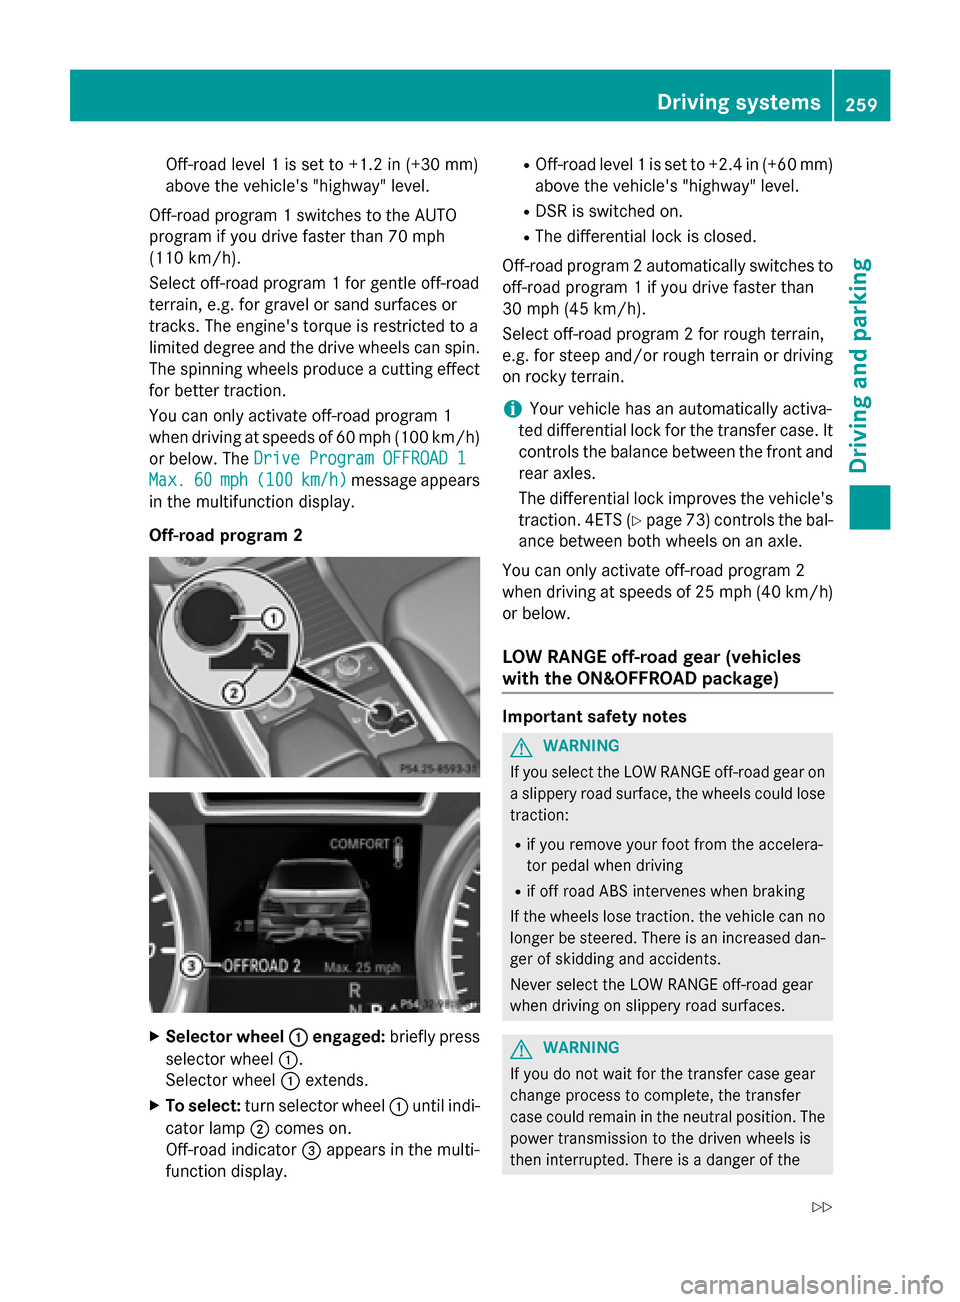
Off-road program 2
XSelector wheel :engaged:briefly press
selector wheel :.
Selector wheel :extends.
XTo select: turn selector wheel :until indi-
cator lamp ;comes on.
Off-road indicator =appears in the multi-
function display.
ROff-road level 1 is set to +2.4 in (+60 mm)
above the vehicle's "highway" level.
RDSR is switched on.
RThe differential lock is closed.
Off-road program 2 automatically switches to
off-road program 1 if you drive faster than
30 mph (45 km/h).
Select off-road program 2 for rough terrain,
e.g. for steep and/or rough terrain or driving
on rocky terrain.
iYour vehicle has an automatically activa-
ted differential lock for the transfer case. It controls the balance between the front and
rear axles.
The differential lock improves the vehicle's
traction. 4ETS (
Ypage 73) controls the bal-
ance between both wheels on an axle.
You can only activate off-road program 2
when driving at speeds of 25 mph (40 km/h)
or below.
LOW RANGE off-road gear (vehicles
with the ON&OFFROAD package)
Important safety notes
GWARNING
If you select the LOW RANGE off-road gear on
a slippery road surface, the wheels could lose traction:
Rif you remove your foot from the accelera-
tor pedal when driving
Rif off road ABS intervenes when braking
If the wheels lose traction. the vehicle can no
longer be steered. There is an increased dan-
ger of skidding and accidents.
Never select the LOW RANGE off-road gear
when driving on slippery road surfaces.
GWARNING
If you do not wait for the transfer case gear
change process to complete, the transfer
case could remain in the neutral position. The power transmission to the driven wheels is
then interrupted. There is a danger of the
Driving systems259
Driving and parking
Z
Page 321 of 462
Display messagesPossible causes/consequences andMSolutions
Check TiresThe tire pressurein on eor mor etires has dropped significantly.
The whee lposition is displayed in th emultifunction display.
A warnin gtone also sounds.
GWARNIN G
Tirepressures that are to olow pos eth efollowing hazards :
Rthey may burst, especially as th eload and vehicl espeed
increase .
Rthey may wear excessivel yand/o runevenly, whic hmay greatl y
impair tire traction .
Rthedrivin gcharacteristics ,as well as steerin gand braking, may
be greatl yimpaired.
There is aris kof an accident.
XStop th evehicl ewithout makin gany sudden steerin gor brakin g
maneuvers .Pay attention to th etraffic condition sas you do so.
XSecur eth evehicl eagainst rollin gaway (Ypage 189).
XCheckth etires and ,if necessary, follow th einstruction sfo r a
flat tire (
Ypage 387).
XCheckth etire pressur e (Ypage 412).
XIf necessary, correc tth etire pressure.
Warnin gTir eMal ‐
function
The tire pressur ein on eor mor etires has dropped suddenly. The
whee lposition is shown in th emultifunction display.
GWARNIN G
Drivingwit h a flat tire poses aris kof th efollowing hazards :
Raflat tire affects th eabilit yto steer or brak eth evehicle.
Ryou could los econtrol of th evehicle.
Rcontinued drivin gwit h a flat tire will caus eexcessive heat build-
up and possibl y afire.
There is aris kof an accident.
XStop th evehicl ewithout makin gany sudden steerin gor brakin g
maneuvers .Pay attention to th etraffic condition sas you do so.
XSecur eth evehicl eagainst rollin gaway (Ypage 189).
XCheckth etires and ,if necessary, follow th einstruction sfo r a
flat tire (
Ypage 387).
Display messages319
On-board computer and displays
Z
Page 332 of 462
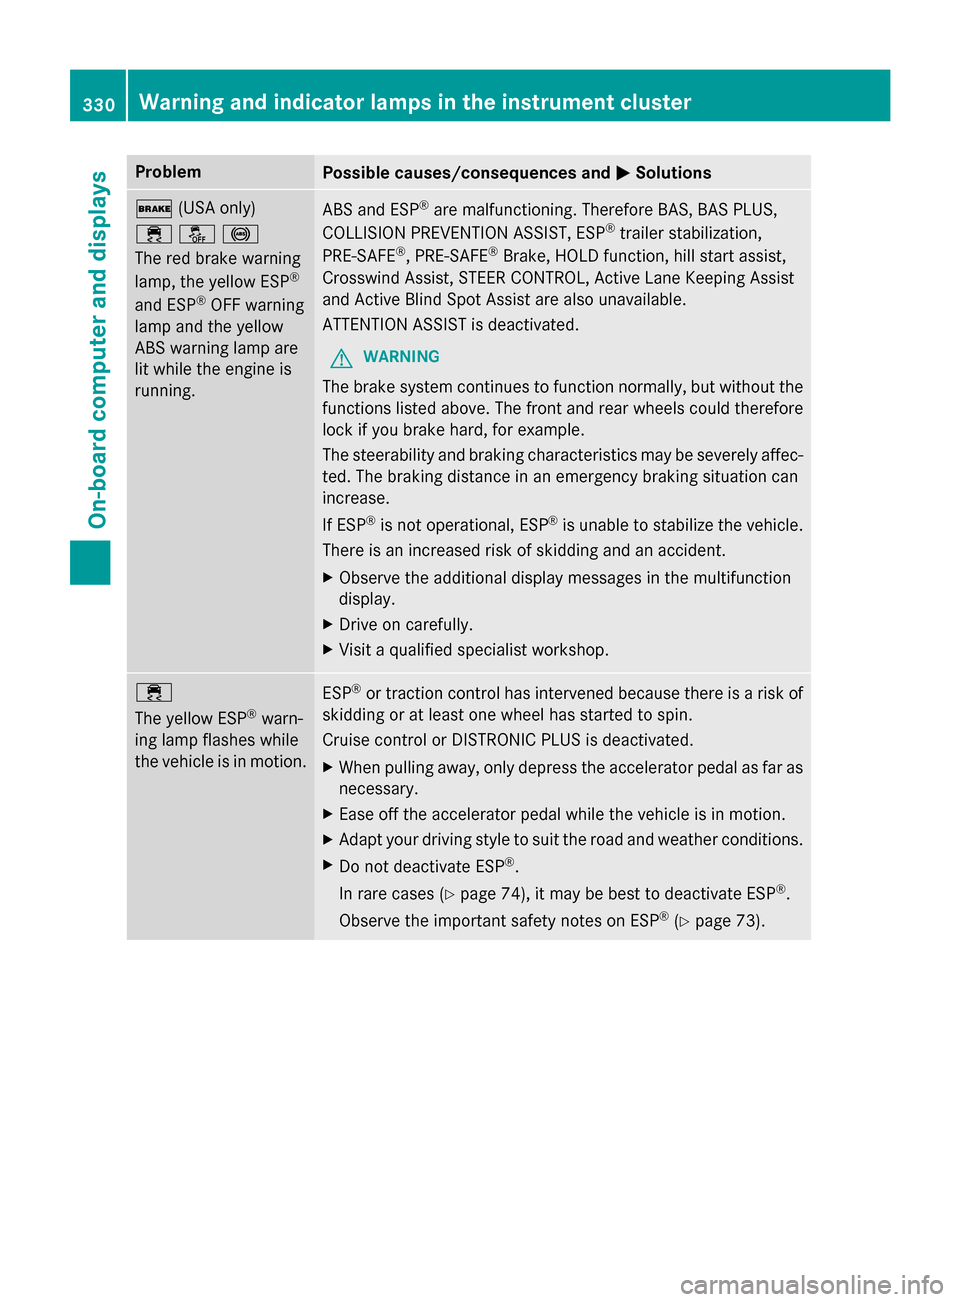
ProblemPossible causes/consequences andMSolutions
$(USA only)
֌!
The red brake warning
lamp, the yellow ESP
®
and ESP®OFF warning
lamp and the yellow
ABS warning lamp are
lit while the engine is
running.
ABS and ESP®are malfunctioning. Therefore BAS, BAS PLUS,
COLLISION PREVENTION ASSIST, ESP®trailer stabilization,
PRE‑SAFE®, PRE ‑SAFE®Brake, HOLD function, hill start assist,
Crosswind Assist, STEER CONTROL, Active Lane Keeping Assist
and Active Blind Spot Assist are also unavailable.
ATTENTION ASSIST is deactivated.
GWARNING
The brake system continues to function normally, but without the
functions listed above. The front and rear wheels could therefore
lock if you brake hard, for example.
The steerability and braking characteristics may be severely affec-
ted. The braking distance in an emergency braking situation can
increase.
If ESP
®is not operational, ESP®is unable to stabilize the vehicle.
There is an increased risk of skidding and an accident.
XObserve the additional display messages in the multifunction
display.
XDrive on carefully.
XVisit a qualified specialist workshop.
÷
The yellow ESP
®warn-
ing lamp flashes while
the vehicle is in motion.
ESP®or traction control has intervened because there is a risk of
skidding or at least one wheel has started to spin.
Cruise control or DISTRONIC PLUS is deactivated.
XWhen pulling away, only depress the accelerator pedal as far as
necessary.
XEase off the accelerator pedal while the vehicle is in motion.
XAdapt your driving style to suit the road and weather conditions.
XDo not deactivate ESP®.
In rare cases (
Ypage 74), it may be best to deactivate ESP®.
Observe the important safety notes on ESP
®(Ypage 73).
330Warning and indicator lamps in the instrument cluster
On-board computer and displays
Page 407 of 462
other obstacles. If it is necessary to drive over
curbs, speed humps or similar elevations, try
to do so slowly and at an obtuse angle. Oth-
erwise, the tires, particularly the sidewalls,
may be damaged.
Regular checking of wheels and tires
GWARNING
Damaged tires can cause tire inflation pres-
sure loss. As a result, you could lose control of
your vehicle. There is a risk of accident.
Check the tires regularly for signs of damage
and replace any damaged tires immediately.
Regularly check the wheels and tires of your
vehicle for damage at least once a month, as
well as after driving off-road or on rough
roads. Damaged wheels can cause a loss of
tire pressure. Pay particular attention to dam-
age such as:
Rcuts in the tires
Rpunctures
Rtears in the tires
Rbulges on tires
Rdeformation or severe corrosion on wheels
Regularly check the tire tread depth and the
condition of the tread across the whole width
of the tire (
Ypage 405). If necessary, turn the
front wheels to full lock in order to inspect the
inner side of the tire surface.
All wheels must have a valve cap to protect
the valve against dirt and moisture. Do not
mount anything onto the valve other than the
standard valve cap or other valve caps
approved by Mercedes-Benz for your vehicle.
Do not use any other valve caps or systems,
e.g. tire pressure monitoring systems.
Regularly check the pressure of all the tires
particularly prior to long trips. Adjust the tire
pressure as necessary (
Ypage 408).
Observe the notes on the emergency spare
wheel (
Ypage 438). The service life of tires depends, among other
things, on the following factors:
RDriving style
RTire pressure
RDistance covered
Notes on tire tread
GWARNING
Insufficient tire tread will reduce tire traction.
The tire is no longer able to dissipate water.
This means that on wet road surfaces, the risk
of hydroplaning increases, in particular where speed is not adapted to suit the driving con-
ditions. There is a risk of accident.
If the tire pressure is too high or too low, tires
may exhibit different levels of wear at differ-
ent locations on the tire tread. Thus, you
should regularly check the tread depth and
the condition of the tread across the entire
width of all tires.
Minimum tire tread depth for:
RSummer tires: âin (3 mm)
RM+S tires: ãin (4 mm)
For safety reasons, replace the tires before
the legally prescribed limit for the minimum
tire tread depth is reached.
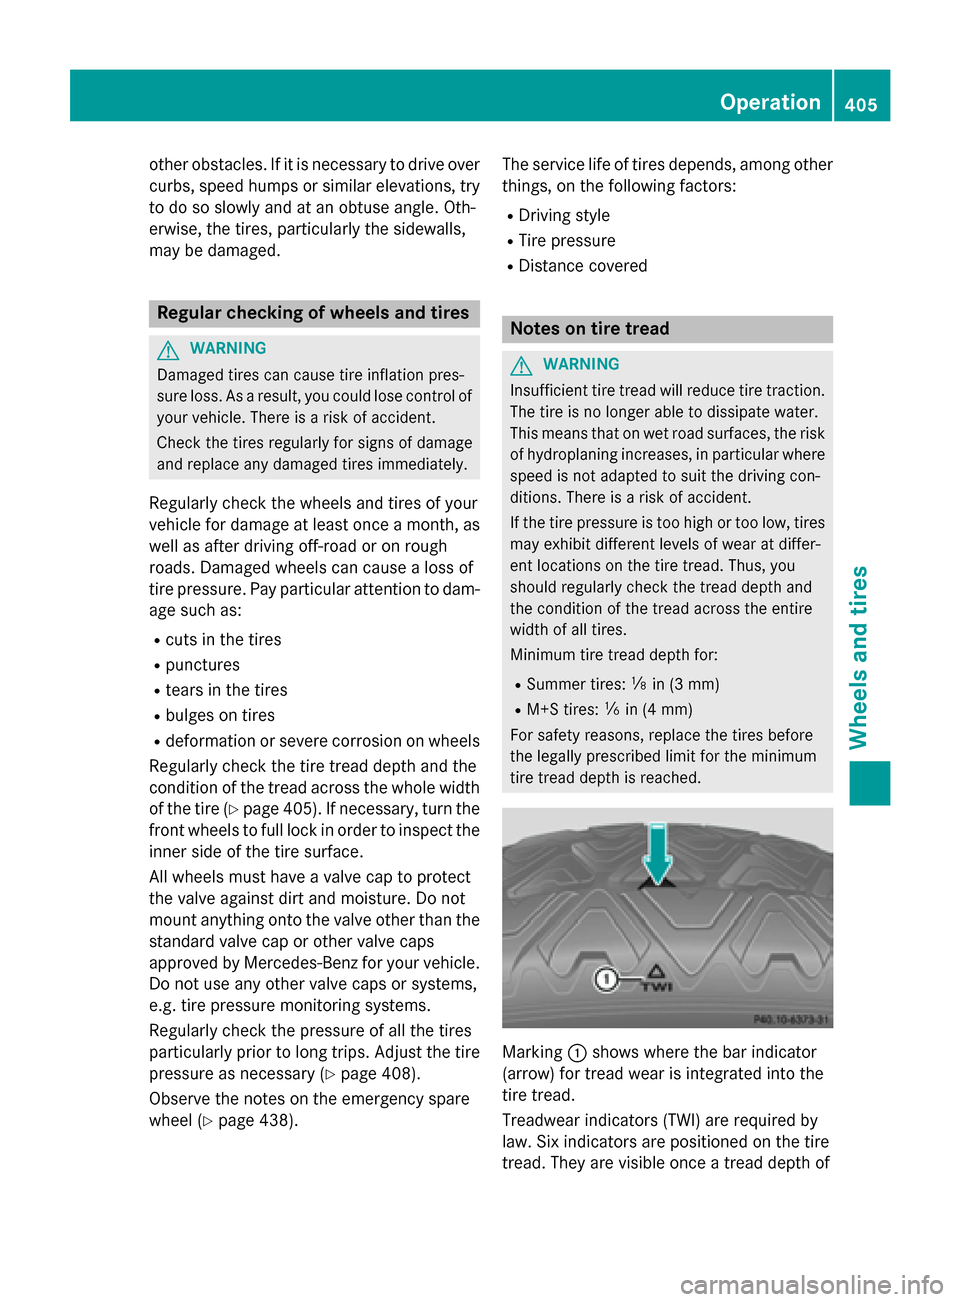
Marking :shows where the bar indicator
(arrow) for tread wear is integrated into the
tire tread.
Treadwear indicators (TWI) are required by
law. Six indicators are positioned on the tire
tread. They are visible once a tread depth of
Operation405
Wheels and tires
Z