fuel pressure MERCEDES-BENZ GL SUV 2009 Owners Manual
[x] Cancel search | Manufacturer: MERCEDES-BENZ, Model Year: 2009, Model line: GL SUV, Model: MERCEDES-BENZ GL SUV 2009Pages: 309, PDF Size: 10.27 MB
Page 12 of 309
Frequencies
Garage door opener .......................298
Telephone ...................................... 285
Front airbag ......................................... 38
Front-passenger airbag ....................... 38
Fuel ..................................................... 287
Diesel ............................................ 173
Loss ............................................... 241
Petrol ............................................. 173
Fuel consumption
Notes ............................................. 288
Fuel filler flap
Emergency release ........................251
Opening/closing ........................... 172
Fuel filter
Display message ............................ 221
Fuel gauge ............................................ 25
Fuel level Calling up the range (on-board
computer) ...................................... 111
Display ............................................. 25
Fuel line
Malfunction ................................... .241
Fuel tank
Defect ............................................ 241
Fuse allocation chart ........................280
Fuse box Dashboard ..................................... 281
Engine compartment .....................281
Luggage compartment ...................281
Fuses .................................................. 280G
Garage door Opening/closing (with the remote
control) .......................................... 166
Garage door opener ..........................165
Clearing the memory .....................166
Frequencies ................................... 298
Programming the remote control ...165
Gear indicator ...................................... 93
Genuine Mercedes-Benz parts .........284
Glove compartment ..........................152
Gradient-climbing capability (max-
imum) ................................................. 191 H
Handbrake Display message ............................ 221
Headlamp cleaning system ..............178
Headlamps Cleaning ......................................... 203
Cleaning system .............................. 83
Misting up ...................................... 245
Headlamps delayed switch-off
see Exterior lighting delayed switch-off
Head restraints
Adjusting (front) ............................... 65
Adjusting (rear) ................................ 68
Luxury .............................................. 66
NECK-PRO ....................................... 40
Removing (rear) ............................... 69
Resetting triggered NECK-PRO
head restraints .............................. 252
Resetting triggered NECK-PRO
luxury head restraints ....................252
Heating
see Air conditioning
High-pressure cleaners ....................202
Hill start assist .................................... 90
HomeLink ®
see Garage door opener I
Immobiliser .......................................... 54
Indicator and warning lamp Automatic child seat recognition
(malfunction) ................................. 234
Brakes (red) ........................... 235, 236
Engine diagnostics .........................237
ESP ®
.............................................. 235
PASSENGER AIRBAG OFF ........43, 234
Reserve fuel ................................... 239
Seat belt ........................................ 238
SRS .......................................... 35, 236
Thermotronic (malfunction) ...........234
Indicator and warning lamps ...........235
Indicator lamp see Indicator and warning lamp .....235
Instrument cluster .............................. 96
On-board computer .......................103 Index
9 X164_AKB; 2; 3, en-GB
wobuchh,
Version: 2.11.8.1
2009-03-31T14:14:58+02:00 - Seite 9Dateiname: 6515431202_buchblock.pdf; erzeugt am 01. Apr 2009 00:16:29; WK
Page 20 of 309
Protection of the environment
H
Environmental note
Daimler's declared policy is one of integrated
environmental protection.
The objectives are for the natural resources
which form the basis of our existence on this
planet to be used sparingly and in a manner
which takes the requirements of both nature
and humanity into account.
You too can help to protect the environment
by operating your vehicle in an environmen-
tally-responsible manner.
Fuel consumption and the rate of engine,
transmission, brake and tyre wear depend on
the following factors:
R operating conditions of your vehicle
R your personal driving style
You can influence both factors.
You should bear the following in mind:
Operating conditions
R avoid short trips as these increase fuel con-
sumption.
R make sure that the tyre pressures are
always correct.
R do not carry any unnecessary weight.
R keep an eye on the vehicle's fuel consump-
tion.
R remove roof racks once you no longer need
them.
R a regularly serviced vehicle will contribute
to environmental protection. You should
therefore adhere to the service intervals.
R always have maintenance work carried out
at a qualified specialist workshop, e.g. a
Mercedes-Benz Service Centre. Personal driving style
R
do not depress the accelerator pedal when
starting the engine.
R do not warm up the engine with the vehicle
stationary.
R drive carefully and maintain a safe distance
from the vehicle in front.
R avoid frequent, sudden acceleration.
R change gear in good time and use each gear
only up to 2
/ 3of its maximum engine speed.
R switch off the engine in stationary traffic. Returning used vehicles
Mercedes-Benz will take back your
Mercedes-Benz to dispose of it in an environ-
mentally-responsible manner, in accordance
with the European Union (EU) End of Life
Vehicles Directive.
The End of Life Vehicles Directive applies to
vehicles of up to 3.5 t gross vehicle weight, in
accordance with national regulations. For
several years, Mercedes-Benz has been
meeting all the legal requirements for a
design which allows for recycling and re-use.
There is a network of return points and dis-
assembly plants which can recycle your vehi-
cle in an environmentally-responsible man-
ner. The options for recycling vehicles and
parts are constantly being developed and
improved. This means that your Mercedes-
Benz will also continue to meet even the
increased recycling quotas in the future in
good time. You can obtain further information
from your national Mercedes-Benz homepage
or your national hotline number. Introduction
17X164_AKB; 2; 3, en-GB
wobuchh,
Version: 2.11.8.1 2009-03-31T14:14:58+02:00 - Seite 17 ZDateiname: 6515431202_buchblock.pdf; erzeugt am 01. Apr 2009 00:16:30; WK
Page 30 of 309
Indicator and warning lamps
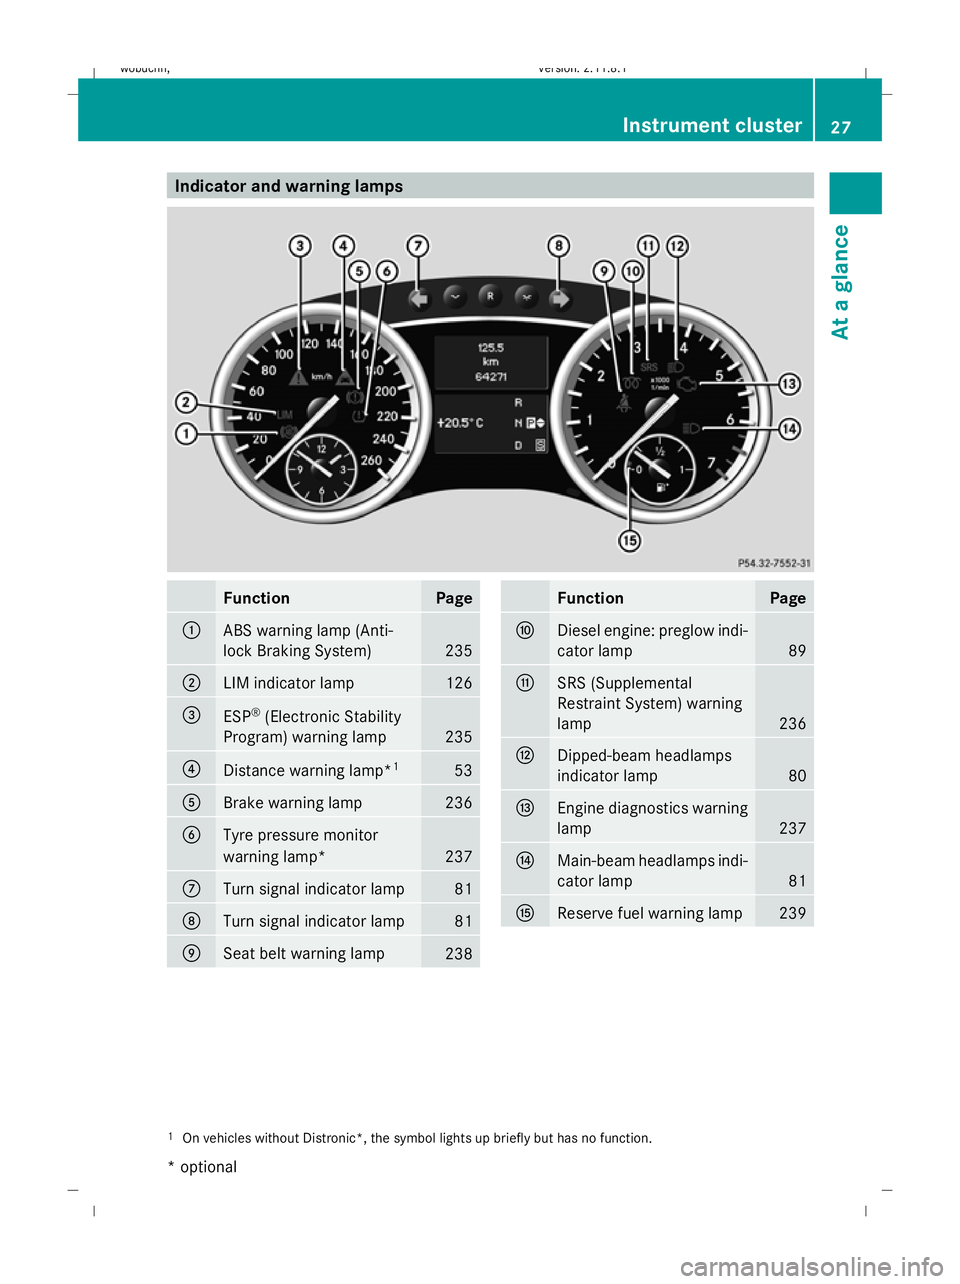
Function Page
:
ABS warning lamp (Anti-
lock Braking System)
235
;
LIM indicator lamp 126
=
ESP
®
(Electronic Stability
Program) warning lamp 235
?
Distance warning lamp*
1 53
A
Brake warning lamp 236
B
Tyre pressure monitor
warning lamp*
237
C
Turn signal indicator lamp 81
D
Turn signal indicator lamp 81
E
Seat belt warning lamp
238 Function Page
F
Diesel engine: preglow indi-
cator lamp
89
G
SRS (Supplemental
Restraint System) warning
lamp 236
H
Dipped-beam headlamps
indicator lamp 80
I
Engine diagnostics warning
lamp 237
J
Main-beam headlamps indi-
cator lamp 81
K
Reserve fuel warning lamp 239
1
On vehicles without Distronic*, the symbol lights up briefly but has no function. Instrument cluster
27At a glance
* optional
X164_AKB; 2; 3, en-GB
wobuchh,
Version: 2.11.8.1 2009-03-31T14:14:58+02:00 - Seite 27 Z
Dateiname: 6515431202_buchblock.pdf; erzeugt am 01. Apr 2009 00:16:37; WK
Page 99 of 309
Drive program
Sis characterised by the fol-
lowing:
R sporty engine and suspension configura-
tion
R the vehicle pulling away in first gear
R the automatic transmission shifting up
later
R the late shift point of the automatic trans-
mission can lead to higher fuel consump-
tion
If you have selected transmission position D,
you can activate the manual drive program
and shift up or down through the individual
gears. The gear currently selected and
engaged is shown in the multi-function dis-
play.
X To deactivate: press program selector
button :repeatedly until Sor Mappears
in the multi-function display.
or
X Restart the engine.
The automatic transmission then switches
to the automatic drive program.
Upshifting
X Pull right-hand steering wheel gearshift
paddle (Y page 94).
The automatic transmission shifts up to the
next gear.
Downshifting G
Risk of accident
Do not change down for additional engine
braking on a slippery road surface. This could
cause the drive wheels to lose their grip and
the vehicle could skid.
X Pull left-hand steering wheel gearshift pad-
dle (Y page 95).
The automatic transmission shifts down to
the next gear.
i If you brake the vehicle or stop without
shifting down, the automatic transmission will shift down to a gear that will allow the
vehicle to accelerate or pull away again.
Kickdown
You can also use kickdown for maximum
acceleration in manual drive program M.
X Depress the accelerator pedal beyond the
pressure point.
The transmission shifts to a lower gear
depending on the engine speed.
X Shift back up once the desired speed is
reached.
i If you apply full throttle, the automatic
transmission shifts up to the next gear
when the maximum engine speed is
reached. This prevents the engine from
overrevving. Instrument cluster
Points to remember
You will find an illustration of the instrument
cluster in the "At a glance" section
(Y page 25). G
Risk of accident
No further messages can be displayed if the
instrument cluster and/or the multi-function
display fails.
This means that you will not see information
about the driving situation, such as the speed,
outside temperature, warning/indicator
lamps, display messages or system failures.
The vehicle's handling characteristics may be
affected. Adjust your driving style and speed
accordingly.
Immediately consult a qualified specialist
workshop which has the necessary specialist
knowledge and tools to carry out the work
required. Mercedes-Benz recommends that
you use a Mercedes-Benz Service Centre for
this purpose. In particular, work relevant to
safety or on safety-related systems must be
carried out at a qualified specialist workshop. 96
Instrument clusterControls
X164_AKB; 2; 3, en-GB
wobuchh
,V ersion: 2.11.8.1
2009-03-31T14:14:58+02:00 - Seite 96
Dateiname: 6515431202_buchblock.pdf; erzeugt am 01. Apr 2009 00:17:13; WK
Page 175 of 309
Running-in notes
The first 1,500 km
G
Risk of accident
New brake pads/linings only have optimal
braking performance after several hundred
kilometres. Until then, compensate for this by
applying greater force to the brake pedal. This
also applies when brake pads/linings or
brake discs have been changed.
If you treat the engine with sufficient care
from the very start, you will be rewarded with
excellent performance for the remainder of
the engine's life.
R Therefore, you should drive at varying road
and engine speeds for the first 1,500 km.
R Avoid heavy loads, e.g. driving at full throt-
tle, during this time. Do not exceed 2
/ 3 of
the maximum permissible engine speed for
each gear.
R Change gear in good time.
R Do not shift down a gear manually in order
to brake.
R try to avoid depressing the accelerator
pedal beyond the pressure point (kick-
down).
R only use ranges 3,2or 1for slow driving,
e.g. in mountainous terrain.
After 1,500 km, you may gradually bring the
vehicle up to full road and engine speeds.
i These running-in instructions must also
be observed if you have the engine, the dif-
ferenial gear or the front axle differential of
your vehicle replaced. Refuelling
Refuelling
G
Risk of explosion
Fuel is highly flammable. Fire, naked flames
and smoking are therefore prohibited when
handling fuels.
Switch off the engine and the auxiliary heat-
ing* before refuelling. G
Risk of injury
Avoid any contact with fuels.
You can damage your health if your skin
comes into direct contact with fuel or if you
inhale fuel vapours. G
Risk of fire
Do not use petrol to refuel vehicles with a die-
sel engine. Never mix diesel with petrol. This
causes damage to the fuel system and engine
and could result in the vehicle catching fire.
! Do not use petrol to refuel vehicles with a
diesel engine. Do not use diesel to refuel
vehicles with a petrol engine. Even a small
quantity of the wrong fuel will damage the
fuel system and engine. Damage resulting
from adding the wrong fuel is not covered
by the implied warranty.
! Do not start the engine if you accidentally
refuel with the wrong fuel. Otherwise, the
fuel could enter the fuel lines. This would
require draining of the fuel tank and fuel
lines. Notify a qualified specialist workshop
and have the fuel tank and fuel lines
drained completely.
When you open or close the vehicle with the
key or KEYLESS GO*, the fuel filler flap is
automatically unlocked or locked.
The position of the fuel filler cap is to the rear
on the right. The position of the fuel filler cap
is displayed in the instrument cluster 8.172
RefuellingOperation
* optional
X164_AKB; 2; 3, en-GB
wobuchh,
Version: 2.11.8.1 2009-03-31T14:14:58+02:00 - Seite 172
Dateiname: 6515431202_buchblock.pdf; erzeugt am 01. Apr 2009 00:17:45; WK
Page 176 of 309
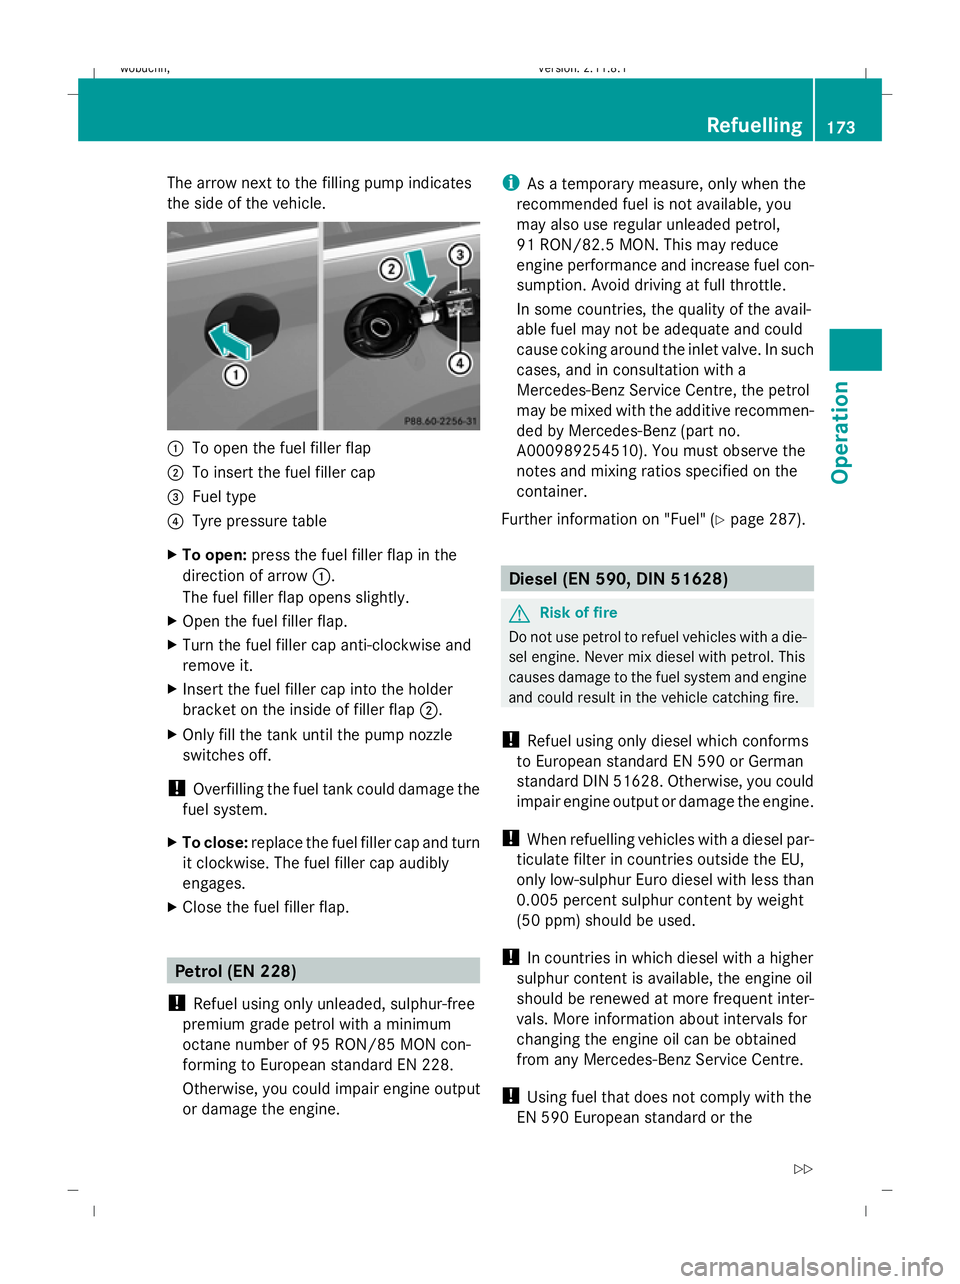
The arrow next to the filling pump indicates
the side of the vehicle.
:
To open the fuel filler flap
; To insert the fuel filler cap
= Fuel type
? Tyre pressure table
X To open: press the fuel filler flap in the
direction of arrow :.
The fuel filler flap opens slightly.
X Open the fuel filler flap.
X Turn the fuel filler cap anti-clockwise and
remove it.
X Insert the fuel filler cap into the holder
bracket on the inside of filler flap ;.
X Only fill the tank until the pump nozzle
switches off.
! Overfilling the fuel tank could damage the
fuel system.
X To close: replace the fuel filler cap and turn
it clockwise. The fuel filler cap audibly
engages.
X Close the fuel filler flap. Petrol (EN 228)
! Refuel using only unleaded, sulphur-free
premium grade petrol with a minimum
octane number of 95 RON/85 MON con-
forming to European standard EN 228.
Otherwise, you could impair engine output
or damage the engine. i
As a temporary measure, only when the
recommended fuel is not available, you
may also use regular unleaded petrol,
91 RON/82.5 MON. This may reduce
engine performance and increase fuel con-
sumption. Avoid driving at full throttle.
In some countries, the quality of the avail-
able fuel may not be adequate and could
cause coking around the inlet valve. In such
cases, and in consultation with a
Mercedes-Benz Service Centre, the petrol
may be mixed with the additive recommen-
ded by Mercedes-Benz (part no.
A000989254510). You must observe the
notes and mixing ratios specified on the
container.
Further information on "Fuel" (Y page 287). Diesel (EN 590, DIN 51628)
G
Risk of fire
Do not use petrol to refuel vehicles with a die-
sel engine. Never mix diesel with petrol. This
causes damage to the fuel system and engine
and could result in the vehicle catching fire.
! Refuel using only diesel which conforms
to European standard EN 590 or German
standard DIN 51628. Otherwise, you could
impair engine output or damage the engine.
! When refuelling vehicles with a diesel par-
ticulate filter in countries outside the EU,
only low-sulphur Euro diesel with less than
0.005 percent sulphur content by weight
(50 ppm) should be used.
! In countries in which diesel with a higher
sulphur content is available, the engine oil
should be renewed at more frequent inter-
vals. More information about intervals for
changing the engine oil can be obtained
from any Mercedes-Benz Service Centre.
! Using fuel that does not comply with the
EN 590 European standard or the Refuelling
173Operation
X164_AKB; 2; 3, en-GB
wobuchh, Version: 2.11.8.1 2009-03-31T14:14:58+02:00 - Seite 173 Z
Dateiname: 6515431202_buchblock.pdf; erzeugt am 01. Apr 2009 00:17:45; WK
Page 183 of 309
res, tears, bulges on tyres and deformation,
cracks or severe corrosion on wheels), at
least every 14 days, as well as after driving
off-road or on rough roads. Damaged
wheels can cause a loss of tyre pressure.
R Regularly check the tyre tread depth and
the condition of the tread across the whole
width of the tyre (Y page 180). If neces-
sary, turn the front wheels to full lock in
order to inspect the inner side of the tyre
surface.
R All wheels must have a valve cap to protect
the valve against dirt and moisture. Do not
fit anything onto the valve (such as tyre
pressure monitoring systems) other than
the standard valve cap or other valve caps
approved by Mercedes-Benz for your vehi-
cle.
R Regularly check the pressure of all the tyres
including the spare tyre*, particularly prior
to long trips, and correct the pressure as
necessary (Y page 180).
Notes on driving R
While driving, pay attention to vibrations,
noises and unusual handling characteris-
tics, e.g. pulling to one side. This may indi-
cate that the wheels or tyres are damaged.
If you suspect that a tyre is defective,
reduce your speed and stop the vehicle as
soon as possible to check the wheels and
tyres for damage. Hidden tyre damage
could also be causing the unusual handling
characteristics. If you find no signs of dam-
age, have the wheels and tyres examined
at a specialist workshop, for example at a
Mercedes-Benz Service Centre.
R When parking your vehicle, make sure that
the tyres do not get deformed by the kerb
or other obstacles. If it is necessary to drive
over kerbs, speed humps or similar eleva-
tions, try to do so slowly and at an obtuse
angle. Otherwise, the tyres, particularly the
sidewalls, can get damaged. Direction of rotation
Tyres with a specified direction of rotation
have additional benefits, e.g. if there is a risk
of aquaplaning. You will only gain these ben-
efits if the correct direction of rotation is
observed.
An arrow on the sidewall of the tyre indicates
its correct direction of rotation.
i You may fit a spare tyre* against the
direction of rotation. Tyre tread
G
Risk of accident
Bear in mind that:
R tyre grip decreases rapidly on wet roads
when the tread depth is less than 3 mm.
Thus, you should replace tyres that have
insufficient tread.
R winter tyres should be replaced when the
tread depth is 4 mm or less as they will no
longer provide adequate grip.
R the tread on a tyre may not wear evenly.
Thus, you should regularly check the tread
depth and the condition of the tread across
the entire width of all tyres. If necessary,
turn the front wheels to full lock in order to
inspect the tyre tread more easily.
Otherwise, you could lose control of the vehi-
cle and cause an accident due to the reduced
grip of the tyres on the road. Tyre pressures
i You will find a table of tyre pressures for
various operating conditions on the inside
of your vehicle's fuel filler flap.
The applicable value for the spare
wheel*/"Minispare" emergency spare
wheel* is stated on the spare wheel and in
the technical data section.
Unless otherwise specified, the tyre pres-
sures on the inside of the fuel filler flap are 180
Tyres and wheelsOperation
* optional
X164_AKB; 2; 3, en-GB
wobuchh,
Version: 2.11.8.1 2009-03-31T14:14:58+02:00 - Seite 180
Dateiname: 6515431202_buchblock.pdf; erzeugt am 01. Apr 2009 00:17:47; WK
Page 185 of 309
it is too low for the current operating condi-
tions.
Driving with tyre pressure that is too high or
too low can:
R shorten the service life of the tyres
R increase the likelihood of tyre damage
R have a negative effect on handling charac-
teristics (e.g. by causing aquaplaning)
i The tyre pressure values given for low
loads are minimum values which offer you
good ride comfort characteristics.
However, you can also use the values given
for higher loads. These are permissible and
will not adversely affect the running of the
vehicle.
Also check the tyre pressure of the spare
wheel* or "Minispare" emergency spare
wheel*. H
Environmental note
Check the tyre pressure regularly, at least
every 14 days. Tyre pressure loss warning
While the vehicle is in motion, the tyre pres-
sure loss warning system monitors the set
tyre pressure using the rotational speed of
the wheels. This enables the system to detect
significant pressure loss in a tyre. If the speed
of rotation of a wheel changes as a result of
a loss of pressure, a corresponding warning
message will appear in the multi-function dis-
play. G
Risk of accident
The tyre pressure loss warning system does
not warn you of an incorrectly set tyre pres-
sure. The table on the inside of the fuel filler
flap will help you decide whether the tyre
pressures should be corrected.
The tyre pressure loss warning system does
not replace the need to regularly check your
vehicle's tyre pressures, since an even loss of pressure on several tyres at the same time
cannot be detected by the tyre pressure loss
warning system.
The tyre pressure monitor is not able to warn
you of a sudden loss of pressure, e.g. if the
tyre is penetrated by a foreign object.
In the event of a sudden loss of pressure, bring
the vehicle to a halt by braking carefully. Do
not make any sudden steering movements
when doing so.
The function of the tyre pressure loss warning
system is limited or delayed if:
R snow chains are fitted to your vehicle's
tyres.
R road conditions are wintry.
R you are driving on sand or gravel.
R you adopt a very sporty driving style (cor-
nering at high speeds or driving with high
rates of acceleration).
R you are towing a very heavy or large trailer.
R you are driving with a heavy load (in the
vehicle or on the roof).
Restarting the tyre pressure loss warn-
ing system Restart the tyre pressure loss warning system
if you have:
R
changed the tyre pressure
R changed the wheels or tyres
R fitted new wheels or tyres
X Before restarting, consult the table of tyre
pressures on the inside of the fuel filler flap
to ensure that the tyre pressure in all four
tyres is set correctly for the respective
operating conditions.
X Observe the notes in the section on tyre
pressures (Y page 180). 182
Tyres and wheelsOperation
* optional
X164_AKB; 2; 3, en-GB
wobuchh,
Version: 2.11.8.1 2009-03-31T14:14:58+02:00 - Seite 182
Dateiname: 6515431202_buchblock.pdf; erzeugt am 01. Apr 2009 00:17:48; WK
Page 186 of 309
G
Risk of accident
The tyre pressure loss warning system can
only give reliable warnings if you have set the
correct tyre pressure.
If an incorrect tyre pressure is set, these
incorrect values will be monitored.
A tyre with insufficient pressure results in
vehicle instability when driving, thus increas-
ing the risk of an accident.
X Make sure that the key is in position
2 (Y page 63) in the ignition lock.
In the multi-function display you will see the
standard display (Y page 98).
X Press *or& to select the Tyre
pressure function.
The
Run Flat Indicator active
Menu: R-Button message is displayed.
X Press the reset button (Y page 25) on the
instrument cluster.
The multi-function display shows the mes-
sage:
Restart Run Flat Indicator?
Yes Cancel
If you wish to confirm the restart:
X Press the Wbutton.
The multi-function display shows the mes-
sage:
Run Flat Indicator restarted
After a teach-in period, the tyre pressure
loss warning system will monitor the set
tyre pressures of all four tyres.
If you wish to cancel the restart:
X Press the Xbutton.
or
X Wait until the Restart Run Flat Indi‐
cator? Yes Cancel message disappears.
The tyre pressure values stored at the last
restart will continue to be monitored. Tyre pressure monitor*
If a tyre pressure monitor system is fitted, the
vehicle's wheels have sensors fitted that
monitor the tyre pressures in all four tyres.
The tyre pressure monitor warns you when
the pressure drops in one or more of the
tyres. The tyre pressure monitor only func-
tions if the correct wheel electronics units are
fitted to all wheels. G
Risk of accident
The tyre pressure monitor does not warn you
of an incorrectly set tyre pressure. The table
on the inside of the fuel filler flap will help you
decide whether the tyre pressures should be
corrected.
The tyre pressure monitor is not able to warn
you of a sudden loss of pressure, e.g. if the
tyre is penetrated by a foreign object. In the
event of a sudden loss of pressure, bring the
vehicle to a halt by braking carefully. Do not
make any sudden steering movements when
doing so.
i The operation of the tyre pressure moni-
tor can be affected by interference from
radio transmitting equipment (e.g. radio
headphones, two-way radios) that may be
being operated in or near the vehicle.
Checking tyre pressure electronically X
Make sure that the key is in posi-
tion 2(Y page 63) in the ignition lock.
X Press the &or* button to select the
Tyre pressure function.
The current tyre pressure for each wheel will
be displayed in the multi-function display.
If the vehicle has been parked for longer than
20 minutes or if you have not driven faster
than 25 km/h since starting the vehicle, the
following message appears:
i The tyre pressure values indicated by the
on-board computer may differ from those
measured at a filling station with a pressure
gauge. The tyre pressures shown by the on- Tyres and wheels
183Operation
* optional
X164_AKB; 2; 3, en-GB
wobuchh,
Version: 2.11.8.1 2009-03-31T14:14:58+02:00 - Seite 183 Z
Dateiname: 6515431202_buchblock.pdf; erzeugt am 01. Apr 2009 00:17:48; WK
Page 187 of 309
board computer refer to those measured at
sea level. At high altitudes, the tyre pres-
sure values indicated by a pressure gauge
are higher than those shown by the on-
board computer. In this case, do not reduce
the tyre pressures.
i After a teach-in period, the tyre pressure
monitor automatically recognises new
wheels or new sensors. As long as a clear
allocation of the tyre pressure values to the
individual wheels is not possible, the dis-
play message Tyre pressure monitor
active is shown instead of the tyre pres-
sure display. The tyre pressures are already
being monitored.
Restarting the tyre pressure monitor When you restart the tyre pressure monitor,
all existing warning messages are deleted and
the warning lamps go out. The monitor uses
the currently set tyre pressures as the speci-
fied values for monitoring.
In most cases, the tyre pressure monitor will
automatically detect the new reference val-
ues, e.g. if you have:
R changed the tyre pressure
R changed the wheels or tyres
R fitted new wheels or tyres
i You will find the menu overview on
(Y page 99).
If you wish to define the new reference values
manually:
X Use the table on the inside of the fuel filler
flap to ensure that the tyre pressure is set
correctly in all four tyres for the current
operating conditions.
Also observe the notes in the section on
tyre pressures (Y page 180).
X Make sure that the key is in position 2in
the ignition lock.
X Press the &or* button to select the
Tyre pressure function or wait until the
following message appears: X
Press the reset button on the instrument
cluster (Y page 25).
The multi-function display shows the mes-
sage:
Restart tyre pressure monitor?
Yes Cancel
X Press the Wbutton.
The multi-function display shows the mes-
sage:
Tyre pressure monitor restarted
The tyre pressure monitor has stored the
pressure of the tyres as a new reference
value.
Cancelling the restart X
Press the Xbutton.
Other messages in the multi-function
display If in multi-function display the following mes-
sage appears:
Please correct tyre pressures
X
Check the tyre pressure on all four wheels
and correct it if necessary.
i If the wheel positions on the vehicle are
interchanged, the tyre pressures may be
displayed for the wrong positions for a
short time. This is rectified after a few
minutes of driving, and the tyre pressures
are displayed for the correct positions. Interchanging the wheels
G
Risk of accident
Interchange the front and rear wheels only if
they have the same dimensions: for example
size, offset, etc.
After a wheel is changed, have the tightening
torque checked at a specialist workshop that
has the necessary specialist knowledge and
tools to carry out the work required.
Mercedes-Benz recommends that you use a 184
Tyres and wheelsOperation
X164_AKB; 2; 3, en-GB
wobuchh,
Version: 2.11.8.1 2009-03-31T14:14:58+02:00 - Seite 184
Dateiname: 6515431202_buchblock.pdf; erzeugt am 01. Apr 2009 00:17:48; WK