open bonnet MERCEDES-BENZ GL SUV 2009 Owners Manual
[x] Cancel search | Manufacturer: MERCEDES-BENZ, Model Year: 2009, Model line: GL SUV, Model: MERCEDES-BENZ GL SUV 2009Pages: 309, PDF Size: 10.27 MB
Page 8 of 309
Automatic transmission
DIRECT SELECT lever .......................92
Display mes-
sage .............................. 213, 216, 217
Driving tips ...................................... 94
Emergency running mode ..............244
Gear indicator .................................. 93
Kickdown ......................................... 94
Malfunction ................................... .244
Program selector button ..................95
Shift ranges ..................................... 94
Trailer towing ................................... 94
Transmission positions ....................93
Auxiliary heating ............................... 147
Display message .................... 231, 232
Notes ............................................. 147
Remote control .............................. 148
Setting (on-board computer) .......... 107
Auxiliary ventilation ..........................147 B
Backrest angle Adjusting (2nd row of seats) ............67
Ball coupling
Fitting ............................................ 194
Folding in ....................................... 198
Folding out ..................................... 193
Removing ....................................... 198
BAS (Brake Assist) ............................... 50
Battery Changing (auxiliary heating
remote control) .............................. 254
Charging ........................................ 275
Checking (key) ............................... 253
Check lamp (key )........................... 253
Disconnecting ................................ 273
Display message ............................ 220
Jump-starting ................................. 276
Maintenance (vehicle) .................... 272
Reconnecting ................................. 276
Removing/fitting ........................... 274
Vehicle battery .............................. 272
Belt force limiters
Activation ......................................... 35
Belt height adjustment .......................77
Belt reel (Easy-Pack fix kit) ..............160Belt tensioners
Activation ......................................... 35
Belt warning ......................................... 77
BlueTEC
AdBlue ®
......................................... 288
Bonnet
Bonnet catch ................................. 175
Display message ............................ 219
Opening/closing ........................... 174
Bonnet release lever
Release leve r................................. 175
Boot
Automatic opening ........................... 62
Boot lid
Opening/closing .............................. 60
Brake Assist
See BAS ........................................... 50
Brake fluid .......................................... 291
Display message ............................ 221
Brake lamps
Adaptive .......................................... .51
Display message ............................ 226
Brakes
Parking brake ................................... 91
Warning lamp ........................ 235, 236
Brake system
Display message ............................ 220
Bulbs .................................................. 254
Brake lamp .................................... 260
Dipped-beam headlamps ...............258
Display message ............................ 225
Licence plate lamp ......................... 260
Main-beam headlamps ................... 258
Overview ........................................ 256
Parking lamp .......................... 258, 260
Rear foglamp ................................. 260
Replacing .............................. .258, 259
Reversing lamp .............................. 260
Side lamp ....................................... 258
Tail lamp ........................................ 260
Turn signal lamp ....................258, 260
see Lamp Index
5 X164_AKB; 2; 3, en-GB
wobuchh,
Version: 2.11.8.1
2009-03-31T14:14:58+02:00 - Seite 5Dateiname: 6515431202_buchblock.pdf; erzeugt am 01. Apr 2009 00:16:29; WK
Page 25 of 309
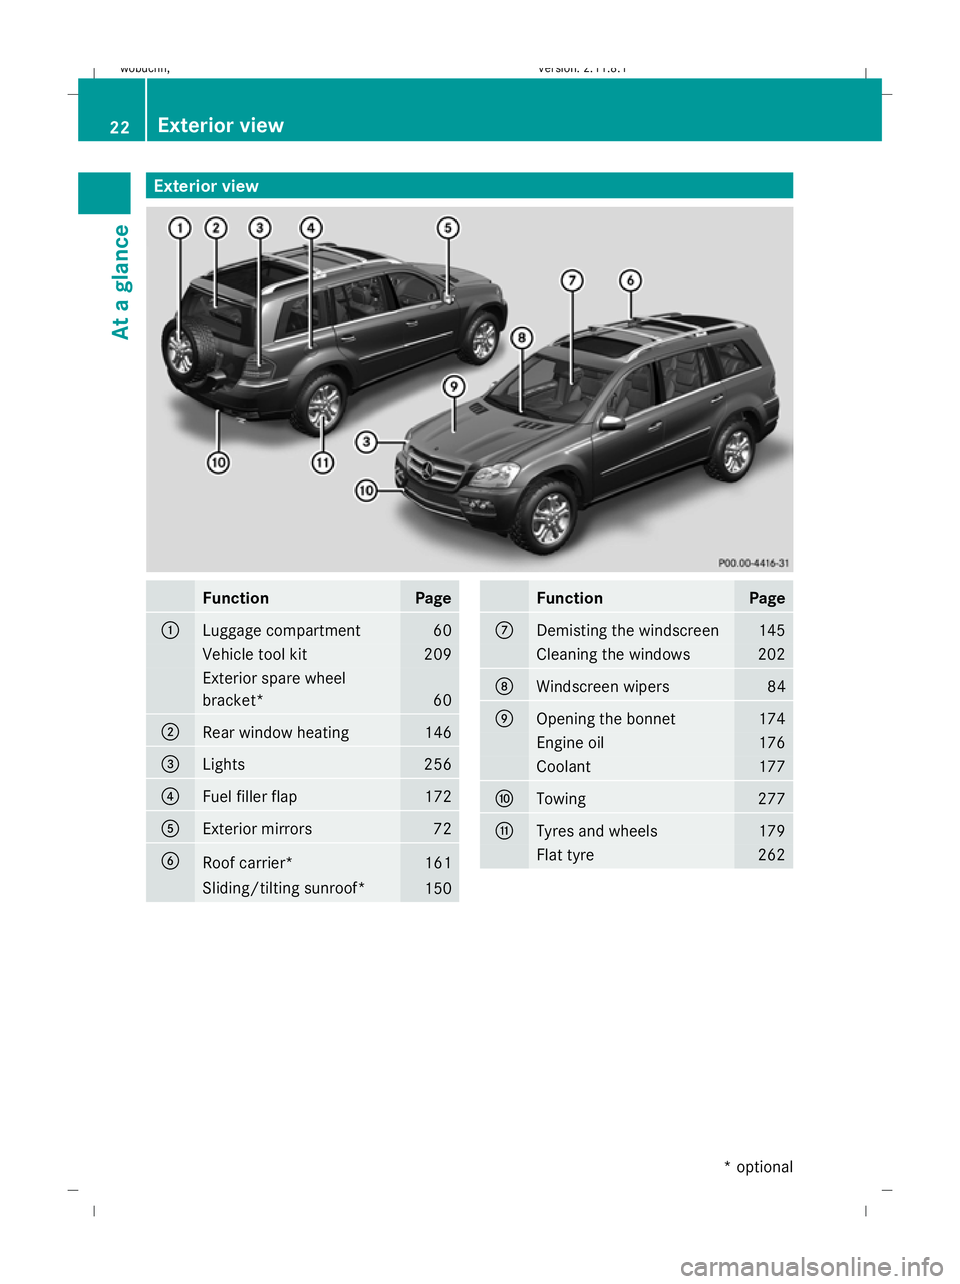
Exterior view
Function Page
:
Luggage compartment 60
Vehicle tool kit 209
Exterior spare wheel
bracket*
60
;
Rear window heating 146
=
Lights 256
?
Fuel filler flap 172
A
Exterior mirrors 72
B
Roof carrier* 161
Sliding/tilting sunroof*
150 Function Page
C
Demisting the windscreen 145
Cleaning the windows 202
D
Windscreen wipers 84
E
Opening the bonnet 174
Engine oil 176
Coolant 177
F
Towing 277
G
Tyres and wheels 179
Flat tyre 26222
Exterior viewAt a glance
* optional
X164_AKB; 2; 3, en-GB
wobuchh,
Version: 2.11.8.1 2009-03-31T14:14:58+02:00 - Seite 22
Dateiname: 6515431202_buchblock.pdf; erzeugt am 01. Apr 2009 00:16:32; WK
Page 26 of 309
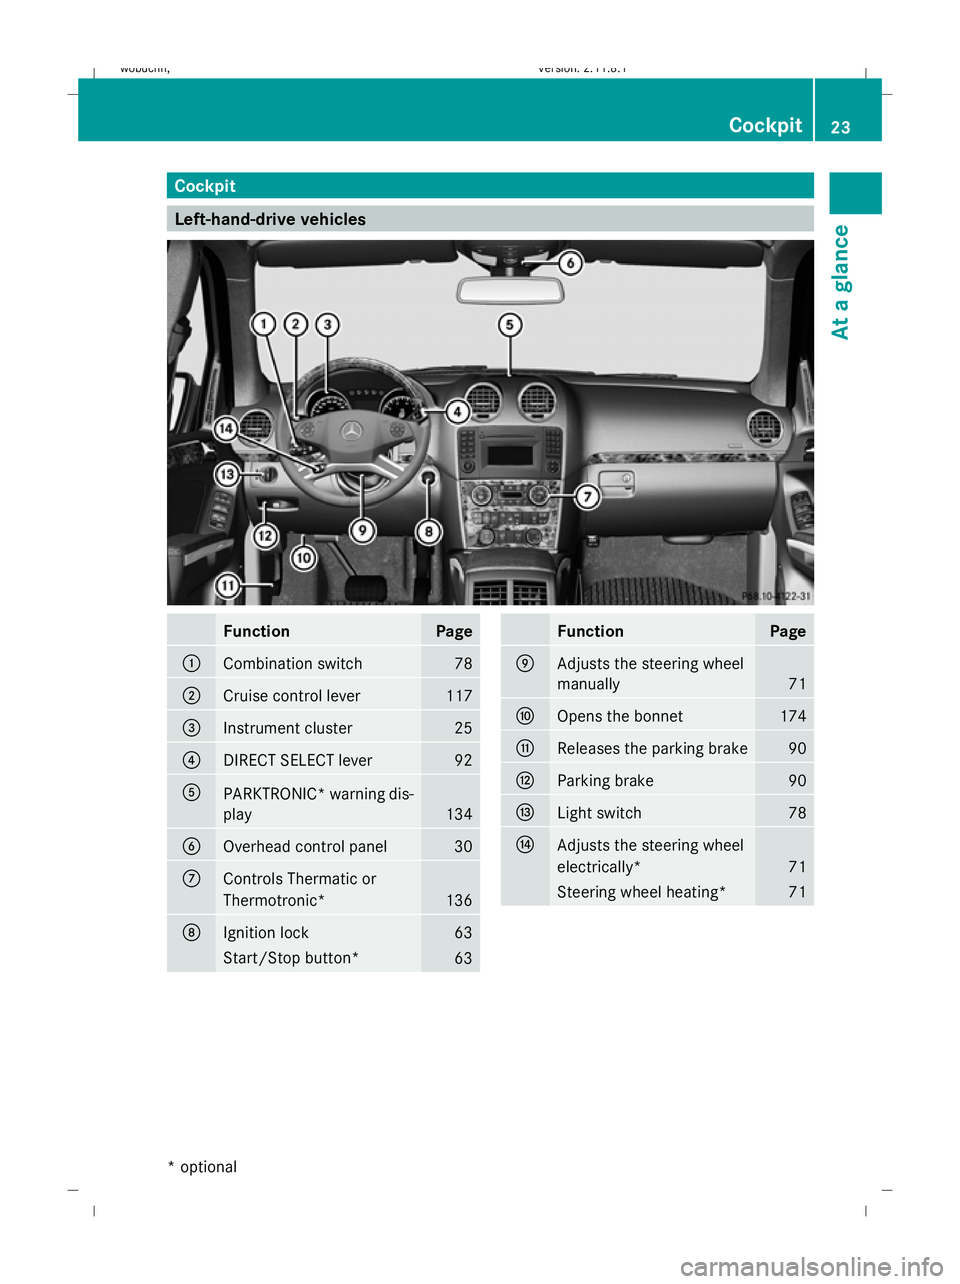
Cockpit
Left-hand-drive vehicles
Function Page
:
Combination switch 78
;
Cruise control lever 117
=
Instrument cluster 25
?
DIRECT SELECT lever 92
A
PARKTRONIC* warning dis-
play
134
B
Overhead control panel 30
C
Controls Thermatic or
Thermotronic*
136
D
Ignition lock 63
Start/Stop button*
63 Function Page
E
Adjusts the steering wheel
manually
71
F
Opens the bonnet 174
G
Releases the parking brake 90
H
Parking brake 90
I
Light switch 78
J
Adjusts the steering wheel
electrically*
71
Steering wheel heating* 71Cockpit
23At a glance
* optional
X164_AKB; 2; 3, en-GB
wobuchh,
Version: 2.11.8.1 2009-03-31T14:14:58+02:00 - Seite 23
Dateiname: 6515431202_buchblock.pdf; erzeugt am 01. Apr 2009 00:16:33; WK
Page 27 of 309
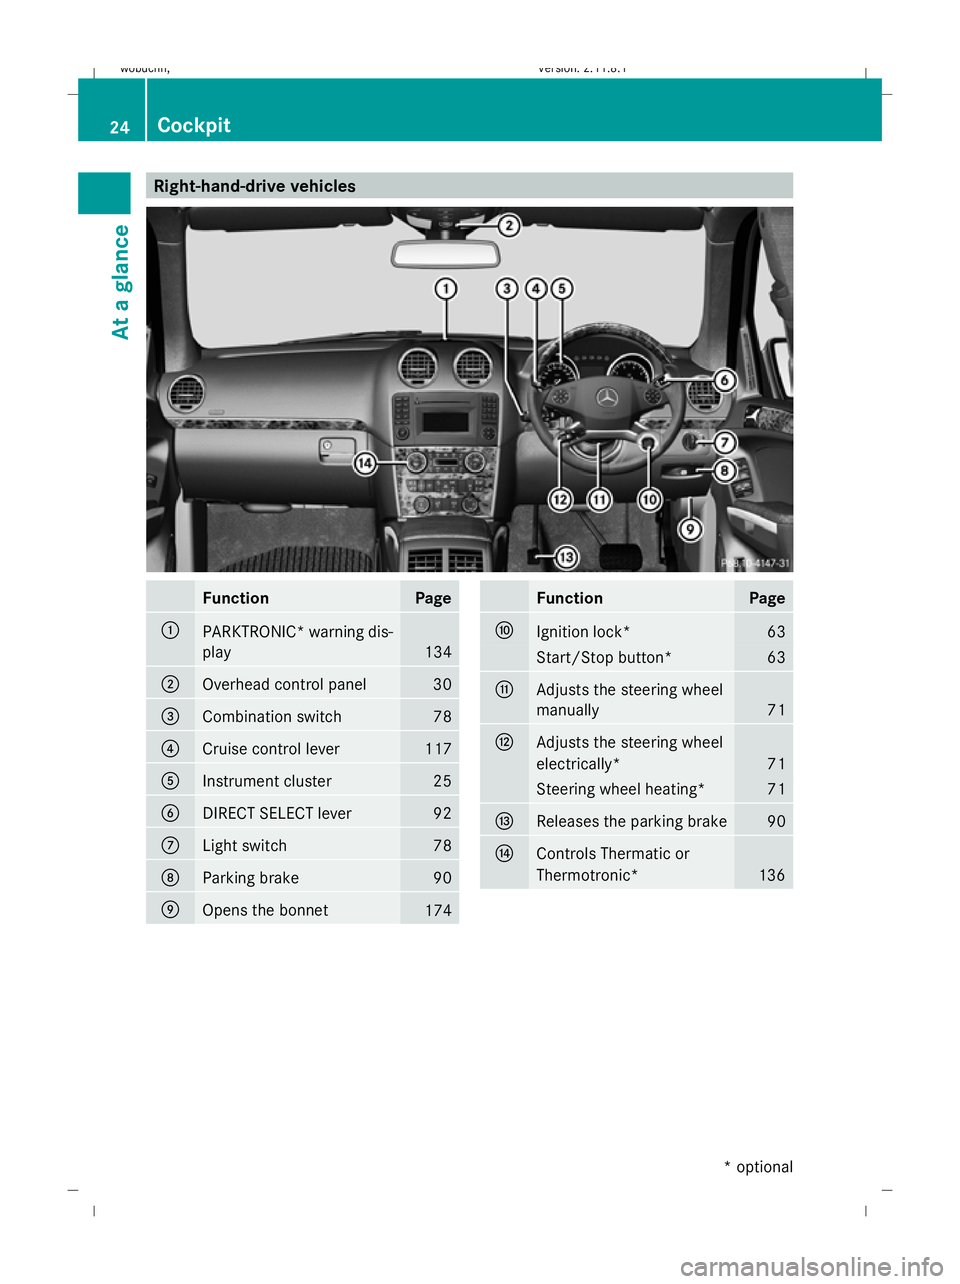
Right-hand-drive vehicles
Function Page
:
PARKTRONIC
*warning dis-
play 134
;
Overhead control panel 30
=
Combination switch 78
?
Cruise control lever 117
A
Instrument cluster 25
B
DIRECT SELECT lever 92
C
Light switch 78
D
Parking brake 90
E
Opens the bonnet
174 Function Page
F
Ignition lock* 63
Start/Stop button* 63
G
Adjusts the steering wheel
manually
71
H
Adjusts the steering wheel
electrically*
71
Steering wheel heating* 71
I
Releases the parking brake 90
J
Controls Thermatic or
Thermotronic*
13624
CockpitAt a glance
* optional
X164_AKB; 2; 3, en-GB
wobuchh,
Version: 2.11.8.1 2009-03-31T14:14:58+02:00 - Seite 24
Dateiname: 6515431202_buchblock.pdf; erzeugt am 01. Apr 2009 00:16:35; WK
Page 57 of 309
In order to maintain the appropriate distance
to the vehicle in front and thus prevent a
crash, you must apply the brakes yourself. G
Risk of accident
Pay particular attention to the traffic condi-
tions if the distance warning lamp ·in the
instrument cluster lights up or an intermittent
warning tone sounds.
If necessary, brake or manoeuvre to avoid an
obstacle.
X To activate/deactivate: activate or deac-
tivate the distance warning function in the
on-board computer (Y page 109).
After activation, the Äsymbol is dis-
played in the lower multi-function display.
For more information on the distance warning
function, see the Distronic section*
(Y page 119). Anti-theft systems
Immobiliser
The immobiliser prevents your vehicle from
being started without the correct key.
Activating the immobiliser X
With the key: remove the key from the
ignition lock.
X With KEYLESS GO*: press the start/stop
button on the dashboard.
The engine switches off.
Deactivating the immobiliser X
With the key: turn the key to position 2in
the ignition lock.
X With KEYLESS GO*: press the start/stop
button on the dashboard twice without
depressing the brake.
i The immobiliser is always deactivated
when you start the engine. ATA* (anti-theft alarm system)
A visual and audible alarm is triggered when
the alarm system is primed and you open:
R a door
R a door using the emergency key element
R the tailgate
R the bonnet
The alarm is not switched off even if you close
an open door again. X
To prime: lock the vehicle using the key.
On vehicles with KEYLESS GO*, the locking
button on the door handle can also be used.
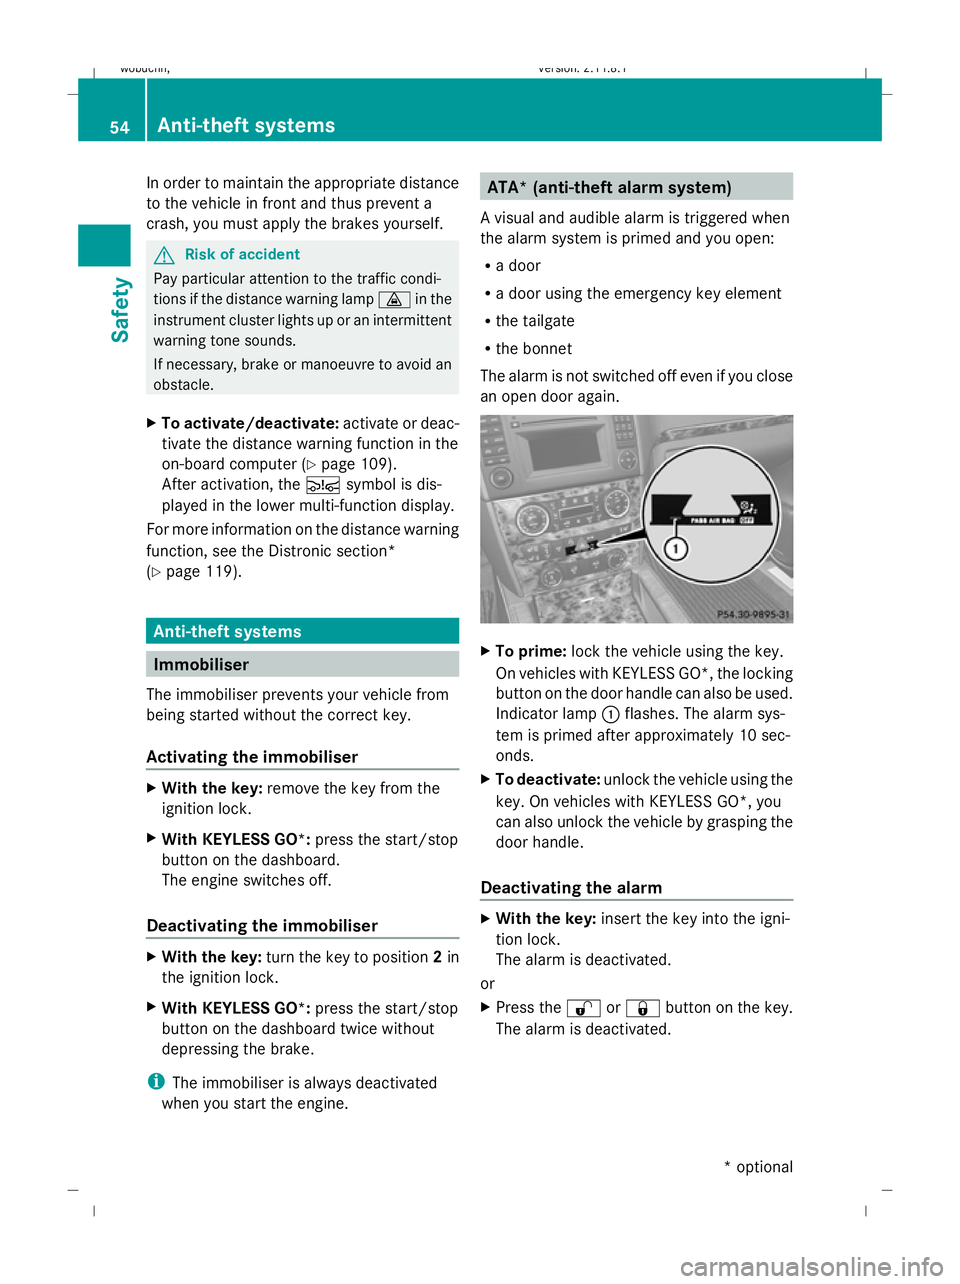
Indicator lamp :flashes. The alarm sys-
tem is primed after approximately 10 sec-
onds.
X To deactivate: unlock the vehicle using the
key. On vehicles with KEYLESS GO*, you
can also unlock the vehicle by grasping the
door handle.
Deactivating the alarm X
With the key: insert the key into the igni-
tion lock.
The alarm is deactivated.
or
X Press the %or& button on the key.
The alarm is deactivated. 54
Anti-theft systemsSafety
* optional
X164_AKB; 2; 3, en-GB
wobuchh,
Version: 2.11.8.1 2009-03-31T14:14:58+02:00 - Seite 54
Dateiname: 6515431202_buchblock.pdf; erzeugt am 01. Apr 2009 00:16:49; WK
Page 146 of 309
trol unit:
turn the key in the ignition lock
to position 2.
X Press the Ybutton.
The display message shown in the display
changes to rear-compartment air condi-
tioning.
X Turn control Eclockwise or anti-clockwise
(Y page 139). Only change the temperature
setting in small increments. Start at 22 †.
i Press the Ybutton to return to the
standard display.
i The rear-compartment display returns to
the standard display automatically after
three seconds.
X To increase/reduce the rear-compart-
ment temperature using the rear con-
trol unit*: turn the key in the ignition lock
to position 2.
X Turn control Rclockwise or anti-clockwise
(Y page 139). Only change the temperature
setting in small increments. Start at 22 †. Adjusting the air vents
G
Risk of injury
Very hot or very cold air can flow from the air
vents. This could cause burns or frostbite to
bare skin in the immediate vicinity of the
vents. Keep bare skin away from these air
outlets. If necessary, direct the airflow away
to a different area of the vehicle interior.
In order to ensure the direct flow of fresh air
through the air vents into the vehicle interior,
please observe the following notes:
R keep the air inlet grille on the bonnet free
of blockage, such as ice, snow or leaves.
R never cover the vents or air inlet and outlet
grilles in the vehicle interior. i
For virtually draught-free ventilation,
adjust the sliders of the air vents to the
centre position.
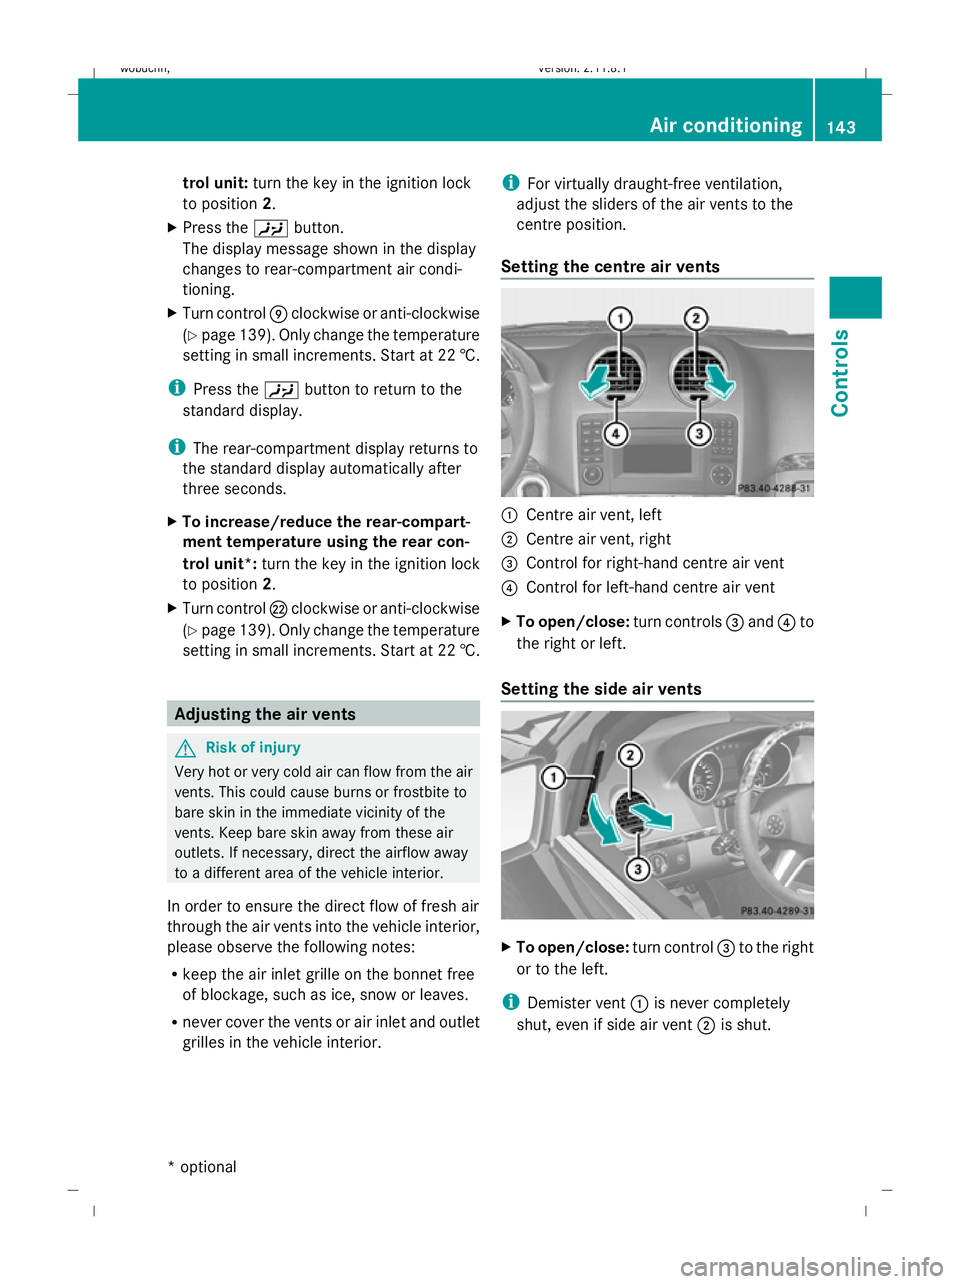
Setting the centre air vents :
Centre air vent, left
; Centre air vent, right
= Control for right-hand centre air vent
? Control for left-hand centre air vent
X To open/close: turn controls=and ?to
the right or left.
Setting the side air vents X
To open/close: turn control=to the right
or to the left.
i Demister vent :is never completely
shut, even if side air vent ;is shut. Air conditioning
143Controls
* optional
X164_AKB; 2; 3, en-GB
wobuchh
,V ersion: 2.11.8.1
2009-03-31T14:14:58+02:00 - Seite 143 Z
Dateiname: 6515431202_buchblock.pdf; erzeugt am 01. Apr 2009 00:17:30; WK
Page 177 of 309
DIN 51628 German standard can lead to
increased wear, engine damage and dam-
age to the exhaust system.
Do not use the following:
R marine diesel
R heating oil
R bio-diesel
R vegetable oil
R petrol
R paraffin
R kerosene
Do not add such fuels to diesel fuel and do
not use any special additives (exception:
flow improvers – see "Low outside temper-
atures").
Damage caused by the use of unapproved
fuels or additives is not covered by the
implied warranty.
Further information on "Fuel" (Y page 287).
Low outside temperatures The flow properties of diesel may be inade-
quate at low ambient temperatures.
Diesel fuel with improved cold flow qualities
is available during the winter months. In
Europe, various climate-dependent low-tem-
perature classes are defined in EN 590. Using
diesel fuels which meet the climatic require-
ments set out in EN 590 can help avoid oper-
ating problems. The flow properties of diesel
fuel may be inadequate at unusually low out-
side temperatures or when using fuel which
has not been adjusted to climatic conditions
(e.g. diesel fuels from Mediterranean
regions).
Flow improver
Flow improvers may be added to improve low-
temperature resistance. The effectiveness of
a flow improver is not guaranteed with every
fuel.
Correct dosage and mixing are decisive fac-
tors in ensuring improvement in low-temper- ature resistance. Under certain circumstan-
ces, an excessive dosage may actually
decrease low-temperature resistance, and
should therefore be avoided (follow the man-
ufacturer's dosing instructions).
Mix the additive with the diesel in good time,
before the flow properties of the diesel
become inadequate. Otherwise, malfunctions
can only be rectified by heating the entire fuel
system, e.g. by parking the vehicle in a heated
garage.
Observe the information provided by the man-
ufacturer when using a flow improver. Only
use flow improvers that have been tested and
approved by Mercedes-Benz. You can obtain
further information from any Mercedes-Benz
Service Centre.
Engine compartment
Bonnet
G
Risk of accident
Do not pull the release lever while the vehicle
is in motion. If you do so, the bonnet may open
up and block your view.
Opening G
Risk of injury
There is a risk of injury if the bonnet is open,
even if the engine is not running.
Some engine components can become very
hot.
To avoid the risk of burns, only touch those
components described in the Owner’s Manual
and observe the relevant safety notes. G
Risk of injury
The radiator fan between the radiator and the
engine can start automatically, even if the key
has been removed from the ignition lock. For
this reason, you must not reach into the fan
rotation area. Otherwise, you could be
injured. 174
Engine compartmentOperation
X164_AKB; 2; 3, en-GB
wobuchh
,V ersion: 2.11.8.1
2009-03-31T14:14:58+02:00 - Seite 174
Dateiname: 6515431202_buchblock.pdf; erzeugt am 01. Apr 2009 00:17:45; WK
Page 178 of 309
Vehicles with a petrol engine:
The electronic ignition system uses high volt-
age. For this reason, you must never touch
ignition system components (ignition coil,
ignition cable, spark plug connector or test
socket) while:
R the engine is running.
R the engine is being started.
R the ignition is switched on and the engine
is being cranked by hand.
You could otherwise suffer an electric shock
and be seriously or even fatally injured.
Vehicles with a diesel engine:
The electronic injection control uses high volt-
age. For this reason, you must never touch
injection system components while:
R the engine is running.
R the engine is being started.
R the ignition is switched on.
You could otherwise suffer an electric shock
and be seriously or even fatally injured.
X Make sure that the windscreen wipers are
switched off. G
Risk of injury
The windscreen wipers and wiper linkage
could be set in motion.
When the bonnet is open, you or others could
be injured by the wiper linkage.
Make sure that the windscreen wiper is
switched off. Remove the key or make sure
that no ignition level has been selected on
KEYLESS GO *. Inthe instrument cluster, all of
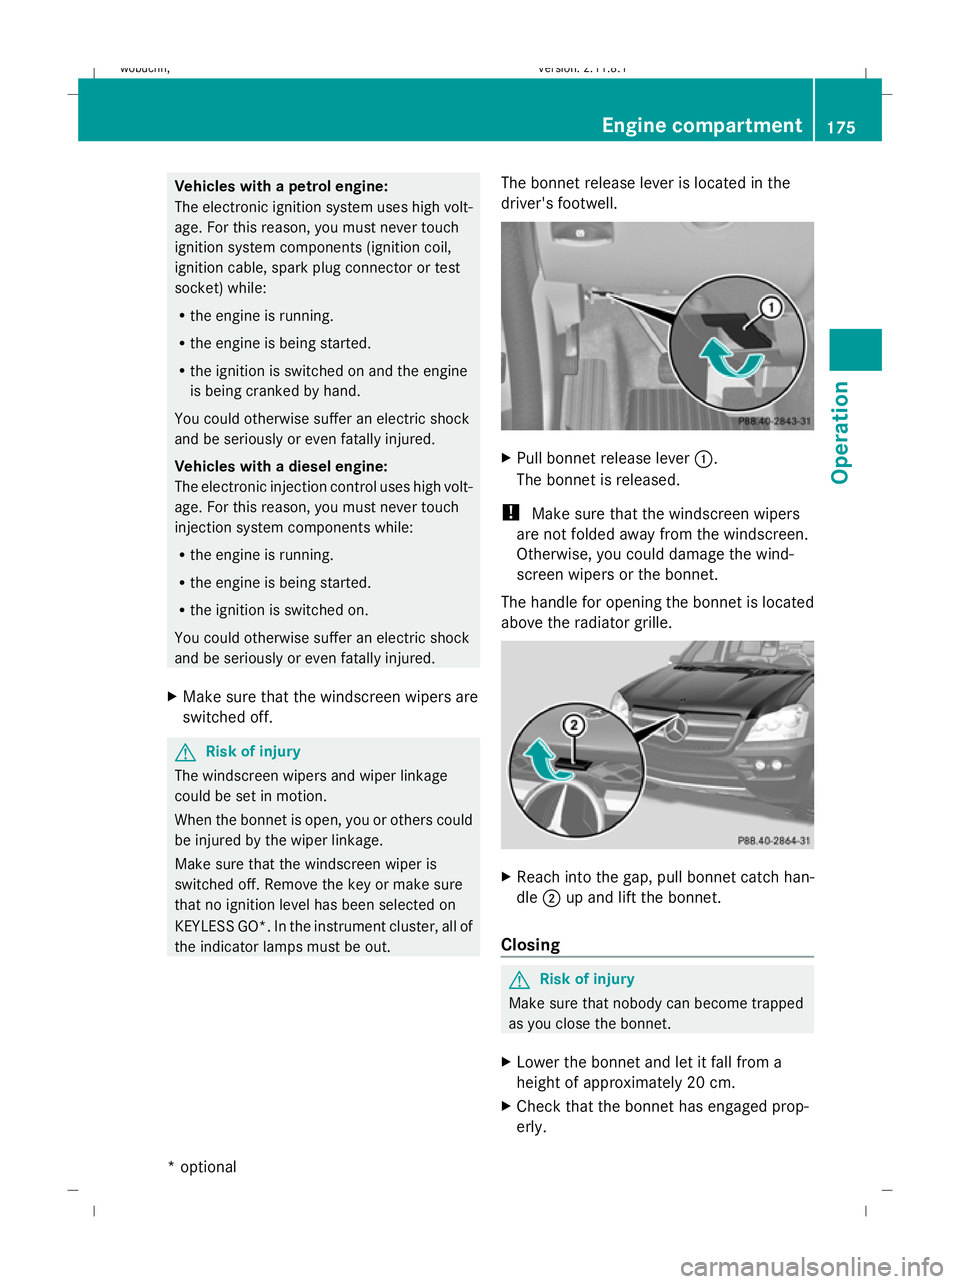
the indicator lamps must be out. The bonnet release lever is located in the
driver's footwell. X
Pull bonnet release lever :.
The bonnet is released.
! Make sure that the windscreen wipers
are not folded away from the windscreen.
Otherwise, you could damage the wind-
screen wipers or the bonnet.
The handle for opening the bonnet is located
above the radiator grille. X
Reach into the gap, pull bonnet catch han-
dle ;up and lift the bonnet.
Closing G
Risk of injury
Make sure that nobody can become trapped
as you close the bonnet.
X Lower the bonnet and let it fall from a
height of approximately 20 cm.
X Check that the bonnet has engaged prop-
erly. Engine compartment
175Operation
* optional
X164_AKB; 2; 3, en-GB
wobuchh
,V ersion: 2.11.8.1
2009-03-31T14:14:58+02:00 - Seite 175 Z
Dateiname: 6515431202_buchblock.pdf; erzeugt am 01. Apr 2009 00:17:45; WK
Page 179 of 309
i
If the bonnet can be raised slightly, it is
not properly engaged. Open it again and
close it with a little more force. Engine oil
Depending on driving style, the vehicle con-
sumes up to 0.8 l oil per 1,000 km. The oil
consumption may be higher than this when
the vehicle is new or if you frequently drive at
high engine speeds.
Checking the engine oil level Before checking the engine oil level the fol-
lowing conditions for the vehicle should be
met:
R the vehicle should be parked on level
ground.
R the engine should be switched off for at
least five minutes if the engine is at normal
operating temperature.
R the engine should be switched off for at
least 30 minutes if the engine is not at
operating temperature (i.e. if you only start
the engine briefly).
Using the on-board computer*
i Only possible on the GL 450 CDI 4MATIC.
On all other models, a dipstick is used to
check the engine oil level (Y page 177).
X Make sure that the key is in position
2(Y page 63) in the ignition lock.
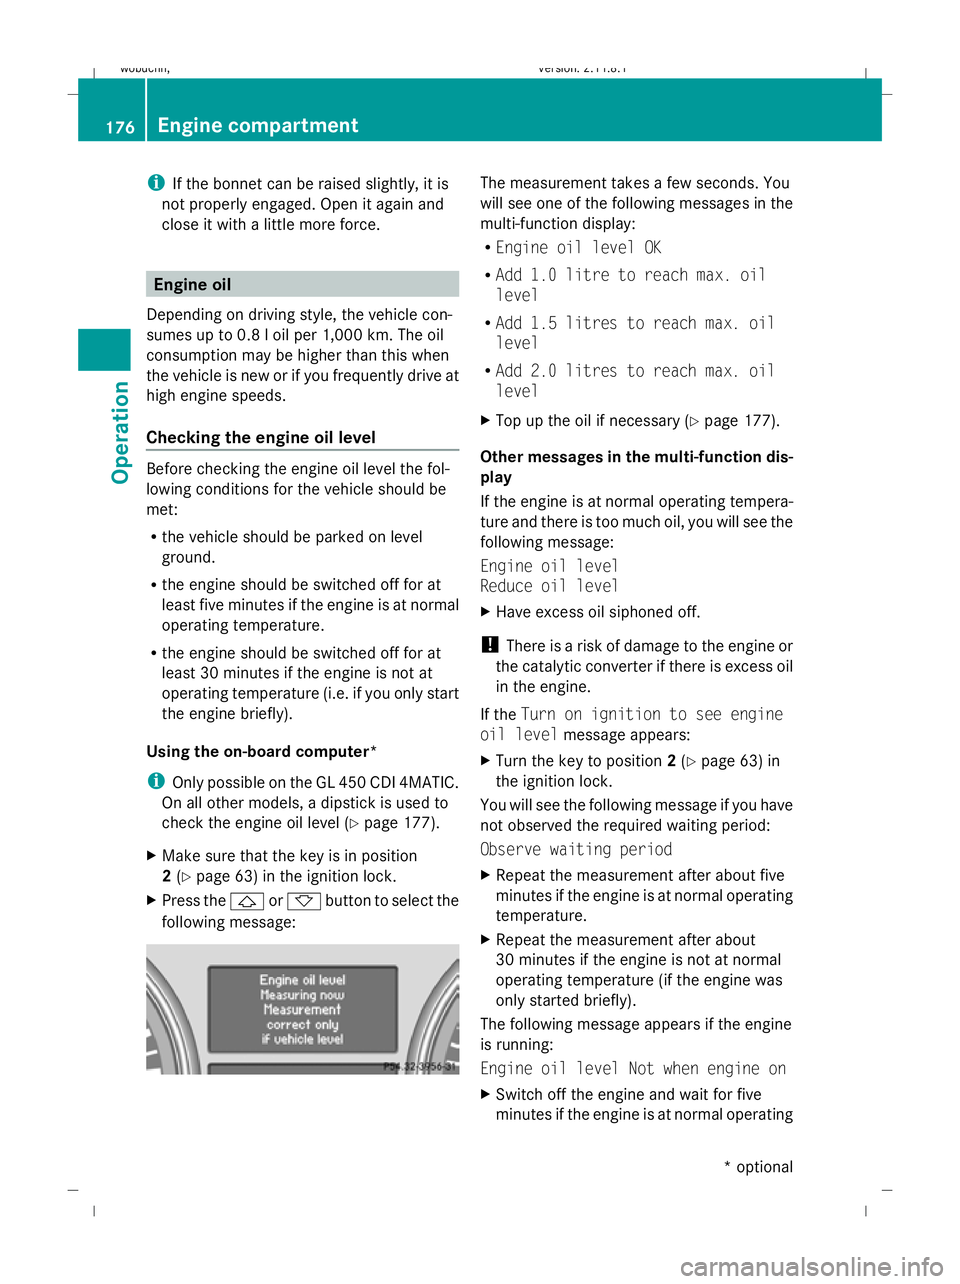
X Press the &or* button to select the
following message: The measurement takes a few seconds. You
will see one of the following messages in the
multi-function display:
R
Engine oil level OK
R Add 1.0 litre to reach max. oil
level
R Add 1.5 litres to reach max. oil
level
R Add 2.0 litres to reach max. oil
level
X Top up the oil if necessary (Y page 177).
Other messages in the multi-function dis-
play
If the engine is at normal operating tempera-
ture and there is too much oil, you will see the
following message:
Engine oil level
Reduce oil level
X Have excess oil siphoned off.
! There is a risk of damage to the engine or
the catalytic converter if there is excess oil
in the engine.
If the Turn on ignition to see engine
oil level message appears:
X Turn the key to position 2(Y page 63) in
the ignition lock.
You will see the following message if you have
not observed the required waiting period:
Observe waiting period
X Repeat the measurement after about five
minutes if the engine is at normal operating
temperature.
X Repeat the measurement after about
30 minutes if the engine is not at normal
operating temperature (if the engine was
only started briefly).
The following message appears if the engine
is running:
Engine oil level Not when engine on
X Switch off the engine and wait for five
minutes if the engine is at normal operating 176
Engine compartmentOperation
* optional
X164_AKB; 2; 3, en-GB
wobuchh,
Version: 2.11.8.1 2009-03-31T14:14:58+02:00 - Seite 176
Dateiname: 6515431202_buchblock.pdf; erzeugt am 01. Apr 2009 00:17:46; WK
Page 222 of 309
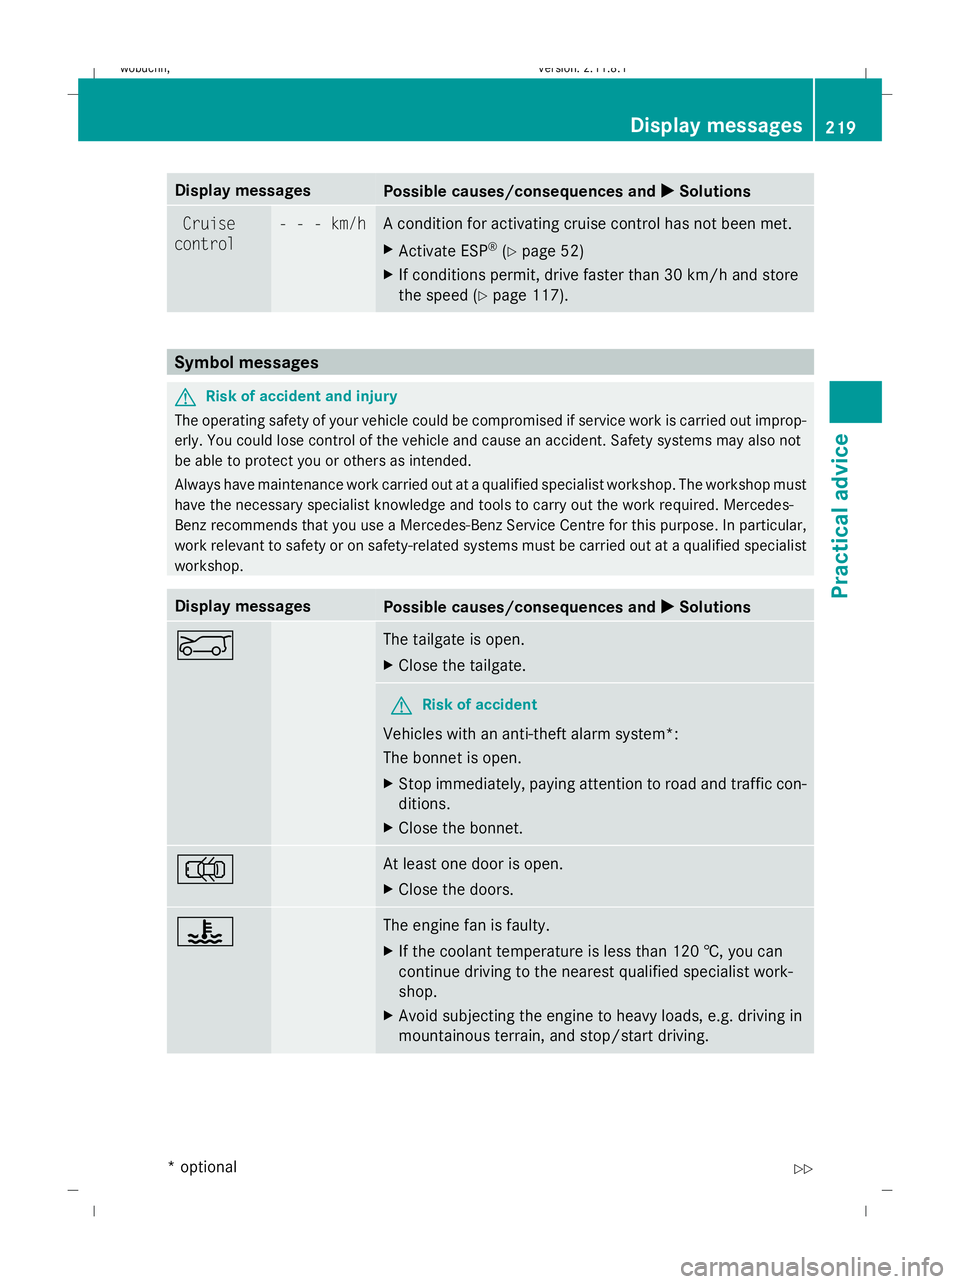
Display messages
Possible causes/consequences and
X
X Solutions Cruise
control - - - km/h A condition for activating cruise control has not been met.
X
Activate ESP ®
(Y page 52)
X If conditions permit, drive faster than 30 km/h and store
the speed (Y page 117). Symbol messages
G
Risk of accident and injury
The operating safety of your vehicle could be compromised if service work is carried out improp-
erly. You could lose control of the vehicle and cause an accident. Safety systems may also not
be able to protect you or others as intended.
Always have maintenance work carried out at a qualified specialist workshop. The workshop must
have the necessary specialist knowledge and tools to carry out the work required. Mercedes-
Benz recommends that you use a Mercedes-Benz Service Centre for this purpose. In particular,
work relevant to safety or on safety-related systems must be carried out at a qualified specialist
workshop. Display messages
Possible causes/consequences and
X
X Solutions E The tailgate is open.
X
Close the tailgate. G
Risk of accident
Vehicles with an anti-theft alarm system*:
The bonnet is open.
X Stop immediately, paying attention to road and traffic con-
ditions.
X Close the bonnet. ; At least one door is open.
X
Close the doors. ? The engine fan is faulty.
X
If the coolant temperature is less than 120 †, you can
continue driving to the nearest qualified specialist work-
shop.
X Avoid subjecting the engine to heavy loads, e.g. driving in
mountainous terrain, and stop/start driving. Display
messages
219Practical advice
* optional
X164_AKB; 2; 3, en-GB
wobuchh
,V ersion: 2.11.8.1
2009-03-31T14:14:58+02:00 - Seite 219 Z
Dateiname: 6515431202_buchblock.pdf; erzeugt am 01. Apr 2009 00:17:59; WK