headlamp MERCEDES-BENZ GL SUV 2012 User Guide
[x] Cancel search | Manufacturer: MERCEDES-BENZ, Model Year: 2012, Model line: GL SUV, Model: MERCEDES-BENZ GL SUV 2012Pages: 441, PDF Size: 10.66 MB
Page 124 of 441
use of the
Tside lamps for several
hours. If possible, switc hontheX right
or the Wleft par king lamp. 1W
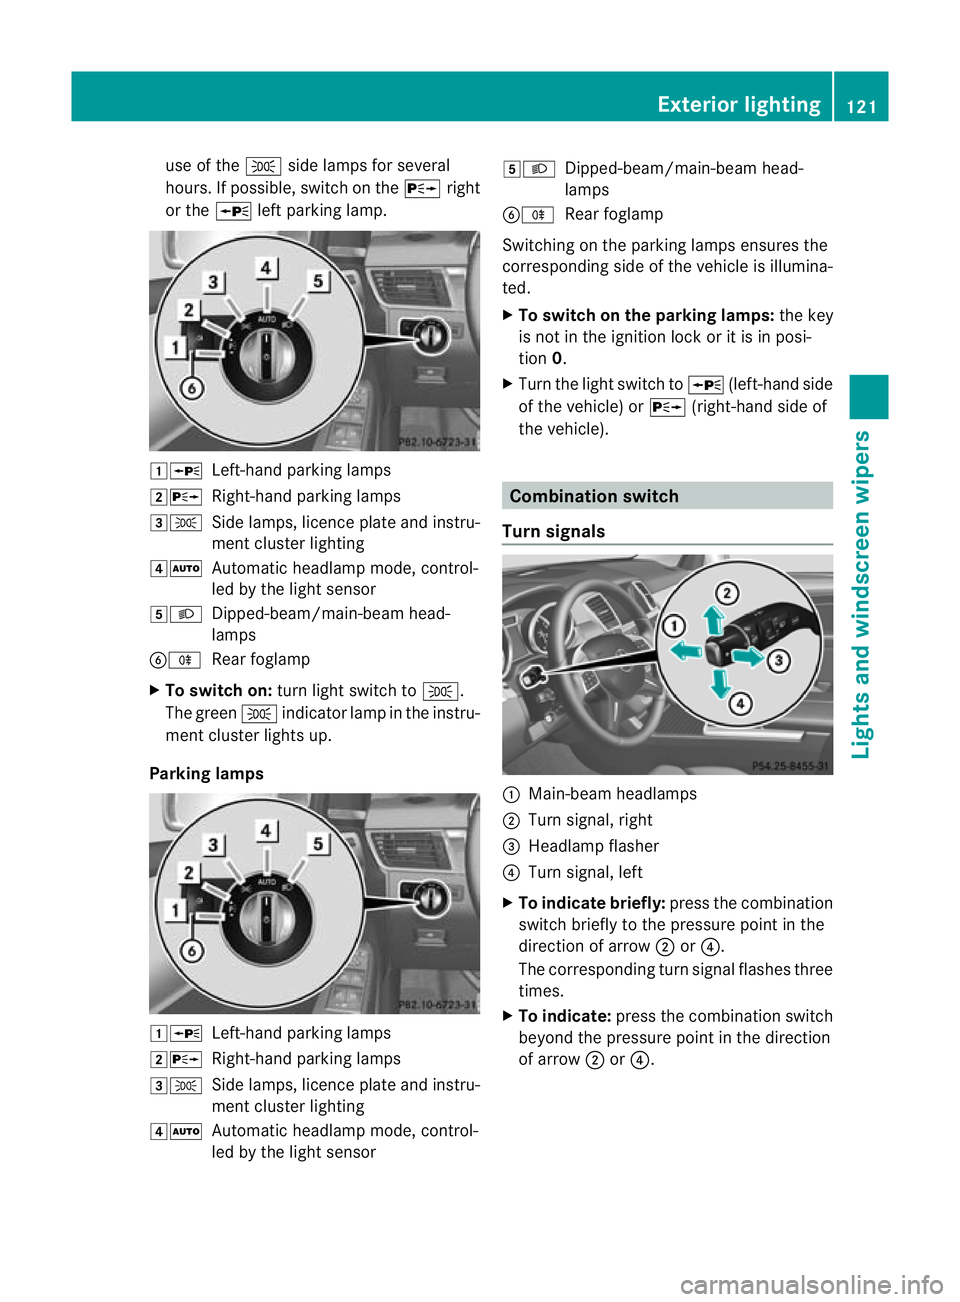
Left-hand parking lamps
2X Right-hand parking lamps
3T Side lamps, licence plate and instru-
mentcluster lighting
4Ã Automatic headlamp mode, control-
led by the light sensor
5L Dipped-beam/main-beam head-
lamps
BR Rear foglamp
X To switch on: turnlight switc htoT .
The green Tindicator lam pinthe instru-
men tcluster lights up.
Parking lamps 1W
Left-handparking lamps
2X Right-hand parking lamps
3T Side lamps, licence plate and instru-
mentcluster lighting
4Ã Automatic headlamp mode, control-
led by the light sensor 5L
Dipped-beam/main-beam head-
lamps
BR Rear foglamp
Switchin gonthe par king lamps ensures the
correspondin gside of the vehicle is illumina-
ted.
X To switch on th eparki ng lamps: the key
is not in the ignition lock or it is in posi-
tion 0.
X Turn the light switc htoW(left-han dside
of the vehicle) or X(right-han dside of
the vehicle). Combination switch
Turn signals :
Main-beam headlamps
; Turn signal, right
= Headlamp flasher
? Turn signal, left
X To indicate briefly: press the combination
switc hbrieflytot he pressur epoint in the
direction of arrow ;or?.
The correspondin gturns ignal flashes three
times.
X To indicate: press the combination switch
beyond the pressure point in the direction
of arrow ;or?. Exterior lighting
121Lights and windsc reen wipers Z
Page 125 of 441
Main-beam headlamps
:
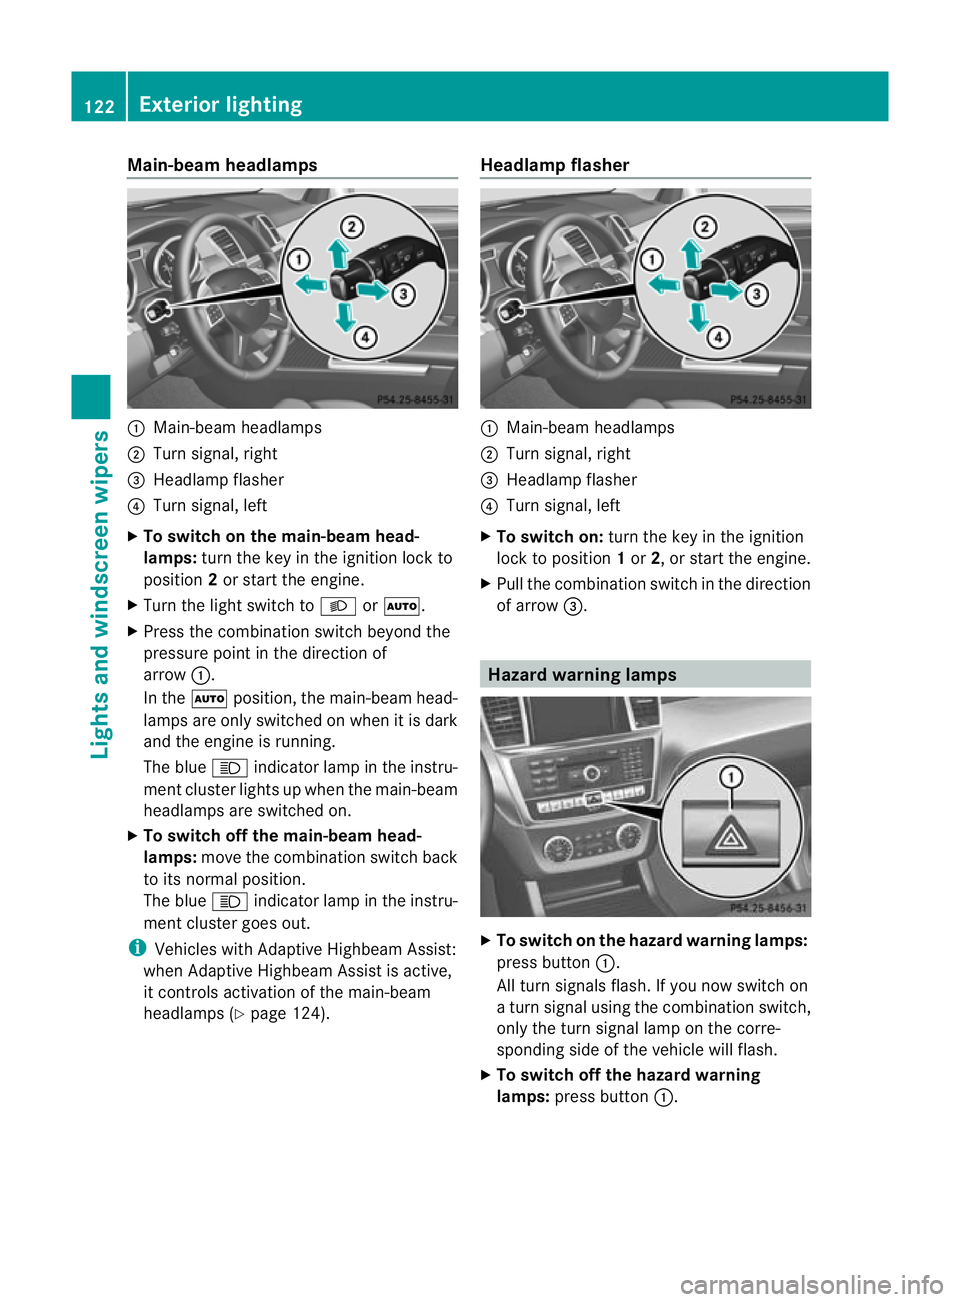
Main-beam headlamps
; Turn signal, right
= Headlam pflasher
? Turn signal, left
X To switch on the main-beam head-
lamps: turn the key in the ignitio nlock to
position 2or star tthe engine.
X Tur nthe light switch to LorÃ.
X Press the combination switch beyond the
pressure point in the direction of
arrow :.
In the Ãposition, the main-beam head-
lamps ar eonly switched on whe nitisdark
and the engine is running.
The blue Kindicator lamp in the instru-
ment cluster lights up when the main-beam
headlamps are switched on.
X To switch off the main-beam head-
lamps: move the combinatio nswitch back
to its normal position.
The blue Kindicator lamp in the instru-
ment cluster goes out.
i Vehicles with Adaptive Highbeam Assist:
when Adaptive Highbeam Assist is active,
it controls activation of the main-beam
headlamps (Y page124). Headlamp flasher :
Main-beam headlamps
; Turn signal, right
= Headlam pflasher
? Turn signal, left
X To switch on: turn the key in the ignition
lock to position 1or 2,ors tart the engine.
X Pul lthe combination switch in the direction
of arrow =. Hazard warning lamps
X
To switch on th ehazard warnin glamps:
press button :.
All turn signals flash .Ifyou now switch on
at urn signa lusing the combination switch,
only the tur nsigna llam pont he corre-
sponding side of the vehicle will flash.
X To switch of fthe hazard warn ing
lamps: press button :.122
Exterior lightingLights and windscreen wipers
Page 126 of 441
The hazar
dwarning lamps automatically
switch on if:
R an airbag is deployed.
R the vehicle decelerates rapidly from a
spee dofm ore than 70 km /hand come sto
as tandstill.
The hazard warning lamps switch off auto-
maticall yifthe vehicle reaches aspeed of
over 10 km/ hagain after afull brake appli-
cation.
i The hazard warning lamps still operate if
the ignition is switched off. Headlamp cleanin
gsystem
Th eh eadlamps are cleane dautomaticall yif
the "Wip ewithw ashe rfluid" function is oper-
ated fiv etimes (Y page 131 )while the lights
ar eona nd the engine is running. Whe nyou
switc hoff th eignition, the automatic head-
lam pcleaning system is reset and countin gis
resumed from 0. Intelligent Light Sys
tem
General notes Th
eI ntelligent Light System is asystem that
adjusts the headlamps automatically to suit
the prevailing drivin gand weather conditions.
It offers advanced functions for improved illu-
mination of the road surface, e.g. depending
on the vehicle speed or weather conditions.
The system includes the active light function,
cornering light function, motorway mode and
extended range foglamps. The system is only
active when it is dark.
You can activate or deactivate the "Intelligent
Light System" using the on-board computer
(Y page 281). Active light function
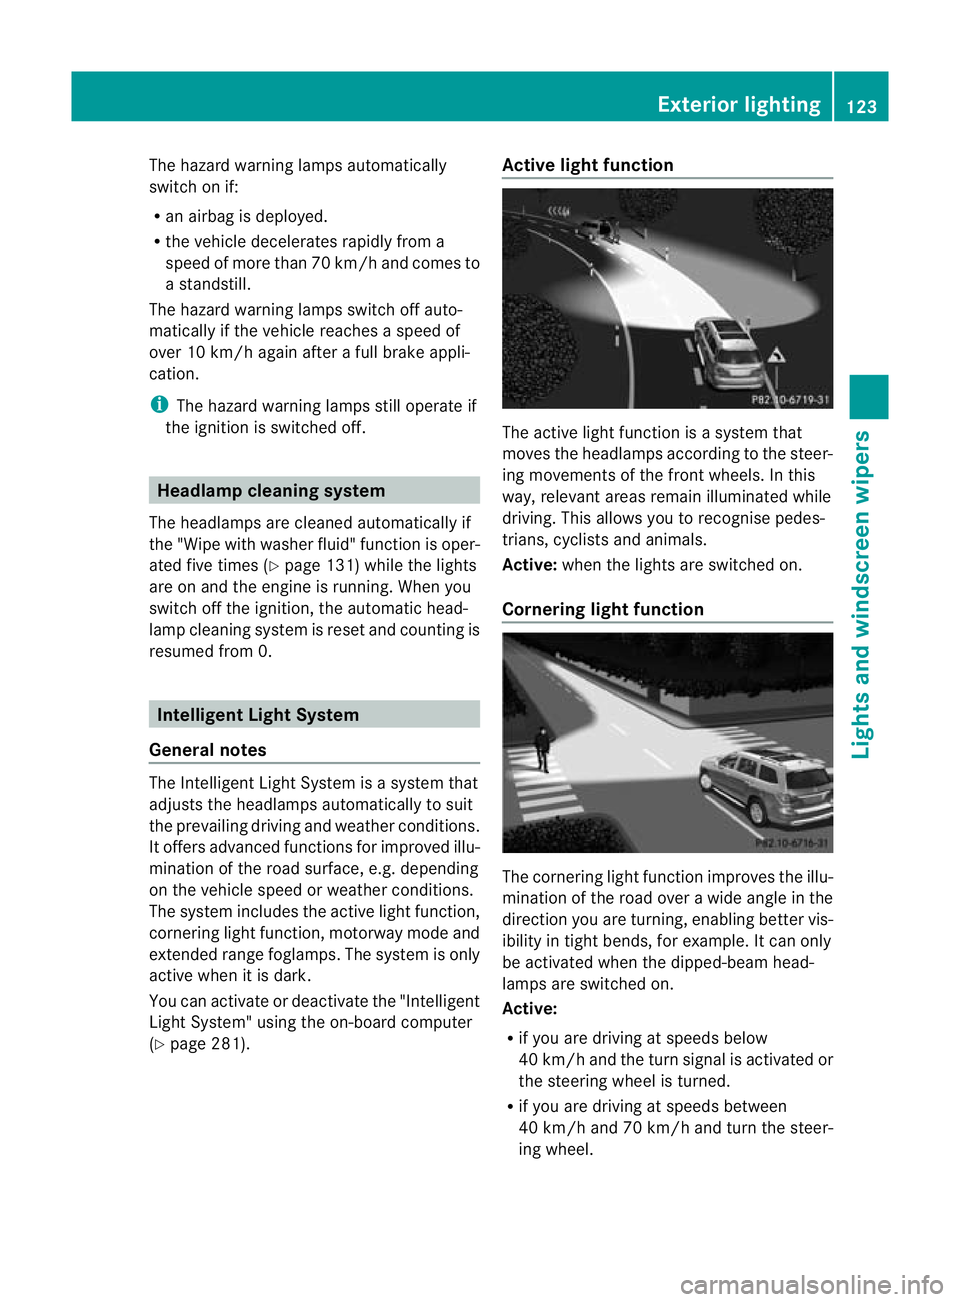
The active light function is
asystem that
moves the headlamps according to the steer-
ing movements of the front wheels. In this
way, relevant areas remain illuminated while
driving. This allows you to recognise pedes-
trians, cyclists and animals.
Active: when the lights are switched on.
Cornering light function The cornering ligh
tfunction improves the illu-
mination of the road over awide angle in the
direction you are turning, enabling better vis-
ibility in tight bends, for example. It can only
be activated when the dipped-beam head-
lamps are switched on.
Active:
R if you are drivin gatspeeds below
40 km/ hand the turn si gnal is activatedor
the steerin gwheel is turned.
R if you ar edriving at speeds between
40 km/h and 70 km/h and tur nthe steer-
ing wheel. Exterior lighting
123Lightsand windscreen wipers Z
Page 127 of 441
Not acti
ve:if yo uare dr iving at speeds above
40 km/ horswitch off the turn signa lorturn
the steering whee ltothe str aight-ahead posi-
tion.
Th ec orn erin glam pm ayremai nlit for ashort
time, but is automati cally switched off after
no mor ethan three mi nutes.
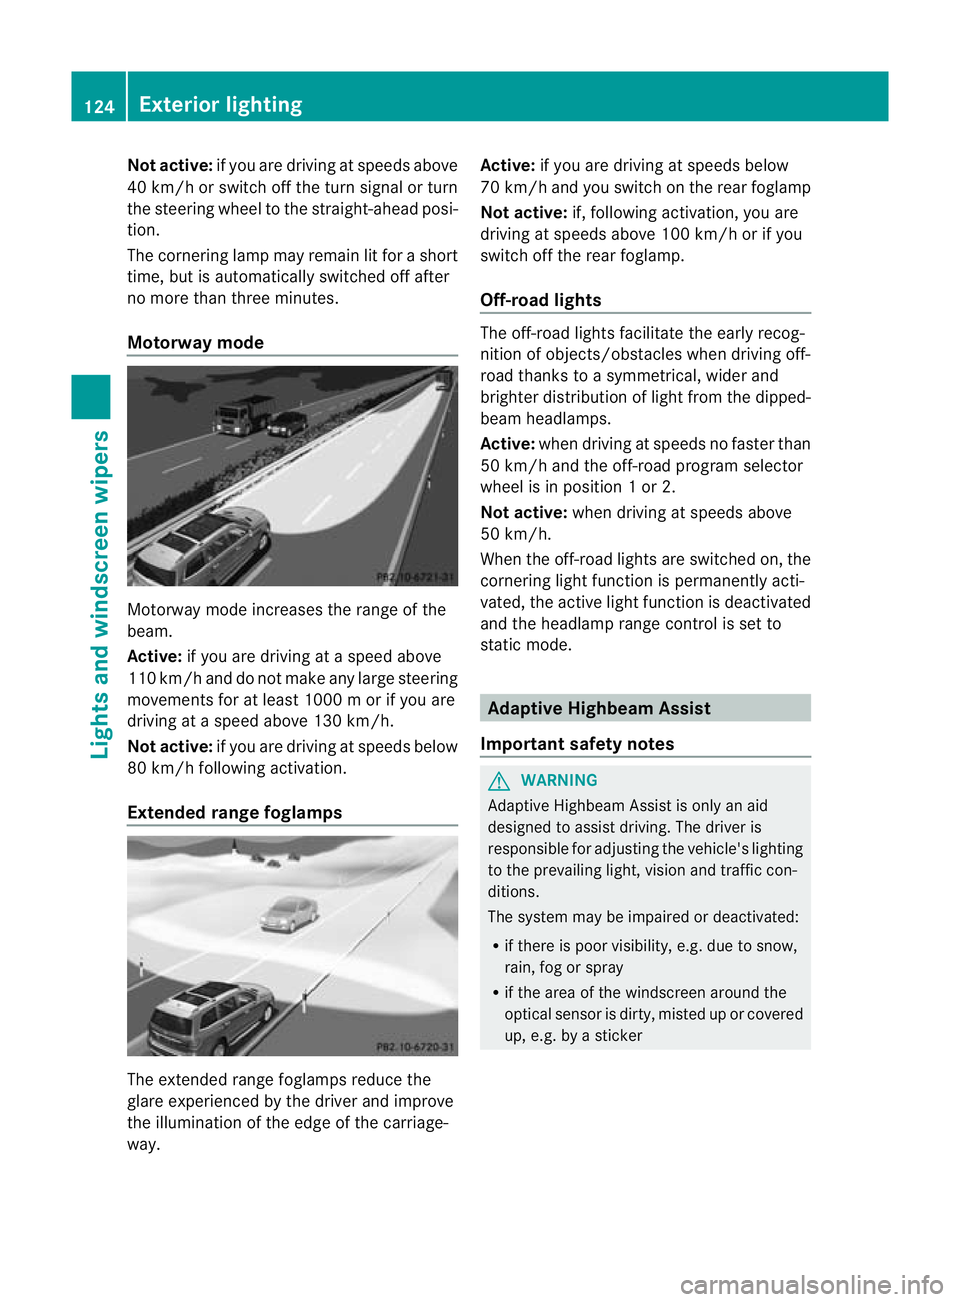
Motorway mode Motorway mode increases the rang
eofthe
beam.
Active: if you ar edriving atas peed above
11 0k m/ hand do not make any large steering
movements for at leas t1000 morify ou are
driving at aspeed abov e130 km/h.
Not active: if you are driving at speeds below
80 km/ hfollowin gactivation.
Extende drange fogla mps The extended range foglamps reduce the
glar
eexperie nced by the driver and improve
the illumination of the edge of the carriage-
way. Active:
if you are drivin gatspeeds below
70 km/ hand yo uswitc honthe rear foglamp
No tactive: if, following activation, you are
driving at speeds above 10 0km/ horify ou
switch off th erear foglamp.
Off-road lights The off-road light
sfacilitat ethe earl yrecog-
nition of objects/obstacles when driving off-
road thank stoasymmetrical, wider and
brighter distribution of ligh tfrom the dipped-
beam headlamps.
Active: whendriving at speeds no faster than
50 km/h and th eoff-road progra mselector
wheel is in position 1or2.
Not acti ve:when driving at speeds above
50 km/h.
When the off-roa dlights are switched on, the
cornering light function is permanent lyacti-
vated ,the act ivel ight function is deactivated
and the headlamp range control is set to
static mode. Adaptive Highbeam Assi
st
Important safety notes G
WARNING
Adaptive Highbeam Assist is only an aid
designed to assist driving. The driver is
responsible for adjusting the vehicle's lighting
to the prevailing light, vision and traffic con-
ditions.
The system may be impaired or deactivated:
R if there is poor visibility, e.g. due to snow,
rain, fog or spray
R if the area of the windscreen around the
optical sensor is dirty, misted up or covered
up, e.g. by asticker 124
Exterior lightingLights and windscree
nwipers
Page 128 of 441
The system may not recognise the following
road users:
R road users that have no lighting, e.g. pedes-
trians
R road users that have poor lighting, e.g.
cyclists
R road users whose lightin gisnot clearly visi-
ble, e.g. road users behind acras hb arrier
R on rare occasions: road users that have
lights that may be recognised too late or not
at all
The automatic main-beam headlamps will not
be deactivated, or they may be activated
despite road users travelling in front of or
approaching the vehicle.
Thus, you could cause an accident and injure
yourself and others. Always observe traffic
conditions and, if necessary, dip the lights
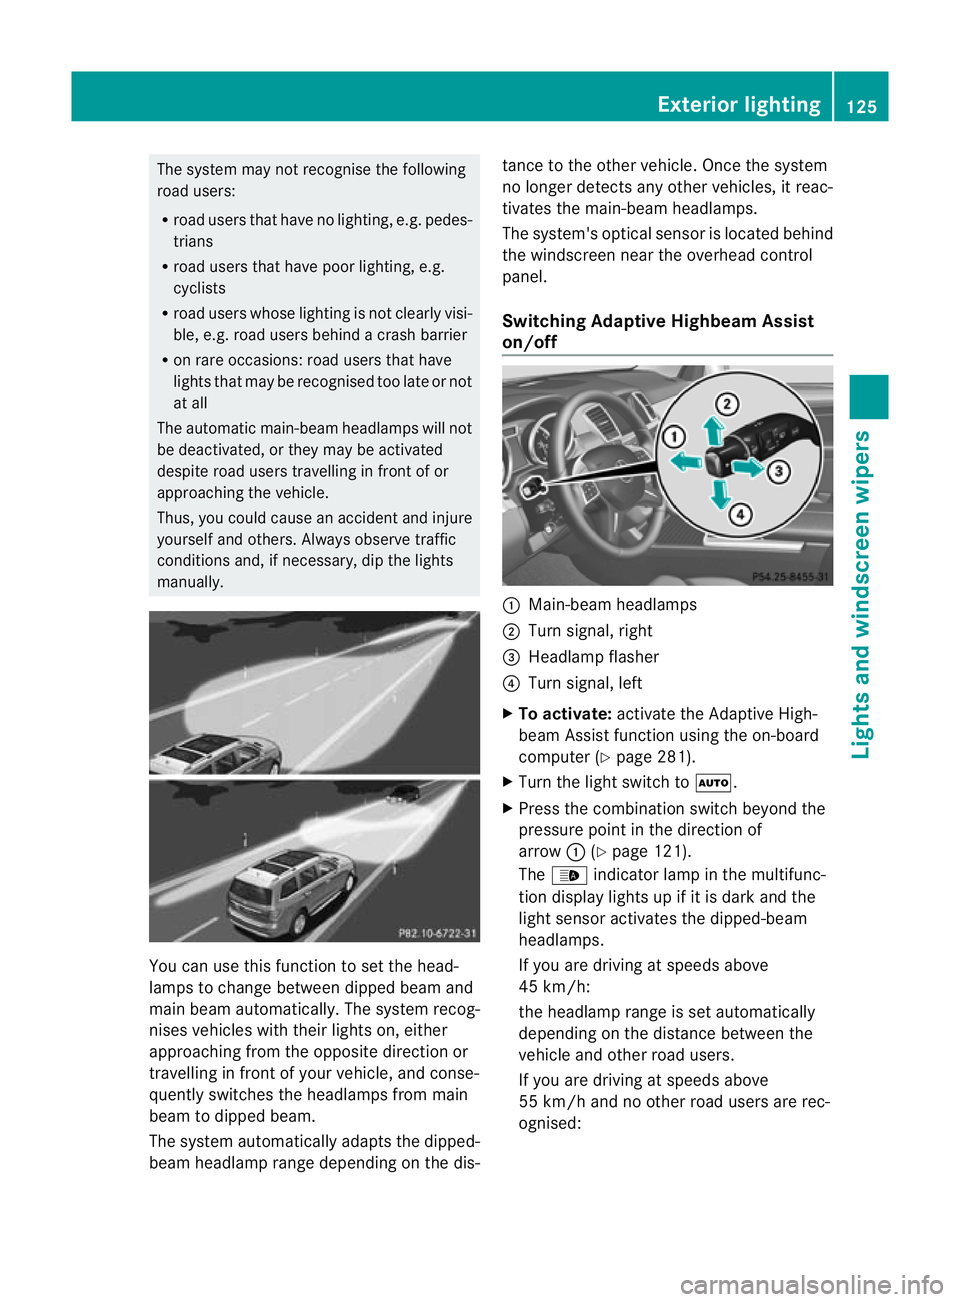
manually. You can use this function to set the head-
lamps to change between dippe dbeam and
mai nbeam automatically. The system recog-
nises vehicles with their lights on, either
approaching from the opposite direction or
travelling in front of your vehicle, and conse-
quently switches the headlamps from main
beam to dipped beam.
The system automatically adapts the dipped-
beam headlam prange depending on the dis- tanc
etot he other vehicle. Onc ethe system
no longer detec tsany other vehicles, it reac-
tivates the main-beam headlamps.
The system's optical senso risl ocated behind
the windscreen near the overhead con trol
panel.
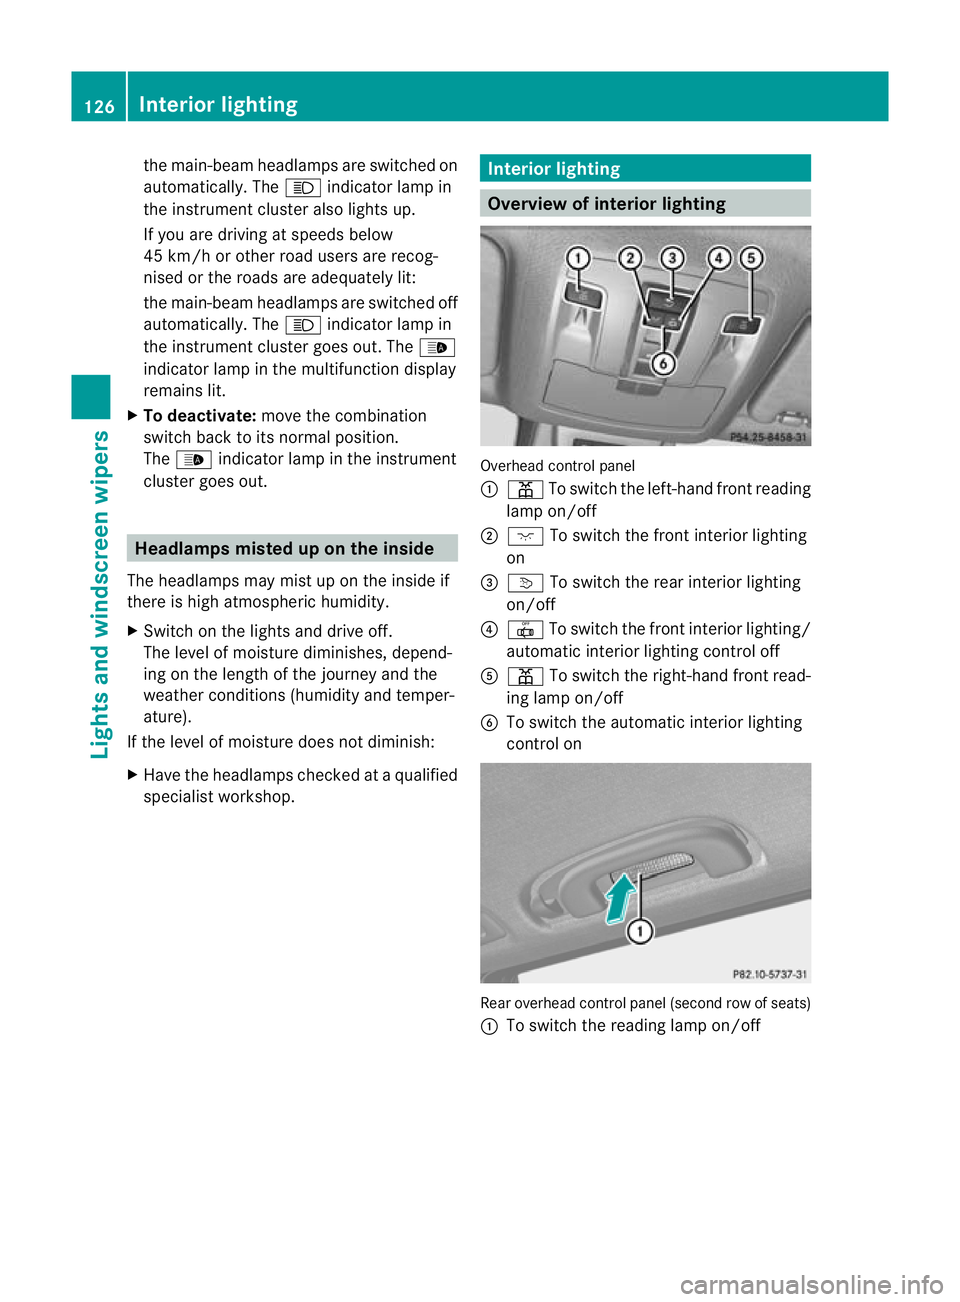
Switching Adaptive Highbeam Assist
on/off :
Main-beam headlamps
; Turnsignal, right
= Headlamp flasher
? Turn signal, left
X To activa te:activate the Adaptive High-
beam Assis tfunction using the on-board
computer (Y page 281).
X Turn the light switch to Ã.
X Press the combination switch beyond the
pressure point in the direction of
arrow :(Ypage 121).
The _ indicator lamp in the multifunc-
tion display lights up if it is dark and the
light senso ractivate sthe dipped-beam
headlamps.
If you ar edriving at speeds above
45 km/h:
th eh eadlam prange is set automatically
depending on the distance between the
vehicle and other road users.
If you are driving at speeds above
55 km/ hand no other road users are rec-
ognised: Exterior lighting
125Lights and windscree nwipers Z
Page 129 of 441
the main-bea
mheadlamps are switched on
automatically. The Kindicator lam pin
the instrument cluster also lights up.
If you are driving at speeds below
45 km/ horother road users are recog-
nised or the roads are adequately lit:
the main-beam headlamps are switched off
automatically. The Kindicator lamp in
the instrument cluster goe sout. The _
indicator lamp in the multifunction display
remains lit.
X To deactivate: move the combination
switch back to its normal position.
The _ indicator lamp in the instrument
cluster goes out. Headlamp
smisted up on the inside
The headlamps may mist up on the inside if
ther eish igh atmospheric humidity.
X Switc honthe lights and drive off.
The level of moistur ediminishes, depend-
ing on the lengt hofthe jour neya nd the
weather conditions (humidity and temper-
ature).
If the level of moisture doe snot diminish:
X Hav ethe headlamps checked at aqualified
specialist workshop. Interior lighting
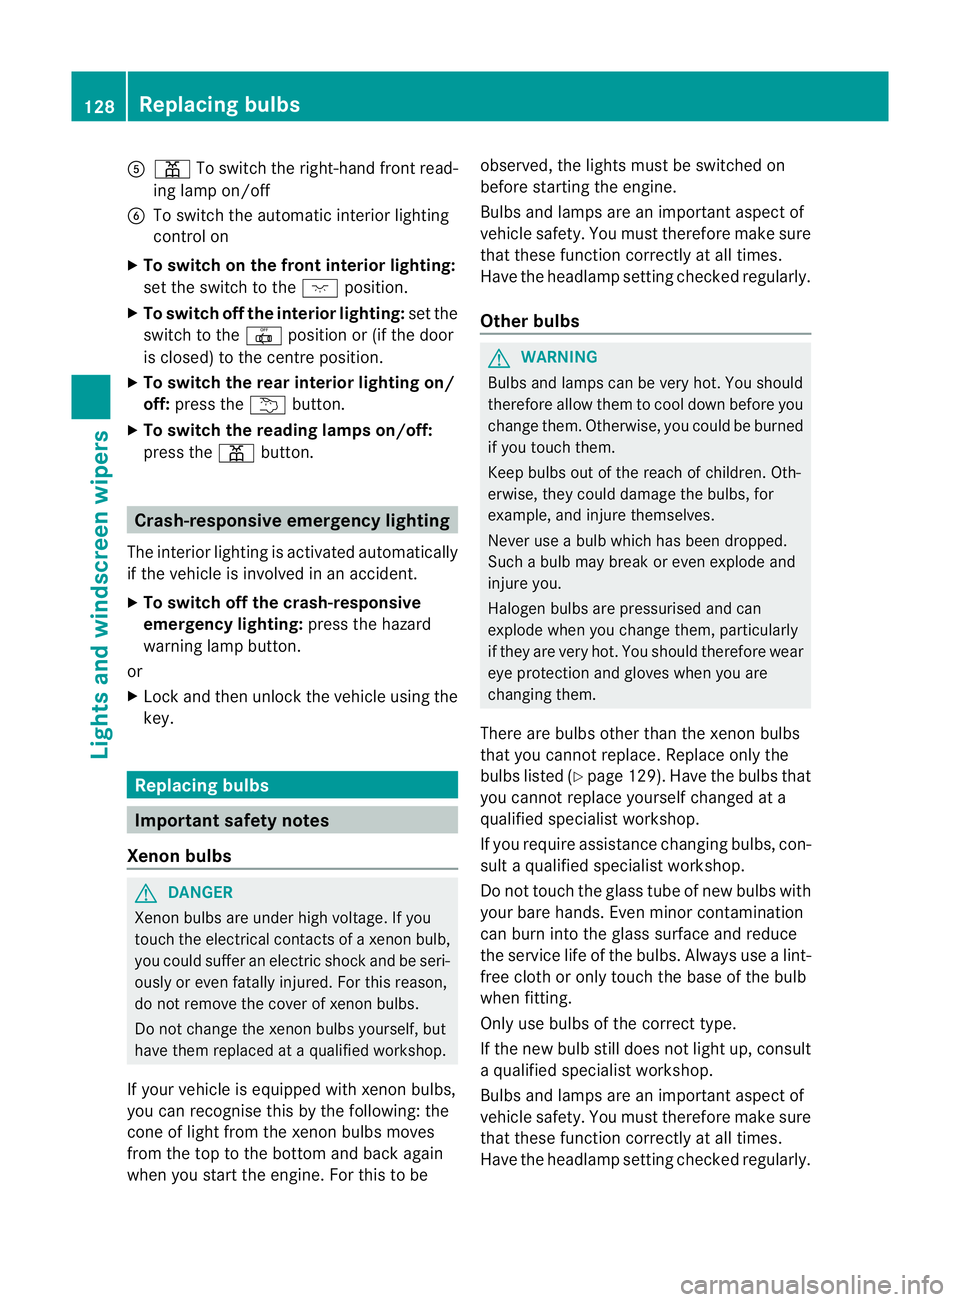
Overview of interior lighting
Overhead control panel
:
p To switch the left-hand fron treading
lam pon/off
; c To switch the fron tinterior lighting
on
= v To switch the rear interior lighting
on/off
? | To switch the fron tinterior light ing/
automatic int eriorl ightin gcontrol off
A p To switc hthe right-han dfront read-
ing lamp on/off
B To switch th eautomatic interior lighting
control on Rear overhead control panel (second row of seats)
: To switc hthe readin glamp on/off 126
Interior lightingLight
sand windscreen wipers
Page 131 of 441
A
p To switc hthe right-hand fron tread-
ing lam pon/off
B To switch the automati cinterior lighting
control on
X To switch on the front interior lighting:
set the switch to the cpositio n.
X To switch off the interior lighting: set the
switch to the |positio nor(if the door
is closed) to the centre position.
X To switch the rear interior lighting on/
off: press the ubutton.
X To switch the reading lamp son/off:
press the pbutton. Crash-responsive emergency lighting
The interior lightin gisa ctivated automatically
if the vehicle is involved in an accident.
X To switch off the crash-responsive
emergenc ylighting: press the hazard
warning lamp button.
or
X Lock and then unlock the vehicle using the
key. Replacing bulbs
Important safet
ynotes
Xenon bulbs G
DANGER
Xenon bulbs are under high voltage. If you
touch the electrical contact sofaxenon bulb,
you could suffer an electric shock and be seri-
ously or even fatally inju red. For this reason,
do not remove the cover of xenon bulbs.
Do not change the xenon bulbs yourself, but
have them replaced at aqualified workshop.
If your vehicle is equipped with xenon bulbs,
you can recognise this by the following :the
con eoflight from the xenon bulbs moves
from the top to the bottom and back again
when you start the engine. For this to be observed, the lights must be switched on
before starting the engine.
Bulbs and lamps are an important aspect of
vehicle safety. You must therefore make sure
that these function correctly at all times.
Hav
ethe headlamp setting checked regularly.
Other bulbs G
WARNING
Bulbs and lamps can be ver yhot. You should
therefore allow them to cool down befor eyou
change them .Otherwise, you could be burned
if you touch them.
Keep bulbs out of the reach of children .Oth-
erwise, the ycould damage the bulbs, for
example, and inj uret hemselves.
Never use abulbw hich ha sbeend ropped.
Suc hab ulbm ay break or even explode and
injure you.
Haloge nbulbs are pressurised and can
explode when you change them ,particularly
if they are ver yhot.Y ou should therefor ewear
eye protec tion and gloves when you are
changing them.
There are bulbs other than the xenon bulbs
that you can notreplace. Replace only the
bulbs listed (Y page 129). Hav ethe bulbs that
you can notreplace yourself changed at a
qualified specialist workshop.
If you require assistanc echanging bulbs, con-
sult aqualified specialist workshop.
Do not touch the glass tube of new bulbs with
your bare hands. Even minor contamination
can burn into the glass surface and reduce
the service life of the bulbs .Always use alint-
free cloth or only touch the base of the bulb
when fitting.
Only use bulbs of the correc ttype.
If the new bulb still does not light up, consult
aq ualified specialist workshop.
Bulbs and lamps are an importan taspect of
vehicle safety .You must therefor emake sure
that these function correctly at all times.
Have the headlamp setting checked regularly. 128
Replacing bulbsLights and windscree
nwipers
Page 132 of 441
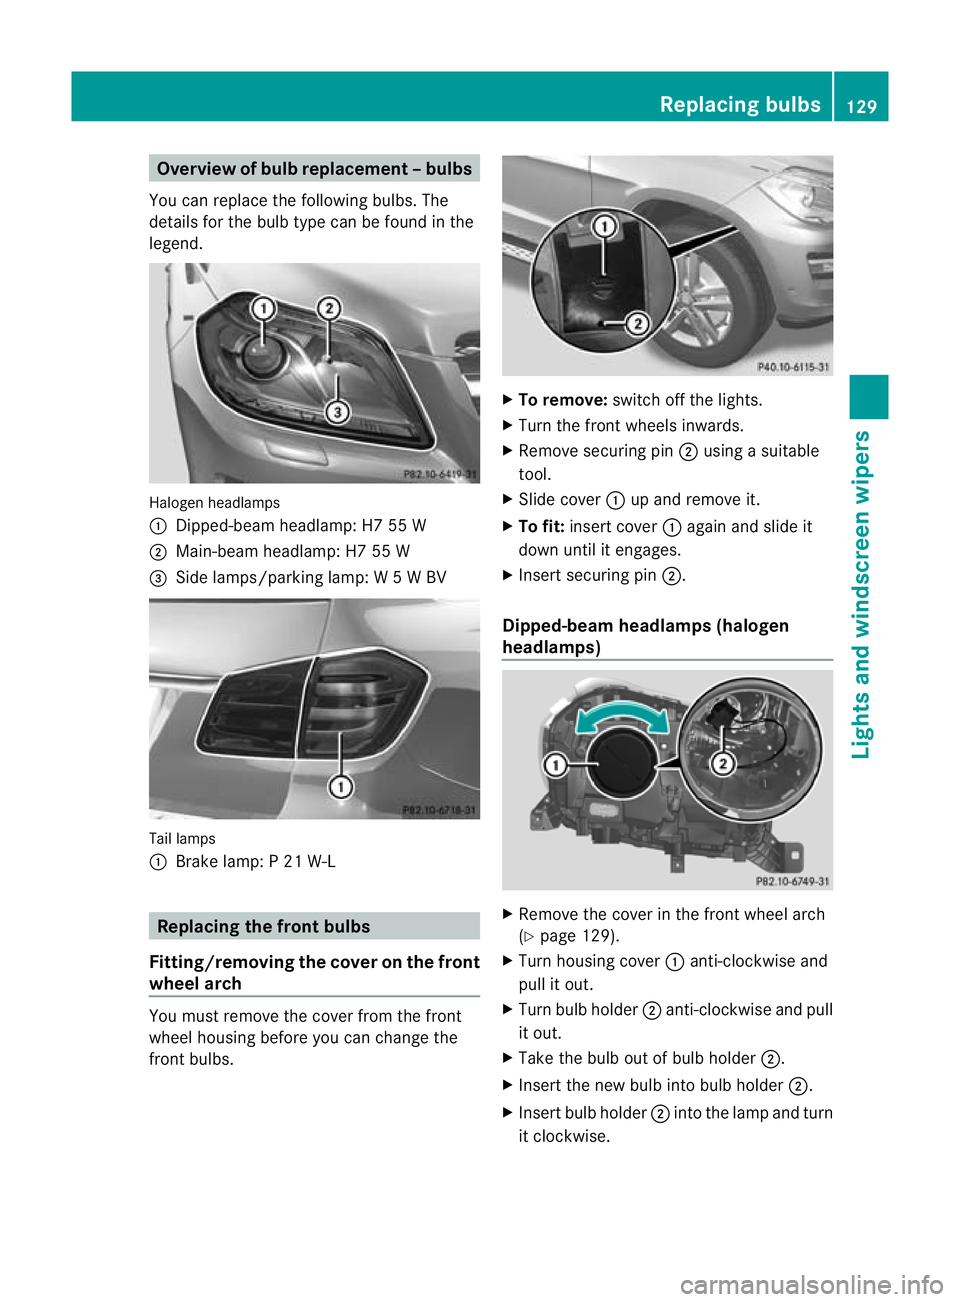
Overview of bulb replacement
–bulbs
Yo uc an replace the following bulbs. The
details for the bul btype can be found in the
legend. Halogen headlamps
:
Dipped-bea mheadlamp: H7 55 W
; Main-beam headlamp: H7 55 W
= Side lamps/par king lamp: W5WBV Tail lamps
:
Brake lamp: P21W-L Replacing the fron
tbulbs
Fitting /removing the cover on the front
wheel arch You must remov
ethe cover from the front
wheel housing before you can change the
front bulbs. X
To remove: switch off the lights.
X Tur nthe front wheels inwards.
X Remov esecuring pin ;using asuitable
tool.
X Slid ecover :up and remove it.
X To fit: insertcover :again and slide it
down until it engages.
X Insert securin gpin; .
Dipped-beam headlamps (halogen
headlamps) X
Remove the cove rinthe front whee larch
(Y page 129).
X Turn housing co ver:anti-clockwise and
pull it out.
X Turn bulb ho lder;anti-clockwise and pull
it out.
X Take the bulb ou tofbulb holder ;.
X Insert the new bulb int obulb holder ;.
X Insert bulb holder ;into the lamp and turn
it clockwise. Replacin
gbulbs
129Lightsand windscreen wipers Z
Page 133 of 441
X
Align housing cover :and turn it clock-
wise unti litengages.
X Replace the cove rinthe front wheel arch
(Y page 129).
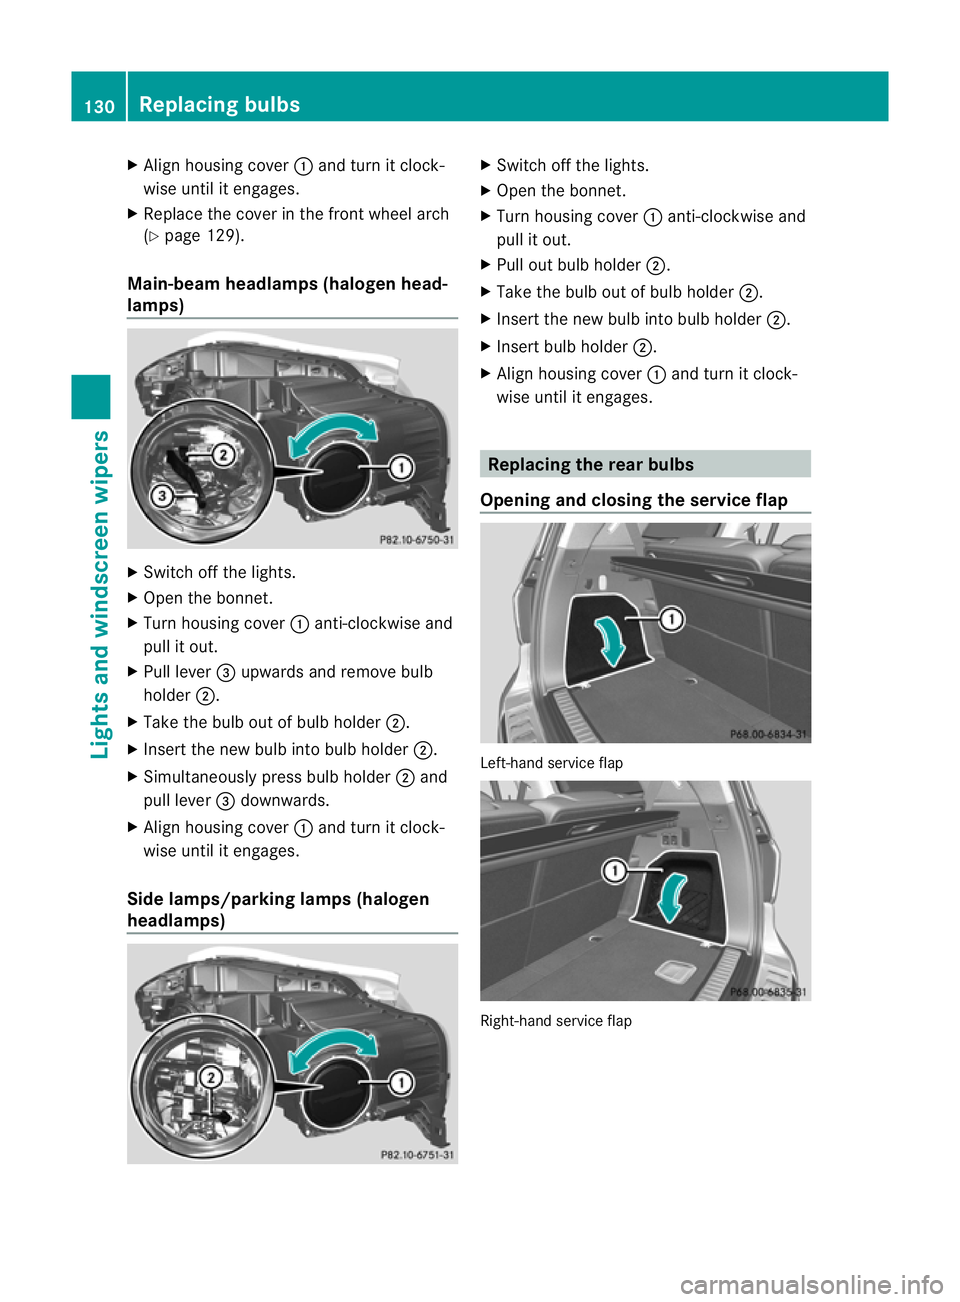
Main-beam headla mps(halogen head-
lamps) X
Switch off the lights.
X Open the bonnet.
X Turn housing cover :anti-clockwise and
pull it out.
X Pull lever =upwards and remov ebulb
holder ;.
X Take the bulb out of bulb holder ;.
X Insert the new bulb into bulb holder ;.
X Simultaneously press bulb holder ;and
pull lever =downwards.
X Align housing cover :and turn it clock-
wise until it engages.
Side lamps/parking lamps (halogen
headlamps) X
Switch off the lights.
X Open the bonnet.
X Turn housing cover :anti-clockwise and
pull it out.
X Pull out bulb holder ;.
X Take the bulb out of bulb holder ;.
X Insert the new bulb into bulb holder ;.
X Insert bulb holder ;.
X Align housing cover :and turn it clock-
wise until it engages. Replacing the rear bulbs
Openin gand closing th eservice flap Left
-hand service flap Right-hand service flap130
Replacin
gbulbsLight sand windscreen wipers
Page 193 of 441
Checklist after driving off-road
!
If you detect damag etothe vehicl eafter
dri ving off-road, have the vehicle checked
immediately at aqualified specialist work-
shop.
X Vehicles with th eON&O FFROAD pack-
age: activat ethe on-road program
(Y page 253).
X Vehicles without th eON&O FFROAD
package: deactivate the on- road program
(Y page 252).
X Deac tivate the LOW RANGE off-roa dgear
(Y page 254).
X Deactiva teDS R(Ypage 251).
X Lowe rthe vehicle level again to alevel suit-
able to the road conditions, e.g. to the high-
way/high-speed level.
X Clean the headlamps and rear lights and
check for damage.
X Clean the front and rear licence plates.
X Clean the wheels/tyres with awater jet and
remove any foreign objects.
X Clea nthe wheels, wheel arches and the
vehicle underside with awater jet; check
for any foreign objects and damage.
X Check whethe rtwigs or other parts of
plants have become trapped. These
increase the risk of fire and can damage
fuel pipes, brake hose sorthe rubber bel-
lows of the axl ejoint sand propeller shafts.
X After the trip, examine without fail the
entire undercarriage, wheels ,tyres, brakes,
bodywork structure, steering, chassis and
exhaus tsystem for damage.
X After driving for extended period sacross
sand ,mud, gravel, water or in similarly dirty
conditions, have the brake discs, wheels,
brake pads/lining sand axle joints checked
and cleaned.
X If you detect strong vibrations after off-road
travel, check for foreig nobject sinthe
wheels and drive train and remove them if
necessary. Foreign objec ts candisturb the
balance and cause vibrations. Driving over rough terrain places greater
demands on your vehicle than drivin
gonnor-
ma lroads. Af terd riving off- road, check the
vehicle. This allow syou to detec tdamage
promptly and reduce the risk of an accident
to yourself and other road users.
Driving on sand Observe the following rules when driving on
sand:
R
vehicle swith the ON&OFFROAD pack-
age: select off- road program 1
(Y page 253).
R vehicle swithou tthe ON&OFFROAD
package: select theoff-road program
(Y pag e252).
R select ahigher vehicle level.
R select ashift range appropriate to the ter-
rain.
R drive quickly to overcom ethe rolling resist-
ance. Otherwise, the vehicle' swheels
could becom estuck in loose ground.
R drive in the track sofother vehicle sifpos-
sible. Make sure that:
- the tyr eruts are not too deep.
- the sand is sufficiently firm.
- the ground clearance of the vehicle is
sufficient.
Tyr eruts and gravel roads !
Check that th eruts are not too deep and
that your vehicle has sufficient clearance.
Otherwise, your vehicle could be damaged
or bottom out and get stuck.
Observe the following rules when driving
along ruts in off-road terrain or on roads with
loos egravel:
R Activate th eoff-road program
(Y pag e252).
R Vehicle swith the AIRMATIC package:
select araised vehicle level.
R Avoid high engine speeds.
R Restrict the shift range to 1.190
Driving tipsDriving and parking