oil MERCEDES-BENZ GL SUV 2012 User Guide
[x] Cancel search | Manufacturer: MERCEDES-BENZ, Model Year: 2012, Model line: GL SUV, Model: MERCEDES-BENZ GL SUV 2012Pages: 441, PDF Size: 10.66 MB
Page 308 of 441
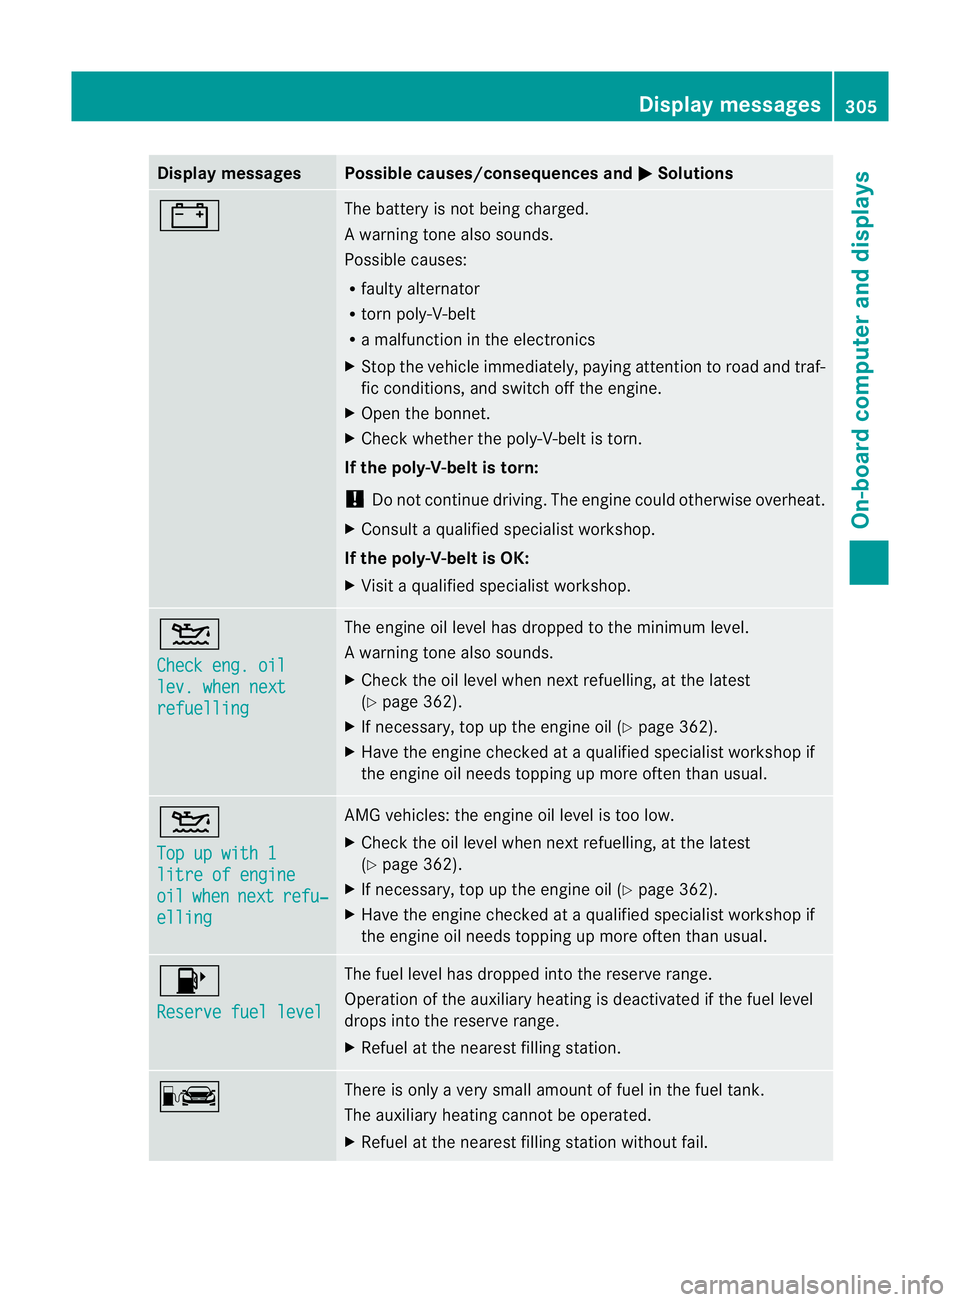
Displa
ymessages Possible causes/consequences and
M Solutions
# The battery is no
tbeing charged.
Aw arning ton ealso sounds.
Possible causes:
R fault yalternator
R torn poly-V-belt
R am alfunction in the elect ronics
X Stop the vehicle immediately, paying attention to road and traf-
fic conditions, and switch off the engine.
X Open the bonnet.
X Check whether the poly-V-belt is torn.
If the poly-V-belt is torn:
! Do not continue driving. The engine could otherwise overheat.
X Consult aqualified specialist workshop.
If the poly-V-belt is OK:
X Visit aqualified specialist workshop. 4
Chec
keng. oil lev. when next
refuelling Th
ee ngine oil level has dropped to the minimum level.
Aw arning ton ealso sounds.
X Chec kthe oil level when nex trefuelling, at the latest
(Y page 362).
X If necessary, top up the engine oil (Y page 362).
X Hav ethe engin echecked at aqualified specialist worksho pif
the engine oil needs topping up more often than usual. 4
Top up wit
h1 litre of engine
oil when next refu‐
elling AM
Gvehicles: the engine oil level is too low.
X Check the oil level when next refuelling, at the latest
(Y page 362).
X If necessary, top up the engine oil (Y page 362).
X Hav ethe engin echecked at aqualified specialist worksho pif
the engine oil needs topping up more often than usual. 8
Reserv
efuel level Th
ef uel level has dropped into the reserve range.
Operation of the auxiliary heating is deactivated if the fuel level
drops into the reserve range.
X Refuel at the nearest filling station. C There is only
avery small amount of fuel in the fuel tank.
The auxiliary heatin gcannot be operated.
X Refuel at the nearest filling station without fail. Display messages
305On-board computer and displays Z
Page 364 of 441
To avoi
dthe risk of burns, only touc hthose
component sdescribed in the Owner's Manual
and observ ethe relevant safety notes. G
WARNING
The radiator fa nbetween the radiator and the
engine can star tautomatically, even if the key
has been removed from the ignition lock. For
this reason, you must not reach into the fan
rotation area. You could otherwis ebeinjured.
Vehicles with apetrol engine: The elec-
tronic ignition system uses high voltage. For
this reason ,you must never touc hignition
system component s(ignition coil, ignition
cables, spark plug connectors or test socket)
while:
R the engine is running
R the engine is being started
R the ignition is switched on and the engine
is being cranked by hand
You could otherwise suffer an electric shock
and be seriously or even fatally injured.
Vehicles with adiesel engine: The elec-
tronic injection control uses high voltage. For
this reason ,you must never touc hinjection
system components while:
R the engi neis running
R the engin eisbeing started
R the ignition is switched on
You could otherwise suffer an electric shock
and be seriously or even fatally injured. G
WAR
NING
The winds creen wipers and wiper linkage
could be set in motion.
When the bonnet is open, you or others could
be injured by the wiper linkage.
Make sure that the windscreen wipers are
switched off .Remov ethe key or make sure
that no ignition position has been selected
with KEYLESS-GO. All indi cator lamps must be
off in the instrumen tpanel.
! Make sure that the windscreen wipers are
not folded away from the windscreen. Oth- er
wise ,you could damage the windscreen
wipers or the bonnet. X
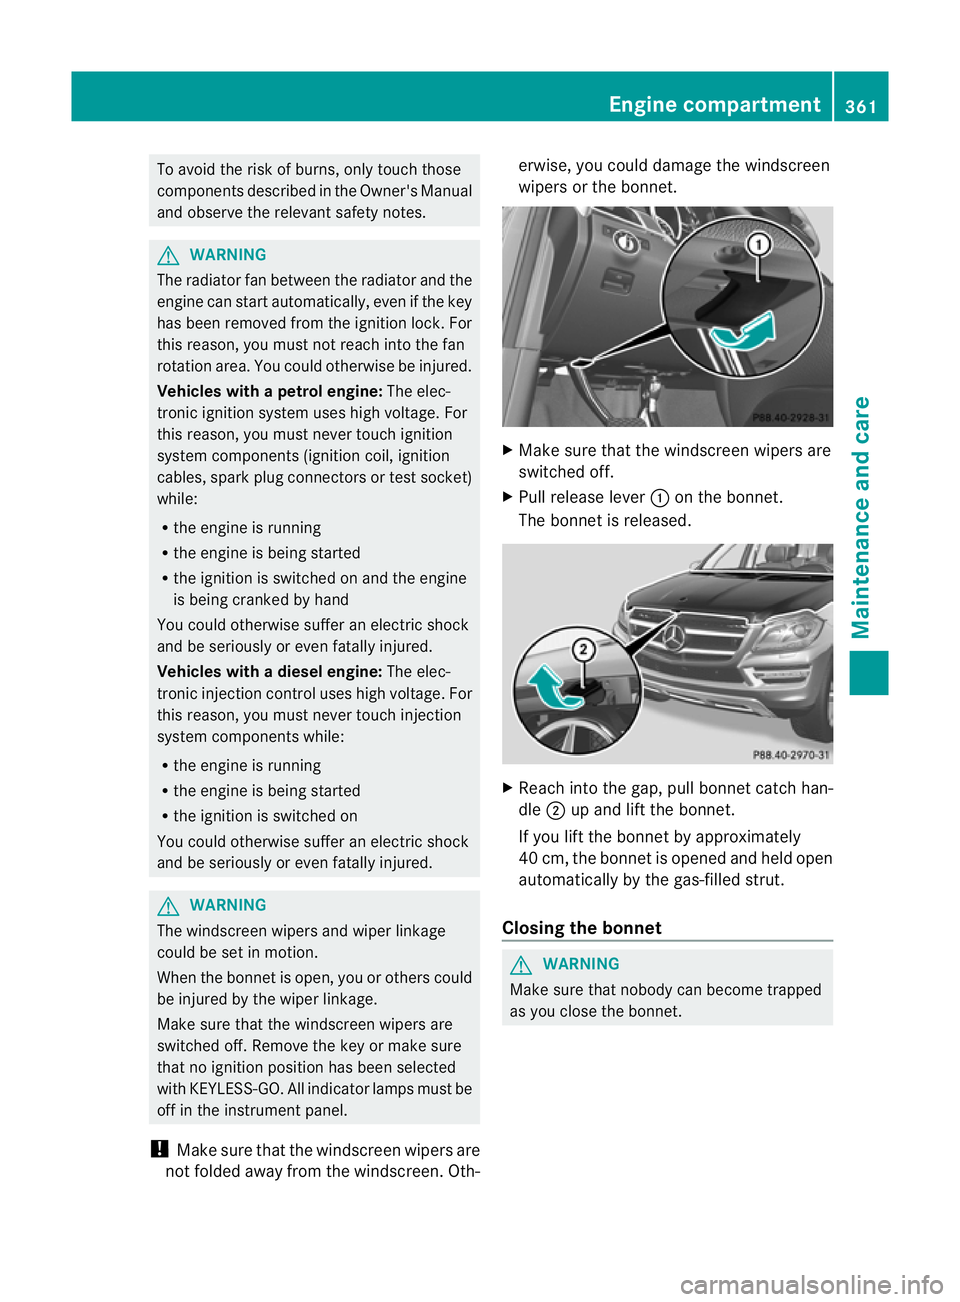
Make sure tha tthe windscreen wiper sare
switche doff.
X Pull release lever :on th ebonnet.
The bonnet is released. X
Reac hinto the gap ,pull bonnet catch han-
dle ;up and lift the bonnet.
If you lift the bonnet by approximately
40 cm, the bonnet is opened and held open
automatically by the gas-filled strut.
Closing the bonnet G
WARNING
Make sure that nobody can become trapped
as you close the bonnet. Eng
inecompartment
361Maintenance and care Z
Page 365 of 441
X
Lower th ebonnet and let it fal lfrom a
heig ht of approx imately 20 cm.
X Check that the bonnet has engaged prop-
erly.
If the bonnet can be raised slightly, it is not
properly engaged. Open it again and close
it with alittle more force. Radiator
Vehicles with adiesel engine: do not cover
the radiator .Donot use therma lmats, insect
protection covers or anything similar. Doing
so can cause the Onboard Diagnostics Sys-
tem to display inaccurat evalues. Some of
these values are legally required and must
always be correct. Engin
eoil
Genera lnotes Dependin
gonyour drivin gstyle, the vehicle
consumes up to 0.8 lofoil per 1,00 0km. The
oi lc onsumption ma ybehigher than this when
the vehicle is new or if you frequently drive at
high engine speeds.
Dependin gonthe engine, the oil dipstick may
be installed at adifferent location.
When checking the oil level:
R park the vehicle on alevel surface.
R the engine should be switched off for
approximately fiv eminutes if the engine is
at normal operating tempera ture.
R if the engine is not at normal operating
tempera ture,e.g. if the engine was only
started briefly, wait about 30 minutes
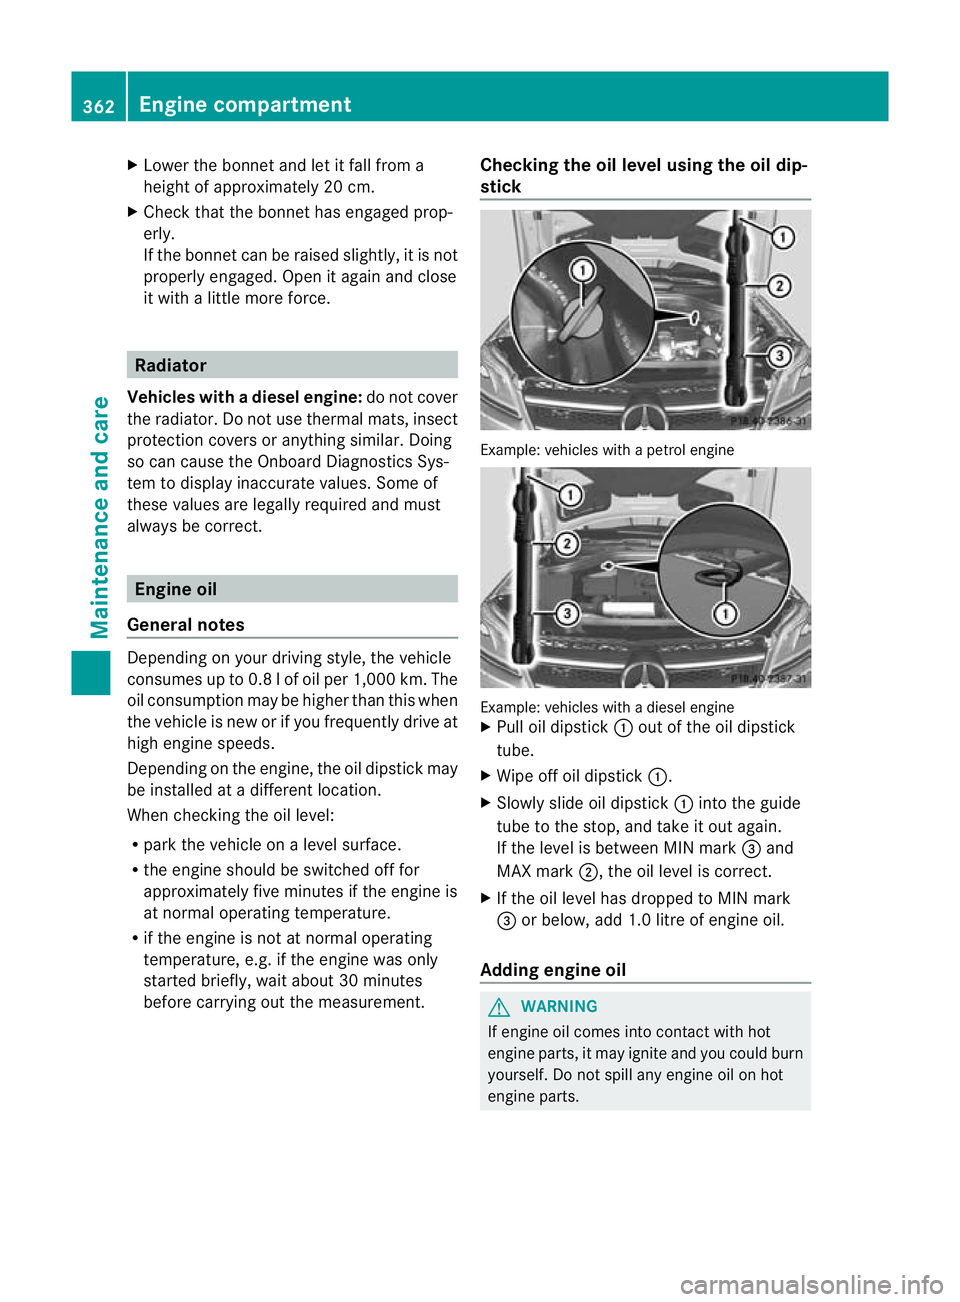
before carrying out the measurement. Checkin
gthe oi llevel using the oil dip-
stick Example: vehicles with
apetrol engine Example: vehicles with
adiesel engine
X Pull oil dipstick :out of the oil dipstick
tube.
X Wipe off oil dipstick :.
X Slowly slide oil dipstick :into the guide
tube to the stop, and take it out again.
If the level is between MIN mark =and
MAX mark ;,the oil level is correct.
X If the oil level has dropped to MIN mark
= or below, add 1. 0litre of engine oil.
Adding engine oil G
WARNING
If engine oil comes into contact with hot
engine parts, it may ignite and you could burn
yourself .Donot spill any engin eoil on hot
engine parts. 362
Engine compartmentMaintenance and care
Page 366 of 441
H
Environmenta
lnote
When toppin guptheoil, tak ecaren ot to spill
any .Ifo il enters th esoil or waterways, it is
harmful to th eenvironment.
! Only use engine oil sand oil filters that
have bee napproved for vehicles with a
servic esystem. You can obtain alist of the
engine oils and oil filters tested and
approved in accordance with the
Mercedes-Ben zSpecification sfor Service
Product satany Mercedes-Ben zService
Centre.
Damage to th eengine or exhaust sys temis
caused by the following:
R using engine oil sand oil filters that have
not bee nspecifically approved for the
servic esystem
R changing the engine oil and oil filter after
missing the change interval required by
the servic esystem
R using engine oil additives
! Do not add too muc hoil. Toppin gupwith
to om uche ngine oil can resul tindamage
to the engine or to the catalytic converter.
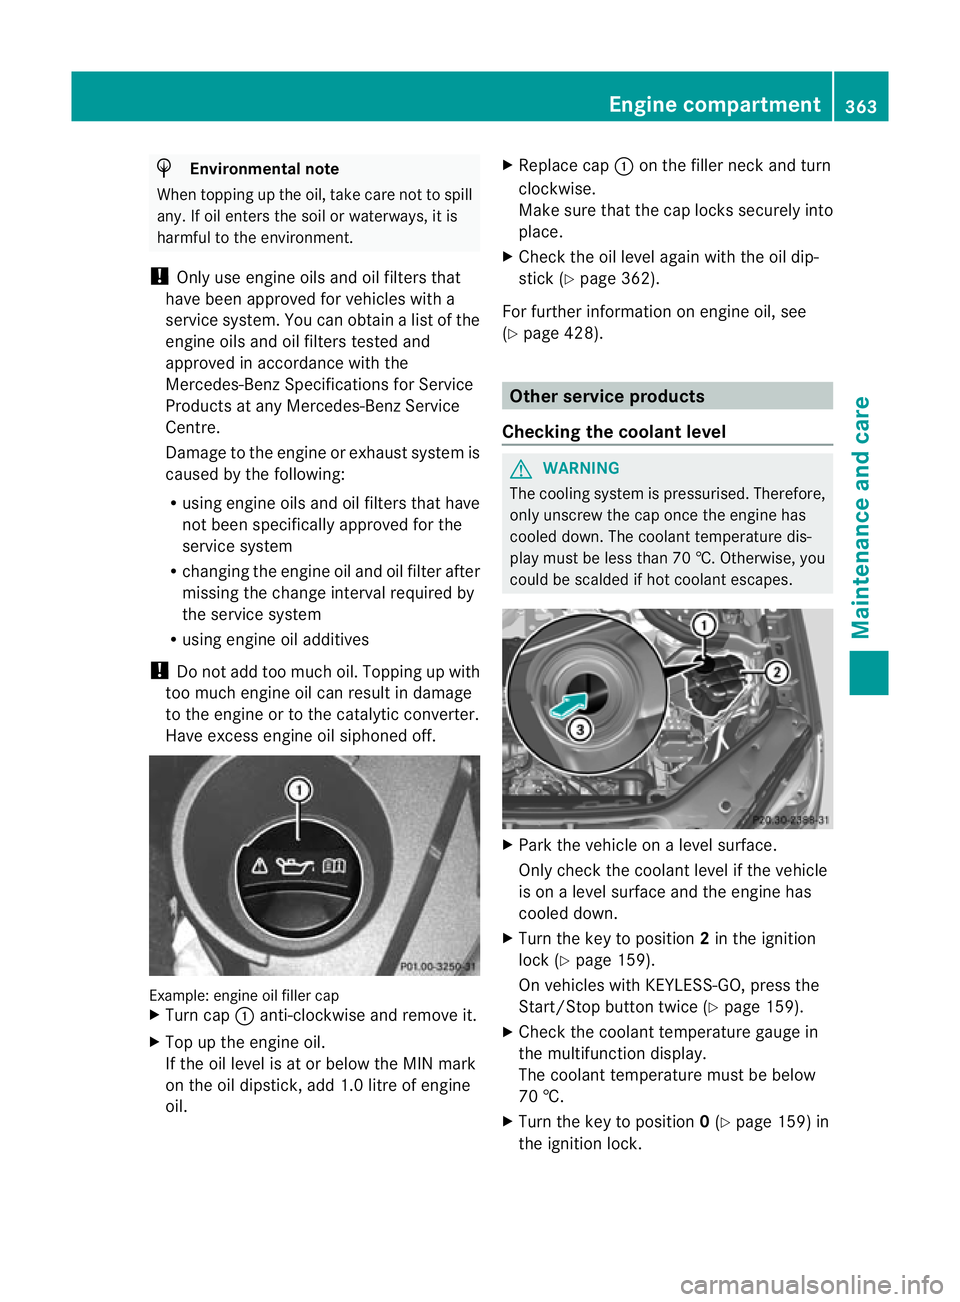
Hav eexcess engine oil siphoned off. Example: engine oil filler cap
X
Turn cap :anti-clockwis eand remove it.
X Top up the engine oil.
If the oil level is at or below the MIN mark
on the oil dipstick ,add 1. 0litreo fengine
oil. X
Replace cap :on the filler nec kand turn
clockwise.
Make sure that the cap locks securely into
place.
X Check the oil level agai nwith the oil dip-
stic k(Ypage 36 2).
For furthe rinformation on engine oil ,see
(Y page 42 8). Other service products
Checking th ecoolant level G
WARNING
The coolin gsystem is pressurised. Therefore,
only unscrew the cap onc ethe engine has
coole ddown. The coolan ttemperatur edis-
play must be less than 70 †. Otherwise, you
could be scalded if hot coolant escapes. X
Park the vehicle on alevel surface.
Only chec kthe coolant level if the vehicle
is on alevel surface and the engine has
cooled down.
X Turn the key to position 2in the ignition
lock (Y page 159).
On vehicles with KEYLESS-GO, press the
Start/Stop button twic e(Ypage 159).
X Check the coolant temperatur egauge in
the multifunction displ ay.
Th ec oolant temperatur emust be below
70 †.
X Turn the key to position 0(Y page 159 )in
the ignition lock. Eng
inecompartment
363Maintenance and care Z
Page 368 of 441
i
The ASSYST PLU Sservice interval display
does not show any information on the
engine oil level. Observ ethe notes on the
engin eoil level (Y page 362).
The multifunction display shows aservice
message for afew seconds, e.g.:
Next servic eAin .. days Service
Adue Service
Aoverdue by ... days Th
eletter indicates which service is due. Astands for
aminor servic eand B for
am ajor
service. Anumber or another letter may be
displayed after the letter. This figure indicates
any necessary additional maintenanc ework
to be performed.
If you notify aqualified specialist worksho pof
this display, you will receive astatement on
the associated costs.
The ASSYST PLUS service interval display
doe snot tak einto account any periods of
tim eduring which the battery is disconnec-
ted.
Maintaining the time-dependent service
schedule:
X Note down the service du edated isplayed
in the multifunction displa ybefor ediscon-
nectin gthe battery.
or
X After reconnecting the battery ,subtract
the battery disconnection periods fro mthe
service date shown on the display.
Hiding aservice message X
Pres sthe % ora button on th esteer-
ing wheel. Displaying service messages X
Switch th eignitio non.
X Press the =or; button on the steer-
ing whee ltoselect the Serv. men
u.
X Press the 9or: button to select the
ASSYS TPLUS submenu and confirm by
press ingt he a button.
The service due date appears in the multi-
function display.
Informatio nabout Service Resetting th
eASSYST PLUS service inte r-
val display
! If the ASSYS TPLUS service interva ldis-
play has been inadvertently reset ,this set-
tin gc an be corrected at aqualified special-
ist workshop.
Have service work carried out as described
in the Servic eBooklet. This ma yotherwise
lead to increased wear and damage to the
major assemblies or the vehicle.
Aq ualified specialist workshop, e.g. a
Mercedes-Ben zService Cent re,w ill reset the
ASSYST PLU Sservic einterval display after
the service work has bee ncarried out. You
can also obtain further information on main-
tenance work, for example.
Special service requirements
Arduous operating conditions or increased
loads on the vehicle will require some service
work to be performed more often than for a
vehicle in normal use. Such arduous condi-
tions include regular city driving with frequent
intermediate stops and use in mountainous
terrain or on poor road surfaces.
For example, if the vehicle is used under ardu-
ous operating conditions, have air filters,
engine oil and oil filters changed frequently
and check the wheels often .Further informa-
tion can be obtaine dataqualified specialist
workshop, e.g. aMercedes-Ben zService
Cent re. Service
365Maintenance and care Z
Page 371 of 441
High-pressure cl
eaning equipment G
WARNING
Do not use high-pressure cleaner swith circu-
lar-jet nozzles (dirt grinders) to clean your
vehicle ,inparticular the tyres. You could oth-
erwise damage the tyres and cause an acci-
dent.
! Always maintain adistance of at least
30 cm between the vehicle and the high-
pressure cleaner nozzle. Information about
the correc tdistanc eisavailable from the
equipment manufacturer.
Move the high-pressure cleane rnozzle
around when cleanin gyour vehicle.
Do not aim directly at any of the following:
R tyres
R door gaps, roof gaps, join tsetc.
R electrical components
R battery
R connectors
R lights
R seals
R trim elements
R ven tilation slots
Damaged seals or electrical components
can lead to leaks or failures.
Cleanin gthe paintwork !
Do not affix:
R stickers
R films
R magnetic plate sorsimilar items
to painted surfaces. You could otherwise
damage the paintwork.
Scratches, corrosive deposits, areas affected
by corrosion and damage caused by inade-
quate care cannot always be completely
repaired. In such cases, visit aqualified spe-
cialist workshop. X
Remove impurities immediately, where
possible, whils tavoiding rubbing to ohard.
X Soak insect remains with insect remover
and rinse off the treated areas afterwards.
X Soak bird droppings with water and rinse
off the treated areas afterwards.
X Remove coolant, brake fluid, tree resin,
oils, fuels and greases by rubbing gently
with acloth soaked in petroleum ether or
lighter fluid.
X Use tar remover to remov etar stains.
X Use silicone remover to remove wax.
Care and treatment of mat tpaintwork !
Never polis hthe vehicle or the light alloy
wheels. Polishin gmakes the paintwork
shiny.
! The following may cause the paint to
become shiny and thus reduce the matt
effect:
R Vigorous rubbing with unsuitable mate-
rials.
R Frequent use of car washes.
R Washing the vehicle in direct sunlight.
! Never use paint cleaner, buffing or pol-
ishing products, or glos spreserver, e.g.
wax .These product sare onl ysuitable for
high-glos ssurfaces. Thei ruse on vehicles
wit hm att finish leads to considerable sur-
face damage (shiny, spotted areas).
Always have paintwork repairs performed
at aq ualified specialist workshop, e.g. a
Mercedes-Ben zService Centre.
! Do not use wash programs with ahot wax
treatmen tunder any circumstances.
Observe thes enotes if your vehicle has a
clea rmatt finish. This will help you to avoid
damage to the paintwork due to incorrect
treatment.
Thes enotes also apply to light-alloy wheels
with aclear matt finish. 368
CareMaintenance and care
Page 374 of 441
X
Select Open camera cover and press
W
to confirm.
Th ec over of the 360° cam erao pens.
X To clean the 360° cam era: clean camera
lens :with clean water and asoft cloth.
i If you ar etravelling faster th an30 km/h
or if the key is in po sition 0or 1in the igni-
tion lock, the cove rofthe 360° cam era
close sautomatically.
Cleaning th eexhaust pipe !
Do not clean the exh aust pipe with acidic
cleaning agents, such as sanitar yorwheel
clea ners.
Impurities combined wit hthe effect sofroad
grit and corrosiv eenvironmental factors may
cause flash rust to for monthe surface. You
can restore the original shine of the exhaust
pip ebyc leaning it regularly ,especiall yinw in-
ter and after washing.
X Clean the exhaust pipe with achrome care
produc ttested and approved by Mercedes-
Benz.
Cleaning the trailer tow hitch H
Environmental note
Dispose of oily and greasy clot hs in an envi-
ronmentally-re sponsible manner.
! Do not clea nthe ball couplin gwithahigh-
pressure cleaner. Do not use solvents.
! Observe the not eoncare provided by the
trailer manufac turer. Th
eb all coupling must be cleaned if it
becomes dirty or corroded.
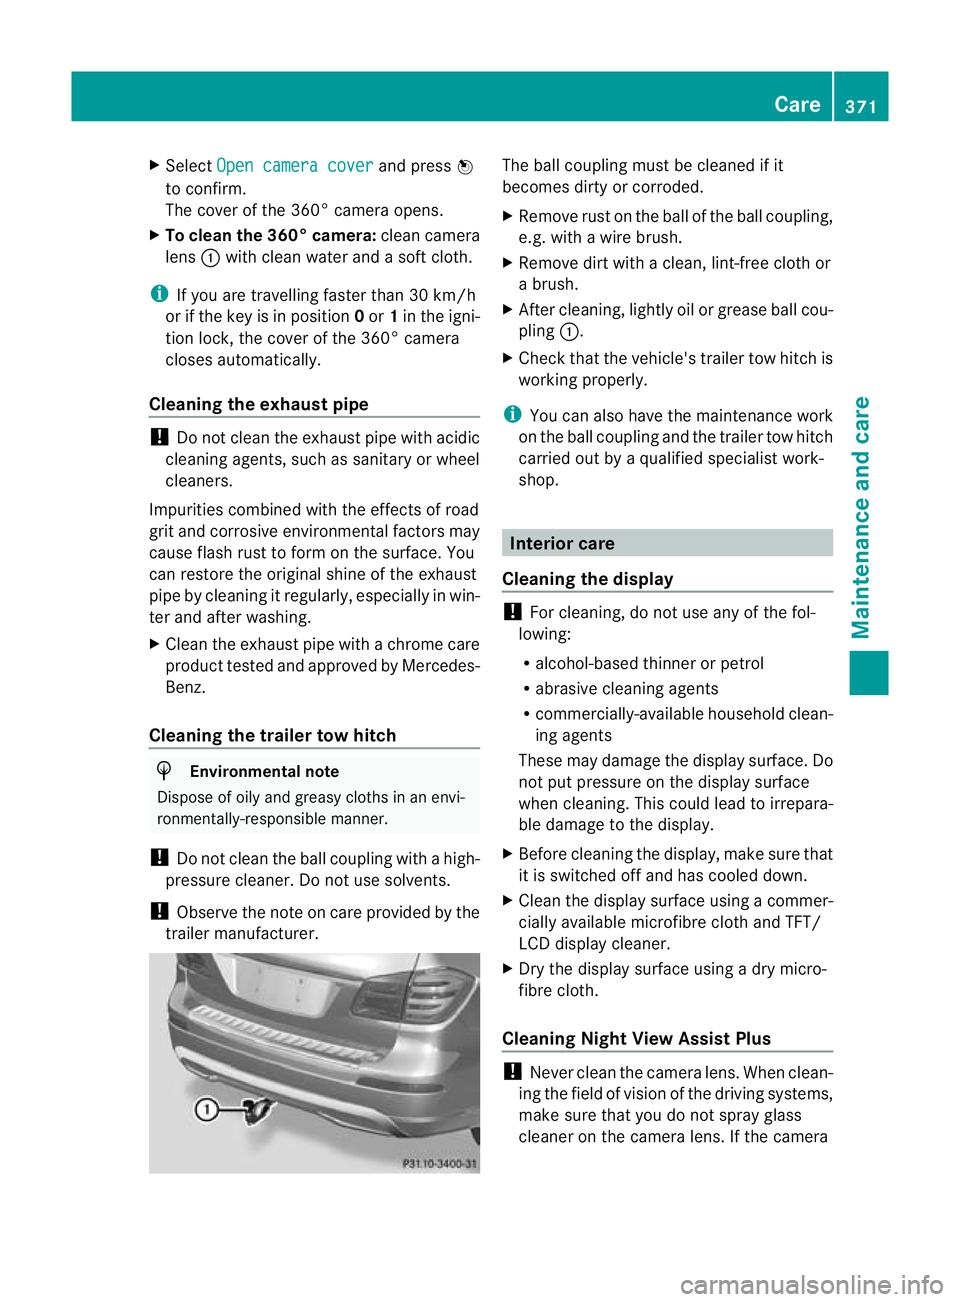
X Remove rust on the ball of the ball coupling,
e.g. with awire brush.
X Remove dirt with aclean, lint-free clot hor
ab rush.
X After cleaning, lightly oi lorg rease ball cou-
pling :.
X Check that th evehicle' strailer to whitchis
workin gproperly.
i Youc an also have the maintenanc ework
on the ball coupling and the trailer tow hitch
carried out by aqualified specialist work-
shop. Interior care
Cleaning the display !
For cleaning, do not use any of the fol-
lowing:
R alcohol-based thinner or petrol
R abrasive cleaning agents
R commercially-available househol dclean-
ing agents
These may damage the display surface. Do
not put pressure on the display surface
when cleaning. This could lead to irrepara-
ble damage to the display.
X Befor ecleanin gthe display, make sur ethat
it is switc hed offand has cooled down.
X Clean the display surface using acommer-
cially available microfibre clot hand TFT/
LCD display cleaner.
X Dry the display surface using adry micro-
fibre cloth.
Cleanin gNight View Assist Plus !
Never clean the camera lens. When clean-
ing the field of vision of the driving systems,
mak esure that you do not spray glass
cleaner on the camera lens. If the camera Care
371Maintenance and care Z
Page 375 of 441
lens is dirty, visit
aqualified specialist work-
shop. X
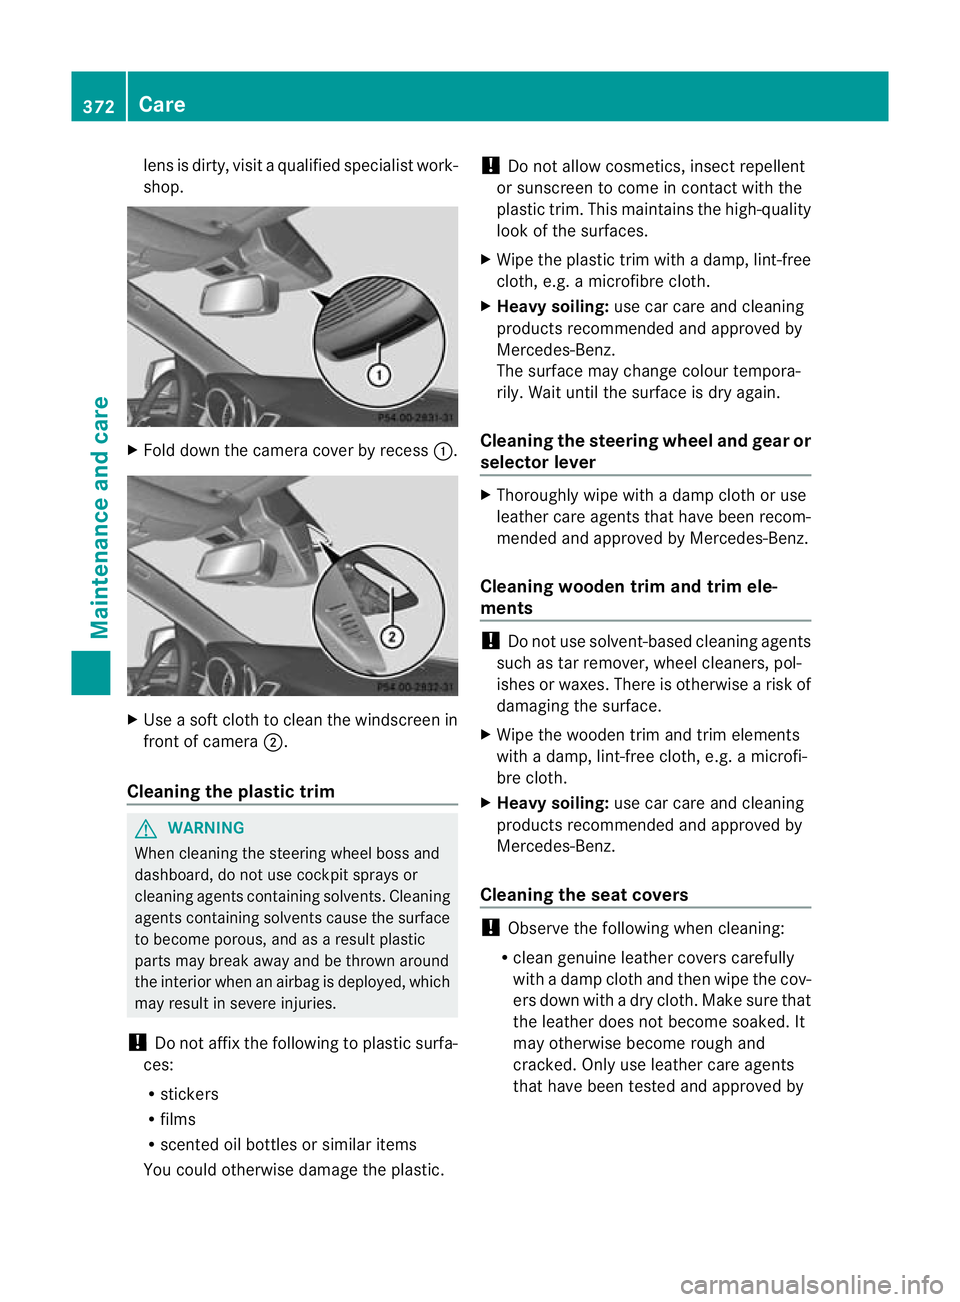
Fold down the camera cover by recess :.X
Use asoft clot htoclean the windscreen in
fron tofc amera ;.
Cleaning th eplastic trim G
WAR
NING
Whe ncleaning the steerin gwheel boss and
dashboard, do not use cockpit sprays or
clea ning agents containing solvents. Cleani ng
agent scontaining solvent scause the surface
to become porous, and as aresult plastic
part smay break away and be thrown around
the interior when an airbag is deployed, which
may result in severe injuries.
! Do not affix the following to plastic surfa-
ces:
R stickers
R films
R scented oil bottles or similar items
You could otherwise damage the plastic. !
Do not allow cosmetics, insect repellent
or sunscreen to come in contact with the
plastic trim .This maintain sthe high-quality
look of the surfaces.
X Wipe the plastic trim with adamp, lint-free
cloth, e.g. amicrofibre cloth.
X Heavy soiling: use car care and cleaning
products recommended and approved by
Mercedes-Benz.
The surface may change colour tempora-
rily. Wait until the surface is dry again.
Cleanin gthe steering whee land gear or
selector lever X
Thoroughl ywipe with adamp cloth or use
leather care agents that have been recom-
mended and approved by Mercedes-Benz.
Cleanin gwooden trim and trim ele-
ments !
Do not use solvent-based cleaning agents
such as tar remover, wheel cleaners, pol-
ishes or waxes. There is otherwise arisk of
damaging the surface.
X Wipe the wooden trim and trim elements
with adamp, lint-free cloth, e.g. amicrofi-
bre cloth.
X Heavy soiling: use car care and cleaning
products recommended and approved by
Mercedes-Benz.
Cleanin gthe seat covers !
Observe th efollowin gwhen cleaning:
R clea ngenuin eleather covers carefully
with adamp cloth and then wipe the cov-
ers down with adry cloth .Make sure that
the leather does not become soaked .It
may otherwise become rough and
cracked .Only use leather care agents
that have bee ntested and approved by 372
CareMaintenance and care
Page 408 of 441
Storing wheels
Stor ewheels that ar enot being used in acool,
dry and preferably dar kplace. Protect the
tyres against oil, grease, petrol and diesel. Cleaning the wheels
G
WARNING
The water jet of circular-jet nozzles (dirt grind-
ers) can cause damage not visible from the
outside to tyres or chassis components. Com-
ponent sdamaged in this way can unexpect-
edly fail. There is arisk of an accident.
Do not use high-pressure cleaners with circu-
lar-jet nozzles to clean the vehicle. Have dam-
aged tyres or chassis components replaced
immediately. Fitting
awheel
Preparing the vehicle X
Vehi cles with an emergency spare
wheel: whenfitting the emergenc yspare
wheel in the even tofaflat tyre, observe the
addi tional note sonvehicl epreparation
under "Flat tyre" (Y page 378).
X Pa rk th evehicle on firm, non-slippery and
level ground.
X Unload heavy luggage.
X Engage the electric parking brak eman-
ually.
X Bring the front wheels into the straight-
ahead position.
X Shift the transmission to position P.
X Switch off the engine.
X Vehicles without KEYLESS-GO: remove
the key from the ignition lock.
X Vehicles with KEYLESS-GO: open the
driver' sdoor.
The on-boar delectronic shave status 0,
which is the same as the key having been
removed. X
Vehicles with KEYLESS-GO: remove the
Start/Stop button from the ignition lock
(Y page 159).
X If included in the vehicle equipment, take
the tyre-change tool kit out of the vehicle.
X Secure the vehicle to prevent it from rolling
away.
i Apart from some country-specific var-
iants, vehicles are not equipped with tyre-
changing tools .For mor einformation on
which tool sare require dtop erform awheel
change on your vehicle, consult a
Mercedes-Ben zService Centre.
Required tyre-cha nging tools could be, for
example:
R jack
R wheel chock
R wheel wrench
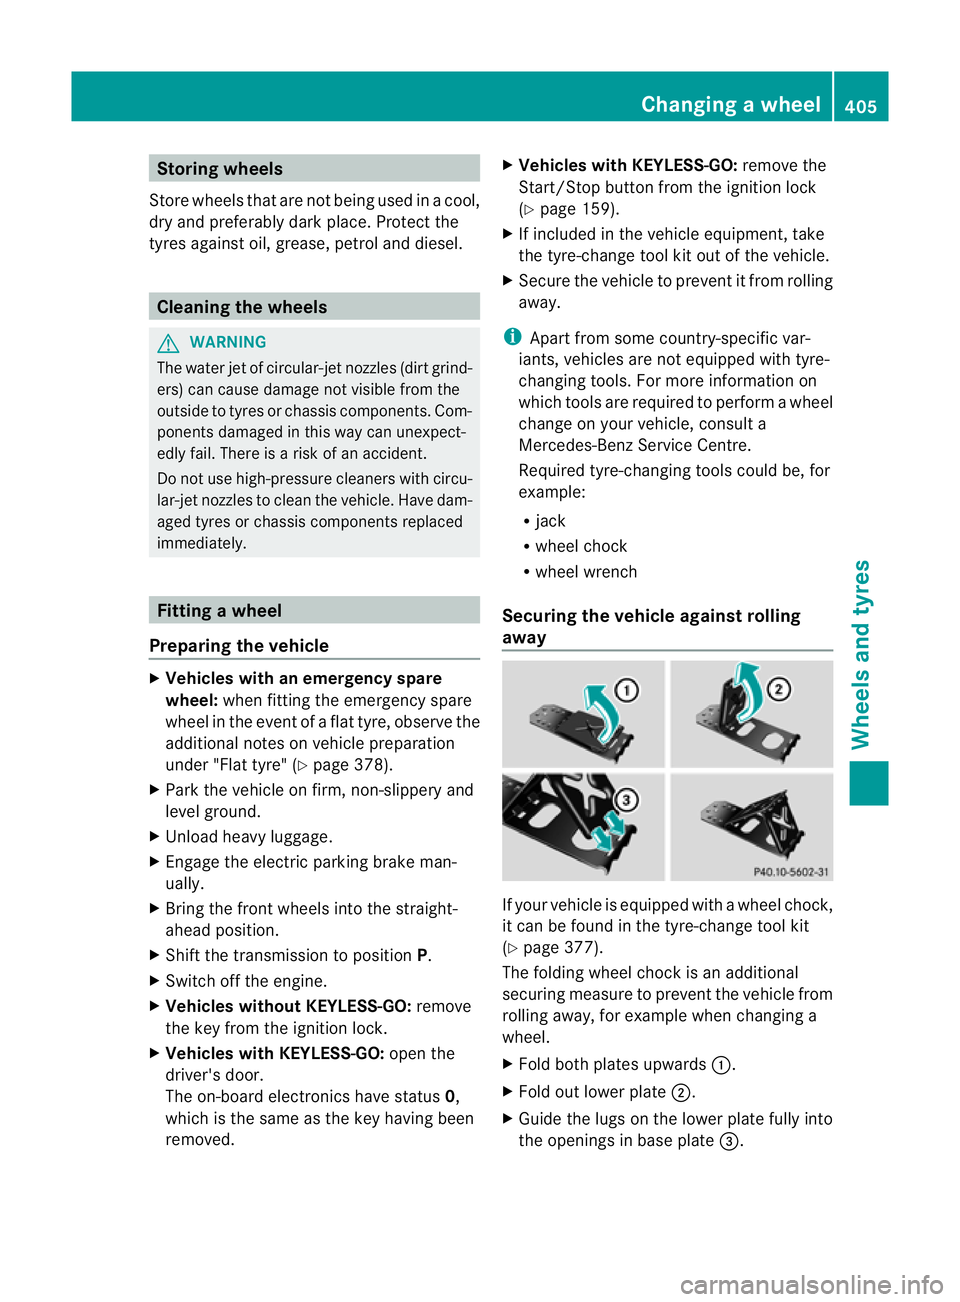
Securing the vehicle against rolling
away If your vehicle is equipped with
awheel choc k,
it can be found in the tyre-change tool kit
(Y page 377).
The folding wheel chock is an additional
securing measure to prevent the vehicle from
rolling away, for example when changing a
wheel.
X Fold both plates upwards :.
X Fold out lower plate ;.
X Guide the lugs on the lower plate fully into
the openings in base plate =. Changing
awheel
405Wheels and tyres Z
Page 411 of 441
X
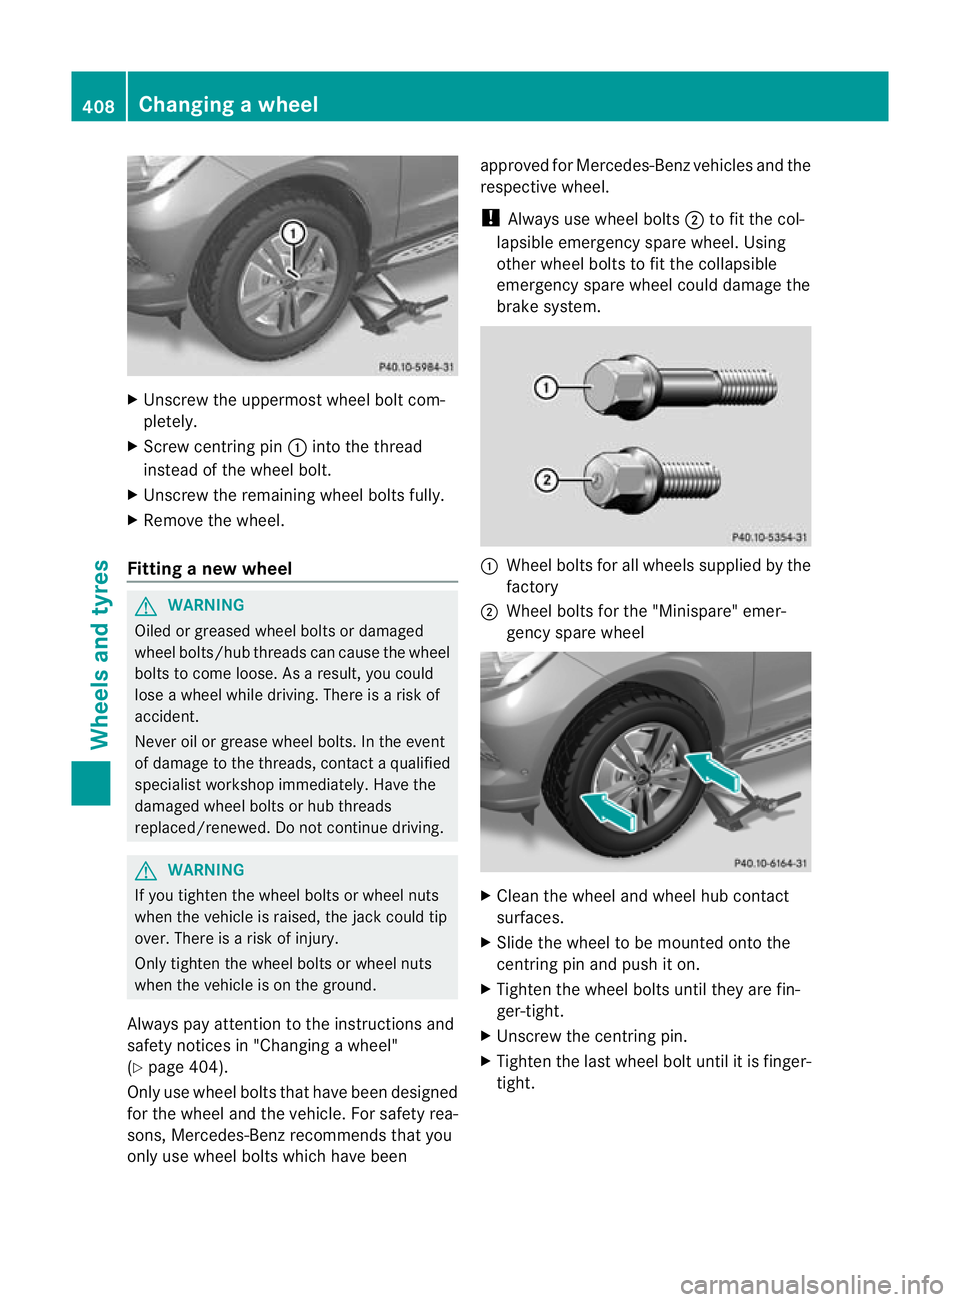
Unscre wthe uppermost wheel bolt com-
pletely.
X Screw cen tringpin:into the thread
instead of the wheel bolt.
X Unscrew the remainin gwheel bolts fully.
X Remove the wheel.
Fitting anew wheel G
WARNING
Oiled or greased wheel bolt sordamaged
wheel bolts/hub threads can cause the wheel
bolts to com eloose .Asa result,you could
lose awheel while driving. There is arisk of
accident.
Never oil or grease wheel bolts. In the event
of damage to the threads, contact aqualified
specialist workshop immediately .Have the
damaged wheel bolts or hub threads
replaced/renewed. Do not continue driving. G
WARNING
If you tighten the wheel bolts or wheel nuts
when the vehicle is raised, the jac kcould tip
over .There is arisk of injury.
Only tighten the wheel bolts or wheel nuts
when the vehicle is on the ground.
Always pay attention to the instructions and
safety notices in "Changing awheel"
(Y page 404).
Only use wheel bolts that hav ebeen designed
for the wheel and the vehicle. For safet yrea-
sons, Mercedes-Benz recommends that you
only use wheel bolts which have been approved for Mercedes-Benz vehicles and the
respec
tivewheel.
! Always use wheel bolts ;to fit the col-
lapsibl eemergency spare wheel. Using
othe rwheel bolts to fit the collapsible
emergenc yspare wheel could damage the
brak esystem. :
Wheel bolts for all wheels supplied by the
factory
; Wheel bolts for the "Minispare" emer-
gency spare wheel X
Clean the whee land wheel hub contact
surfaces.
X Slide the wheel to be mounted onto the
centring pin and pus hito n.
X Tighten the wheel bolts until they are fin-
ger-tight.
X Unscrew the centring pin.
X Tighten the last wheel bol tuntil it is finger-
tight. 408
Changin
gawheelWheels and tyres