battery MERCEDES-BENZ GL SUV 2012 Owner's Manual
[x] Cancel search | Manufacturer: MERCEDES-BENZ, Model Year: 2012, Model line: GL SUV, Model: MERCEDES-BENZ GL SUV 2012Pages: 441, PDF Size: 10.66 MB
Page 206 of 441
Even if the vehicl
einfront leaves th edetec-
tion range ,DIST RONICP LUSt emporarily
maintains the curren tdriving spee dand does
not accelerate. This is base donthe current
map data in the navigation system.
The current spee dismaintained:
R approximately 10 second sbefore the
roundabout/ T-junctio nand approximately
1.5 second swhen drivin gonaroundabout.
R approximately 12 second sbefor ereaching
am otorway exit and approximately
4s econds after the motorway exit.
Af terw ards, the vehicle accelerates back to
the set spee dyou specified.
Stopping G
WARNING
Never get out of the vehicle when DISTRONIC
PLU Sisa ctivated.
DISTRONIC PLUS must als onever be oper-
ated, activated or deactivated by apassenger
or from outside the vehicle.
DISTRONI CPLUS does no treplace the elec-
tri cp arking brake and must not be used for
parking.
The DISTRONI CPLUS brakin geffect is can-
celle dand the vehicl ecan start moving if:
R DISTRONI CPLUS is deactivate dusing the
cruise con trollever.
R you accelerate.
R there is amalfunction in the system or an
interruption in the power supply ,e.g. bat-
tery failure.
R the electrical system in the engine com-
partment, the battery or the fuses are tam-
pere dwith.
R the battery is disconnected.
If you wish to leave the vehicle or park it,
deactivate DISTRONIC PLU Sand secure the
vehicl eagainst rolling away.
If DI STRONIC PLUS detects that the vehicle
in front is stopping, it brakes your vehicle until
it is stationary. Once your vehicle is stationary, it remains
stationary and you do not need to depres
sthe
brake.
Af terat ime, the electric parkin gbrake
secure sthe vehicle and relieves the service
brake.
Depending on the specifie dminimum dis-
tance, your vehicle will come to astandstill at
as ufficient distance behind the vehicle in
front .The specifie dminimum distance is set
using the control on the cruise control lever.
The electric parkin gbrake secure sthe vehicle
automatically if DI STRONIC PLUS is activated
and:
R the driver's doo risopen and the driver's
seat belt is unfastened.
R the engine is switched off ,unles sitisa uto-
matically switched off by the ECO start/
stop function.
R as ystem fault occurs.
R the powe rsupply is not sufficient.
On steep uphill or downhill inclines or if there
is am alfunction, the transmission may also
be automatically shifted into position P.
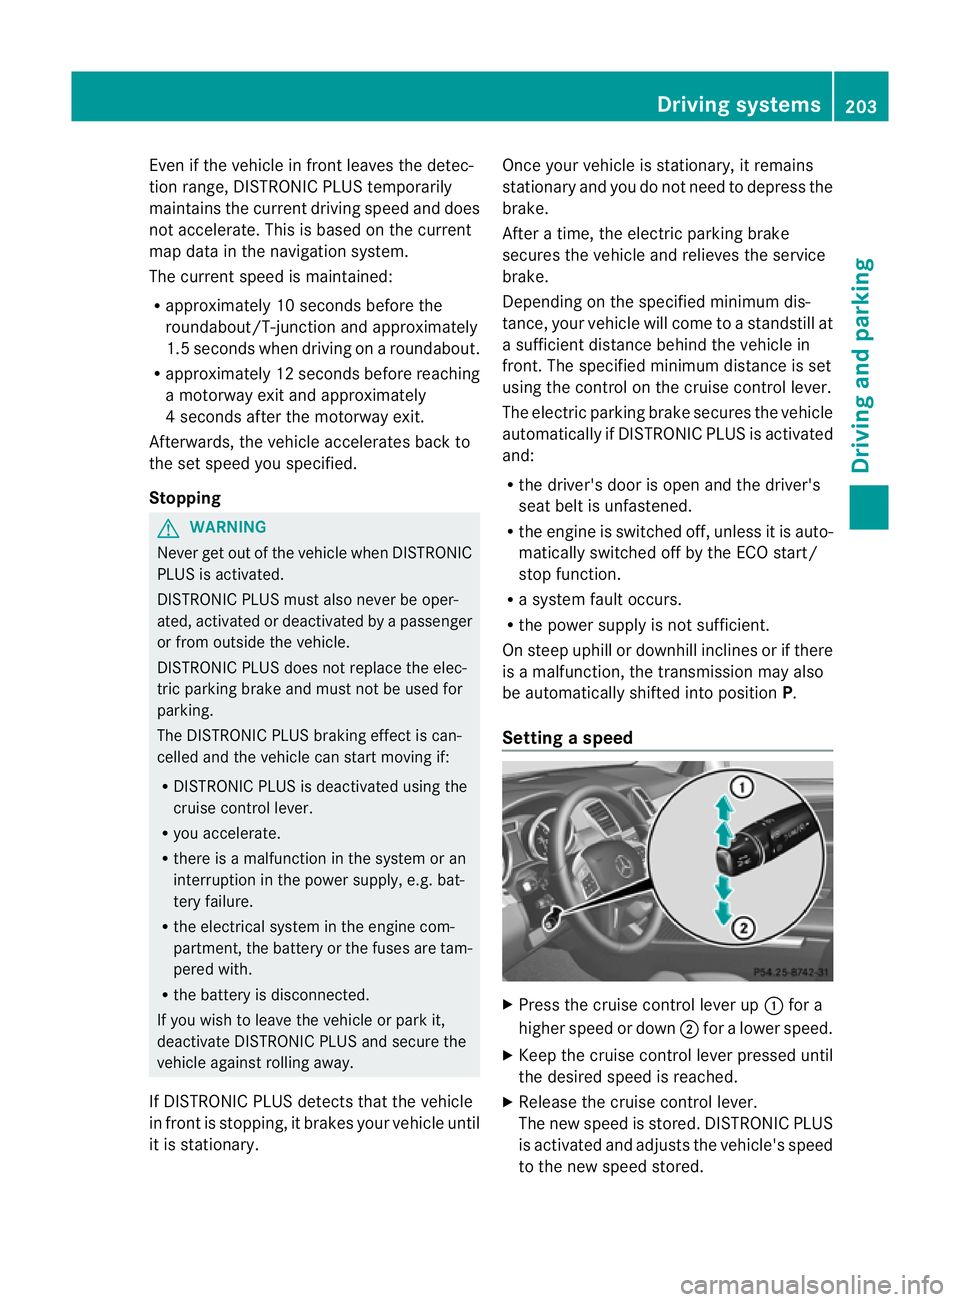
Setting aspeed X
Press the cruise control lever up :for a
high er spee dordown;for alower speed.
X Keep the cruise contr ol leverpresse duntil
the desired speed is reached.
X Release the cruise contro llever.
The new speed is stored. DI STRONIC PLUS
is activated and adjusts the vehicle's speed
to the new speed stored. Driving systems
203Drivingand parking Z
Page 214 of 441
HOL
Dfunction
Gen eral notes Th
eH OLD function ca nassist the driver in the
foll owing situations:
R when pulling away, especially on steep
slopes
R when manoeuvrin gonsteep slopes
R when waiting in traffic
The vehicle is kept stationary without the
driver having to depress the brake pedal.
The braking effect is cancelled and the HOLD
function is deactivated when you depress the
accelerator peda ltop ull away.
i Do not use the HOLD function when driv-
ing off-road, on steep downhill or uphill
inclines or on aslippery or loose surface.
Under such circumstances, the HOLD func-
tion may not be able to keep the vehicle
stationary.
Activation conditions You can activate the HOLD func
tion if:
R the vehicle is stationary.
R the engin eisrunning or if it has been auto-
matically switched off by the ECO start/
stop function.
R the driver' sdoor is closed or if your seat
belt is fastened.
R the electric parkin gbrake is released.
R thet ransmission is in position D,Ror N.
R DISTRONIC PLUS is deactivated.
Activatin gthe HOL Dfunction G
WARNING
Th ev ehicle' sbrake sare applied when the
HOLD functio nisactivated. For thi sreason,
deactivat ethe HOL Dfunction if the vehicle is
to be set in motion by other means (e.g. in a
car wash or by towing). X
Make sure that the activation conditions
are met.
X Depress the brake pedal.
X Quickly depres sthe brake pedal further
until ë appears in the multifunction dis-
play.
The HOL Dfunction is activated. You can
release the brake pedal.
i If depressing the brake pedal the first
time does not activate the HOLD function,
wait briefly and then try again.
Deactivating the HOLD function G
WARNING
Never get out of the vehicle when the HOLD
function is activated.
The HOLD function must never be operated
or deactivated by apassenger or from outside
the vehicle.
The HOLD function does not replace the elec-
tric parking brake and must not be used for
parking.
The braking effect of the HOLD function is
cancelled and the vehicle could roll away if:
R the HOLD function is deactivated by
depressing the accelerator pedal or the
brake pedal.
R there is amalfunction in the system or an
interruption in the power supply ,e.g. bat-
tery failure.
R the electrical system in the engine com-
partment, the battery or the fuses are tam-
pere dwith.
R the battery is disconnected.
If you leave the vehicle or park it, deactivate
the HOLD func tion and secur ethe vehicle
against rolling away.
The HOL Dfunction is deactivated automati-
cally if:
R you accelerate and the transmission is in
position Dor R.
R you shift the transmission to position P. Driving systems
211Drivingand pa rking Z
Page 287 of 441
When you are close to radi
otelescope facili-
ties, the rada rsensor system will be deacti-
vated automatically.
The following system sare switche doff when
th er adar senso rsystem is deactivated:
R DISTRONIC PLUS (Y page 198)
R BAS PLUS (Y page 62)
R PRE-SAFE ®
Brak e(Ypage 68)
R Blin dSpot Assist (Y page 238)
R Active Blin dSpot Assist (Y page 242)
Heating submenu Auxiliary heating dep
arture time G
WARNING
Exhaus tfumes are produced when the auxili-
ary heating is in operation. Inhaling the se
exhaus tfumes can be poisonous. You should
therefor eswitch off th eauxiliar yheating in
confine dspaces without an extraction sys-
tem, e.g .agarage. G
WARNING
When operating the auxiliary heating parts of
the vehicle can get very hot. Make sure that
the exhaust system does not under any cir-
cumstances come into contact with easily
ignitable material such as dry grass or fuels.
The material could otherwise ignite and set
the vehicle alight. Choos eyour parkin gspot
accordingly.
Operating the auxiliary heating is thus pro-
hibited at fillin gstations or when your vehicle
is being refuelled .You must therefor eswitch
off the auxiliary heating at filling stations.
! Operating the auxiliary heating/ventila-
tion draws on the vehicle battery. After you
have heated or ventilated the vehicle a
maximum of two times, drive for alonger
distance.
This func tion is only available on vehicles with
auxiliary heatin g(Ypage 148). In the
Heating submenu, you can select a
stored departure tim eorchange adeparture
time.
The auxiliary heatin gtimer func tion calcu-
lates the switch-on tim eaccording to the out-
sid etemperatur esothat the vehicle is pre-
heate dbyt he departur etime. When the
departur etime is reached, the auxiliary heat-
ing continues to heat for afurther five
minutes and then switches off. The auxiliary
heating adopts the THERMATI Cor
THERMOTRONI Ctemperature setting.
You can switc hoff th eauxiliary heating by
using the remot econtrol or the auxiliar yheat-
ing button on the centre console.
i Swit chthe auxiliary heating on regularly
once amonthfor about ten minutes.
Selecting th edepartur etime or deactivat-
ing aselected depa rtur et ime
X Press the =or; button on the steer-
ing wheel to select the Settings menu.
X Press the :or9 button to select the
Heating submenu.
X Press ato confirm.
You will see the selected setting.
X Press ato confirm.
X Press the :or9 button to select
one of the three departur etimes or Timer off (no timer active).
X Press ato confirm.
If ad eparture tim eisselected, the yellow
indicator lam plights up on the auxiliary
heating button.
Changing the depa rtur et ime
X Press the =or; button on the steer-
ing wheel to select the Settings menu.
X Press the :or9 button to select the
Heating submenu.
X Press ato confirm.
You will see the selected setting.
X Press ato confirm. 284
Menus and submenusOn-board computer and displays
Page 299 of 441
Displa
ymessages Possible causes/consequences and
M Solutions
!
Pa
rking brake inop‐
erative Th
ey ellow !warning lamp lights up. The red !indicator
lamp flashes fo rabout ten seconds after the electric parkin gbrake
ha sb een applied or released. It then goes out or remains lit.
The electric parkin gbrake is malfunctioning ,e.g. because of over-
voltag eorundervoltage.
X Remove the cause for the overvoltage or undervoltage ,e.g. by
charging the battery or restarting the engine.
X Appl yorr elease the electric parkin gbrake.
If it remains impossibl etoapply or release the electric parking
brake:
X Swit choff the ignition and tur nitback on.
X Apply or release the electric parkin gbrake.
If th eelectric parkin gbrake can stil lnot be released:
X Consult aqualified specialist workshop. The display messag
eisonly shown whil ethe vehicle is in motion.
The red !indicator lam pflashes and the yellow !warning
lamp is lit.
It is not possible to apply the electric parkin gbrake manually.
X Move th etransmission selector lever to P.
X Visit aqualified specialist workshop. !
Turn on th
eigni‐ tion to release
the parkin
gbrake Th
er ed ! indicator lam pislit.
You attempted to release the electric parkin gbrake whil ethe igni-
tion was switched off.
X Key: turnthe key to position 1in the igni tion lock.
X KEYLESS-GO: switchonthe igni tion. J
Chec
kbrake fluid level There is insufficient brake fluid in th
ebrake flui dreservoir. In addi-
tion ,the J warnin glamp in the instrument cluster lights up and
aw arning ton esounds.
G WARNING
The brakin gefficienc ymay be impaired.
There is arisk of an accident.
X Pull over and stop the vehicle safely as soon as possible ,paying
attention to road and traffic conditions. Do not continue driving
under any circumstances.
X Secure the vehicle against rolling away (Y page 181).
X Consult aqualified specialist workshop.
X Do not top up the brake fluid. This does not correct the error. 296
Display messagesOn-board computer and displays
Page 308 of 441
Displa
ymessages Possible causes/consequences and
M Solutions
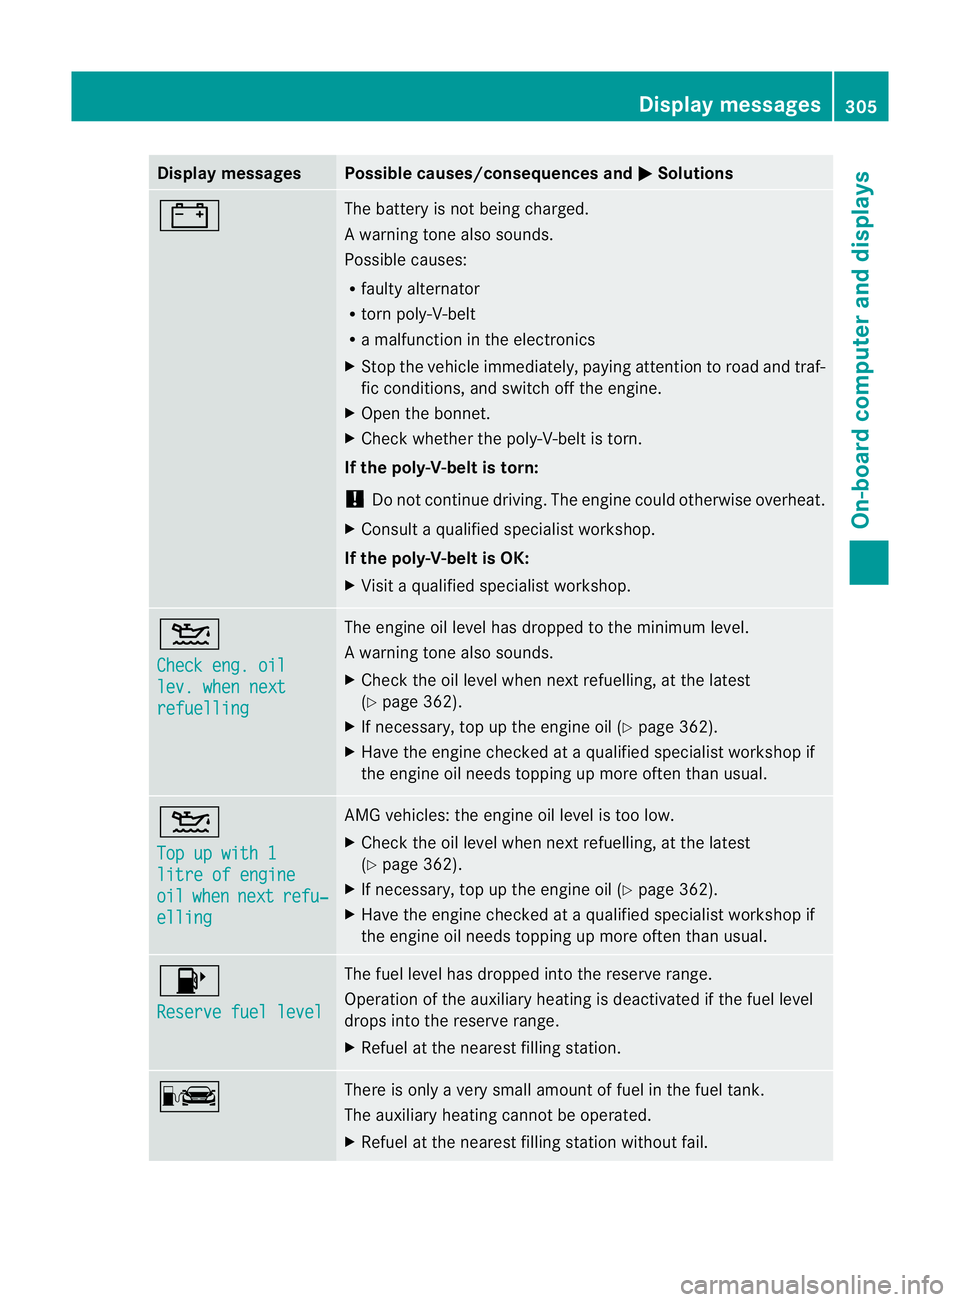
# The battery is no
tbeing charged.
Aw arning ton ealso sounds.
Possible causes:
R fault yalternator
R torn poly-V-belt
R am alfunction in the elect ronics
X Stop the vehicle immediately, paying attention to road and traf-
fic conditions, and switch off the engine.
X Open the bonnet.
X Check whether the poly-V-belt is torn.
If the poly-V-belt is torn:
! Do not continue driving. The engine could otherwise overheat.
X Consult aqualified specialist workshop.
If the poly-V-belt is OK:
X Visit aqualified specialist workshop. 4
Chec
keng. oil lev. when next
refuelling Th
ee ngine oil level has dropped to the minimum level.
Aw arning ton ealso sounds.
X Chec kthe oil level when nex trefuelling, at the latest
(Y page 362).
X If necessary, top up the engine oil (Y page 362).
X Hav ethe engin echecked at aqualified specialist worksho pif
the engine oil needs topping up more often than usual. 4
Top up wit
h1 litre of engine
oil when next refu‐
elling AM
Gvehicles: the engine oil level is too low.
X Check the oil level when next refuelling, at the latest
(Y page 362).
X If necessary, top up the engine oil (Y page 362).
X Hav ethe engin echecked at aqualified specialist worksho pif
the engine oil needs topping up more often than usual. 8
Reserv
efuel level Th
ef uel level has dropped into the reserve range.
Operation of the auxiliary heating is deactivated if the fuel level
drops into the reserve range.
X Refuel at the nearest filling station. C There is only
avery small amount of fuel in the fuel tank.
The auxiliary heatin gcannot be operated.
X Refuel at the nearest filling station without fail. Display messages
305On-board computer and displays Z
Page 322 of 441
Vehicle
Display messages Possible caus
es/consequences and M Solutions
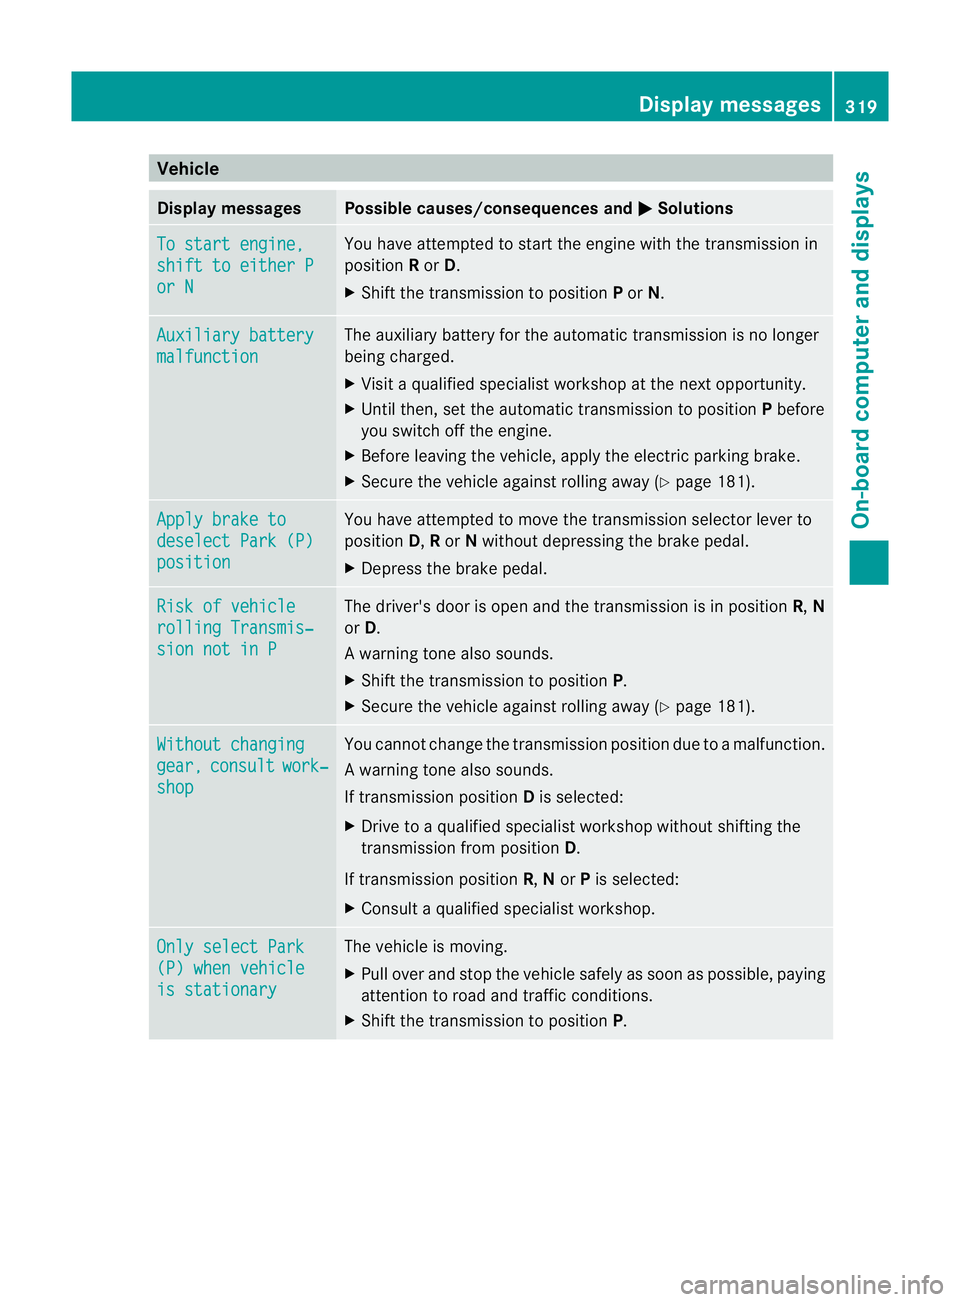
To start engine,
shift to either P
or N Yo
uh avea ttempte dtostart the engine with the transmission in
position Ror D.
X Shift the transmission to position Por N. Auxiliary battery
malfunction The auxiliary battery for the automatic transmission is no longer
being charged.
X Visit aqualified spec ialist worksho patthe nex toppor tunity.
X Until then, set the automatic transmission to position Pbefore
yo us witch off the engine.
X Before leaving the vehicle, appl ythe electr ic parking bra ke.
X Secure the vehicle agai nstrolling away ( Ypage 181). Ap
plyb rake to deselect Par
k(P) position Yo
uh ave attempted to mov ethe transmission selector lever to
position D,Ror Nwithout depressing the brake pedal.
X Depress the brake pedal. Risk of vehicle
rollin
gTransmis‐ sion not in P Th
ed river's door is open and th etransmission is in position R,N
or D.
Aw arning ton ealso sounds.
X Shift th etransmissio ntoposition P.
X Secur ethe vehicl eagainst rolling away ( Ypage 181). Wi
thoutc hanging gear, consult work‐
shop Yo
uc annot change the transmission position due to amalfunction.
Aw arning ton ealso sounds.
If transmission position Dis selected:
X Drive to aqualified specialist workshop without shiftin gthe
transmissio nfromp osition D.
If transmission position R,Nor Pis selected:
X Consult aqualified specialist workshop. On
ly select Park (P) whe
nvehicle is stationary Th
ev ehicle is moving.
X Pull ove rand sto pthe vehicle safel yassoonasp ossible, paying
attention to roa dand traffic conditions.
X Shift the transmissio ntoposition P. Display messages
319On-board computer and displays Z
Page 324 of 441
Displa
ymessages Possible causes/consequences and
M Solutions
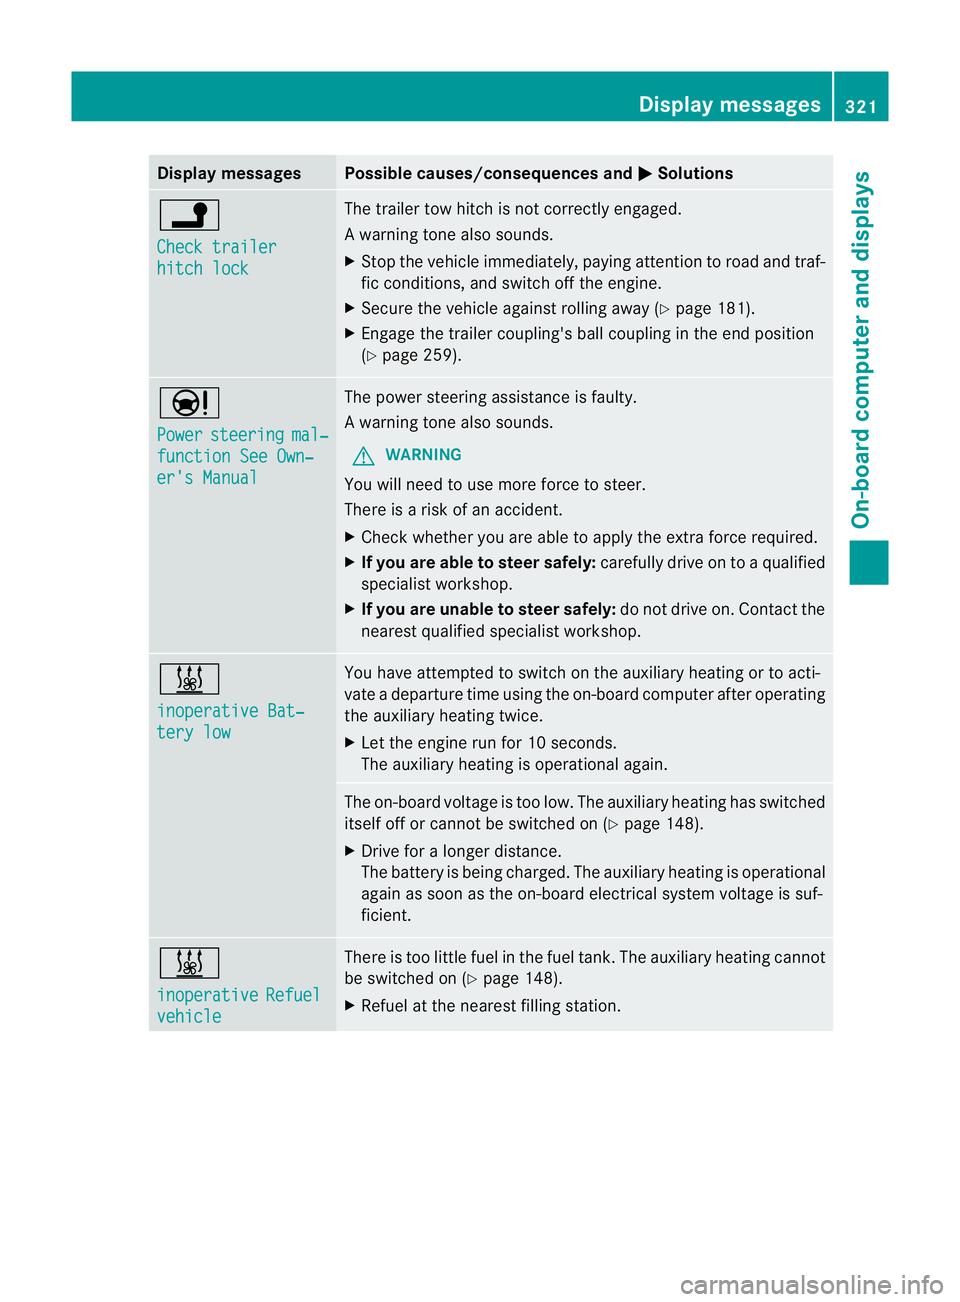
j
Ch
eckt railer hitch lock Th
et railer to whitch is no tcorrectly engaged.
Aw arning ton ealso sounds.
X Stop th evehicle immediately, payin gattentio ntoroad and traf-
fic conditions, and switc hoff th eengine.
X Secure the vehicl eagainst rolling away (Y page 181).
X Engage the trailer coupling' sball coupling in the end position
(Y page 259). Ð
Power
steering mal‐
function Se
eOwn‐ er's Manual Th
ep ower steerin gassistanc eisf aulty.
Aw arning ton ealso sounds.
G WARNING
You will need to use mor eforce to steer.
Ther eisar isk of an ac cident.
X Check wheth er youare able to appl ythe ext raforce required.
X If you are abl etosteer safely: carefully drive on to aqualified
specialist workshop.
X If you are unable to steer safely: do not drive on. Contact the
nearest qualified specialist workshop. &
inoperativ
eBat‐ tery low Yo
uh ave attempted to switch on the auxiliary heating or to acti-
vate adeparture tim eusing the on-boar dcomputer after operating
the auxiliary heatin gtwice.
X Let the engine run for 10 seconds.
The auxiliary heating is operational again. The on-board voltage is too low. The auxiliary heating has switched
itself off or cannot be switched on (Y
page 148).
X Driv efor alonger distance.
The battery is being charged. The auxiliary heatin gisoperational
again as soon as the on-boar delectrical system voltage is suf-
ficient. &
inoperative
Refuel
vehicle There is too little fuel in the fuel tank
.The auxiliary heating cannot
be switched on (Y page 148).
X Refuel at the nearest filling station. Displa
ymessages
321On-board compu tera nd displays Z
Page 353 of 441
Make sur
ethat children travellin ginthe vehi-
cle ar enot able to injure themselves on the
hot cigarette lighter or cause afire with it.
! The cigarette lighter in the centre console
in the front compartmen tisn ot intended
for operatin gthe tyr einflation compressor. X
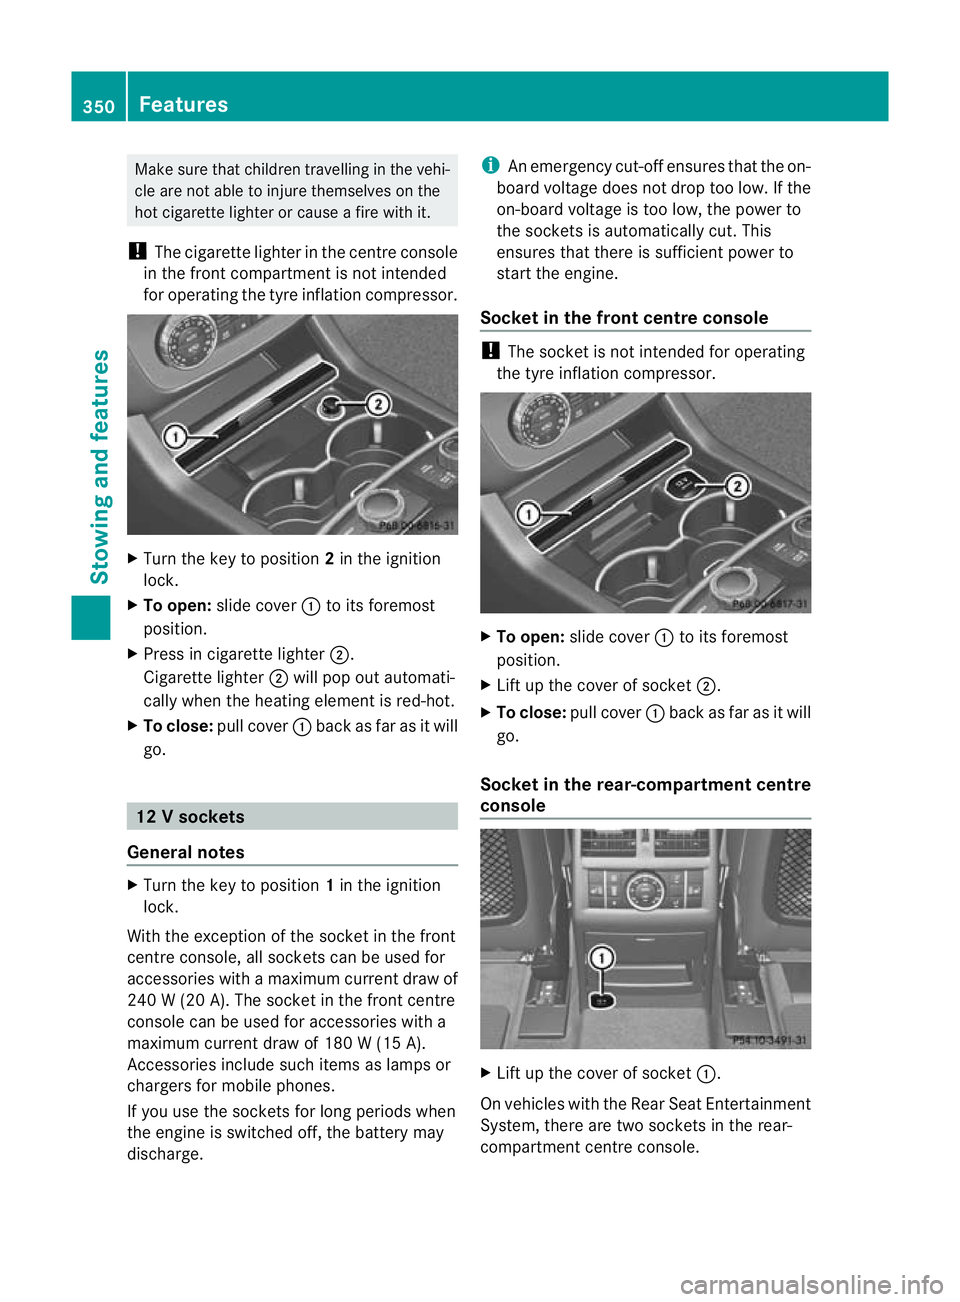
Turn the key to position 2in the ignition
lock.
X To open: slide cover :to its foremost
position.
X Pres sinc igarette lighter ;.
Cigarette lighter ;will pop out automati-
cally when the heating element is red-hot.
X To close: pull cover :back as far as it will
go. 12
Vsockets
General notes X
Turn th ekey to position 1in th eignition
lock.
Wit hthe exception of th esocket in th efront
centr econsole, all socket scan be used for
accessories with amaximum curren tdraw of
240 W(20 A) .The socket in the front centre
console can be used for accessories with a
maximum curren tdraw of 180 W(15 A).
Accessories includ esuch items as lamp sor
charg ersf or mobi lephones.
If you use the sockets for long periods when
the engine is switched off ,the battery may
discharge. i
An emergency cut-of fensure sthat the on-
board voltage does not drop too low. If the
on-boar dvoltage is too low, the power to
the socket sisautomatically cut. This
ensures that there is sufficient power to
start the engine.
Socket in the front centre console !
The socket is not intended for operating
the tyre inflation compressor. X
To open: slide cover :to its foremost
position.
X Lift up the cover of socket ;.
X To close: pull cover :back as far as it will
go.
Socket in the rear-compartment centre
console X
Lift up the cover of socket :.
On vehicles with the Rear Seat Entertainment
System, there are two sockets in the rear-
compartmen tcentre console. 350
FeaturesStowing and features
Page 368 of 441
i
The ASSYST PLU Sservice interval display
does not show any information on the
engine oil level. Observ ethe notes on the
engin eoil level (Y page 362).
The multifunction display shows aservice
message for afew seconds, e.g.:
Next servic eAin .. days Service
Adue Service
Aoverdue by ... days Th
eletter indicates which service is due. Astands for
aminor servic eand B for
am ajor
service. Anumber or another letter may be
displayed after the letter. This figure indicates
any necessary additional maintenanc ework
to be performed.
If you notify aqualified specialist worksho pof
this display, you will receive astatement on
the associated costs.
The ASSYST PLUS service interval display
doe snot tak einto account any periods of
tim eduring which the battery is disconnec-
ted.
Maintaining the time-dependent service
schedule:
X Note down the service du edated isplayed
in the multifunction displa ybefor ediscon-
nectin gthe battery.
or
X After reconnecting the battery ,subtract
the battery disconnection periods fro mthe
service date shown on the display.
Hiding aservice message X
Pres sthe % ora button on th esteer-
ing wheel. Displaying service messages X
Switch th eignitio non.
X Press the =or; button on the steer-
ing whee ltoselect the Serv. men
u.
X Press the 9or: button to select the
ASSYS TPLUS submenu and confirm by
press ingt he a button.
The service due date appears in the multi-
function display.
Informatio nabout Service Resetting th
eASSYST PLUS service inte r-
val display
! If the ASSYS TPLUS service interva ldis-
play has been inadvertently reset ,this set-
tin gc an be corrected at aqualified special-
ist workshop.
Have service work carried out as described
in the Servic eBooklet. This ma yotherwise
lead to increased wear and damage to the
major assemblies or the vehicle.
Aq ualified specialist workshop, e.g. a
Mercedes-Ben zService Cent re,w ill reset the
ASSYST PLU Sservic einterval display after
the service work has bee ncarried out. You
can also obtain further information on main-
tenance work, for example.
Special service requirements
Arduous operating conditions or increased
loads on the vehicle will require some service
work to be performed more often than for a
vehicle in normal use. Such arduous condi-
tions include regular city driving with frequent
intermediate stops and use in mountainous
terrain or on poor road surfaces.
For example, if the vehicle is used under ardu-
ous operating conditions, have air filters,
engine oil and oil filters changed frequently
and check the wheels often .Further informa-
tion can be obtaine dataqualified specialist
workshop, e.g. aMercedes-Ben zService
Cent re. Service
365Maintenance and care Z
Page 371 of 441
High-pressure cl
eaning equipment G
WARNING
Do not use high-pressure cleaner swith circu-
lar-jet nozzles (dirt grinders) to clean your
vehicle ,inparticular the tyres. You could oth-
erwise damage the tyres and cause an acci-
dent.
! Always maintain adistance of at least
30 cm between the vehicle and the high-
pressure cleaner nozzle. Information about
the correc tdistanc eisavailable from the
equipment manufacturer.
Move the high-pressure cleane rnozzle
around when cleanin gyour vehicle.
Do not aim directly at any of the following:
R tyres
R door gaps, roof gaps, join tsetc.
R electrical components
R battery
R connectors
R lights
R seals
R trim elements
R ven tilation slots
Damaged seals or electrical components
can lead to leaks or failures.
Cleanin gthe paintwork !
Do not affix:
R stickers
R films
R magnetic plate sorsimilar items
to painted surfaces. You could otherwise
damage the paintwork.
Scratches, corrosive deposits, areas affected
by corrosion and damage caused by inade-
quate care cannot always be completely
repaired. In such cases, visit aqualified spe-
cialist workshop. X
Remove impurities immediately, where
possible, whils tavoiding rubbing to ohard.
X Soak insect remains with insect remover
and rinse off the treated areas afterwards.
X Soak bird droppings with water and rinse
off the treated areas afterwards.
X Remove coolant, brake fluid, tree resin,
oils, fuels and greases by rubbing gently
with acloth soaked in petroleum ether or
lighter fluid.
X Use tar remover to remov etar stains.
X Use silicone remover to remove wax.
Care and treatment of mat tpaintwork !
Never polis hthe vehicle or the light alloy
wheels. Polishin gmakes the paintwork
shiny.
! The following may cause the paint to
become shiny and thus reduce the matt
effect:
R Vigorous rubbing with unsuitable mate-
rials.
R Frequent use of car washes.
R Washing the vehicle in direct sunlight.
! Never use paint cleaner, buffing or pol-
ishing products, or glos spreserver, e.g.
wax .These product sare onl ysuitable for
high-glos ssurfaces. Thei ruse on vehicles
wit hm att finish leads to considerable sur-
face damage (shiny, spotted areas).
Always have paintwork repairs performed
at aq ualified specialist workshop, e.g. a
Mercedes-Ben zService Centre.
! Do not use wash programs with ahot wax
treatmen tunder any circumstances.
Observe thes enotes if your vehicle has a
clea rmatt finish. This will help you to avoid
damage to the paintwork due to incorrect
treatment.
Thes enotes also apply to light-alloy wheels
with aclear matt finish. 368
CareMaintenance and care