door lock MERCEDES-BENZ GL SUV 2012 Owner's Guide
[x] Cancel search | Manufacturer: MERCEDES-BENZ, Model Year: 2012, Model line: GL SUV, Model: MERCEDES-BENZ GL SUV 2012Pages: 441, PDF Size: 10.66 MB
Page 115 of 441
Position of th
esteerin gwheel for driv-
ing Th
es teering whee lismoved to the previously
set position if:
R the driver's door is closed and
R you inser tthe key int othe ignition lock
or
R you press the Star t/Stop butto nonce on
vehicles with KEYLESS-GO.
If you clos ethe driver's door with the key
inserted int othe ignition lock ,the steering
wheel is automatically moved to the previ-
ously set position.
The last position of the steering wheel is
stored when you switc hoff th eignition or
when you stor ethe setti ngwith the memory
function (Y page 115).
Crash-responsive EASY-EXIT fea tureIf th
ecrash-resp onsive EASY-EXIT feature is
trig gere dinana ccident,the steeri ngcolu mn
will mov eupwards when the driv er'sdoor is
opened. This occurs irrespective of the posi-
tion of the key in the ignition lock .This makes
it easier to exit the vehicle and rescue the
occupants.
The crash-responsive EASY-EXIT featur eis
only operational if the EASY-EXIT/ENTRY fea-
tur eisa ctivate dinthe on-boar dcomputer
(Y page 285). Mirrors
Rear-view mirror
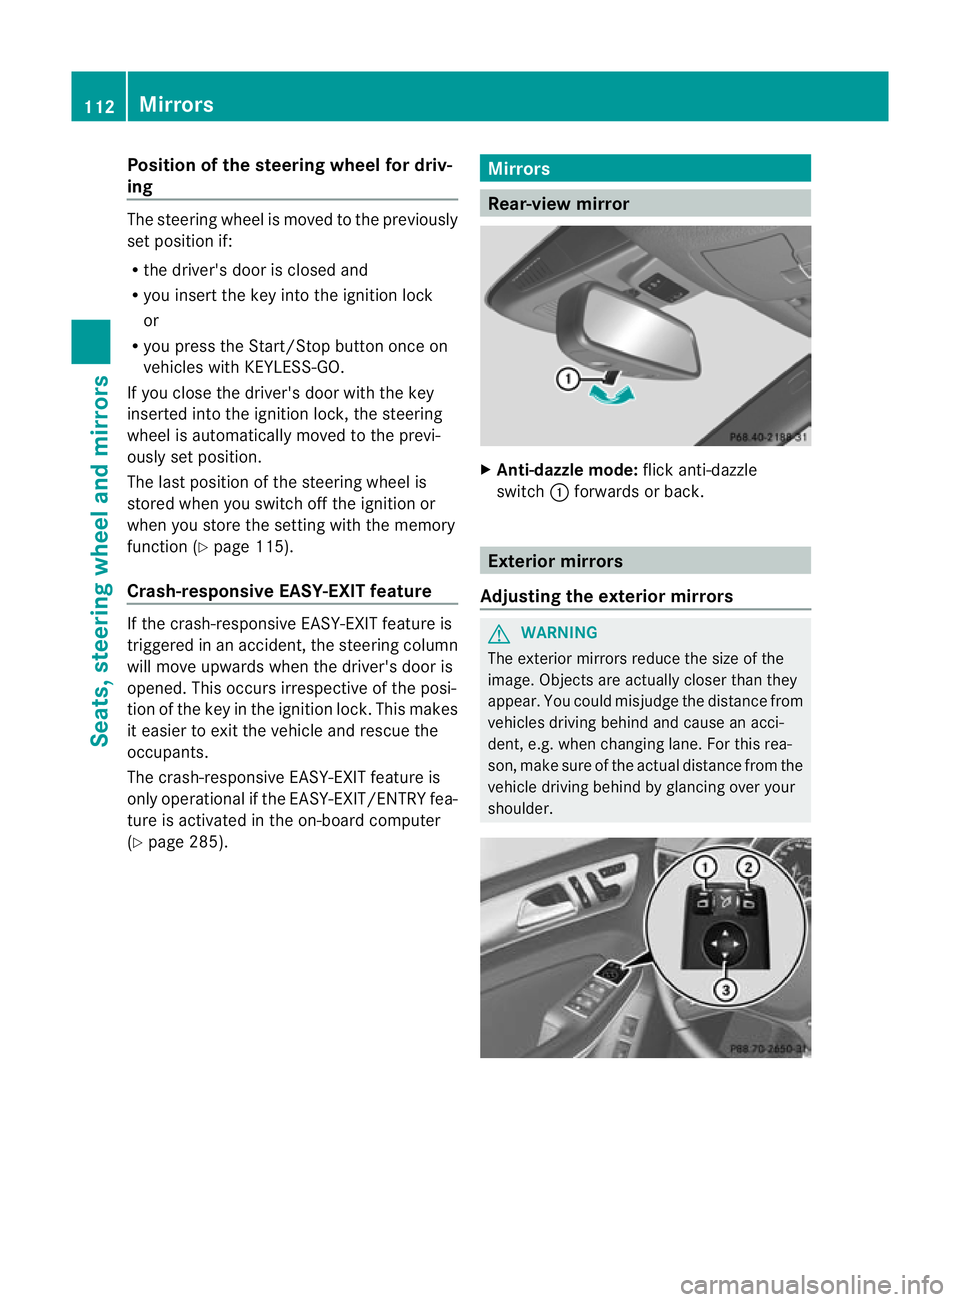
X
Anti-dazzle mode: flick anti-dazzle
switch :forwards or back. Exterior mirrors
Adjusting th eexterior mir rors G
WARNING
The exterior mirrors reduce the size of the
image. Objects are actually close rthan they
appear. You coul dmisjudge the distance from
vehicles drivin gbehind and cause an acci-
dent, e.g. when changing lane. For this rea-
son, mak esure of the actual distance from the
vehicle driving behind by glancing over your
shoulder. 112
MirrorsSeats, steerin
gwhee land mirrors
Page 116 of 441
X
Make sur ethat the key is in position 1or
2 in the ignition lock.
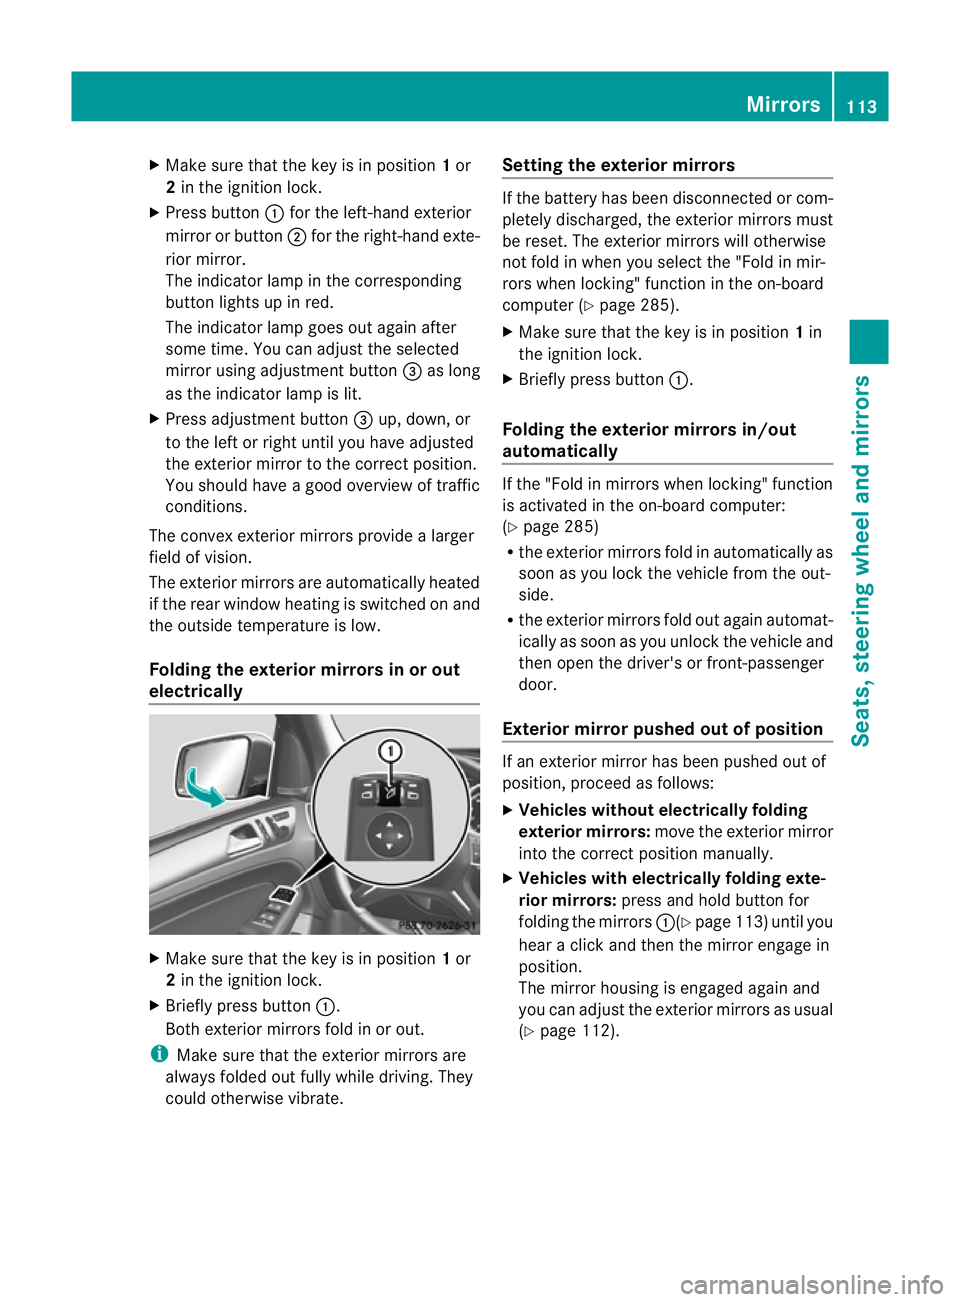
X Press button :for the left-hand exterior
mirror or button ;for the right-hand exte-
rior mirror.
The indicator lam pint he corresponding
button lights up in red.
The indicator lam pgoes out again after
some time. You can adjust the selected
mirror using adjustment button =as long
as the indicator lam pislit.
X Press adjustment button =up, down, or
to the left or right until you have adjusted
the exterior mirror to the correct position.
You should have agood overview of traffic
conditions.
The convex exterior mirror sprovide alarger
field of vision.
The exterior mirrors are automatically heated
if the rear window heating is switched on and
the outside temperature is low.
Folding the exterior mirrors in or out
electrically X
Make sure that the key is in position 1or
2 in the ignition lock.
X Briefly press button :.
Both exterior mirrors fold in or out.
i Make sure that the exterior mirrors are
always folded out fully while driving. They
could otherwise vibrate. Setting the exterior mirrors If the battery has been disconnected or com-
pletely discharged
,the exterior mirrors must
be reset .The exterior mirrors will otherwise
not fol dinwhen you selec tthe "Fold in mir-
ror sw hen locking" func tion in the on-board
computer (Y page 285).
X Make sure that the key is in position 1in
the ignition lock.
X Briefl ypres sbutton :.
Folding the exterior mirrors in/out
automatically If the "Fold in mirrors when locking" function
is activated in the on-board computer:
(Y
page 285)
R the exterior mirrors fold in automatically as
soo nasyou lock the vehicle from the out-
side.
R the exterior mirror sfold out again automat-
ically as soon as you unloc kthe vehicle and
then open the driver's or front-passenger
door.
Exterior mir rorp ushe dout of position If an exterior mirro
rhas been pushe dout of
position, proceed as follows:
X Vehicles without electrically folding
exterior mirrors: move the exterior mirror
into the correct position manually.
X Vehicles with electrically folding exte-
rior mirrors: press and hold button for
folding the mirrors :(Ypage 113 )until you
hea rac lick and then the mirror engage in
position.
The mirror housing is engaged again and
you can adjust the exterior mirrors as usual
(Y page 112). Mirrors
113Seats, steerin gwhee land mirrors Z
Page 122 of 441
Light switch
Operation
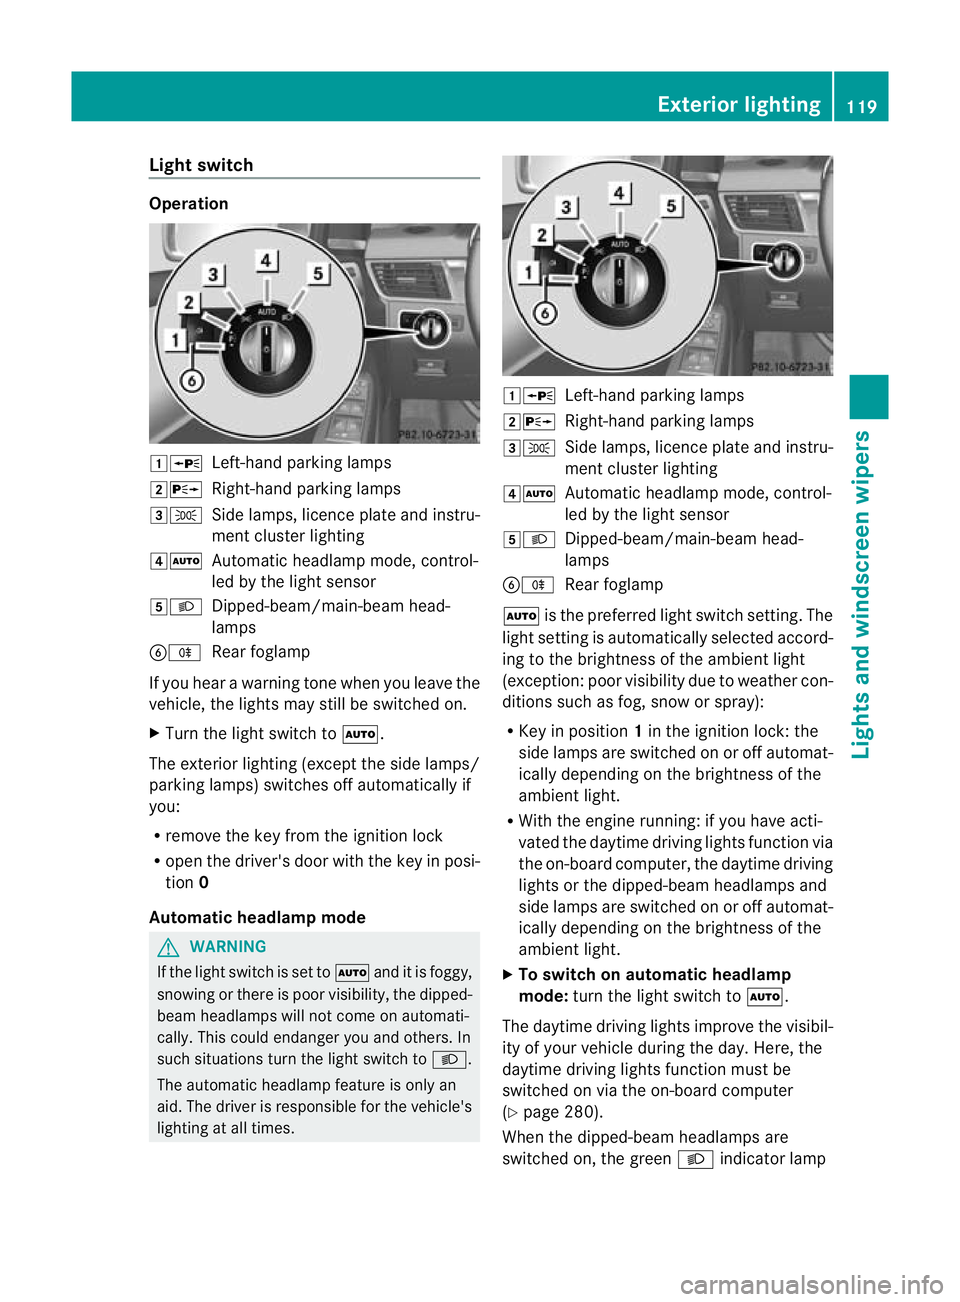
1W
Left-handparking lamps
2X Right-hand parking lamps
3T Side lamps, licenc eplatea nd instru-
men tcluster lighting
4Ã Automatic headlamp mode, control-
led by the light sensor
5L Dipped-beam/main-beam head-
lamps
BR Rear foglamp
If you hear awarnin gton ew hen you leav ethe
vehi cle, the light smay still be switched on.
X Turn the light switc htoÃ.
The exterior lighting (except the side lamps/
par king lamps )switches off automatically if
you:
R remove the key fro mthe igni tion lock
R open the driv er'sdoor with the key in posi-
tion 0
Automatic hea dlamp mode G
WARNING
If the light switch is se ttoÃand it is foggy,
snowing or ther eispoor visibility, the dipped-
beam headlamps will not com eonautomati-
cally. This could endanger you and others. In
such situations tur nthe light switc htoL .
The automatic headlamp feature is only an
aid. The driver is responsible for the vehicle's
lightin gatall times. 1W
Left-hand parking lamps
2X Right-hand parking lamps
3T Side lamps, licence plate and instru-
ment cluster lighting
4Ã Automatic headlamp mode, control-
led by the light sensor
5L Dipped-beam/main-beam head-
lamps
BR Rear foglamp
à is the preferred light switch setting. The
light setting is automatically selected accord-
ing to the brightness of the ambient light
(exception: poor visibility due to weather con-
ditions such as fog, snow or spray):
R Key in position 1in the ignition lock: the
side lamps are switched on or off automat-
ically depending on the brightness of the
ambient light.
R With the engine running: if you have acti-
vated the daytime driving lights function via
the on-board computer, the daytime driving
lights or the dipped-bea mheadlamps and
side lamps are switched on or off automat-
icall ydepending on the brightness of the
ambient light.
X To switc honautomatic headl amp
mode: turn the ligh tswitch to Ã.
The daytime driving lights improve the visibil-
ity of your vehicle during the day. Here, the
daytime driving lights function must be
switched on via the on-board computer
(Y page 280).
When the dipped-beam headlamps are
switched on, the green Lindicator lamp Exterio
rlighting
119Lights and windscreen wipers Z
Page 130 of 441
Rear overhead control panel (thir
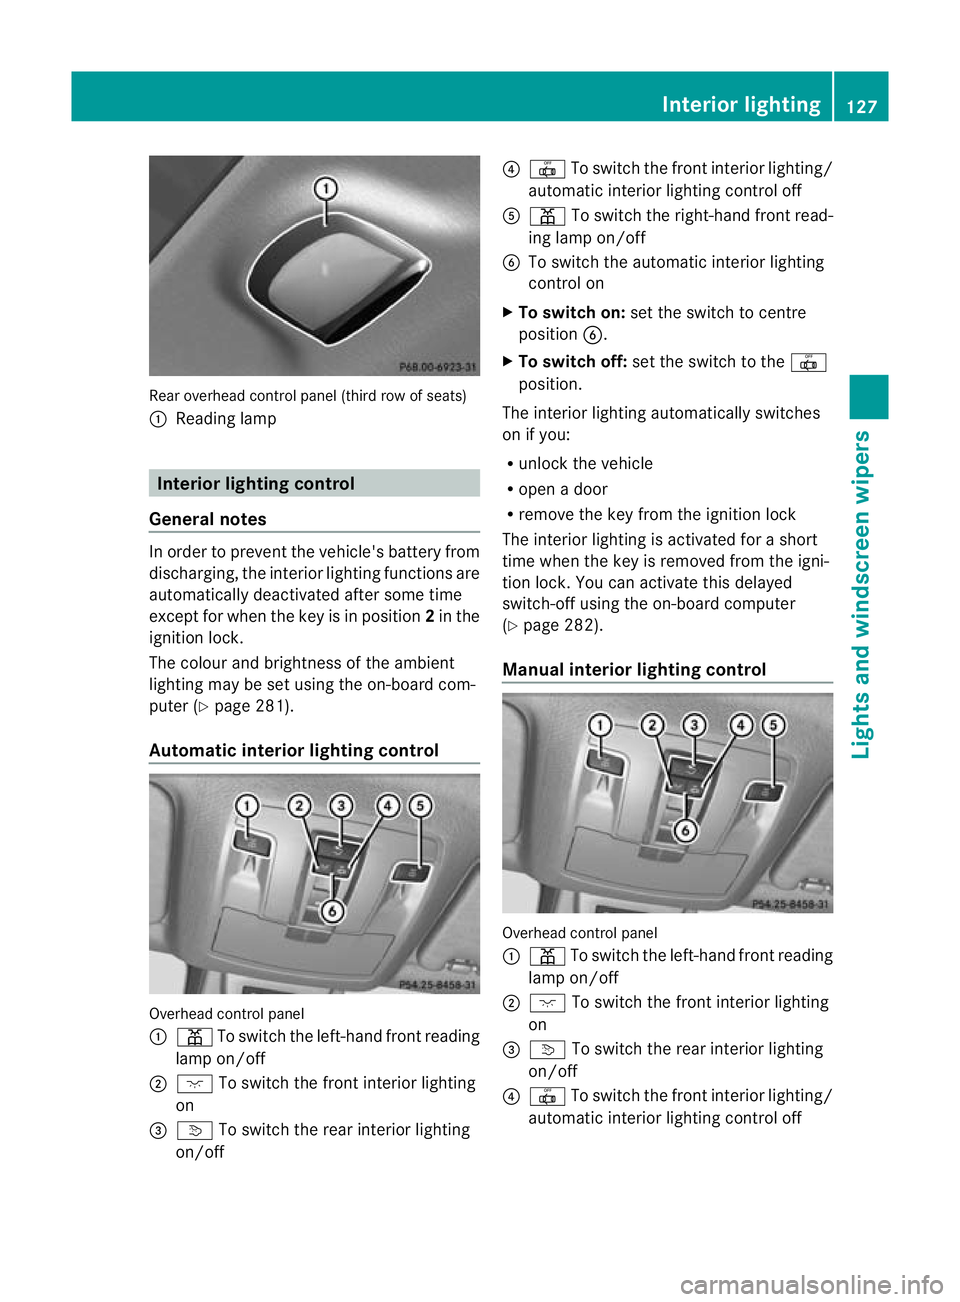
drow of seats)
: Readin glamp Interior lightin
gcontrol
General notes In order to preven
tthe vehicle' sbattery from
discharging, the interior lighting functions are
automatically deactivated after some time
except for when the key is in position 2in the
ignition lock.
The colour and brightness of the ambient
lighting may be set using the on-board com-
puter (Y page 281).
Automatic interior lighting control Overhead control panel
:
p To switch the left-hand front reading
lamp on/off
; c To switch the front interior lighting
on
= v To switch the rear interior lighting
on/off ?
| To switch the front interior lighting/
automatic interior lighting control off
A p To switch the right-hand front read-
ing lamp on/off
B To switch the automatic interior lighting
control on
X To switch on: set the switch to centre
position B.
X To switch off: set the switch to the |
position.
The interior lighting automatically switches
on if you:
R unlock the vehicle
R open adoor
R remove the key from the ignition lock
The interior lightin gisactivate dfor as hort
tim ew hen the key is removed from the igni-
tion lock .You can activate this delayed
switch-of fusing the on-boar dcomputer
(Y page 282).
Manua linterior lighting control Overhead con
trolpanel
: p To switch the left-hand front reading
lamp on/off
; c To switch the front interior lighting
on
= v To switch the rear interior lighting
on/off
? | To switch the front interior lighting/
automatic interior lighting control off Interior lighting
127Lights and windscreen wipers Z
Page 131 of 441
A
p To switc hthe right-hand fron tread-
ing lam pon/off
B To switch the automati cinterior lighting
control on
X To switch on the front interior lighting:
set the switch to the cpositio n.
X To switch off the interior lighting: set the
switch to the |positio nor(if the door
is closed) to the centre position.
X To switch the rear interior lighting on/
off: press the ubutton.
X To switch the reading lamp son/off:
press the pbutton. Crash-responsive emergency lighting
The interior lightin gisa ctivated automatically
if the vehicle is involved in an accident.
X To switch off the crash-responsive
emergenc ylighting: press the hazard
warning lamp button.
or
X Lock and then unlock the vehicle using the
key. Replacing bulbs
Important safet
ynotes
Xenon bulbs G
DANGER
Xenon bulbs are under high voltage. If you
touch the electrical contact sofaxenon bulb,
you could suffer an electric shock and be seri-
ously or even fatally inju red. For this reason,
do not remove the cover of xenon bulbs.
Do not change the xenon bulbs yourself, but
have them replaced at aqualified workshop.
If your vehicle is equipped with xenon bulbs,
you can recognise this by the following :the
con eoflight from the xenon bulbs moves
from the top to the bottom and back again
when you start the engine. For this to be observed, the lights must be switched on
before starting the engine.
Bulbs and lamps are an important aspect of
vehicle safety. You must therefore make sure
that these function correctly at all times.
Hav
ethe headlamp setting checked regularly.
Other bulbs G
WARNING
Bulbs and lamps can be ver yhot. You should
therefore allow them to cool down befor eyou
change them .Otherwise, you could be burned
if you touch them.
Keep bulbs out of the reach of children .Oth-
erwise, the ycould damage the bulbs, for
example, and inj uret hemselves.
Never use abulbw hich ha sbeend ropped.
Suc hab ulbm ay break or even explode and
injure you.
Haloge nbulbs are pressurised and can
explode when you change them ,particularly
if they are ver yhot.Y ou should therefor ewear
eye protec tion and gloves when you are
changing them.
There are bulbs other than the xenon bulbs
that you can notreplace. Replace only the
bulbs listed (Y page 129). Hav ethe bulbs that
you can notreplace yourself changed at a
qualified specialist workshop.
If you require assistanc echanging bulbs, con-
sult aqualified specialist workshop.
Do not touch the glass tube of new bulbs with
your bare hands. Even minor contamination
can burn into the glass surface and reduce
the service life of the bulbs .Always use alint-
free cloth or only touch the base of the bulb
when fitting.
Only use bulbs of the correc ttype.
If the new bulb still does not light up, consult
aq ualified specialist workshop.
Bulbs and lamps are an importan taspect of
vehicle safety .You must therefor emake sure
that these function correctly at all times.
Have the headlamp setting checked regularly. 128
Replacing bulbsLights and windscree
nwipers
Page 136 of 441
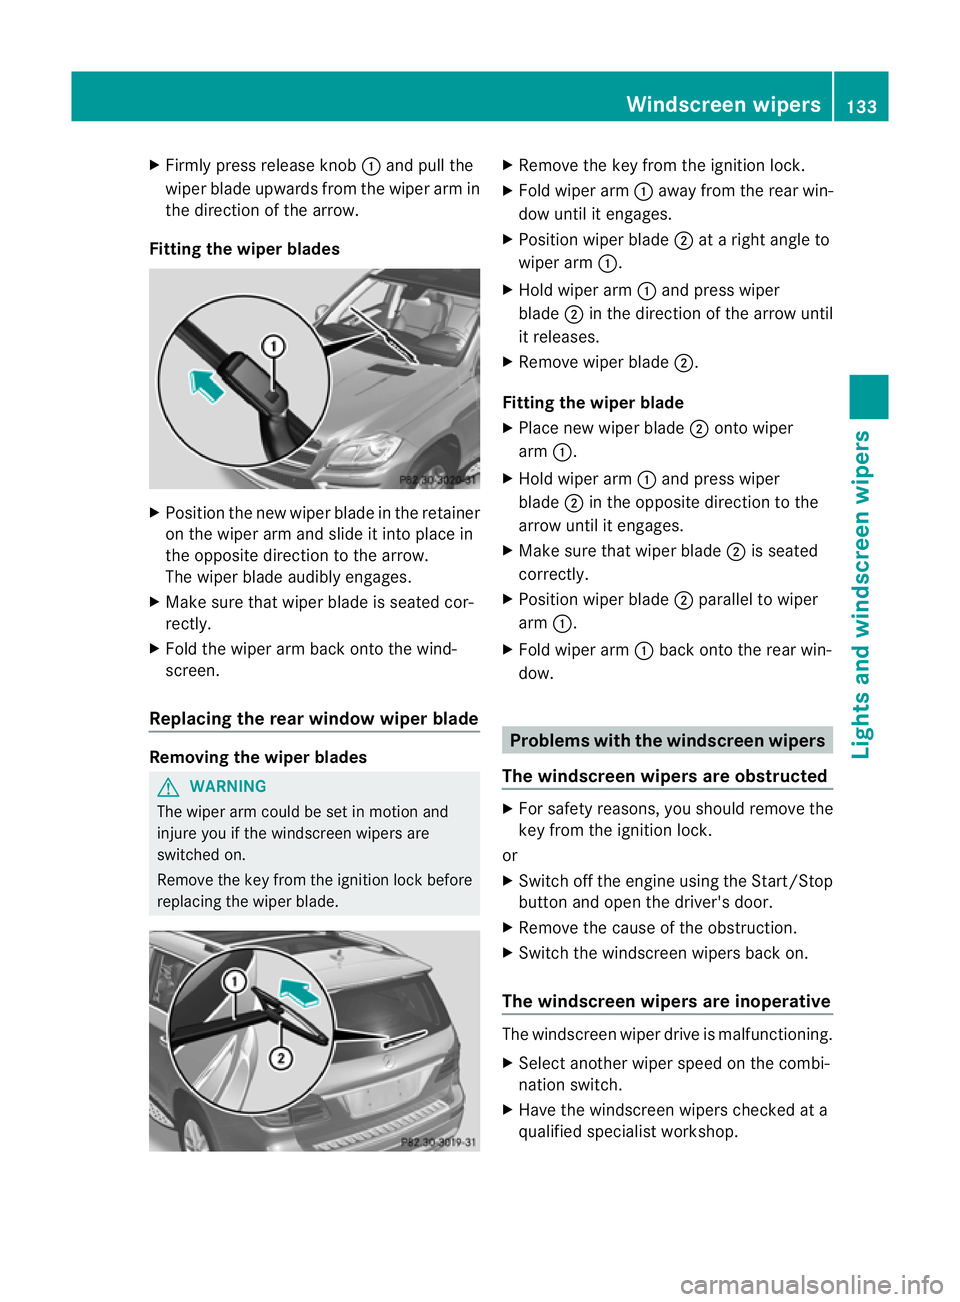
X
Firml ypress release knob :and pull the
wipe rblade upwards from the wiper arm in
the directio nofthe arrow.
Fitting th ewiper blades X
Position the new wiper blade in the retainer
on the wiper arm and slide it into place in
the opposite direction to the arrow.
The wiper blade audibly engages.
X Make sure that wiper blade is seated cor-
rectly.
X Fold the wiper arm back onto the wind-
screen.
Replacing the rear window wiper blade Removing the wiper blades
G
WARNING
The wiper arm could be set in motion and
injur eyou if the windscreen wiper sare
switched on.
Remove th ekey from the ignition lock before
replacing the wiper blade. X
Remov ethe key from the ignition lock.
X Fold wiper arm :away from the rea rwin-
dow until it engages.
X Position wiper blade ;atar ight angle to
wiper arm :.
X Hold wiper arm :and press wiper
blade ;in the direction of the arrow until
it releases.
X Remove wiper blade ;.
Fitting the wiper blade
X Place new wiper blade ;onto wiper
arm :.
X Hold wiper arm :and press wiper
blade ;in the opposite direction to the
arrow until it engages.
X Make sure that wiper blade ;is seated
correctly.
X Position wiper blade ;parallel to wiper
arm :.
X Fold wiper arm :back onto the rear win-
dow. Problems with the windscreen wipers
The windscreen wipers are obstructed X
For safety reasons, you should remov ethe
key from the ignition lock.
or
X Switc hoff th eengine using the Start/Stop
butto nand ope nthe driver's door.
X Remove the cause of the obstruction.
X Switc hthe windscreen wiper sback on.
The windscreen wipers are inoperative The windscreen wiper drive is malfunctioning.
X
Select another wiper spee donthe combi-
nation switch.
X Hav ethe windscreen wiper schecked at a
qualified specialist workshop. Windscreen wipers
133Lights and windscreen wipers Z
Page 163 of 441
The Start/Stop button must be inser
tedint he
ignition lock and the key with the integrated
KEYL ESS-GO function must be in the vehicle.
Pressing the Start/Stop butto nseveral times
in succession corresponds to the different
key positions in the ignition lock. This is only
the case if you are not depressing the brake
pedal.
If you depress the brak epedal and press the
Start/Stop button ,the engin estart simmedi-
ately.
i Thee ngine can be switched off whil ethe
vehicle is in motion by pressing and holding
the Start/ Stop button for three seconds.
This func tion operates independently of the
ECO star t/stop automatic engine switch-
off func tion.
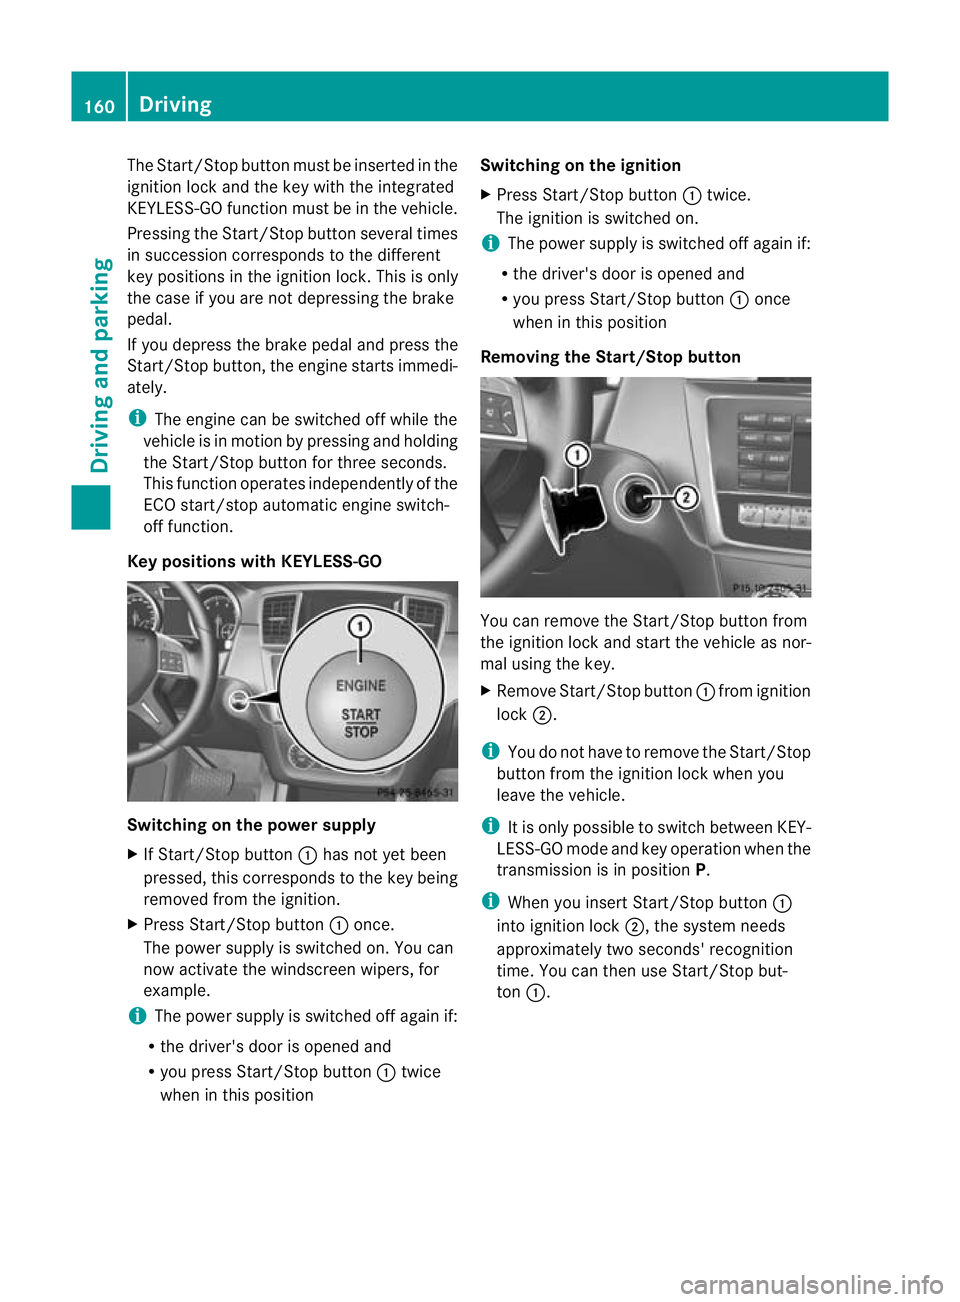
Key positions with KEYLESS-GO Switching on th
epower supply
X If Start/ Stop button :has not yet been
pressed, this corresponds to the key being
removed from the ignition.
X Press Start/Stop button :once.
The power supply is switched on. You can
now activa tethe windscreen wipers, for
example.
i The powe rsupply is switched off again if:
R the driver' sdoor is opened and
R you press Start/Stop button :twice
when in this position Switching on th
eignition
X Press Start/Stop button :twice.
The ignition is switched on.
i The power supply is switched off again if:
R the driver' sdoor is opened and
R you press Start/Stop button :once
when in this position
Removing th eStart/Stop button You can remove the Start/Stop butto
nfrom
th ei gnition lock and star tthe vehicle as nor-
ma lusing the key.
X Remove Start/ Stop button :from ignition
lock ;.
i You do not have to remove the Start/Stop
button from the ignition lock when you
leav ethe vehicle.
i It is only possible to switc hbetween KEY-
LE SS -GO mode and key operation whe nthe
transmission is in position P.
i When you inser tStart/St op button :
int oignition lock ;,the system needs
approximatel ytwo seconds' recognition
time. You can then use Start/ Stop but-
ton :. 160
DrivingDriving and pa
rking
Page 165 of 441
X
Release the brak epedal.
X Carefully depress th eaccele rator pedal.
The electric parkin gbrake (Y page 182) is
automaticall yreleased.
The red !indicator lam pinthe instru-
men tcluster goes out.
i It is only possible to shift the transmission
from position Pto the desired position if
you depress the brake pedal. Only then is
the parkin glock released. If the brake
pedal is not depressed, the DIRECT SELECT
leve rcan still be moved but the parkin glock
remains engaged.
i The vehicle lock scentrally onc eyou have
pulled away .The lockin gknobs in the doors
drop down.
You can open the doors from the inside at
any time.
You can also deactivat ethe automatic lock-
ing featur e(Ypage 28 3).
i Upshif tstake place at higher engine
speeds after acold star t.This helps the
catalytic converter to reach its operating
temperature mor equickly.
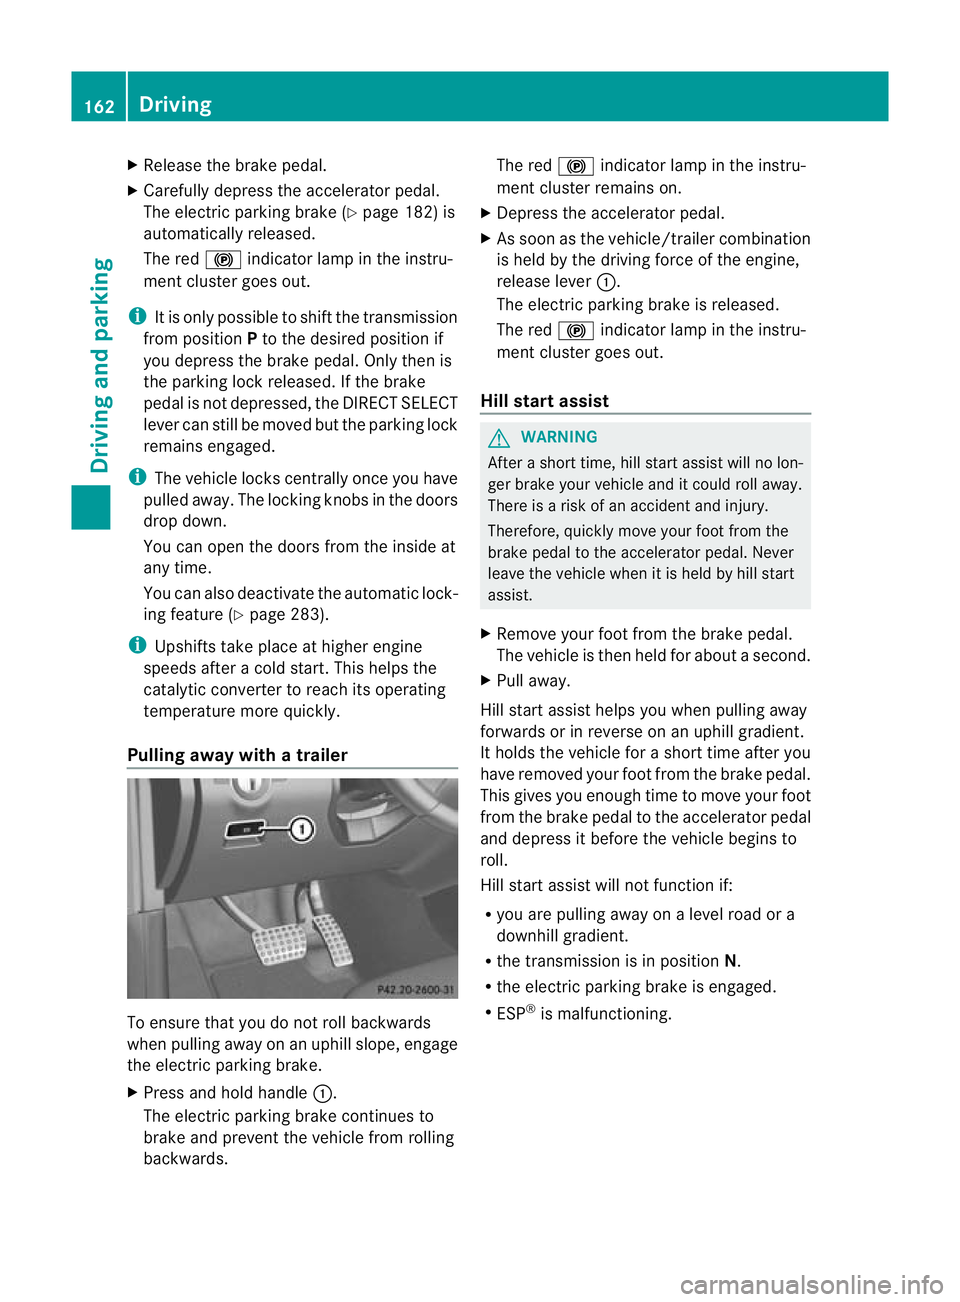
Pullin gaway with atrailer To ensure that you do not roll backwards
when pulling away on an uphill slope, engage
the electric parking brake.
X
Press and hol dhandle :.
The electric parking brake continues to
brake and prevent the vehicle from rolling
backwards. The red
!indicator lamp in the instru-
ment cluster remains on.
X Depress the accelerator pedal.
X As soon as the vehicle/trailer combination
is held by the driving force of the engine,
release lever :.
The electric parking brake is released.
The red !indicator lamp in the instru-
ment cluster goes out.
Hill star tassist G
WARNING
Af teras hort time, hill star tassist will no lon-
ger brake your vehicle and it could rol laway.
There is arisk of an accident and injury.
Therefore, quickly move your foot from the
brake pedal to the accelerator pedal. Never
leave the vehicle when it is held by hill start
assist.
X Remove your foot from the brake pedal.
The vehicle is then held for about asecond.
X Pull away.
Hill star tassist helps you when pulling away
forwards or in reverse on an uphil lgradient.
It hold sthe vehicle for ashort tim eafter you
have removed you rfoot from the brake pedal.
This gives you enough tim etomove your foot
from the brake pedal to the accelerator pedal
and depress it befor ethe vehicle begin sto
roll.
Hil lstart assist will not function if:
R you are pulling away on alevel road or a
downhill gradien t.
R the transmission is in position N.
R the electric parking brake is engaged.
R ESP ®
is malfunctioning. 162
DrivingDrivin
gand pa rking
Page 171 of 441
Transmission position and driv
epro-
gram display !
If the transmission positio ndisplay in the
multifunction display is not working, you
should pull away carefully to chec kwhether
the desired transmission position is
engaged. Ideally, you should selec ttrans-
mission position Dand ,for AMG vehicles,
drive program Cor S.Don ot restric tthe
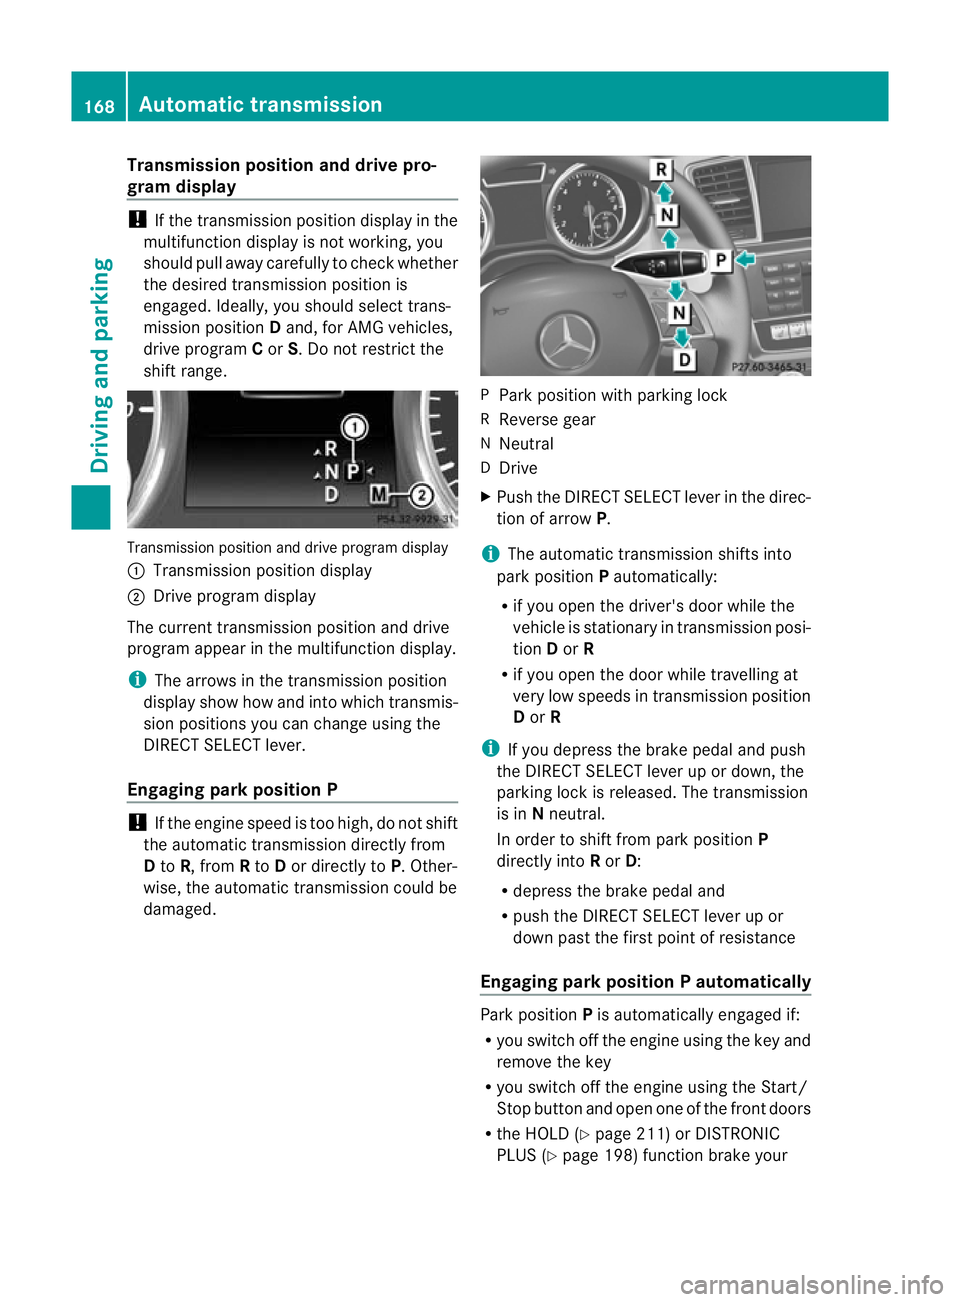
shift range. Transmission position and drive progra
mdisplay
: Transmission positio ndisplay
; Driv eprogram display
Th ec urrent transmission position and drive
program appea rinthe multifunction display.
i The arrow sint he transmission position
display show how and int owhich transmis-
sion positions you can change usin gthe
DIREC TSELECT lever.
Engaging par kposition P !
If th eengine speed is too high, do not shift
the automatic transmission directly from
D to R,f rom Rto Dor directly to P.Other-
wise ,the automatic transmission could be
damaged. P
Par kposition with parkin glock
R Reverse gear
N Neutral
D Drive
X Push the DIREC TSELECT lever in the direc-
tion of arrow P.
i The automatic transmission shifts into
park position Pautomaticall y:
R ifyou ope nthe driver's door while the
vehicle is stationary in transmission posi-
tion Dor R
R if you open the door while travellin gat
very lo wspeeds in transmission position
D or R
i If you depress the brak epedal and push
the DIRECT SELECT lever up or down, the
parking lock is released. The transmission
is in Nneutral.
In order to shift from park position P
directly into Ror D:
R depress the brak epedal and
R push the DIRECT SELECT lever up or
down past the first point of resistance
Engaging pa rk position Pautomatically Park position
Pis automatically engaged if:
R you switch off th eengine using the key and
remove the key
R you swi tcho ff the engin eusingthe Start/
Stop button an dopen on eofthe front doors
R theH OLD (Y page 211) or DI STRONIC
PLUS (Y page 198) function brake your 168
Automatic transmissionDrivin
gand pa rking
Page 178 of 441
G
WARNING
Electrostati ccharge can lead to the creation
of sparks and to fuel vapours igniting. There
is ar isk of fire and explosion.
Touch the vehicle bodywork just before open-
ing the fuel filler cap. This wil ldischarge a
possible electrostatic charge.
! Do not use petrol to refuel vehicle swith a
diesel engine. Do not use diesel to refu el
vehicles wit hapetrol engine. Do not switch
on the igniti on if youaccidentally refuel
with the wrong fuel. Otherwise, the fuel will
ente rthe fuel system .Even small amounts
of th ewrong fue lcould result in damage to
the fuel system and the engine. The repair
cost sare high .Notif yaq ualified specialist
workshop and have the fuel tan kand fuel
lines draine dcompletely.
! Overfilling the fuel tan kcould damage the
fuel system.
! Take care not to spill any fuel on painted
surfaces .You coul dotherwis edamage the
paintwork.
! Use afilter when adding fuel from afuel
can. The fuel lines and/or the diesel injec-
tion system could otherwis ebeblocked by
particles from the fuel can.
If you overfill the fuel tank ,fuel could spray
out when the fuel pump nozzle is removed.
Further information on fuel and on fuel grades
can be found in the "Fuel" section
(Y page 423). Refuelling
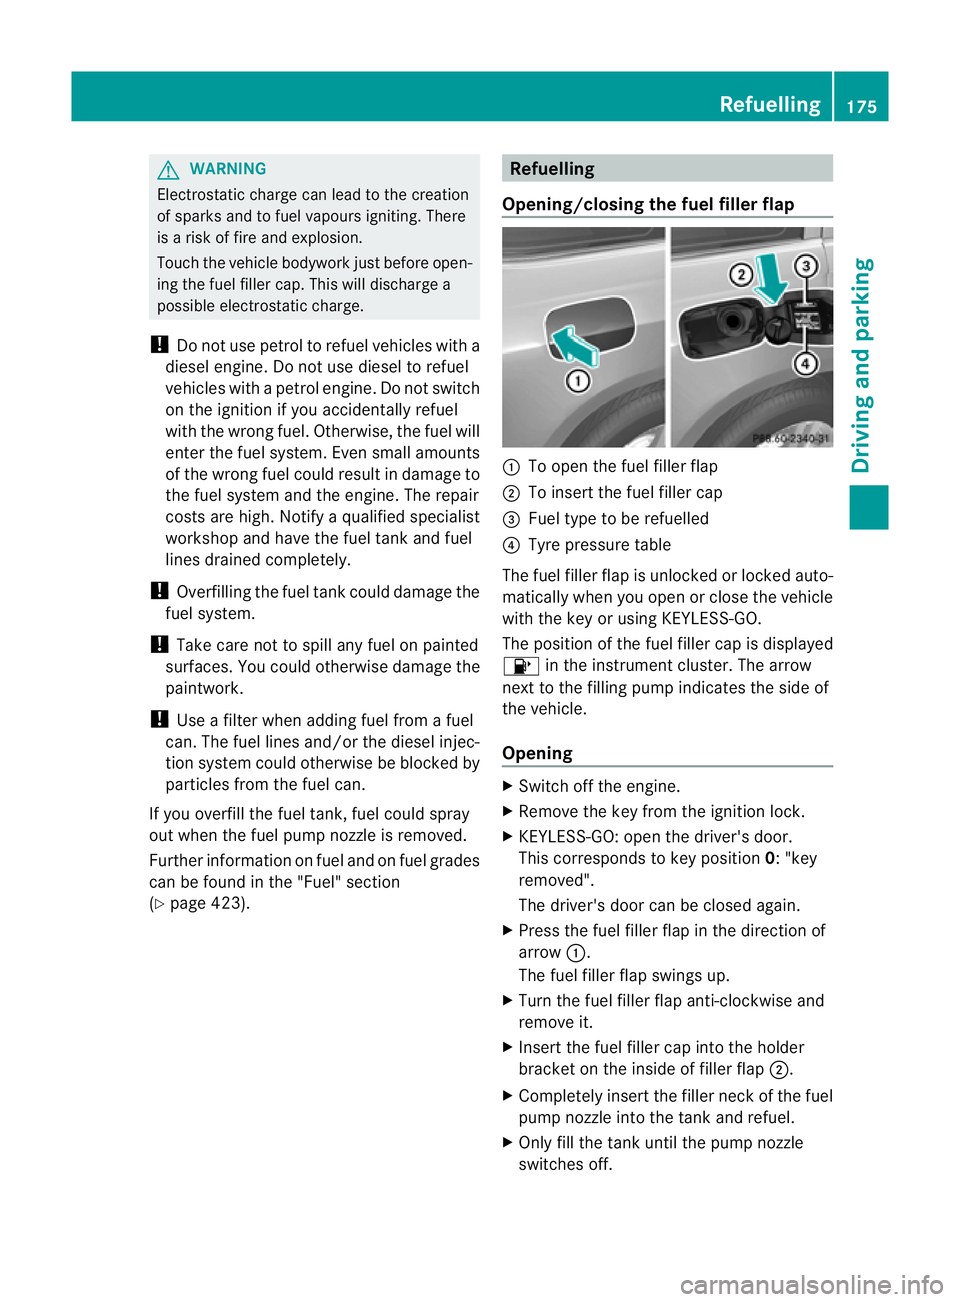
Opening/closing the fuel filler flap :
To open the fuel filler flap
; To insert the fuel filler cap
= Fuel type to be refuelled
? Tyre pressure table
The fuel filler flap is unlocked or locked auto-
matically when you open or close the vehicle
with the key or using KEYLESS-GO.
The position of the fuel filler cap is displayed
8 in the instrument cluster. The arrow
next to the filling pump indicates the side of
the vehicle.
Opening X
Switch off the engine.
X Remove the key from the ignition lock.
X KEYLESS-GO: open the driver' sdoor.
This corresponds to key position 0:"key
removed".
The driver's doo rcan be closed again.
X Press the fuel filler flap in the direction of
arrow :.
The fuel filler flap swings up.
X Turn the fuel filler flap anti-clockwise and
remove it.
X Insert the fuel filler cap into the holder
bracket on the inside of filler flap ;.
X Completely insert the filler neck of the fuel
pump nozzle into the tank and refuel.
X Only fill the tank until the pump nozzle
switches off. Refuelling
175Driving and parking Z