window MERCEDES-BENZ GL SUV 2012 Service Manual
[x] Cancel search | Manufacturer: MERCEDES-BENZ, Model Year: 2012, Model line: GL SUV, Model: MERCEDES-BENZ GL SUV 2012Pages: 441, PDF Size: 10.66 MB
Page 347 of 441
Luggage compartment cover
Important safety notes G
WARNING
The luggage compartmen tcover is not a
restraint system .Secur ethe load unde rthe
luggag ecompart ment cover by suitable
means. Make sure that the luggage compart-
ment cover is engaged securely. If luggage is
not sufficiently secured, it can be thrown over
the backres tinto the passenger compart-
ment, for instance during heavy braking, sud-
den change sofdirection or in the event of an
accident .You coul dcause an accident or
cause injury to yourself and others.
! When loading the vehicle, make sure that
you do not stack the load in the luggage
compartment higher than the lower edge of
the side windows .Donot plac eheavy
object sontop of the luggage compartment
cover.
The luggage compartment cover ma ybe
installed behind the 2nd or 3r drow of seats.
Extending and ret racting the luggage
compartment cover X
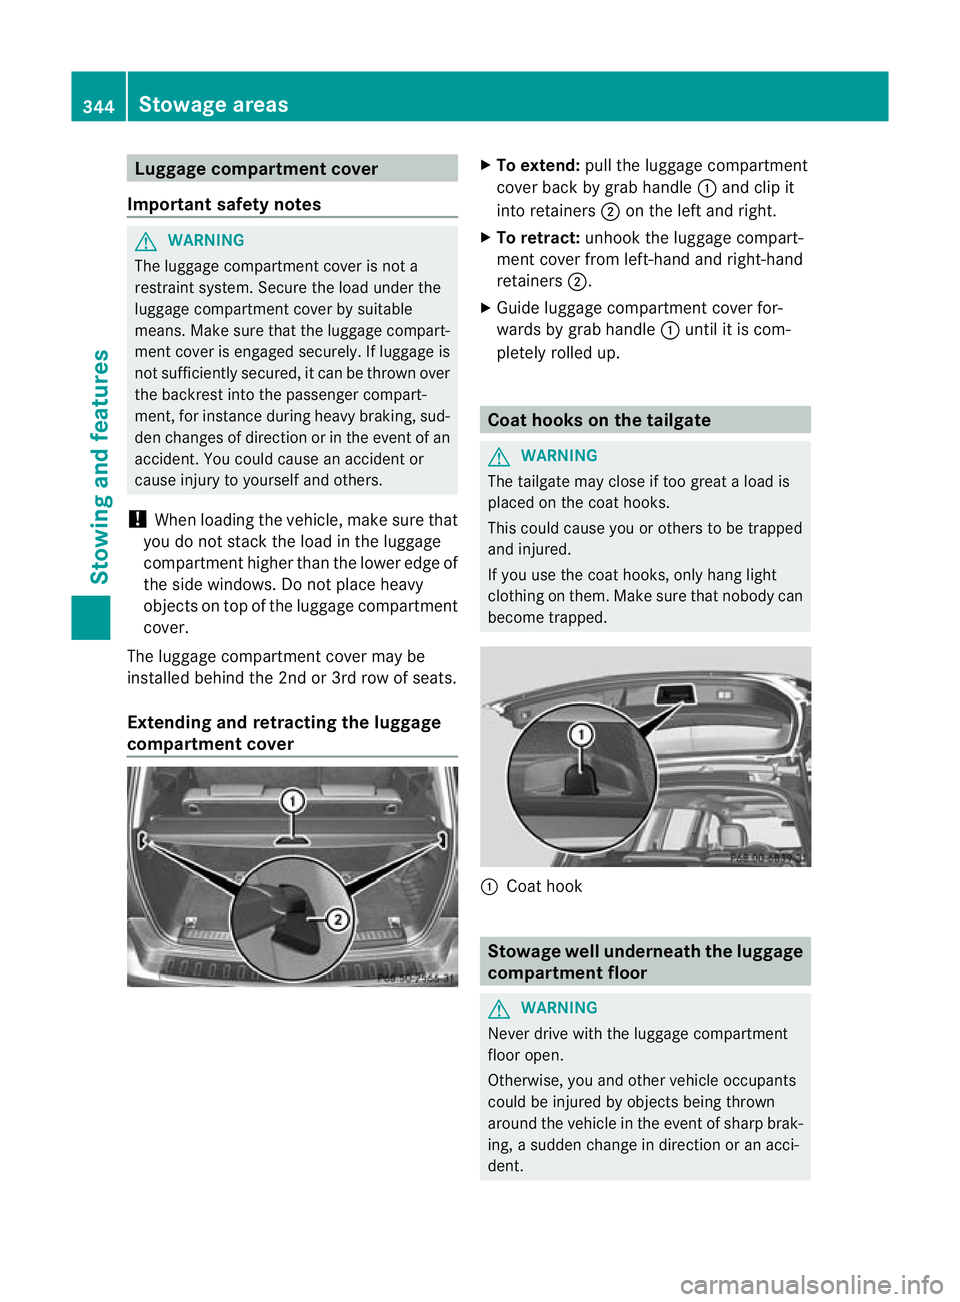
To extend: pull the luggage compartment
cover back by grab handle :and clip it
into retainers ;on the left and right.
X To retract: unhook the luggage compart-
ment cover from left-hand and right-hand
retainers ;.
X Guide luggage compartment cover for-
wards by grab handle :until it is com-
pletely rolled up. Coat hooks on the tailgate
G
WARNING
The tailgate may close if too great aload is
placed on the coat hooks.
This coul dcause you or others to be trapped
and injured.
If you use the coat hooks ,only hang light
clothing on them. Make sure that nobody can
become trapped. :
Coat hook Stowage well underneat
hthe lug gage
compartment floor G
WARNING
Never driv ewith the luggage compartment
floor open.
Otherwise, you and other vehicle occupants
could be injured by objects being thrown
around the vehicle in the event of sharp brak-
ing, asudden change in direction or an acci-
dent. 344
Stowage areasSto
wing and features
Page 351 of 441
:
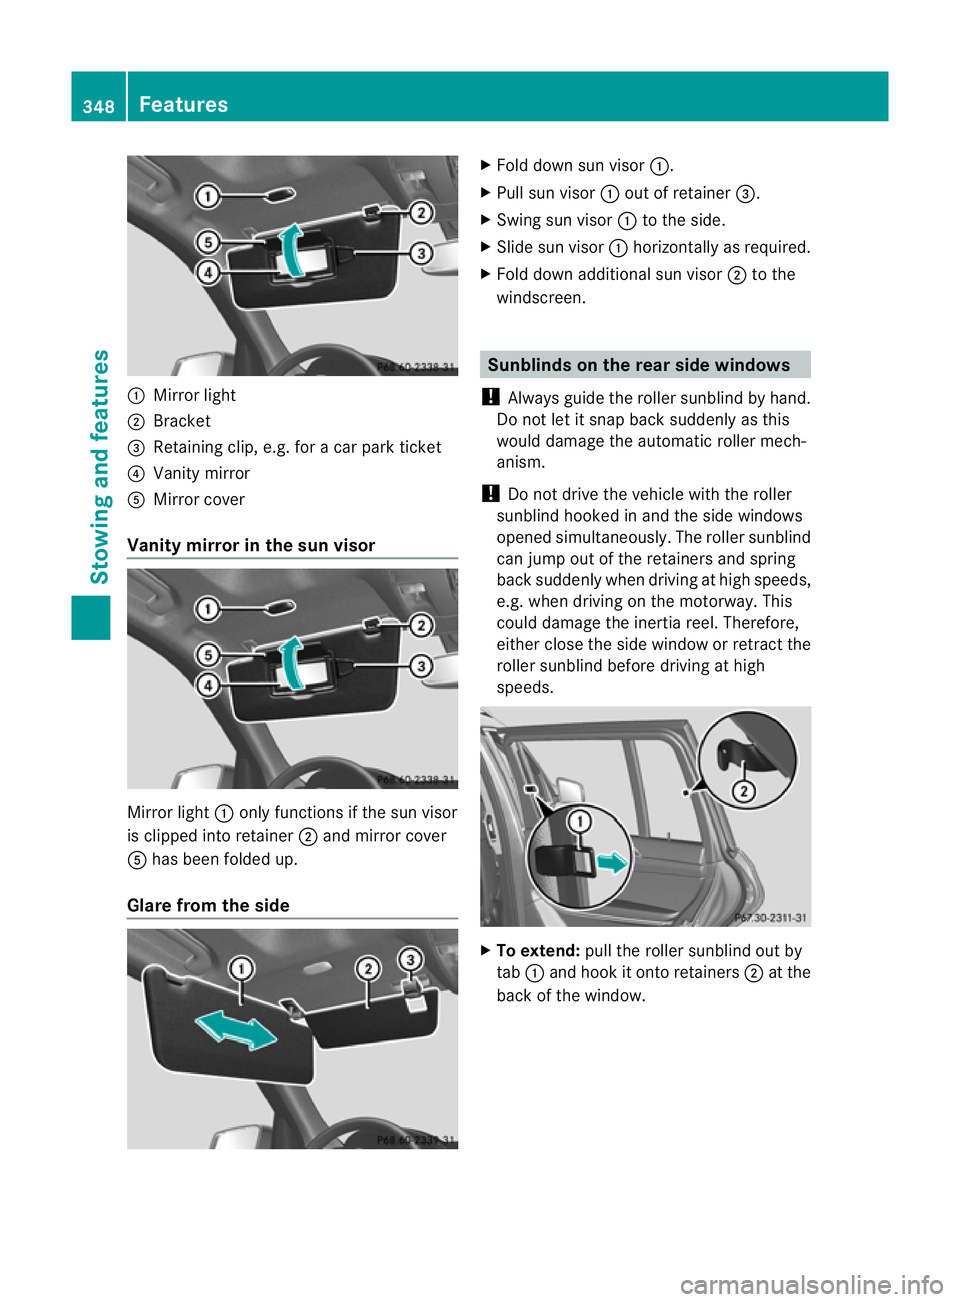
Mirror light
; Bracket
= Retainin gclip, e.g. for acar park ticket
? Vanity mirror
A Mirror cover
Vanity mirror in the sun visor Mirror light
:only functions if the sun visor
is clipped into retainer ;and mirror cover
A has been folded up.
Glare from the side X
Fold down sun visor :.
X Pull sun visor :out of retainer =.
X Swing sun visor :to the side.
X Slide sun visor :horizontally as required.
X Fold down additional sun visor ;to the
windscreen. Sunblinds on the rear side windows
! Always guide the roller sunblind by hand.
Do not let it snap back suddenly as this
would damage the automatic roller mech-
anism.
! Do not drive the vehicle with the roller
sunblind hooke dinand the sid ewindows
opened simultaneously. The roller sunblind
can jump out of the retainers and spring
back suddenly when drivin gathigh speeds,
e.g. when drivin gonthe motorway. This
could damage the inertia reel .Therefore,
either close the side window or retract the
roller sunblind before driving at high
speeds. X
To extend: pull the roller sunblind out by
tab :and hook it ont oretainers ;at the
back of the window. 348
FeaturesStowing and features
Page 361 of 441
Australia
Country Radio type approval num-
ber
Frequency range (MHz)
AU (Aus-
tralia) 28 June
MHz
:27,30 ,40, 433, 868 NZ
(New
Zealand) 20 March 06
MHz: 27
,30, 40, 433 Floormats
G
WARNING
Mak esure that there is sufficient clearance
around the pedal swhen floormats are used,
and that the floormats are prope rlys ecured.
The floormat smust be correctly secured at all
times using the securing knob and retainers.
Before you drive off ,chec kthe floormats and
secur ethem if necessary. Afloormat which is
not properly secured can slip and thereby
interfere with the movemen tofthe pedals.
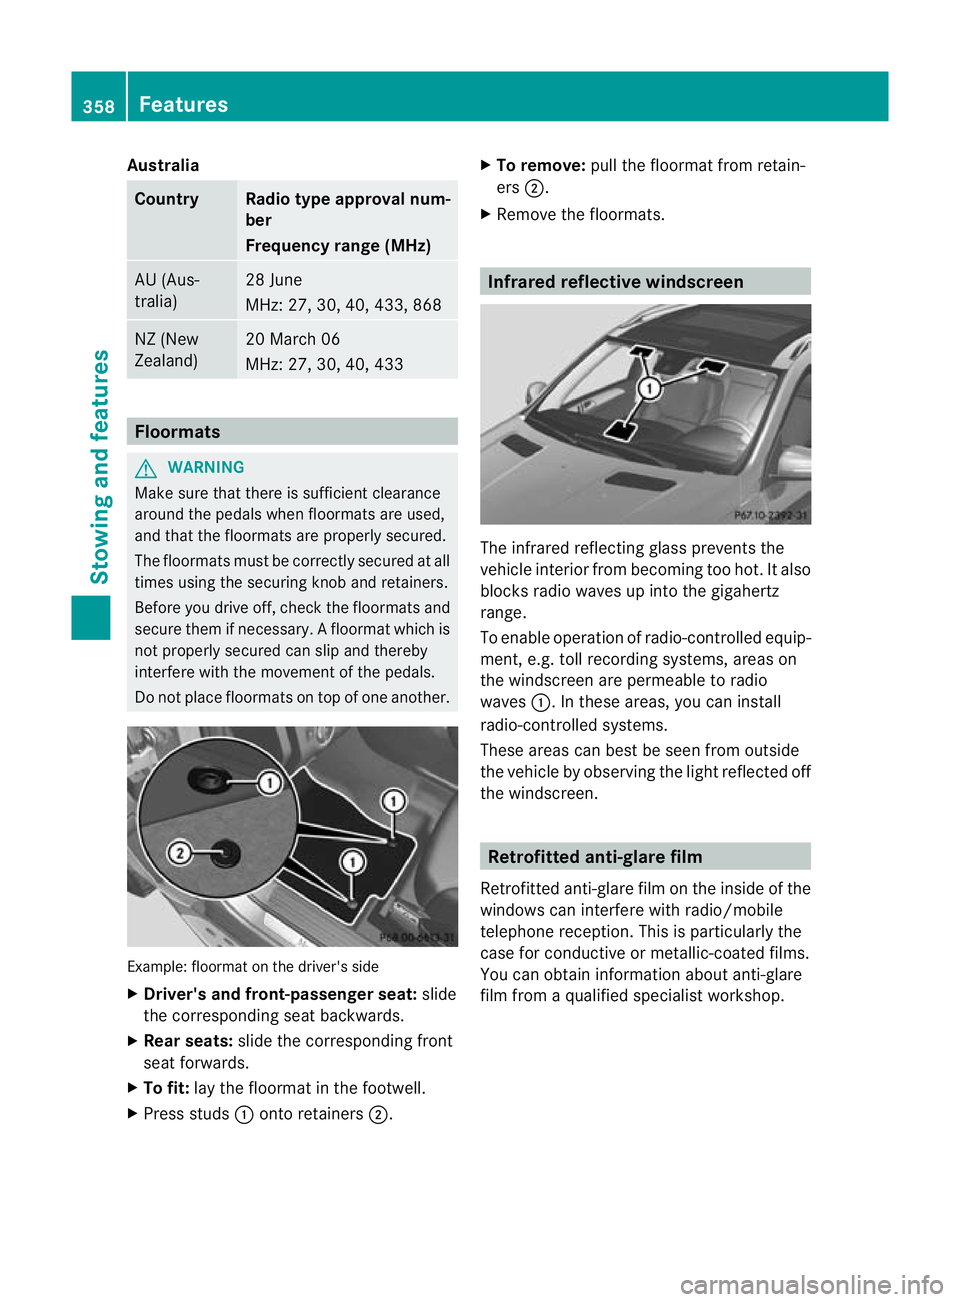
Do not plac efloormats on top of one another. Example: floormat on the driver's side
X
Driver's and front- passenger seat: slide
the corresponding seat backwards.
X Rea rseats: slide the corresponding front
seat forwards.
X To fit: lay the floormat in the footwell.
X Press studs :onto retainers ;. X
To remove: pull the floormat from retain-
ers ;.
X Remove the floormats. Infrared reflective windscreen
The infrared reflectin
gglass prevent sthe
vehicle interior from becoming too hot. It also
blocks radio waves up int othe gigahertz
range.
To enable operation of radio-controlled equip-
ment, e.g. toll recording systems, areas on
the windscreen ar epermeable to radio
waves :.Int hese areas, you can install
radio-controlled systems.
These areas can best be seen from outside
the vehicle by observin gthe light reflected off
the windscreen. Ret
rofi tted anti-glar efilm
Retrofitted anti-glare film on the inside of the
windows can inter ferewith radio/mobile
telephone reception. This is particularly the
case for conductive or metallic-coated films.
You can obtain information about anti-glare
film from aqualified specialist workshop. 358
FeaturesStowin
gand features
Page 370 of 441
G
WARNING
Th ev ehicle is braked when the HOL Dfunction
or DISTRONIC PLUS is activated. Therefore,
deactivate the HOLD function and DISTRONIC
PLUS before the vehicl eiswashed in an auto-
matic car wash.
! Make sure that:
R the side windows and sliding sunroof are
closed completely.
R the blower for the ventilation/heating is
switched off (OFF button is depressed).
R the windscreen wiper switch is at posi-
tion 0.
The vehicl ecould otherwise be dam aged.
! In car washes with atowing mechanism,
make sure that the automatic transmission
is in transmission position N,otherwise the
vehicl ecould be dam aged.
R Vehicles with akey:
do not remove the key from the igniti on
lock. Do not open the driver's door or
front-passenge rdoor when the engin eis
switched off .Otherwise, the automatic
transmission selects park position P
automatically and locks the wheels. You
can prevent this by shiftin gthe auto-
matic transmission to Nbeforehand.
R Vehicles with KEYL ESS-GO:
do not ope nthe driver's door or front-
passenger door when the engin eis
switched off .Otherwise, the automatic
transmission selects park position P
automatically and locks the wheels.
Observe the following to make sure that the
automatic transmission stays in position N:
X Make sure the vehicle is statio naryand the
ignition is switched off.
X Turn the key to position 2(Y page 159 )in
the ignitio nlock.
Use the key instead of the Start/S topb ut-
ton on vehicles with KEYLESS-GO.
X Depress and hold the brake pedal. X
Shift the automatic transmissio ntoposi-
tion N.
X Release the brake pedal.
X Release the electric parkin gbrake.
X Switch off th eignition and leav ethe key in
the ignition lock.
You can wash the vehicle in an automatic car
wash from the ver ystart.
Wash off excess dirt before cleaning the vehi-
cle in an automatic car wash.
After using an automatic car wash ,wipe off
wax from the windscreen and the wiper
blades. This will prevent smears and reduce
wiping noises caused by residue on the wind-
screen.
Washing by hand In some countries, washing by hand is only
allowe
datspecially equipped washing bays.
Observe the legal requirement sfor each indi-
vidual coun try.
X Do not use hot water and do not wash the
vehicle in direct sunlight.
X Use asoft sponge to clean.
X Use amild cleaning agent, such as acar
shampoo approved by Mercedes-Benz.
X Thoroughly hos edown the vehicle with a
gentl ejet of water.
X Do not point the water jet directly towards
the air inlets.
X Use plenty of water and rinse out the
sponge frequently.
X Rinse the vehicle with clean water and dry
thoroughly with achamois.
X Do not let the cleanin gagent dry on the
paintwork.
When using the vehicle in winter, remove all
traces of roa dsalt deposits carefully and as
soon as possible. Care
367Maintenance and care Z
Page 372 of 441
i
The vehicle should preferably be washed
by hand using asoft sponge, car shampoo
and plent yofwater.
i Use only insect remover and car shampoo
from the range of recommended and
approved Mercedes -Benz care products. Cleaning vehicle parts
Cleaning the wheels !
Do not use acidic wheel cleaning products
to remove brake dust. Thi scould damage
wheel bolts and brake components.
! Do not par kupthe vehicle for an extended
period straight after cleanin git, particularly
after having cleaned the wheels with wheel
cleaner. Wheel cleaners could cause
increased corrosion of the brake discs and
brake pads/linings .For this reason, you
should drive for afew minutes after clean-
ing. Brakin gheats the brak ediscs and the
brake pads/linings, thus drying them. The
vehicle can then be parked up.
Cleaning the windows G
WARNING
Switc hoff the windscree nwipers and remove
the key from the ignition lock before cleaning
the windscreen or the wiper blades. On vehi-
cles with KEYL ESS-GO, pres sthe Start/S top
button repeatedly until all indicator lamps in
the instrumen tcluster have gone off. The
windscreen wipers could otherwise move and
injur eyou.
! Do not use dry cloths, abrasive products,
solven tsor cleanin gagents con taining sol-
vent stoc lean the inside of the windows.
Do not touch the insides of the windows
with hard objects, e.g. an ice scraper or
ring. There is otherwise arisk of damaging
the windows.
! Clean the water drainage channels of the
windscreen and the rear window at regular intervals. Deposits such as leaves, petals
and pollen may under certain circumstan-
ces prevent water from drainin
gaway. This
can lead to corrosion damage and damage
to electronic components.
X Clean the inside and outside of the win-
dows with adamp cloth and acleaning
agent that is recommended and approved
by Mercedes-Benz.
Cleanin gthe wiper blades G
WARNING
Switch off the windscree nwipers and remove
the key from the ignition lock before cleaning
the windscreen or the wiper blades. On vehi-
cles with KEYLESS-GO, press the Star t/Stop
butto nrepeatedly unti lall indicator lamps in
the instrumen tcluster have gone off. The
windscreen wipers could otherwise move and
injur eyou.
! Do not pull on the wiper blade. Otherwise,
the wiper blade could be damaged.
! Do not clean wiper blades too often and
do not rub them too hard. Otherwise, the
graphit ecoatin gcould be damaged. This
coul dcause wiper noise.
! Hold the wiper arm securely when folding
back. The windscreen could be damaged if
the wiper arm hits against it suddenly.
X Fold the wiper arms away from the wind-
screen.
X Clea nthe wiper blades carefully usin ga
damp cloth.
X Fold the windscreen wipers back again
befor eswitching on the ignition.
Cleanin gthe exterio rlighting !
Only use cleaning agents or cleaning
cloths that are suitable for plastic lenses.
Unsuitable cleaning agents or cleaning
cloths could scratc hordamage the plastic
lenses of the exterior lighting. Care
369Maintenance and care Z