dimensions MERCEDES-BENZ GL SUV 2012 Owners Manual
[x] Cancel search | Manufacturer: MERCEDES-BENZ, Model Year: 2012, Model line: GL SUV, Model: MERCEDES-BENZ GL SUV 2012Pages: 441, PDF Size: 10.66 MB
Page 22 of 441
Segments
...................................... 268
Sel ecting the unit of measure-
ment .............................................. 280
se eI nstrument cluster
SPEEDTRONIC
Activating variabl e......................... 197
Deactivating variabl e..................... 198
Display message ............................ 314
Function/notes ............................. 196
Important safety notes ..................196
LIM ind icator lamp ......................... 196
Permanen t..................................... 198
Sel ecting ........................................ 196
Storing the current spe ed.............. 196
Variabl e......................................... 196
SRS (Supplemental Restrain tSys-
tem) Disp laym essage ............................ 299
Introduction ..................................... 41
Warn ingl am p................................. 332
Warning lamp (function) ................... 41
Startin g(engine) ................................ 161
STEE RCONTROL .................................. 70
Ste ering (display message) ..............321
Ste ering wheel
Adjustin g(electrically )................... 110
Adjusting (manually )...................... 110
Butto noverview ............................... 33
Buttons (on-bo ardc omputer )......... 269
Cleaning ......................................... 372
Gearshift paddle s........................... 171
Important safety note s.................. 110
Steering wh eelh eating .................. 111
Storing settings (memory func-
tion) ............................................... 115
Ste ering wheel gearshift paddles ....171
Ste ering wheel heating
Problem (malfunction) ...................111
Switch ingo n/off ........................... 111
Stopwatch (RACETIMER) ................... 287
Sto wage areas ................................... 338
Sto wage compartment
Spectacle scompartmen t............... 340
Sto wage compartments
Armrest (under) ............................. 339
Centre consol e.............................. 340
Centre consol e(rear) ..................... 340
Cu ph older ..................................... 346Glove comp
artment ....................... 339
Important safety informatio n......... 338
Sto wage net ...................................... .340
Sto wage sp ace
Stowag enet ...... ............................. 340
Summer tyres .................................... 398
Sun bl ind
Rea rside windows ......................... 348
Sun visor ............................................ 347
Supplement Restrain tSyst em
se eS RS (Supplemental Restraint
System)
Surround lighting (on-board com-
puter) ................................................. .282
Suspensi ontuning
AMG RIDE CONTROL sports sus-
pens ion .......................................... 215
SETUP (on-bo ardc omputer ).......... 287
Switchi ngoff the alarm (ATA) ............71 T
Tail gate
Disp laym essage ............................ 320
Emergency unl ocking ....................... 88
Important safety notes ....................85
Limiting the opening ang le ...............88
Opening/closing (automatically
from insi de)...................................... 87
Opening/closing (automatically
from outs ide) ................................... 86
Opening/closing (fro moutside) .......86
Opening dimensions ......................431
Po wer closing. ................................. 84
Tail lamps
Display message ............................ 301
Tank
seeF uel tank
Technical data
Capacities ...................................... 423
Emergency sp arew heel ................. 417
Informat ion.................................... 420
Traile rloads ................................... 433
Tyres/whee ls................................. 409
Vehicle data ................................... 431
Tel ephone
Accepting acall............................. 276
Display message ............................ 322 Index
19
Page 23 of 441
Menu (on-boar
dcomputer )............ 275
Number from the phone book ........ 276
Redialling ....................................... 276
Rej ecting/end ingac all................. 276
Te lephon ecompartmen t................ 339
Temperature
Coolan t.......................................... 268
Co olan t(on-board computer) ...... ...2 86
Engine oi l(on-board computer) ...... 286
Outside temperatur e..................... .268
Setting (cl imate control) ................143
TEMPOMAT
Function/notes ............................. 193
Theft-deterren tsyst em
ATA (Anti-Theft Alarm system) .........71
Immob iliser ...................................... 71
Through-loading ................................ 341
Time seeS eparate Owner's manual
Timing (RACETIMER) .........................287
TIRE FITk it.......................................... 379
Top Tether ............................................ 55
Total distanc erecorder .................... 271
Tow-away protection ..........................71
Towing Important safety notes ..................388
Towing atrailer
Active Blind Sp ot Assist................. 245
Active Lane Kee ping Assist ............248
Active Parking Assis t..................... 223
Axle lo ad,p erm issible .................... 433
Bulb failure ind icator for LED
lamps ............................................. 263
ESP ®
(Electroni cStability Pro-
gram) ............................................... 67
Pullin gawayw ithat railer .............. 162
Traile rdrive program ..................... 250
Towing away
Fitting the tow inge ye.................... 390
Removing the tow inge ye............... 390
With both axl eson the ground .......390
Tow-starting
Emergency engine starting ............391
Important safety notes ..................388
Trailer
Display message ............................ 321Trailer coupli
ng
se eT owing atrailer
Traile rtowing
7-pin connector ............................. 263
Blind Spo tAssist ...... ...................... 240
Cleaning the trailer tow hitch ......... 371
Coupling up atrailer ...................... 260
Decouplin gatrailer ....................... 261
Driving tip s.................................... 257
Fol ding in the bal lcoupling ............ 261
Fol ding out the bal lcoupling .......... 259
Important safety notes ..................257
Mo unting dimensions ....................432
Parktroni c...................................... 218
Po wer suppl y................................. 262
Pro blem (fault) ............................... 264
Shift rang e..................................... 170
Traile rloads ................................... 433
Transmission
seeA utomati ctransmission
Transmissio nposition display .........168
Transmission pos ition display
(DIRECT SELECT lever) ......................168
Transportin gthe vehicle .................. 391
Travellin guphill
Brow of hil l..................................... 192
Driving downhil l............................. 192
Maximum gradient-cl imbing capa-
bility .............................................. .192
Trim pie ces( cle anin ginstructions) .372
Trip computer (on-b oard com-
puter) ................................................. .271
Trip meter Calling up ....................................... 271
Resetting (on-bo ardc omputer )...... 272
Turn si gnal
se eT urn signals
Turn signals
Switching on/off ........................... 121
TV
Operating (on-bo ardc omputer )..... 275
se eS eparate operating instructions
Two- wayradio
Freq uencies ................................... 421
Installati on .................................... .421
Transmission output (maximum ).... 421 20
Index
Page 90 of 441
tha
tthere is sufficient clearanc eabove and
behind the tailgate.
i Tailgate opening dimensions
(Y page 431).
Opening the tailgate automatically You can open the tailgat
eautomatically with
the key or the handle in the tailgate.
X Press and hold the Fbutton on the key
until the tailgate opens.
or
X When the tailgate is unlocked, pull the han-
dle and let it go again immediately.
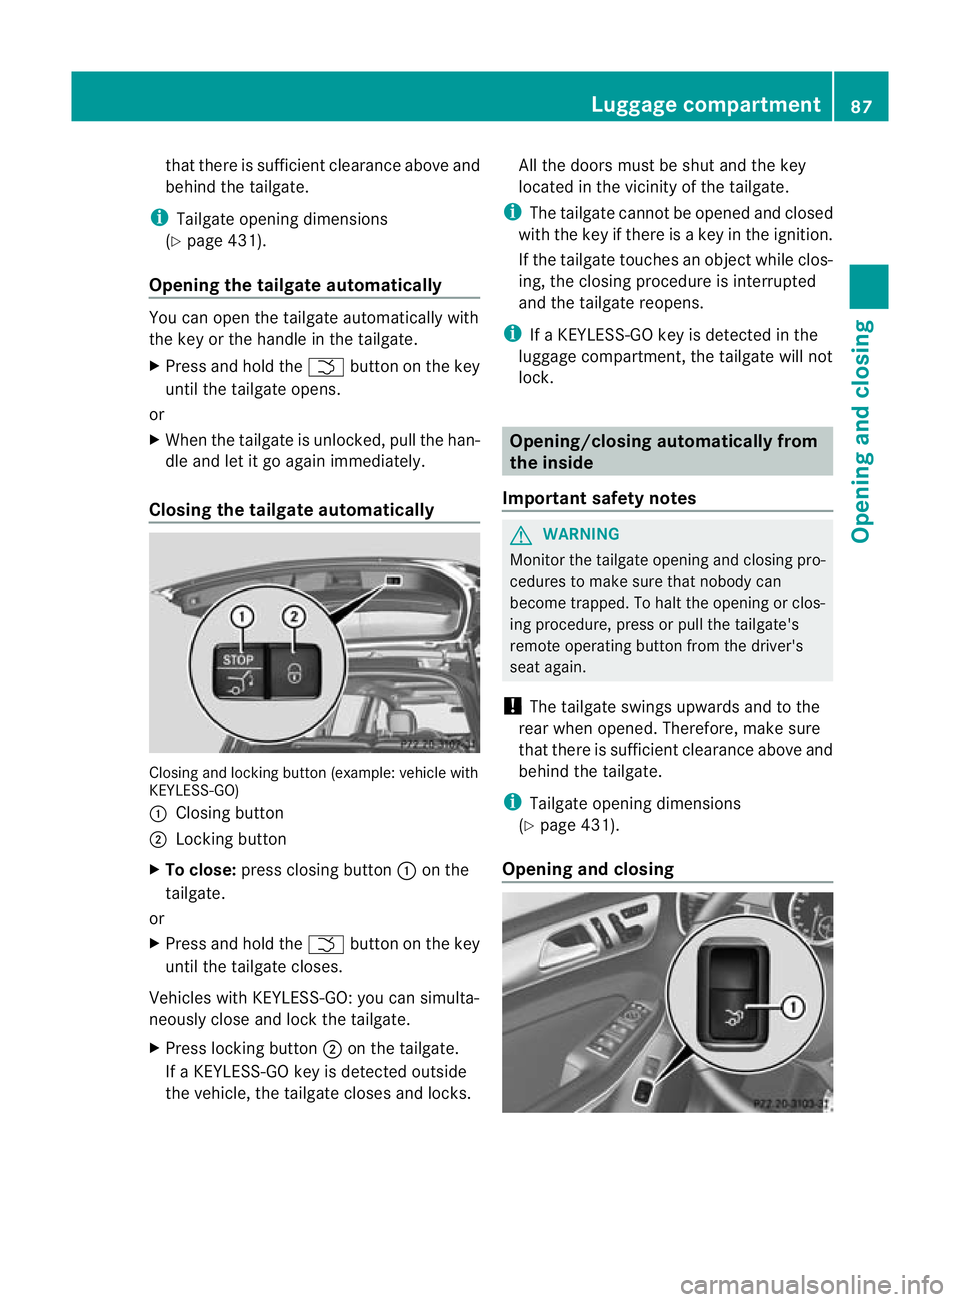
Closing the tailgate automatically Closing and locking button (example: vehicle with
KEYLE
SS-GO)
: Closing button
; Locking button
X To clos e:press closing button :on the
tailgate.
or
X Press and hold the Fbutton on the key
unti lthe tailgat ecloses.
Vehicles with KEYL ESS-GO:you can simulta-
neously close and lock the tailgate.
X Press locking button ;on the tailgate.
If aK EYLESS-GO key is detected outside
the vehicle ,the tailgat ecloses and locks. All the doors must be shut and the key
located in the vicinity of the tailgate.
i The tailgate cannot be opened and closed
with the key if there is akey in the ignition.
If the tailgate touches an object while clos-
ing, the closing procedure is interrupted
and the tailgate reopens.
i IfaK EYLESS-GO key is detected in the
lugg age compartment, the tailgate wil lnot
lock. Opening/
closing automatically from
the inside
Important safety notes G
WARNING
Monitor the tailgate opening and closing pro-
cedures to make sure that nobody can
become trapped. To halt the opening or clos-
ing procedure, press or pull the tailgate's
remote operating button from the driver's
seat again.
! The tailgate swings upwards and to the
rear when opened. Therefore, make sure
that there is sufficient clearance above and
behind the tailgate.
i Tailgate opening dimensions
(Y page 431).
Opening and closing Luggage compartment
87Opening and closing Z
Page 91 of 441

You can open and close the tailgat
efrom the
driver's seat whe nthe vehicle is stationary
and unlocked.
X To open: pull remote operating switch :
for the tailgat euntil the tailgate opens.
X To clos e:turn the key to position 1or 2in
the ignitio nlock.
X Press remote operatin gswitch for tail-
gate :until the tailgate is closed.
i If the tailgate touches an object while
closing, the closing procedure is interrup-
ted and the tailgate reopens. Limiting the opening angle of the tail-
gate
Important safety notes !
Make sure there is sufficient clearanc eto
open the tailgate fully when settin gthe
opening angle. The tailgat ecould otherwise
be damaged. Ideally, set the openin gangle
outside.
Activating You can limit the opening angle of the tail-
gate .This is possible in the top half of its
opening range, up to approximatel y10cm
befor ethe stop.
This could be useful, for example, if ther eis
insufficient space above the tailgate.
X To open the tailgate: pull the handle on
the tailgate.
X To stop the opening procedure at the
desired position: press the closing button
(Y page 86) in the tailgate or pull the handle
on the outside of the tailgate again.
X To store the position: press and hold the
closing button in the tailgate until you hear
as hort tone.
The opening angl elimiter is activated. The
tailgate then stops in the stored position
when opened. Switching off X
Press and hold the closing button
(Y page 86) in the tailgate until you hear
two short tones. Tailgat
eemergency release
Important safety notes !
The tailgate swing supwards and to the
rear when opened. Therefore, mak esure
that there is sufficient clearance above and
behind the tailgate.
i Opening dimensions of the tailgate
(Y page 431).
If the tailgate can no longer be opened from
outsid ethe vehicle, use the emergency
release on the insid eofthe tailgate.
Opening X
Take the emergenc ykey elemen tout of the
key (Y page 78).
X Insert emergency key element ;into the
opening in trim :.
X Turn emergency key element ;90°clock-
wise.
X Push emergenc ykey element ;in the
direction of the arrow and open the tail-
gate. 88
Luggage compa
rtmentOpening and closing
Page 261 of 441
Make sur
ethat the followin gvalues are not
exceeded:
R the permissible trailer drawba rnoseweight
R the permissible trailer load
R the permissible rea raxle load of the towing
vehicle
R the maximum permissible gros svehicle
weight of both the towing vehicle and the
trailer
The applicable permissible values, which
must not be exceeded, can be found:
R in the vehicle documents
R on the identification plates of the trailer tow
hitch, the trailer and the vehicle
If the values differ, the lowest value applies.
You will fin dthe values approved by the man-
ufacturer on the vehicle identification plates
and those for the towing vehicle under "Tech-
nical data "(Ypage 433).
When towing atrailer, your vehicle's handling
characteristics wil lbedifferent in comparison
to when drivin gwithout atrailer.
Th ev ehicle/ trailer combination:
R is heavier
R is restricted in its acceleration and gradi-
ent-climbin gcapability
R has an increased braking distance
R is affected more by stron gcrosswinds
R demand smore sensitive steering
R has alarger turnin gcircle
This could impair the handling charac teris-
tics. Adapt your styl eofdriving accordingly.
Maintain asafe distance. Drive carefully.
When towing atrailer, alw aysa djust your
speed to the current road and weather con-
ditions. Do not exceed the maximum permis-
sible speed for your vehicle/trailer combina-
tion.
General notes !
Use adrawbar noseweigh tasc lose as
possible to the maximum permissible nose-
weight. Do not use anoseweight of less than 50kg, otherwise the trailer ma
ycome
loose.
Not ethat the payload and the rea raxle load
are reduce dbythe actual payload.
i Chec kthe tyr epressures when towin ga
trailer. You will find the values in the tyre
pressure table in the fuel filler flap of the
vehicle (Y page 399).
You will find installation dimensions and loads
in the "Technical data" section
(Y page 432).
The maximum permissible trailer drawbar
noseweight on the ball coupling is 140 kg.
However, the actual noseweight must not
exceed the value given on the trailer tow hitch
or trailer identification plates .The lowest
weight applies.
Please not ethat when towing atrailer, PARK-
TRONIC (Y page 216) and Blind Spo tAssist
(Y page 238) ar eonly available with limita-
tions ,orn ot at all.
Driving tips i
Observ ethe information on ESP ®
trailer
stabilisation (Y page 67)and on pulling
away with atrailer. (Y page 162).
Vehicle swith the ON&OFFROAD pack-
age: select the trailer program (Y page 250)
with the off- road program selector wheel in
the centre console.
The maximum permissible spee dfor vehicle/
trailer combina tions depends on the type of
trailer .Befor ebeginning the journey, check
the trailer's document stosee what the max-
imu mpermitted speed is. Observ ethe legally
prescribed maximum speed in the relevant
country.
For cer tain Mercedes-Benz vehicles, the max-
imum permissible rear axle load is increased
when towing atrailer. See "Technica ldata" to
find out whethe rthis applies to your vehicle
(Y page 433). If you utilise any of the added
maximum rea raxle load whe ntowing atrailer,
th ev ehicle/ trailer combination may not
exceed amaximum spee dof100 km/h for 258
Towin
gatrailerDriving an dparking
Page 399 of 441
Usefu
linfor mati on
i This Owner's Manual describes all mod-
els, series and optional equipment for your
vehicle that were available at the time of
going to press. National variation sare pos-
sible. Note that your vehicl emay not be
equippe dwith all of the function sdescri-
bed. This is also the case for system sand
functions relevant to safety.
i Read the information on qualified special-
ist workshops: (Y page25). Impo
rtantsafety notes G
WARNING
If wheels and tyres of the wron gsize are used,
the wheel brakes or suspension components
may be damaged. There is arisk of accident.
Always replac ewheels and tyr es with those
that fulfil th especifications of the original part
(designation ,manufacturer, model). G
WARNING
Af lat tyre severely impair sthe driving, steer-
ing and bra king characteristics of the vehicle.
There is arisk of accident.
Tyres withou trun-flat characteristics:
R do not drive with aflat tyre.
R immediately replac ethe fla ttyre with your
emergenc yspare wheel or spare wheel, or
consult aqualified specialist workshop.
Tyres with run-flat characteristics:
R pay attention to the information and warn-
ing notices on MOExtended tyre s(tyres
with run-flat charac teristics).
Accessorie sthat ar enot approved for your
vehicle by Mercedes-Ben zorare not be ing
use dcorrectly can impair the operating
safety. Before purchasing and using non-approved
accessories, visi
taqualified specialist work-
sho pand enquire about:
R suitability
R leg alstipulations
R factory recommendations
Information on the dimensions and types of
wheels and tyres for your vehicle can be
found in the "Wheel/tyre combinations" sec-
tion (Y page 409).
Information on air pressure for the tyres on
your vehicle can be found:
R on the tyre pressure label on the fuel filler
flap (Y page 175)
R in the "Tyre pressure" section
R under "Tyre pressure" (Y page 399)
Modification work on the brake system and
wheels is not permitted. The use of wheel
spacers or brake dust shields is not permit-
ted. This invalidates the general operating
permit for the vehicle.
i Further information on wheels and tyres
can be obtained at any qualified specialist
workshop. Operation
Information on driving
Check the tyre pressures when the vehicle is
heavily laden and, if necessary, adjust.
While driving, pay attention to vibrations,
noises and unusual handling charac teristics,
e.g .pulling to one side .This ma yindicate that
the wheels or tyres are damaged. If you sus-
pect that atyre is defective, reduce your
speed immediately. Stop the vehicle as soon
as possibl etocheckthe wheels and tyres for
damage. Hidden tyr edamage could also be
causing the unusual handling characteristics.
If you find no signs of damage, have the tyres
and wheel schecked at aqualified specialist
workshop.
When parking your vehicle, make sure that
the tyres do not get deformed by the kerb or 396
OperationWheels and tyres
Page 407 of 441
Country Radio type approval number
Brazil 1489-10-4415
Dubai TRA, Registered NO
0016161/08
TRA, Registered NO
0016162/08
Morocco MR5527 ANRT 2010
/27. April
2010
MR5526 ANRT 2010/ 27. April
2010 Ph
ilip-
pines ESD-1105558C
Singa-
pore Compliance with IDA Standard
N0140-09
South
Africa TA-2008/1068
TA-2008/1069
Changing
awheel Flat tyre
Yo uc an find information on wha ttodointhe
even tofa flat tyre in th e"Breakdown assis-
tance" sectio n(Ypage 378). Instruction sfor
drivin gwith MOExtended tyres in the event of
af lat tyre are also provided there.
Vehicles with an emergency spare
wheel: in the event of aflat tyre, the emer-
gency spare wheel is fitted according to the
description under "Fittin gawheel"
(Y page 405). Inte
rchangin gthe wheels G
WARNING
Interchanging the front and rear wheel smay
severely impair the driving characteristic sif
the wheels or tyres have differen tdimensions.
The wheel brakes or suspension componen ts
may als obedamaged. There is arisk of acci-
dent. Interchange front and rear wheels only if the
wheels and tyre
sare of th esame dimensions.
! On vehicles fitted with atyre pressure
monitor ,electronic componen tsare loca-
ted in the wheel.
Tyre-fittin gtools should not be applied in
the area of the valve, as this coul ddamage
the electronic components.
Only have tyre schanged at aqualified spe-
cialist workshop.
Interchanging the front and rear wheel sof
diff ering dimension scan render the general
operating permit invalid.
Obse rvet he instructions and safet ynotes in
the "Fi ttin gaw heel" section (Y page 405).
The wear pattern sonthe fr ont an drear tyr es
diff er,depending on the operating conditions.
Interchange the wheels befor eaclear wear
pattern ha sform edon the tyr es.F ront tyres
typicall ywearm ore on the shoulder sand the
rea rtyre sint he centre.
On vehicles that have the same size front and
rear wheels, you can interchange the wheels
every 5000k mto10,000 km depending on
the degre eoftyre wear. Maintain the direc-
tion of tyre rotation.
Clea nthe con tact surface softhe wheel and
the brake disc thoroughly ever ytime awheel
is interchanged. Chec kthe tyr epressure and,
if necessary, restart th etyre pressure loss
warning syste morthe tyrepressure monitor. Directio
nofrotation
Tyres with aspecified direction of rotation
have additional benefits, e.g. if there is arisk
of aquaplaning. You will only gain these ben-
efits if the correct direction of rotation is
observed.
An arrow on the sidewall of the tyre indicates
its correct direction of rotation. 404
Changing
awheelWheels and tyres
Page 417 of 441
GL 63 AMG
Summer tyres
R21
Tyres Light-alloy wheels
BA: 295/40 ZR 21 111
YXL1 BA: 10.0
Jx21H2ET46 Winter tyres
R20
Tyres Light-alloy wheels
BA: 275/45
R20110VXLM +Si BA: 9.0
Jx20H2ET41 Emergency spare wheel
Important safety notes
G
WARNING
The wheel/tyr edimensions and the tyre type
of the spare wheel/emergency spare wheel
and the whee ltobereplaced may differ. Fit-
ting aspare wheel/emergency spare wheel
may severely impair the driving characteris-
tics. There is arisk of accident.
To prevent hazardous situations:
R Adapt you rdriving style accordingl yand
drive carefully.
R Never fit more than one spare whe el/emer-
gency spare whe elif the dimesions are dif-
ferent to those of the whee lbeing replaced.
R Only use aspare wheel/emergency spare
whee lbriefl yift he dimesions ar ediffer ent
to thos eofthe wheel being repl aced.
R Do not switch off ESP ®
.
R Hav ethe spar ewheel/emergency spare
wheel in question repl aced at the nearest
qualified specialist workshop .Make sure
that the wheel/ty redimension sand tyre
type are correct.
! AMG vehicles equipped with the
"Minis pare"emergency spare wheel:
Use the "Minispare" emergency spare wheel
only on th ereara xle.Ift he
"Mini spare" eme rgency spar ewheel is
mou nted on th efront axle, it could damage
the brake system.
If at yre on the front axl eisfaulty ,anintact
whee lfrom th ereara xlem ustfirst be
replaced by th e"Minispare" emergency
spare wheel. The faulty tyre on the front
axl es hould then be replaced by the int act
tyre from the rea raxle.
Be sure to observe the instructio nlabel on
the "Minispare" emergenc yspar ew heel.
When usin ganemergenc yspar ew heel or
spar ewheel of adifferent size, you must not
excee dthe maximu mspee dof80k m/h.
Snow chain smust not be fitted to emergency
spare wheels. General notes
Fittin gthe emergency spar ewheel is descri-
bed in "Fi ttin gaW heel" (Y page 405).
You should regularly chec kthe pressur eof
the emergency spare wheel, particularly prior
to long trips, and correct the pressure as nec-
essary (Y page 399). The applicable value is
found on the whee loru nder "Technical data"
(Y pag e417).
1 Use of sno wchains is not permitted. Observ ethe notes under "Snow chains". 414
Emergency spar
ewheelWheels and tyres
Page 434 of 441
Vehicl
edata General notes
Please not ethat for the specified vehicle
data:
R the heights specified may vary as aresult
of:
- tyres
- load
- condition of the suspension
- optiona lequipment
R item sofo ptional equipmen tincrease the
unlade nweight and reduc ethe maximum
payload. The unladen weight is specifie din
accordanc ewith EC directiv eand includes:
- driver (68 kg)
- luggage (7 kg)
- all fluids (fuel tank 90% full)
R vehicle-specific weight information can be
found on the vehicl eidentification plate
(Y page 422).
R only for cer tain countries: you can find vehi-
cle-specific vehicle data in the COC docu-
ment s(CERTIFICATE OF CONFORMITY).
Thes edocument sare delivere dwith your
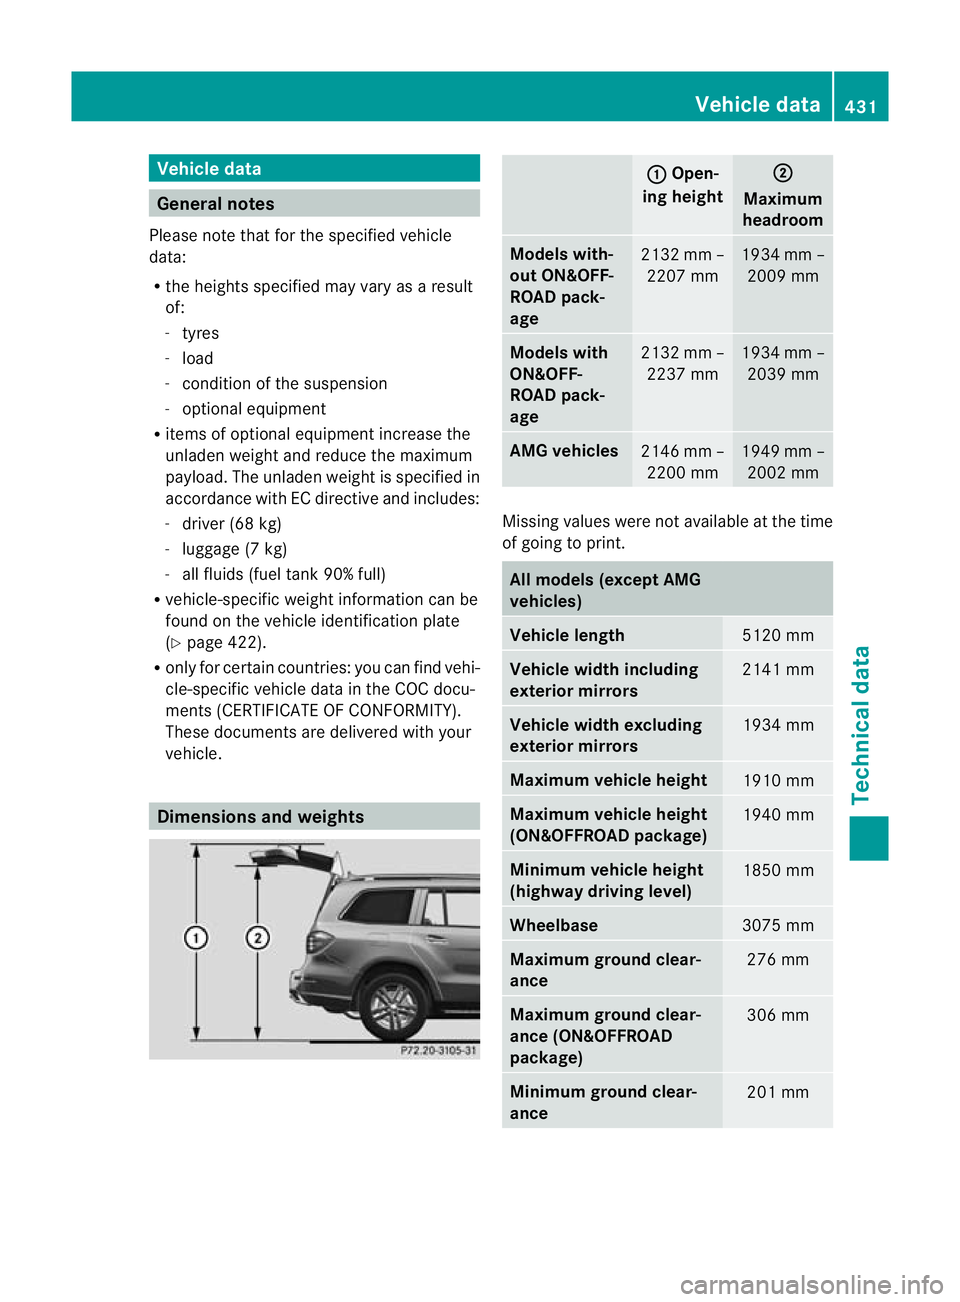
vehicle. Dimensions and weights : Open-
ing height ;
Maximum
headroom Models with-
out ON&OFF-
ROAD pack-
age
213
2mm–
2207 mm 1934 mm –
2009 mm Model
swith
ON&OFF-
ROAD pack-
age 2132 mm –
2237 mm 1934 mm –
2039 mm AMG vehicles
2146 mm –
2200 mm 1949 mm –
2002 mm Missing values were not available at the time
of going to print.
All models (except AMG
vehicles)
Vehicle length
5120 mm
Vehicle width including
exterior mirrors
2141 mm
Vehicle width excluding
exterior mirrors
1934 mm
Maximu
mvehicle height 1910 mm
Maximu
mvehicle height
(ON&OFFROAD package) 1940 mm
Minimum vehicle height
(highway driving level)
1850 mm
Wheelbase
3075 mm
Maximu
mground clear-
ance 27
6mm Maximum gro
undc lear-
ance (ON&OFFROAD
packa ge) 306 mm
Mi
nimum ground clea r-
ance 20
1mm Vehicl
edata
431Technical data Z
Page 435 of 441
All models (except AMG
vehicles)
Unladen weight
Maximum roof load
10
0kg GL 63 AMG
Vehi
clel ength 514
6mm Vehicle width including
exterio rmirrors 2141 mm
Vehicle width excluding
exterior mirrors
1982 mm
Maximum vehicle height
1903 mm
Minimum vehicle height
1850 mm
Wheelbase
3075 mm
Maximum ground clear-
ance
24
9mm Min
imum ground clear-
ance 198 mm
Un
laden weight 2580 kg
Maximum roof load
100 kg
Traile
rtow hitch Mounting dimensions
! If you have atrailer to whitch retrofitted,
changes to the cooling system and drive
train may be necessary, depending on the
vehicle type.
If you have atrailer to whitch retrofitted,
observ ethe anchorage point sonthe chas-
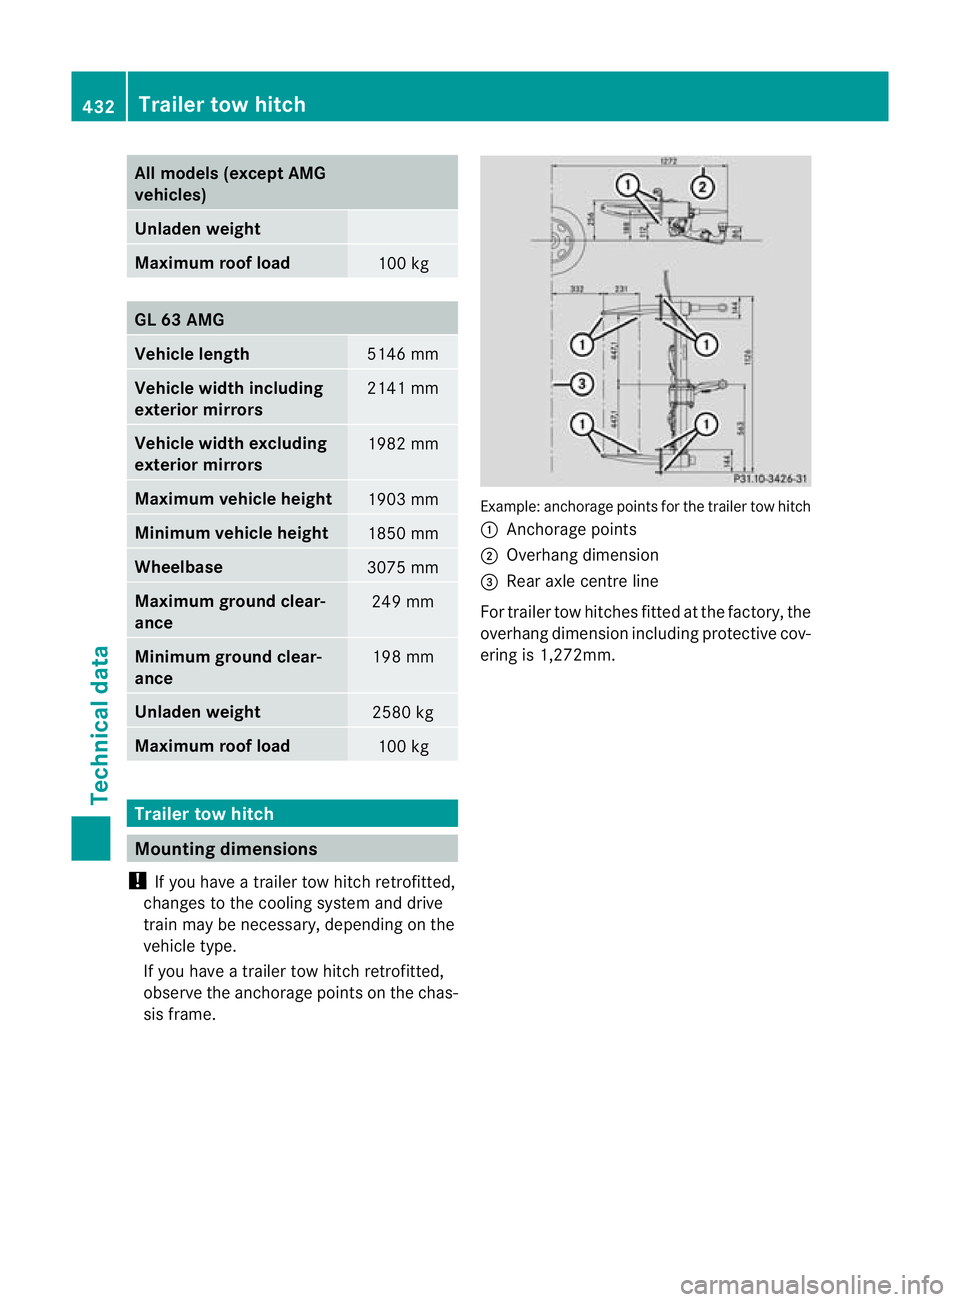
sis frame. Example: anchorage point
sfor the trailer tow hitch
: Anchorage points
; Overhang dimension
= Rear axle centre line
For traile rtow hitches fit tedatt he factory, the
overhang dimension includin gprotective cov-
ering is 1,272mm. 432
Trailer tow hitchTechnical data