fold seats MERCEDES-BENZ GL SUV 2012 Owners Manual
[x] Cancel search | Manufacturer: MERCEDES-BENZ, Model Year: 2012, Model line: GL SUV, Model: MERCEDES-BENZ GL SUV 2012Pages: 441, PDF Size: 10.66 MB
Page 105 of 441
i
Further related subjects:
R Luggage compartment enlargement
(folding do wnthe rear bench seat)
(Y page 341) Adjustin
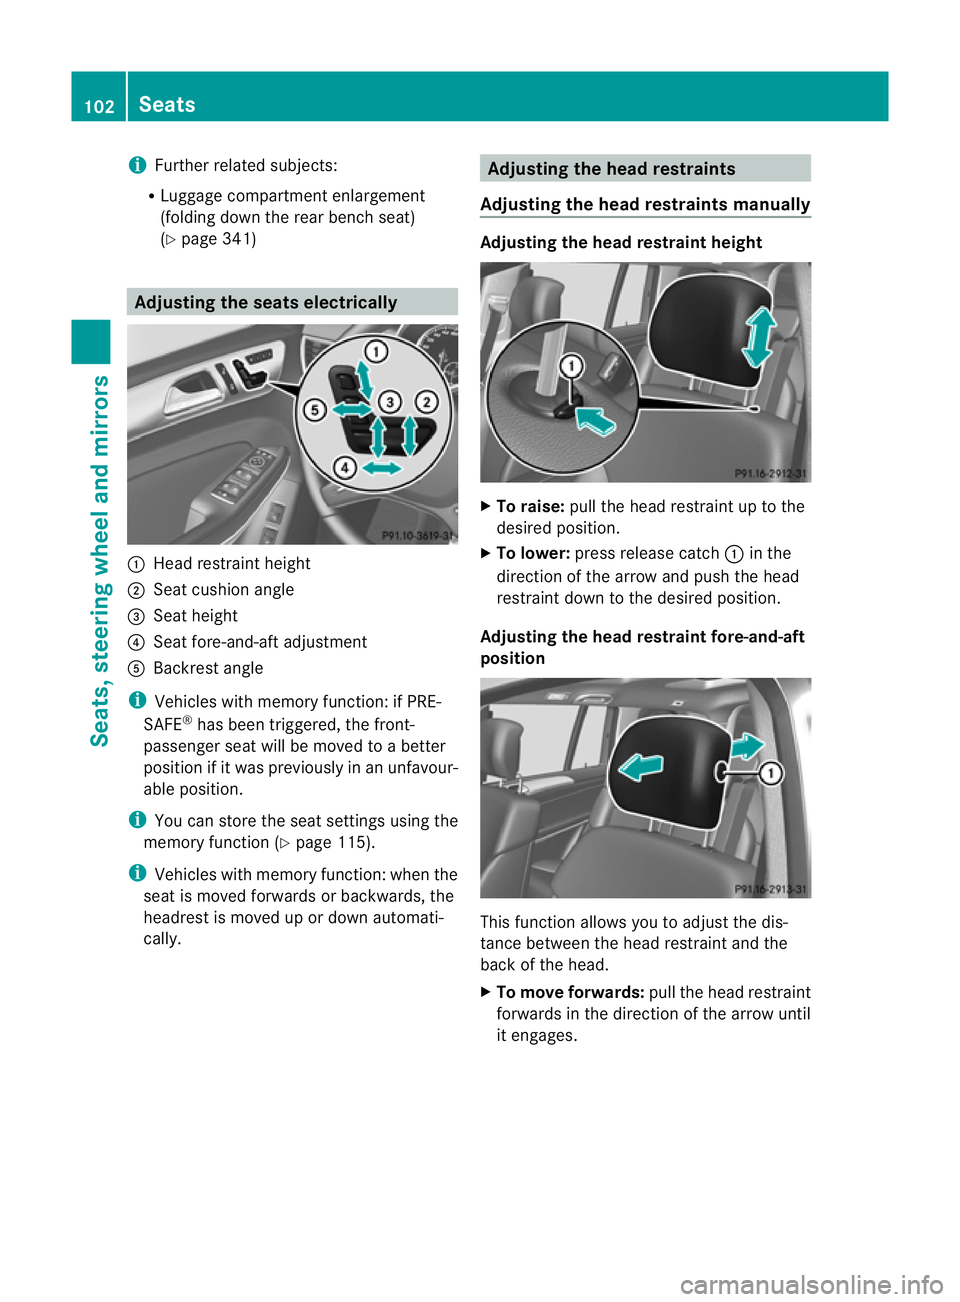
gthe seats electrically :
Hea drestraint height
; Seat cushion angle
= Seat height
? Seat fore-and-aft adjustment
A Backrest angle
i Vehicles with memory function: if PRE-
SAFE ®
has been triggered, the front-
passenger seat will be moved to abetter
position if it was previously in an unfavour-
able position.
i You can store the seat settings using the
memory function (Y page 115).
i Vehicles with memory function: when the
seat is moved forwards or backwards, the
headrest is moved up or down automati-
cally. Adjusting the hea
drestraints
Adjusting the head restraints manually Adjusting the head restraint height
X
To raise: pull the head restrain tuptot he
desired position.
X To lower: press release catch :in the
direction of the arrow and push the head
restraint down to the desired position.
Adjusting th ehead restraint fore-and-aft
position This func
tion allows you to adjust the dis-
tance between the head restraint and the
back of the head.
X To move forwards: pull the head restraint
forwards in the direction of the arrow until
it engages. 102
SeatsSeats, steering wheel and mirrors
Page 107 of 441
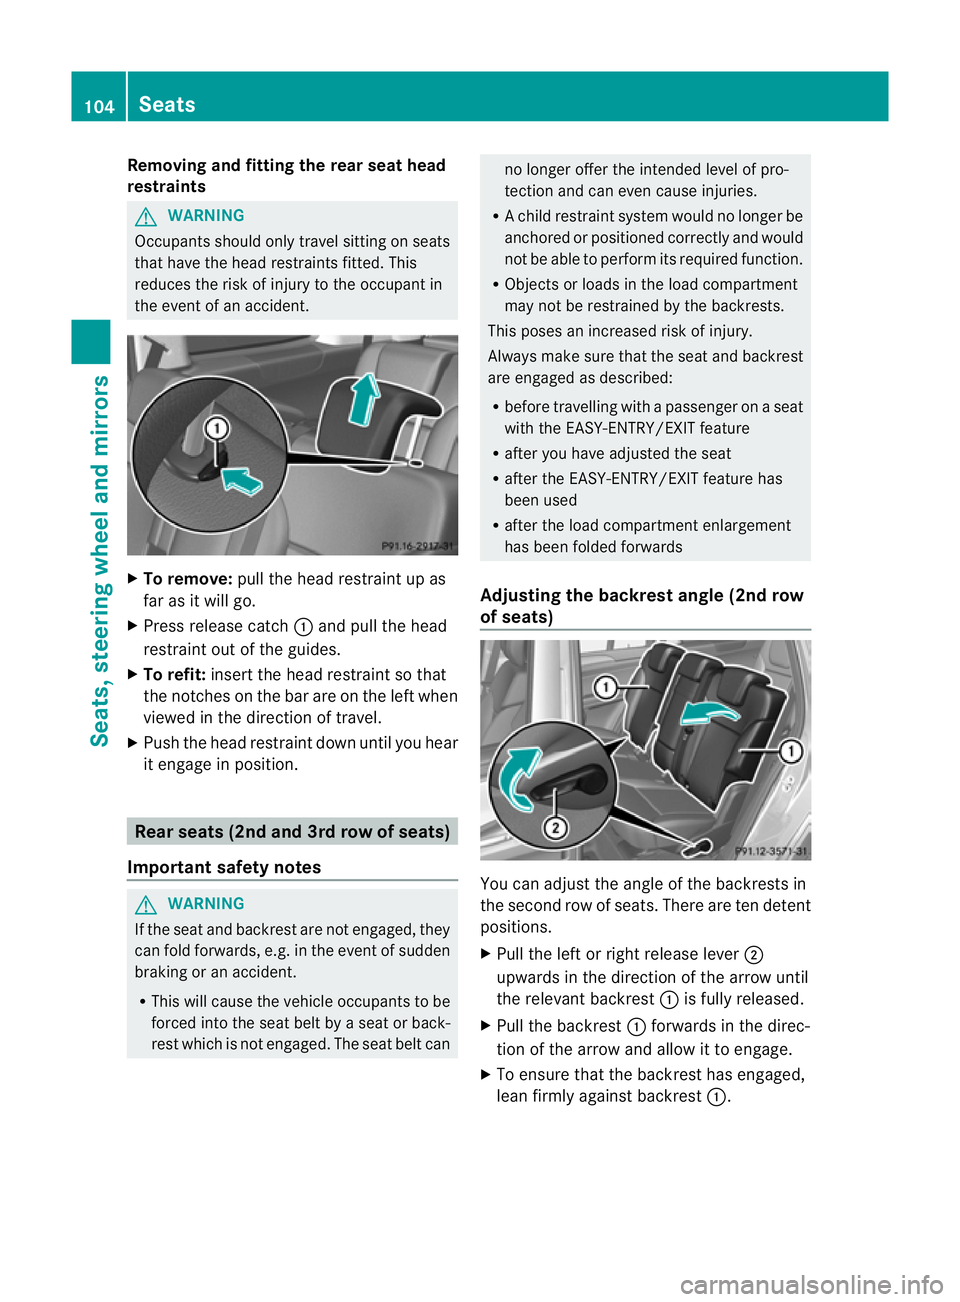
Removi
ngand fitting the rear seat head
restraints G
WARNING
Occupants sh ouldonly travel sitting on seats
tha thave the head restraint sfitted. This
reduces the risk of injury to the occupant in
the even tofanaccident. X
To remove: pullthe head restraint up as
fa ra sitw ill go.
X Press release catch :and pull the head
restraint out of the guides.
X To refit: insertthe head restraint so that
the notches on the bar ar eonthe leftwhen
viewed in the direction of travel.
X Push the head restraint down until you hear
it enga ge in po sition. Rea
rseat s(2nd and 3rd row of seats)
Important safet ynotes G
WARNING
If the seat and backrest are not engaged, they
can fold forwards, e.g. in the even tofsudden
braking or an accident.
R This will cause the vehicle occupants to be
forced int othe seat belt by aseat or back-
res twhich is not engaged. The seat belt can no longer offer the intended level of pro-
tec
tion and can even cause injuries.
R Ac hild restraint system would no longer be
anchored or positioned correc tlya nd would
not be able to perform its require dfunction.
R Objects or loads in the load compartment
may not be restrained by the backrests.
This pose sanincrease drisk of injury.
Always make sure that the seat and backrest
are engaged as described:
R before travelling with apassenger on aseat
with the EASY-ENTRY/EXI Tfeature
R after you have adjusted the seat
R after the EASY-ENTRY/EXI Tfeatur ehas
been used
R after the load compartmen tenlargement
has bee nfolded forwards
Adjusting th ebackrest angle (2nd row
of seats) Yo
uc an adjust the angle of the backrests in
the second row of seats. There are ten detent
positions.
X Pull the left or right release lever ;
upwards in the direction of the arrow until
the relevant backrest :is fully released.
X Pull the backrest :forwards in the direc-
tion of the arrow and allow it to engage.
X To ensure that the backrest has engaged,
lean firmly against backrest :.104
SeatsSeats
,steering whee land mirrors
Page 108 of 441
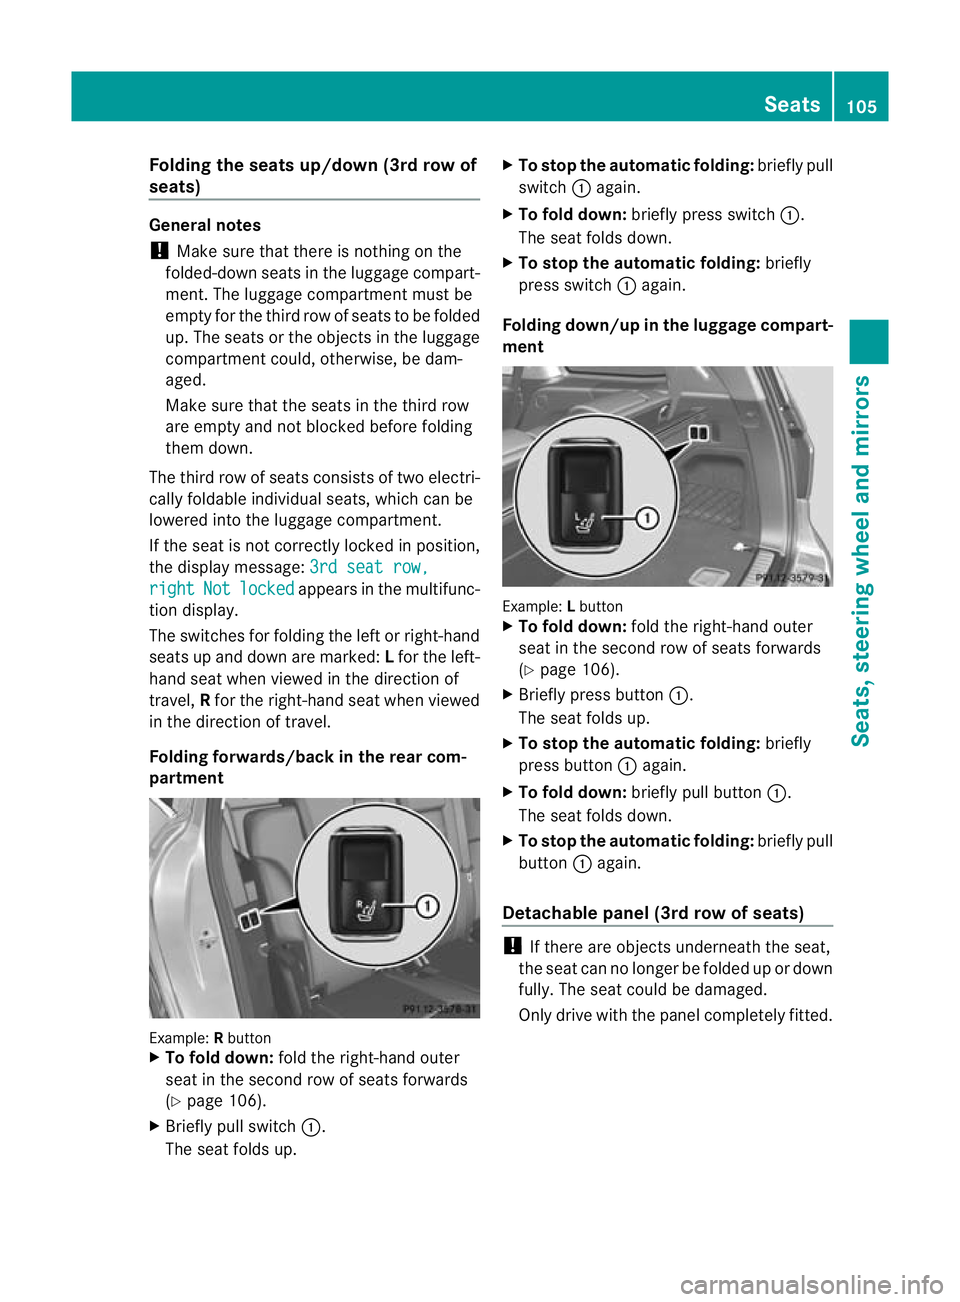
Folding th
eseat sup/down (3rd row of
seats) Genera
lnotes
! Mak esure that there is nothing on the
folded-down seats in the luggag ecompar t-
ment. Th eluggag ecompar tmentm ust be
empt yfor th ethird ro wofseatstobef olded
up. The seat sorthe objects in th eluggage
compartment could, otherwise, be dam-
aged.
Make sure that the seats in the thir drow
ar ee mpty and not blocked before folding
them down.
Th et hir dr ow of seats consist softwo electri-
cally foldable individual seats, which can be
lowered into the luggage compartment.
If the seat is not correctly locked in position,
the display message: 3rds eat row, right Not locked appears in th
emultifunc-
tion display.
The switches for folding the left or right-hand
seats up and down are marked: Lfor the left-
hand seat when viewed in the direction of
travel, Rfor the right-hand seat when viewed
in the direction of travel.
Folding forwards/back in the rear com-
partment Example:
Rbutton
X To fold down: fold the right-hand outer
seat in the second row of seats forwards
(Y page 106).
X Briefly pull switch :.
The seat folds up. X
To stop the automatic folding: briefly pull
switch :again.
X To fold down: briefly press switch :.
The seat folds down.
X To stop the automatic folding: briefly
press switch :again.
Folding down/up in the luggage compart-
ment Example:
Lbutton
X To fold down: fold the right-hand outer
seat in the second row of seats forwards
(Y page 106).
X Briefly press button :.
The seat folds up.
X To stop the automatic folding: briefly
press button :again.
X To fold down: briefly pull button :.
The seat folds down.
X To stop the automatic folding: briefly pull
button :again.
Detachable panel (3rd row of seats) !
If there are objects underneath the seat,
the seat can no longer be folded up or down
fully. The seat could be damaged.
Only drive with the panel completely fitted. Seats
105Seats, steerin gwhee land mirrors Z
Page 109 of 441
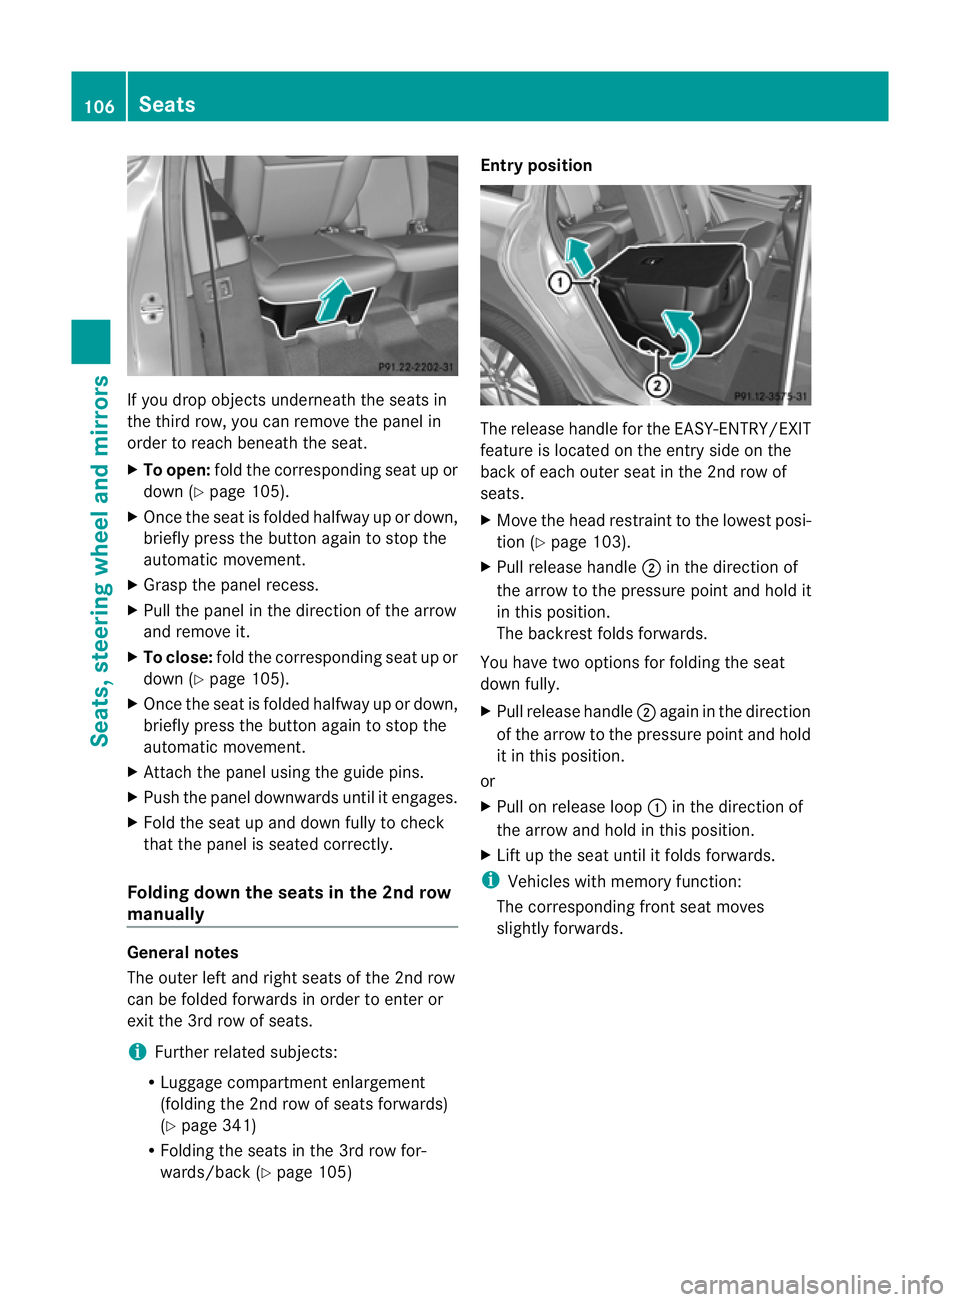
If yo
udrop objects underne atht he seats in
the thir drow, you can remove the panel in
order to reach beneat hthe seat.
X To open: foldt he correspondin gseat up or
down (Y page 105).
X Once the seat is folded halfway up or down,
briefly press the button again to stop the
autom atic movement.
X Grasp the panel recess.
X Pul lthe pane lint he direction of the arrow
and remove it.
X To close: foldthe correspondin gseat up or
down (Y page 105).
X Once the seat is folded halfway up or down,
briefly press the button again to stop the
autom atic movement.
X Attach the panel using the guide pins.
X Push the panel downwards until it engages.
X Fold the seat up and down fully to check
that the panel is seated correctly.
Folding down the seats in the 2nd row
manually General notes
The outer left and right seats of the 2nd row
can be folded forwar
dsin order to enter or
exit the 3r drow of seats.
i Further related subjects:
R Luggage compartment enlargement
(folding the 2n drow of seats forwar ds)
( Y page 341)
R Folding the seats in the 3r drow for-
war ds/ back (Y page 105) Entry positi
on Th
er eleas ehandle for the EASY-ENTRY/EXIT
feature is located on the entry side on the
back of each outer seat in the 2nd row of
seats.
X Move the head restraint to the lowest posi-
tion (Y page 103).
X Pul lreleas ehandle ;in the direction of
the arrow to the pressure point and hold it
in this position.
The backrest folds forwards.
You have two options for folding the seat
down fully.
X Pul lreleas ehandle ;again in the direction
of the arrow to the pressure point and hold
it in this position.
or
X Pul lonr eleas eloop :in the direction of
the arrow and hold in this position.
X Lif tu pt he seat until it folds forwar ds.
i Vehicl eswith memory function:
The corresponding front seat moves
slightly forwar ds.106
SeatsSeats, steerin
gwheel and mirrors
Page 110 of 441
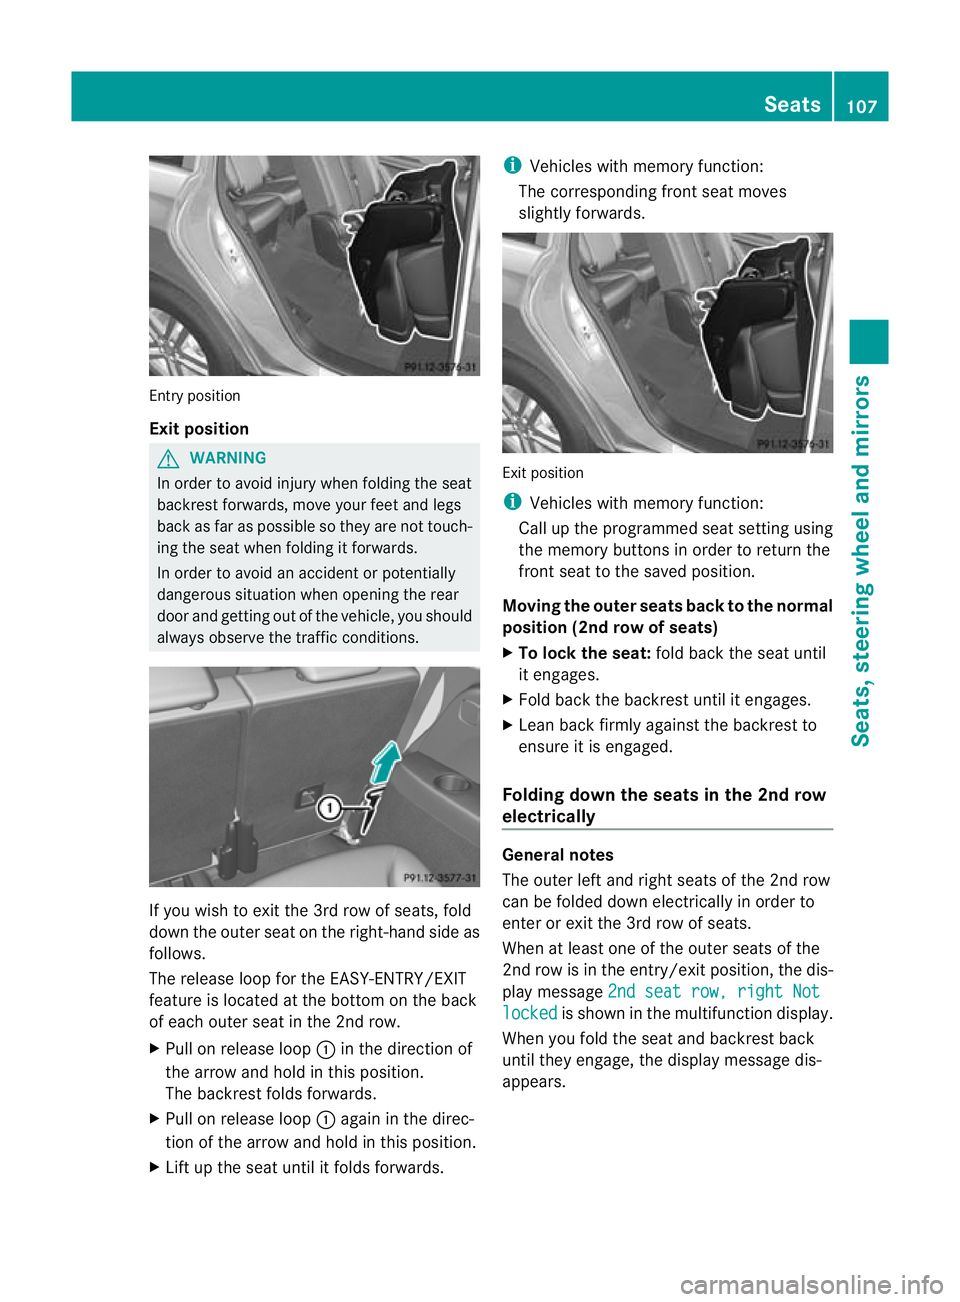
Entry position
Exit position
G
WARNING
In order to avo idinjury when folding the seat
backres tforwards, mov eyour feet and legs
back as far as possible so they are not touch-
ing the seat when folding it forwards.
In order to avoi danaccident or potentially
dangerou ssituation when opening the rear
door and gettin gout of the vehicle, you should
alway sobserv ethe traffic conditions. If you wish to exit the 3r
drow of seats, fold
down the outer seat on the right -hand side as
follows.
The release loop for the EASY-ENTRY/EXIT
feature is located at the bottom on the back
of each outer seat in the 2nd row.
X Pull on release loop :in the direction of
the arrow and hold in this position.
The backrest folds forwards.
X Pull on release loop :again in the direc-
tion of the arrow and hold in this position.
X Lift up the seat until it folds forwards. i
Vehicles with memory function:
The corresponding front seat moves
slightly forwards. Exit position
i
Vehicles with memory function:
Call up the programmed seat setting using
the memory buttons in order to return the
front seat to the saved position.
Moving the outer seats back to the normal
position (2nd row of seats)
X To lock the seat: fold back the seat until
it engages.
X Fold back the backrest until it engages.
X Lean back firmly against the backrest to
ensure it is engaged.
Folding down the seats in the 2nd row
electrically General notes
The outer left and right seats of the 2nd row
can be folded down electrically in order to
enter or exit the 3rd row of seats.
When at least one of the outer seats of the
2nd row is in the entry/exit position, the dis-
play message
2nds eat row, right Not locked is show
ninthe multifunc tion display.
When you fold the seat and backrest back
until they engage, the display message dis-
appears. Seats
107Seats, steering wheel and mirrors Z
Page 111 of 441
i
Further related subjects:
R Luggage compartment enlargement
(folding the 2nd row of se atsf orwards)
(Y page 341)
R Folding the seats in the 3r drow for-
wards/back (Y page 105)
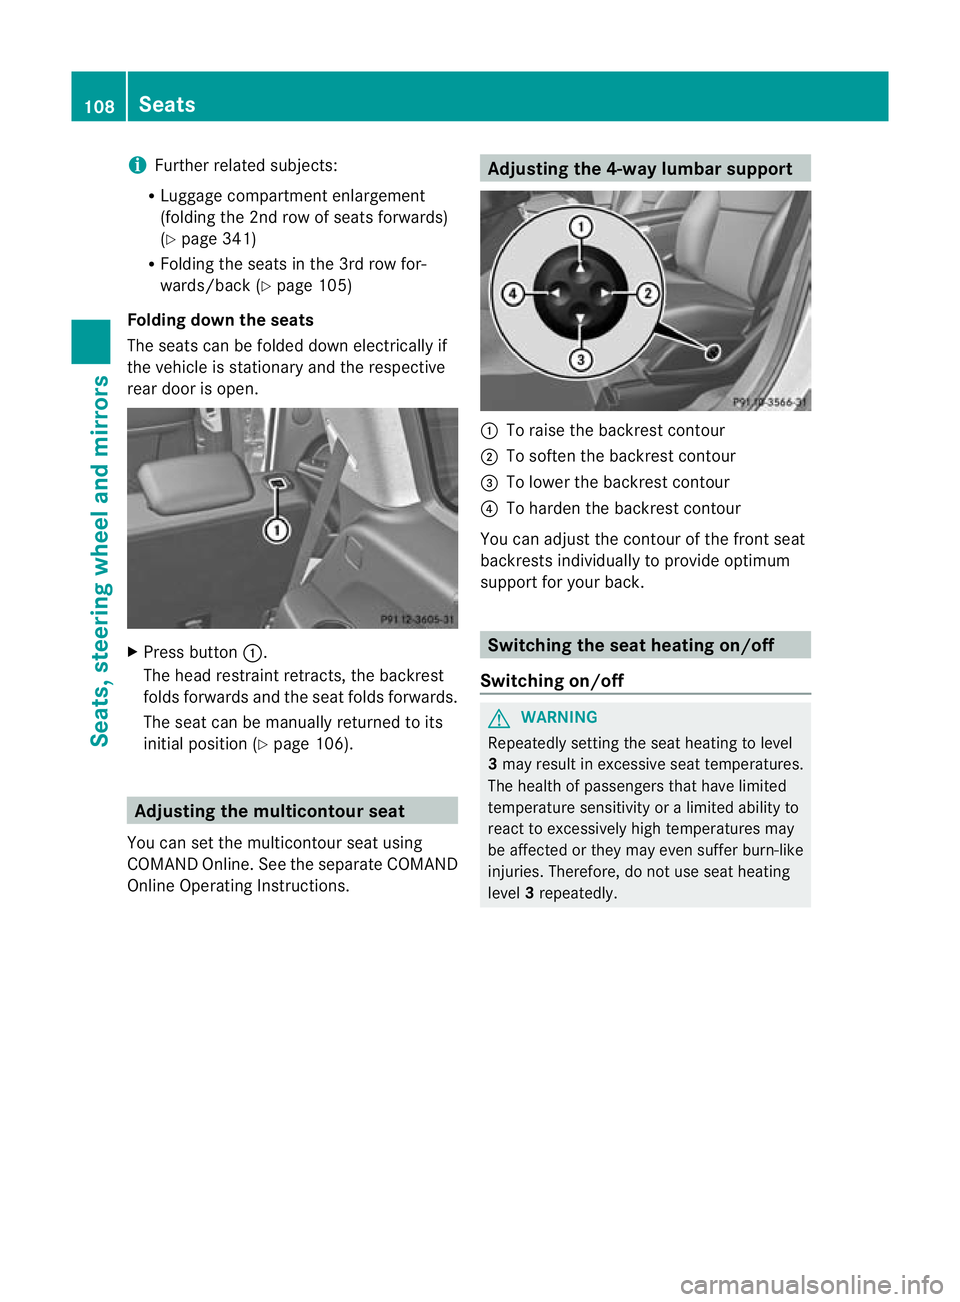
Folding down th eseats
The seats can be folded dow nelectrically if
the vehicle is stationary and the respec tive
rea rdoor is open. X
Press button :.
The head restraint retracts, the backrest
folds forwards and the seat folds forwards.
The seat can be manually returne dtoits
initial position (Y page 106). Adjusting th
emulticon tour seat
Yo uc an set the multicontour seat using
COMAND Online. See the separat eCOMAND
Onli neOperating Instructions. Adjusting th
e4-way lumbar support :
To rais ethe bac krest contour
; To soften the backrest contour
= To lower the backrest contour
? To harden the backrest contour
You can adjust the contour of the fr ontseat
bac krest sindividually to provide optimum
support for your back. Switching th
eseat heating on/off
Switching on/off G
WARNING
Repeatedly settin gthe seat heating to level
3 ma yresult in excessiv eseat temperatures.
The health of passengers that have limited
temperatur esensitivit yoralimited ability to
react to excessively high temperatures may
be affected or they may even suffer burn-like
injuries. Therefore, do not use seat heating
level 3repeatedly. 108
SeatsSeats, steering wheel and mirrors
Page 116 of 441
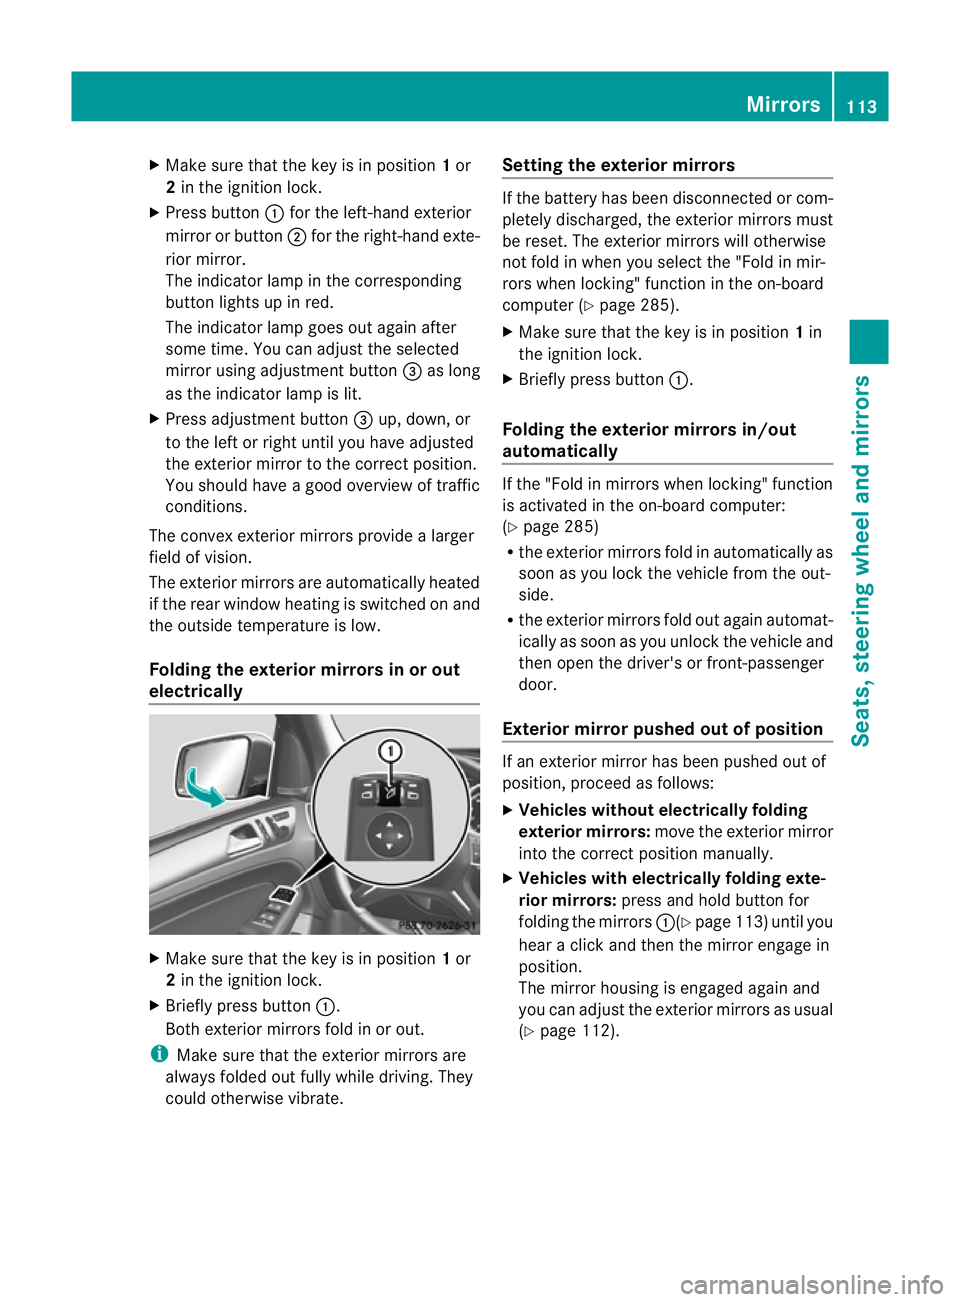
X
Make sur ethat the key is in position 1or
2 in the ignition lock.
X Press button :for the left-hand exterior
mirror or button ;for the right-hand exte-
rior mirror.
The indicator lam pint he corresponding
button lights up in red.
The indicator lam pgoes out again after
some time. You can adjust the selected
mirror using adjustment button =as long
as the indicator lam pislit.
X Press adjustment button =up, down, or
to the left or right until you have adjusted
the exterior mirror to the correct position.
You should have agood overview of traffic
conditions.
The convex exterior mirror sprovide alarger
field of vision.
The exterior mirrors are automatically heated
if the rear window heating is switched on and
the outside temperature is low.
Folding the exterior mirrors in or out
electrically X
Make sure that the key is in position 1or
2 in the ignition lock.
X Briefly press button :.
Both exterior mirrors fold in or out.
i Make sure that the exterior mirrors are
always folded out fully while driving. They
could otherwise vibrate. Setting the exterior mirrors If the battery has been disconnected or com-
pletely discharged
,the exterior mirrors must
be reset .The exterior mirrors will otherwise
not fol dinwhen you selec tthe "Fold in mir-
ror sw hen locking" func tion in the on-board
computer (Y page 285).
X Make sure that the key is in position 1in
the ignition lock.
X Briefl ypres sbutton :.
Folding the exterior mirrors in/out
automatically If the "Fold in mirrors when locking" function
is activated in the on-board computer:
(Y
page 285)
R the exterior mirrors fold in automatically as
soo nasyou lock the vehicle from the out-
side.
R the exterior mirror sfold out again automat-
ically as soon as you unloc kthe vehicle and
then open the driver's or front-passenger
door.
Exterior mir rorp ushe dout of position If an exterior mirro
rhas been pushe dout of
position, proceed as follows:
X Vehicles without electrically folding
exterior mirrors: move the exterior mirror
into the correct position manually.
X Vehicles with electrically folding exte-
rior mirrors: press and hold button for
folding the mirrors :(Ypage 113 )until you
hea rac lick and then the mirror engage in
position.
The mirror housing is engaged again and
you can adjust the exterior mirrors as usual
(Y page 112). Mirrors
113Seats, steerin gwhee land mirrors Z
Page 344 of 441
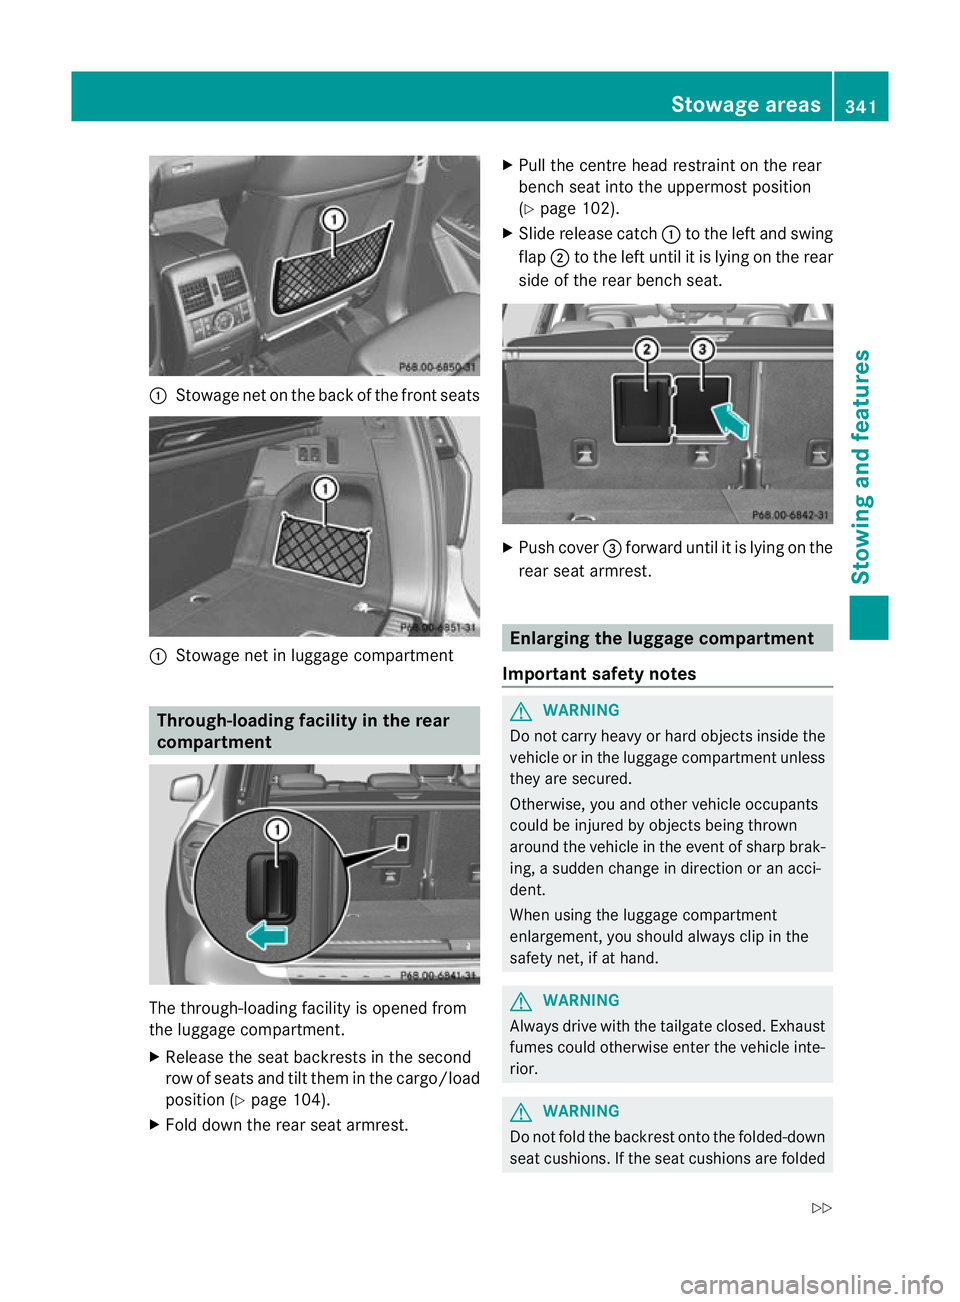
:
Stowag enet on the back of the front seats :
Stowag enet in luggage com partment Through-loadin
gfacility in the rear
compartment Th
et hrough-loading facility is opened from
the luggage com partment.
X Releas ethe sea tbackrest sinthesecond
row of seat sand tilt them in the cargo/load
position (Y page 104).
X Fold down the rear seat armrest. X
Pull the centre head restraint on the rear
bench seat into the uppermost position
(Y page 102).
X Slide release catch :to the left and swing
flap ;to the left until it is lying on the rear
side of the rear bench seat. X
Push cover =forward until it is lying on the
rear seat armrest. Enlarging the luggage compartment
Impor tantsafety notes G
WARNING
Do not carry heavy or hard objects inside the
vehicle or in the luggag ecompartmen tunless
they are secured.
Oth erwise, yo uand othe rvehicle occupants
could be injured by objects being thrown
around the vehicle in the event of sharp brak-
ing, asudden change in direction or an acci-
dent.
When using the luggag ecompartment
enlargement, you should always clip in the
safet ynet,ifath and. G
WARNING
Always drive with the tailgat eclosed. Exhaust
fumes could otherwise enter the vehicle inte-
rior. G
WARNING
Do not fold the backrest ont othe folded-down
seat cushi ons.Ift he seat cushi ons arefolded Stowage areas
341Stowing and fea tures
Z
Page 345 of 441
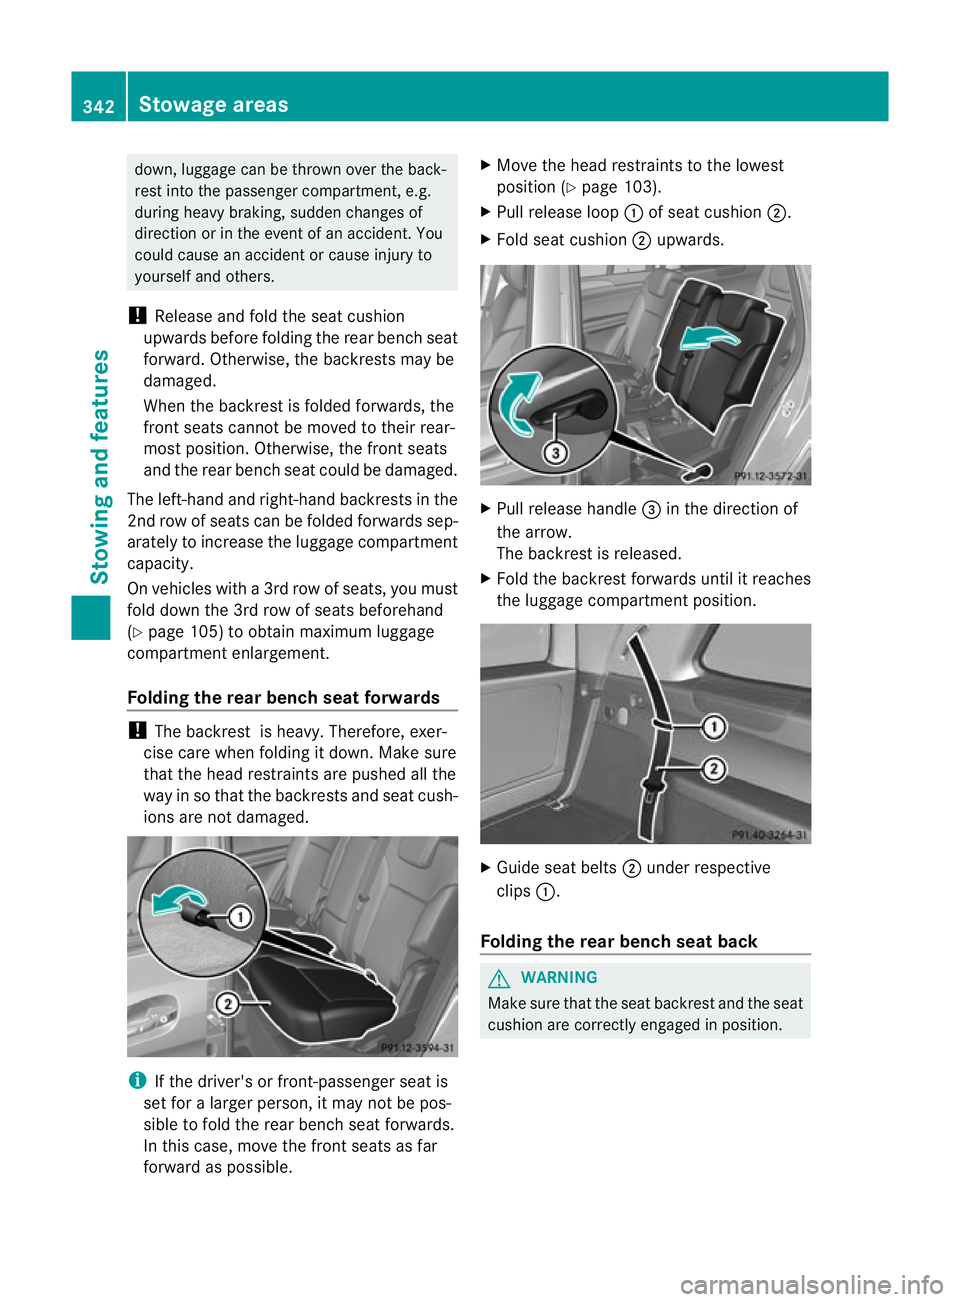
down, luggage can be thrown over the back-
rest int
othe passenger compar tment ,e.g.
during heavy braking, sudden changes of
direction or in the event of an accide nt.Y ou
coul dcause an acciden torcause injury to
yourself and others.
! Releas eand fold the sea tcushion
upwards befor efolding th erear bench seat
forward. Otherwise, th ebackrests may be
damaged.
When the backrest is folded forwards, the
front seats cannot be moved to their rear-
most position. Otherwise, the front seats
and the rea rbench seat could be damaged.
The left-hand and right-hand backrests in the
2n dr ow of seats can be folde dforwards sep-
arately to increase the luggage compartment
capacity.
On vehicles with a3rd row of seats ,you must
fold down the 3r drow of seats beforehand
(Y page 105) to obtain maximum luggage
compartment enlargement.
Folding th erear benc hseat forwards !
The backrest is heavy. Therefore, exer-
cise care when folding it down. Make sure
that the head restraints are pushed all the
way in so that the backrests and seat cush-
ions are not damaged. i
If the driver's or fron t-passenger seat is
set for alarger person, it may not be pos-
sible to fold the rear bench seat forwards.
In this case, move the front seats as far
forward as possible. X
Move the head restraints to the lowest
position (Y page 103).
X Pull release loop :of seat cushion ;.
X Fold seat cushion ;upwards. X
Pull release handle =in the direction of
the arrow.
The backrest is released.
X Fold the backrest forwards until it reaches
the luggage compartment position. X
Guide seat belts ;under respective
clips :.
Foldin gthe rear benc hseat back G
WARNING
Mak esure that the seat backrest and th eseat
cushion are correctly engaged in position. 342
Stowage areasStowi
ng andfeatures
Page 350 of 441
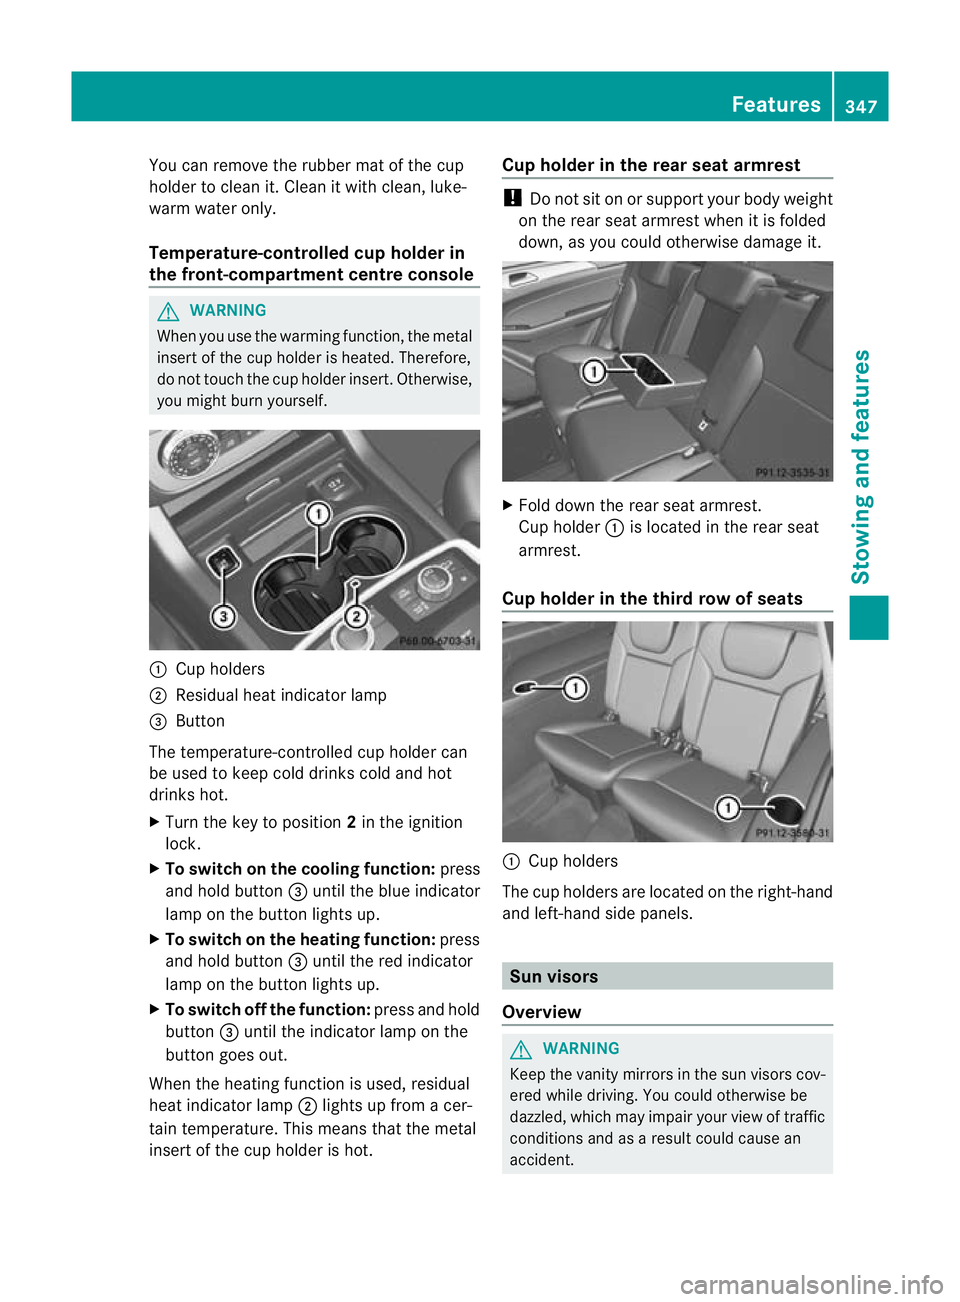
You can remove the rubber mat of the cup
holder to clean it. Clean it with clean
,luke-
warm water only.
Temperature-controlled cup holder in
th ef ront-compartment centr econsole G
WARNING
When you use the warmin gfunction ,the metal
insert of thecup holder is heated. Therefore,
do not touch the cup holder inser t.Otherwise,
you migh tburny oursel f. :
Cuph olders
; Residual heat indicator lamp
= Button
Th et emperature-c ontrolle dcup holde rcan
be used to keep cold drinks cold and hot
drinks hot.
X Turn the key to position 2in the ignition
lock.
X To switch on th ecooling function: press
and hold button =until th eblue indicator
lamp on th ebutton lights up.
X To switch on th eheating function: press
and hold button =until the red indicator
lamp on the button lights up.
X To switch off th efunc tion: press and hold
button =until the indicator lamp on the
button goes out.
When the heatin gfunction is used, residual
heat indicator lamp ;lights up fro macer-
tain temperature. This mean sthat the metal
insert of the cup holder is hot. Cu
ph older in th erears eat armrest !
Do not sit on or support your body weight
on the rear seat arm rest when it is folded
down ,asy ou coul dotherwise damage it. X
Fold down the rear seat armrest.
Cup holder :is located in the rear seat
armrest.
Cup holder in th ethird row of seats :
Cup holders
The cup holders are located on the right-hand
and left-han dside panels. Sun visors
Overview G
WAR
NING
Keep the vanity mirrors in the sun visors cov-
ered whil edriving.Y ou coul dotherwise be
dazzled, which may impair your view of traffic
conditions and as aresult could cause an
accident. Features
347Stowing and features Z