manual transmission MERCEDES-BENZ GL SUV 2012 Owners Manual
[x] Cancel search | Manufacturer: MERCEDES-BENZ, Model Year: 2012, Model line: GL SUV, Model: MERCEDES-BENZ GL SUV 2012Pages: 441, PDF Size: 10.66 MB
Page 8 of 441
Alar
msystem
se eA TA(Anti-Thef tAlarms ystem)
Ambient lighting
Setting the brightness (on-board
computer) ...................................... 281
Setting the colou r(on-boar dcom-
puter )............................................. 282
AMG men u(on-boa rd computer) .....286
AMG RID ECONTROL sports sus-
pension ............................................... 215
Anti-glare film .................................... 358
Ant i-loc kB rakin gSystem
se eA BS (Anti-lock Braking System)
Anti-Thef tAlarm system
se eA TA (Anti-Theft Alarm system)
Approach/d eparture angle ..............191
Aquaplaning ....................................... 186
Ashtray ............................................... 349
Assistanc emenu (on-board com-
puter) ................................................. .277
AS SYST PLUS
Displaying aservice message ........365
Hid ingas ervice message ..............365
Note s............................................. 364
Resetting the service interva ldis-
pla y................................................ 365
Service message ............................ 364
Specia lservice requirem ents ......... 365
ATA (Anti-Theft Alarm system)
Activating/deactivating ...................71
Functio n.......................................... .71
Interio rmotion sensor ..................... 72
Switch ingo ff th ealarm .................... 71
To w-awa yprotectio n........................ 71
ATTENTIO NASSIST
Ac tivating/deactivating .................278
Display message ............................ 307
Function/notes ............................. 232
Audio men u(on-boa rd computer) ....274
Author ised workshop
see Qualified specialist workshop
AUTO lights
Display message ............................ 303
se eL ights
Automatic engine start (ECO start/
stop function) .................................... 165Automatic en
gine switch-of f(ECO
st art/stop functio n).......................... 164
Automatic headlamp mode ..............119
Automatic transmission Accelerator pe dalposition ............. 170
Automatic drive program ...............171
Ch anging gear ............................... 170
DIREC TSELECT leve r..................... 167
Display message ............................ 319
Drive positio n(ECO start/stop
function) ........................................ 169
Drive program di splay. ................... 168
Driving tip s.................................... 170
Emergency running mod e.............. 174
Engag ingd rive positio n.................. 169
Engag ingn eutral ............................ 169
Engag ingp ark positio nautomati-
cally ............................................... 168
Engag ingr ever se ge ar................... 169
Engag ingt he park position ............168
Kickdow n....................................... 170
Manual drive program ....................172
Neutral (EC Ostart/stop function) .169
Overview ........................................ 167
Pro blem (fault) ............................... 174
Progra mselector button ................170
Pullin gaway................................... 161
Shift rang es................................... 171
Starting the engine ........................161
Steering wh eelgearshift paddle s... 171
Traile rtowing ................................. 170
Transmissio nposition display ........168
Transmission positions ..................169
Automatic transmission emer-
gency runnin gmode ......................... 174
Aux iliary heating
Activating/deactivating .................148
Activating/deactivating (o nthe
centr econsole) .............................. 149
Display message ............................ 321
Important safety notes ..................148
Pro blem (display message) ............153
Remote control .............................. 149
Setting ........................................... 284
Setting the de parture time ............. 150 Index
5
Page 23 of 441
Menu (on-boar
dcomputer )............ 275
Number from the phone book ........ 276
Redialling ....................................... 276
Rej ecting/end ingac all................. 276
Te lephon ecompartmen t................ 339
Temperature
Coolan t.......................................... 268
Co olan t(on-board computer) ...... ...2 86
Engine oi l(on-board computer) ...... 286
Outside temperatur e..................... .268
Setting (cl imate control) ................143
TEMPOMAT
Function/notes ............................. 193
Theft-deterren tsyst em
ATA (Anti-Theft Alarm system) .........71
Immob iliser ...................................... 71
Through-loading ................................ 341
Time seeS eparate Owner's manual
Timing (RACETIMER) .........................287
TIRE FITk it.......................................... 379
Top Tether ............................................ 55
Total distanc erecorder .................... 271
Tow-away protection ..........................71
Towing Important safety notes ..................388
Towing atrailer
Active Blind Sp ot Assist................. 245
Active Lane Kee ping Assist ............248
Active Parking Assis t..................... 223
Axle lo ad,p erm issible .................... 433
Bulb failure ind icator for LED
lamps ............................................. 263
ESP ®
(Electroni cStability Pro-
gram) ............................................... 67
Pullin gawayw ithat railer .............. 162
Traile rdrive program ..................... 250
Towing away
Fitting the tow inge ye.................... 390
Removing the tow inge ye............... 390
With both axl eson the ground .......390
Tow-starting
Emergency engine starting ............391
Important safety notes ..................388
Trailer
Display message ............................ 321Trailer coupli
ng
se eT owing atrailer
Traile rtowing
7-pin connector ............................. 263
Blind Spo tAssist ...... ...................... 240
Cleaning the trailer tow hitch ......... 371
Coupling up atrailer ...................... 260
Decouplin gatrailer ....................... 261
Driving tip s.................................... 257
Fol ding in the bal lcoupling ............ 261
Fol ding out the bal lcoupling .......... 259
Important safety notes ..................257
Mo unting dimensions ....................432
Parktroni c...................................... 218
Po wer suppl y................................. 262
Pro blem (fault) ............................... 264
Shift rang e..................................... 170
Traile rloads ................................... 433
Transmission
seeA utomati ctransmission
Transmissio nposition display .........168
Transmission pos ition display
(DIRECT SELECT lever) ......................168
Transportin gthe vehicle .................. 391
Travellin guphill
Brow of hil l..................................... 192
Driving downhil l............................. 192
Maximum gradient-cl imbing capa-
bility .............................................. .192
Trim pie ces( cle anin ginstructions) .372
Trip computer (on-b oard com-
puter) ................................................. .271
Trip meter Calling up ....................................... 271
Resetting (on-bo ardc omputer )...... 272
Turn si gnal
se eT urn signals
Turn signals
Switching on/off ........................... 121
TV
Operating (on-bo ardc omputer )..... 275
se eS eparate operating instructions
Two- wayradio
Freq uencies ................................... 421
Installati on .................................... .421
Transmission output (maximum ).... 421 20
Index
Page 173 of 441
Changing gear
The automatic transmission shifts to th eindi-
vidual gea rsautomatically when it is in trans-
mission position D.Gearshif ting is deter-
mined by:
R ap ossible limitation of the shift range
R the selected drive program
R the position of the accelerator pedal
R the roa dspeed Driving tips
Accelerator peda lposition Your style of drivin
ginfluences how the auto-
matic transmissio nshift sgear:
R littl ethrottle: early upshifts
R mor ethrottle: lat eupshifts
Kickdown Use kickdown for maximum acceleration:
X
Depres sthe accelerator pedal beyon dthe
pressur epoint.
The transmission shift stoalower gear
depending on the engin espeed.
X Ease off the accelerator pedal onc ethe
desired speed is reached.
The automatic transmission shift sback up.
Towing atrailer X
Drive in the mid dleo fthe engine speed
range on uphill gradient s.
X Shift down to sh iftr ange 3or
2( Y pag e171) depending on the uphill or
downhil lgradient ,evenifc ruisecontrol,
DISTRONIC PLU SorSPEEDTRONI Cisacti-
vated. Program selector button
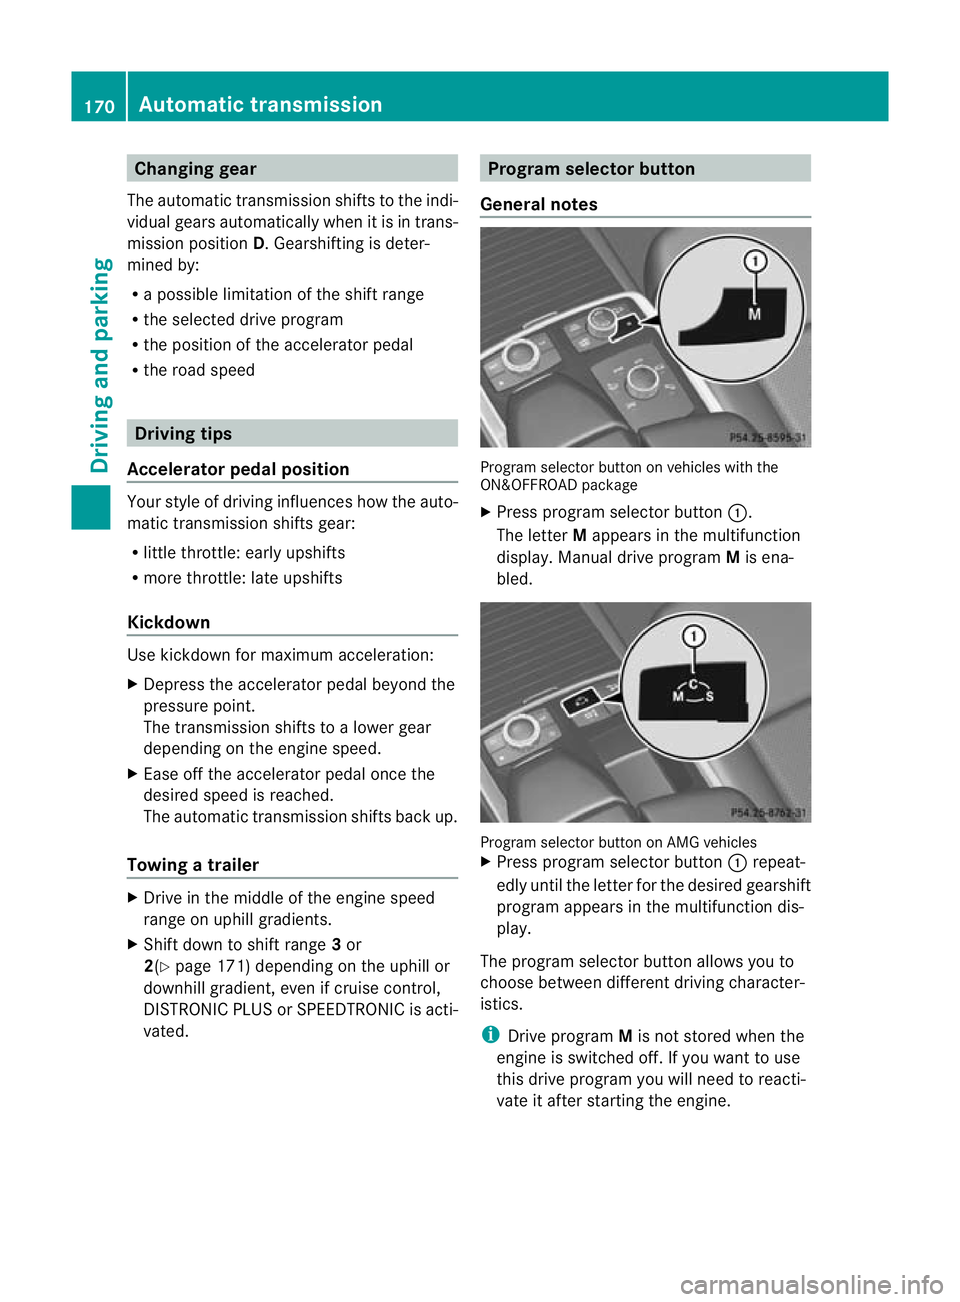
General notes Progra
mselector button on vehicles with the
ON&OFFROAD package
X Press program selecto rbutton :.
The letter Mappears in the multifunction
display. Manual driv eprogram Mis ena-
bled. Program selector button on AMG vehicles
X
Press program selector button :repeat-
edly until the letter for the desired gearshift
program appears in the multifunction dis-
play.
The program selector button allow syou to
choose between differen tdriving character-
istics.
i Drive program Mis not store dwhen the
engin eisswitched off. If you want to use
this drive program you will need to reacti-
vate it after startin gthe engine. 170
Automa
tict ran smissionDriving and pa rking
Page 174 of 441
Drive progra
mson AMG vehicles C
Controlled
Efficiency Comfortable, economical
driving
S
Sport Sport
ydrivin gstyle M
Manual Manual gearshif
ting i
For further information on the automatic
drive program, se e(Ypage 171). Steering whee
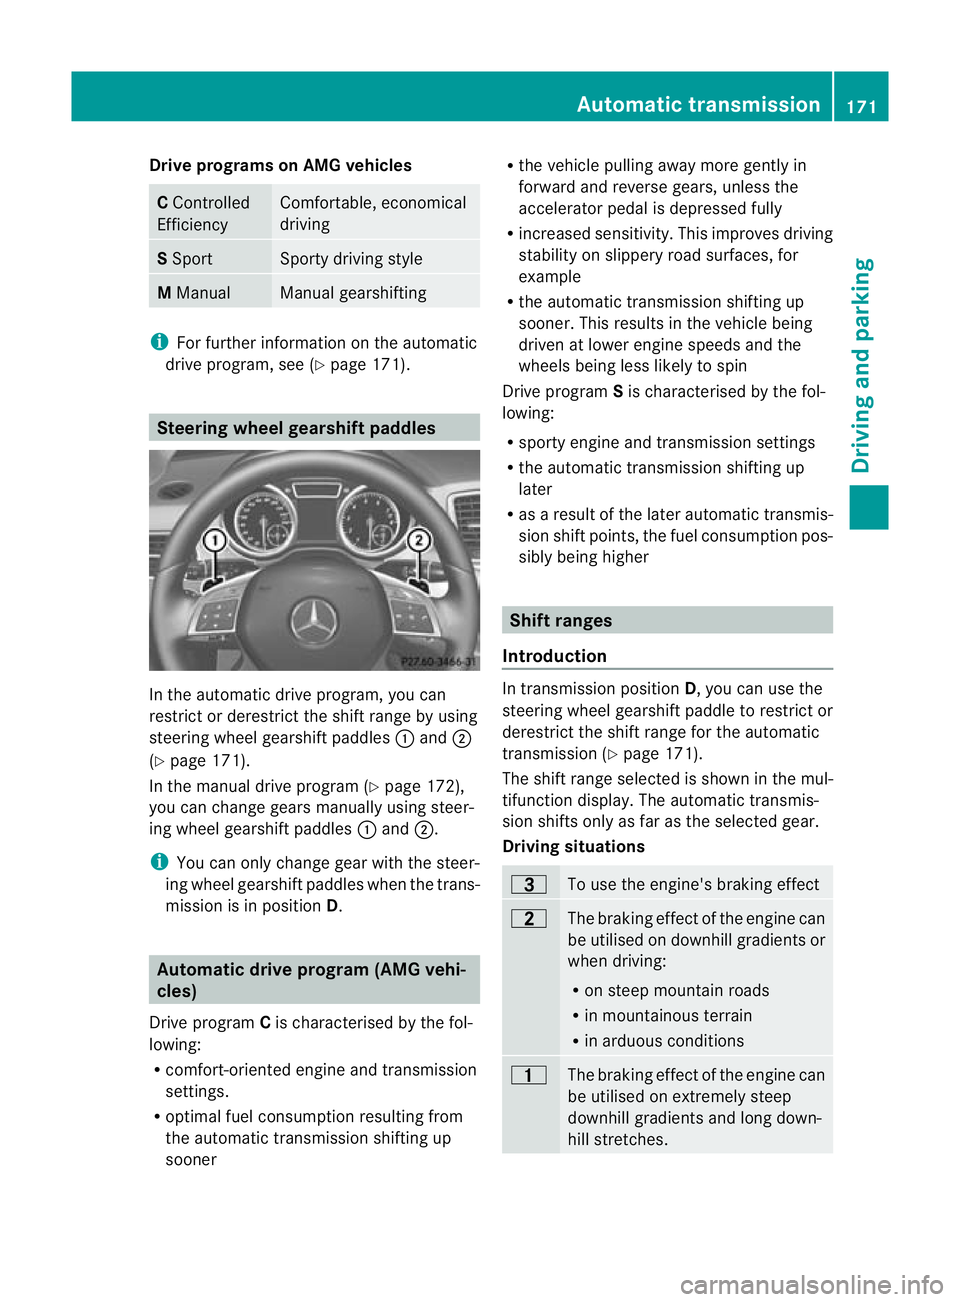
lgearshif tpaddles In the automatic driv
eprogram, yo ucan
restrict or derestrict the shift range by using
steering wheel gearshift paddles :and ;
(Y pag e171).
In the manual drive pro gram (Y page172),
you can change ge arsm anually using steer-
ing wheel gearshift paddles :and ;.
i You can only change gea rwith the steer-
ing wheel gearshif tpaddles when the trans-
mission is in position D.Automatic drive progra
m(AMG vehi-
cles)
Drive program Cis characterised by the fol-
lowing:
R comfort-oriented engine and transmission
settings.
R optimal fuel consumption resulting from
the automatic transmission shifting up
sooner R
the vehicle pulling awa ymore gentl yin
forward and reverse gears ,unles sthe
accelerator pedal is depressed fully
R increased sensitivity. This improves driving
stability on slippery roa dsurfaces, for
example
R the automatic transmission shifting up
sooner. This results in the vehicle being
driven at lower engine speeds and the
wheel sbeing less likely to spin
Drive program Sis characterised by the fol-
lowing:
R sporty engine and transmission settings
R the automatic transmission shiftin gup
later
R as aresult of the later automatic transmis-
sion shift points, the fuel consumption pos-
sibly being higher Shif
tranges
Introduction In transmission position
D,you can use the
steering wheel gearshift paddle to restric tor
derestrict the shift range for the automatic
transmission (Y page 171).
The shift range selected is shown in the mul-
tifunc tion display. The automatic transmis-
sion shift sonly as far as the selected gear.
Driving situations =
To use the engine's braking effect
5
The braking effect of the engine can
be utilised on downhil
lgradients or
when driving:
R on stee pmountain roads
R in mountainous terrain
R in arduous conditions 4
The brakin
geffect of th eengine can
be utilised on extremel ysteep
downhill gradients and long down-
hill stretches. Automatic transmission
171Drivingand pa rking Z
Page 175 of 441
Restrictin
gthe shift range X
Pull th eleft-hand steering wheel gearshift
paddle.
The automatic transmissio nshift sdown
one gear and restric tsthe shift range to the
relevant gear.
i If the engine exceed sthe maximum
engin espeed when shiftin gdown, the auto-
matic transmission protect sagainst engine
damage by not shifting down.
i If the maximum engin espeed for the shift
range is reached and you continue to accel-
erate, the automatic transmission shifts up,
even if the shift range is restricted. This
prevents the engine from overrevving.
Extending the shif trange X
Pul lthe right-hand steering wheel gearshift
paddle.
The shift range is derestricted.
Clearing th eshift rang erestriction X
Pull and hold the right-hand steering wheel
gearshift paddle until Dis shown again in
the multifunction display.
The automatic transmission shifts from the
current shift range directly to D.
or
X Use the DIRECT SELECT lever to shift the
transmission to position D.
The automatic transmission shifts from the
current shift range directly to D.
Selecting the ideal shift range X
Pull the left-hand steering wheel gearshift
paddle and hold it in position.
The automatic transmission shifts to the
gear which allow soptimum acceleration
and deceleration. To do this, the automatic
transmission shifts down one or more
gears. Manua
ldrive program
Activatin gthe manua ldrive program In manual drive program
M,you can change
gear using the steering wheel gearshift pad-
dles if the transmission is in position D.The
curren tdrive progra mand the engaged gear
are shown in the multifunctio ndisplay.
X AMG vehicles: press the program selector
button (Y page 170)until Mappe arsint he
multifunction display.
X Vehicle swith the ON&OFFROAD pack-
age: press the program selector button
(Y page 170).
The letter Mappears in the multifunction
display.
Upshifting (all vehicles except AMG
vehicles) X
Pull the right-han dsteering whee lgearshift
paddle (Y page 171).
The automatic transmission shifts up to the
next gear.
Upshifting (AM Gvehicles) !
In manua lgearshif tprogram M,the auto-
matic transmission does not shift up auto-
matically even when the engin elimiting
speed for the current gear is reached.
When the engine limitin gspeed is reached,
the fuel supply is cut to prevent the engine
from overrevving. You must mak esure that
the engine spee ddoes not reach the red
area of the rev counter .Otherwise, there is
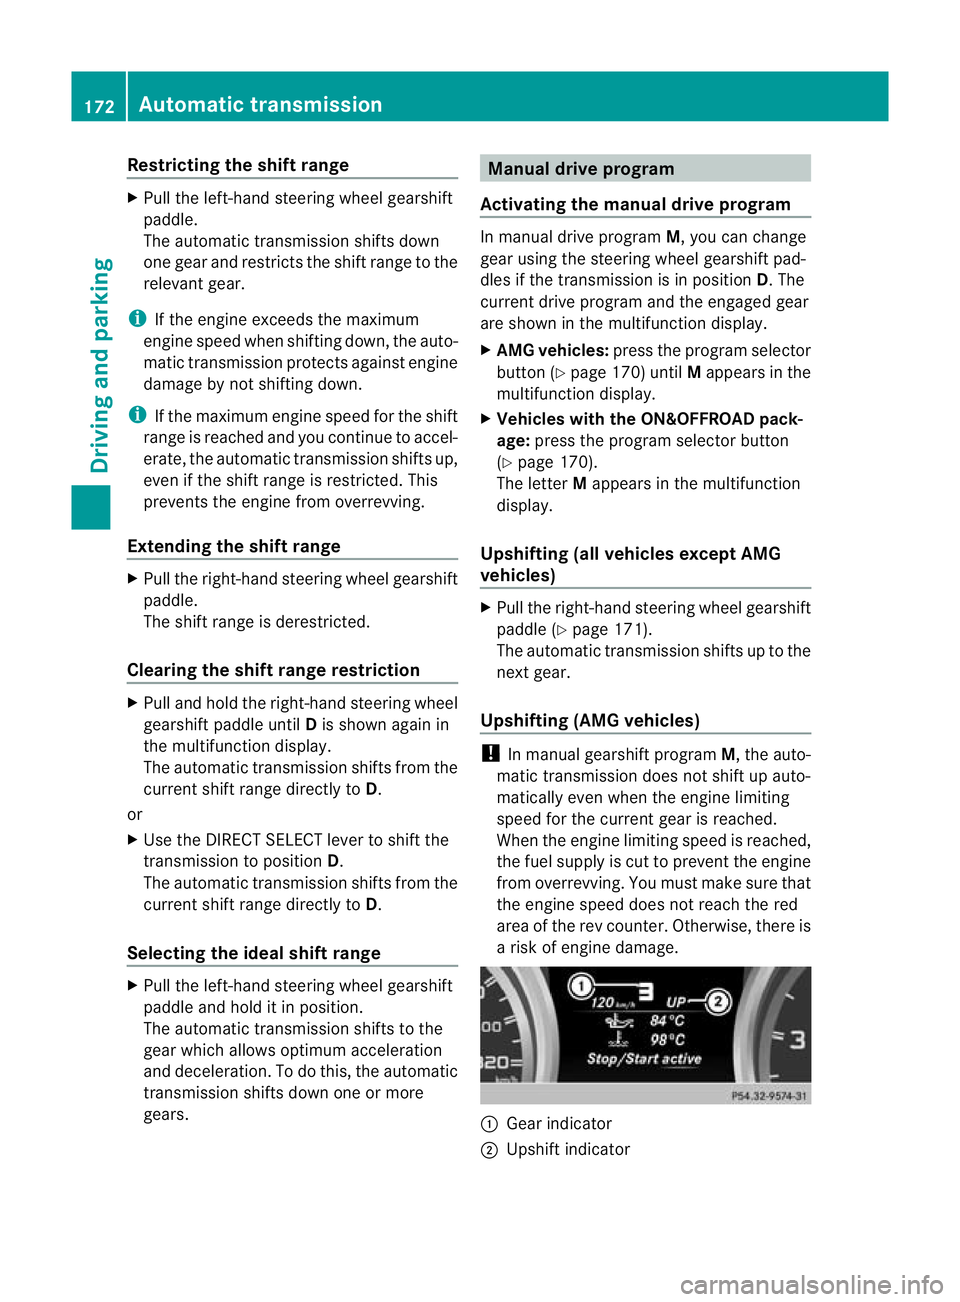
ar isk of engine damage. :
Gear indicator
; Upshift indicator 172
Automa
tict ran smissionDriving and pa rking
Page 176 of 441
Befor
ethe engine speed reaches the red ar ea,
an upshift indicator will be shown in the mul-
tifunction display.
X If the colour in the speedometer multifunc-
tion display changes to red and the UP dis-
play messag eisshown, shift up agear.
Downshifting X
Pull the left-han dsteering wheel gearshift
paddl e(Ypage 171).
The automatic transmission shifts dow nto
the next gear.
Maximu macceleration
X Pull the left-hand steering whee lgears hift
paddle unt ilthe transmission selects the
optimu mgearfor the curr ents peed.
i If yo uslowd ownors topw ithou tshifting
down, the automati ctransmissio nauto-
matically shift sdown.
Kickdown You can also use kickdown for maximum
acceleration in manua
ldrive program M.
X Dep ress the ac celerator pedal beyond the
pressure point.
The transmission shift stoalower gear
depending on the engine speed.
X Shif tback up onc ethe desired speed is
reached.
i All vehicles (excep tAMG vehicles): if
yo ua pply full throttle, the automatic trans-
mission shifts up to the next gear when the
maximum engine speed is reached. This
prevents the engine from overrevving.
i AMG vehicles: it is not possible to use
kickdown in manual drive program M.Deactivating the manua
ldrive program X
AMG vehicles: press the program selector
button (Y page 170) repeatedly until Cor
S appe arsint he multifunction display.
X Vehicle swith the ON&OFFROAD pack-
age: press the program selector button
(Y page 170).
M is no longer shown in the multifunction
display. Automa
tict ran smission
173Driving and pa rking Z
Page 184 of 441
take
noff ag aina fter be ingo nly partially
emptied.
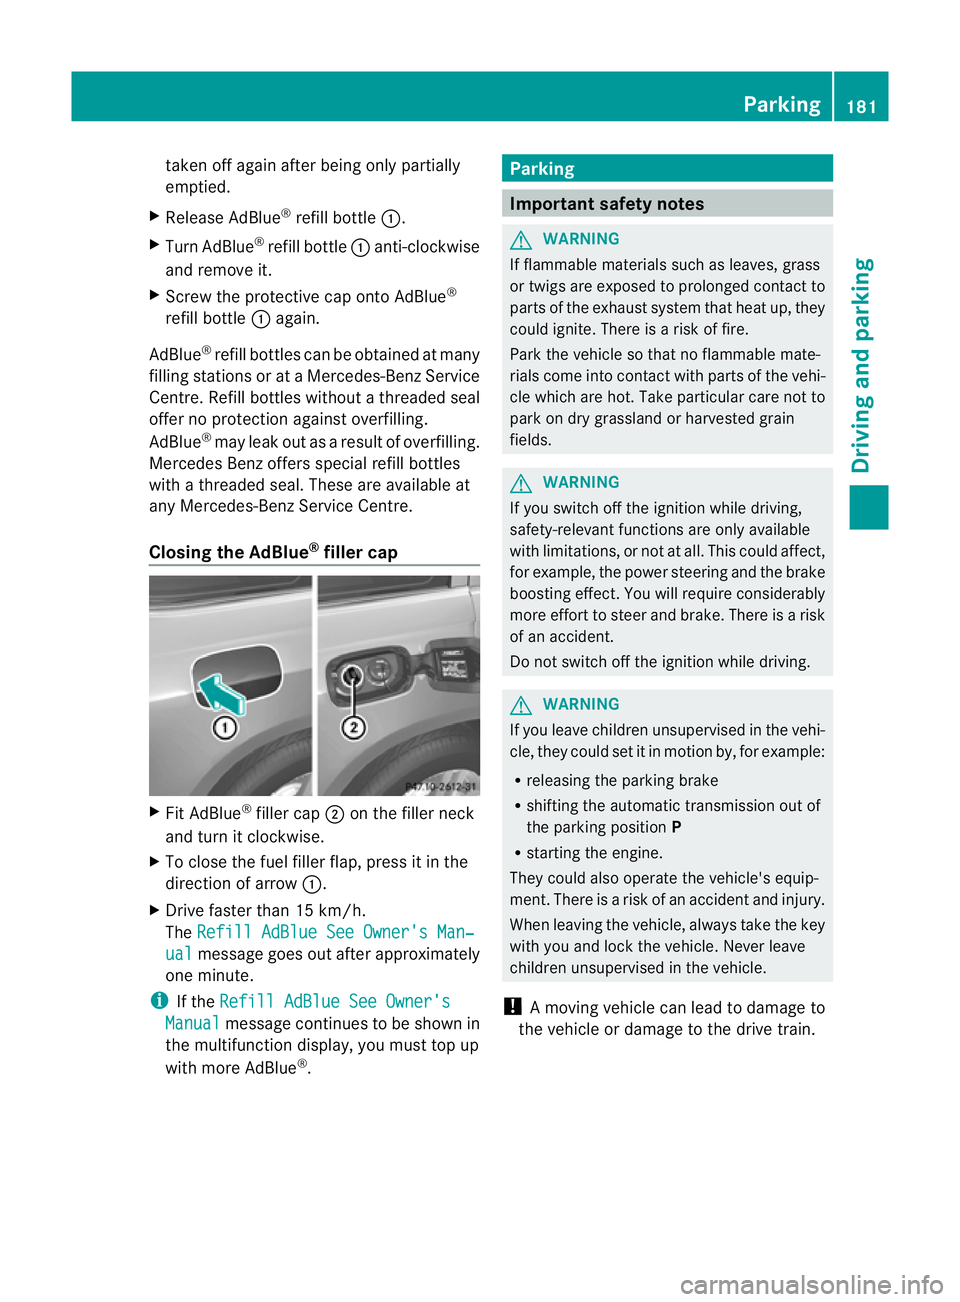
X Releas eAdBlue ®
refil lbottle :.
X Tur nAdBlue ®
refil lbottle :anti-clockwise
and remove it.
X Screw the protective cap onto AdBlue ®
refill bottle :again.
AdBlue ®
refill bottles can be obtained at many
fil ling stations or at aMercedes-Benz Ser vice
Centre. Refil lbottles withou tathreaded seal
offer no protection agains toverfilling.
AdBlue ®
may leak ou tasaresult of overfilling.
Mercedes Ben zoffers special refi llbottles
with athrea deds eal. Thes eare avail able at
any Mercedes-Benz Service Centre.
Closin gthe AdBlue ®
fil lerc ap X
Fit AdBl ue®
filler cap ;on th efiller neck
and turn it clockwise.
X To close the fuel filler flap, press it in the
direction of arrow :.
X Driv efaster than 15 km/h.
The Refill AdBlue Se eOwner' sMan‐ ual message goes ou
tafter approximately
one minute.
i If the Refill AdBlue See Owner's Manual message continues to be show
nin
the multifunctio ndisplay, you must top up
with mor eAdBlue ®
. Parking
Important safety notes
G
WAR
NING
If flammable materials such as leaves ,grass
or twigs are exposed to prolo nged contac tto
part soft he exhaust system that heat up, they
coul dignite. There is arisk of fire.
Park the vehicle so that no flammable mate-
rials come int ocontac twith parts of the vehi-
cle which are hot. Take particular care not to
park on dry grassland or harvested grain
fields. G
WARNING
If you switch off the ignition while driving,
safety-relevan tfunctions are only available
with lim itations, or not at all .This coul daffect,
for example, the powe rsteering and the brake
boosting effect .You will require considerably
mor eeffort to steer and brake. There is arisk
of an accident.
Do not switch off the ignition while driving. G
WARNING
If you leave children unsupervised in the vehi-
cle, they could set it in motion by, for example:
R releasing the parking brake
R shifting the automatic transmission out of
the parking position P
R starting the engine.
They could also operate the vehicle's equip-
ment .There is arisk of an accident and injury.
When leaving the vehicle, always take the key
with you and lock the vehicle. Never leave
children unsupervised in the vehicle.
! Am ovin gvehicle can lead to damage to
the vehicle or damage to the driv etrain. Parking
181Driving and parking Z
Page 186 of 441
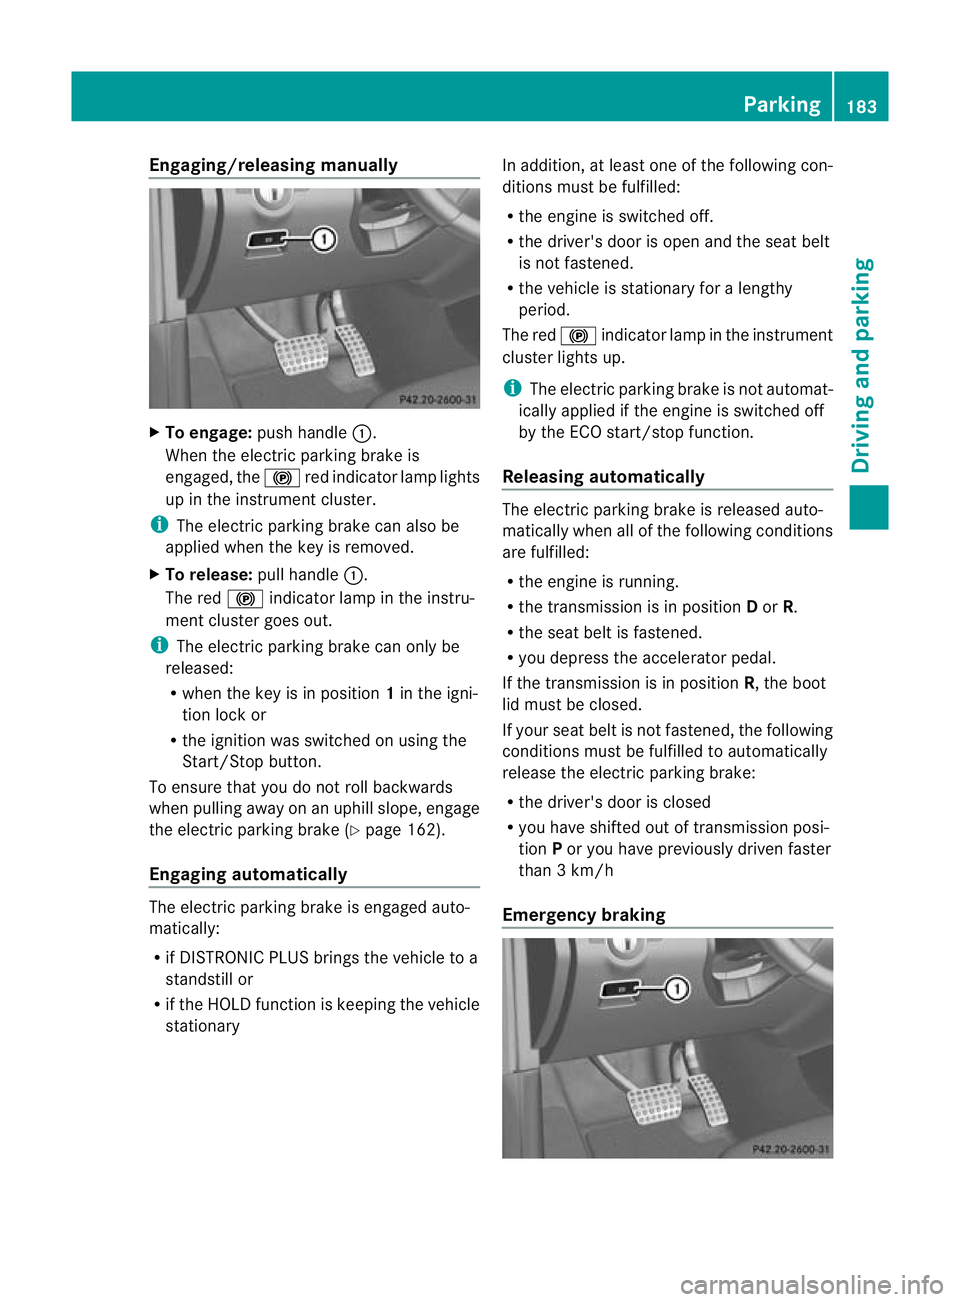
Engaging/releasing manually
X
To engage: push handle :.
When th eelectric parking brak eis
engaged ,the ! redi ndicator lamp lights
up in the instrumen tcluster.
i The electric parking brak ecan also be
applied when the key is removed.
X To release: pull handle:.
The red !indicator lamp in the inst ru-
ment cluster goe sout.
i The electric parking brake can only be
released:
R when the key is in position 1in the igni-
tion lock or
R the ignition was switched on using the
Start/Stop button.
To ensure that you do not roll backwards
when pulling away on an uphill slope, engage
the electric parking brake (Y page 162).
Engagin gautomatically Th
ee lectric parkin gbrake is engaged auto-
matically:
R if DISTRONIC PLUS brings th evehicle to a
standstill or
R if the HOL Dfunction is keeping the vehicle
stationary In addition, at least one of the following con-
ditions must be fulfilled:
R
the engine is switched off.
R the driver' sdoor is open and the seat belt
is not fastened.
R the vehicle is stationar yfor alengthy
period.
The red !indicator lam pint he inst rument
cluster lights up.
i Thee lectric parkin gbrake is not automat-
icall yapplied if the engine is switched off
by the ECO star t/stopfunction.
Releasing automatically The electric parking brake is released auto-
matically when all of the following conditions
are fulfilled:
R
the engine is running.
R the transmissio nisinp osition Dor R.
R the seat belt is fastened.
R you depress the accelerator pedal.
If the transmission is in position R,the boot
lid must be closed.
If your seat belt is not fastened, the following
conditions must be fulfilled to automatically
release the electric parkin gbrake:
R thed river's door is closed
R yo uh ave shifted out of transmission posi-
tion Por you have previously driven faster
than 3km/h
Emergenc ybraking Parking
183Drivingand pa rking Z
Page 254 of 441
on such
adynamometer, pleas econsult a
qualified workshop. You coul dotherwise
damage the drive train or the brake system.
4MATIC ensures that all four wheels are per-
manently driven. Togethe rwith ESP ®
and
4ETS, it improves the trac tion of your vehicle
whenever adrive whee lspins due to insuffi-
cient grip.
i In wintr ydriving conditions ,the maximum
effect of 4MATIC can only be achieved if
you use winter tyres (M+ Styres), with snow
chain sifn eces sary.
Fo rfurther information on "Driving off-road",
see (Y page 188).
DSR (Downhill Speed Regulation) Important safet
ynotes G
WARNING
DS Riso nlyana id designed to assist you when
drivin gdownhill .You are responsible for keep-
ing control of the vehicle and for assessing
whether the downhil lgradient can be man-
aged.
When activating DSR th evehicle may brake
suddenly due to DSR inter vening. Thi sis
dependent on the downhill gradien tand the
difference between the current speed and the
speed set. DSR may not alway sbeable to
keep to the set speed, depending on road sur-
fac eand tyre conditions .You coul dlose con-
trol of the vehicle and cause an accident.
Selec taset speed suitable for the prevailing
conditions and when necessary, apply the
brakes manually. G
WARNING
If you depress the accelerator pedal wit hDSR
activated, the nthe set speed can be excee-
ded. Drive downhill with specia lcare and
alway skeep in min dthat DSR brakes the vehi-
cle as soon as you remove your foot from the
accelerator pedal. The vehicle ma ybrake sud-
denly due to DSR intervening, depending on
th ed ownhill gradient and the differen ce between the current speed and the set speed.
You could lose control of the vehicl
eand
cause an accident.
DSR assists you whe ndriving downhill. It
keeps th espeed of travel at the speed set on
the on-boar dcomputer .The steeper the
downhill gradient ,the greater the DS Rbrak-
ing effect on th evehicle. When driving on flat
stretches of road or on an uphill gradient, the
DSR braking effect is minima lornon-existent.
DSR con trols the set speed when it is active
and the automatic transmission is in the D,
R or Nposition .Bya ccelerating or braking,
you can always drive at ahigher or alower
speed than that set on the on-boar dcom-
puter.
Further information about "Driving off-road"
(Y page 188).
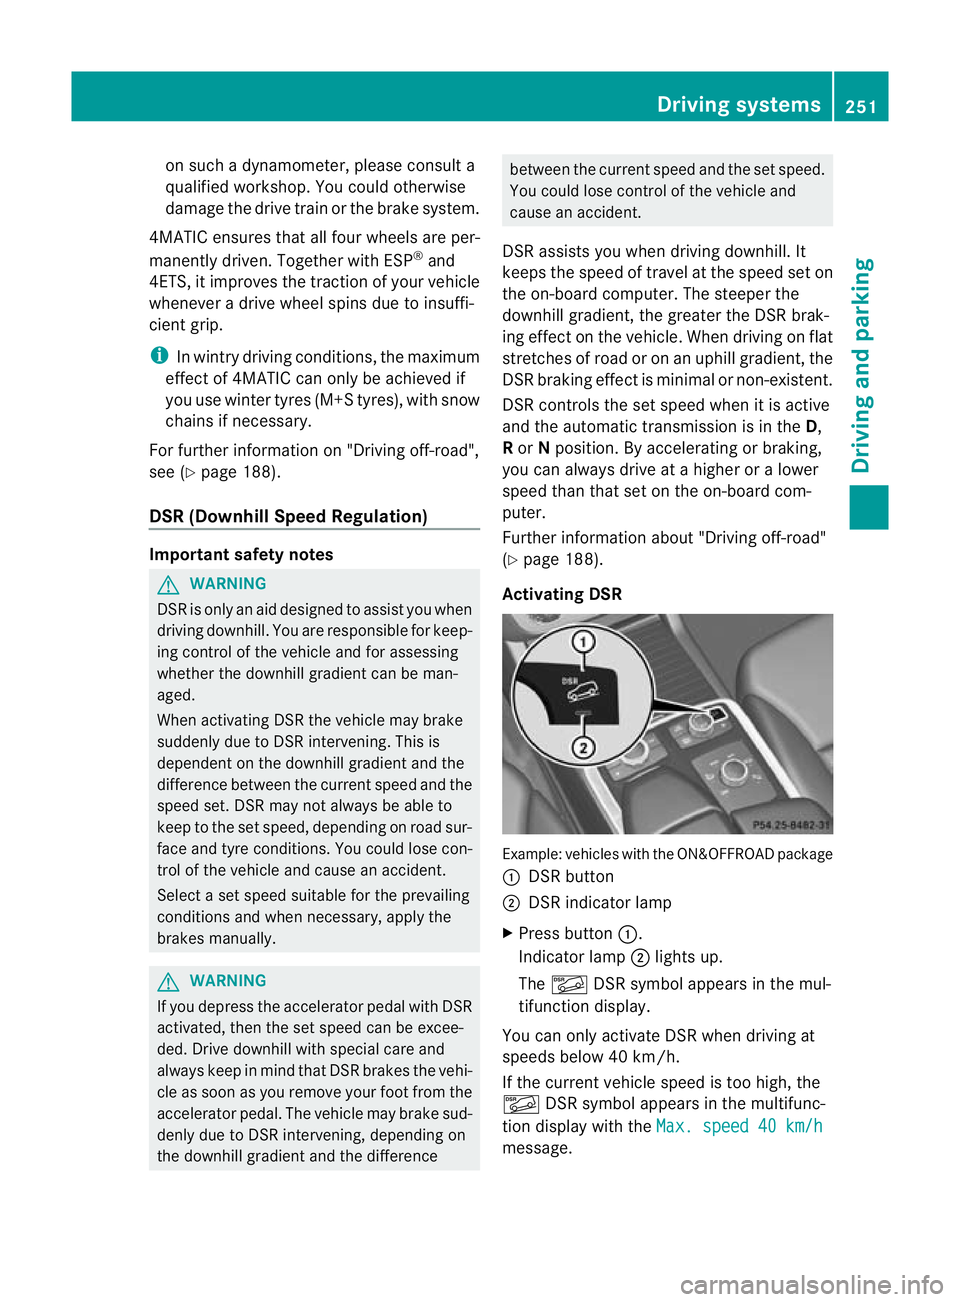
Activating DSR Example: vehicles wit
hthe ON&OFFROAD package
: DSR button
; DSR indicator lamp
X Press button :.
Indicator lamp ;lights up.
The à DSR symbol appear sint he mul-
tifunction display.
You can only activate DS Rwhen drivin gat
speeds below 40 km /h.
If the current vehicle speed is too high, the
à DSR symbol appears in the multifunc-
tion display with the Max.speed 40 km/h message. Drivin
gsystems
251Drivingand pa rking Z
Page 297 of 441
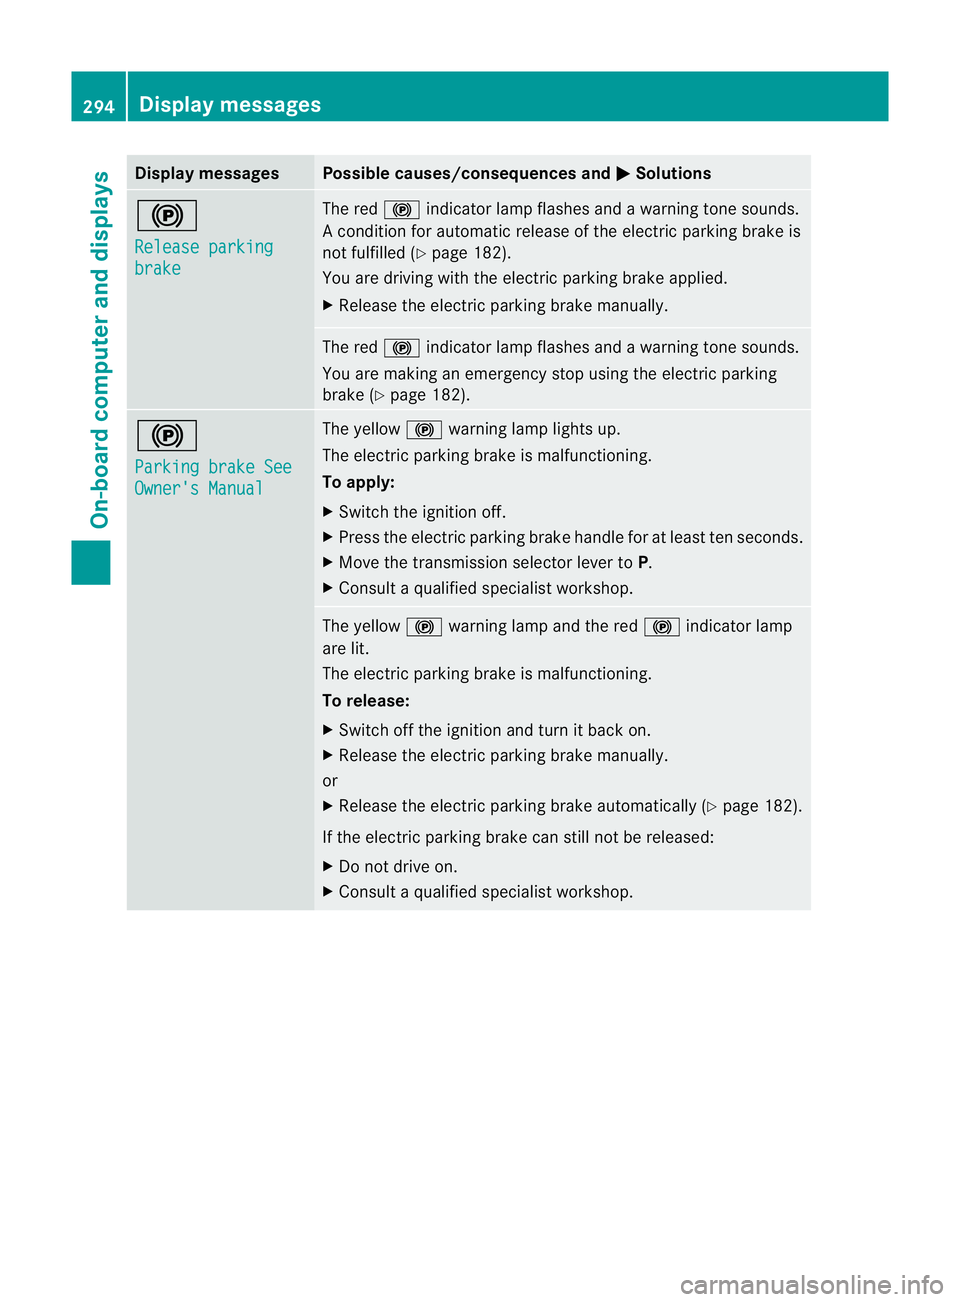
Displa
ymessages Possible causes/consequences and
M Solutions
!
Re
leasep arking brake Th
er ed ! indicato rlamp flashes and awarning ton esounds.
Ac onditio nfor aut omatic relea se of theelectric parking brak eis
not fulfilled (Y page182).
You are driving wit hthe electric parking brak eapplied.
X Releas ethe electric parking brak emanually. The red
!indicator lamp flashes and awarning ton esounds.
You ar emaking an emergenc ystopu singthe electric parking
brak e(Ypage 182). !
Pa
rkingb rake See Owner'
sManual Th
ey ellow !warning lamp light sup.
The electric parking brak eismalfunctioning.
To apply:
X Switch th eignition off.
X Press th eelectric parking brak ehandle for at least ten seconds.
X Move the transmission selector lever to P.
X Consul taqualified specialist workshop. The yellow
!warning lamp and the red !indicator lamp
are lit.
The electric parkin gbrake is malfunctioning.
To release:
X Switch off th eignition and tur nitback on.
X Release the electric parkin gbrake manually.
or
X Releas ethe electric parkin gbrake automaticall y(Ypage 18 2).
If the electric parking brake can still not be released:
X Do not drive on.
X Consul taqualified specialist workshop. 294
Display messagesOn-boar
dcomputer and displays