winter tyres MERCEDES-BENZ GL SUV 2012 Owners Manual
[x] Cancel search | Manufacturer: MERCEDES-BENZ, Model Year: 2012, Model line: GL SUV, Model: MERCEDES-BENZ GL SUV 2012Pages: 441, PDF Size: 10.66 MB
Page 64 of 441
Important safety notes
If you fail to adapt your driving style or
become distracted, th edriving sa fetysys-
tems ca nneith er reduce th erisk of accident
no ro verri dethe law sofphysics. Driving
safety system sare mere ly aids desig nedto
assis tdrivi ng.You ar eresponsible for the dis-
tance to the vehicle in fr ont, forvehicle speed
and for braking in good time. Alway sadapt
your drivin gstyle to suit the prevailing road
and weather condition sand maintain asafe
distance from the vehicle in front .Drive care-
fully.
i Thed riving safet ysystems described only
work as effectively as possibl ewhen there
is adequate con tact betwee nthe tyres and
the roa dsurface. Pleas epay special atten-
tion to the notes on tyres, recommended
minimum tyre tread depths ,etc.
(Y page 396).
In wintry driving conditions, always use
winter tyres (M+S tyres) and if necessary,
snow chains .Only in this way will the driv-
ing safety systems described in this section
work as effectively as possible. ABS (Anti-lock Braking System)
Important safety notes i
Observe the "Important safety notes" sec-
tion (Y page61). G
WARNING
If ABS is faulty, the wheels could lock when
braking .The steerability and brakin gcharac-
teristics ma ybeseverely impaired. Addition-
ally, further driving safet ysystems are deac-
tivated. There is an increased danger of skid-
ding and accidents.
Drive on carefully. Have ABS checked imme-
diatel yata qualified specialist workshop.
When ABS is malfunctioning, other systems,
including driving safety systems, will also
become inoperative. Observe the infor mation on the ABS warning lamp (Y
page 326) and
display messages which may be shown in the
instrument cluster (Y page 291).
ABS regulate sbrake pressure in such away
that the wheels do not lock when you brake.
This allows you to continue steering the vehi-
cle when braking.
ABS works from aspeed of about 8km/h
upwards, regardless of road-surfac econdi-
tions. AB Sworksons lippery surfaces, even
when you only brake gently.
The yellow !ABS warnin glamp in the
instrument cluster lights up when the ignition
is switched on. It goes out when the engine is
running.
Brakes X
If ABS intervenes: continue to depress the
brake pedal with force until the braking sit-
uation is over.
X To mak eafull brake application:
depress th ebrake peda lwith full force.
If ABS intervenes when braking, you will feel
ap ulsing in the brake pedal.
The pulsating brake pedal can be an indica-
tion of hazardous road conditions, and func-
tions as areminder to take extr acare while
driving.
Off-road ABS An ABS system specifically suited to off-road
terrain is activated automatically once the off-
road program is activated on:
R
Vehicles without the ON&OFFROAD pack-
age (Y page 252)
R Vehicles with the ON&OFFROAD package
(Y page 253)
At speeds below 30 km/h, the front wheels
lock cyclically during braking. The digging-in
effect achieved in the process reduces the
stopping distance when driving off-road. This
limits steering capability. Driving safety systems
61Safety Z
Page 191 of 441
At the onse
tofwinter, have your vehicle win-
terproofed at aqualified specialist workshop.
Vehicles with th eON&OFFROAD pack-
age: if drivin ginsnow or with snow chains,
select the snow program (Y page 249)with
the off- road program selector wheel in the
centre console.
Observe the notes in the "Winter operation"
section (Y page 398).
Driving with summer tyres Observe the notes in the "Winter operation"
section (Y
page 398).
Slippery road surfaces G
WARNING
If you shift down on aslippery road surfac ein
an attempt to increase the engine's braking
effect ,the drive wheels coul dlose their grip.
This increases the risk of skiddin gand having
an accident.
Do not shift down for additional engine brak-
ing on aslippery road surface.
If the vehicle threaten stoskid or cannot be
stopped whe nmovin gatl ow speed:
X Move the transmission to position N.
X Try to bring the vehicle under con trolby
using corrective steering.
i For more information on driving with
snow chains, see (Y page 399).
You should drive particularly carefully on slip-
pery road surfaces. Avoid sudde naccelera-
tion, steering and brakin gmanoeuvres. Off-road driving
Important safety notes G
WARNING
If you drive up asteep incline at an angle or
turn on asteep incline, the vehicle could slip sideways, tip and overturn. There is
arisk of
an accident.
When drivin gupanincline, drive into the line
of fall (upw ards or downwards in astraight
line) and do not turn. G
WARNING
If the vehicle level is high, the vehicle centre
of gravity is raised .This coul dcause the vehi-
cle to tip over more easily on uphill or downhill
gradients. There is arisk of an accident.
Select the lowest possible vehicle level.
When drivin goff-road, sand, mud and water,
possibly mixe dwith oil, for example, could get
into the brakes. This could result in areduced
braking effect or in total brak efailure and also
in increased wear and tear. The braking char-
acteristic schange depending on the material
ingressing the brakes. Clean the brakes after
driving off-road. If you detec tareduce dbrak-
ing effect or grinding noises, have th ebrake
system checked in aqualified specialist work-
sho pass oon as possible. Adapt your driving
style to the differen tbraking characteristics.
Driving off- road increases the likelihood of
damage to the vehicle, which, in turn, can lead
to failure of the mechanical assembly or sys-
tems. Adapt your driving style to suit the ter-
rain conditions. Drive carefully. Have damage
to the vehicle rectified immediately at aquali-
fied specialist workshop.
Do not switch to transmission position N
when driving off-road. You could lose control
of the vehicle if you attempt to brake using
the service brake. If the gradient is too steep,
drive backwards in reverse gear.
General notes H
Environmental note
Protection of the environment is of primary
importance. Treat nature with respect.
Observe all prohibiting signs. 188
Driving tipsDrivin
gand pa rking
Page 199 of 441
SPEEDTRONIC
Important safety notes G
WARNING
Never depress the brake peda lcontinuously
while the vehicle is in motion, e.g. never cause
the brakes to rub by applying constant slight
pedal pressure. This causes the brake system
to overheat, increases the brakin gdistance
and can lead to the brakes failing completely. G
WARNING
Do not change down for additional engine
braking on aslippery road surface. This could
cause the drive wheels to lose their grip and
the vehicle could skid. G
WARNING
SPEEDTRONI Cisonly an aid designe dto
assis tdriving. Yo uare responsibl efor the
vehicle' sspeed and for braking in good time. G
WARNING
If there is achange of drivers, advise the new
driver of the limit speed stored.
Only use variable SPE EDTRONI Cifyou will not
have to accelerate suddenl ytoaspeed above
that stored as the limit speed. You could oth-
erwise cause an accident.
You can only exceed the limit speed stored if
you deactivate variable SPE EDTRONIC:
R using the cruise control lever
R by depressin gthe accelerator pedal
beyon dthe pressure point (kickdown)
It is not possible to deactivate variable
SPE EDTRONI Cbybraking.
General notes SPE
EDTRONIC brakes automatically so that
you do not exceed the set speed. On long and
steep downhil lgradients ,especially if the
vehicle is laden or towing atrailer, yo umust
select shift range 1,2or 3in good time. By
doing so, you will make use of the braking
effect of the engine. This relieves the load on the brake system and prevent
sthe brakes
from overheating and wearing too quickly .If
you need additional braking, depres sthe
brake pedal repeatedly rather than con tinu-
ously.
You can set avariable or permanent limit
speed:
R variable for speedlimits, e.g. in built-up
areas
R permanent for long-term speed restric-
tions, e.g. when drivin gwith winter tyres
fitted (Y page 198)
i The speed indicated in the speedometer
may differ slightly from the limit speed
stored.
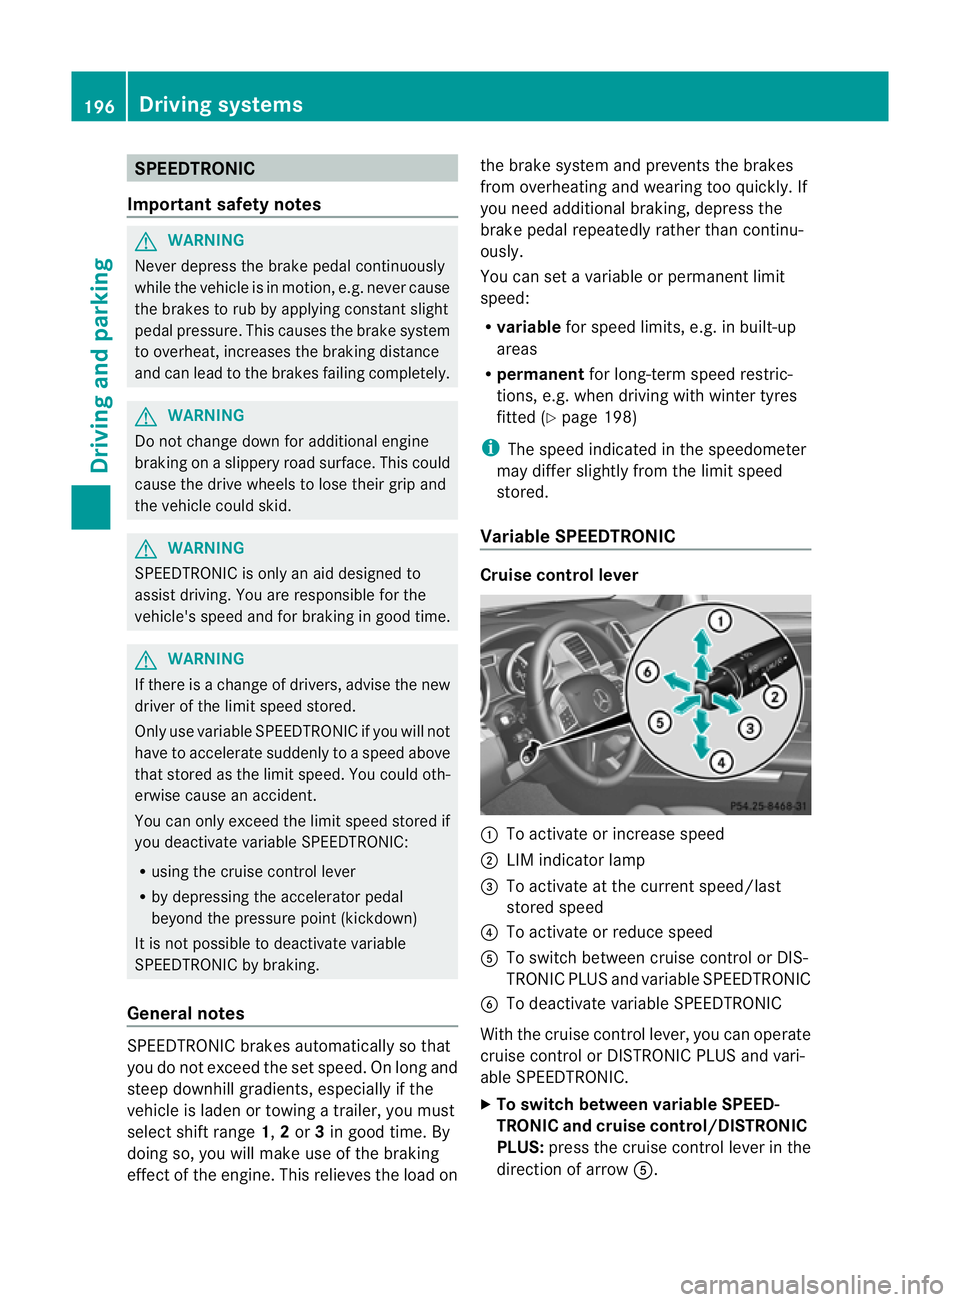
Variable SPEEDTRONIC Cruise control lever
:
To activate or increase speed
; LIMi ndicato rlamp
= To activate at the current speed/last
stored speed
? To activate or reduce speed
A To switch between cruise control or DIS-
TRONIC PLUS and variable SPEEDTRONIC
B To deactivate variable SPEEDTRONIC
With the cruise control lever, you can operate
cruise control or DISTRONIC PLUS and vari-
able SPEEDTRONIC.
X To switch between variable SPEED-
TRONIC and cruise control/DISTRONIC
PLUS: press the cruise control lever in the
direction of arrow A.196
Driving systemsDriving and parking
Page 201 of 441
ah
igher speed or down ;for alower
speed.
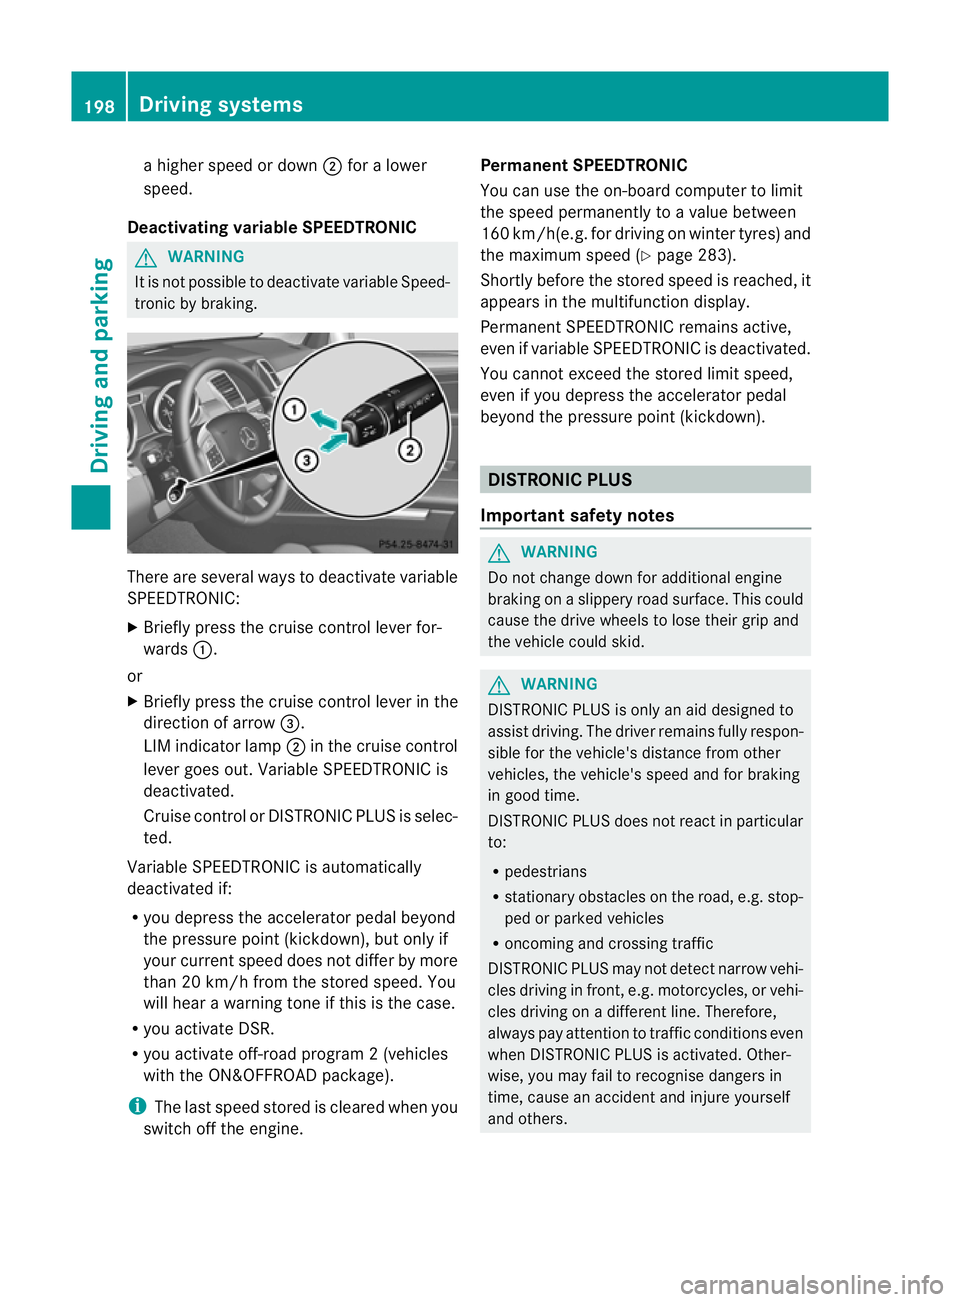
Deactivatin gvariable SPEED TRONIC G
WARNING
It is no tpossible to deactivate variable Speed-
tronic by braking. There are several ways to deactivate variable
SPEEDTRONIC:
X Briefly press the cruise control lever for-
wards :.
or
X Briefly press the cruise control lever in the
direction of arrow =.
LI Mi ndicato rlamp ;in the cruise control
lever goes out. Variable SPEEDTRONIC is
deactivated.
Cruise control or DISTRONIC PLUS is selec-
ted.
Variable SPEEDTRONIC is automatically
deactivated if:
R you depress the accelerator pedal beyond
the pressure point (kickdown), but only if
your current spee ddoes not differ by more
than 20 km /h from the stored speed. You
will hear awarning tone if this is the case.
R you activate DSR.
R you activate off-road program 2(vehicles
wit hthe ON&OFFROAD package).
i The last speed stored is cleared when you
switch off the engine. Permanent SPEEDTRONIC
You can use the on-board computer to limit
the speed permanently to avalue between
16 0k m/ h(e.g .for dri ving on winter tyres) and
the maximum speed (Y page283).
Shortly before th estore dspeed is reached, it
appear sinthe multifunction display.
Permanent SPEEDTRONIC remain sactive,
even if variabl eSPEEDTRONI Cisdeactivated.
You can note xceed the sto redl imit speed,
even if you depress the accelerator pedal
beyond the pressure point (kickdown). DISTRONIC PLUS
Importan tsafety notes G
WARNING
Do not change down for additiona lengine
braking on aslippery road surface. This could
cause the drive wheels to lose their grip and
the vehicle could skid. G
WARNING
DISTRONIC PLU Siso nly an aid designe dto
assis tdriving. Th edrive rremain sfully respon-
sible for the vehicle's distance from other
vehicles, the vehicle's spee dand for braking
in goo dtime.
DISTRONIC PLU Sdoes not react in particular
to:
R pedestrians
R stationar yobstacles on the road, e.g. stop-
ped or parked vehicles
R oncoming and crossin gtraffic
DISTRONIC PLUS may not detect narrow vehi-
cle sdriving in front, e.g .motorcycles, or vehi-
cles driving on adifferen tline. Therefore,
always pay attention to traffic condition seven
when DISTRO NICP LUS is activated. Other-
wise ,you may fai ltorecognise danger sin
time, cause an accident and injure yourself
and others. 198
Drivin
gsystemsDrivin gand parking
Page 254 of 441
on such
adynamometer, pleas econsult a
qualified workshop. You coul dotherwise
damage the drive train or the brake system.
4MATIC ensures that all four wheels are per-
manently driven. Togethe rwith ESP ®
and
4ETS, it improves the trac tion of your vehicle
whenever adrive whee lspins due to insuffi-
cient grip.
i In wintr ydriving conditions ,the maximum
effect of 4MATIC can only be achieved if
you use winter tyres (M+ Styres), with snow
chain sifn eces sary.
Fo rfurther information on "Driving off-road",
see (Y page 188).
DSR (Downhill Speed Regulation) Important safet
ynotes G
WARNING
DS Riso nlyana id designed to assist you when
drivin gdownhill .You are responsible for keep-
ing control of the vehicle and for assessing
whether the downhil lgradient can be man-
aged.
When activating DSR th evehicle may brake
suddenly due to DSR inter vening. Thi sis
dependent on the downhill gradien tand the
difference between the current speed and the
speed set. DSR may not alway sbeable to
keep to the set speed, depending on road sur-
fac eand tyre conditions .You coul dlose con-
trol of the vehicle and cause an accident.
Selec taset speed suitable for the prevailing
conditions and when necessary, apply the
brakes manually. G
WARNING
If you depress the accelerator pedal wit hDSR
activated, the nthe set speed can be excee-
ded. Drive downhill with specia lcare and
alway skeep in min dthat DSR brakes the vehi-
cle as soon as you remove your foot from the
accelerator pedal. The vehicle ma ybrake sud-
denly due to DSR intervening, depending on
th ed ownhill gradient and the differen ce between the current speed and the set speed.
You could lose control of the vehicl
eand
cause an accident.
DSR assists you whe ndriving downhill. It
keeps th espeed of travel at the speed set on
the on-boar dcomputer .The steeper the
downhill gradient ,the greater the DS Rbrak-
ing effect on th evehicle. When driving on flat
stretches of road or on an uphill gradient, the
DSR braking effect is minima lornon-existent.
DSR con trols the set speed when it is active
and the automatic transmission is in the D,
R or Nposition .Bya ccelerating or braking,
you can always drive at ahigher or alower
speed than that set on the on-boar dcom-
puter.
Further information about "Driving off-road"
(Y page 188).
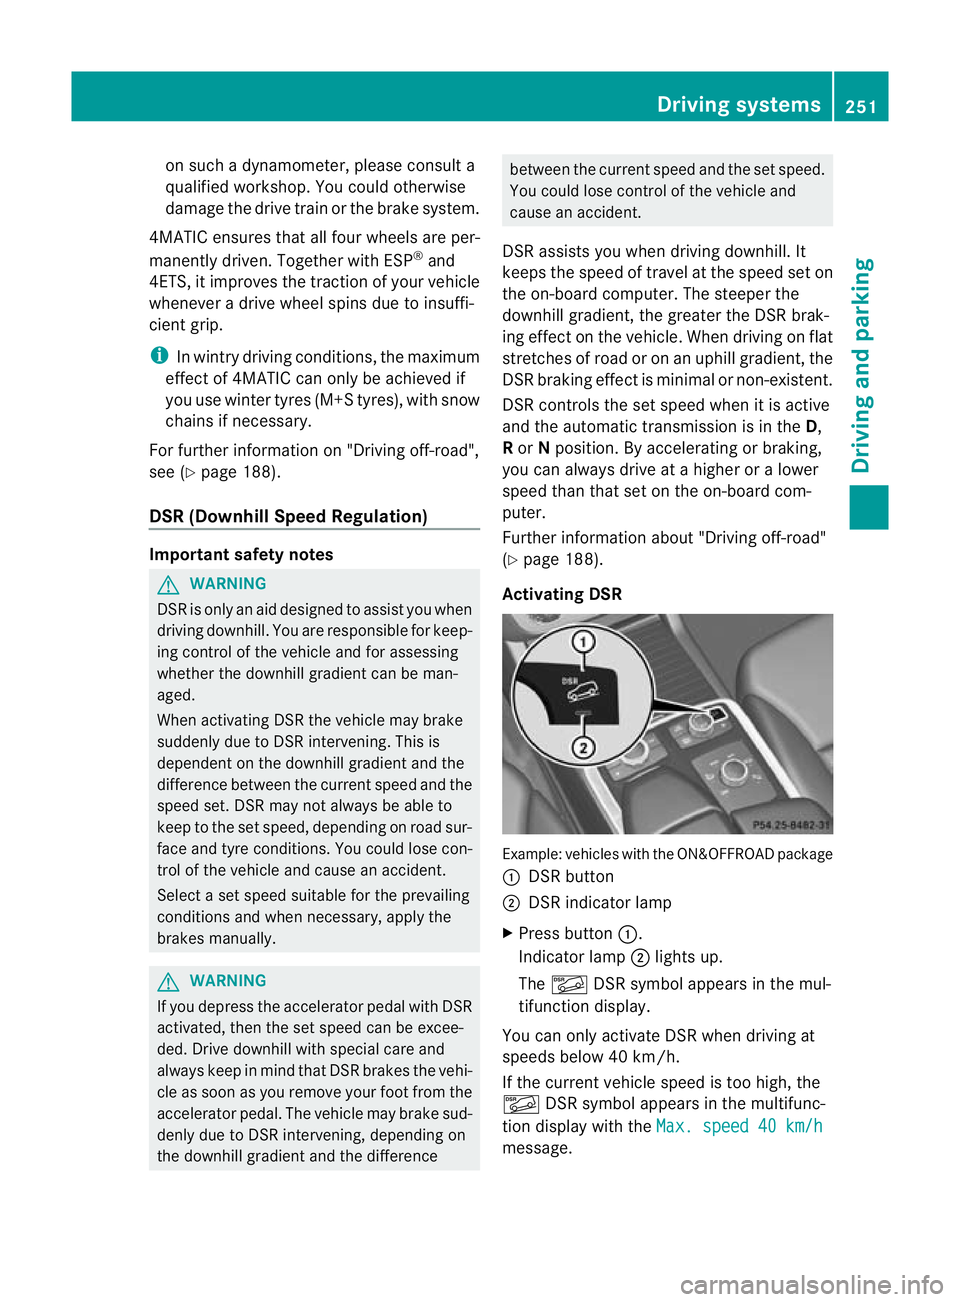
Activating DSR Example: vehicles wit
hthe ON&OFFROAD package
: DSR button
; DSR indicator lamp
X Press button :.
Indicator lamp ;lights up.
The à DSR symbol appear sint he mul-
tifunction display.
You can only activate DS Rwhen drivin gat
speeds below 40 km /h.
If the current vehicle speed is too high, the
à DSR symbol appears in the multifunc-
tion display with the Max.speed 40 km/h message. Drivin
gsystems
251Drivingand pa rking Z
Page 286 of 441
X
Press the =or; button on the steer-
ing wheel to select the Settings menu.
X Press the :or9 button to select the
Light submenu.
X Press ato confirm.
X Press :or9 to select the Light‐ in
gd elayed sw.-off function.
When the Lighting delayed sw.-off function is activated, th
evehicle interior is
displayed in red in the multifunction dis-
play.
X Press the abutton to save the setting.
Vehicle submenu Setting per
manent SPEEDTRONIC
X Press the =or; button on the steer-
ing wheel to select the Settings menu.
X Press :or9 to select the Vehicle submenu.
X Press ato confirm.
X Press the :or9 button to select the
Limit speed (winter tyres): function.
You will see the curren tsetting.
X Press ato confirm.
X Press the :or9 button to adjust
permanen tSPEEDTRONI Cinincrements of
ten (23 0km/h to
160 km/h ). The
Off set-
ting switches permanent SPEED TRONIC
off.
X Press the abuttontos tore the entry.
For furth erinformation on perm anent SPEED-
TRONIC (Y page 198).
Switchin gthe automati clocking feature
on/off
If yo uactivate the Automatic door locks function, the vehicl
eiscentrally locked above
as peed of around 15 km/h.
X Press the =or; button on the steer-
ing whee ltoselectthe Settings men
u.
X Press :or9 to select the Vehicle submenu. X
Press ato confirm.
X Press :or9 to select the Auto‐ matic door locks function.
When the Automaticdoorl ocks func-
ti on is activated, the vehicle doors are dis-
played in red in the multifunction displ ay.
X Press the abutton to save the setting.
For further information on the automatic lock-
ing feature, see (Y page 84).
Activating/deactivating th eacoustic
lockin gconfirmation
If you switch on the Acoustic Lock function,
an acoustic signal sounds when you lock the
vehicle.
X Press the =or; button on the steer-
ing wheel to select the Settings menu.
X Press :or9 to select the Vehicle submenu.
X Press ato confirm.
X Press the :or9 button to select the
Acoustic Lock function.
If the Acoustic Lock function is activated,
the & symbol in the multifunction dis-
play lights up red.
X Press the abutton to save the setting.
Activating/deactivating the radar sensor
system
X Press the =or; button on the steer-
ing wheel to select the Settings menu.
X Press :or9 to select the Vehicle submenu.
X Press ato confirm.
X Press the 9or: button to select
Rada rsensor (See Owner's Man.): .
Yo uw ill see the selected setting: on or
off .
X Press the abutton to save the setting.
i You must deactivate the radar sensor sys-
tem in certain countries and near radio
telescope facilities. For further informa-
tion, see (Y page 433). Menus and submenus
283On-board computer and displays Z
Page 289 of 441
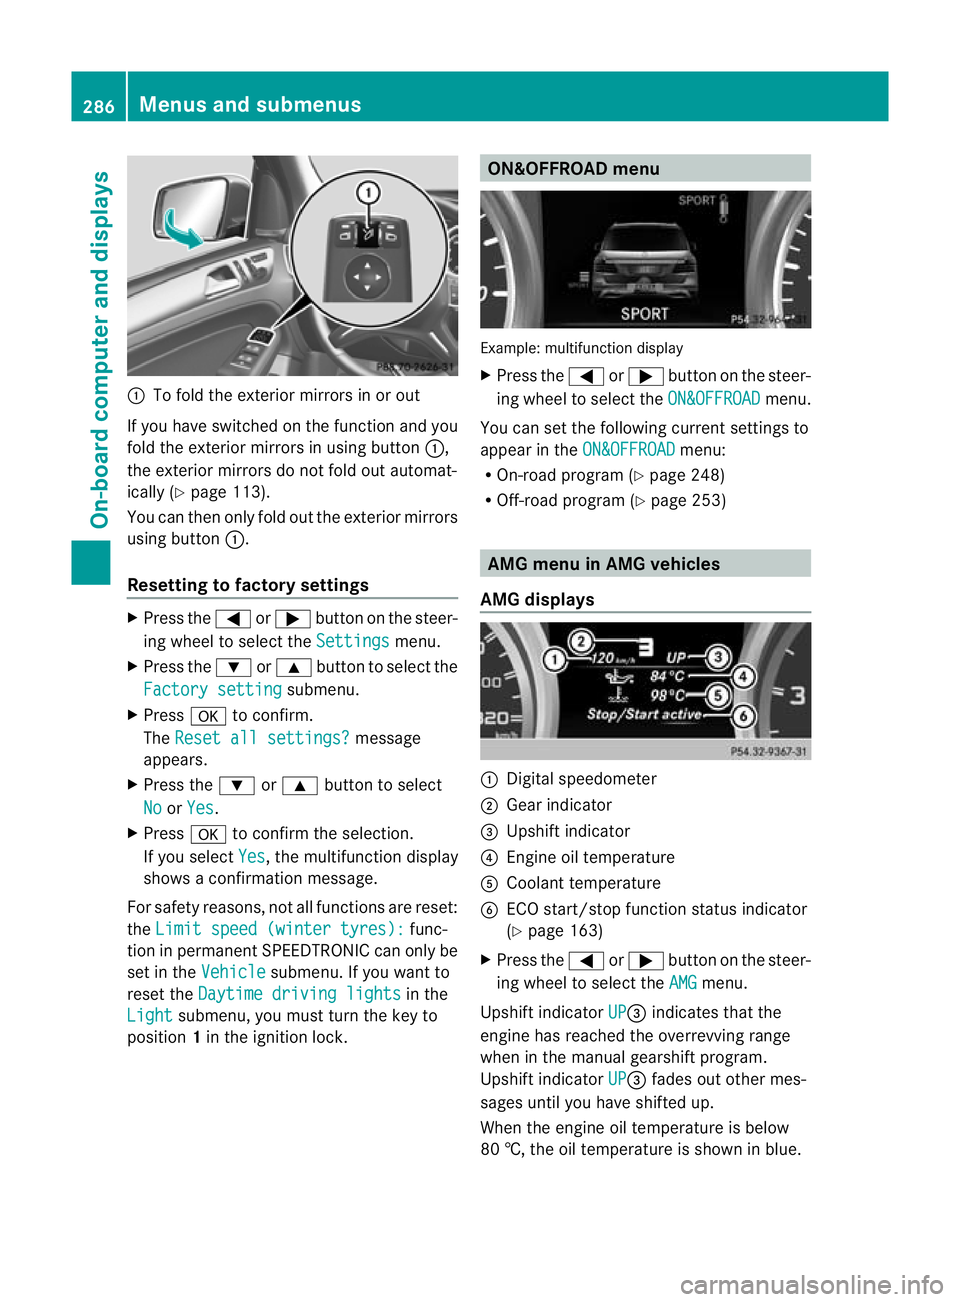
:
To fold the exterior mirror sinorout
If you have switched on the function and you
fold the exterior mirrors in using button :,
the exterior mirrors do not fold out automat-
ically (Y page 113).
You can then only fold out the exterior mirrors
using button :.
Resetting to factor ysettings X
Pres sthe = or; button on th esteer-
ing wheel to selec tthe Settings menu.
X Press the :or9 button to selec tthe
Factor ysetting submenu.
X Press ato confirm.
The Reset all settings? message
appe ars.
X Pres sthe : or9 button to select
No or
Yes .
X Press ato confir mthe selection.
If you select Yes ,t
he multifunction display
shows aconfirmation message.
For safet yreasons, not all functions are reset:
the Limi tspeed (winter tyres): func-
tion in permanen tSPEEDTRONIC can only be
set in the Vehicle submenu. If you want to
reset the Daytimedriving lights in the
Light submenu, yo
umust turn the key to
position 1in the ignition lock. ON&OFFROAD menu
Example: multifunction display
X
Press the =or; button on the steer-
ing wheel to select the ON&OFFROAD menu.
You can set the following current settings to
appea rintheON&OFFROAD menu:
R On-road program (Y page 248)
R Off-road program (Y page 253) AM
Gm enu in AMG vehicles
AMG displays :
Digital speedometer
; Gear indicator
= Upshift indicator
? Engin eoil temperature
A Coolant temperature
B ECO start/stop func tion status indicator
(Y page 163)
X Press the =or; button on the steer-
ing wheel to select the AMG menu.
Upshift indicator UP =
indicates that the
engin ehas reached the overrevving range
when in the manual gearshift program.
Upshift indicator UP =
fades out other mes-
sages until you have shifted up.
When the engine oil temperature is below
80 †, the oil temperature is shown in blue. 286
Menus and submenusOn-board computer and displays
Page 382 of 441
R
ESP ®
is intervening constantly.
R there are tears in the sidewall softhe tyre.
After driving in emergency mode, have the
whee lrims checked at aquali fied specialist
workshop with regar dtotheir furthe ruse. The
fault ytyre must be replaced.
With MOExtended tyres (tyres with run-flat
characteristics), you can continue to drive
your vehicle even if there is atotal loss of
pressure in one or mor etyres.
MOExtended tyres may only be used in con-
junction with an active tyre pressure loss
warning syste morwith an activ etyre pres-
sure monitor.
The maximum driving distance is approx-
imately 80 km when the vehicle is partially
laden, and approximatel y30kmwhen the
vehicle is fully laden.
In addition to the vehicle load, the drivin gdis-
tance possible depends upon:
R speed
R road condition
R outside temperature
The drivin gdistance possible in run-flat mode
may be reduced by extrem edriving condi-
tions/manoeuvres ,oritcan be increased
through amoderate style of driving.
The maximum permissible distance which
can be driven in run-flat mode is counted from
the moment the tyr epressure loss warning
appe arsint he multifunction display.
You must not exceed amaximum spee dof
80 km/h.
i When replacing one or all tyres, make
sure tha tyou only use tyres marked
"MOExtended". Make sure that you only
use the size of tyr especified for the vehicle.
i Vehicles with MOExtended tyres are not
equipped with aTIREFIT kit at th efactory.
It is therefore recommended that you addi-
tionally equip your vehicle with aTIREFIT kit
if yo ufit tyres that do not featur erun-flat
characteristics, e.g. winter tyres. ATIREFIT kit can be obtaine
dfrom aqualified spe-
cialist workshop. TIREFIT kit
Usin gthe TIREFIT kit TIREFIT is
atyre seal ant.
You can use TIREFIT to seal punctures of up
to 4m m, particularl ythose in the tyr etread.
Yo uc an use TIREFI Tatoutside temperatures
down to Ò20 †. G
WARNING
In the following situations, the tyre sealant is
unable to provide sufficient breakdown assis-
tance, as it is unable to seal the tyre properly:
R there are cuts or punctures in the tyre
larger than those mentioned above.
R the wheel rim is damaged.
R you have driven at very low tyre pressures
or on aflat tyre.
There is arisk of accident.
Do not drive any further. Contact aqualified
specialist workshop. G
WARNING
The tyre sealant is harmful and causes irrita-
tion. It must not come into contact with your
skin, eyes or clothing or be swallowed. Do not
inhale TIREFIT fumes. Keep tyre sealant away
from children. There is arisk of injury.
If you come into contact with the tyre sealant,
observe the following:
R Rinse off the tyre sealant from your skin
immediately with water.
R If the tyre sealant comes into contact with
your eyes, immediately rinse them thor-
oughly with clean water.
R If tyre sealant is swallowed, immediately
rinse your mouth out thoroughly and drink
plenty of water. Do not induce vomiting,
and seek medical attention immediately. Flat tyre
379Breakdown assistance
Z
Page 398 of 441
Usefu
linfor mation ............................ 396
Important safet ynotes .................... 396
Operation ........................................... 396
Winter oper ation ............................... 398
Ty re pressure .................................... 399
Changing awheel ............................. 404
Wheel and ty recombinations ..........409
Emergency spa rewheel ................... 414 395Wheels and tyres
Page 401 of 441
Observe the notes on the emergenc
yspare
wheel (Y page 414). MOExtended tyres (tyres with run-flat
characteristics)
With MOExtended tyres (tyres with run-flat
characteristics), you can continue to drive
your vehicle even if there is atotal loss of
pressure in one or mor etyres.
MOExtended tyres may only be used in con-
junction with an active tyre pressure loss
warning syste morwith an activ etyre pres-
sure monitor and on wheels specificall ytes-
ted by Mercedes-Ben z.
No tes on driving with MOExtended tyres with
af lat tyre (Y page 378).
i Vehicles with MOExtended tyres are not
equipped with aTIREFIT kit at th efactory.
It is therefore recommended that you addi-
tionally equi pyour vehicle with aTIREFIT kit
if yo ufit tyres that do not featur erun-flat
characteristics, e.g. winter tyres. ATIREFIT
kit can be obtaine dfrom aqualified spe-
cialist workshop. Winter operation
General notes
Have your vehicle winterproofed at aqualified
specialist worksho patthe onset of winter.
Observ ethe notes in the "Changin gawheel"
section (Y page 404). Driving wit
hsummer tyres
At temperatures belo w+7† ,summer tyres
lose elasticity and therefore traction and
braking power. Change the tyres on your vehi-
cle to M+S tyres .Using summer tyres at very
cold temperatures could cause tears to form,
thereby damaging the tyres permanently.
Mercedes-Benz cannot accept responsibility
for this typ eofdamage. M+S tyres
G
WARNING
M+S tyres with atyre tread depth of less than
4mma re not su itable for use in winter as they
do not provid esufficient traction. There is a
risk of accident.
M+S tyres with atrea ddepth of less than
4mmm ust be replaced.
At temperatures below +7 †, use winter tyres
or all-seas ontyres.B oth types of tyr eare
identified by th eM+S marking.
Onl ywinter tyres bearing the isnowflake
symbol in addition to the M+S marking pro-
vide the best possible grip in wintr yroad con-
ditions.
Only these tyres will allow drivin gsafety sys-
tems such as ABS and ESP ®
to function opti-
mally in winter. Thes etyres have been devel-
ope dspecifically for driving in snow.
Use M+S tyres of the same mak eand tread
on all wheels to maintain safe handling char-
acteris tics.
Alway sobserv ethe maximum permissible
speed specifie dfor the M+S tyres you have
fit ted.
If you fit M+S tyres that have alower maxi-
mu mp ermissible speed than that of the vehi-
cle, affix acorresponding warnin glabel in the
driver' sfield of vision. This can be obtained
at aq ualified specialist workshop.
Under these circumstances, you should also
restrict the maximum spee dofthe vehicle
usin gpermanen tSPEEDTRONIC so that it
does not exceed the maximu mpermissible
speed for the M+S tyres(Y page 198).
When you have fit tedt he M+S tyres:
X Chec kthe tyr epressures (Y page 399).
X Restart th etyre pressure monitor
(Y page 403).
X Restart the tyre pressure los swarning sys-
tem (Y page 401).
For more information on driving with the
emergenc yspare wheel, see (Y page 414).398
Winter opera
tionWheels and tyres