child lock MERCEDES-BENZ GL350 BlueTEC 2011 X164 Owner's Manual
[x] Cancel search | Manufacturer: MERCEDES-BENZ, Model Year: 2011, Model line: GL350 BlueTEC, Model: MERCEDES-BENZ GL350 BlueTEC 2011 X164Pages: 376, PDF Size: 17.39 MB
Page 8 of 376
Central lockingAutomatic locking (on-board
computer) ...................................... 224
SmartKey ......................................... 72
Changing bulbs
Headlamps ..................................... 120
Changing gears .................................. 154
Changing the programming SmartKey ......................................... 75
Checklist
After driving off-road ...................... 175
Before driving off-road ...................175
Child-proof locks
Rear doors ....................................... 64
Special seat belt retractor ...............61
Children
In the vehicle ................................... 59
Restraint systems ............................ 59
Child seat
Automatic recognition .....................48
Automatic recognition/air bag
deactivation, self-test ......................50
ISOFIX (LATCH-type child seat
anchors) ........................................... 62
Special seat belt retractor ...............61
Top Tether ....................................... 62
Troubleshooting ............................... 51
Cigarette lighter ................................ 280
Climate control Activating/deactivating .................136
Activating/deactivating air-
recirculation mode .........................141
Controlling automatically ...............138
Cooling with air dehumidification ..137
Defrosting the windshield ..............140
Demisting the windows .................. 141
Dual-zone automatic climate
control ........................................... 131
Important safety information .........130
Indicator lamp ................................ 138
Multi-zone automatic climate
control ........................................... 132
Problems with "cooling with air
dehumidification" ........................... 138
Problems with the rear window
heating .......................................... 141
Rear control panel .................133, 136
Refrigerant ..................................... 369Setting the air distribution .............140
Setting the airflow .........................140
Setting the air vents ......................143
Setting the temperature ................139
Setting the temperature (rear
compartment) ................................ 139
Switching the MONO function on/
off .................................................. 140
Switching the rear window
heating on/off ............................... 141
Switching the residual heat
function on/off .............................. 142
Clock (on-board computer) ............... 222
Cockpit ................................................. 27
Combination switch .......................... 117
Compass ............................................ 291
Calling up ....................................... 291
Consumption statistics (on-board
computer) .......................................... 227
Convenience closing feature .............. 87
Convenience opening feature ............ 86
Coolant (engine) Checking the level .........................297
Display message ............................ 240
Notes ............................................. 369
Temperature gauge ........................ 218
Cooling
see Climate control
Cornering light (display message) ... 237
Crash-responsive emergency
lighting ............................................... 119
Crossbar Installing ........................................ 274
Setting the span width ...................276
Cross bar ............................................ 273
Cruise control .................................... 179
Cruise control lever .......................179
Display message ............................ 246
Cup holder ......................................... 277
Center console .............................. 277
Rear compartment .........................278
third row of seats ........................... 278
Current fuel consumption (on-
board computer) ............................... 227
Customer Assistance Center (CAC) ............................................... 22
Customer Relations Department ....... 236IndexBA 164.8 USA, CA Edition B 2011; 1; 2, en-USd2sboikeVersion: 3.0.3.52010-04-21T15:08:44+02:00 - Seite 6
Page 12 of 376
I
Immobilizer .......................................... 69
Indicator and warning lamps ABS ................................................ 256
Brakes ........................................... 254
DISTRONIC .................................... 260
Engine diagnostics .........................259
ESP ®
.............................................. 257
Fuel tank ........................................ 259
Reserve fuel ................................... 259
Seat belt ........................................ 255
SRS ................................................ 258
Tire pressure monitor ....................260
Insect protection on the radiator .... 295
Instrument cluster Overview .......................................... 28
Selecting the language (on-board
computer) ...................................... 222
Submenu (on-board computer) ......221
Warning and indicator lamps ...........29
Instrument cluster lighting ................ 28
Instrument lighting see Instrument cluster lighting
Interior lighting
Automatic control ..........................119
Delayed switch-off (on-board
computer) ...................................... 224
Emergency lighting ........................119
Manual control ............................... 119
Reading lamp ................................. 118
Setting ambient lighting (on-board
computer) ...................................... 223
ISOFIX (LATCH-type child seat
securing system) ................................. 62
J
Jack Storage location ............................ 310
Using ............................................. 318
Jump-starting ..................................... 325
K
Key Convenience closing feature ............87
Convenience opening feature ..........86
Display message ............................ 252
Starting the engine ........................148
KEYLESS-GO
Button ............................................ 147
Convenience closing feature ............87
Locking ............................................ 73
Starting the engine ........................149
Unlocking ......................................... 73
Key positions
KEYLESS-GO .................................. 147
SmartKey ....................................... 147
Kickdown ........................................... 155
Knee bag .............................................. 40
L
Lane-change assistant see Blind Spot Assist
Language (on-board computer) ........ 222
Level control ...................................... 189
Level control (display message) ...... 244
License plate lamp (display
message) ............................................ 239
Light Setting ambient lighting (on-board
computer) ...................................... 223
Lights
Activating/deactivating the
interior lighting delayed switch-off
(on-board computer) ......................224
Active light function .......................118
Automatic headlamp mode ............115
Daytime running lamps ..................115
Driving abroad ............................... 114
Fog lamps ...................................... 116
Hazard warning lamps ...................117
High-beam headlamps ...................117
Light switch ................................... 114
Low-beam headlamps ....................115
Rear fog lamp ................................ 116
Switching the daytime driving
lights on/off (on-board computer) . 223
Switching the exterior lighting
delayed switch-off on/off (on-
board computer) ............................ 223
Switching the surround lighting
on/off (on-board computer) ..........223
Light sensor (display message) ....... 240
10IndexBA 164.8 USA, CA Edition B 2011; 1; 2, en-USd2sboikeVersion: 3.0.3.52010-04-21T15:08:44+02:00 - Seite 10
Page 13 of 376
Loading guidelines ............................ 264
Locking Automatic ........................................ 79
Emergency locking ........................... 80
From inside the vehicle (central
locking button) ................................. 79
Low-beam headlamp (display
message) ............................................ 237
LOW RANGE Display message ............................ 245
Off-road gear ......................... 157, 205
LOW RANGE off-road gear ........ 157, 205
Luggage net ....................................... 266
Lumbar support 4-way lumbar support ....................104
Luxury head restraints ....................... 97
M
Main-beam headlamps (display
message) ............................................ 238
Malfunction message see Display messages
Malfunctions relevant to safety
Reporting ......................................... 23
mbrace
Call priority .................................... 287
Display message ............................ 231
Downloading destinations
(COMAND) ..................................... 287
Emergency call .............................. 284
Important safety notes ..................283
Locating a stolen vehicle ...............288
MB info call button ........................286
Roadside Assistance button ..........285
Self-test ......................................... 283
System .......................................... 283
Vehicle remote unlocking ..............287
Mechanical key
Function/notes ................................ 75
Memory card (on-board computer) . 219
Memory function ............................... 110
Menu (on-board computer) Additional functions .......................226
Audio ............................................. 219
DISTRONIC .................................... 186
DVD ............................................... 220
Message memory .......................... 229
Navigation ..................................... 220
Off-road ......................................... 220
Overview of menus ........................217
Resetting to factory settings ..........221
Settings ......................................... 221
Standard display ............................ 218
Telephone ...................................... 227
Trip computer ................................ 227
Messages
see Display messages
Mirrors
Sun visor ........................................ 278
see Exterior mirrors or Rear-view mirror
MOExtended run-flat system ........... 321
MP3 Operating (on-board computer) .....219
see separate operating instructions
Multicontour seat .............................. 103
Multifunction display ........................ 215
Multifunction steering wheel Operating the on-board computer . 215
Overview .......................................... 30
N
Navigation On-board computer .......................220
see separate operating instructions
NECK-PRO head restraints
Operation ......................................... 52
Resetting triggered ..........................52
NECK-PRO luxury head restraints
Resetting triggered ..........................52
Notes on breaking-in a new
vehicle ................................................ 146
O
Occupant Classification System
(OCS) Faults ............................................... 47
Operation ......................................... 42
System self-test ............................... 46
Occupant safety
Children in the vehicle .....................59
System overview .............................. 36
Index11BA 164.8 USA, CA Edition B 2011; 1; 2, en-USd2sboikeVersion: 3.0.3.52010-04-21T15:08:44+02:00 - Seite 11
Page 47 of 376
Rwhen securing a child in a child restraint
system on the front-passenger seat, you
must:
- move the front-passenger seat as far
back as possible
- use a child restraint system that is
suitable for the age, size and weight of
the child
- observe the manufacturer's installation
instructions in order to install and secure
the child restraint system correctly.
R for children larger than the typical 12-
month-old child, the passenger front air bag
is activated.
Deployment of the driver front air bag does
not mean that the front-passenger front air
bag also should have deployed. The OCS may
have determined:
R that the seat was empty or occupied by a
person with a weight up to or less than that
of a typical 12 month-old child seated in a
standard child restraint
R that the seat was occupied by a small
person (e.g. a young teenager or a small
adult) or a child that weighs more than a
typical 12 month old child in a child
restraint system
These are examples of when OCS disables the
front-passenger front air bag. This occurs
even though the impact fulfills the criteria for
deployment of the driver's front air bag.
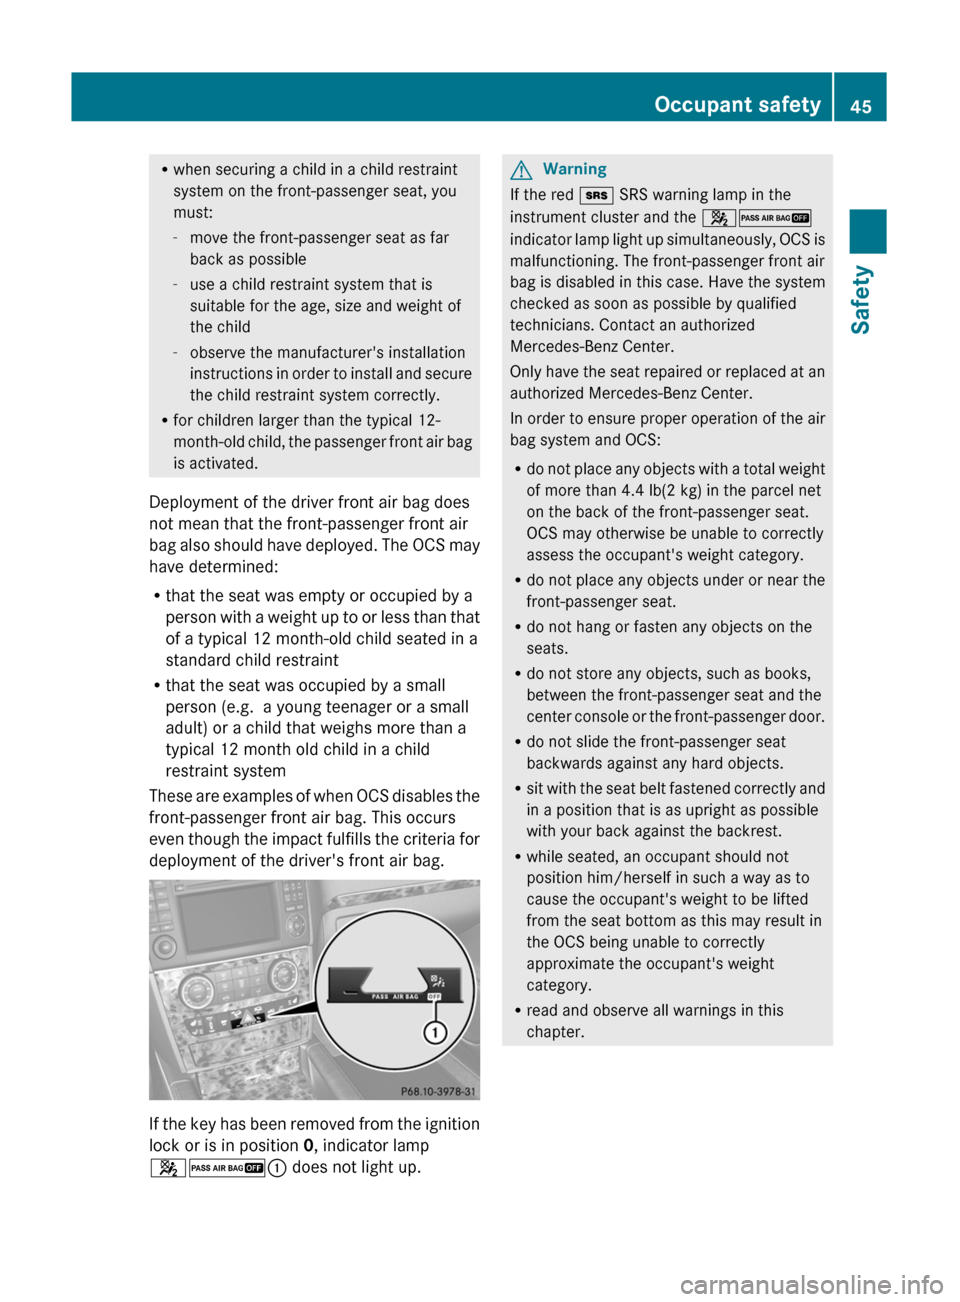
If the key has been removed from the ignition
lock or is in position 0, indicator lamp
42 : does not light up.
GWarning
If the red + SRS warning lamp in the
instrument cluster and the 42
indicator lamp light up simultaneously, OCS is
malfunctioning. The front-passenger front air
bag is disabled in this case. Have the system
checked as soon as possible by qualified
technicians. Contact an authorized
Mercedes-Benz Center.
Only have the seat repaired or replaced at an
authorized Mercedes-Benz Center.
In order to ensure proper operation of the air
bag system and OCS:
R do not place any objects with a total weight
of more than 4.4 lb(2 kg) in the parcel net
on the back of the front-passenger seat.
OCS may otherwise be unable to correctly
assess the occupant's weight category.
R do not place any objects under or near the
front-passenger seat.
R do not hang or fasten any objects on the
seats.
R do not store any objects, such as books,
between the front-passenger seat and the
center console or the front-passenger door.
R do not slide the front-passenger seat
backwards against any hard objects.
R sit with the seat belt fastened correctly and
in a position that is as upright as possible
with your back against the backrest.
R while seated, an occupant should not
position him/herself in such a way as to
cause the occupant's weight to be lifted
from the seat bottom as this may result in
the OCS being unable to correctly
approximate the occupant's weight
category.
R read and observe all warnings in this
chapter.
Occupant safety45SafetyBA 164.8 USA, CA Edition B 2011; 1; 2, en-USd2sboikeVersion: 3.0.3.52010-04-21T15:08:44+02:00 - Seite 45Z
Page 48 of 376
System self-test
The 42 indicator lamp
illuminates when you:
R turn the SmartKey to position 1 or 2 in the
ignition lock
R press the KEYLESS-GO Start-Stop button
once or twice
If an adult occupant is properly sitting on the
passenger seat and the OCS classifies the
occupant as an adult, the 42
indicator lamp illuminates and goes out again
after approximately 6 seconds.
If the seat is not occupied and the OCS
classifies the front-passenger seat as being
unoccupied, the 42 indicator
lamp will illuminate and not go out.
GWarning!
If the 4 2 indicator lamp does
not illuminate, the system is not functioning.
You must contact an authorized Mercedes-
Benz Center before seating any child on the
front passenger seat.
For more information, see "Problems with the
occupant classification system"
( Y page 47).
GWarning
Never place anything between seat cushion
and child seat (e.g. a pillow), since it reduces
the effectiveness of the OCS. The underside
and rear side child restraint system must be
placed entirely on the seat cushion and the
backrest of the front-passenger seat
backrest.
If necessary, adjust the tilt of the passenger
seat backrest.
An incorrectly mounted child seat could cause
injuries to the child in case of an accident,
instead of increasing protection for the child.
Follow the manufacturer's instructions for
installation of child restraint systems.
46Occupant safetySafety
BA 164.8 USA, CA Edition B 2011; 1; 2, en-USd2sboikeVersion: 3.0.3.52010-04-21T15:08:44+02:00 - Seite 46
Page 51 of 376
carry a child on the front-passenger seat
once the system has been repaired.
A child in a rear-facing child restraint on the
passenger seat will be seriously injured or
even killed if the passenger front air bag
inflates.
R when securing a child in a front-facing child
restraint system on the front-passenger
seat, you must:
- move the front-passenger seat as far
back as possible
- use a child restraint system that is
suitable for the age, size and weight of
the child
- observe the manufacturer's installation
instructions in order to install and secure
the child restraint system correctly.GWarning
When using a BabySmart™-compatible child
restraint system on the front-passenger seat,
the front-passenger front air bag is only
disabled if the 42 indicator lamp
is illuminated.
Always check the 42 indicator
lamp if you are using a BabySmart™-
compatible child restraint system on the
front-passenger seat. If the 42
indicator lamp does not light up or goes out
when the child restraint system is installed,
check the anchorages of the restraint system.
If the 42 indicator lamp remains
out, do not use the BabySmart™ child
restraint system to carry a child on the front-
passenger seat until the system has been
repaired.
GWarning
The BabySmart™ air bag disabling system
ONLY works with specially adapted child
restraint systems. It does not work with child
restraint systems that are not compatible with
BabySmart™.
Never place anything between the seat
cushion and the child restraint system (e.g. a
cushion), as this reduces the effectiveness of
the BabySmart™ air bag deactivation system.
The underside of the child restraint system
must lie against the seat cushion of the front-
passenger seat. In the event of an accident,
an incorrectly installed child restraint system
could injure the child instead of offering
protection.
Observe the manufacturer's instructions
when installing special child restraint
systems.
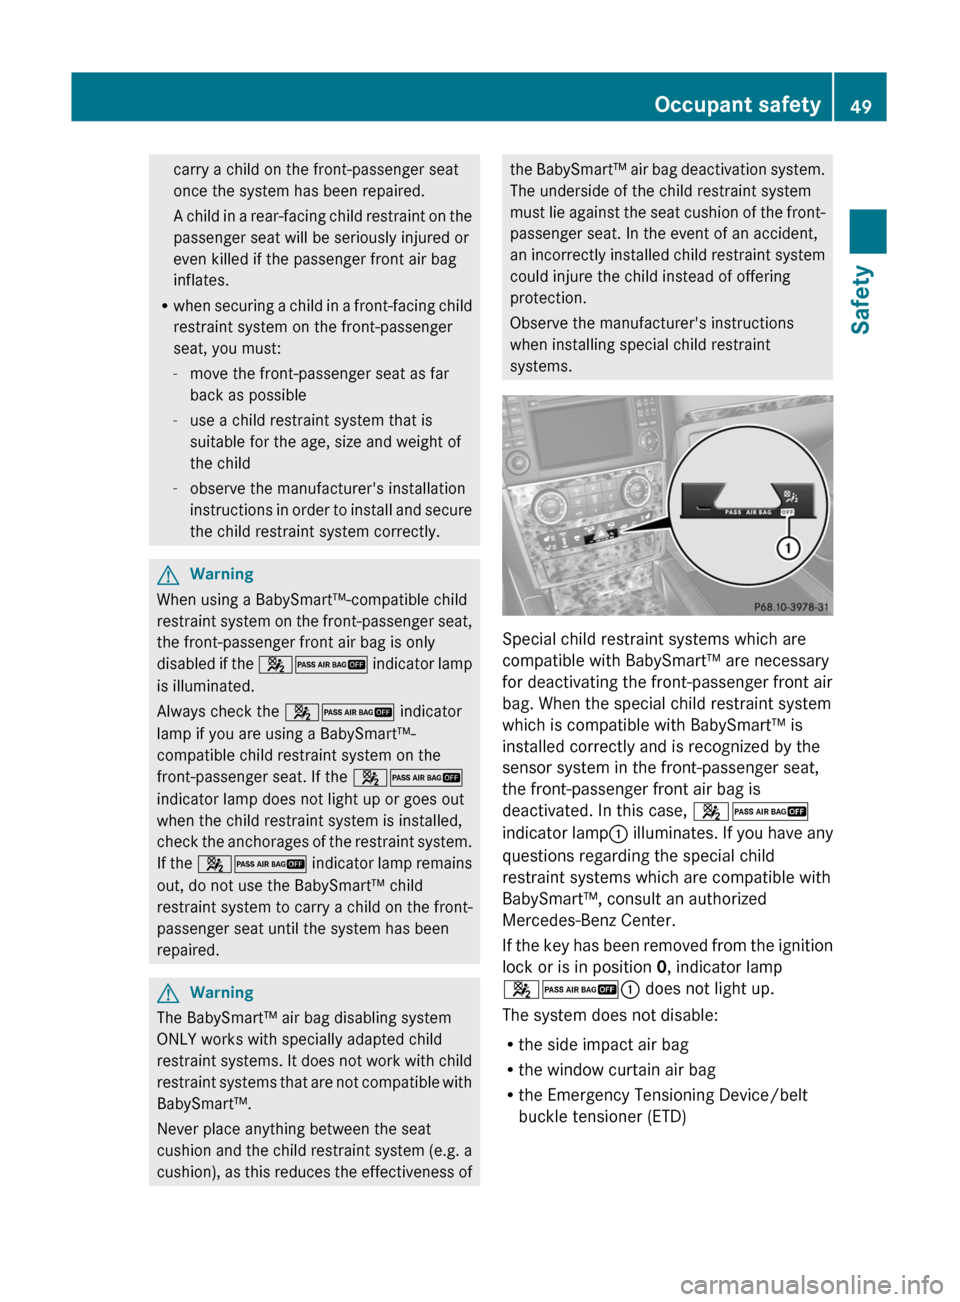
Special child restraint systems which are
compatible with BabySmart™ are necessary
for deactivating the front-passenger front air
bag. When the special child restraint system
which is compatible with BabySmart™ is
installed correctly and is recognized by the
sensor system in the front-passenger seat,
the front-passenger front air bag is
deactivated. In this case, 42
indicator lamp : illuminates. If you have any
questions regarding the special child
restraint systems which are compatible with
BabySmart™, consult an authorized
Mercedes-Benz Center.
If the key has been removed from the ignition
lock or is in position 0, indicator lamp
42 : does not light up.
The system does not disable:
R the side impact air bag
R the window curtain air bag
R the Emergency Tensioning Device/belt
buckle tensioner (ETD)
Occupant safety49SafetyBA 164.8 USA, CA Edition B 2011; 1; 2, en-USd2sboikeVersion: 3.0.3.52010-04-21T15:08:44+02:00 - Seite 49Z
Page 52 of 376
System self-test
The 42 indicator lamp
illuminates when you:
R turn the SmartKey to position 1 or 2 in the
ignition lock
R on vehicles with KEYLESS-GO, press the
Start-Stop button once or twice.
The 42 indicator lamp goes out
again after approximately six seconds.
If the 42 indicator lamp does not
illuminate or is lit continuously, the system is
malfunctioning. Before transporting a child
on the front-passenger seat, have the
BabySmart™ system checked at an
authorized Mercedes-Benz Center.
For more information, see "Problems with the
air bag deactivation system" section
( Y page 51)
GWarning!
Do not place powered-on laptops, mobile
phones, electronic tags such as those used in
ski passes and like electronic devices on the
front passenger seat. Signals from such
devices may interfere with the BabySmart™
air bag deactivation system. Such signal
interference may cause the 4 2
indicator lamp not to come on during self-test.
The SRS indicator lamp + and/or the
4 2 indicator lamp could be
continuously lit, indicating that the system is
not functioning. The front passenger front air
bag could deploy inadvertently or fail to
deploy in an accident.
50Occupant safetySafety
BA 164.8 USA, CA Edition B 2011; 1; 2, en-USd2sboikeVersion: 3.0.3.52010-04-21T15:08:44+02:00 - Seite 50
Page 58 of 376
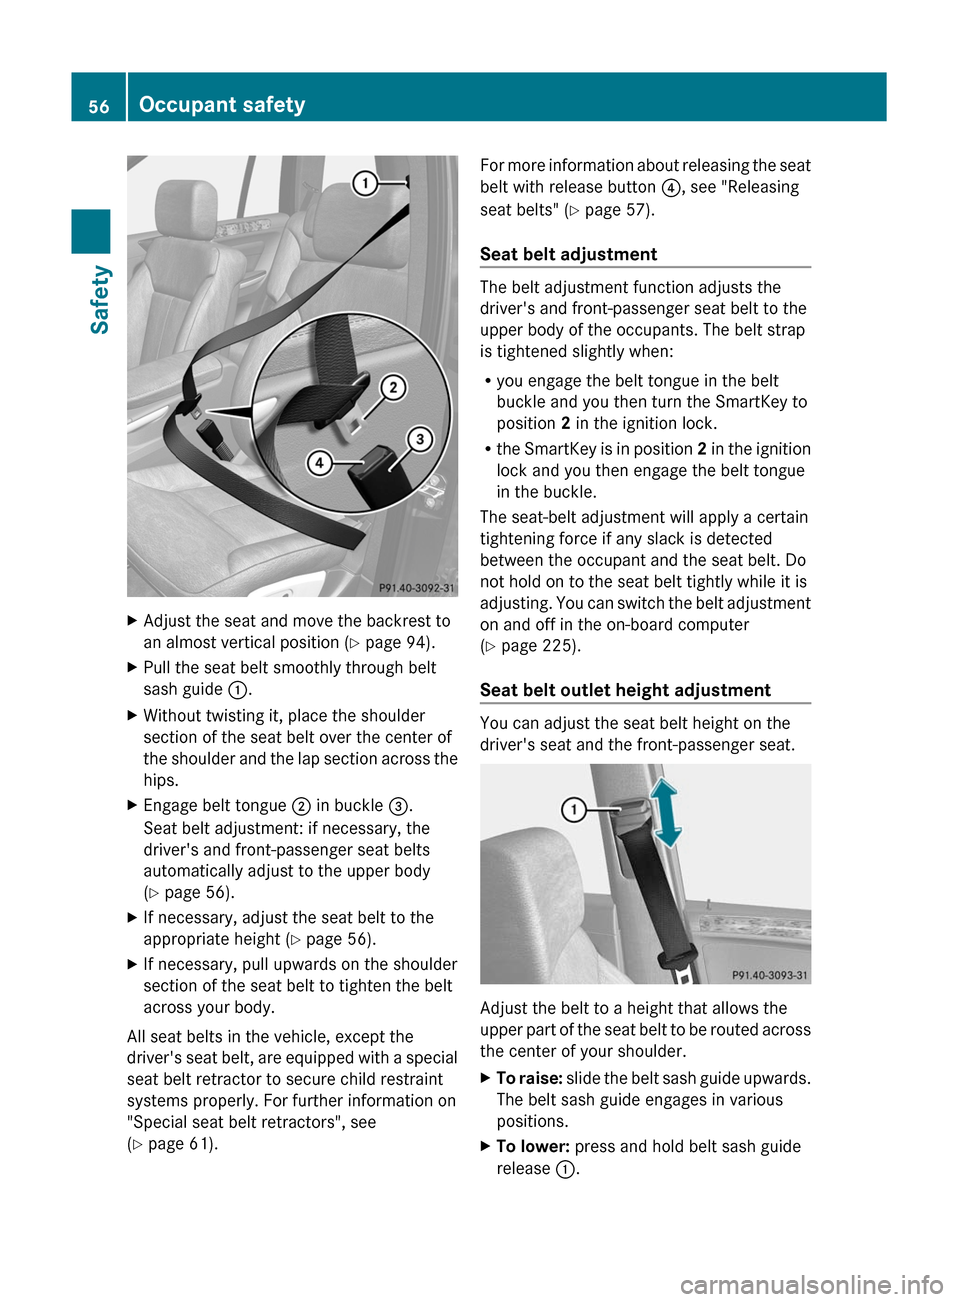
XAdjust the seat and move the backrest to
an almost vertical position ( Y page 94).XPull the seat belt smoothly through belt
sash guide :.XWithout twisting it, place the shoulder
section of the seat belt over the center of
the shoulder and the lap section across the
hips.XEngage belt tongue ; in buckle =.
Seat belt adjustment: if necessary, the
driver's and front-passenger seat belts
automatically adjust to the upper body
( Y page 56).XIf necessary, adjust the seat belt to the
appropriate height ( Y page 56).XIf necessary, pull upwards on the shoulder
section of the seat belt to tighten the belt
across your body.
All seat belts in the vehicle, except the
driver's seat belt, are equipped with a special
seat belt retractor to secure child restraint
systems properly. For further information on
"Special seat belt retractors", see
( Y page 61).
For more information about releasing the seat
belt with release button ?, see "Releasing
seat belts" ( Y page 57).
Seat belt adjustment
The belt adjustment function adjusts the
driver's and front-passenger seat belt to the
upper body of the occupants. The belt strap
is tightened slightly when:
R you engage the belt tongue in the belt
buckle and you then turn the SmartKey to
position 2 in the ignition lock.
R the SmartKey is in position 2 in the ignition
lock and you then engage the belt tongue
in the buckle.
The seat-belt adjustment will apply a certain
tightening force if any slack is detected
between the occupant and the seat belt. Do
not hold on to the seat belt tightly while it is
adjusting. You can switch the belt adjustment
on and off in the on-board computer
( Y page 225).
Seat belt outlet height adjustment
You can adjust the seat belt height on the
driver's seat and the front-passenger seat.
Adjust the belt to a height that allows the
upper part of the seat belt to be routed across
the center of your shoulder.
XTo raise: slide the belt sash guide upwards.
The belt sash guide engages in various
positions.XTo lower: press and hold belt sash guide
release :.56Occupant safetySafety
BA 164.8 USA, CA Edition B 2011; 1; 2, en-USd2sboikeVersion: 3.0.3.52010-04-21T15:08:44+02:00 - Seite 56
Page 61 of 376
Children in the vehicle
Important safety notes
GWarning
When leaving the vehicle, always remove the
SmartKey from the ignition lock. Always take
the SmartKey with you and lock the vehicle.
Do not leave children unattended in the
vehicle, even if they are secured in a child
restraint system, or with access to an
unlocked vehicle. A child's unsupervised
access to a vehicle could result in an accident
and/or serious personal injury. The children
could:
R injure themselves on parts of the vehicle
R be seriously or fatally injured through
excessive exposure to extreme heat or cold
R injure themselves or cause an accident with
vehicle equipment that can be operated
even if the SmartKey is removed from the
ignition lock or removed from the vehicle,
such as seat adjustment, steering wheel
adjustment, or the memory function
If children open a door, they could injure other
persons or get out of the vehicle and injure
themselves or be injured by following traffic.
Do not expose the child restraint system to
direct sunlight. The child restraint system's
metal parts, for example, could become very
hot, and the child could be burned on these
parts.
GWarning!
Do not carry heavy or hard objects in the
passenger compartment or trunk unless they
are firmly secured in place.
Unsecured or improperly positioned cargo
increases a child's risk of injury in the event
of
R strong braking maneuvers
R sudden changes of direction
R an accident
If an infant or child is traveling in the vehicle:XSecure the child using an infant or child
restraint system appropriate to the age and
weight of the child.XMake sure that the infant or child is
properly secured at all times while the
vehicle is in motion.
Child restraint systems
Important safety notes
GWarning
Observe "Important safety instructions"
( Y page 59).
We recommend all infants and children be
properly restrained using the child restraint
systems at all times while the vehicle is in
motion.
The use of infant or child restraints is required
by law in all 50 states, the District of
Columbia, the U.S. territories and all
Canadian provinces.
Infants and small children should always be
seated in an infant or child seat restraint
system appropriate for the size and weight of
the child. They must be properly secured in
accordance with the manufacturer's
installation instructions for the infant or child
seat restraint system. All infant and child seat
restraint systems must comply with the US
Federal Motor Vehicle Safety Standards 213
and 225 and Canadian Motor Vehicle Safety
Standards 213 and 210.2.
A statement by the child restraint
manufacturer of compliance with these
standards can be found on the instruction
label on the child restraint system. You will
also find the statement in the instruction
manual provided with the child restraint
system.
When using an infant restraint system, child
restraint system or booster seat, make sure
to carefully read and follow all manufacturer's
instructions for installation and use.
Children in the vehicle59SafetyBA 164.8 USA, CA Edition B 2011; 1; 2, en-USd2sboikeVersion: 3.0.3.52010-04-21T15:08:44+02:00 - Seite 59Z
Page 64 of 376
LATCH-type child restraint (ISOFIX) in
the rearGWarning
Observe "Important safety instructions"
( Y page 59).
GWarning
Children too big for a toddler restraint must
ride in seats using regular seat belts. Position
the shoulder belt across the chest and
shoulder, not face or neck.
In order to attain the correct seating position
for children weighing over 41 lb (18 kg), it may
be necessary to use a booster seat until they
reach a height where a normal lap/shoulder
seat belt lies properly across their bodies
without the need for a booster seat.
Install the child restraint system according to
the manufacturer's instructions.
The child restraint system must be installed
firmly on both brackets.
An incorrectly installed child restraint system
can come loose in the event of an accident,
causing the child to be severely or fatally
injured.
Child restraint systems/child restraint
retaining brackets that are damaged or have
suffered damage due to an impact must be
replaced.
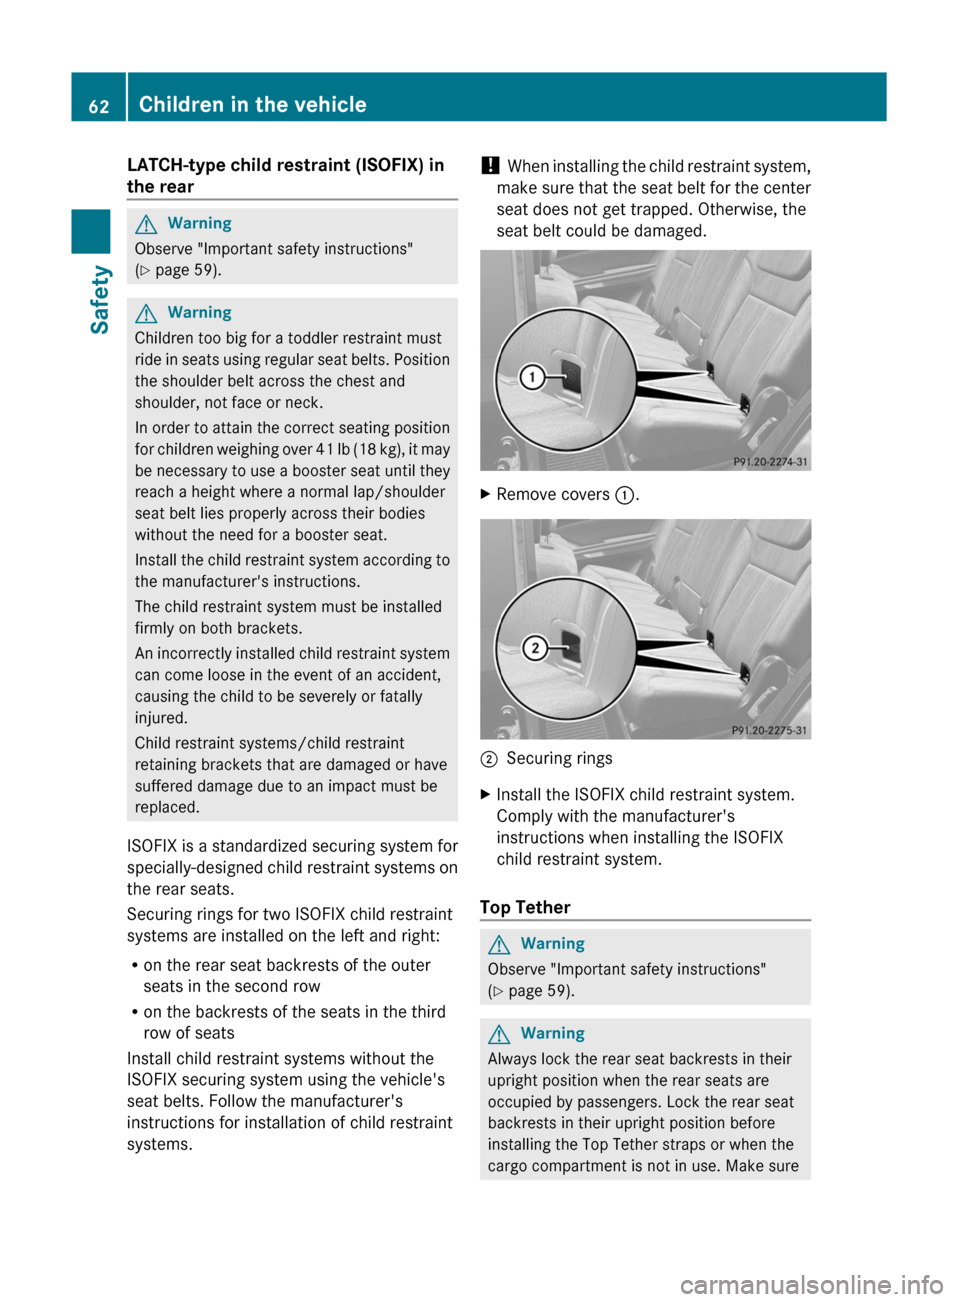
ISOFIX is a standardized securing system for
specially-designed child restraint systems on
the rear seats.
Securing rings for two ISOFIX child restraint
systems are installed on the left and right:
R on the rear seat backrests of the outer
seats in the second row
R on the backrests of the seats in the third
row of seats
Install child restraint systems without the
ISOFIX securing system using the vehicle's
seat belts. Follow the manufacturer's
instructions for installation of child restraint
systems.
! When installing the child restraint system,
make sure that the seat belt for the center
seat does not get trapped. Otherwise, the
seat belt could be damaged.XRemove covers :.;Securing ringsXInstall the ISOFIX child restraint system.
Comply with the manufacturer's
instructions when installing the ISOFIX
child restraint system.
Top Tether
GWarning
Observe "Important safety instructions"
( Y page 59).
GWarning
Always lock the rear seat backrests in their
upright position when the rear seats are
occupied by passengers. Lock the rear seat
backrests in their upright position before
installing the Top Tether straps or when the
cargo compartment is not in use. Make sure
62Children in the vehicleSafety
BA 164.8 USA, CA Edition B 2011; 1; 2, en-USd2sboikeVersion: 3.0.3.52010-04-21T15:08:44+02:00 - Seite 62