fuel fill door release MERCEDES-BENZ GL350 BlueTEC 2011 X164 Owner's Manual
[x] Cancel search | Manufacturer: MERCEDES-BENZ, Model Year: 2011, Model line: GL350 BlueTEC, Model: MERCEDES-BENZ GL350 BlueTEC 2011 X164Pages: 376, PDF Size: 17.39 MB
Page 11 of 376

Storing settings (memory
function) ........................................ 110
Storing the parking position ..........109
Exterior view ........................................ 26
F
Filling capacity see Technical data
First-aid kit ......................................... 309
Flat tire Changing a wheel/mounting the
spare wheel ................................... 316
MOExtended run-flat system .........321
Preparing the vehicle .....................311
Raising the vehicle .........................318
TIREFIT kit ...................................... 312
Floormat ............................................. 291
Front fog lamp (display
message) ............................................ 239
Fuel Additives ........................................ 367
Notes ............................................. 366
Premium-grade unleaded gasoline . 366
Refueling ........................................ 159
Specifications ................................ 366
Troubleshooting ............................. 162
Fuel consumption
Current (on-board computer) .........227
Notes ............................................. 167
Fuel filler cap (display message) ..... 243
Fuel filler flap Emergency release ........................161
Opening/closing ............................ 160
Fuel filter (display message) ............ 243
Fuel level Calling up the range (on-board
computer) ...................................... 227
Fuses
Dashboard fuse box .......................330
Engine emergency stop .................331
Fuse allocation chart .....................330
Fuse box in the cargo
compartment ................................. 331
Fuse box in the engine
compartment ................................. 330
Notes ............................................. 329
G
Garage door opener Clearing the memory .....................291
Notes ............................................. 288
Opening/closing the garage door ..291
Programming the remote control ...289
Gear or selector lever (cleaning
guidelines) ......................................... 304
Genuine Mercedes-Benz parts ......... 362
Genuine wood trim and trim strips
(cleaning instructions) ...................... 304
Glove box ........................................... 265
GTW (Gross Trailer Weight)
(definition) ......................................... 355
H
Headlamp cleaning system .............. 117
Adding washer fluid .......................297
Notes ............................................. 370
Headlamp delayed switch-off
see Delayed switch-off, exterior lighting
Headlamp mode (daytime driving)
see Daytime running lamps
Headlamps
Cleaning ......................................... 302
Misting up ...................................... 118
Setting ........................................... 124
Head restraint
Adjusting (electrically) .....................97
Head restraints
Adjusting (manually) ........................97
Adjusting (rear) ................................ 98
Installing/removing (rear) ................99
Luxury .............................................. 97
see NECK-PRO head restraints
Heating
see Climate control
High beam flasher ............................. 117
Hill start assist .................................. 150
Hood Closing ........................................... 295
Opening ......................................... 294
Hydroplaning ..................................... 170
Index9BA 164.8 USA, CA Edition B 2011; 1; 2, en-USd2sboikeVersion: 3.0.3.52010-04-21T15:08:44+02:00 - Seite 9
Page 77 of 376

X To unlock the vehicle: touch the inner
surface of the door handle.XTo lock the vehicle: press locking
button :.
If you pull on the handle of the tailgate, only
the cargo compartment of the vehicle is
unlocked.
Changing the settings of the locking
system
You can change the setting of the locking
system in such a way that only the driver's
door and the fuel filler flap are unlocked. This
is useful if you frequently travel on your own.
XTo change the setting: press and hold
down the % and & buttons
simultaneously for approximately six
seconds until the battery check lamp
( Y page 76) flashes twice.
The SmartKey now functions as follows:
XTo unlock the driver's door: press the
% button once.XTo unlock centrally: press the %
button twice.XTo lock centrally: press the & button.
The KEYLESS-GO function is changed as
follows:
XTo unlock the driver's door: touch the
inner surface of the door handle on the
driver's door.XTo unlock centrally: touch the inner
surface of the door handle on the front-
passenger door or the rear door.XTo lock centrally: press locking
button : on one of the door handles.
Restoring the factory settings
XPress the % and & buttons
simultaneously for approximately six
seconds until the battery check lamp
flashes twice.Mechanical key
General notes
If the vehicle can no longer be unlocked with
the SmartKey, use the mechanical key.
If you use the mechanical key to unlock and
open the driver's door, the anti-theft alarm
system will be triggered ( Y page 69).
There are several ways to turn off the alarm:
XPress the % or & button on the
SmartKey.
or
XInsert the SmartKey into the ignition lock.
or
XPress the Start/Stop button in the ignition
lock. The SmartKey must be in the vehicle.
or
XLock or unlock the vehicle using KEYLESS-
GO. The SmartKey must be outside the
vehicle.
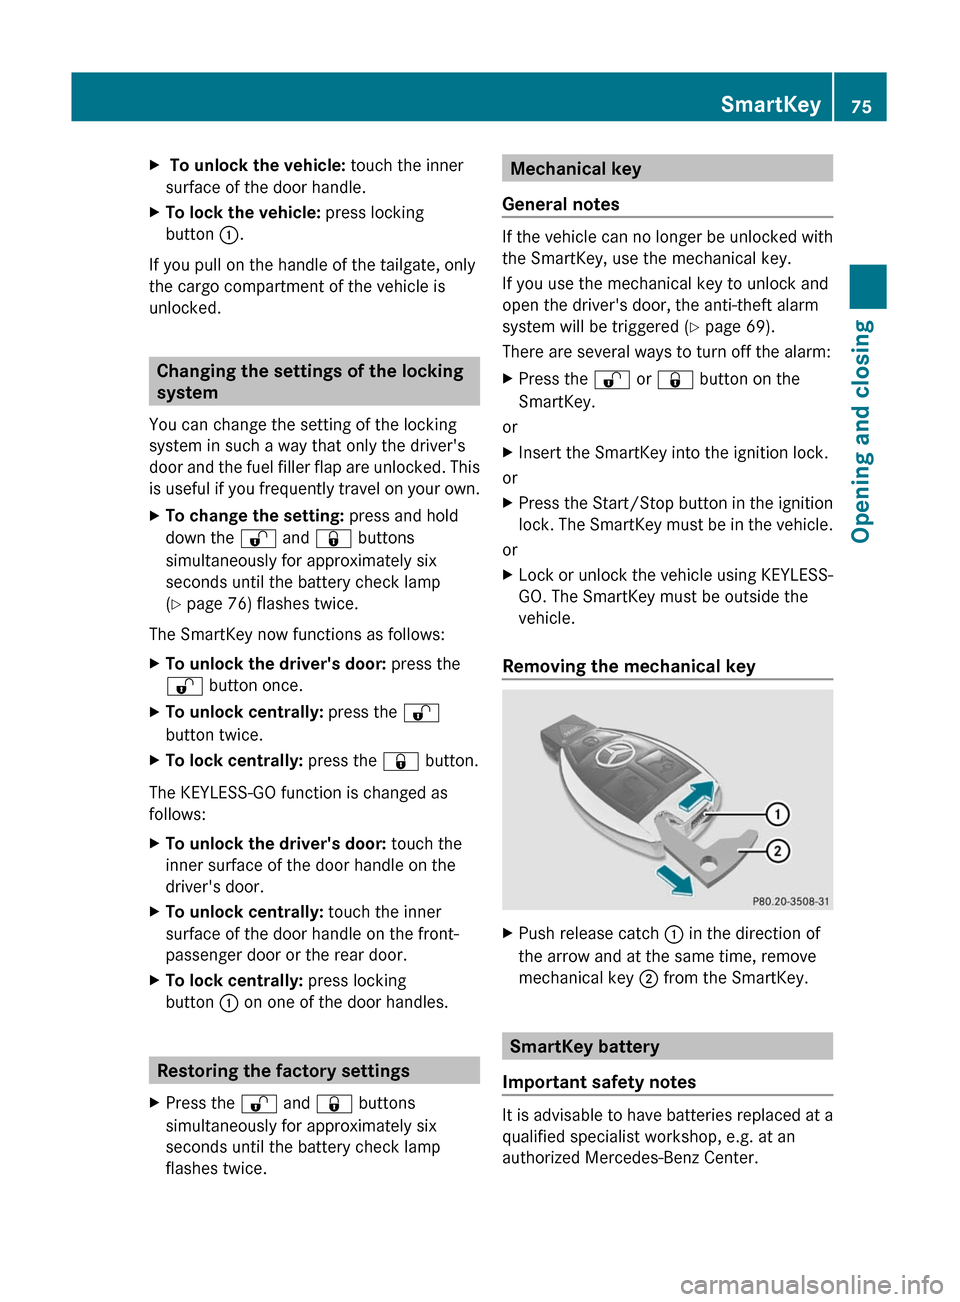
Removing the mechanical key
XPush release catch : in the direction of
the arrow and at the same time, remove
mechanical key ; from the SmartKey.
SmartKey battery
Important safety notes
It is advisable to have batteries replaced at a
qualified specialist workshop, e.g. at an
authorized Mercedes-Benz Center.
SmartKey75Opening and closingBA 164.8 USA, CA Edition B 2011; 1; 2, en-USd2sboikeVersion: 3.0.3.52010-04-21T15:08:44+02:00 - Seite 75Z
Page 163 of 376

XRemove the SmartKey from the ignition
lock.
KEYLESS-GO: the driver's door is open.
This returns the ignition to position 0,
which corresponds to the SmartKey being
removed. The driver's door can be closed
again.XPress the fuel filler flap in the direction of
arrow :.
The fuel filler flap opens slightly.XOpen the fuel filler flap.XTurn the fuel filler cap counter-clockwise
and remove it.XInsert the fuel filler cap into the holder
bracket on the inside of filler flap ;.XCompletely insert the filler neck of the fuel
pump nozzle into the tank and refuel.XOnly fill the tank until the pump nozzle
switches off.
! Overfilling the fuel tank could damage the
fuel system.
Closing
XReplace the fuel filler cap and turn it
clockwise. The fuel filler cap audibly
engages.
i Close the fuel filler flap before locking the
vehicle. A locking pin otherwise prevents
the fuel filler flap from closing after the
vehicle has been locked.
XClose the fuel filler flap.
Emergency fuel filler flap release
GWarning!
Avoid contact with the vehicle walls as they
may contain sharp edges. Otherwise, you
could injure yourself while releasing the fuel
filler flap.
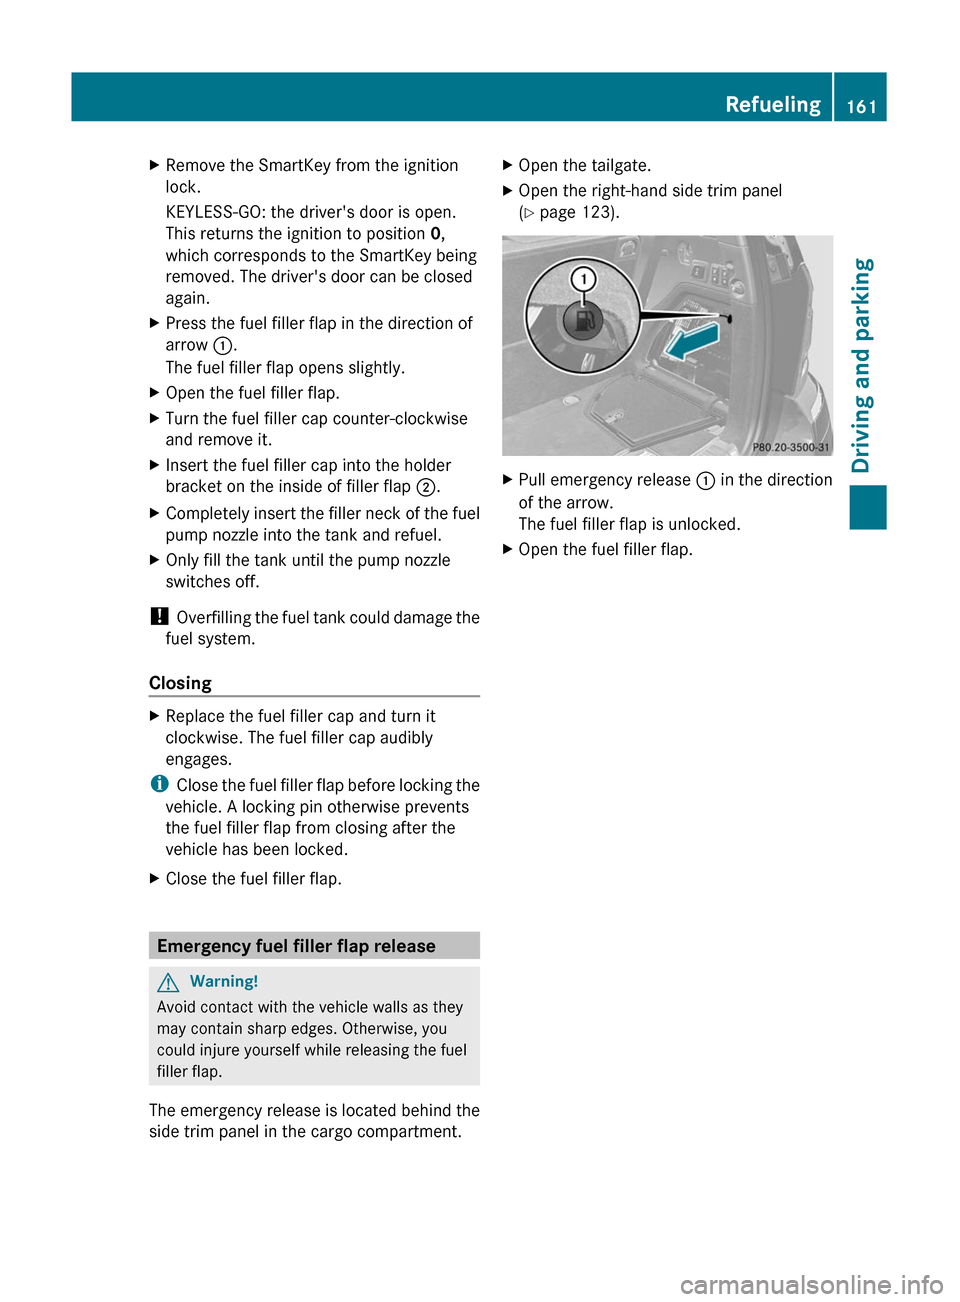
The emergency release is located behind the
side trim panel in the cargo compartment.
XOpen the tailgate.XOpen the right-hand side trim panel
( Y page 123).XPull emergency release : in the direction
of the arrow.
The fuel filler flap is unlocked.XOpen the fuel filler flap.Refueling161Driving and parkingBA 164.8 USA, CA Edition B 2011; 1; 2, en-USd2sboikeVersion: 3.0.3.52010-04-21T15:08:44+02:00 - Seite 161Z