washer fluid MERCEDES-BENZ GL350 BlueTEC 2011 X164 Owner's Manual
[x] Cancel search | Manufacturer: MERCEDES-BENZ, Model Year: 2011, Model line: GL350 BlueTEC, Model: MERCEDES-BENZ GL350 BlueTEC 2011 X164Pages: 376, PDF Size: 17.39 MB
Page 7 of 376
B
BAS (Brake Assist System) ................. 66
Battery Charging ........................................ 323
Checking (SmartKey) .......................76
Display message ............................ 242
Important safety guidelines
(SmartKey) ....................................... 75
Jump-starting ................................. 325
Replacing (SmartKey) ......................76
Safety notes .................................. 322
Belt
see Seat belts
Blind Spot Assist
Activating/deactivating (on-
board computer) ............................ 226
Display message ............................ 246
Function/notes ............................. 200
Trailer towing ................................. 202
BlueTEC
AdBlue ®
......................................... 367
Adding AdBlue ®
............................. 163
Brake fluid
Notes ............................................. 369
Brake fluid level ................................ 298
Brake lamp (display message) ......... 238
Brakes ABS .................................................. 65
BAS .................................................. 66
Brake fluid (notes) .........................369
Display message ............................ 236
Maintenance .................................. 169
Parking brake ........................ 166, 170
Warning lamp ................................. 254
Braking
Important safety instructions ......... 168
Breakdown
see Accident (notes)
see Flat tire
Bulbs
Backup lamp .................................. 123
High-beam headlamps ...................122
License plate lamp .........................124
Low-beam headlamps ....................121
Overview ........................................ 120
Parking lamps ................................ 122
Rear fog lamp ................................ 123Replacing ....................................... 123
Standing lamps (front) ...................122
Turn signals (front) ......................... 122
C
CAC (Customer Assistance Center) .........22
California
Important notice for retail
customers and lessees ....................20
Calling up a malfunction
see Display messages
Care
Carpets .......................................... 305
Car wash ........................................ 300
Display ........................................... 303
Gear or selector lever ....................304
Headlamps ..................................... 302
Notes ............................................. 299
Paint .............................................. 301
Plastic trim .................................... 304
Power washer ................................ 301
Rear view camera .......................... 303
Roof lining ...................................... 305
Seat belt ........................................ 305
Seat covers .................................... 304
Sensors ......................................... 303
Steering wheel ............................... 304
Tail pipes ....................................... 303
Trim strips ..................................... 304
Washing by hand ........................... 301
Wheels ........................................... 301
Windows ........................................ 302
Wiper blades .................................. 302
Wooden trim .................................. 304
Cargo compartment cover ............... 269
Cargo compartment enlargement ... 266
Cargo compartment floor ................. 310
Cargo net Attaching ....................................... 270
Important safety information .........270
Cargo tie down rings ......................... 268
CD player/CD changer (on-board
computer) .......................................... 219
Center console ..................................... 31
Index5BA 164.8 USA, CA Edition B 2011; 1; 2, en-USd2sboikeVersion: 3.0.3.52010-04-21T15:08:44+02:00 - Seite 5
Page 11 of 376
Storing settings (memory
function) ........................................ 110
Storing the parking position ..........109
Exterior view ........................................ 26
F
Filling capacity see Technical data
First-aid kit ......................................... 309
Flat tire Changing a wheel/mounting the
spare wheel ................................... 316
MOExtended run-flat system .........321
Preparing the vehicle .....................311
Raising the vehicle .........................318
TIREFIT kit ...................................... 312
Floormat ............................................. 291
Front fog lamp (display
message) ............................................ 239
Fuel Additives ........................................ 367
Notes ............................................. 366
Premium-grade unleaded gasoline . 366
Refueling ........................................ 159
Specifications ................................ 366
Troubleshooting ............................. 162
Fuel consumption
Current (on-board computer) .........227
Notes ............................................. 167
Fuel filler cap (display message) ..... 243
Fuel filler flap Emergency release ........................161
Opening/closing ............................ 160
Fuel filter (display message) ............ 243
Fuel level Calling up the range (on-board
computer) ...................................... 227
Fuses
Dashboard fuse box .......................330
Engine emergency stop .................331
Fuse allocation chart .....................330
Fuse box in the cargo
compartment ................................. 331
Fuse box in the engine
compartment ................................. 330
Notes ............................................. 329
G
Garage door opener Clearing the memory .....................291
Notes ............................................. 288
Opening/closing the garage door ..291
Programming the remote control ...289
Gear or selector lever (cleaning
guidelines) ......................................... 304
Genuine Mercedes-Benz parts ......... 362
Genuine wood trim and trim strips
(cleaning instructions) ...................... 304
Glove box ........................................... 265
GTW (Gross Trailer Weight)
(definition) ......................................... 355
H
Headlamp cleaning system .............. 117
Adding washer fluid .......................297
Notes ............................................. 370
Headlamp delayed switch-off
see Delayed switch-off, exterior lighting
Headlamp mode (daytime driving)
see Daytime running lamps
Headlamps
Cleaning ......................................... 302
Misting up ...................................... 118
Setting ........................................... 124
Head restraint
Adjusting (electrically) .....................97
Head restraints
Adjusting (manually) ........................97
Adjusting (rear) ................................ 98
Installing/removing (rear) ................99
Luxury .............................................. 97
see NECK-PRO head restraints
Heating
see Climate control
High beam flasher ............................. 117
Hill start assist .................................. 150
Hood Closing ........................................... 295
Opening ......................................... 294
Hydroplaning ..................................... 170
Index9BA 164.8 USA, CA Edition B 2011; 1; 2, en-USd2sboikeVersion: 3.0.3.52010-04-21T15:08:44+02:00 - Seite 9
Page 16 of 376
Emergency Tensioning Devices ........ 57
Fastening ......................................... 55
Important safety guidelines .............53
Releasing ......................................... 57
Safety guidelines ............................. 37
Switching belt adjustment on/off
(on-board computer) ......................225
Warning lamp ................................. 255
Warning lamp (function) ................... 57
Seat heating
Indicator lamp (Malfunction) ..........105
Seats
Adjusting (electrically) .....................96
Adjusting (second and third rows) . 100
Adjusting the 4-way lumbar
support .......................................... 104
Adjusting the head restraint ............97
Cleaning the cover .........................304
Correct driver's seat position ........... 94
Important safety instructions ...........95
Multicontour seat .......................... 103
Storing settings (memory
function) ........................................ 110
Switching seat heating on/off .......104
Switching the seat ventilation on/
off .................................................. 105
Seat ventilation
Indicator lamp (Malfunction) ..........105
Securing hooks .................................. 268
Sensors (cleaning instructions) ....... 303
Service indicator see Service interval display
Service interval display .................... 298
Displaying a service message (on-
board computer) ............................ 299
Service products
AdBlue ®
special additives ..............367
Brake fluid ..................................... 369
Coolant (engine) ............................ 369
Engine oil ....................................... 368
Filling capacity ............................... 365
Fuel ................................................ 366
Important safety notes ..................364
Notes ............................................. 364
Refrigerant (air-conditioning
system) .......................................... 369
Washer fluid ................................... 370Settings
Factory (on-board computer) .........221
On-board computer .......................221
Shift ranges ....................................... 155
Side impact air bag ............................. 41
Side marker lamp (display
message) ............................................ 239
Side windows Convenience closing feature ............87
Convenience opening feature ..........86
Hinged side windows .......................86
Important safety information ...........84
Opening/closing .............................. 85
Resetting ......................................... 87
Troubleshooting ............................... 88
Sliding sunroof
Important safety information ...........88
Troubleshooting ............................... 90
see Tilt/sliding sunroof
SmartKey
Changing the battery .......................76
Changing the programming .............75
Checking the battery .......................76
Important safety notes ....................72
Malfunction ...................................... 77
Snow chains ...................................... 172
Socket ................................................ 281
Dashboard ..................................... 281
Front-passenger footwell ...............281
Luggage compartment ...................281
Rear compartment .........................281
SOS
see mbrace
Spare wheel
Notes/data .................................... 359
Storage location ............................ 311
see Emergency spare wheel
Speedometer
Additional speedometer (on-
board computer) ............................ 218
Segments ...................................... 215
Setting the unit (on-board
computer) ...................................... 221
SRS (Supplemental Restraint
System) Display message ............................ 231
Introduction ..................................... 3614IndexBA 164.8 USA, CA Edition B 2011; 1; 2, en-USd2sboikeVersion: 3.0.3.52010-04-21T15:08:44+02:00 - Seite 14
Page 20 of 376
WheelsChanging/replacing .......................350
Changing a wheel .......................... 316
Checking ........................................ 335
Cleaning ......................................... 301
Guidelines to be observed .............335
Mounting a wheel .......................... 319
Removing a wheel ..........................319
Tightening torque ........................... 320
Wheel size/tire size .......................357
Window curtain air bag ....................... 42
Windows see Side windows
Windows (cleaning instructions) ..... 302
Windshield Defrosting ...................................... 140
Infrared reflective .......................... 292
Windshield washer fluid (display
message) ............................................ 252
Windshield washer system Adding washer fluid .......................297
Notes ............................................. 370
Windshield wipers
Important safety notes ..................125
Replacing the wiper blades ............126
Switching on/off ........................... 125
Troubleshooting ............................. 127
Winter operation ............................... 173
Radiator cover ............................... 295
Winter tires ........................................ 171
Wiper blades Cleaning ......................................... 30218IndexBA 164.8 USA, CA Edition B 2011; 1; 2, en-USd2sboikeVersion: 3.0.3.52010-04-21T15:08:44+02:00 - Seite 18
Page 119 of 376
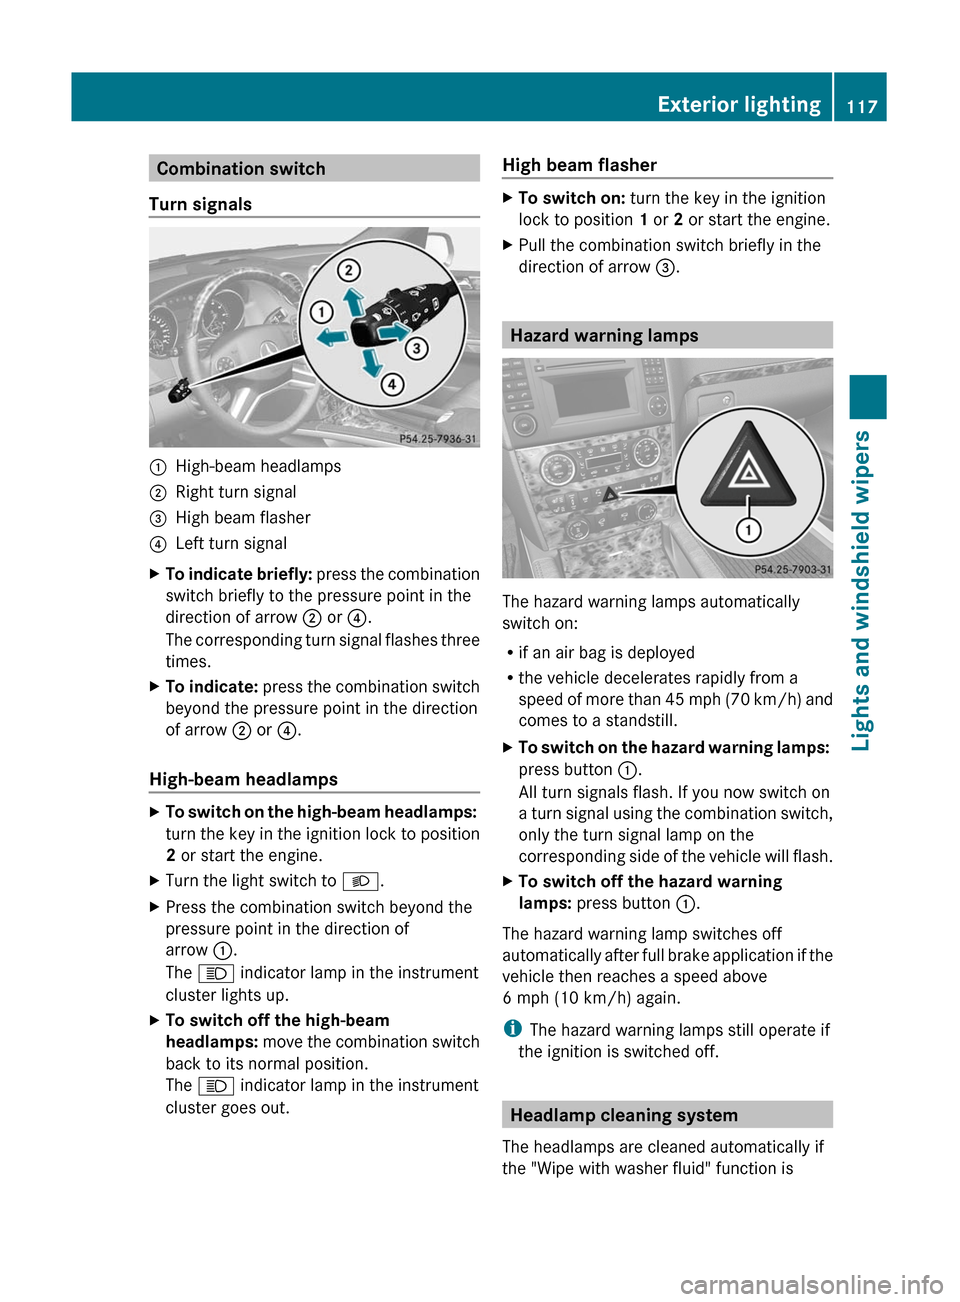
Combination switch
Turn signals:High-beam headlamps;Right turn signal=High beam flasher?Left turn signalXTo indicate briefly: press the combination
switch briefly to the pressure point in the
direction of arrow ; or ?.
The corresponding turn signal flashes three
times.XTo indicate: press the combination switch
beyond the pressure point in the direction
of arrow ; or ?.
High-beam headlamps
XTo switch on the high-beam headlamps:
turn the key in the ignition lock to position
2 or start the engine.XTurn the light switch to L.XPress the combination switch beyond the
pressure point in the direction of
arrow :.
The K indicator lamp in the instrument
cluster lights up.XTo switch off the high-beam
headlamps: move the combination switch
back to its normal position.
The K indicator lamp in the instrument
cluster goes out.High beam flasherXTo switch on: turn the key in the ignition
lock to position 1 or 2 or start the engine.XPull the combination switch briefly in the
direction of arrow =.
Hazard warning lamps
The hazard warning lamps automatically
switch on:
R if an air bag is deployed
R the vehicle decelerates rapidly from a
speed of more than 45 mph (70 km/h) and
comes to a standstill.
XTo switch on the hazard warning lamps:
press button :.
All turn signals flash. If you now switch on
a turn signal using the combination switch,
only the turn signal lamp on the
corresponding side of the vehicle will flash.XTo switch off the hazard warning
lamps: press button :.
The hazard warning lamp switches off
automatically after full brake application if the
vehicle then reaches a speed above
6 mph (10 km/h) again.
i The hazard warning lamps still operate if
the ignition is switched off.
Headlamp cleaning system
The headlamps are cleaned automatically if
the "Wipe with washer fluid" function is
Exterior lighting117Lights and windshield wipersBA 164.8 USA, CA Edition B 2011; 1; 2, en-USd2sboikeVersion: 3.0.3.52010-04-21T15:08:44+02:00 - Seite 117Z
Page 127 of 376
adjustment performed at an authorized
Mercedes-Benz Center.
Windshield wipers
Important safety notes
GWarning!
Wiper blades are components that are subject
to wear and tear. Replace the wiper blades
twice a year, preferably in the spring and fall.
Otherwise the windows will not be wiped
properly. As a result, you may not be able to
observe surrounding traffic conditions and
could cause an accident.
! Do not operate the windshield wipers
when the windshield is dry, as this could
damage the wiper blades. Moreover, dust
that has collected on the windshield/rear
window can scratch the glass if wiping
takes place when the windshield/rear
window is dry.
If it is necessary to switch on the windshield
wipers in dry weather conditions, always
use washer fluid when operating the
windshield wipers.
Switching the windshield wipers on/
off
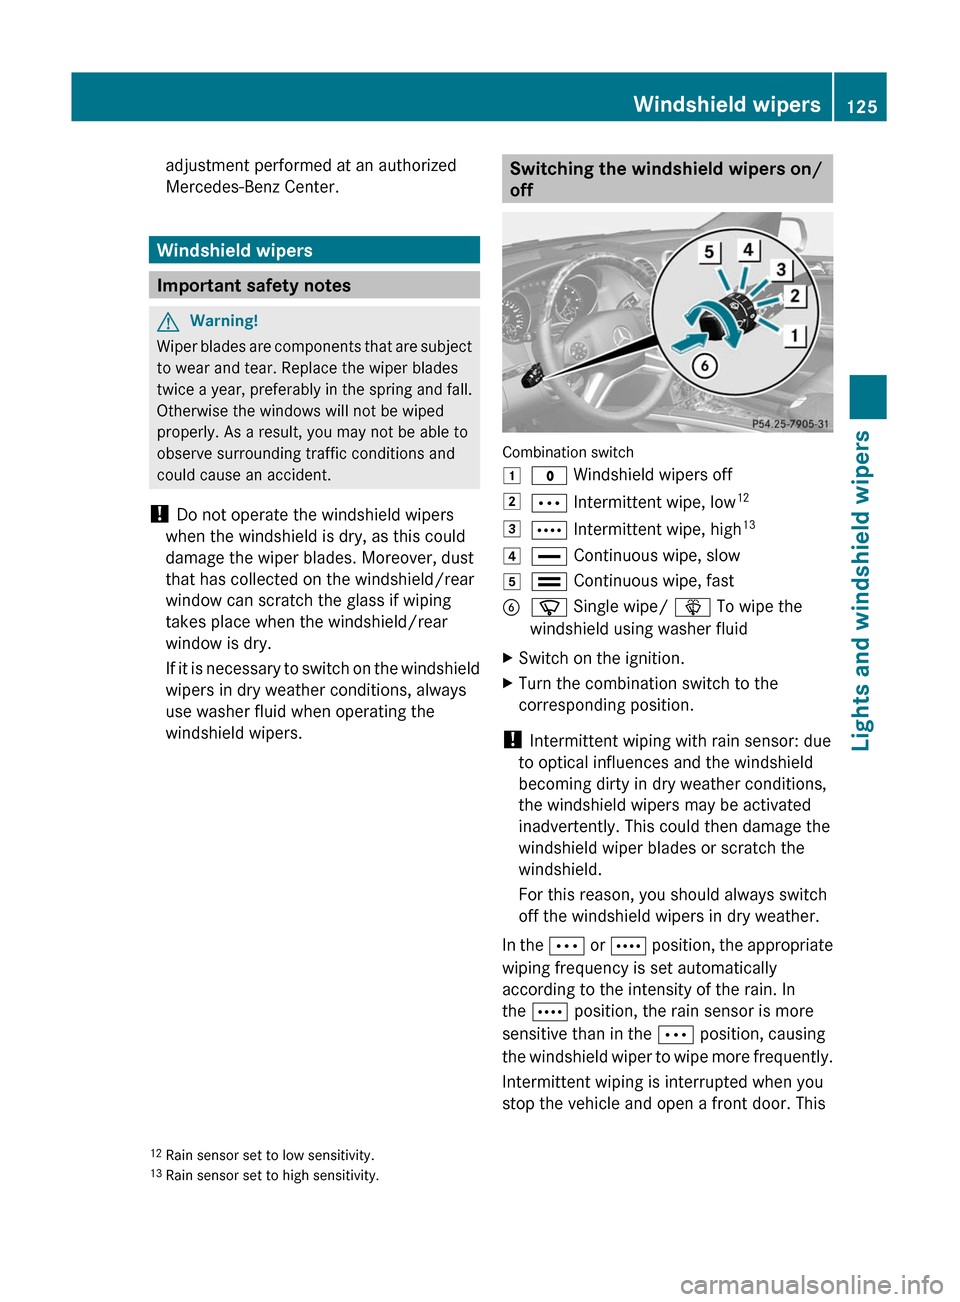
Combination switch
1$ Windshield wipers off2Ä Intermittent wipe, low 123Å
Intermittent wipe, high 134°
Continuous wipe, slow5¯ Continuous wipe, fastBí Single wipe/ î To wipe the
windshield using washer fluidXSwitch on the ignition.XTurn the combination switch to the
corresponding position.
! Intermittent wiping with rain sensor: due
to optical influences and the windshield
becoming dirty in dry weather conditions,
the windshield wipers may be activated
inadvertently. This could then damage the
windshield wiper blades or scratch the
windshield.
For this reason, you should always switch
off the windshield wipers in dry weather.
In the Ä or Å position, the appropriate
wiping frequency is set automatically
according to the intensity of the rain. In
the Å position, the rain sensor is more
sensitive than in the Ä position, causing
the windshield wiper to wipe more frequently.
Intermittent wiping is interrupted when you
stop the vehicle and open a front door. This
12 Rain sensor set to low sensitivity.
13 Rain sensor set to high sensitivity.Windshield wipers125Lights and windshield wipersBA 164.8 USA, CA Edition B 2011; 1; 2, en-USd2sboikeVersion: 3.0.3.52010-04-21T15:08:44+02:00 - Seite 125Z
Page 128 of 376
prevents a person from being splashed
inadvertently when getting into or out of the
vehicle.
Intermittent wiping continues when all doors
are closed and
R you shift the automatic transmission to
drive position D or reverse gear R
or
R you change the wipe setting on the
combination switch.
i To prevent smearing on the windshield or
noise when wiping, wipe the windshield
occasionally with washer fluid.
Switching the rear window wiper on/
off
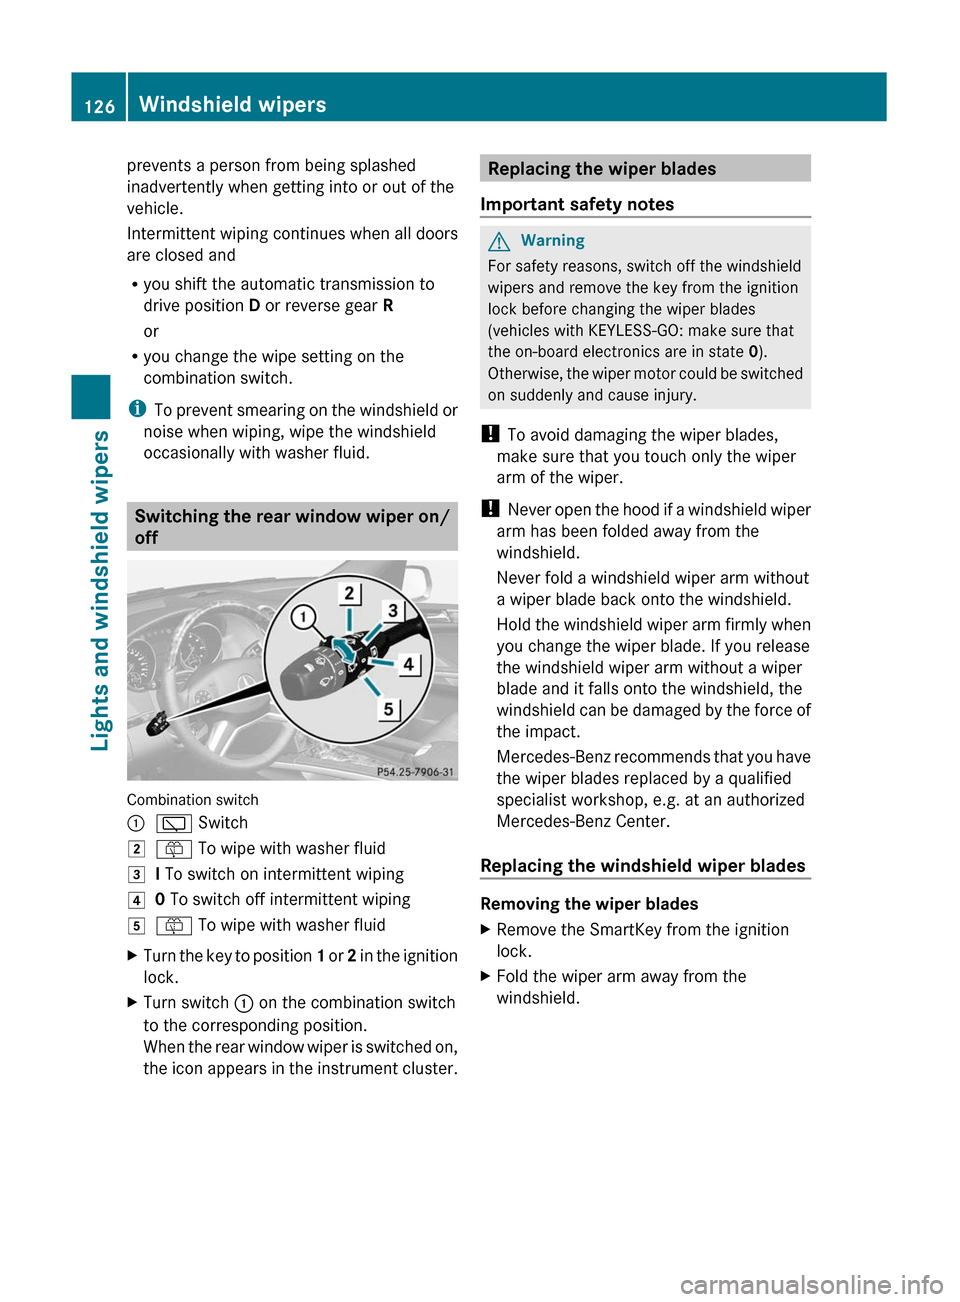
Combination switch
:è Switch2ô To wipe with washer fluid3I To switch on intermittent wiping40 To switch off intermittent wiping5ô To wipe with washer fluidXTurn the key to position 1 or 2 in the ignition
lock.XTurn switch : on the combination switch
to the corresponding position.
When the rear window wiper is switched on,
the icon appears in the instrument cluster.Replacing the wiper blades
Important safety notesGWarning
For safety reasons, switch off the windshield
wipers and remove the key from the ignition
lock before changing the wiper blades
(vehicles with KEYLESS-GO: make sure that
the on-board electronics are in state 0).
Otherwise, the wiper motor could be switched
on suddenly and cause injury.
! To avoid damaging the wiper blades,
make sure that you touch only the wiper
arm of the wiper.
! Never open the hood if a windshield wiper
arm has been folded away from the
windshield.
Never fold a windshield wiper arm without
a wiper blade back onto the windshield.
Hold the windshield wiper arm firmly when
you change the wiper blade. If you release
the windshield wiper arm without a wiper
blade and it falls onto the windshield, the
windshield can be damaged by the force of
the impact.
Mercedes-Benz recommends that you have
the wiper blades replaced by a qualified
specialist workshop, e.g. at an authorized
Mercedes-Benz Center.
Replacing the windshield wiper blades
Removing the wiper blades
XRemove the SmartKey from the ignition
lock.XFold the wiper arm away from the
windshield.126Windshield wipersLights and windshield wipers
BA 164.8 USA, CA Edition B 2011; 1; 2, en-USd2sboikeVersion: 3.0.3.52010-04-21T15:08:44+02:00 - Seite 126
Page 254 of 376
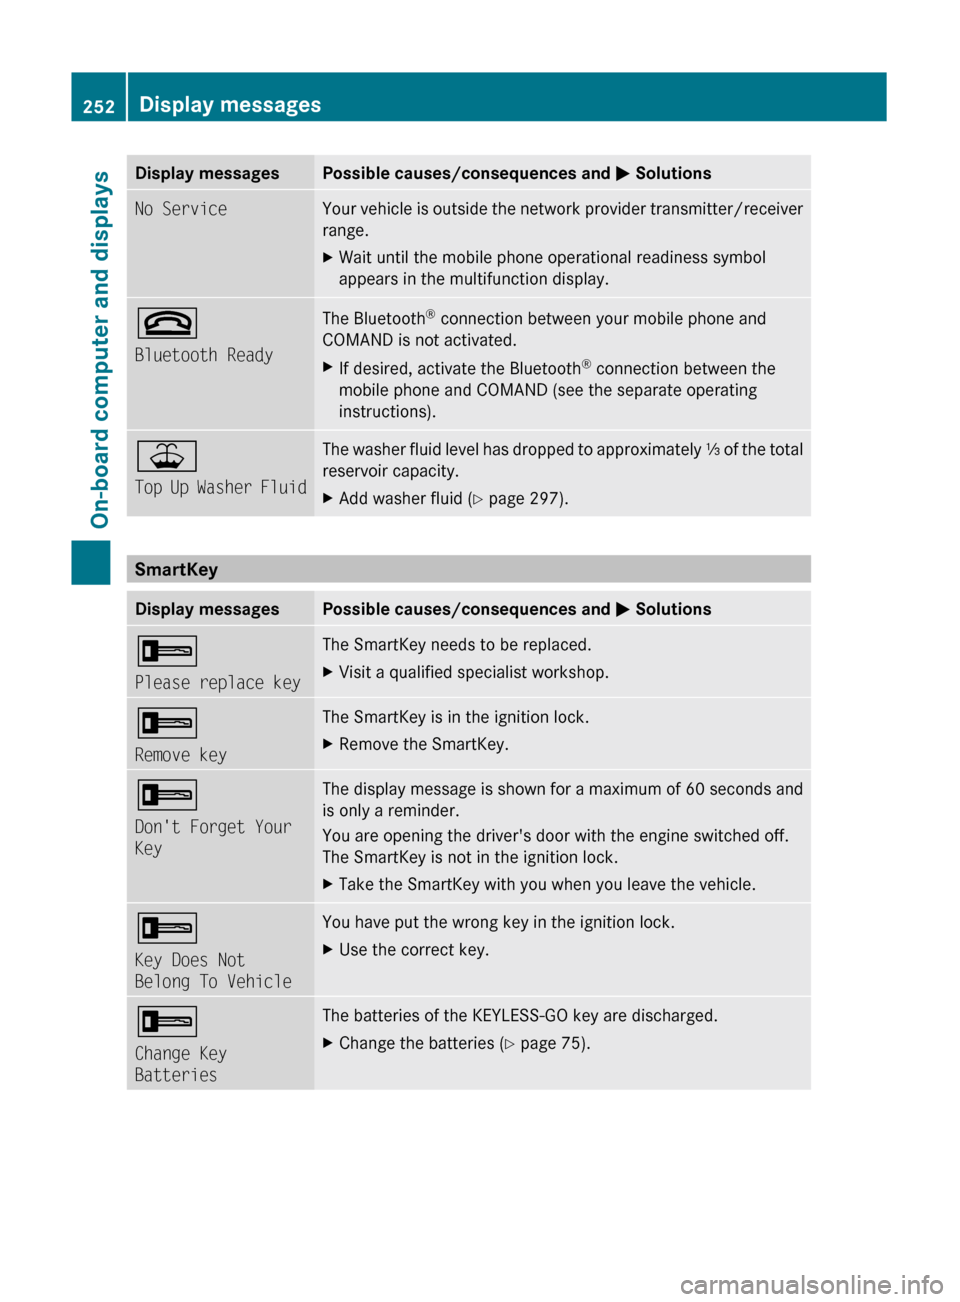
Display messagesPossible causes/consequences and M SolutionsNo ServiceYour vehicle is outside the network provider transmitter/receiver
range. XWait until the mobile phone operational readiness symbol
appears in the multifunction display.~
Bluetooth ReadyThe Bluetooth ®
connection between your mobile phone and
COMAND is not activated.XIf desired, activate the Bluetooth ®
connection between the
mobile phone and COMAND (see the separate operating
instructions).¥
Top Up Washer FluidThe washer fluid level has dropped to approximately ⅓ of the total
reservoir capacity.XAdd washer fluid ( Y page 297).
SmartKey
Display messagesPossible causes/consequences and M Solutions+
Please replace keyThe SmartKey needs to be replaced. XVisit a qualified specialist workshop.+
Remove keyThe SmartKey is in the ignition lock.XRemove the SmartKey.+
Don't Forget Your
KeyThe display message is shown for a maximum of 60 seconds and
is only a reminder.
You are opening the driver's door with the engine switched off.
The SmartKey is not in the ignition lock.XTake the SmartKey with you when you leave the vehicle.+
Key Does Not
Belong To VehicleYou have put the wrong key in the ignition lock.XUse the correct key.+
Change Key
BatteriesThe batteries of the KEYLESS-GO key are discharged.XChange the batteries ( Y page 75).252Display messagesOn-board computer and displays
BA 164.8 USA, CA Edition B 2011; 1; 2, en-USd2sboikeVersion: 3.0.3.52010-04-21T15:08:44+02:00 - Seite 252
Page 299 of 376
Further information on engine oil
( Y page 368).XReplace cap : on the filler neck and
tighten clockwise.
Ensure that the cap locks into place
securely.
Checking and adding other service
products
Checking the coolant level
Only check the coolant level when the vehicle
is on a level surface and the engine has cooled
down.
XTurn the SmartKey to position
2 (Y page 147) in the ignition lock.
On vehicles with KEYLESS-GO, press the
Start/Stop button twice ( Y page 147).XCheck the coolant temperature gauge in
the multifunction display.
The coolant temperature must be below
158 ‡ (70 †).GWarning
In order to avoid any potentially serious burns:
R use extreme caution when opening the
hood if there are any signs of steam or
coolant leaking from the cooling system, or
if the coolant temperature display indicates
that the coolant is overheated.
R do not remove the pressure cap on the
coolant reservoir if the coolant temperature
is above 158 ‡ (70 †). Allow the engine to
cool down before removing the cap. The
coolant reservoir contains hot fluid and is
under pressure.
R using a rag, slowly turn the cap
approximately 1
/ 2 turn to relieve excess
pressure. If opened immediately, scalding
hot fluid and steam will be blown out under
pressure.
R do not spill antifreeze on hot engine parts.
Antifreeze contains ethylene glycol which
may burn if it comes into contact with hot
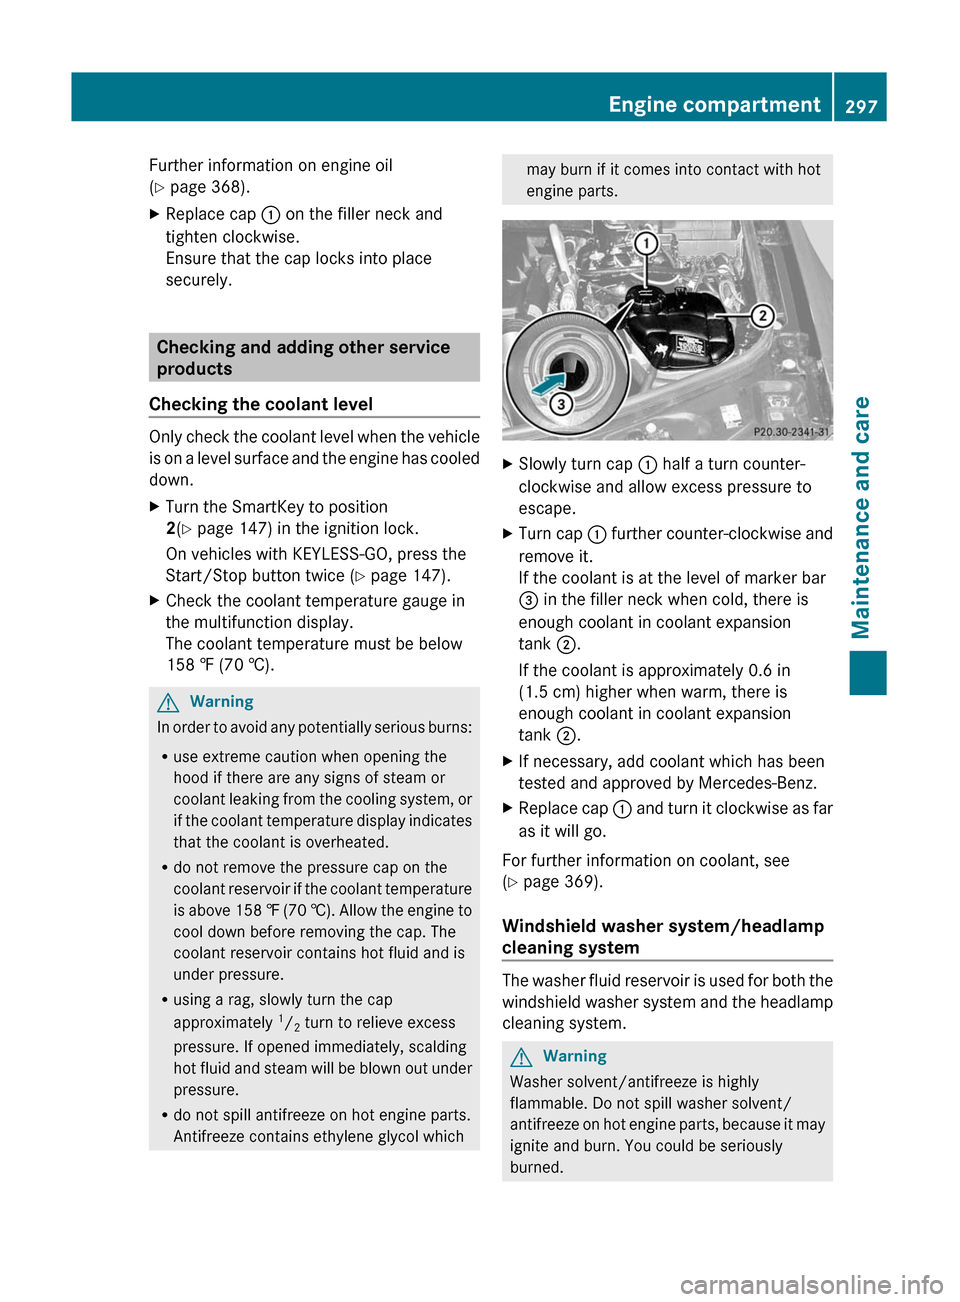
engine parts.XSlowly turn cap : half a turn counter-
clockwise and allow excess pressure to
escape.XTurn cap : further counter-clockwise and
remove it.
If the coolant is at the level of marker bar
= in the filler neck when cold, there is
enough coolant in coolant expansion
tank ;.
If the coolant is approximately 0.6 in
(1.5 cm) higher when warm, there is
enough coolant in coolant expansion
tank ;.XIf necessary, add coolant which has been
tested and approved by Mercedes-Benz.XReplace cap : and turn it clockwise as far
as it will go.
For further information on coolant, see
( Y page 369).
Windshield washer system/headlamp
cleaning system
The washer fluid reservoir is used for both the
windshield washer system and the headlamp
cleaning system.
GWarning
Washer solvent/antifreeze is highly
flammable. Do not spill washer solvent/
antifreeze on hot engine parts, because it may
ignite and burn. You could be seriously
burned.
Engine compartment297Maintenance and careBA 164.8 USA, CA Edition B 2011; 1; 2, en-USd2sboikeVersion: 3.0.3.52010-04-21T15:08:44+02:00 - Seite 297Z
Page 300 of 376
! At temperatures below freezing, always
fill the washer fluid container with a mix of
windshield washer concentrate and
antifreeze additive. There is otherwise a
risk of damaging the windshield washer
system/headlamp cleaning system.
! Only use washer fluid concentrate which
is suitable for plastic lenses. Unsuitable
washer fluid concentrate could damage the
plastic lenses of the headlamps.
! Do not add distilled or de-ionized water to
the washer fluid container. Otherwise, the
fluid level measuring gauge could be
damaged.
i Add windshield washer concentrate, e.g.
MB SummerFit, to the washer fluid all year
round.
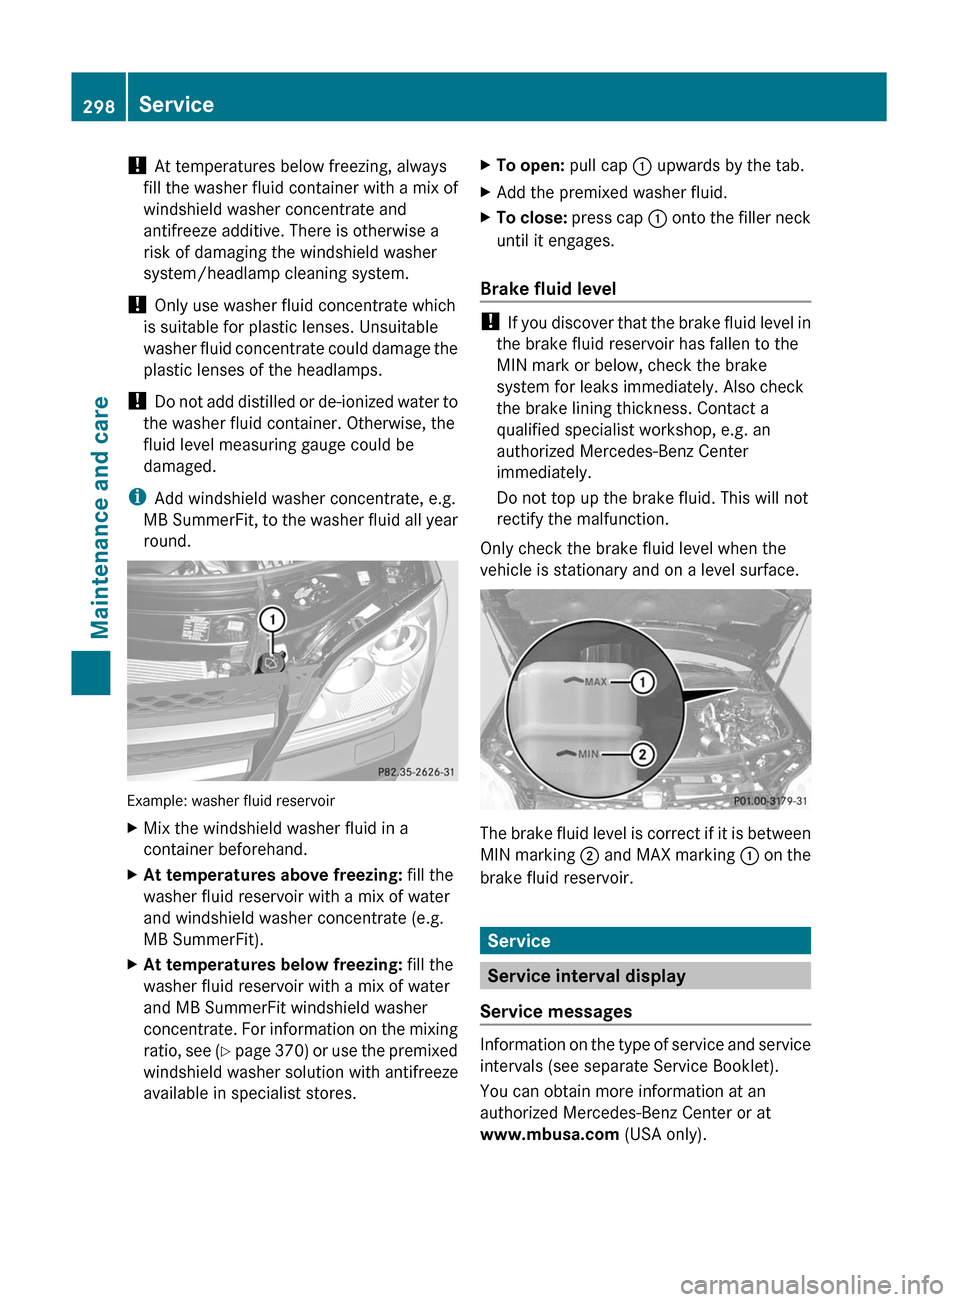
Example: washer fluid reservoir
XMix the windshield washer fluid in a
container beforehand.XAt temperatures above freezing: fill the
washer fluid reservoir with a mix of water
and windshield washer concentrate (e.g.
MB SummerFit).XAt temperatures below freezing: fill the
washer fluid reservoir with a mix of water
and MB SummerFit windshield washer
concentrate. For information on the mixing
ratio, see (Y page 370) or use the premixed
windshield washer solution with antifreeze
available in specialist stores.XTo open: pull cap : upwards by the tab.XAdd the premixed washer fluid.XTo close: press cap : onto the filler neck
until it engages.
Brake fluid level
! If you discover that the brake fluid level in
the brake fluid reservoir has fallen to the
MIN mark or below, check the brake
system for leaks immediately. Also check
the brake lining thickness. Contact a
qualified specialist workshop, e.g. an
authorized Mercedes-Benz Center
immediately.
Do not top up the brake fluid. This will not
rectify the malfunction.
Only check the brake fluid level when the
vehicle is stationary and on a level surface.
The brake fluid level is correct if it is between
MIN marking ; and MAX marking : on the
brake fluid reservoir.
Service
Service interval display
Service messages
Information on the type of service and service
intervals (see separate Service Booklet).
You can obtain more information at an
authorized Mercedes-Benz Center or at
www.mbusa.com (USA only).
298ServiceMaintenance and care
BA 164.8 USA, CA Edition B 2011; 1; 2, en-USd2sboikeVersion: 3.0.3.52010-04-21T15:08:44+02:00 - Seite 298