child lock MERCEDES-BENZ GL550 2010 X164 User Guide
[x] Cancel search | Manufacturer: MERCEDES-BENZ, Model Year: 2010, Model line: GL550, Model: MERCEDES-BENZ GL550 2010 X164Pages: 380, PDF Size: 9.81 MB
Page 60 of 380
accident, they could be crushed between the
occupant and seat belt.
A child’s risk of serious or fatal injuries is
significantly increased if the child restraints
are not properly secured in the vehicle and/
or the child is not properly secured in the child
restraint.
Children too big for a toddler restraint must
ride in seats using regular seat belts. Position
shoulder belt across chest and shoulder, not
face or neck. A booster seat may be
necessary to achieve proper seat belt
positioning for children over 41 lb (18 kg) until
they reach a height where a lap/shoulder belt
fits properly without a booster.
When the child restraint is not in use, remove
it from the vehicle or secure it with the seat
belt to prevent the child restraint from
becoming a projectile in the event of an
accident.
Installation of infant and child restraint
systems
GObserve Safety notes, see page 55.GWarning!
Always lock the seat backrests in their upright
position when the rear seats are occupied by
passengers. Lock the seat backrests in their
upright position after installing top tether
straps or when the extended cargo
compartment is not in use. Make sure that
seat backrests are secured properly by
pushing and pulling on the seat backrests. If
a seat backrest is not locked properly, the
seat backrest could fold. The child seat would
no longer be supported properly or positioned
to provide its intended benefit. That could
cause serious or even fatal injuries.
This vehicle is equipped with tether
anchorages for a top tether strap at the
second-row seat backrest. For installing an
infant and child restraint system at the
third-row seats, use the cargo tie-down rings
in the cargo compartment (Y page 200).
Top tether straps enable an additional
connection to be made between child
restraint systems secured with LATCH-type
anchors and rear seats. This can further
reduce the risk of injury.
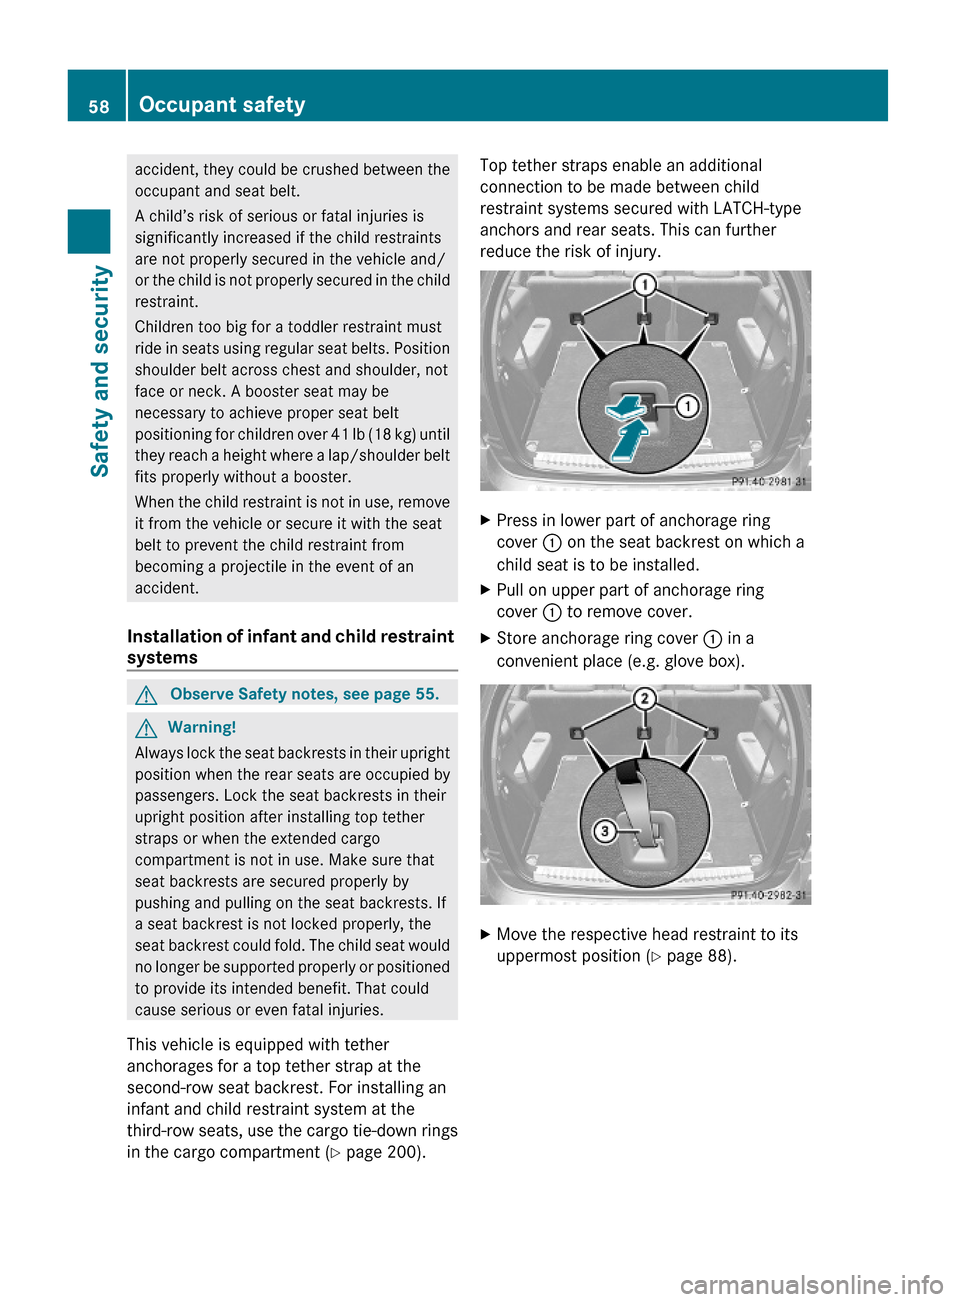
XPress in lower part of anchorage ring
cover : on the seat backrest on which a
child seat is to be installed.
XPull on upper part of anchorage ring
cover : to remove cover.
XStore anchorage ring cover : in a
convenient place (e.g. glove box).
XMove the respective head restraint to its
uppermost position (Y page 88).
58Occupant safetySafety and security
X164_AKB; 5; 31, en-USd2ureepe,Version: 2.11.8.12009-09-11T12:30:16+02:00 - Seite 58
Page 62 of 380
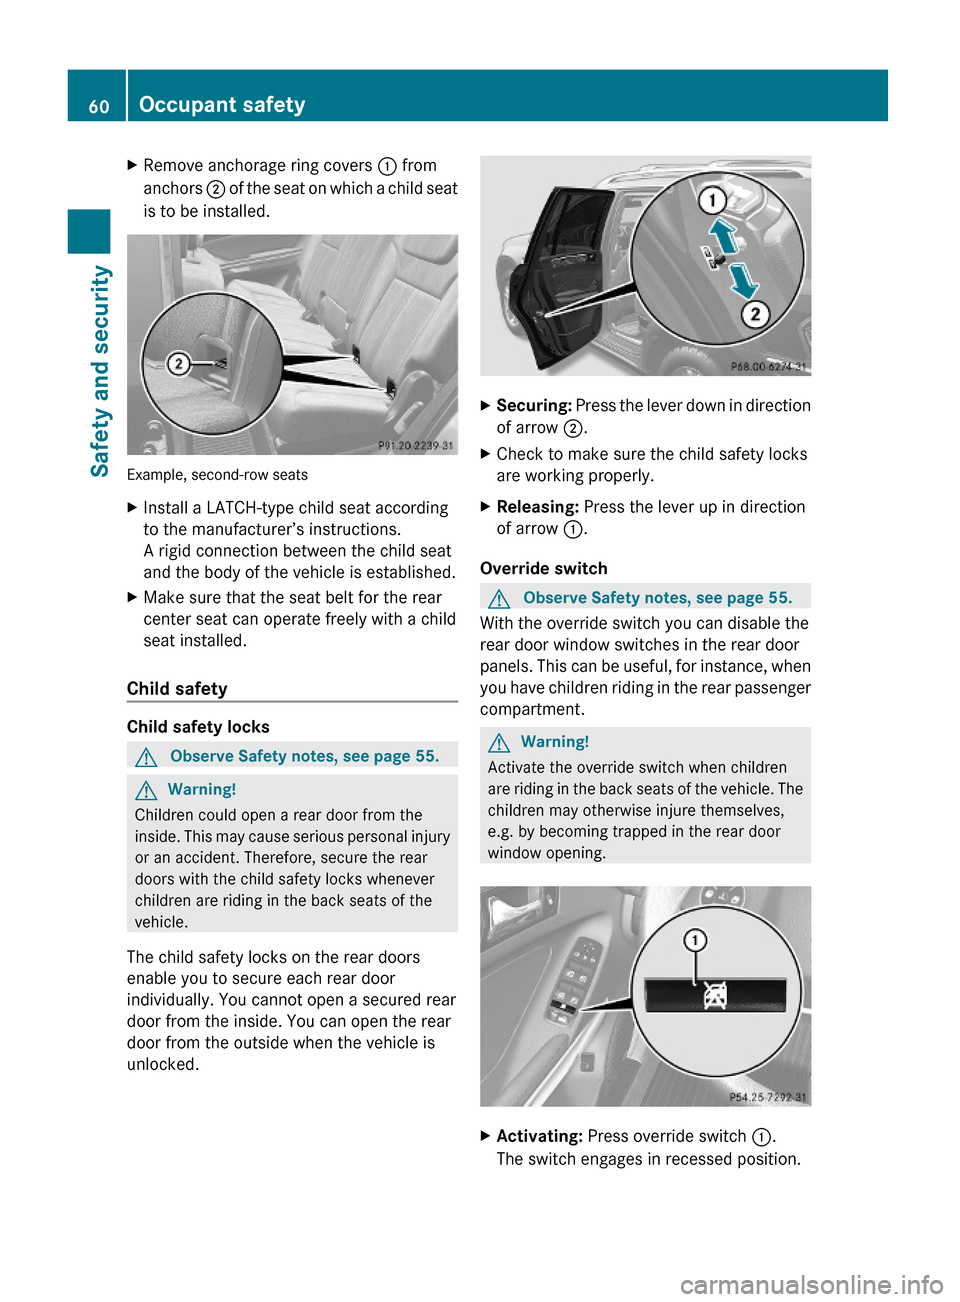
XRemove anchorage ring covers : from
anchors ; of the seat on which a child seat
is to be installed.
Example, second-row seats
XInstall a LATCH-type child seat according
to the manufacturer’s instructions.
A rigid connection between the child seat
and the body of the vehicle is established.
XMake sure that the seat belt for the rear
center seat can operate freely with a child
seat installed.
Child safety
Child safety locks
GObserve Safety notes, see page 55.GWarning!
Children could open a rear door from the
inside. This may cause serious personal injury
or an accident. Therefore, secure the rear
doors with the child safety locks whenever
children are riding in the back seats of the
vehicle.
The child safety locks on the rear doors
enable you to secure each rear door
individually. You cannot open a secured rear
door from the inside. You can open the rear
door from the outside when the vehicle is
unlocked.
XSecuring: Press the lever down in direction
of arrow ;.
XCheck to make sure the child safety locks
are working properly.
XReleasing: Press the lever up in direction
of arrow :.
Override switch
GObserve Safety notes, see page 55.
With the override switch you can disable the
rear door window switches in the rear door
panels. This can be useful, for instance, when
you have children riding in the rear passenger
compartment.
GWarning!
Activate the override switch when children
are riding in the back seats of the vehicle. The
children may otherwise injure themselves,
e.g. by becoming trapped in the rear door
window opening.
XActivating: Press override switch :.
The switch engages in recessed position.
60Occupant safetySafety and security
X164_AKB; 5; 31, en-USd2ureepe,Version: 2.11.8.12009-09-11T12:30:16+02:00 - Seite 60
Page 76 of 380
information on replacing the SmartKey, see
“Replacing the SmartKey” (Y page 74).
Replacing the SmartKey
Only you, or someone authorized by you can
order a replacement key from any Mercedes-
Benz Center. In order to do so, the Mercedes-
Benz Center will require proof of identity and
vehicle ownership with original documents,
including the following:
If you are the current owner of the vehicle:
Rthe vehicle’s current state registration
Ra current identity card, passport, or drivers
license
If you are an authorized person:
Rthe vehicle’s current state registration
Ra current identity card, passport, or drivers
license for the authorized individual
Rsigned and dated authorization from the
owner of the vehicle for which the key is
being requested
iDuplicated or photocopied
documentation will not be accepted.
Activating the key
Once you, or an authorized person, has
provided the appropriate documents, the
Mercedes-Benz Center will need to
synchronize the key to your vehicle before it
can be used. In order to do so, the Mercedes-
Benz Center need access to your vehicle.
Opening the doors from the inside
You can open a door from the inside even
when it is locked unless it is secured with the
child safety lock (Y page 60).
Open door only when conditions are safe to
do so.
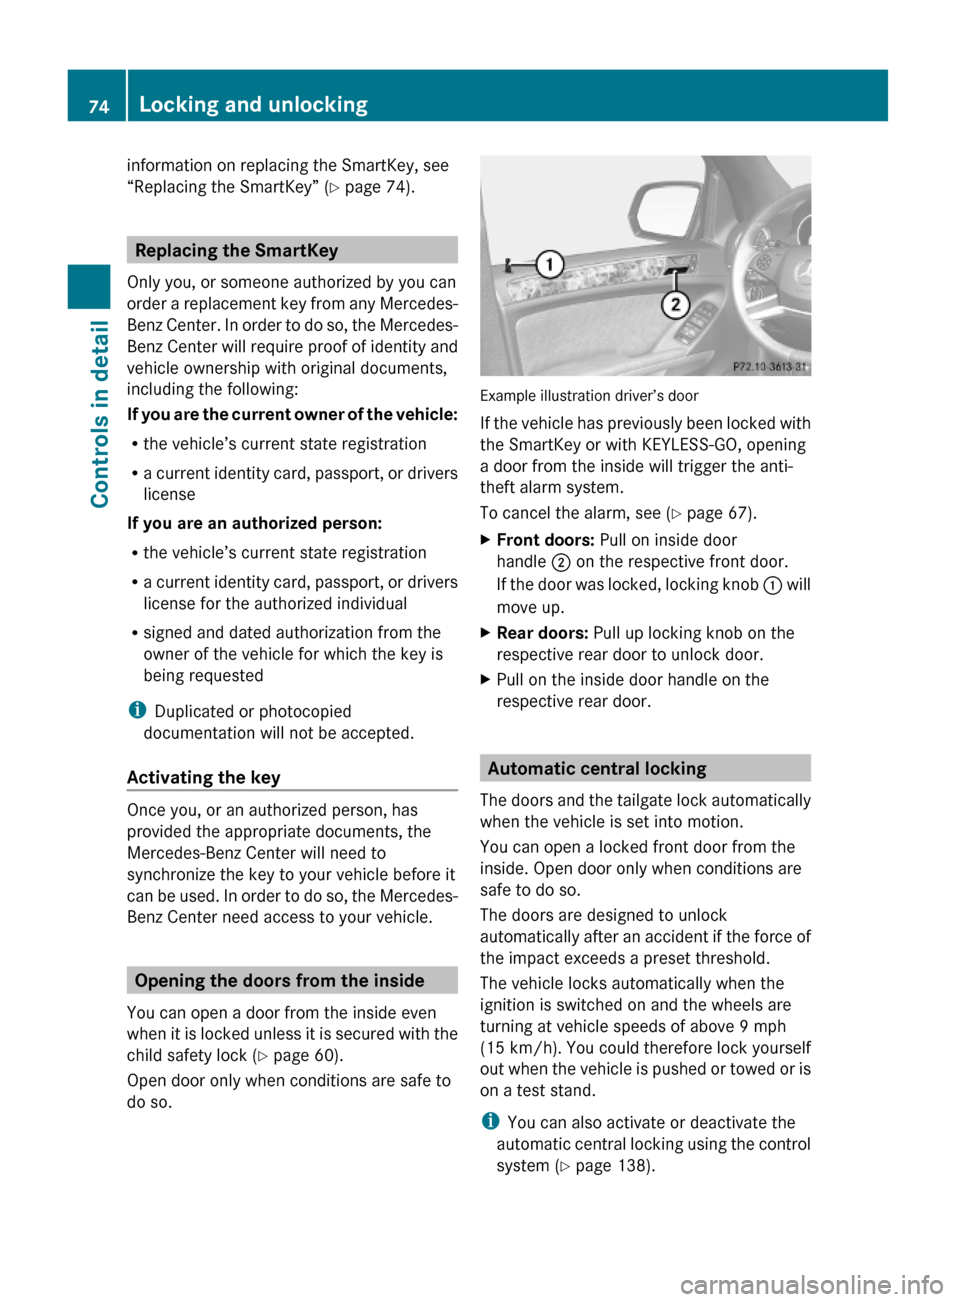
Example illustration driver’s door
If the vehicle has previously been locked with
the SmartKey or with KEYLESS-GO, opening
a door from the inside will trigger the anti-
theft alarm system.
To cancel the alarm, see (Y page 67).
XFront doors: Pull on inside door
handle ; on the respective front door.
If the door was locked, locking knob : will
move up.
XRear doors: Pull up locking knob on the
respective rear door to unlock door.
XPull on the inside door handle on the
respective rear door.
Automatic central locking
The doors and the tailgate lock automatically
when the vehicle is set into motion.
You can open a locked front door from the
inside. Open door only when conditions are
safe to do so.
The doors are designed to unlock
automatically after an accident if the force of
the impact exceeds a preset threshold.
The vehicle locks automatically when the
ignition is switched on and the wheels are
turning at vehicle speeds of above 9 mph
(15 km/h). You could therefore lock yourself
out when the vehicle is pushed or towed or is
on a test stand.
iYou can also activate or deactivate the
automatic central locking using the control
system (Y page 138).
74Locking and unlockingControls in detail
X164_AKB; 5; 31, en-USd2ureepe,Version: 2.11.8.12009-09-11T12:30:16+02:00 - Seite 74
Page 77 of 380
Locking and unlocking from the insideGObserve Safety notes, see page 55.
You can lock or unlock the vehicle from the
inside using the central locking switches. This
can be useful, for example, if you want to lock
the vehicle before starting to drive.
The central locking switches do not lock or
unlock the fuel filler flap.
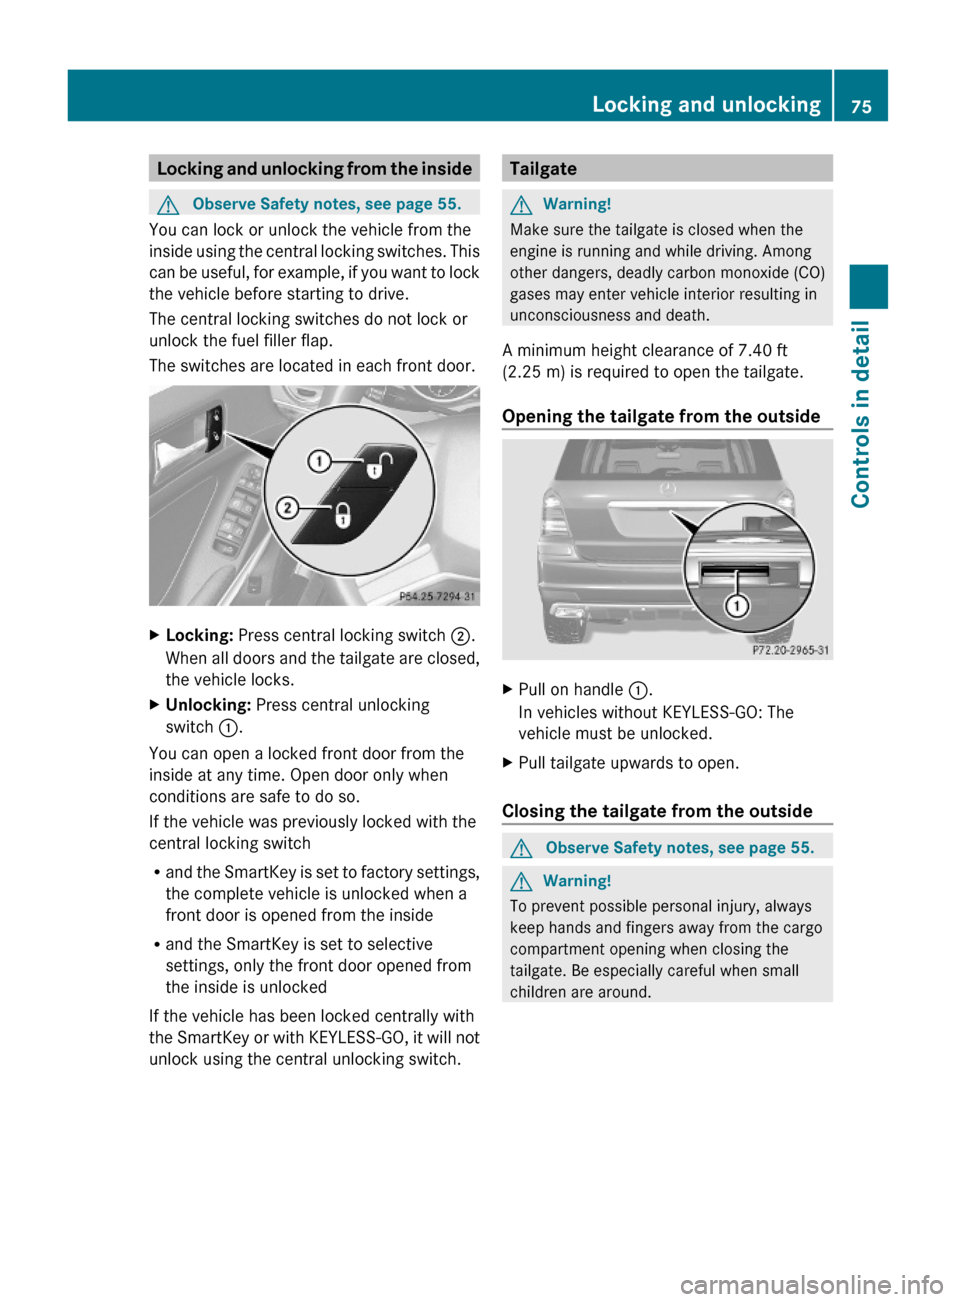
The switches are located in each front door.
XLocking: Press central locking switch ;.
When all doors and the tailgate are closed,
the vehicle locks.
XUnlocking: Press central unlocking
switch :.
You can open a locked front door from the
inside at any time. Open door only when
conditions are safe to do so.
If the vehicle was previously locked with the
central locking switch
Rand the SmartKey is set to factory settings,
the complete vehicle is unlocked when a
front door is opened from the inside
Rand the SmartKey is set to selective
settings, only the front door opened from
the inside is unlocked
If the vehicle has been locked centrally with
the SmartKey or with KEYLESS-GO, it will not
unlock using the central unlocking switch.
TailgateGWarning!
Make sure the tailgate is closed when the
engine is running and while driving. Among
other dangers, deadly carbon monoxide (CO)
gases may enter vehicle interior resulting in
unconsciousness and death.
A minimum height clearance of 7.40 ft
(2.25 m) is required to open the tailgate.
Opening the tailgate from the outside
XPull on handle :.
In vehicles without KEYLESS-GO: The
vehicle must be unlocked.
XPull tailgate upwards to open.
Closing the tailgate from the outside
GObserve Safety notes, see page 55.GWarning!
To prevent possible personal injury, always
keep hands and fingers away from the cargo
compartment opening when closing the
tailgate. Be especially careful when small
children are around.
Locking and unlocking75Controls in detailX164_AKB; 5; 31, en-USd2ureepe,Version: 2.11.8.12009-09-11T12:30:16+02:00 - Seite 75Z
Page 78 of 380
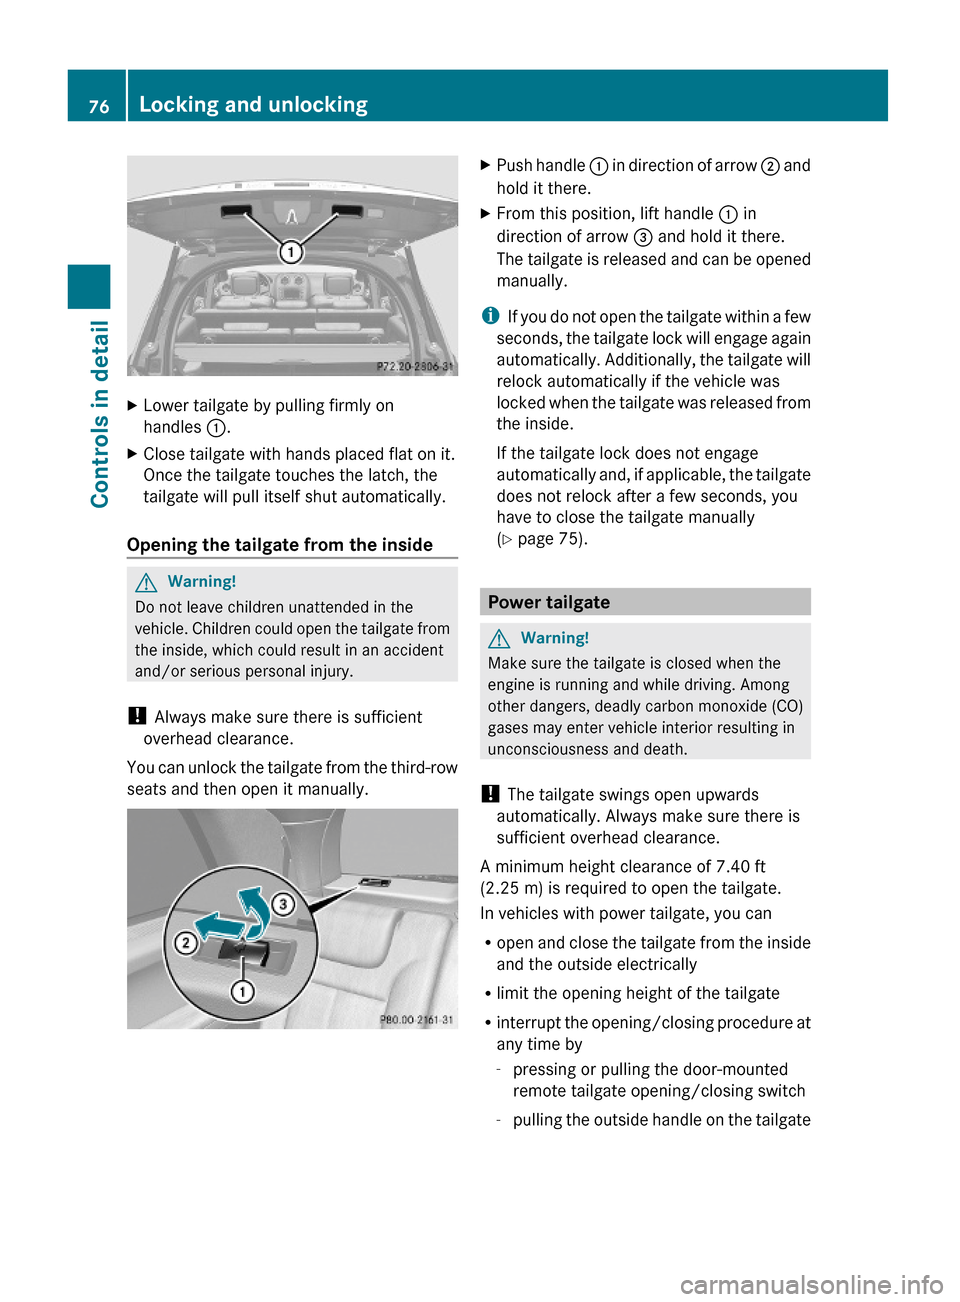
XLower tailgate by pulling firmly on
handles :.
XClose tailgate with hands placed flat on it.
Once the tailgate touches the latch, the
tailgate will pull itself shut automatically.
Opening the tailgate from the inside
GWarning!
Do not leave children unattended in the
vehicle. Children could open the tailgate from
the inside, which could result in an accident
and/or serious personal injury.
! Always make sure there is sufficient
overhead clearance.
You can unlock the tailgate from the third-row
seats and then open it manually.
XPush handle : in direction of arrow ; and
hold it there.
XFrom this position, lift handle : in
direction of arrow = and hold it there.
The tailgate is released and can be opened
manually.
iIf you do not open the tailgate within a few
seconds, the tailgate lock will engage again
automatically. Additionally, the tailgate will
relock automatically if the vehicle was
locked when the tailgate was released from
the inside.
If the tailgate lock does not engage
automatically and, if applicable, the tailgate
does not relock after a few seconds, you
have to close the tailgate manually
(Y page 75).
Power tailgate
GWarning!
Make sure the tailgate is closed when the
engine is running and while driving. Among
other dangers, deadly carbon monoxide (CO)
gases may enter vehicle interior resulting in
unconsciousness and death.
! The tailgate swings open upwards
automatically. Always make sure there is
sufficient overhead clearance.
A minimum height clearance of 7.40 ft
(2.25 m) is required to open the tailgate.
In vehicles with power tailgate, you can
Ropen and close the tailgate from the inside
and the outside electrically
Rlimit the opening height of the tailgate
Rinterrupt the opening/closing procedure at
any time by
-pressing or pulling the door-mounted
remote tailgate opening/closing switch
-pulling the outside handle on the tailgate
76Locking and unlockingControls in detail
X164_AKB; 5; 31, en-USd2ureepe,Version: 2.11.8.12009-09-11T12:30:16+02:00 - Seite 76
Page 79 of 380
-pressing the tailgate closing switch
-pressing the KEYLESS-GO locking/
closing switch
Notes for operating the tailgate with the
SmartKey:
You can also open, close, and stop the
tailgate by pressing button F on the
SmartKey.
The prerequisites for this are:RNo SmartKey is inserted in the starter
switch.
RKEYLESS-GO: The vehicle’s on-board
electronics must have status 0
(Y page 80).
Opening the tailgate from the outside
You can unlock and open the tailgate
simultaneously from the outside when the
vehicle is stationary.
XPress and hold button F on the
SmartKey until the tailgate unlocks and
begins to open.
While the tailgate is opening, an acoustic
warning sounds.
or
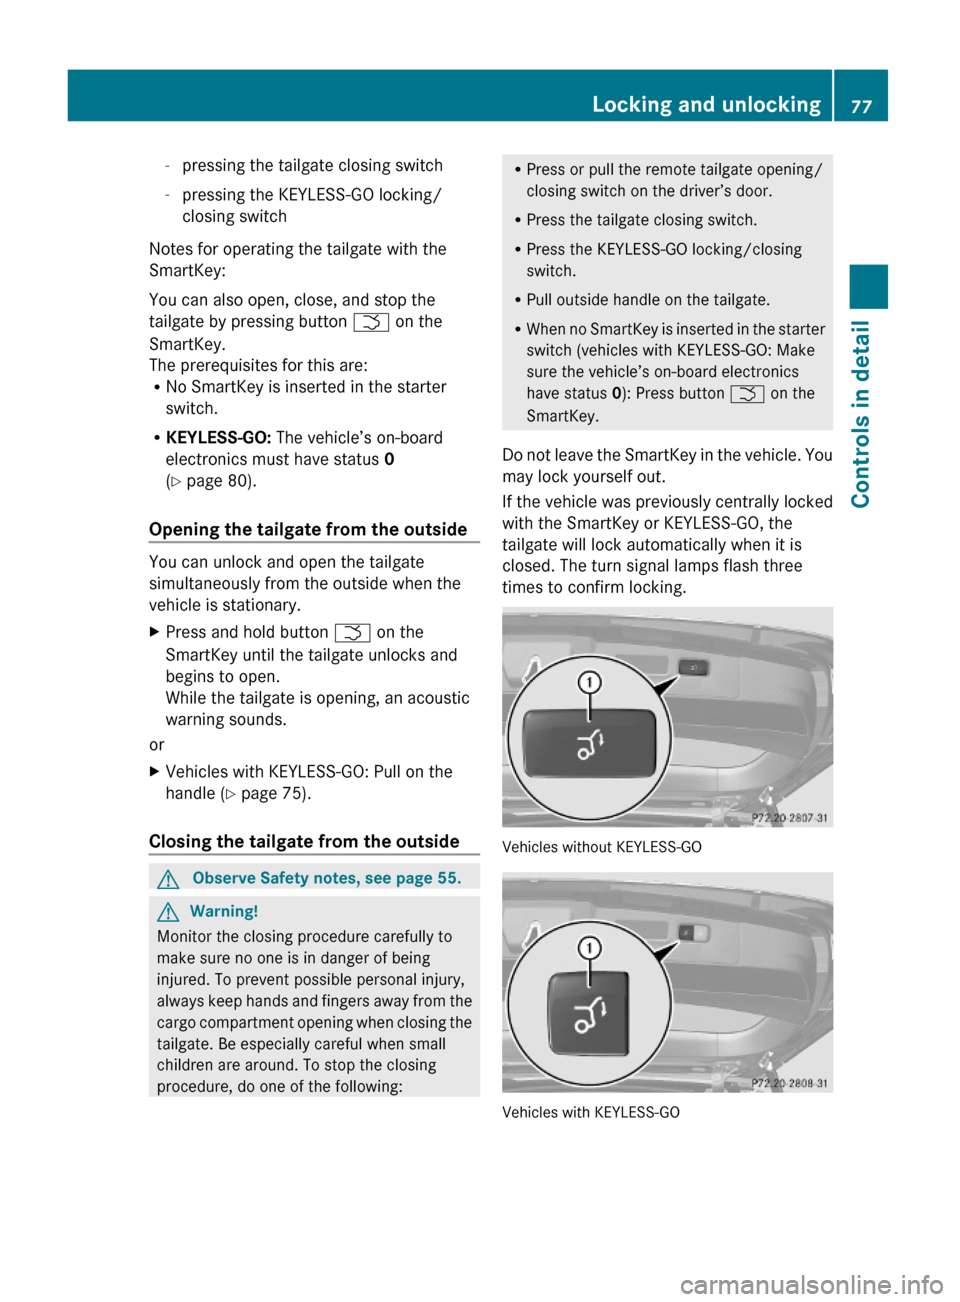
XVehicles with KEYLESS-GO: Pull on the
handle (Y page 75).
Closing the tailgate from the outside
GObserve Safety notes, see page 55.GWarning!
Monitor the closing procedure carefully to
make sure no one is in danger of being
injured. To prevent possible personal injury,
always keep hands and fingers away from the
cargo compartment opening when closing the
tailgate. Be especially careful when small
children are around. To stop the closing
procedure, do one of the following:
RPress or pull the remote tailgate opening/
closing switch on the driver’s door.
RPress the tailgate closing switch.
RPress the KEYLESS-GO locking/closing
switch.
RPull outside handle on the tailgate.
RWhen no SmartKey is inserted in the starter
switch (vehicles with KEYLESS-GO: Make
sure the vehicle’s on-board electronics
have status 0): Press button F on the
SmartKey.
Do not leave the SmartKey in the vehicle. You
may lock yourself out.
If the vehicle was previously centrally locked
with the SmartKey or KEYLESS-GO, the
tailgate will lock automatically when it is
closed. The turn signal lamps flash three
times to confirm locking.
Vehicles without KEYLESS-GO
Vehicles with KEYLESS-GO
Locking and unlocking77Controls in detailX164_AKB; 5; 31, en-USd2ureepe,Version: 2.11.8.12009-09-11T12:30:16+02:00 - Seite 77Z
Page 80 of 380
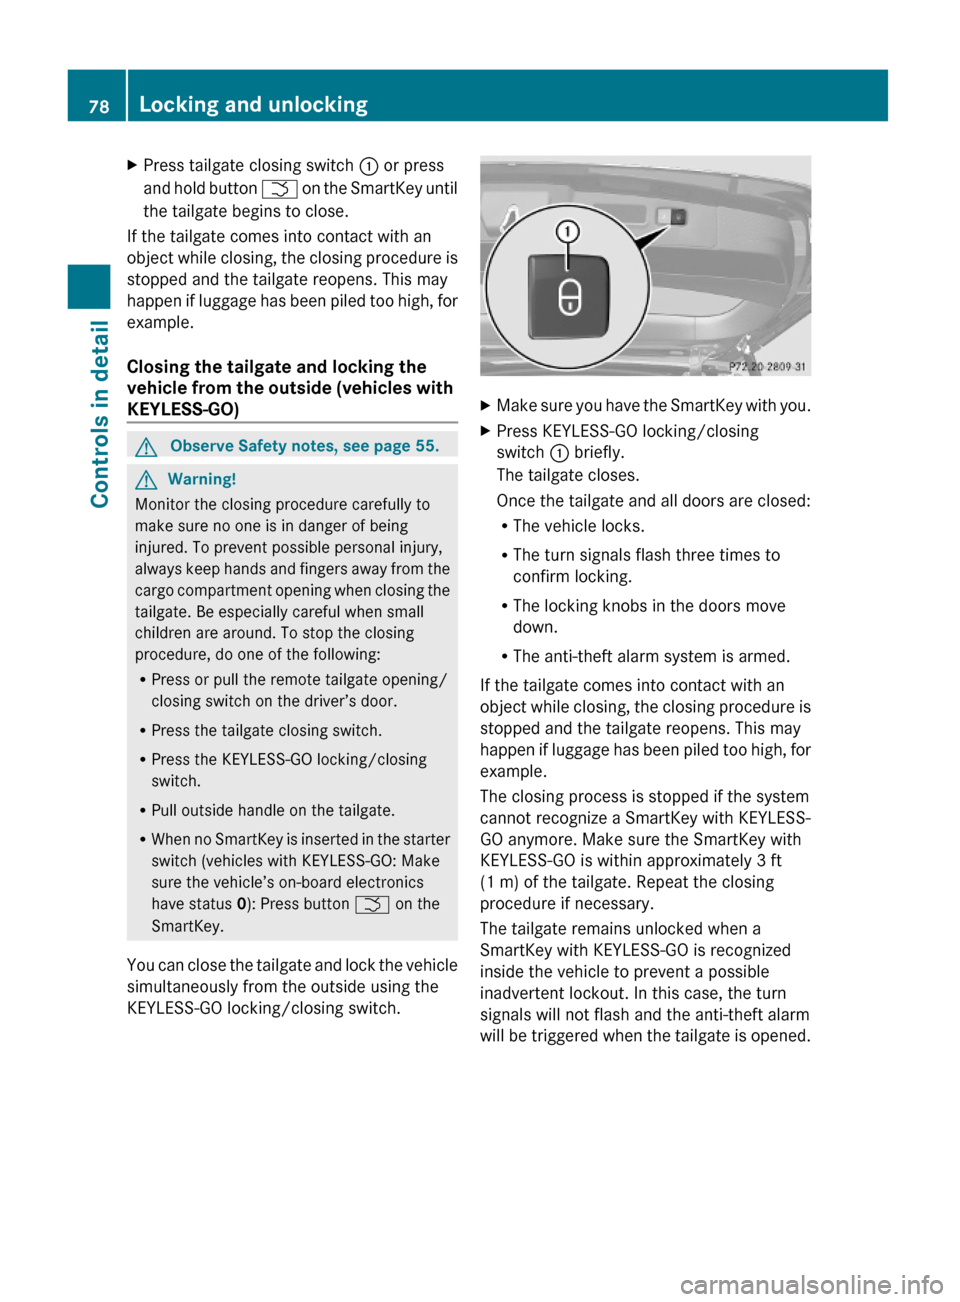
XPress tailgate closing switch : or press
and hold button F on the SmartKey until
the tailgate begins to close.
If the tailgate comes into contact with an
object while closing, the closing procedure is
stopped and the tailgate reopens. This may
happen if luggage has been piled too high, for
example.
Closing the tailgate and locking the
vehicle from the outside (vehicles with
KEYLESS-GO)
GObserve Safety notes, see page 55.GWarning!
Monitor the closing procedure carefully to
make sure no one is in danger of being
injured. To prevent possible personal injury,
always keep hands and fingers away from the
cargo compartment opening when closing the
tailgate. Be especially careful when small
children are around. To stop the closing
procedure, do one of the following:
RPress or pull the remote tailgate opening/
closing switch on the driver’s door.
RPress the tailgate closing switch.
RPress the KEYLESS-GO locking/closing
switch.
RPull outside handle on the tailgate.
RWhen no SmartKey is inserted in the starter
switch (vehicles with KEYLESS-GO: Make
sure the vehicle’s on-board electronics
have status 0): Press button F on the
SmartKey.
You can close the tailgate and lock the vehicle
simultaneously from the outside using the
KEYLESS-GO locking/closing switch.
XMake sure you have the SmartKey with you.XPress KEYLESS-GO locking/closing
switch : briefly.
The tailgate closes.
Once the tailgate and all doors are closed:
RThe vehicle locks.
RThe turn signals flash three times to
confirm locking.
RThe locking knobs in the doors move
down.
RThe anti-theft alarm system is armed.
If the tailgate comes into contact with an
object while closing, the closing procedure is
stopped and the tailgate reopens. This may
happen if luggage has been piled too high, for
example.
The closing process is stopped if the system
cannot recognize a SmartKey with KEYLESS-
GO anymore. Make sure the SmartKey with
KEYLESS-GO is within approximately 3 ft
(1 m) of the tailgate. Repeat the closing
procedure if necessary.
The tailgate remains unlocked when a
SmartKey with KEYLESS-GO is recognized
inside the vehicle to prevent a possible
inadvertent lockout. In this case, the turn
signals will not flash and the anti-theft alarm
will be triggered when the tailgate is opened.
78Locking and unlockingControls in detail
X164_AKB; 5; 31, en-USd2ureepe,Version: 2.11.8.12009-09-11T12:30:16+02:00 - Seite 78
Page 84 of 380
Seats
Safety notes
GWarning!
In order to avoid possible loss of vehicle
control the following must be done before the
vehicle is put into motion:
R seat adjustment
R head restraint adjustment
R steering wheel adjustment
R rear view mirror adjustment
R fastening of seat belts
GWarning!
Do not adjust the driver’s seat while driving.
Adjusting the seat while driving could cause
the driver to lose control of the vehicle.
Never ride in a moving vehicle with the seat
backrest in an excessively reclined position as
this can be dangerous. You could slide under
the seat belt in a collision. If you slide under
it, the seat belt would apply force at the
abdomen or neck. That could cause serious
or fatal injuries. The seat backrest and seat
belts provide the best restraint when the
wearer is in a position that is as upright as
possible and seat belts are properly
positioned on the body.
GWarning!
Your seat must be adjusted so that you can
correctly fasten your seat belt.
Observe the following points:
R Adjust the seat backrest until your arms are
slightly angled when holding the steering
wheel.
R Adjust the seat to a comfortable seating
position that still allows you to reach the
accelerator/brake pedal safely. The
position should be as far back as possible
with the driver still able to operate the
controls properly.
R Adjust the head restraint so that it is as
close to the head as possible. The center of
the head restraint must support the back of
the head at eye level.
R Never place hands under the seat or near
any moving parts while a seat is being
adjusted.
Failure to do so could result in an accident
and/or serious personal injury.GWarning!
The power seats can be operated at any time.
Therefore, do not leave children unattended
in the vehicle, or with access to an unlocked
vehicle. A child’s unsupervised access to a
vehicle could result in an accident and/or
serious personal injury.
GWarning!
According to accident statistics, children are
safer when properly restrained in the rear
seating positions than in the front seating
position. Thus, we strongly recommend that
children be placed in the rear seats whenever
possible. Regardless of seating position,
children 12 years old and under must be
seated and properly secured in an
appropriately sized infant restraint, toddler
restraint, or booster seat recommended for
the size and weight of the child. For additional
information, see “Children in the vehicle”.
A child’s risk of serious or fatal injuries is
significantly increased if the child restraints
are not properly secured in the vehicle and/
or the child is not properly secured in the child
restraint.
GWarning!
For your protection, drive only with properly
positioned head restraints.
Adjust the head restraint so that it is as close
to the head as possible and the center of the
head restraint supports the back of the head
at eye level. This will reduce the potential for
injury to the head and neck in the event of an
accident or similar situation.
82SeatsControls in detail
X164_AKB; 5; 31, en-USd2ureepe,Version: 2.11.8.12009-09-11T12:30:16+02:00 - Seite 82
Page 89 of 380
! Make sure the head restraint is pushed all
the way down.
XPull emergency release : in the direction
of arrow.
XPush seat backrest ; forwards.GWarning!
To help avoid personal injury when folding the
seat backrest forward, make sure you move
both feet and legs all the way back and out of
the way to avoid them contacting the seat as
it pivots forward.
In order to prevent an accident or any other
potentially dangerous situations when
opening the rear door and exiting the vehicle,
make sure you are aware of the traffic
situation at all times.
XOpen the left door.XExit the vehicle.
Lumbar support
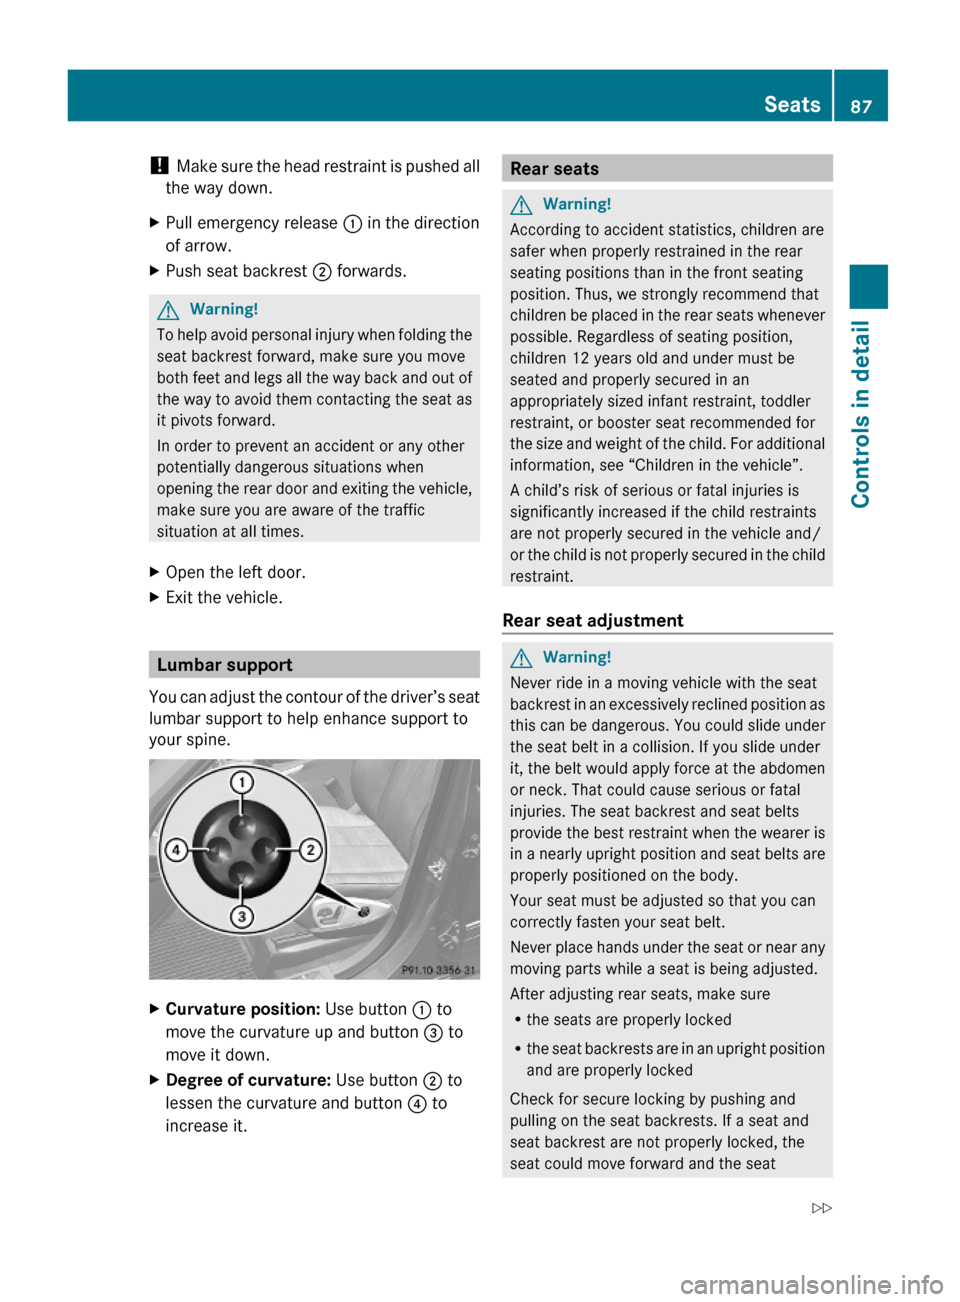
You can adjust the contour of the driver’s seat
lumbar support to help enhance support to
your spine.
XCurvature position: Use button : to
move the curvature up and button = to
move it down.
XDegree of curvature: Use button ; to
lessen the curvature and button ? to
increase it.
Rear seatsGWarning!
According to accident statistics, children are
safer when properly restrained in the rear
seating positions than in the front seating
position. Thus, we strongly recommend that
children be placed in the rear seats whenever
possible. Regardless of seating position,
children 12 years old and under must be
seated and properly secured in an
appropriately sized infant restraint, toddler
restraint, or booster seat recommended for
the size and weight of the child. For additional
information, see “Children in the vehicle”.
A child’s risk of serious or fatal injuries is
significantly increased if the child restraints
are not properly secured in the vehicle and/
or the child is not properly secured in the child
restraint.
Rear seat adjustment
GWarning!
Never ride in a moving vehicle with the seat
backrest in an excessively reclined position as
this can be dangerous. You could slide under
the seat belt in a collision. If you slide under
it, the belt would apply force at the abdomen
or neck. That could cause serious or fatal
injuries. The seat backrest and seat belts
provide the best restraint when the wearer is
in a nearly upright position and seat belts are
properly positioned on the body.
Your seat must be adjusted so that you can
correctly fasten your seat belt.
Never place hands under the seat or near any
moving parts while a seat is being adjusted.
After adjusting rear seats, make sure
Rthe seats are properly locked
Rthe seat backrests are in an upright position
and are properly locked
Check for secure locking by pushing and
pulling on the seat backrests. If a seat and
seat backrest are not properly locked, the
seat could move forward and the seat
Seats87Controls in detailX164_AKB; 5; 31, en-USd2ureepe,Version: 2.11.8.12009-09-11T12:30:16+02:00 - Seite 87Z
Page 93 of 380
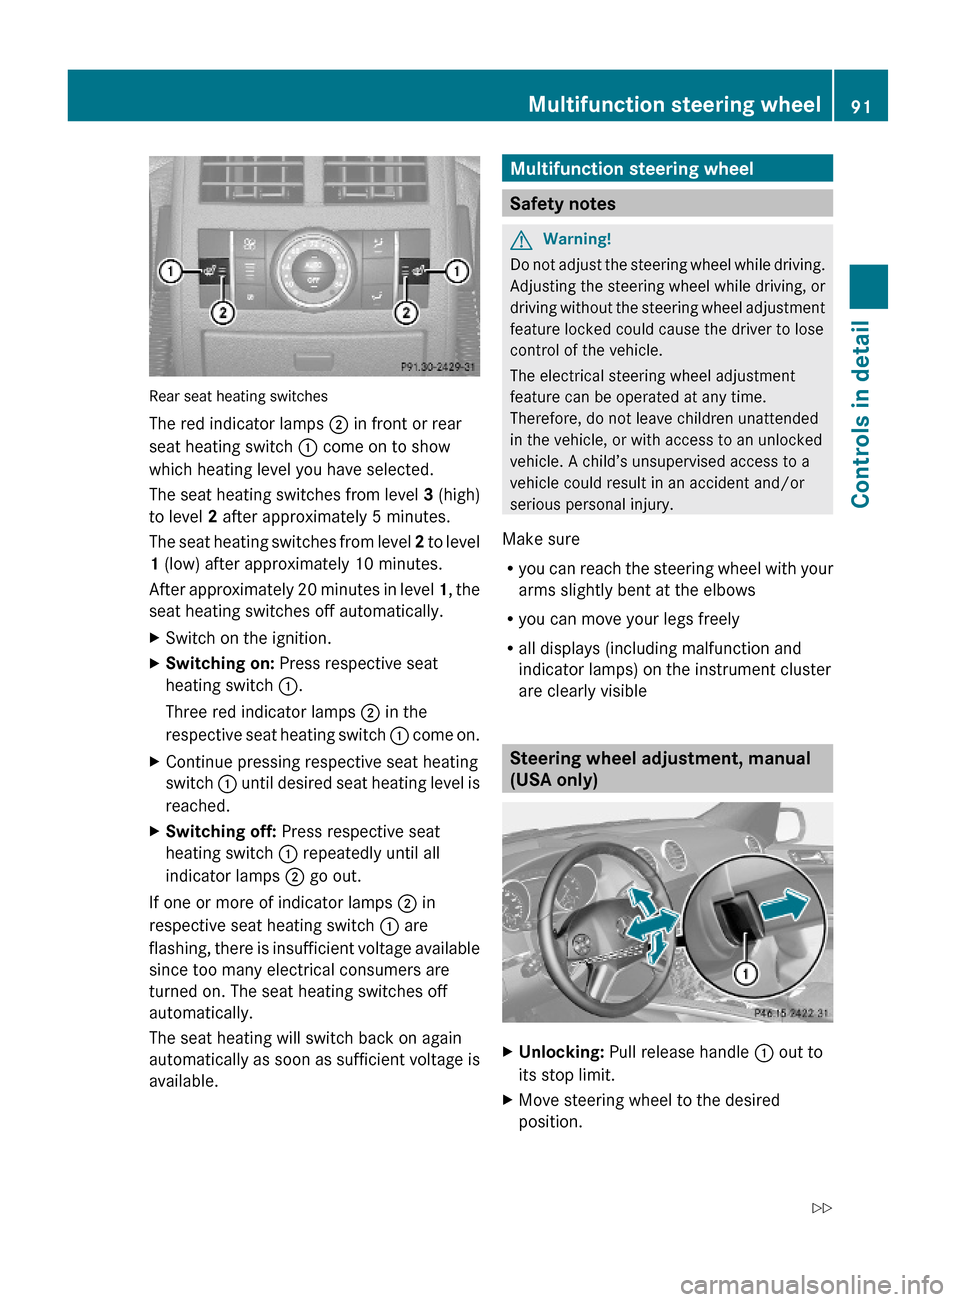
Rear seat heating switches
The red indicator lamps ; in front or rear
seat heating switch : come on to show
which heating level you have selected.
The seat heating switches from level 3 (high)
to level 2 after approximately 5 minutes.
The seat heating switches from level 2 to level
1 (low) after approximately 10 minutes.
After approximately 20 minutes in level 1, the
seat heating switches off automatically.
XSwitch on the ignition.XSwitching on: Press respective seat
heating switch :.
Three red indicator lamps ; in the
respective seat heating switch : come on.
XContinue pressing respective seat heating
switch : until desired seat heating level is
reached.
XSwitching off: Press respective seat
heating switch : repeatedly until all
indicator lamps ; go out.
If one or more of indicator lamps ; in
respective seat heating switch : are
flashing, there is insufficient voltage available
since too many electrical consumers are
turned on. The seat heating switches off
automatically.
The seat heating will switch back on again
automatically as soon as sufficient voltage is
available.
Multifunction steering wheel
Safety notes
GWarning!
Do not adjust the steering wheel while driving.
Adjusting the steering wheel while driving, or
driving without the steering wheel adjustment
feature locked could cause the driver to lose
control of the vehicle.
The electrical steering wheel adjustment
feature can be operated at any time.
Therefore, do not leave children unattended
in the vehicle, or with access to an unlocked
vehicle. A child’s unsupervised access to a
vehicle could result in an accident and/or
serious personal injury.
Make sure
Ryou can reach the steering wheel with your
arms slightly bent at the elbows
Ryou can move your legs freely
Rall displays (including malfunction and
indicator lamps) on the instrument cluster
are clearly visible
Steering wheel adjustment, manual
(USA only)
XUnlocking: Pull release handle : out to
its stop limit.
XMove steering wheel to the desired
position.
Multifunction steering wheel91Controls in detailX164_AKB; 5; 31, en-USd2ureepe,Version: 2.11.8.12009-09-11T12:30:16+02:00 - Seite 91Z