audio MERCEDES-BENZ GLA-Class 2015 X156 Comand Manual
[x] Cancel search | Manufacturer: MERCEDES-BENZ, Model Year: 2015, Model line: GLA-Class, Model: MERCEDES-BENZ GLA-Class 2015 X156Pages: 270, PDF Size: 5.82 MB
Page 226 of 270

R
Media Interface or audio AUX mode
R Bluetooth ®
audio mode
Switching modes via the audio menu When you connect an external audio source,
audio AUX is not selected automatically.
X Select Audio Audioin the main function bar by
sliding 00970052and turning 00790052007Athe COMAND
controller and press 0098to confirm.
If AUX mode was the last mode selected, it
will now be active.
If another audio source is switched on, you
can now switch to audio AUX mode in the
audio menu.
X Select Audio
Audio using00970052and press 0098to
confirm.
The audio menu appears.
X Select Aux Auxby turning 00790052007Aand press 0098to
confirm.
The audio AUX menu appears. The medium in the external audio source is played if the
source is connected and playback selec-
ted. Please see the respective operating instruc-
tions for how to operate the external audio
source.
Information on:
R Volume settings (Y page 29)
R Sound settings (Y page 30) Increasing the volume on COMAND
X
Select Volume Volume in the AUX display by turning
00790052007A the COMAND controller and press 0098
to confirm.
A menu appears. The 003Bdot indicates the
current setting.
X Select Standard
Standard orBoost Boost and press 0098to
confirm.
Standard Standard: the volume of the external audio
source is adjusted to a standard value.
Boost Boost: the volume of the external audio
source is raised by approximately 10 dB.
A device which is connected as an external
audio source may seem quieter or louder in
the vehicle, or the usual maximum volume
cannot be achieved. On some devices, it is
possible to adjust the volume separately. In
this case, start at a medium volume and
increase it gradually. This enables you to
determine whether the system is able to play the music at high volume without distorting it. 224
Audio AUX modeAudio
Page 229 of 270

Notes on discs
! Do not affix stickers or labels to the discs.
They could peel off and damage COMAND.
Stickers can cause the disc to bend, which can result in read errors and disc recogni-
tion problems.
! COMAND is designed to play discs that
comply with the EN 60908 standard. There-
fore, you can only use discs with a maxi-
mum thickness of 1.3 mm.
If you insert thicker discs, e.g. those that
contain data on both sides (DVD on one
side and audio data on the other), they can- not be ejected and can damage the device.
Only use round discs with a diameter of
12 cm. Do not use discs with a diameter of 8 cm, even with an adapter.
Playback problems may occur when playing
copied discs. There are a large variety of
discs, DVD authoring software, writing soft-
ware and writers available. This variety means that there is no guarantee that the system will
be able to play discs that you have copied
yourself. DVD playback conditions
If video DVDs do not conform to the NTSC or PAL TV standards, they may create picture,
sound or other problems during playback.
COMAND is capable of playing back video
DVDs produced according to the following
standards:
R Region code 1 or region code 0 (no region
code)
R PAL or NTSC standard
You will generally find the relevant details
either on the DVD itself or on the DVD case.
i If you insert a video DVD with a different
region code, you will see a message to this
effect.
i COMAND is set to region code 1 at the
factory. This setting can be changed at an authorized Mercedes-Benz Center. This will
allow you to play video DVDs with a differ-
ent region code, provided that they are pro- duced in accordance with the PAL or NTSC
standard. The region code can be changed up to five times. Function restrictions
Depending on the DVD, it is possible that cer- tain functions or actions will be temporarily
blocked or may not function at all. As soon as
you try to activate these functions or actions, you will see the 0047symbol in the display. Inserting and removing DVDs
X Proceed as described in the "Inserting and
ejecting CDs and DVDs" section
(Y page 196). Switching to video DVD mode
Switching on automatically X
Insert a video DVD.
COMAND loads the medium inserted and
starts to play it.
Switching on using the DISC button X
Press the 003Abutton.
COMAND switches to the previous disc
operating mode.
By pressing the 003Abutton repeatedly, you
can switch modes in the following order:
R video DVD/CD/MP3 in the single DVD
drive (disc mode)
R memory card mode
R MUSIC REGISTER
R USB storage device
R Media Interface or audio AUX mode
R Bluetooth ®
audio mode Video
DVDmode
227Video Z
Page 232 of 270

Selecting a video DVD from the media
list
X Show the menu (Y page 228).
X Select Media
Mediaby sliding 00520064and turning
00790052007A the COMAND controller and press 0098
to confirm.
The media list appears. The 003Bdot indicates
the current medium being played. Video
DVDs are indicated by the ýicon.
X Press 0098the COMAND controller.
COMAND loads the video DVD and begins
playing it.
i If you select a CD or an MP3 medium, you
switch to the respective audio mode.
Further information on the media list
(Y page 198). DVD menu
Calling up the DVD menu The DVD menu is the menu stored on the DVD
itself. It is structured in various ways accord- ing to the individual DVD and permits certain
actions and settings.
In the case of multi-language DVDs, for exam-
ple, you can change the DVD language in the DVD menu.
X Show the menu (Y page 228).
X Select DVD-Video
DVD-Video in the menu by turning
00790052007A the COMAND controller and press 0098
to confirm.
X Select DVD Functions DVD Functions and press0098to
confirm.
X Select Menu
Menu and press 0098to confirm.
The DVD menu appears. Selecting menu items in the DVD menu X
Show the DVD menu (Y page 230).
X Select a menu item by sliding 009700520064the
COMAND controller and press 0098to con-
firm.
or X Select a menu item by sliding 009500520096the
COMAND controller and press 0098to con-
firm.
The menu appears.
X To reconfirm your selection: confirm
Select Select by pressing 0098.
COMAND carries out the action.
Make a selection from the further options,
if necessary.
COMAND then switches back to the DVD
menu.
i Menu items which cannot be selected are
shown in gray.
i Depending on the DVD, the menu items:
Back (to movie) Back (to movie), Play
Play,Stop
Stop,004E,
004F orGo
Go Up
Upmay either not function at all
or may not function at certain points in the DVD menu. To indicate this, the 0047symbol
appears in the display.
Moving up one level in the DVD menu X
Show the DVD menu (Y page 230).
X Select the corresponding menu item in the
DVD menu and press 0098the COMAND con-
troller to confirm.
or 230
Video DVD modeVideo
Page 233 of 270
X
Select any menu item in the DVD menu and
press 0098the COMAND controller to con-
firm.
X Select Go Up
Go Up and press 0098to confirm.
Back to the film X
Press the 003Dback button repeatedly
until you see the movie.
or X Select the corresponding menu item from
the DVD menu.
X Select the Back Back(to
(tomovie)
movie) menu item in
the menu and press 0098to confirm. Setting the language and audio for-
mat
This function is not available on all DVDs. If it is available, you can set the DVD menu lan-
guage, the audio language or the audio for-
mat. The number of settings is determined by
the DVD content. It is possible that the set-
tings may also be accessed in the DVD menu (Y page 230).
X Show the DVD menu (Y page 230).
X In full-screen mode, press 0098the COMAND
controller to show the menu.
X Select DVD-Video
DVD-Video in the menu by turning
00790052007A the COMAND controller and press 0098
to confirm.
X Select DVD Functions
DVD Functions and press0098to
confirm.
X Select Menu Language
Menu Language orAudio Lan‐ Audio Lan‐
guage
guage and press 0098to confirm.
In both cases, a menu appears after a few
seconds. The 003Bdot in front of an entry indi-
cates the currently selected language.
X Select a setting by turning 00790052007Athe
COMAND controller and press 0098to con-
firm. Subtitles and camera angle
These functions are not available on all DVDs.
The number of subtitle languages and camera
angles available depends on the content of
the DVD. It may also be possible to access the settings from the DVD menu.
X Show the DVD menu (Y page 230).
X Select DVD-Video DVD-Video in the menu by turning
00790052007A the COMAND controller and press 0098
to confirm.
X Select DVD Functions
DVD Functions and press0098to
confirm.
X Select Subtitles
Subtitles orCamera Angle
Camera Angle and
press 0098to confirm.
In both cases, a menu appears. The 003Bdot in
front of an entry indicates the current set-
ting.
X Select a setting by turning 00790052007Athe
COMAND controller and press 0098to con-
firm. Interactive content
DVDs can contain interactive content (e.g. a
video game). In a video game, for example,
you may be able to influence events by select- ing and triggering actions. The type and num-
ber of actions depend on the DVD.
X Select an action by sliding 009700520064or009500520096 the
COMAND controller and press 0098to exe-
cute it.
A menu appears and the first entry, Select Select,
is highlighted.
X Press 0098the COMAND controller. Video AUX mode
Connecting external video sources
External video sources may have different
volumes, which can mean that system mes-
sages such as traffic announcements and
navigation system announcements are much louder. If necessary, deactivate the system
messages or adjust their volume manually. Video AUX mode
231Video Z
Page 234 of 270
If your vehicle is equipped with Media Inter-
face, you can connect an external video
source (AUX video) (Y page 217).
The 1/8 inch audio/video jacks are in the
center console stowage compartment.
i In vehicles with a rear view camera, the
AUX video jack cannot be used for external video sources. Switching to AUX video mode
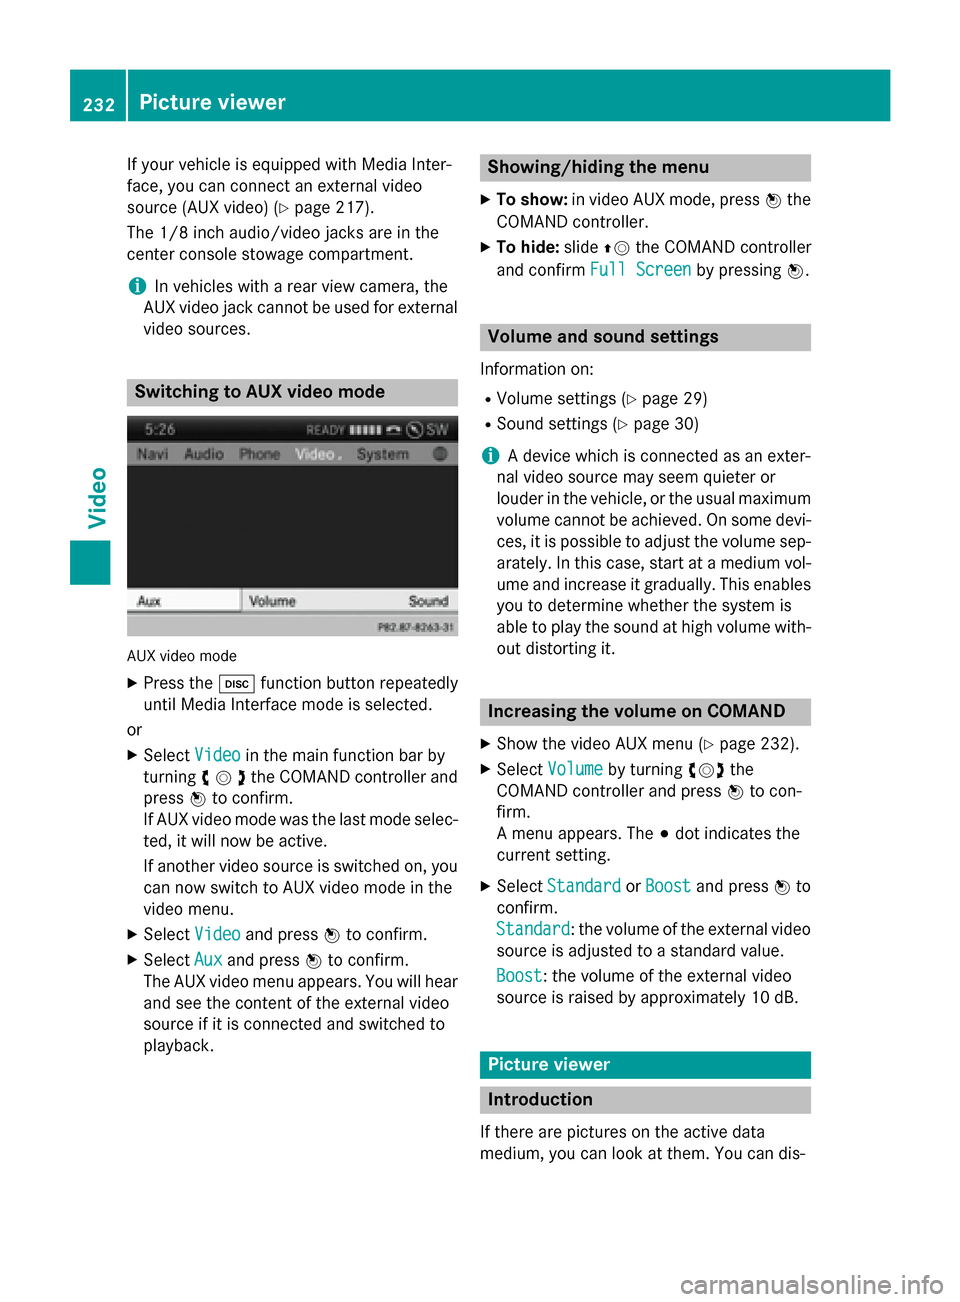
AUX video mode
X Press the 003Afunction button repeatedly
until Media Interface mode is selected.
or X Select Video
Videoin the main function bar by
turning 00790052007Athe COMAND controller and
press 0098to confirm.
If AUX video mode was the last mode selec-
ted, it will now be active.
If another video source is switched on, you can now switch to AUX video mode in the
video menu.
X Select Video
Video and press 0098to confirm.
X Select Aux
Aux and press 0098to confirm.
The AUX video menu appears. You will hear
and see the content of the external video
source if it is connected and switched to
playback. Showing/hiding the menu
X To show: in video AUX mode, press 0098the
COMAND controller.
X To hide: slide00970052the COMAND controller
and confirm Full Screen Full Screen by pressing0098. Volume and sound settings
Information on:
R Volume settings (Y page 29)
R Sound settings (Y page 30)
i A device which is connected as an exter-
nal video source may seem quieter or
louder in the vehicle, or the usual maximum
volume cannot be achieved. On some devi-
ces, it is possible to adjust the volume sep-
arately. In this case, start at a medium vol- ume and increase it gradually. This enables
you to determine whether the system is
able to play the sound at high volume with-
out distorting it. Increasing the volume on COMAND
X Show the video AUX menu (Y page 232).
X Select Volume
Volume by turning 00790052007Athe
COMAND controller and press 0098to con-
firm.
A menu appears. The 003Bdot indicates the
current setting.
X Select Standard Standard orBoost
Boost and press 0098to
confirm.
Standard Standard: the volume of the external video
source is adjusted to a standard value.
Boost Boost: the volume of the external video
source is raised by approximately 10 dB. Picture viewer
Introduction
If there are pictures on the active data
medium, you can look at them. You can dis- 232
Picture viewerVideo
Page 235 of 270
play pictures with a resolution of up to 20
megapixels. Data medium Supported picture
formats
CD/DVD with pic-
ture files bmp, jpeg, jpg, png
USB devices (sticks,
hard drives)
SD memory card bmp, jpeg, jpg, png
Calling up a category list
X Select a data medium with pictures (e.g. a
memory card):
R in the Audio menu (Y page 186)
R in the media list (Y page 198)
X Select Search Search in the basic display by slid-
ing 00520064 and turning 00790052007Athe COMAND
controller and press 0098to confirm.
The category list appears (Y page 204).Displaying pictures
X Select (Y page 204) Photos
Photosin the category
list by turning 00790052007Athe COMAND controller
and press 0098to confirm.
A folder directory appears.
X Select a folder with photos and press 0098to
confirm.
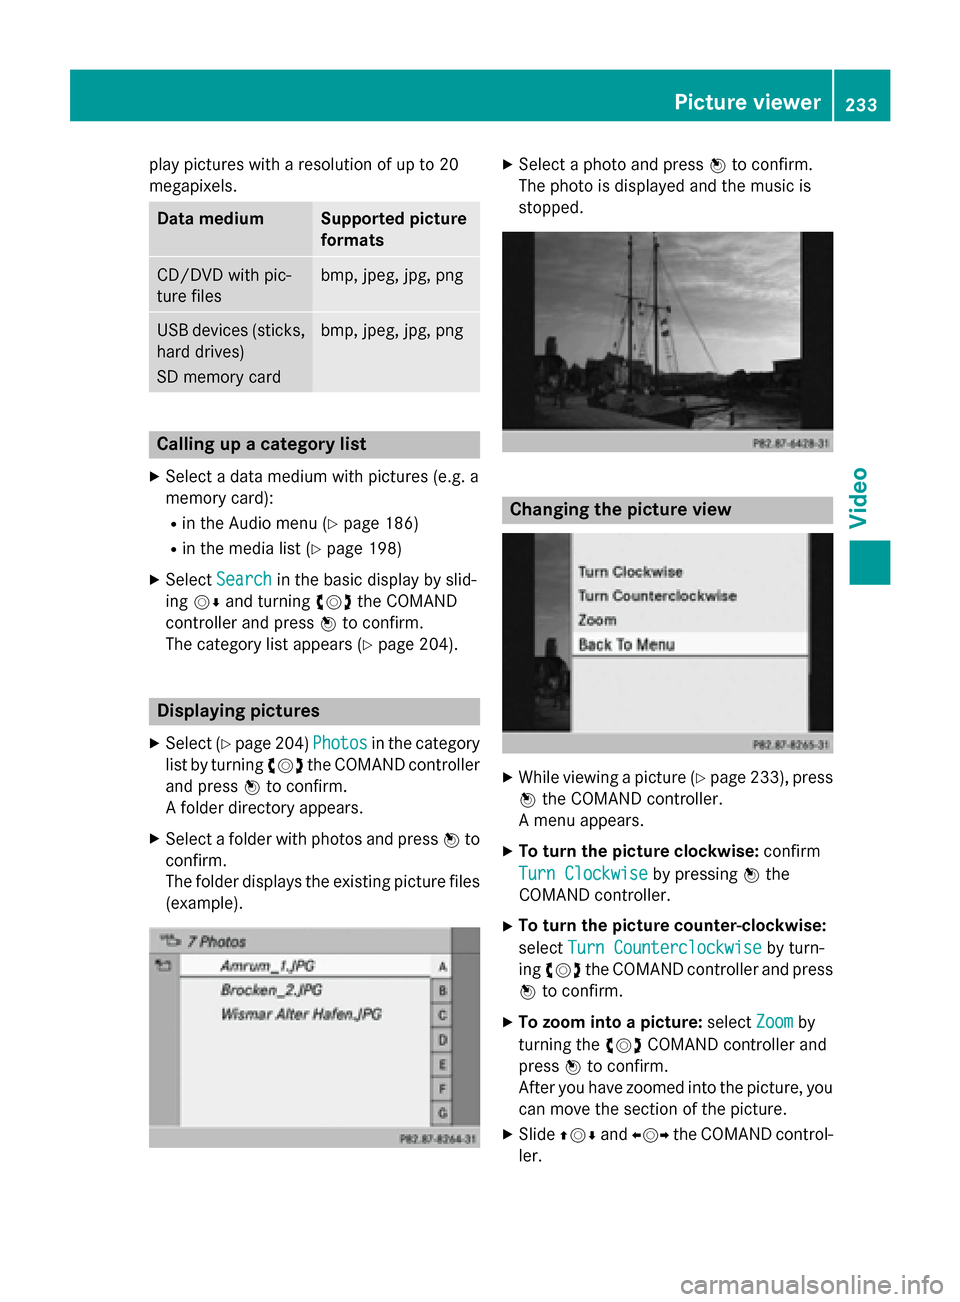
The folder displays the existing picture files (example). X
Select a photo and press 0098to confirm.
The photo is displayed and the music is
stopped. Changing the picture view
X
While viewing a picture (Y page 233), press
0098 the COMAND controller.
A menu appears.
X To turn the picture clockwise: confirm
Turn Clockwise Turn Clockwise by pressing0098the
COMAND controller.
X To turn the picture counter-clockwise:
select Turn Counterclockwise
Turn Counterclockwise by turn-
ing 00790052007A the COMAND controller and press
0098 to confirm.
X To zoom into a picture: selectZoom
Zoomby
turning the 00790052007ACOMAND controller and
press 0098to confirm.
After you have zoomed into the picture, you
can move the section of the picture.
X Slide 009700520064 and009500520096 the COMAND control-
ler. Picture viewer
233Video Z
Page 237 of 270

Your COMAND equipment
................236
Overview ............................................ 236
Basic functions ................................. 241
System settings ................................ 243
CD/audio DVD and MP3 mode ........244
Video DVD mode ............................... 247
Operation with an active COMAND source ................................................ 252
AUX mode .......................................... 254 235Rea
r Seat Entertainment System
Page 238 of 270
Your COMAND equipment
These operating instructions describe all the
standard and optional equipment for your
COMAND system, as available at the time of
going to print. Country-specific differences
are possible. Please note that your
COMAND system may not be equipped with
all the features described. Overview
Important safety notes
G
WARNING
The CD/DVD drive is a class 1 laser product. If you open the housing of the CD/DVD drive,
there is a risk of exposure to invisible laser
radiation. This laser radiation could damage
your retina. There is a risk of injury.
Never open the housing. Always have main-
tenance and repair work carried out at a quali- fied specialist workshop. G
WARNING
If objects such as headphones/headsets or
external audio/video sources are not secured in the passenger compartment, they can be
flung around and hit vehicle occupants. There
is a risk of injury, for example in the event of
sudden braking or a sudden change in direc-
tion.
Always stow these items or similar objects
carefully so that they cannot be flung around, for example in a lockable vehicle stowage
compartment. equipment
Observe that a range of Rear Seat Entertain-
ment Systems are available for Mercedes-
Benz vehicles. In this Operator's Manual, the
Rear Seat Entertainment System Code 864 is
used for illustration purposes. If you have a
different Rear Seat Entertainment System in your vehicle, please refer to the separate prin-
ted operating instructions . Components
The Rear Seat Entertainment System
includes:
R two screens for the rear behind the front-
seat head restraints
R two remote controls
R a CD/DVD drive
R AUX jacks on both screens (AUX display)
and on the CD/DVD drive (AUX drive)
R two sets of cordless headphones 236
OverviewRea
r Seat Entertainment System
Page 240 of 270
X
Point the remote control at the rear-com-
partment screen which has been selected
for remote operation.
X Press button 0043on the remote control
(Y page 237).
The respective rear-compartment screen
switches on or off.
i You can only switch the screens on using
the remote control if the ignition is
switched on.
Switching the button lighting on/off X
Press button 0044on the remote control
(Y page 237).
Depending on the previous status, the but-
ton lighting is switched on or off.
i If you do not use the remote control for
about 15 seconds, the button lighting
switches off automatically.
Switching the sound on or off X
Press button 0084on the remote control
(Y page 237).
The sound is switched on/off.
Selecting a menu/menu item and con-
firming your selection X
Select a menu/menu item using the
0059006500630064 buttons on the
remote control and press the 008Bbutton to
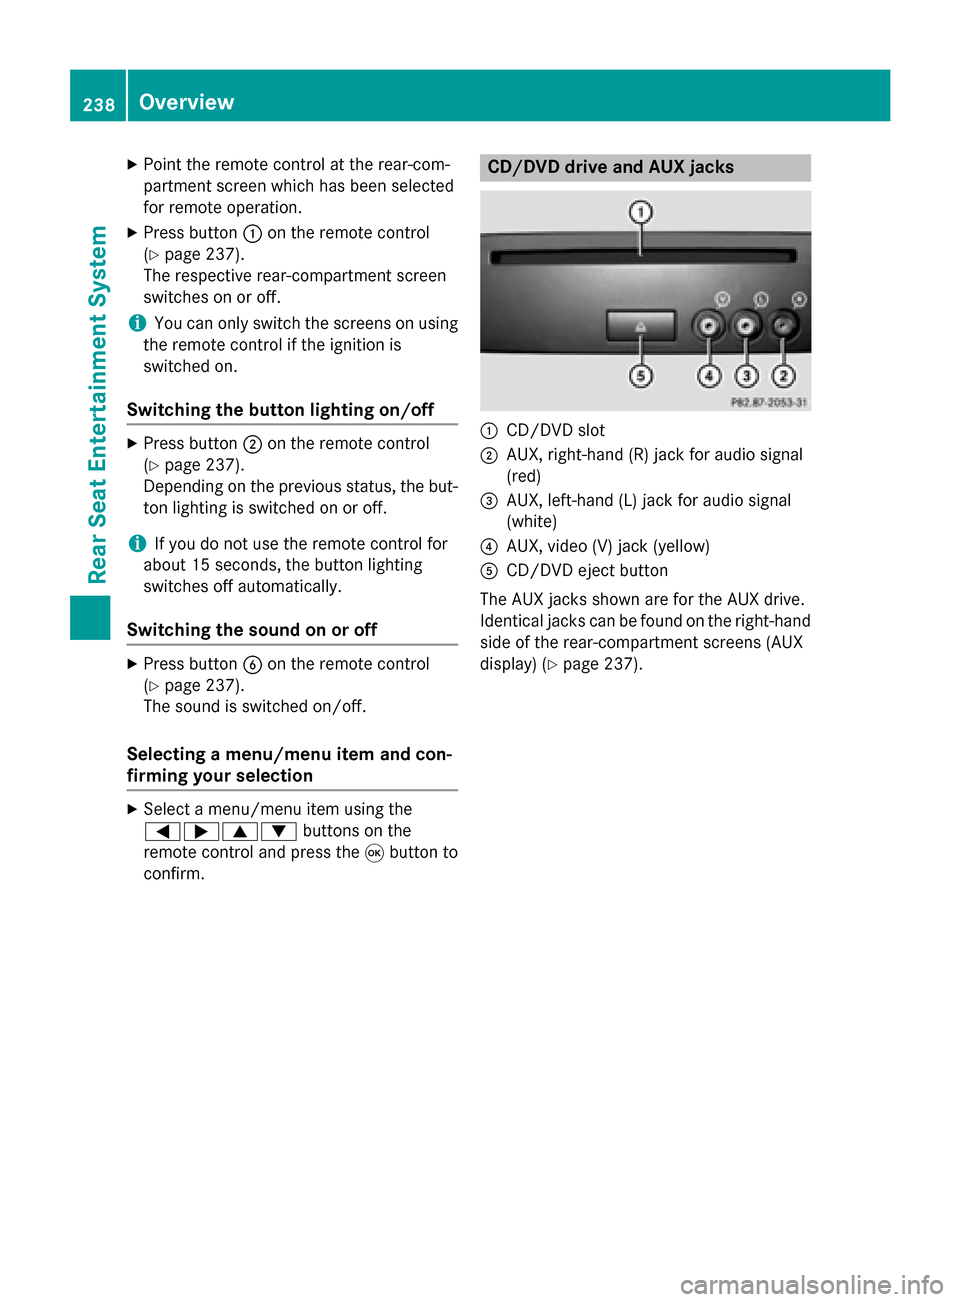
confirm. CD/DVD drive and AUX jacks
0043
CD/DVD slot
0044 AUX, right-hand (R) jack for audio signal
(red)
0087 AUX, left-hand (L) jack for audio signal
(white)
0085 AUX, video (V) jack (yellow)
0083 CD/DVD eject button
The AUX jacks shown are for the AUX drive.
Identical jacks can be found on the right-hand side of the rear-compartment screens (AUX
display) (Y page 237).238
OverviewRear Seat Entertainment System
Page 241 of 270
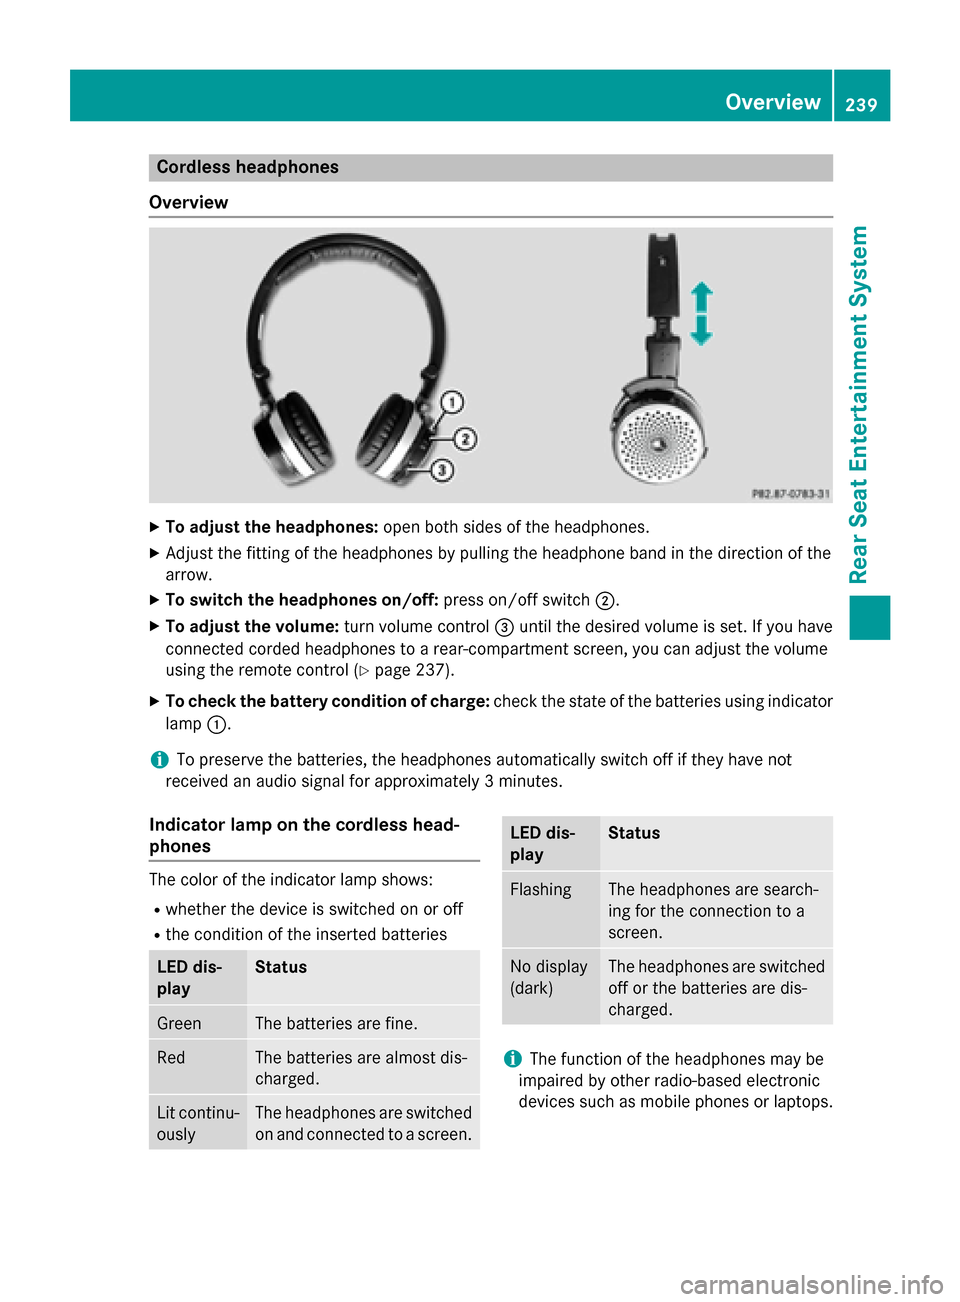
Cordless headphones
Overview X
To adjust the headphones: open both sides of the headphones.
X Adjust the fitting of the headphones by pulling the headphone band in the direction of the
arrow.
X To switch the headphones on/off: press on/off switch0044.
X To adjust the volume: turn volume control0087until the desired volume is set. If you have
connected corded headphones to a rear-compartment screen, you can adjust the volume
using the remote control (Y page 237).
X To check the battery condition of charge: check the state of the batteries using indicator
lamp 0043.
i To preserve the batteries, the headphones automatically switch off if they have not
received an audio signal for approximately 3 minutes.
Indicator lamp on the cordless head-
phones The color of the indicator lamp shows:
R whether the device is switched on or off
R the condition of the inserted batteries LED dis-
play Status
Green The batteries are fine.
Red The batteries are almost dis-
charged.
Lit continu-
ously The headphones are switched
on and connected to a screen. LED dis-
play Status
Flashing The headphones are search-
ing for the connection to a
screen.
No display
(dark) The headphones are switched
off or the batteries are dis-
charged. i
The function of the headphones may be
impaired by other radio-based electronic
devices such as mobile phones or laptops. Overview
239Rear Seat Entertainment System Z