check engine light MERCEDES-BENZ GLA-Class 2015 X156 User Guide
[x] Cancel search | Manufacturer: MERCEDES-BENZ, Model Year: 2015, Model line: GLA-Class, Model: MERCEDES-BENZ GLA-Class 2015 X156Pages: 374, PDF Size: 6.85 MB
Page 104 of 374
Problems with the seat heating
Problem
Possible causes/consequences and
0050
0050Solutions The seat heating has
switched off prema-
turely or cannot be
switched on. The on-board voltage is too low because too many electrical con-
sumers are switched on.
X Switch off electrical consumers that you do not need, such as
the rear window defroster or interior lighting.
Once the battery is sufficiently charged, the seat heating will
switch back on automatically. Steering wheel
Important safety notes
G
WARNING
You could lose control of your vehicle if you do the following while driving:
R adjust the driver's seat, head restraint,
steering wheel or mirrors
R fasten the seat belt
There is a risk of an accident.
Adjust the driver's seat, head restraint, steer-
ing wheel and mirror and fasten your seat belt before starting the engine. G
WARNING
Children could injure themselves if they
adjust the steering wheel. There is a risk of
injury.
When leaving the vehicle, always take the
SmartKey with you and lock the vehicle. Never leave children unsupervised in the vehicle. Adjusting the steering wheel
G
WARNING
If the steering wheel is unlocked while the
vehicle is in motion, it could change position
unexpectedly. This could cause you to lose
control of the vehicle. There is a risk of an
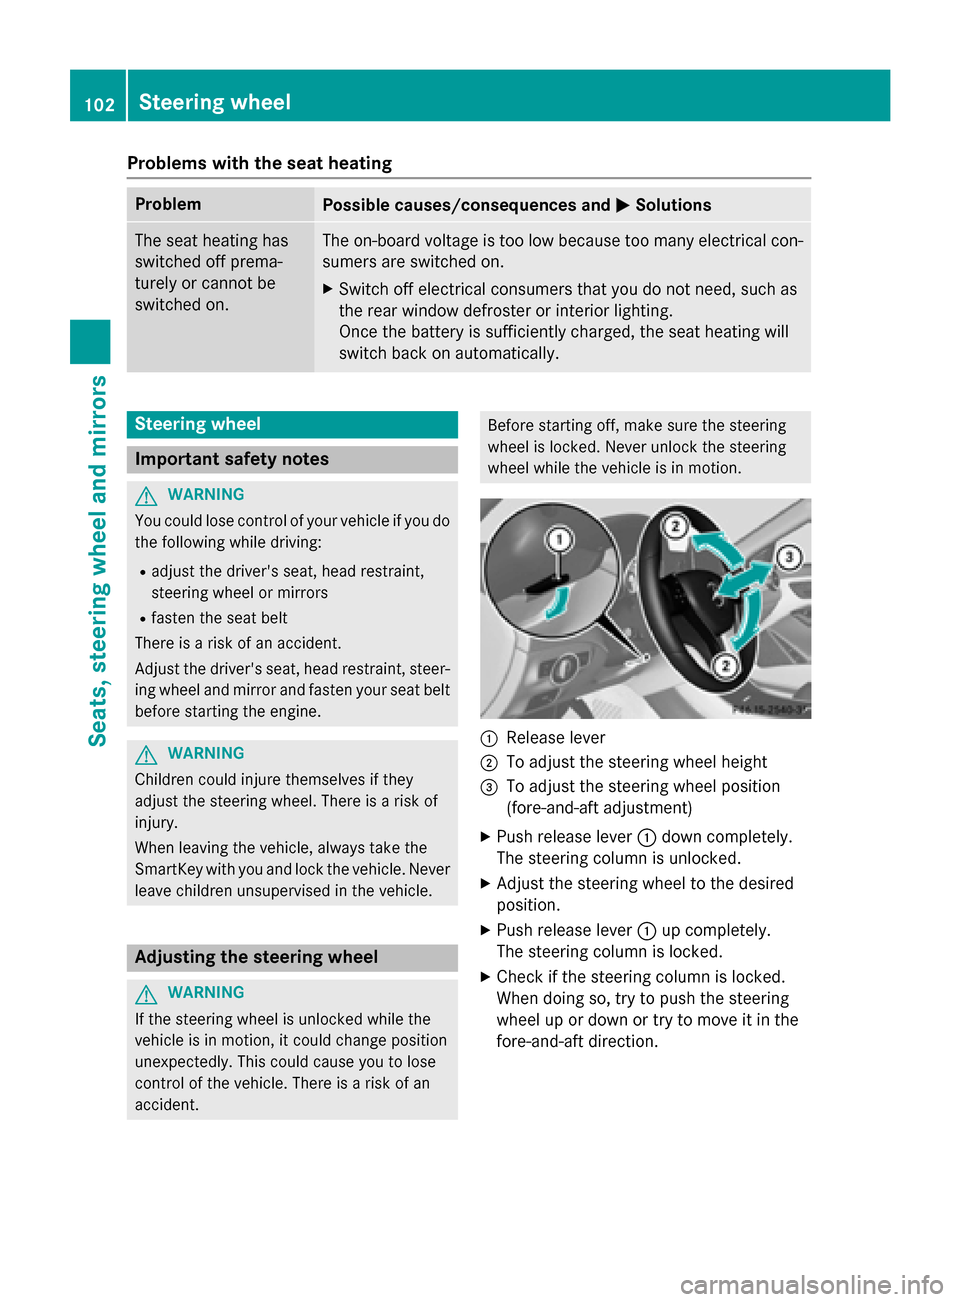
accident. Before starting off, make sure the steering
wheel is locked. Never unlock the steering
wheel while the vehicle is in motion. 0043
Release lever
0044 To adjust the steering wheel height
0087 To adjust the steering wheel position
(fore-and-aft adjustment)
X Push release lever 0043down completely.
The steering column is unlocked.
X Adjust the steering wheel to the desired
position.
X Push release lever 0043up completely.
The steering column is locked.
X Check if the steering column is locked.
When doing so, try to push the steering
wheel up or down or try to move it in the
fore-and-aft direction. 102
Steering wheelSeats, steering wheel and mirrors
Page 119 of 374

Replacing bulbs
Important safety notes
Xenon bulbs G
DANGER
Xenon bulbs carry a high voltage. You can get an electric shock if you remove the cover of
the Xenon bulb and touch the electrical con-
tacts. There is a risk of fatal injury.
Never touch the parts or the electrical con-
tacts of the Xenon bulb. Always have work on
the Xenon bulbs carried out at a qualified spe-
cialist workshop.
If your vehicle is equipped with Xenon bulbs,
you can recognize this by the following: the
cone of light from the Xenon bulbs moves
from the top to the bottom and back again
when you start the engine. For this to be
observed, the lights must be switched on
before starting the engine.
Bulbs and lamps are an important aspect of
vehicle safety. You must therefore make sure that these function correctly at all times.
Have the headlamp setting checked regularly.
Other bulbs G
WARNING
Bulbs, lamps and connectors can get very hot when operating. If you change a bulb, you
could burn yourself on these components.
There is a risk of injury.
Allow these components to cool down before changing a bulb.
Do not use a bulb that has been dropped or if
its glass tube has been scratched.
The bulb may explode if:
R you touch it
R it is hot
R you drop it
R you scratch it
Only operate bulbs in enclosed lamps
designed for that purpose. Only install spare bulbs of the same type and the specified volt-
age.
Marks on the glass tube reduce the service
life of the bulbs. Do not touch the glass tube
with your bare hands. If necessary, clean the
glass tube when cold with alcohol or spirit and
rub it off with a lint-free cloth.
Protect bulbs from moisture during opera-
tion. Do not allow bulbs to come into contact
with liquids.
There are bulbs other than the Xenon bulbs
that you cannot replace. Replace only the
bulbs listed (Y page 117). Have the bulbs that
you cannot replace yourself changed at a
qualified specialist workshop.
If you require assistance changing bulbs, con- sult a qualified specialist workshop.
If the new bulb still does not light up, consult
a qualified specialist workshop.
Bulbs and lamps are an important aspect of
vehicle safety. You must therefore make sure that these function correctly at all times.
Have the headlamp setting checked regularly. Overview: changing bulbs/bulb types
You can change the following bulbs. The bulb type can be found in the legend. Vehicles with halogen headlamps
0043
Turn signal lamp: PY 21 W
0044 High-beam headlamps/daytime running
lights: H15 55 W/15 W
0087 Low-beam headlamps/parking lamps/
standing lamps: H7 55 W Replacing bulbs
117Lights and windshield wipers Z
Page 150 of 374
Problem
Possible causes/consequences and
0050
0050Solutions The engine is not run-
ning smoothly and is
misfiring. There is a malfunction in the engine electronics or in a mechanical
component of the engine management system.
X Only depress the accelerator pedal slightly.
X Have the cause rectified immediately at a qualified specialist
workshop.
Otherwise, non-combusted fuel may get into the catalytic con-
verter and damage it. The coolant tempera-
ture display is showing
more than 248 ‡
(120 †). The coolant
warning lamp may also
be lit and a warning
tone may sound. The coolant level is too low. The coolant is too hot and the engine
is no longer being cooled sufficiently.
X Stop as soon as possible and allow the engine and the coolant to
cool down.
X Check the coolant level (Y page 295). Observe the warning
notes as you do so and add coolant if necessary. Automatic transmission
Important safety notes
G
WARNING
If the engine speed is above the idling speed
and you engage transmission position Dor R,
the vehicle could pull away suddenly. There is a risk of an accident.
When engaging transmission position Dor R,
always firmly depress the brake pedal and do not simultaneously accelerate. G
WARNING
The automatic transmission switches to neu-
tral position Nwhen you switch off the engine.
The vehicle may roll away. There is a risk of an
accident.
After switching off the engine, always switch
to parking position P. Prevent the parked vehi-
cle from rolling away by applying the parking
brake. DIRECT SELECT lever
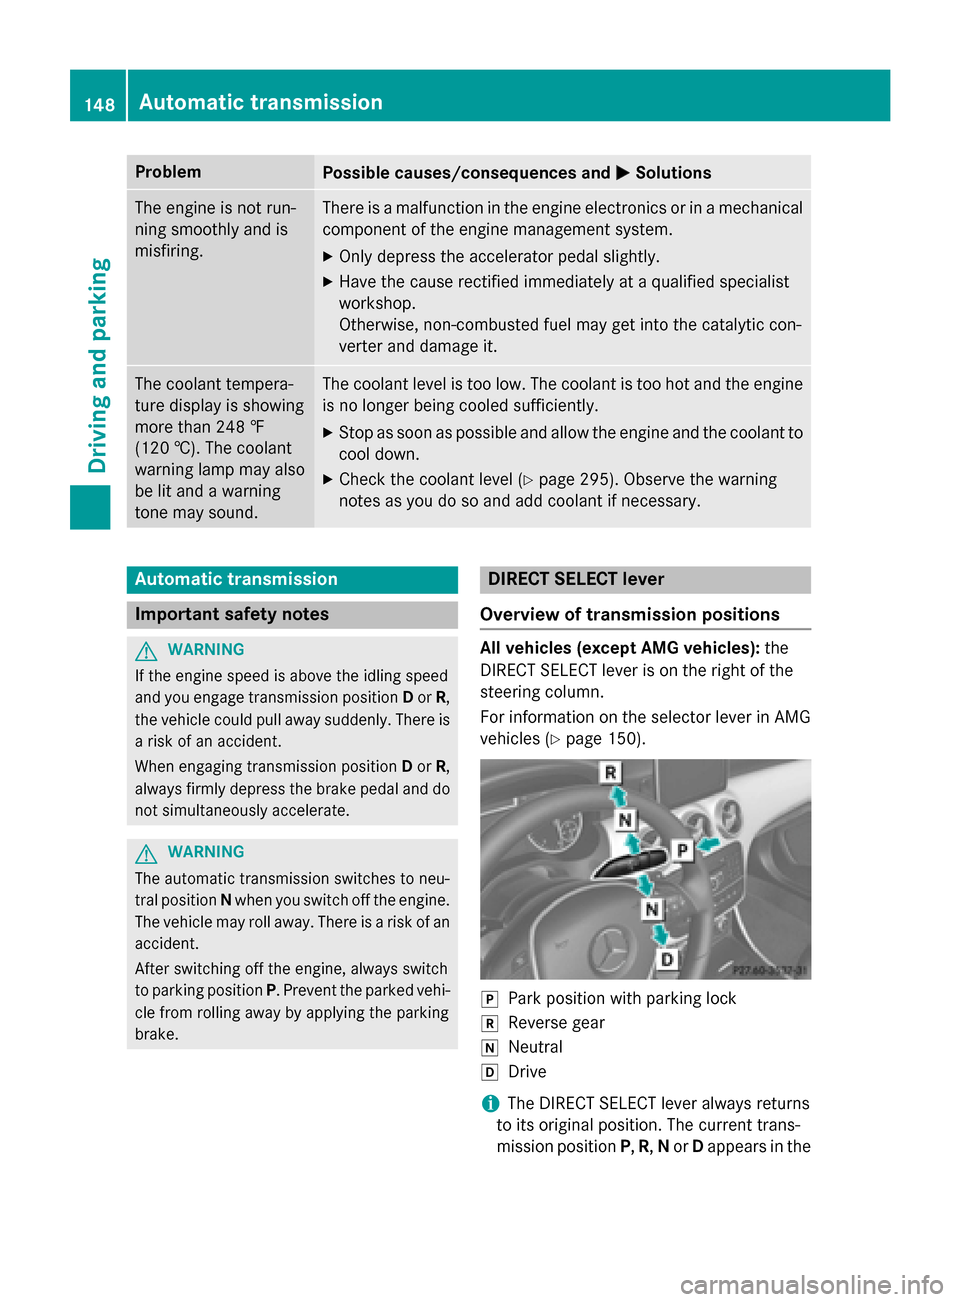
Overview of transmission positions All vehicles (except AMG vehicles):
the
DIRECT SELECT lever is on the right of the
steering column.
For information on the selector lever in AMG
vehicles (Y page 150). 005D
Park position with parking lock
005E Reverse gear
005C Neutral
005B Drive
i The DIRECT SELECT lever always returns
to its original position. The current trans-
mission position P,R, Nor Dappears in the 148
Automatic transmissionDriving and parking
Page 160 of 374
!
Overfilling the fuel tank could damage the
fuel system.
! Take care not to spill any fuel on painted
surfaces. You could otherwise damage the
paintwork.
! Use a filter when refueling from a fuel can.
Otherwise, the fuel lines and/or injection
system could be blocked by particles from
the fuel can.
Do not get into the vehicle again during the
refueling process. Otherwise, electrostatic
charge could build up again.
If you overfill the fuel tank, fuel could spray
out when the fuel pump nozzle is removed.
For further information on fuel and fuel quality (Y page 362). Refueling
General information The fuel filler flap is unlocked or locked auto-
matically when you open or close the vehicle
with the SmartKey.
The position of the fuel filler cap is displayed
00D4 in the instrument cluster. The arrow on
the filling pump indicates the side of the vehi-
cle.
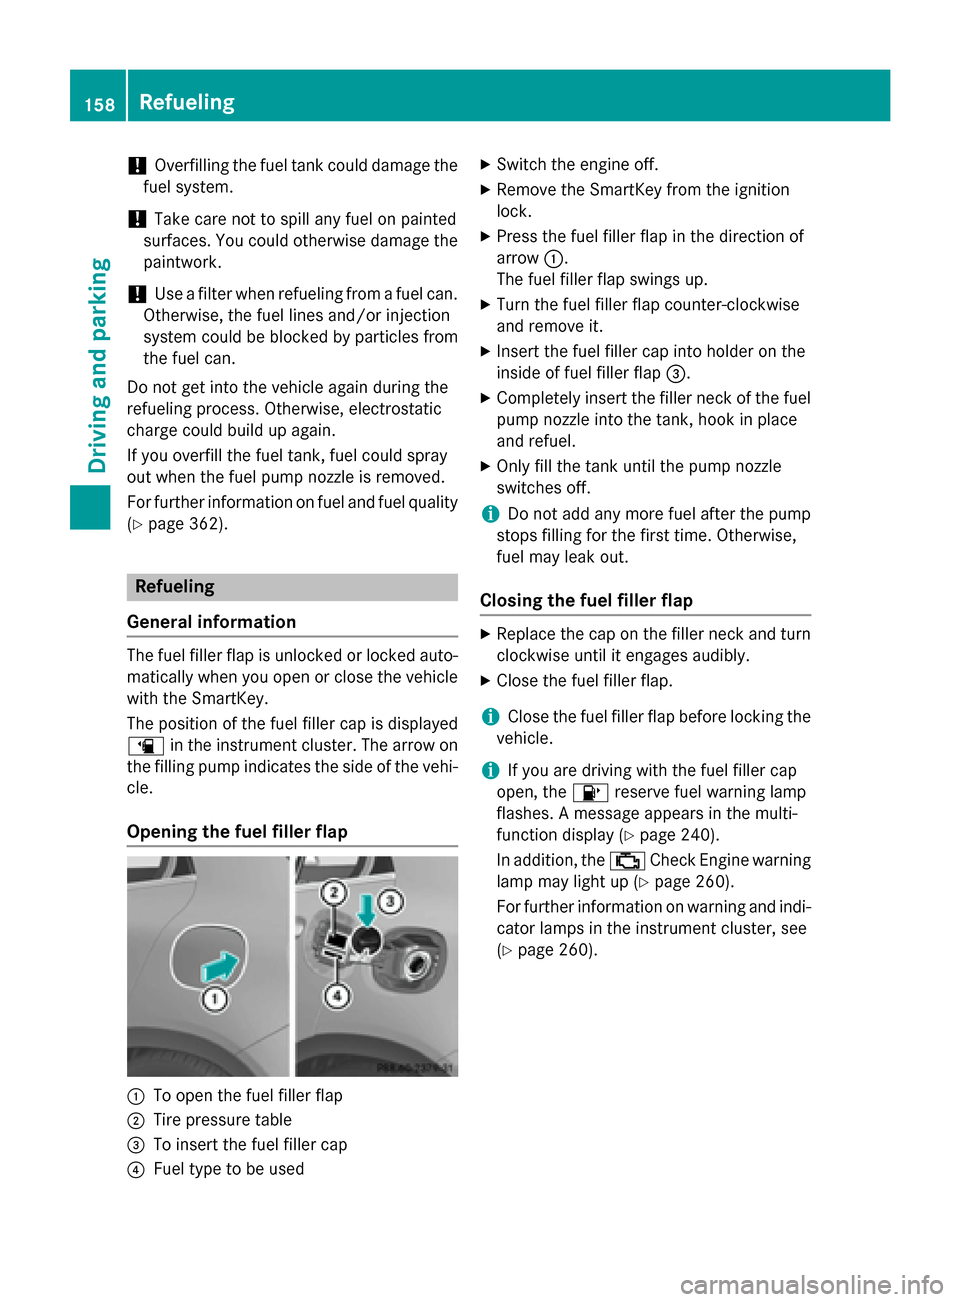
Opening the fuel filler flap 0043
To open the fuel filler flap
0044 Tire pressure table
0087 To insert the fuel filler cap
0085 Fuel type to be used X
Switch the engine off.
X Remove the SmartKey from the ignition
lock.
X Press the fuel filler flap in the direction of
arrow 0043.
The fuel filler flap swings up.
X Turn the fuel filler flap counter-clockwise
and remove it.
X Insert the fuel filler cap into holder on the
inside of fuel filler flap 0087.
X Completely insert the filler neck of the fuel
pump nozzle into the tank, hook in place
and refuel.
X Only fill the tank until the pump nozzle
switches off.
i Do not add any more fuel after the pump
stops filling for the first time. Otherwise,
fuel may leak out.
Closing the fuel filler flap X
Replace the cap on the filler neck and turn
clockwise until it engages audibly.
X Close the fuel filler flap.
i Close the fuel filler flap before locking the
vehicle.
i If you are driving with the fuel filler cap
open, the 00B6reserve fuel warning lamp
flashes. A message appears in the multi-
function display (Y page 240).
In addition, the 00B9Check Engine warning
lamp may light up (Y page 260).
For further information on warning and indi- cator lamps in the instrument cluster, see
(Y page 260). 158
RefuelingDriving and parking
Page 167 of 374
Heavy and light loads
G
WARNING
If you rest your foot on the brake pedal while
driving, the braking system can overheat. This increases the stopping distance and can even
cause the braking system to fail. There is a
risk of an accident.
Never use the brake pedal as a footrest. Never
depress the brake pedal and the accelerator
pedal at the same time.
! Depressing the brake pedal constantly
results in excessive and premature wear to
the brake pads.
If the brakes have been subjected to a heavy load, do not stop the vehicle immediately.
Drive on for a short while. This allows the air-
flow to cool the brakes more quickly.
Wet roads If you have driven for a long time in heavy rain
without braking, there may be a delayed reac- tion from the brakes when braking for the firsttime. This may also occur after the vehicle has
been washed or driven through deep water.
You have to depress the brake pedal more
firmly. Maintain a greater distance from the
vehicle in front.
After driving on a wet road or having the vehi-
cle washed, brake firmly while paying atten-
tion to the traffic conditions. This will warm up the brake discs, thereby drying them more
quickly and protecting them against corro-
sion.
Limited braking performance on salt-
treated roads If you drive on salted roads, a layer of salt
residue may form on the brake discs and
brake pads. This can result in a significantly
longer braking distance. R
Brake occasionally to remove any possible
salt residue. Make sure that you do not
endanger other road users when doing so.
R Carefully depress the brake pedal and the
beginning and end of a journey.
R Maintain a greater distance to the vehicle
ahead.
Servicing the brakes !
If the red brake warning lamp lights up in
the instrument cluster and you hear a warn- ing tone while the engine is running, the
brake fluid level may be too low. Observe
additional warning messages in the multi-
function display.
The brake fluid level may be too low due tobrake pad wear or leaking brake lines.
Have the brake system checked immedi-
ately. This work should be carried out at a
qualified specialist workshop.
! A function or performance test should
only be carried out on a 2-axle dynamom-
eter. If you are planning to have the vehicle tested on such a dynamometer, contact an
authorized Mercedes-Benz Center to
obtain further information first. Otherwise,
you could damage the drive train or the
brake system.
! As the ESP ®
system operates automati-
cally, the engine and the ignition must be
switched off (the SmartKey must be in posi-
tion 0or 1in the ignition lock) if:
R the electric parking brake is tested on a
brake dynamometer (for a maximum of
ten seconds)
R the vehicle is towed with the front axle
raised.
Braking triggered automatically by ESP ®
may seriously damage the brake system.
All checks and maintenance work on the
brake system must be carried out at a quali-
fied specialist workshop. Consult a qualified
specialist workshop to arrange this. Driving tips
165Driving and parking Z
Page 172 of 374
Checklist after driving off-road
!
If you detect damage to the vehicle after
driving off-road, have the vehicle checked
immediately at a qualified specialist work-
shop.
X Deactivate off-road program (Y page 186).
X Deactivate DSR (Y page 184).
X Clean the headlamps and rear lights and
check for damage.
X Clean the front and rear license plates.
X Clean the wheels/tires with a water jet and
remove any foreign objects.
X Clean the wheels, wheel housings and the
vehicle underside with a water jet; check
for any foreign objects and damage.
X Check whether twigs or other parts of
plants have become trapped. These
increase the risk of fire and can damage
fuel pipes, brake hoses or the rubber bel-
lows of the axle joints and propeller shafts.
X After the trip, examine without fail the
entire undercarriage, wheels, tires, brakes,
bodywork structure, steering, chassis and
exhaust system for damage.
X After driving in sand, mud, gravel, water or
similar dirty conditions, have the following
checked and cleaned:
R brake discs
R the wheels
R brake pads
R axle joints
X If you detect strong vibrations after off-road
travel, check for foreign objects in the
wheels and drive train and remove them if
necessary. Foreign objects can disturb the
balance and cause vibrations.
Driving over poor road surfaces places
greater demands on your vehicle than driving on normal roads. After driving off-road, checkthe vehicle. This allows you to detect damage
promptly and reduce the risk of an accident to
yourself and other road users. Driving on sand Observe the following rules when driving on
sand:
R Select the off-road program (Y page 186).
R Avoid high engine speeds.
R Use the left-hand steering wheel paddle
shifter to shift to a lower gear appropriate
to the terrain.
R Drive quickly to overcome the rolling resist-
ance. Otherwise the vehicle's wheels could
become stuck in loose ground.
R Drive in the tracks of other vehicles if pos-
sible. Make sure that:
- the tire ruts are not too deep.
- the sand is sufficiently firm.
- the ground clearance of the vehicle is
sufficient.
Tire ruts and gravel roads !
Check that the ruts are not too deep and
that your vehicle has sufficient clearance.
Otherwise, your vehicle could be damaged
or bottom out and get stuck.
Observe the following rules when driving
along ruts in off-road terrain or on roads with loose gravel:
R Activate the off-road program
(Y page 186).
R Avoid high engine speeds.
R Shift to a lower gear using the left-hand
steering wheel paddle shifter.
R Drive slowly.
R Where ruts are too deep, drive with the
wheels of one side on the center grassy
area, if possible. Traveling uphill
Approach/departure angle G
WARNING
If you drive on a steep incline at an angle or
turn when driving on an incline, the vehicle 170
Driving tipsDriving and parking
Page 173 of 374
could slip sideways, tip and rollover. There is a
risk of an accident.
Always drive on a steep incline in the line of
fall (straight up or down) and do not turn the
vehicle.
R Observe the warnings for off-road driving
(Y page 168).
R Follow the line of fall when driving on slopes
and steep inclines.
R Before driving on extreme uphill and down-
hill gradients, select the off-road program
(Y page 186).
R Drive slowly.
R Accelerate gently and make sure that the
wheels are gripping.
R Avoid high engine speeds, except when
driving on sandy and muddy routes with
high driving resistance.
R Use the left-hand steering wheel paddle
shifter to shift to a lower gear appropriate
to the gradient.
R Use the left-hand paddle shifter to shift into
a lower gear in good time on long and steep
downhill gradients.
i Hill start assist will aid you when pulling
away on a hill.
For further information about hill start
assist, see (Y page 144).
Do not switch to transmission position N
when driving off-road. If you try to brake the
vehicle using the service brake, you could
lose control of the vehicle. If the gradient is
too steep for your vehicle, drive back down in reverse gear.
Always observe the approach/departure
angle values (Y page 369).
Maximum gradient-climbing capability Always observe the maximum gradient climb-
ing ability values (Y page 369). Hilltops When driving up an uphill gradient, slightly
reduce pressure on the accelerator immedi-
ately before reaching the brow of the hill.
Make use of the vehicle's own impetus to
travel over the brow.
This style of driving prevents:
R the vehicle from lifting off the ground on the
brow of a hill
R the vehicle from traveling too quickly down
the other side
Driving downhill R
Drive slowly.
R Do not drive at an angle down steep
inclines. Steer into the line of fall and drive
with the front wheels aligned straight. Oth- erwise, the vehicle could slip sideways, tip
and rollover.
R Shift to a lower gear using the left-hand
paddle shifter before tackling steep down-
hill gradients.
R Activate DSR. If this is not sufficient, brake
gently. When doing so, make sure that the
vehicle is facing in the direction of the line
of fall.
R Check that the brakes are working normally
after a long downhill stretch.
i Off-road ABS is activated when the off-
road program is selected.
At speeds below 18 mph (30 km/h), the
front wheels lock cyclically during braking.
The digging-in effect achieved in the proc-
ess reduces the stopping distance on off-
road terrain. The steerability of the vehicle
is considerably reduced if the wheels lock. Driving tips
171Driving and parking Z
Page 196 of 374
Rear view camera
General notes Rear view camera
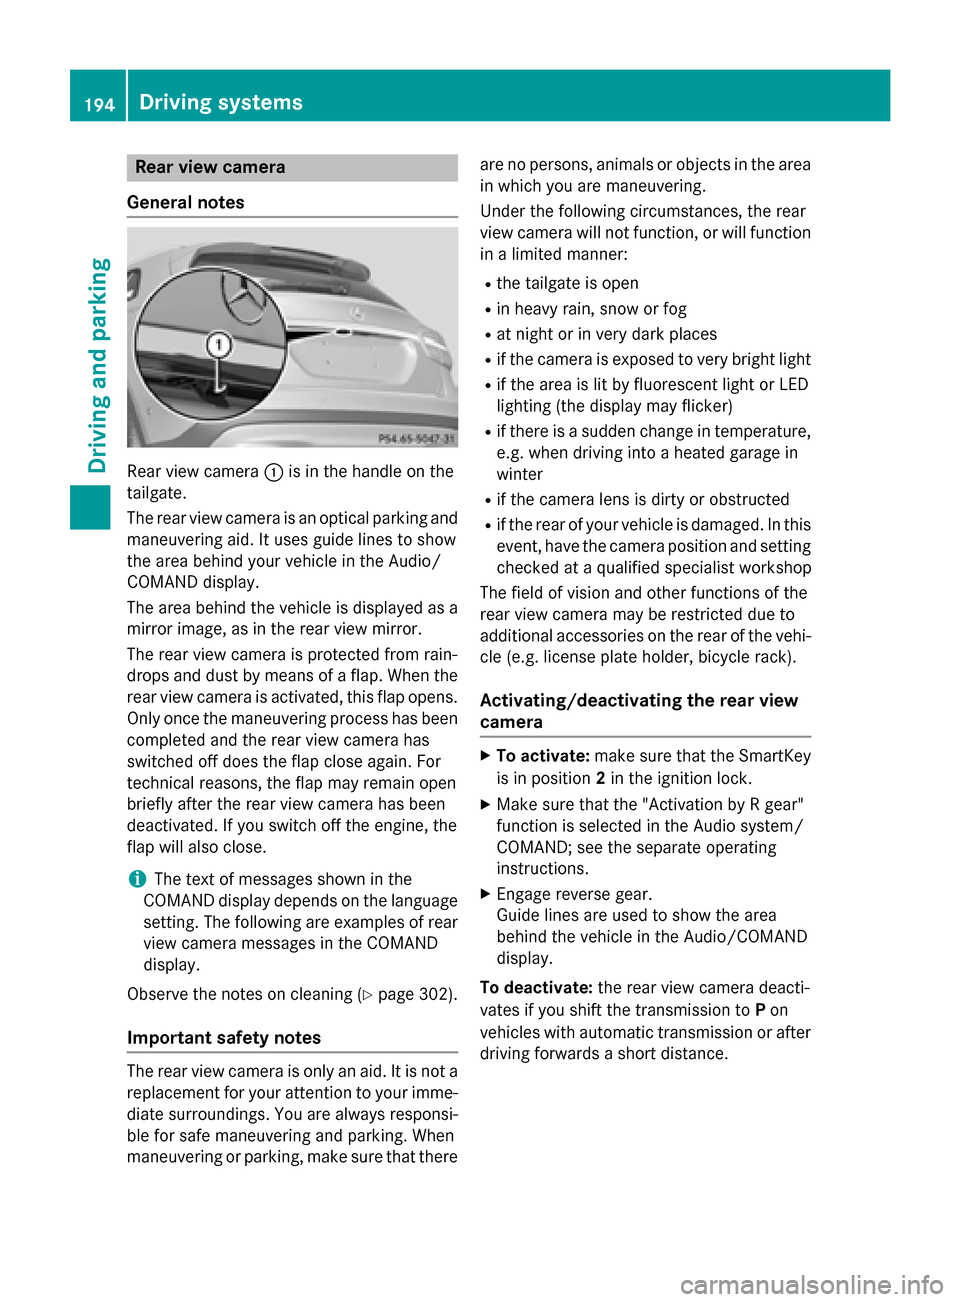
0043is in the handle on the
tailgate.
The rear view camera is an optical parking and maneuvering aid. It uses guide lines to show
the area behind your vehicle in the Audio/
COMAND display.
The area behind the vehicle is displayed as a
mirror image, as in the rear view mirror.
The rear view camera is protected from rain-
drops and dust by means of a flap. When the
rear view camera is activated, this flap opens. Only once the maneuvering process has been
completed and the rear view camera has
switched off does the flap close again. For
technical reasons, the flap may remain open
briefly after the rear view camera has been
deactivated. If you switch off the engine, the
flap will also close.
i The text of messages shown in the
COMAND display depends on the language
setting. The following are examples of rear view camera messages in the COMAND
display.
Observe the notes on cleaning (Y page 302).
Important safety notes The rear view camera is only an aid. It is not a
replacement for your attention to your imme-
diate surroundings. You are always responsi- ble for safe maneuvering and parking. When
maneuvering or parking, make sure that there are no persons, animals or objects in the area
in which you are maneuvering.
Under the following circumstances, the rear
view camera will not function, or will function
in a limited manner:
R the tailgate is open
R in heavy rain, snow or fog
R at night or in very dark places
R if the camera is exposed to very bright light
R if the area is lit by fluorescent light or LED
lighting (the display may flicker)
R if there is a sudden change in temperature,
e.g. when driving into a heated garage in
winter
R if the camera lens is dirty or obstructed
R if the rear of your vehicle is damaged. In this
event, have the camera position and setting checked at a qualified specialist workshop
The field of vision and other functions of the
rear view camera may be restricted due to
additional accessories on the rear of the vehi-
cle (e.g. license plate holder, bicycle rack).
Activating/deactivating the rear view
camera X
To activate: make sure that the SmartKey
is in position 2in the ignition lock.
X Make sure that the "Activation by R gear"
function is selected in the Audio system/
COMAND; see the separate operating
instructions.
X Engage reverse gear.
Guide lines are used to show the area
behind the vehicle in the Audio/COMAND
display.
To deactivate: the rear view camera deacti-
vates if you shift the transmission to Pon
vehicles with automatic transmission or after driving forwards a short distance. 194
Driving systemsDriving and parking
Page 206 of 374
Useful information
i This Operator's Manual describes all
models and all standard and optional equip- ment of your vehicle available at the time of
publication of the Operator's Manual.
Country-specific differences are possible.
Please note that your vehicle may not be
equipped with all features described. This
also applies to safety-related systems and
functions.
i Read the information on qualified special-
ist workshops (Y page 28). Important safety notes
G
WARNING
If you operate information systems and com-
munication equipment integrated in the vehi- cle while driving, you will be distracted from
traffic conditions. You could also lose control of the vehicle. There is a risk of an accident.
Only operate the equipment when the traffic
situation permits. If you are not sure that this
is possible, park the vehicle paying attention
to traffic conditions and operate the equip-
ment when the vehicle is stationary.
You must observe the legal requirements for
the country in which you are currently driving when operating the on-board computer. G
WARNING
If the instrument cluster has failed or mal-
functioned, you may not recognize function
restrictions in systems relevant to safety. The operating safety of your vehicle may be
impaired. There is a risk of an accident.
Drive on carefully. Have the vehicle checked
at a qualified specialist workshop immedi-
ately.
The on-board computer only shows messages
or warnings from certain systems in the mul- tifunction display. You should therefore make
sure your vehicle is operating safely at all times. Otherwise, a vehicle that is not oper-
ating safely may cause an accident.
If the operating safety of your vehicle is
impaired, pull over as soon as it is safe to do
so. Contact a qualified specialist workshop.
For an overview, see the instrument panel
illustration (Y
page 33). Displays and operation
Instrument cluster lighting
The lighting in the instrument cluster, in the
displays and the controls in the vehicle inte-
rior can be adjusted using the brightness con-
trol knob.
The brightness control knob is located on the bottom left of the instrument cluster
(Y page 33).
X Turn the brightness control knob clockwise
or counter-clockwise.
If the light switch is set to 0058,0060or
0058, the brightness is dependent upon
the brightness of the ambient light.
i The light sensor in the instrument cluster
automatically controls the brightness of
the multifunction display.
In daylight, the displays in the instrument
cluster are not illuminated. Coolant temperature display
G
WARNING
Opening the hood when the engine is over-
heated or when there is a fire in the engine
compartment could expose you to hot gases
or other service products. There is a risk of
injury.
Let an overheated engine cool down before
opening the hood. If there is a fire in the
engine compartment, keep the hood closed
and contact the fire department.
! A display message is shown if the coolant
temperature is too high. 204
Displays and operationOn-board computer and displays
Page 261 of 374
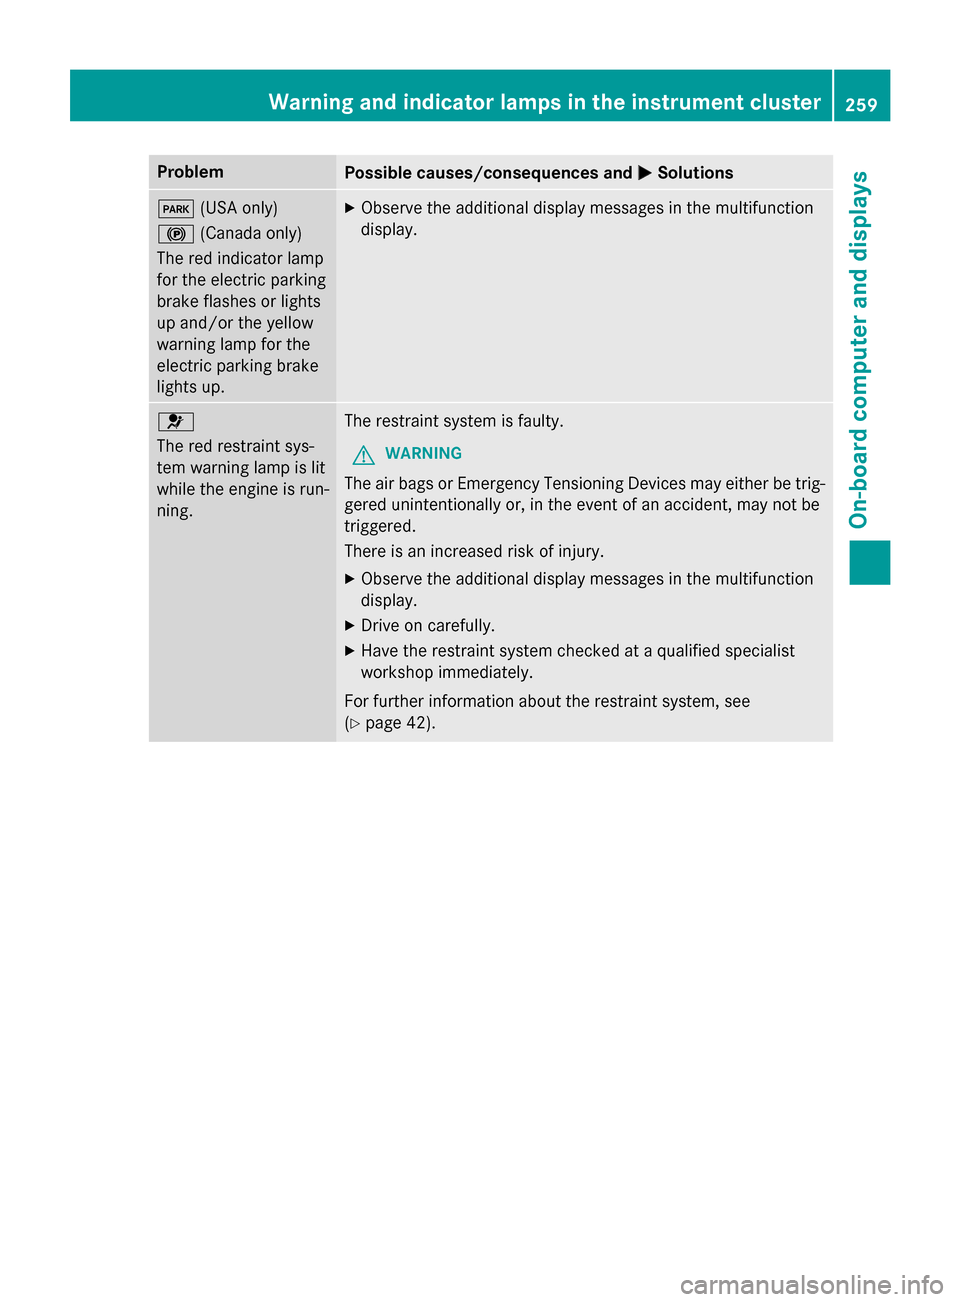
Problem
Possible causes/consequences and
0050
0050Solutions 0049
(USA only)
0024 (Canada only)
The red indicator lamp
for the electric parking
brake flashes or lights
up and/or the yellow
warning lamp for the
electric parking brake
lights up. X
Observe the additional display messages in the multifunction
display. 0075
The red restraint sys-
tem warning lamp is lit
while the engine is run-
ning.
The restraint system is faulty.
G WARNING
The air bags or Emergency Tensioning Devices may either be trig- gered unintentionally or, in the event of an accident, may not be
triggered.
There is an increased risk of injury.
X Observe the additional display messages in the multifunction
display.
X Drive on carefully.
X Have the restraint system checked at a qualified specialist
workshop immediately.
For further information about the restraint system, see
(Y page 42). Warning and indicator lamps in the instrument cluster
259On-board computer and displays Z