heating MERCEDES-BENZ GLA-Class 2015 X156 Owner's Manual
[x] Cancel search | Manufacturer: MERCEDES-BENZ, Model Year: 2015, Model line: GLA-Class, Model: MERCEDES-BENZ GLA-Class 2015 X156Pages: 374, PDF Size: 6.85 MB
Page 13 of 374
F
Filler cap see Fuel filler flap
Filling capacities (Technical data) ...3 61
Flat tire MOExtended tires .......................... 307
Preparing the vehicle ..................... 306
TIREFIT kit ...................................... 308
Floormats .......................................... .290
Fog lamps Extended range .............................. 114
Switching on/off ........................... 111
Front fog lamps
Display message ............................ 236
Switching on/off ........................... 111
Front-passenger seat
Folding the backrest forward/
back ............................................... 269
Fuel
Additives ........................................ 363
Consumption statistics .................. 207
Displaying the current consump-
tion ................................................ 208
Displaying the range ..................... .208
Driving tips ................................... .163
Flexible fuel vehicles ..................... .363
Fuel gauge ....................................... 33
Grade (gasoline) ............................ 362
Important safety notes .................. 362
Premium-grade unleaded gaso-
line ................................................. 362
Problem (malfunction) ................... 159
Refueling ........................................ 157
Tank content/reserve fuel ............. 362
Fuel filler flap
Opening ......................................... 158
Fuel level
Calling up the range (on-board
computer) ...................................... 208
Fuel tank
Capacity ........................................ 362
Problem (malfunction) ................... 159
Fuses
Allocation chart ............................ .322
Before changing ............................ .321 Fuse box in the engine compart-
ment .............................................. 321
Fuse box in the front-passenger
footwell .......................................... 322
Important safety notes .................. 320
see Fuses G
Garage door opener Clearing the memory ..................... 289
General notes ................................ 286
Important safety notes .................. 286
Opening/closing the garage door .. 288
Programming (button in the rear-
view mirror) ................................... 286
Gear indicator (on-board com-
puter, AMG vehicles) ......................... 218
Gear or selector lever (cleaning
guidelines) ......................................... 303
Genuine parts ...................................... 23
Glove box .......................................... .267 H
Handbrake see Parking brake
Handling control system
see ESP ®
(Electronic Stability Program)
Hands-free system
see Mobile phone
Hazard warning lamps
Display message ............................ 251
Notes ............................................. 113
Headlamps
Cleaning system (notes) ................ 366
Fogging up ..................................... 115
see Lights
Head restraints
Adjusting ......................................... 98
Adjusting (electrically) ..................... 99
Adjusting (manually) ........................ 99
Adjusting (rear) .............................. 100
General notes .................................. 99
Heating
see Climate control Index
11
Page 19 of 374
S
Safety Children in the vehicle ..................... 58
Child restraint systems .................... 59
Occupant Classification System
(OCS) ............................................... 51
Safety system
see Driving safety systems
Seat belts
Adjusting the height .........................46
Cleaning ........................................ .304
Correct usage .................................. 45
Fastening ......................................... 46
Important safety guidelines ............. 44
Introduction ..................................... 44
Releasing ......................................... 47
Warning lamp ................................. 252
Warning lamp (function) ................... 47
Seats
Adjusting (AMG Performance
Seat) .............................................. 100
Adjusting (electrically) ..................... 98
Adjusting (manually) ........................ 98
Adjusting the 4-way lumbar sup-
port ................................................ 100
Adjusting the head restraint ............ 98
Calling up a stored setting (mem-
ory function) .................................. 107
Cleaning the cover ......................... 303
Correct driver's seat position ........... 96
Important safety notes .................... 97
Seat heating problem .................... 102
Storing settings (memory func-
tion) ............................................... 106
Switching seat heating on/off ....... 100
Selecting a gear
see Automatic transmission
Selector lever
see Automatic transmission
Sensors (cleaning instructions) ....... 301
Service Center see Qualified specialist workshop
Service menu (on-board com-
puter) ................................................. .215
Service products Brake fluid ..................................... 365
Coolant (engine) ............................ 365 Engine oil ....................................... 364
Fuel ................................................ 362
Important safety notes .................. 361
Refrigerant (air-conditioning sys-
tem) ............................................... 367
Washer fluid ................................... 366
Setting a speed
see Cruise control
Settings
Factory (on-board computer) ......... 218
On-board computer ....................... 215
Setting the air distribution ...............134
Setting the airflow ............................ 134
SETUP (on-board computer) ............. 219
Side impact air bag .............................50
Side marker lamp (display mes-
sage) ................................................... 236
Side windows Cleaning ......................................... 300
Convenience closing feature ............ 88
Convenience opening feature ..........88
Important safety information ........... 87
Opening/closing .............................. 87
Problem (malfunction) .....................90
Resetting ........................................ .89
Reversing feature ............................ .87
Sliding sunroof
see Panorama roof with power
tilt/sliding panel
SmartKey
Changing the battery ....................... 78
Changing the programming .............77
Checking the battery ...................... .78
Convenience closing feature ............ 88
Convenience opening feature .......... 88
Display message ............................ 252
Door central locking/unlocking ...... .76
Important safety notes .................... 76
Loss .................................................80
Mechanical key ................................ 77
Positions (ignition lock) ................. 143
Problem (malfunction) ..................... 80
Starting the engine ........................ 144
SmartKey positions (ignition lock) .. 143
Snow chains ...................................... 327 Index
17
Page 38 of 374
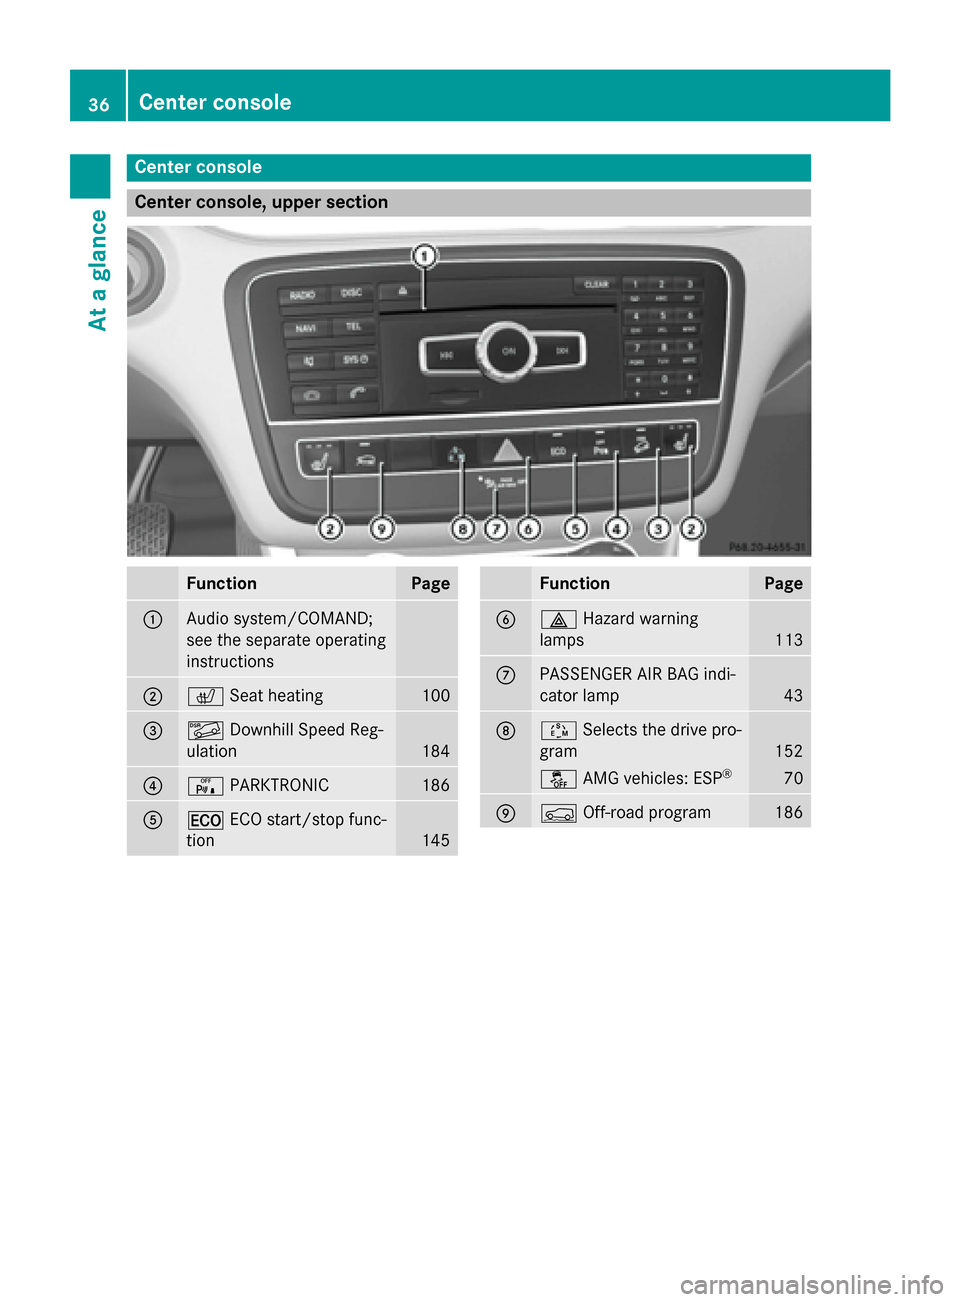
Center console
Center console, upper section
Function Page
0043
Audio system/COMAND;
see the separate operating
instructions
0044
0072
Seat heating 100
0087
00C6
Downhill Speed Reg-
ulation 184
0085
008F
PARKTRONIC 186
0083
00A7
ECO start/stop func-
tion 145 Function Page
0084
002F
Hazard warning
lamps 113
006B
PASSENGER AIR BAG indi-
cator lamp
43
006C
00C8
Selects the drive pro-
gram 152
00BB
AMG vehicles: ESP ® 70
006D
00CA
Off-road program 18636
Center consoleAt a glance
Page 83 of 374
Problem
Possible causes/consequences and
0050
0050Solutions The engine cannot be
started using the
SmartKey. The on-board voltage is too low.
X Switch off non-essential consumers, e.g. seat heating or interior
lighting, and try to start the engine again.
If this does not work:
X Check the starter battery and charge it if necessary
(Y page 311).
or
X Jump-start the vehicle (Y page 315).
or
X Consult a qualified specialist workshop. The engine cannot be
started using the
SmartKey. The steering lock is mechanically blocked.
X Remove the SmartKey and reinsert it into the ignition lock. While
doing this, turn the steering wheel in both directions. Doors
Important safety notes
G
WARNING
If children are left unsupervised in the vehicle, they could:
R open the doors, thus endangering other
people or road users.
R get out and disrupt traffic.
R operate the vehicle's equipment.
Additionally, children could set the vehicle in
motion if, for example, they:
R release the parking brake.
R shifting the automatic transmission out of
park position P
R Start the engine.
There is a risk of an accident and injury.
When leaving the vehicle, always take the
SmartKey with you and lock the vehicle. Never
leave children or animals unattended in the
vehicle. Always keep the SmartKey out of
reach of children. You should preferably place luggage or loads
in the cargo compartment. Observe the load-
ing guidelines (Y page 266). Unlocking and opening doors from
the inside
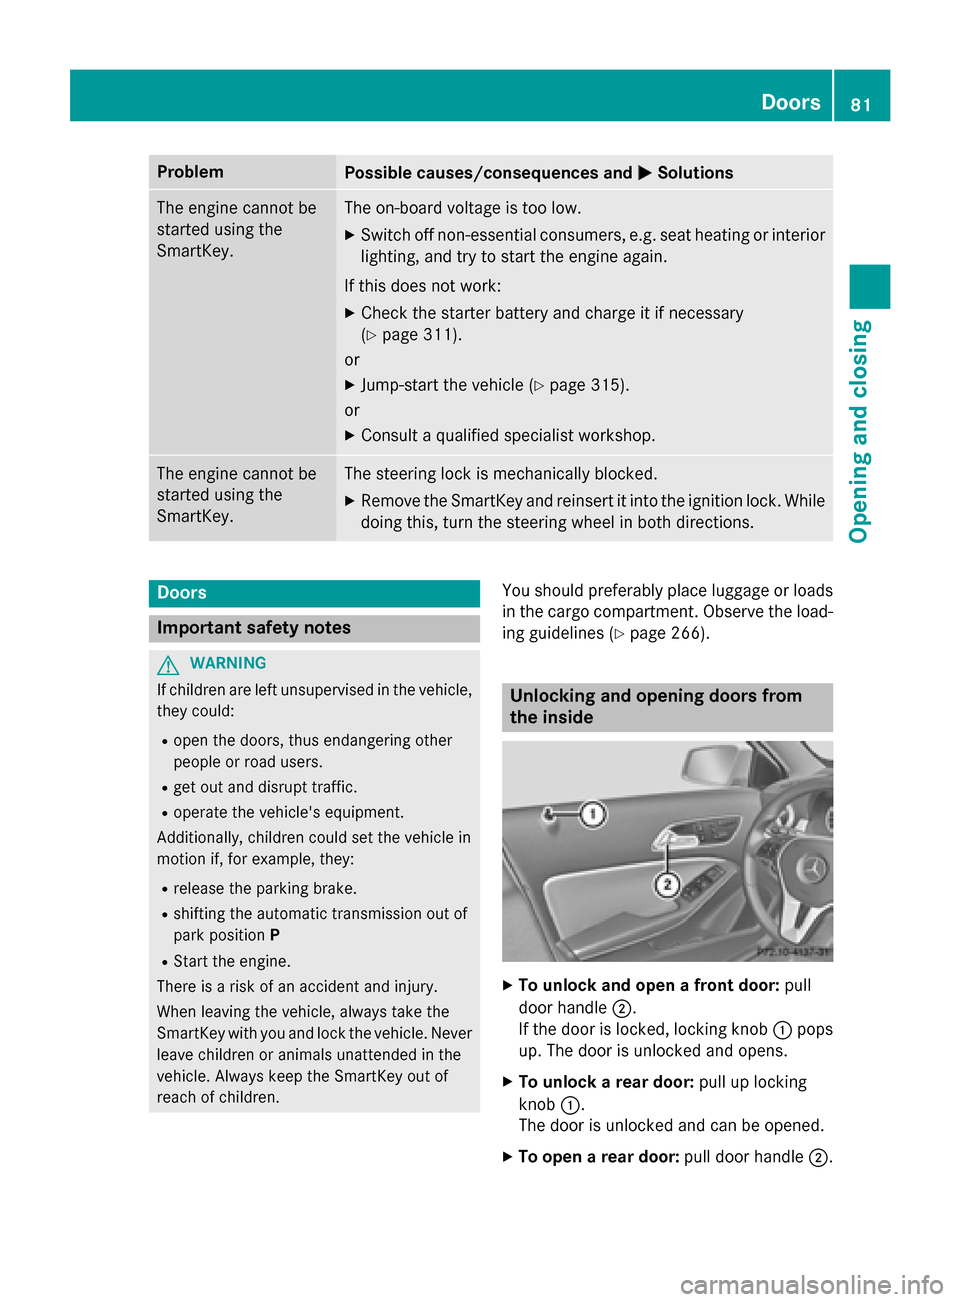
X
To unlock and open a front door: pull
door handle 0044.
If the door is locked, locking knob 0043pops
up. The door is unlocked and opens.
X To unlock a rear door: pull up locking
knob 0043.
The door is unlocked and can be opened.
X To open a rear door: pull door handle0044. Doors
81Opening and closing Z
Page 99 of 374
The seat belt should:
R fit snugly across your body
R be routed across the middle of your
shoulder
R be routed in your pelvic area across the
hip joints
X Before starting off, adjust the rear-view mir-
ror and the exterior mirrors (Y page 103) in
such a way that you have a good view of
road and traffic conditions.
X Vehicles with a memory function: save
the seat and exterior mirror settings
(Y page 106). Seats
Important safety notes
G
WARNING
Children could become trapped if they adjust the seats, particularly when unattended.
There is a risk of injury.
When leaving the vehicle, always take the
SmartKey with you and lock the vehicle. Never leave children unsupervised in the vehicle.
The seats can still be adjusted when there is
no SmartKey in the ignition lock. G
WARNING
If the driver's seat is not engaged, it could
move unexpectedly while the vehicle is in
motion. This could cause you to lose control of the vehicle. There is a risk of an accident.
Always make sure that the driver's seat is
engaged before starting the engine. G
WARNING
You could lose control of your vehicle if you do the following while driving:
R adjust the driver's seat, head restraint,
steering wheel or mirrors
R fasten the seat belt
There is a risk of an accident. Adjust the driver's seat, head restraint, steer-
ing wheel and mirror and fasten your seat belt
before starting the engine. G
WARNING
If you adjust the seat height carelessly, you or other vehicle occupants could be trapped andthereby injured. Children in particular could
accidentally press the electrical seat adjust-
ment buttons and become trapped. There is a
risk of injury.
While moving the seats, make sure that your
hands or other body parts do not get under the
lever assembly of the seat adjustment sys-
tem. G
WARNING
When you adjust a seat, you or other vehicle
occupants could become trapped, e.g. on the seat guide rail. There is a risk of injury.
Make sure when adjusting a seat that no one
has any body parts in the sweep of the seat.
Observe the safety notes on "Air bags"
(Y page 48) and "Children in the Vehicle"
(Y page 58).
! To avoid damage to the seats and the seat
heating, observe the following information:
R keep liquids from spilling on the seats. If
liquid is spilled on the seats, dry them as soon as possible.
R if the seat covers are damp or wet, do not
switch on the seat heating. The seat
heating should also not be used to dry
the seats.
R clean the seat covers as recommended;
see the "Interior care" section.
R do not transport heavy loads on the
seats. Do not place sharp objects on the
seat cushions, e.g. knives, nails or tools. The seats should only be occupied by
passengers, if possible.
R when the seat heating is in operation, do
not cover the seats with insulating mate- Seats
97Seats, steering wheel and mirrors Z
Page 102 of 374
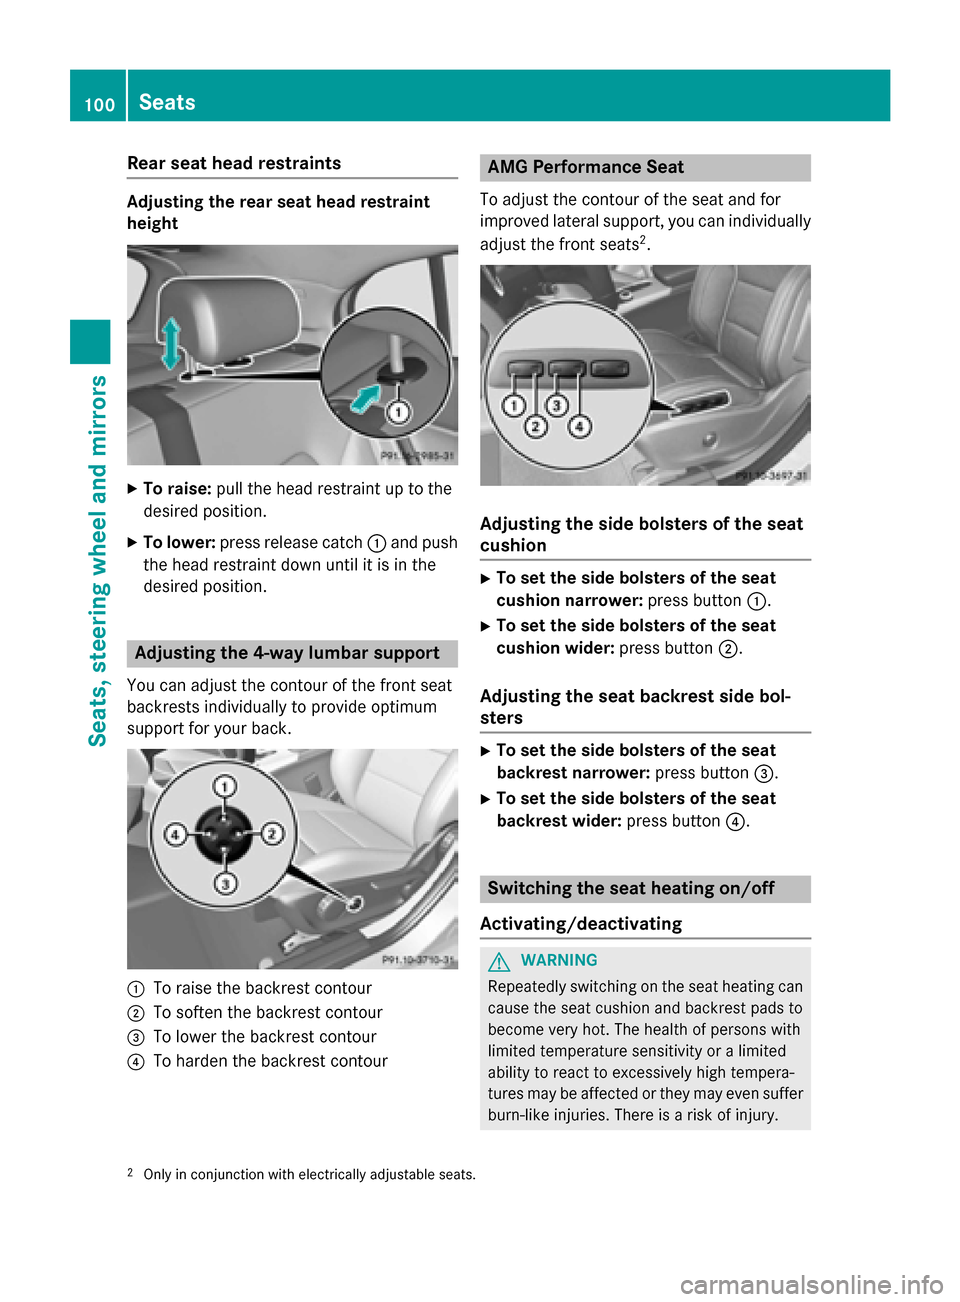
Rear seat head restraints
Adjusting the rear seat head restraint
height
X
To raise: pull the head restraint up to the
desired position.
X To lower: press release catch 0043and push
the head restraint down until it is in the
desired position. Adjusting the 4-way lumbar support
You can adjust the contour of the front seat
backrests individually to provide optimum
support for your back. 0043
To raise the backrest contour
0044 To soften the backrest contour
0087 To lower the backrest contour
0085 To harden the backrest contour AMG Performance Seat
To adjust the contour of the seat and for
improved lateral support, you can individually adjust the front seats 2
. Adjusting the side bolsters of the seat
cushion
X
To set the side bolsters of the seat
cushion narrower: press button0043.
X To set the side bolsters of the seat
cushion wider: press button0044.
Adjusting the seat backrest side bol-
sters X
To set the side bolsters of the seat
backrest narrower: press button0087.
X To set the side bolsters of the seat
backrest wider: press button0085. Switching the seat heating on/off
Activating/deactivating G
WARNING
Repeatedly switching on the seat heating can
cause the seat cushion and backrest pads to
become very hot. The health of persons with
limited temperature sensitivity or a limited
ability to react to excessively high tempera-
tures may be affected or they may even suffer burn-like injuries. There is a risk of injury.
2 Only in conjunction with electrically adjustable seats. 100
SeatsSeats, steering wheel and mirrors
Page 103 of 374
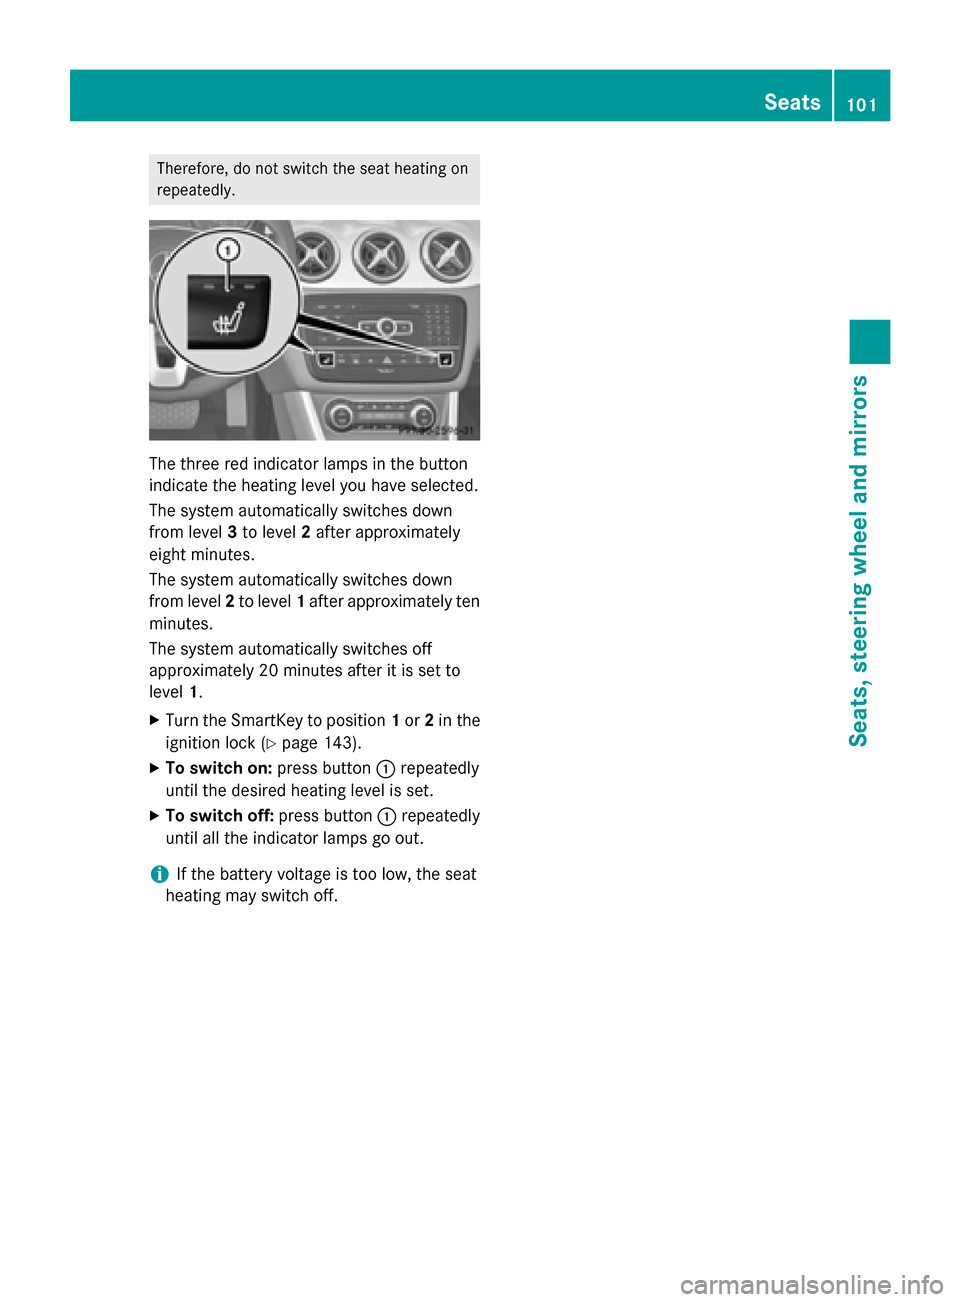
Therefore, do not switch the seat heating on
repeatedly. The three red indicator lamps in the button
indicate the heating level you have selected.
The system automatically switches down
from level 3to level 2after approximately
eight minutes.
The system automatically switches down
from level 2to level 1after approximately ten
minutes.
The system automatically switches off
approximately 20 minutes after it is set to
level 1.
X Turn the SmartKey to position 1or 2in the
ignition lock (Y page 143).
X To switch on: press button0043repeatedly
until the desired heating level is set.
X To switch off: press button0043repeatedly
until all the indicator lamps go out.
i If the battery voltage is too low, the seat
heating may switch off. Seats
101Seats, steering wheel and mirrors Z
Page 104 of 374
Problems with the seat heating
Problem
Possible causes/consequences and
0050
0050Solutions The seat heating has
switched off prema-
turely or cannot be
switched on. The on-board voltage is too low because too many electrical con-
sumers are switched on.
X Switch off electrical consumers that you do not need, such as
the rear window defroster or interior lighting.
Once the battery is sufficiently charged, the seat heating will
switch back on automatically. Steering wheel
Important safety notes
G
WARNING
You could lose control of your vehicle if you do the following while driving:
R adjust the driver's seat, head restraint,
steering wheel or mirrors
R fasten the seat belt
There is a risk of an accident.
Adjust the driver's seat, head restraint, steer-
ing wheel and mirror and fasten your seat belt before starting the engine. G
WARNING
Children could injure themselves if they
adjust the steering wheel. There is a risk of
injury.
When leaving the vehicle, always take the
SmartKey with you and lock the vehicle. Never leave children unsupervised in the vehicle. Adjusting the steering wheel
G
WARNING
If the steering wheel is unlocked while the
vehicle is in motion, it could change position
unexpectedly. This could cause you to lose
control of the vehicle. There is a risk of an
accident. Before starting off, make sure the steering
wheel is locked. Never unlock the steering
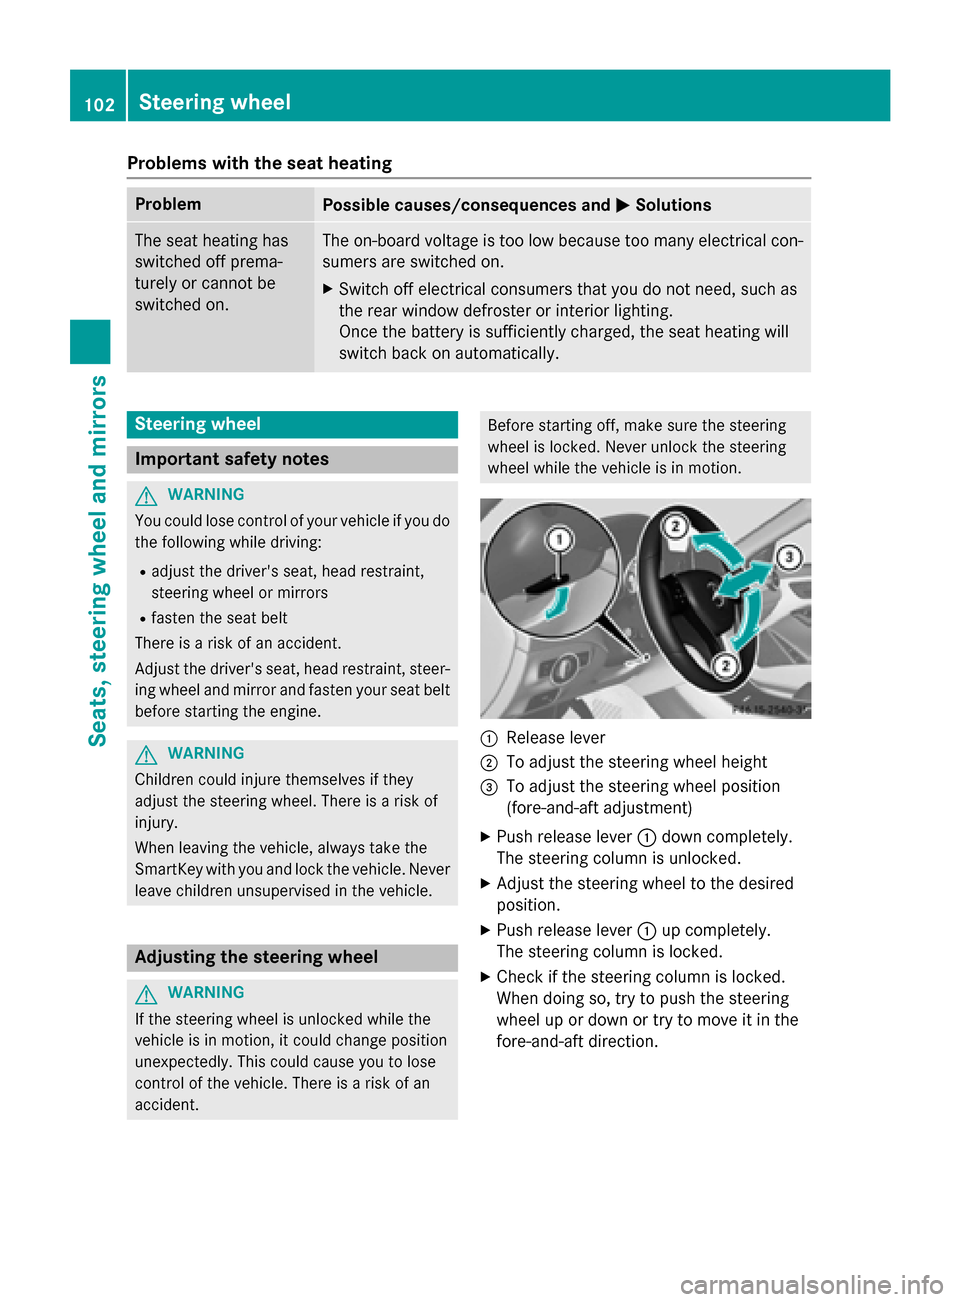
wheel while the vehicle is in motion. 0043
Release lever
0044 To adjust the steering wheel height
0087 To adjust the steering wheel position
(fore-and-aft adjustment)
X Push release lever 0043down completely.
The steering column is unlocked.
X Adjust the steering wheel to the desired
position.
X Push release lever 0043up completely.
The steering column is locked.
X Check if the steering column is locked.
When doing so, try to push the steering
wheel up or down or try to move it in the
fore-and-aft direction. 102
Steering wheelSeats, steering wheel and mirrors
Page 105 of 374
Mirrors
Rear-view mirror
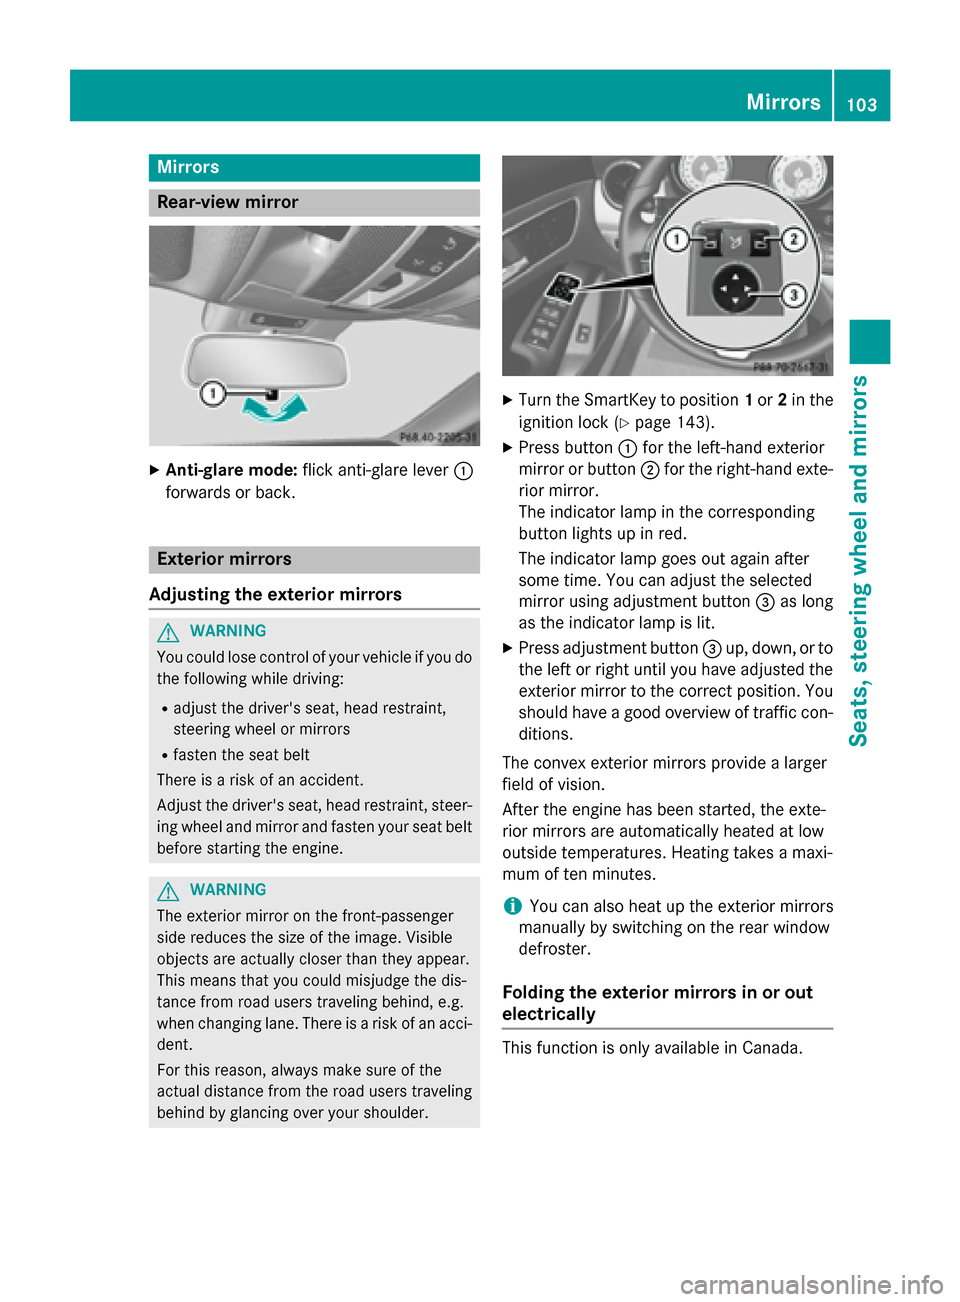
X
Anti-glare mode: flick anti-glare lever 0043
forwards or back. Exterior mirrors
Adjusting the exterior mirrors G
WARNING
You could lose control of your vehicle if you do the following while driving:
R adjust the driver's seat, head restraint,
steering wheel or mirrors
R fasten the seat belt
There is a risk of an accident.
Adjust the driver's seat, head restraint, steer-
ing wheel and mirror and fasten your seat belt before starting the engine. G
WARNING
The exterior mirror on the front-passenger
side reduces the size of the image. Visible
objects are actually closer than they appear.
This means that you could misjudge the dis-
tance from road users traveling behind, e.g.
when changing lane. There is a risk of an acci-
dent.
For this reason, always make sure of the
actual distance from the road users traveling
behind by glancing over your shoulder. X
Turn the SmartKey to position 1or 2in the
ignition lock (Y page 143).
X Press button 0043for the left-hand exterior
mirror or button 0044for the right-hand exte-
rior mirror.
The indicator lamp in the corresponding
button lights up in red.
The indicator lamp goes out again after
some time. You can adjust the selected
mirror using adjustment button 0087as long
as the indicator lamp is lit.
X Press adjustment button 0087up, down, or to
the left or right until you have adjusted the
exterior mirror to the correct position. You
should have a good overview of traffic con- ditions.
The convex exterior mirrors provide a larger
field of vision.
After the engine has been started, the exte-
rior mirrors are automatically heated at low
outside temperatures. Heating takes a maxi-
mum of ten minutes.
i You can also heat up the exterior mirrors
manually by switching on the rear window
defroster.
Folding the exterior mirrors in or out
electrically This function is only available in Canada. Mirrors
103Seats, steering wheel and mirrors Z
Page 130 of 374
0085
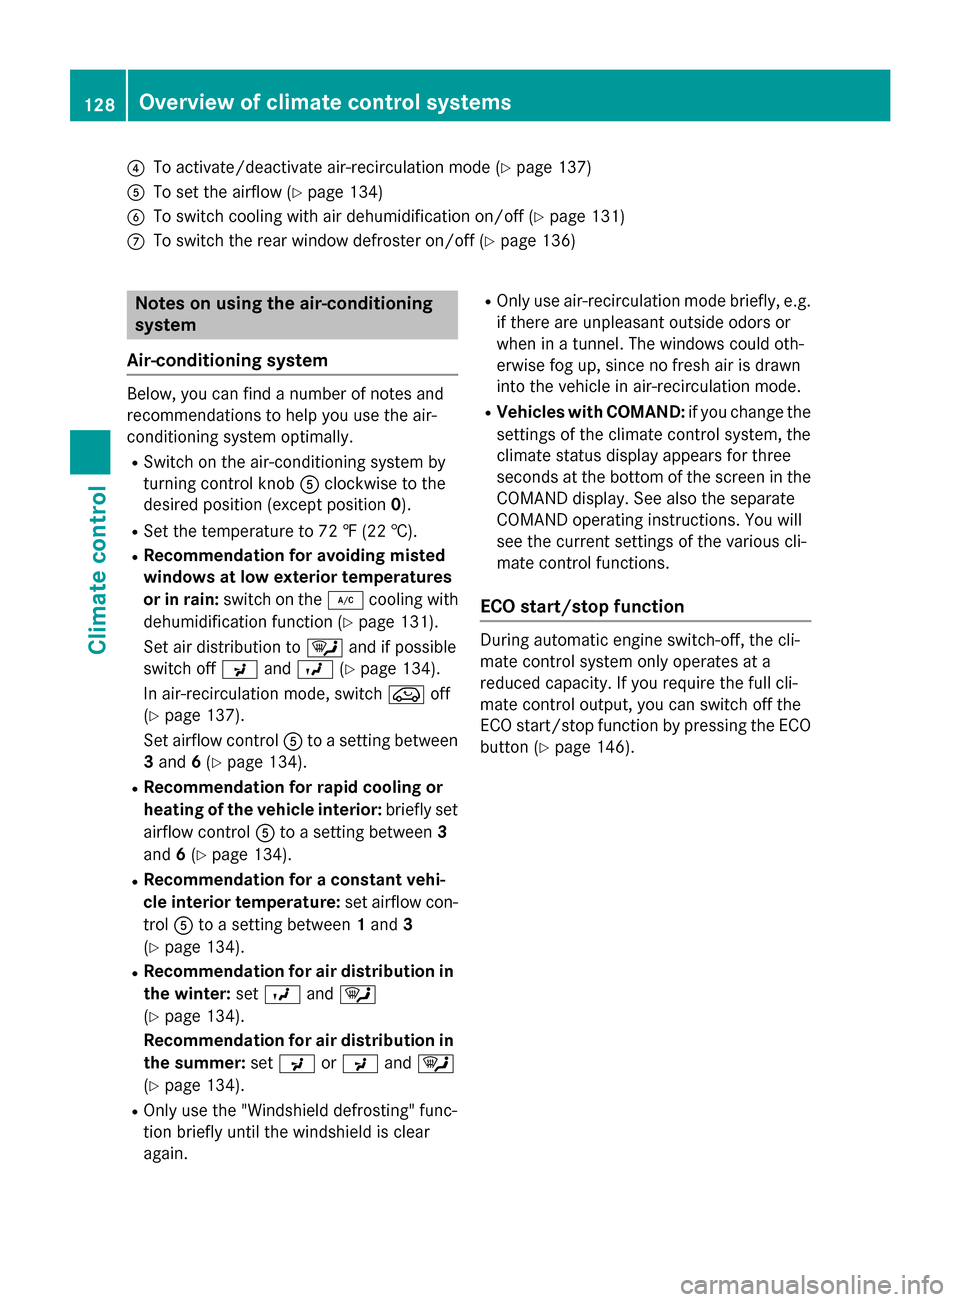
To activate/deactivate air-recirculation mode (Y page 137)
0083 To set the airflow (Y page 134)
0084 To switch cooling with air dehumidification on/off (Y page 131)
006B To switch the rear window defroster on/off (Y page 136)Notes on using the air-conditioning
system
Air-conditioning system Below, you can find a number of notes and
recommendations to help you use the air-
conditioning system optimally.
R Switch on the air-conditioning system by
turning control knob 0083clockwise to the
desired position (except position 0).
R Set the temperature to 72 ‡ (22 †).
R Recommendation for avoiding misted
windows at low exterior temperatures
or in rain: switch on the 005Acooling with
dehumidification function (Y page 131).
Set air distribution to 0061and if possible
switch off 009Cand009B (Ypage 134).
In air-recirculation mode, switch 008Aoff
(Y page 137).
Set airflow control 0083to a setting between
3 and 6(Y page 134).
R Recommendation for rapid cooling or
heating of the vehicle interior: briefly set
airflow control 0083to a setting between 3
and 6(Y page 134).
R Recommendation for a constant vehi-
cle interior temperature: set airflow con-
trol 0083to a setting between 1and 3
(Y page 134).
R Recommendation for air distribution in
the winter: set009B and0061
(Y page 134).
Recommendation for air distribution in
the summer: set009C or009C and0061
(Y page 134).
R Only use the "Windshield defrosting" func-
tion briefly until the windshield is clear
again. R
Only use air-recirculation mode briefly, e.g.
if there are unpleasant outside odors or
when in a tunnel. The windows could oth-
erwise fog up, since no fresh air is drawn
into the vehicle in air-recirculation mode.
R Vehicles with COMAND: if you change the
settings of the climate control system, the
climate status display appears for three
seconds at the bottom of the screen in the
COMAND display. See also the separate
COMAND operating instructions. You will
see the current settings of the various cli-
mate control functions.
ECO start/stop function During automatic engine switch-off, the cli-
mate control system only operates at a
reduced capacity. If you require the full cli-
mate control output, you can switch off the
ECO start/stop function by pressing the ECO
button (Y page 146). 128
Overview of climate control systemsClimate control