turn signal MERCEDES-BENZ GLA-Class 2016 X156 User Guide
[x] Cancel search | Manufacturer: MERCEDES-BENZ, Model Year: 2016, Model line: GLA-Class, Model: MERCEDES-BENZ GLA-Class 2016 X156Pages: 390, PDF Size: 8.37 MB
Page 125 of 390
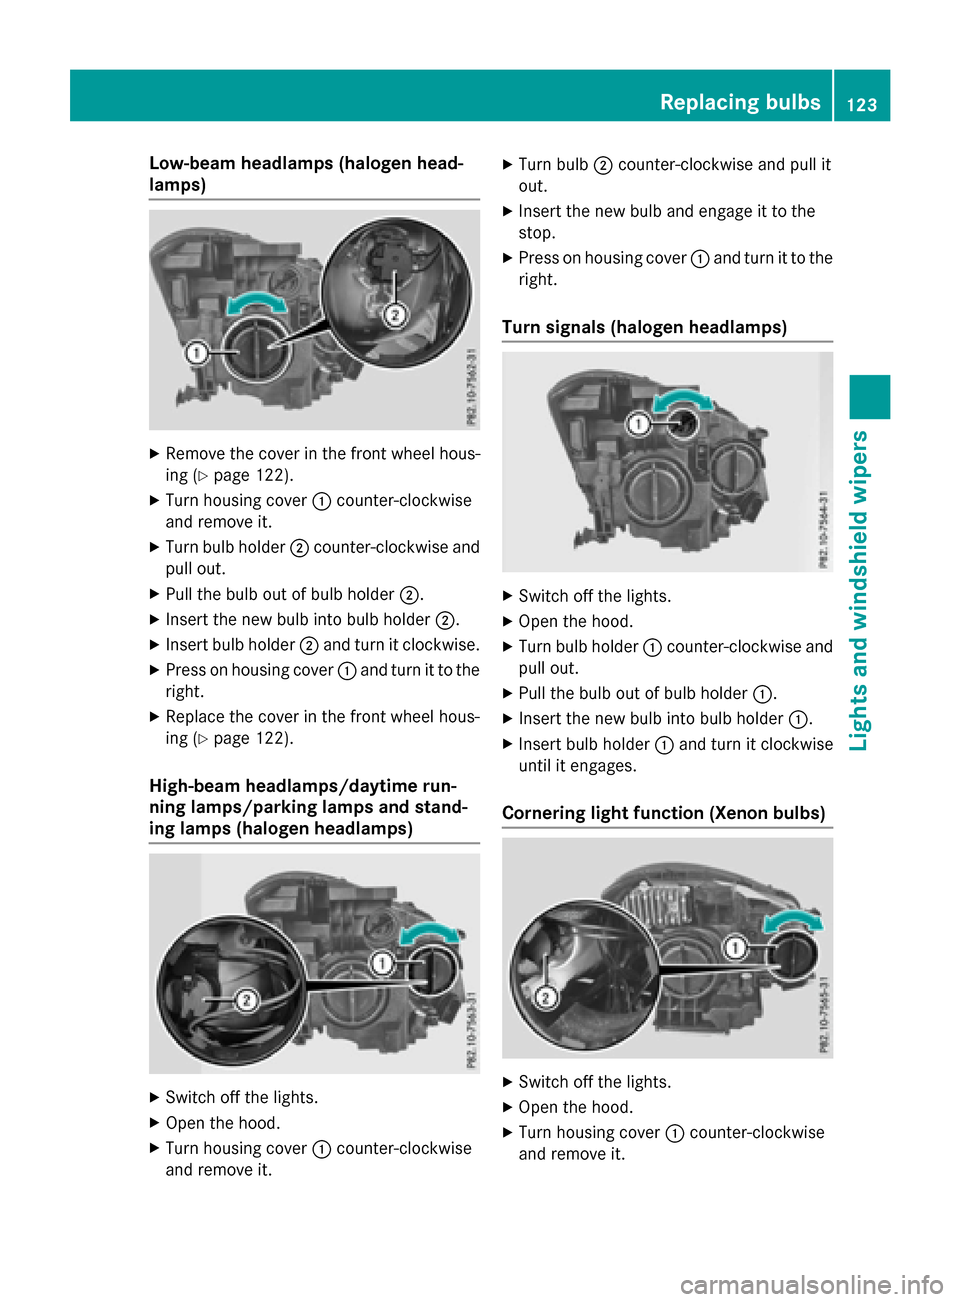
Low-beam headlamps (halogen head-
lamps)
XRemove the cover in the front wheel hous-
ing (
Ypage 122).
XTurn housing cover:counter-clockwise
and remove it.
XTurn bulb holder ;counter-clockwise and
pull out.
XPull the bulb out of bulb holder ;.
XInsert the new bulb into bulb holder ;.
XInsert bulb holder;and turn it clockwise.
XPress on housing cover :and turn it to the
right.
XReplace the cover in the front wheel hous-
ing (
Ypage 122).
High-beam headlamps/daytime run-
ning lamps/parking lamps and stand-
ing lamps (halogen headlamps)
XSwitch off the lights.
XOpen the hood.
XTurn housing cover :counter-clockwise
and remove it.
XTurn bulb ;counter-clockwise and pull it
out.
XInsert the new bulb and engage it to the
stop.
XPress on housing cover :and turn it to the
right.
Turn signals (halogen headlamps)
XSwitch off the lights.
XOpen the hood.
XTurn bulb holder :counter-clockwise and
pull out.
XPull the bulb out of bulb holder :.
XInsert the new bulb into bulb holder :.
XInsert bulb holder:and turn it clockwise
until it engages.
Cornering light function (Xenon bulbs)
XSwitch off the lights.
XOpen the hood.
XTurn housing cover :counter-clockwise
and remove it.
Replacing bulbs123
Lights and windshield wipers
Z
Page 127 of 390
XLoosen screws=using a screwdriver.
XRemove the bulb holder from the tail lamp.
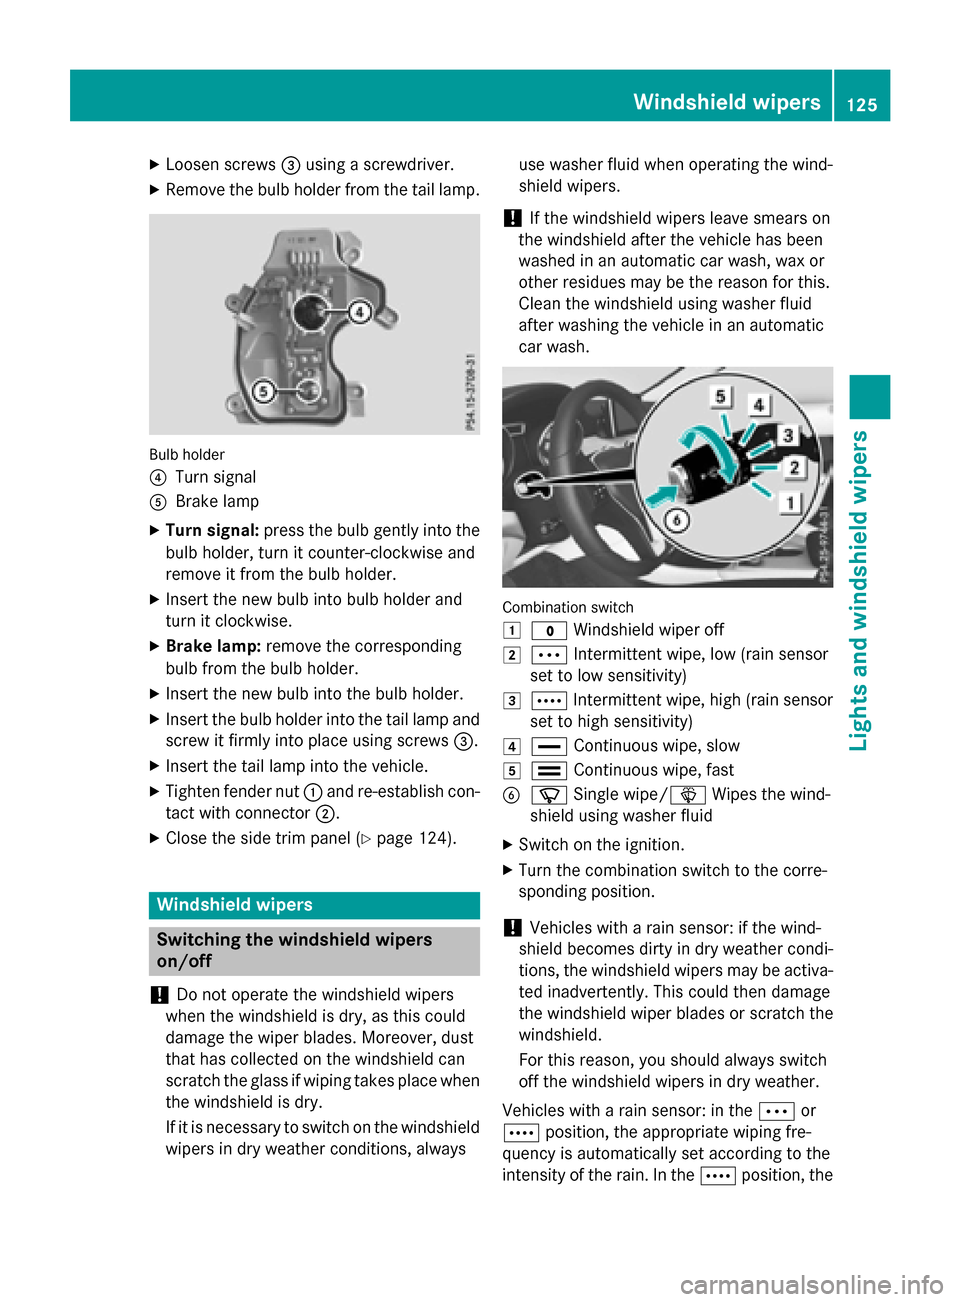
Bulb holder
?
Turn signal
ABrake lamp
XTurn signal: press the bulb gently into the
bulb holder, turn it counter-clockwise and
remove it from the bulb holder.
XInsert the new bulb into bulb holder and
turn it clockwise.
XBrake lamp: remove the corresponding
bulb from the bulb holder.
XInsert the new bulb into the bulb holder.
XInsert the bulb holder into the tail lamp and
screw it firmly into place using screws =.
XInsert the tail lamp into the vehicle.
XTighten fender nut:and re-establish con-
tact with connector ;.
XClose the side trim panel (Ypage 124).
Windshield wipers
Switching the windshield wipers
on/off
!
Do not operate the windshield wipers
when the windshield is dry, as this could
damage the wiper blades. Moreover, dust
that has collected on the windshield can
scratch the glass if wiping takes place when
the windshield is dry.
If it is necessary to switch on the windshield
wipers in dry weather conditions, always use washer fluid when operating the wind-
shield wipers.
!If the windshield wipers leave smears on
the windshield after the vehicle has been
washed in an automatic car wash, wax or
other residues may be the reason for this.
Clean the windshield using washer fluid
after washing the vehicle in an automatic
car wash.
Combination switch
1
$ Windshield wiper off
2ÄIntermittent wipe, low (rain sensor
set to low sensitivity)
3Å Intermittent wipe, high (rain sensor
set to high sensitivity)
4° Continuous wipe, slow
5¯Continuous wipe, fast
BíSingle wipe/î Wipes the wind-
shield using washer fluid
XSwitch on the ignition.
XTurn the combination switch to the corre-
sponding position.
!Vehicles with a rain sensor: if the wind-
shield becomes dirty in dry weather condi-
tions, the windshield wipers may be activa-
ted inadvertently. This could then damage
the windshield wiper blades or scratch the
windshield.
For this reason, you should always switch
off the windshield wipers in dry weather.
Vehicles with a rain sensor: in the Äor
Å position, the appropriate wiping fre-
quency is automatically set according to the
intensity of the rain. In the Åposition, the
Windshield wipers125
Lights and windshield wipers
Z
Page 174 of 390
Switching off the engine
Important safety notes
GWARNING
The automatic transmission switches to neu-
tral position Nwhen you switch off the engine.
The vehicle may roll away. There is a risk of an
accident.
After switching off the engine, always switch
to parking position P. Prevent the parked vehi-
cle from rolling away by applying the parking
brake.
Vehicles with automatic transmission
XApply the electric parking brake.
XAll vehicles (except Mercedes-AMG
vehicles): shift the transmission to posi-
tion P.
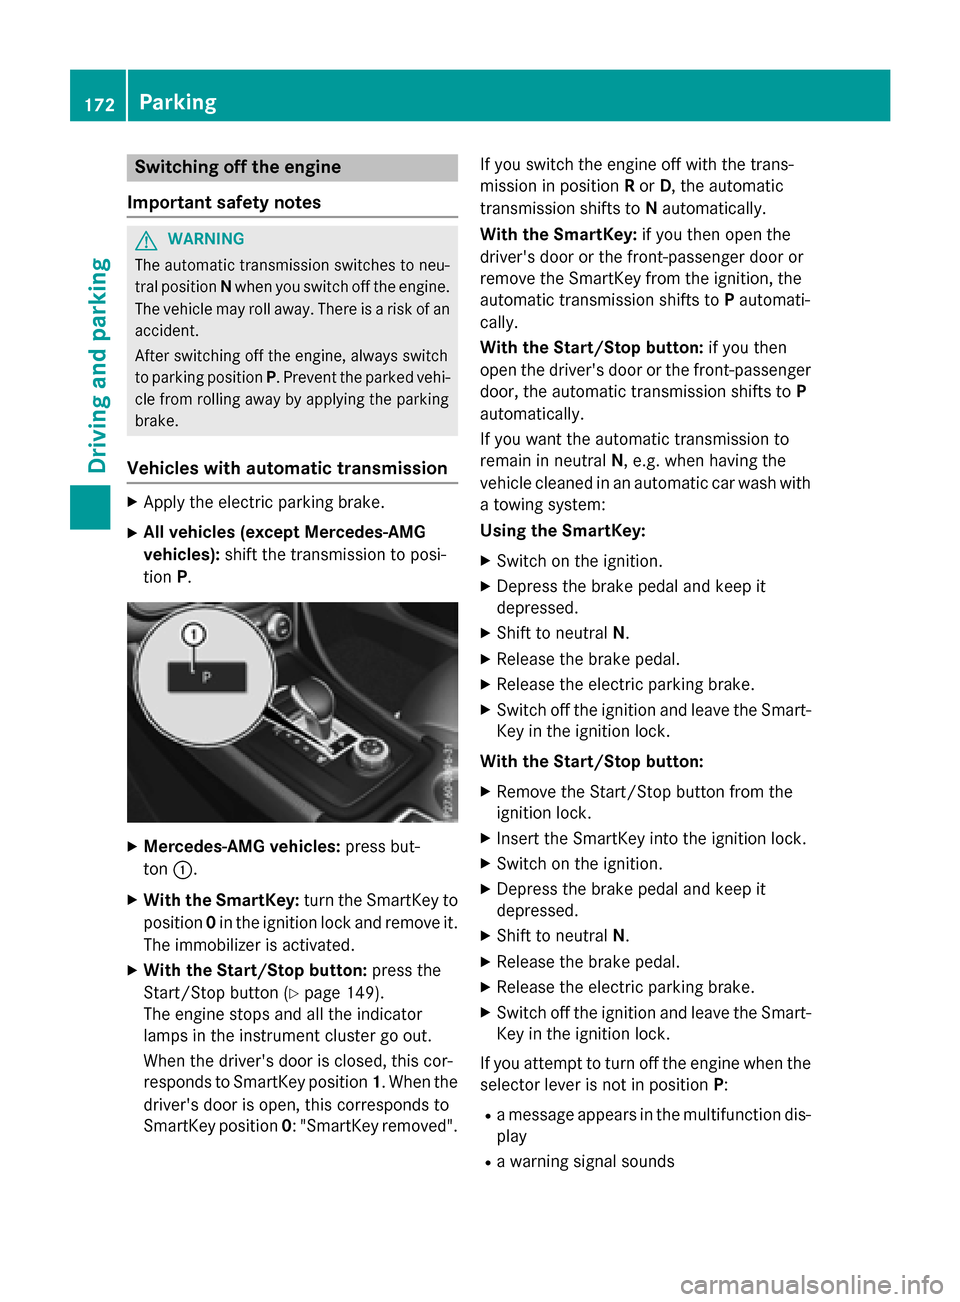
XMercedes-AMG vehicles: press but-
ton :.
XWith the SmartKey: turn the SmartKey to
position 0in the ignition lock and remove it.
The immobilizer is activated.
XWith the Start/Stop button: press the
Start/Stop button (
Ypage 149).
The engine stops and all the indicator
lamps in the instrument cluster go out.
When the driver's door is closed, this cor-
responds to SmartKey position 1. When the
driver's door is open, this corresponds to
SmartKey position 0: "SmartKey removed". If you switch the engine off with the trans-
mission in position
Ror D, the automatic
transmission shifts to Nautomatically.
With the SmartKey: if you then open the
driver's door or the front-passenger door or
remove the SmartKey from the ignition, the
automatic transmission shifts to Pautomati-
cally.
With the Start/Stop button: if you then
open the driver's door or the front-passenger door, the automatic transmission shifts to P
automatically.
If you want the automatic transmission to
remain in neutral N, e.g. when having the
vehicle cleaned in an automatic car wash with
a towing system:
Using the SmartKey:
XSwitch on the ignition.
XDepress the brake pedal and keep it
depressed.
XShift to neutral N.
XRelease the brake pedal.
XRelease the electric parking brake.
XSwitch off the ignition and leave the Smart-
Key in the ignition lock.
With the Start/Stop button:
XRemove the Start/Stop button from the
ignition lock.
XInsert the SmartKey into the ignition lock.
XSwitch on the ignition.
XDepress the brake pedal and keep it
depressed.
XShift to neutral N.
XRelease the brake pedal.
XRelease the electric parking brake.
XSwitch off the ignition and leave the Smart-
Key in the ignition lock.
If you attempt to turn off the engine when the
selector lever is not in position P:
Ra message appears in the multifunction dis-
play
Ra warning signal sounds
172Parking
Driving and parking
Page 190 of 390
Rthe driver's door must be closed when you
shift fromPto Dor your seat belt must be
fastened.
Rthe front-passenger door and rear doors
must be closed.
Activating
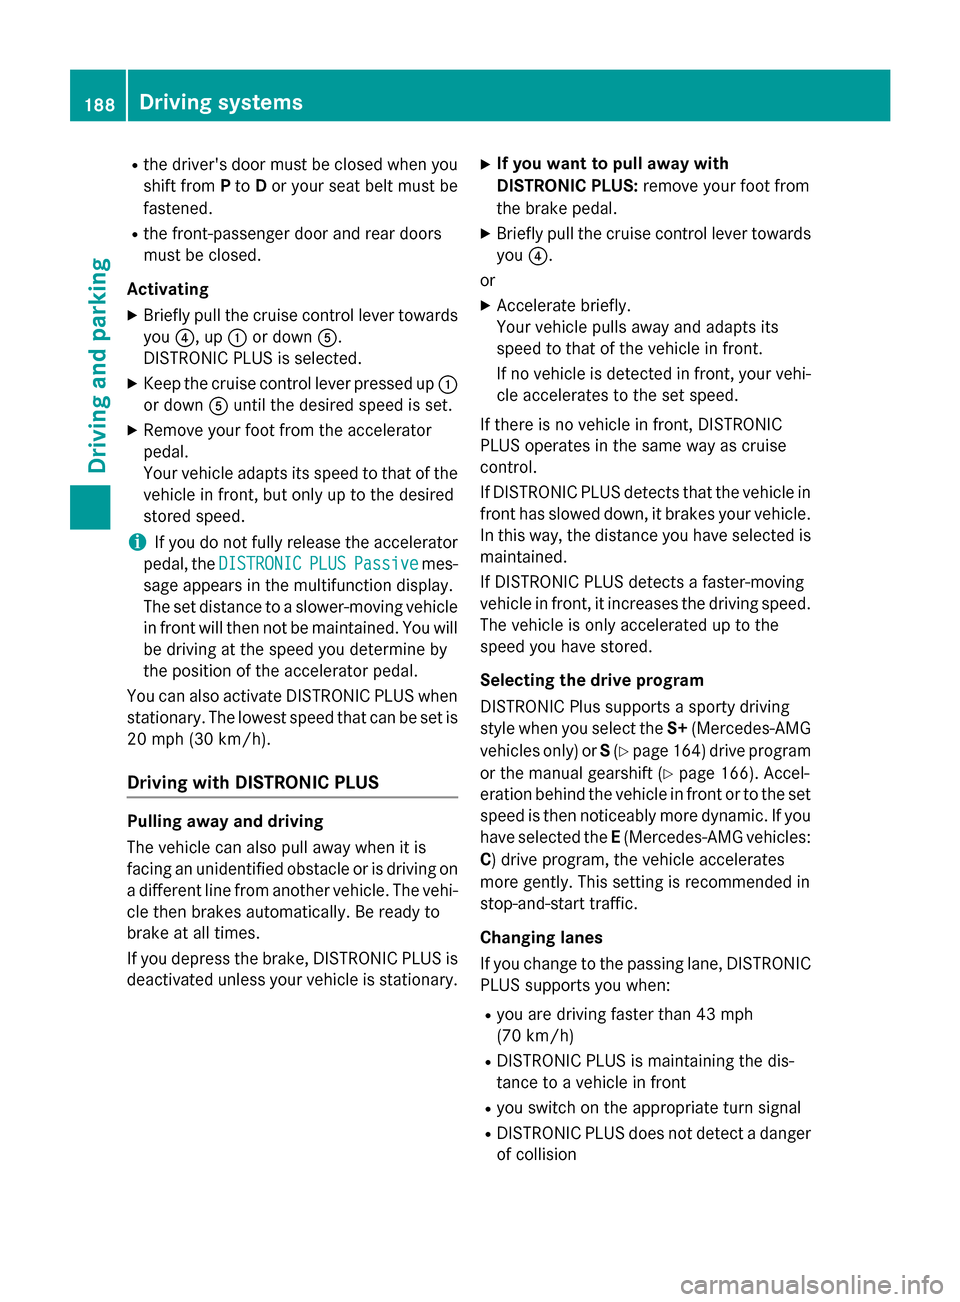
XBriefly pull the cruise control lever towards
you ?, up :or down A.
DISTRONIC PLUS is selected.
XKeep the cruise control lever pressed up :
or down Auntil the desired speed is set.
XRemove your foot from the accelerator
pedal.
Your vehicle adapts its speed to that of the
vehicle in front, but only up to the desired
stored speed.
iIf you do not fully release the accelerator
pedal, the DISTRONIC
PLUSPassivemes-
sage appears in the multifunction display.
The set distance to a slower-moving vehicle
in front will then not be maintained. You will
be driving at the speed you determine by
the position of the accelerator pedal.
You can also activate DISTRONIC PLUS when
stationary. The lowest speed that can be set is
20 mph (30 km/h).
Driving with DISTRONIC PLUS
Pulling away and driving
The vehicle can also pull away when it is
facing an unidentified obstacle or is driving on a different line from another vehicle. The vehi-
cle then brakes automatically. Be ready to
brake at all times.
If you depress the brake, DISTRONIC PLUS is
deactivated unless your vehicle is stationary.
XIf you want to pull away with
DISTRONIC PLUS: remove your foot from
the brake pedal.
XBriefly pull the cruise control lever towards
you ?.
or
XAccelerate briefly.
Your vehicle pulls away and adapts its
speed to that of the vehicle in front.
If no vehicle is detected in front, your vehi-
cle accelerates to the set speed.
If there is no vehicle in front, DISTRONIC
PLUS operates in the same way as cruise
control.
If DISTRONIC PLUS detects that the vehicle in
front has slowed down, it brakes your vehicle.
In this way, the distance you have selected is
maintained.
If DISTRONIC PLUS detects a faster-moving
vehicle in front, it increases the driving speed.
The vehicle is only accelerated up to the
speed you have stored.
Selecting the drive program
DISTRONIC Plus supports a sporty driving
style whe
n you select the S+(Mercedes-AMG
vehicles only) or S(
Ypage 164 )drive program
or the manual gearshift (
Ypage 166). Accel-
eration behind the vehicle in front or to the set
speed is then noticeably more dynamic. If you
have selected the E(Mercedes-AMG vehicles:
C ) drive program, the vehicle accelerates
more gently. This setting is recommended in
stop-and-start traffic.
Changing lanes
If you change to the passing lane, DISTRONIC
PLUS supports you when:
Ryou are driving faster than 43 mph
(70 km/h)
RDISTRONIC PLUS is maintaining the dis-
tance to a vehicle in front
Ryou switch on the appropriate turn signal
RDISTRONIC PLUS does not detect a danger
of collision
188Driving systems
Driving and parking
Page 207 of 390
Active Parking Assist is switched on automat-
ically when driving forwards. The system is
operational at speeds of up to approximately
22 mph (35 km/h). While in operation, the
system independently locates and measures
parking spaces on both sides of the vehicle.
Active Parking Assist will only detect parking
spaces:
Rthat are parallel or at right-angles to the
direction of travel
Rthat are parallel to the direction of travel
and at least 59 in (1.5m) wide
Rthat are parallel to the direction of travel
and at least 39.5 in (1.0 m) longer than your
vehicle
Rthat are at right angles to the direction of
travel and at least 39.5 in (1.0 m) wider
than your vehicle
iNote that Active Parking Assist cannot
measure the length of a parking space if it
is at right angles to the direction of travel.
You will need to judge whether your vehicle
will fit into the parking space.
When driving at speeds below 19 mph
(30 km/h), you will see parking symbol ;as
a status indicator in the instrument cluster.
When a parking space has been detected, an
arrow towards the right or the left also
appears. By default, Active Parking Assist
onl y d
isplays parking spaces on the front-
passenger side. Parking spaces on the driv-
er's side are displayed as soon as the turn
signal on the driver's side is activated. When
parking on the driver's side, this must remain
activated until you confirm the use of Active
Parking Assist by pressing the abutton on
the multifunction steering wheel. The system
automatically determines whether the park-
ing space is parallel or at right-angles to the
direction of travel.
A parking space is displayed while you are
driving past it, and until you are approx-
imately 50 ft (15 m) away from it.
Parking
GWARNING
If you leave the vehicle when it is only being
braked by Active Parking Assist it could roll
away if:
Rthere is a malfunction in the system or in
the voltage supply.
Rthe electrical system in the engine com-
partment, the battery or the fuses have
been tampered with.
Rthe battery is disconnected.
Rthe accelerator pedal has been depressed,
e.g. by a vehicle occupant.
There is a risk of an accident.
Before leaving the vehicle, always secure it
against rolling away.
iWhen PARKTRONIC detects obstacles,
Active Parking Assist brakes automatically
during the parking process. You are respon-
sible for braking in good time.
XStop the vehicle when the parking space
symbol shows the desired parking space in
the instrument cluster.
XShift the transmission to position R.
The Start Park Assist?
Yes: OKNo:
% message appears in the multifunction
display.
XTo cancel the procedure: press the%
button on the multifunction steering wheel or pull away.
or
XTo park using Active Parking Assist:
press the abutton on the multifunction
steering wheel.
The Park Assist Active Accelerate
and BrakeObserve Surroundingsmes-
sage appears in the multifunction display.
XLet go of the multifunction steering wheel.
XBack up the vehicle, being ready to brake at
all times. When backing up, drive at a speed
below approximately 6 mph (10 km/h).
Driving system s205
Driving an d parking
Z
Page 209 of 390
XStart the engine.
XRelease the electric parking brake.
XSwitch on the turn signal in the direction
you will drive out of the parking space.
XShift the transmission to positionDor R.
The Start Park Assist? Yes: OK No:
message appears in the multifunction dis-
play %.
XTo cancel the procedure: press the%
button on the multifunction steering wheel or pull away.
or
XTo exit a parking space using Active
Parking Assist: press theabutton on
the multifunction steering wheel.
The Park Assist Active Accelerate
andBrakeObserveSurroundingsmes-
sage appears in the multifunction display.
XLet go of the multifunction steering wheel.
XPull away, being ready to brake at all times.
Do not exceed a maximum speed of
approximately 6 mph (10 km/h) when exit-
ing a parking space. Otherwise Active Park-
ing Assist will be canceled.
XDepending on the message or as required, shift the transmission to position Dor R.
Active Parking Assist immediately steers in
the other direction. The Park Assist
Active Accelerate and Brake
ObserveSurroundingsmessage appears
in the multifunction display.
iYou will achieve the best results by wait-
ing for the steering procedure to complete
before pulling away.
If you back up after activation, the steering
wheel is moved to the straight-ahead posi-
tion.
XDrive forwards and back up as prompted by
the PARKTRONIC warning displays, several
times if necessary.
Once you have exited the parking space com-
pletely, the steering wheel is moved to the
straight-ahead position. You hear a tone and
the Park Assist Finished
message
appears in the multifunction display. You will then have to steer and merge into traffic on
your own. PARKTRONIC is still available. You
can take over the steering, before the vehicle
has exited the parking space completely. This
is useful, for example when you recognize
that it is already possible to pull out of the
parking space.
Canceling Active Parking Assist
XStop the movement of the multifunction
steering wheel or steer yourself.
Active Parking Assist will be canceled at
once. The Park Assist Canceled
mes-
sage appears in the multifunction display.
or
XPress the PARKTRONIC button
(
Ypage 202).
PARKTRONIC is switched off and Active
Parking Assist is immediately canceled.
The Park Assist Canceled
message
appears in the multifunction display.
Active Parking Assist is canceled automati-
cally if:
Rthe electric parking brake is engaged
Rtransmission position Pis selected
Rparking using Active Parking Assist is no
longer possible
Ryou are driving faster than 6 mph (10 km/h)
Ra wheel spins, ESP®intervenes or fails. The
÷ warning lamp lights up in the instru-
ment cluster
A warning tone sounds. The parking symbol
disappears and the multifunction display
shows the Park Assist Canceled
mes-
sage.
When Active Parking Assist is canceled, you
must steer and brake again yourself.
If a system malfunction occurs, the vehicle is
braked to a standstill. To drive on, depress the accelerator again.
Driving systems207
Driving and parking
Z
Page 215 of 390
XIf necessary, take a break.
XConfirm the message by pressing thea
button on the steering wheel.
On long journeys, take regular breaks in good
time to allow yourself to rest properly. If you
do not take a break and ATTENTION ASSIST
still detects increasing lapses in concentra-
tion, you will be warned again after
15 minutes at the earliest. This will only hap-
pen if ATTENTION ASSIST still detects typical
indicators of fatigue or increasing lapses in
concentration.
If a warning is output in the multifunction dis-
play, a service station search is performed in
COMAND. You can select a service station
and navigation to this service station will then
begin. This function can be activated and
deactivated in COMAND.
Lane Tracking package
General notes
The Lane Tracking package consists of Blind
Spot Assist (
Ypage 213) and Lane Keeping
Assist (
Ypage 215).
Blind Spot Assist
General notes
Blind Spot Assist monitors the areas on either
side of the vehicle that are not visible to the
driver with two lateral, rear-facing radar sen-
sors. A warning display in the exterior mirrors
draws your attention to vehicles detected in
the monitored area. If you then switch on the
corresponding turn signal to change lane, you
will also receive an optical and audible warn-
ing.
Blind Spot Assist supports you from a speed
of approximately 20 mph (30 km/h). Important safety notes
GWARNING
Blind Spot Assist does not react to:
Rvehicles overtaken too closely on the side,
placing them in the blind spot area
Rvehicles which approach with a large speed
differential and overtake your vehicle
As a result, Blind Spot Assist may not give
warnings in such situations. There is a risk of
an accident.
Always observe the traffic conditions care-
fully, and maintain a safe lateral distance.
Blind Spot Assist is only an aid. It may fail to
detect some vehicles and is no substitute for
attentive driving. Always ensure that there is
sufficient distance to the side for other road
users and obstacles.
iUSA only:
This device has been approved by the FCC
as a "Vehicular Radar System". The radar
sensor is intended for use in an automotive
radar system only. Removing, tampering
with, or altering the device will void any
warranties, and is not permitted by the
FCC. Do not tamper with, alter, or use in
any non-approved way.
Any unauthorized modification to this
device could void the user’s authority to
operate the equipment.
Radar sensors
The radar sensors for Blind Spot Assist are
integrated into the rear bumper. Make sure
that the bumpers are free from dirt, ice or
slush. The sensors must not be covered, for
example by cycle racks or overhanging loads.
Following a severe impact or in the event of
damage to the bumpers, have the function of
the radar sensors checked at a qualified spe-
cialist workshop. Blind Spot Assist may no
longer work properly.
Driving systems213
Driving and parking
Z
Page 217 of 390
Collision warning
If a vehicle is detected in the monitoring range
of Blind Spot Assist and you switch on the
corresponding turn signal, a double warning
tone sounds. Red warning lamp :flashes. If
the turn signal remains on, vehicles detected
are indicated by the flashing of red warning
lamp :. There are no further warning tones.
Switching on Blind Spot Assist
XMake sure that Blind Spot Assist is activa-
ted in the on-board computer
(
Ypage 228).
XTurn the SmartKey to position 2in the igni-
tion lock.
Warning lamps :in the exterior mirrors
light up red for approximately 1.5 seconds
and then turn yellow.
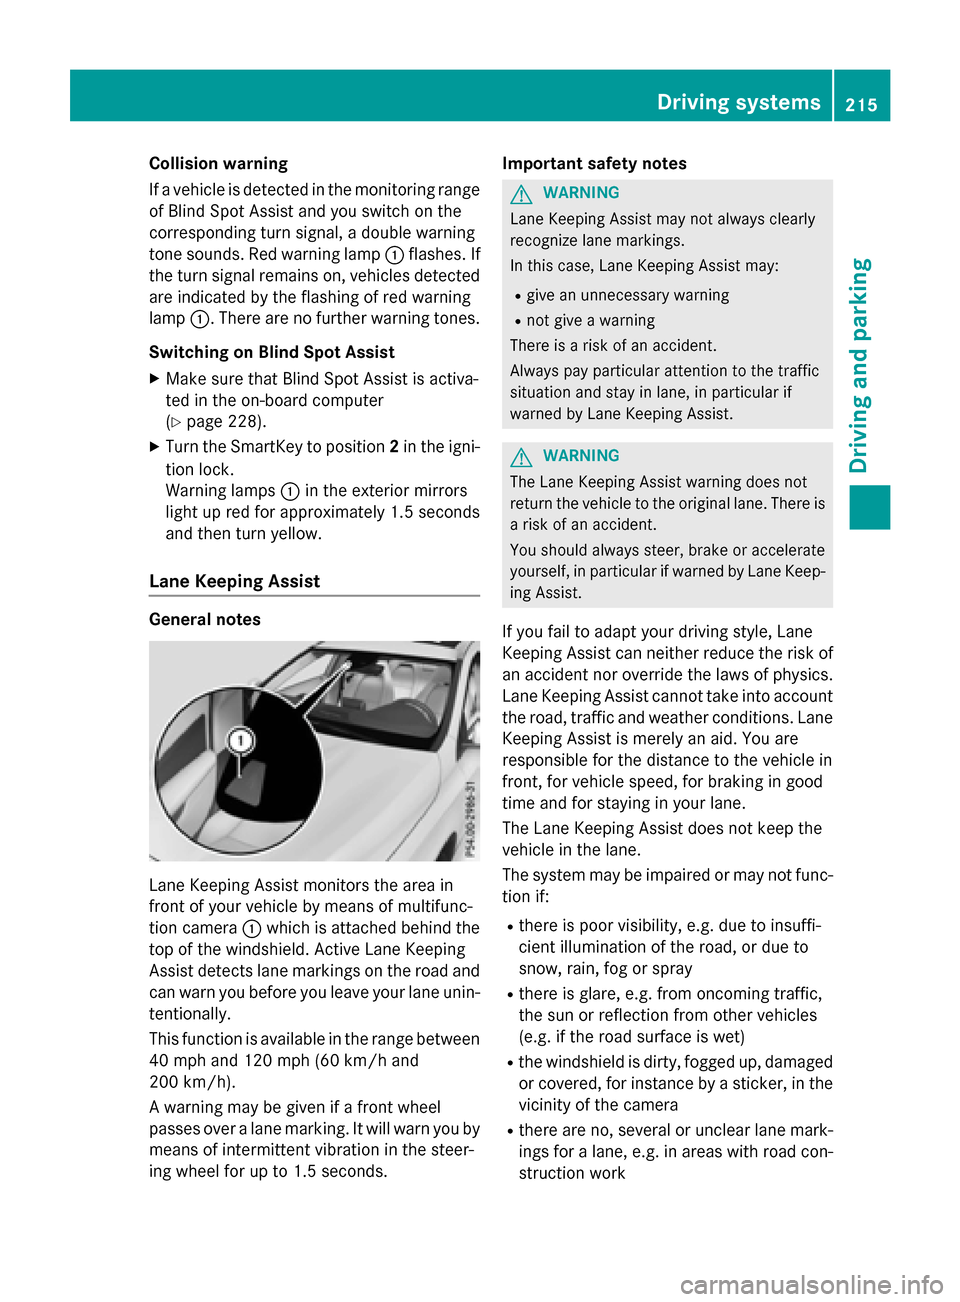
Lane Keeping Assist
General notes
Lane Keeping Assist monitors the area in
front of your vehicle by means of multifunc-
tion camera :which is attached behind the
top of the windshield. Active Lane Keeping
Assist detects lane markings on the road and
can warn you before you leave your lane unin- tentionally.
This function is available in the range between
40 mph and 120 mph (60 km/h and
200 km/h).
A warning may be given if a front wheel
passes over a lane marking. It will warn you by
means of intermittent vibration in the steer-
ing wheel for up to 1.5 seconds. Important safety notes
GWARNING
Lane Keeping Assist may not always clearly
recognize lane markings.
In this case, Lane Keeping Assist may:
Rgive an unnecessary warning
Rnot give a warning
There is a risk of an accident.
Always pay particular attention to the traffic
situation and stay in lane, in particular if
warned by Lane Keeping Assist.
GWARNING
The Lane Keeping Assist warning does not
return the vehicle to the original lane. There is
a risk of an accident.
You should always steer, brake or accelerate
yourself, in particular if warned by Lane Keep-
ing Assist.
If you fail to adapt your driving style, Lane
Keeping Assist can neither reduce the risk of
an accident nor override the laws of physics.
Lane Keeping Assist cannot take into account
the road, traffic and weather conditions. Lane
Keeping Assist is merely an aid. You are
responsible for the distance to the vehicle in
front, for vehicle speed, for braking in good
time and for staying in your lane.
The Lane Keeping Assist does not keep the
vehicle in the lane.
The system may be impaired or may not func- tion if:
Rthere is poor visibility, e.g. due to insuffi-
cient illumination of the road, or due to
snow, rain, fog or spray
Rthere is glare, e.g. from oncoming traffic,
the sun or reflection from other vehicles
(e.g. if the road surface is wet)
Rthe windshield is dirty, fogged up, damagedor covered, for instance by a sticker, in the
vicinity of the camera
Rthere are no, several or unclear lane mark-
ings for a lane, e.g. in areas with road con-
struction work
Driving systems215
Driving and parking
Z
Page 218 of 390
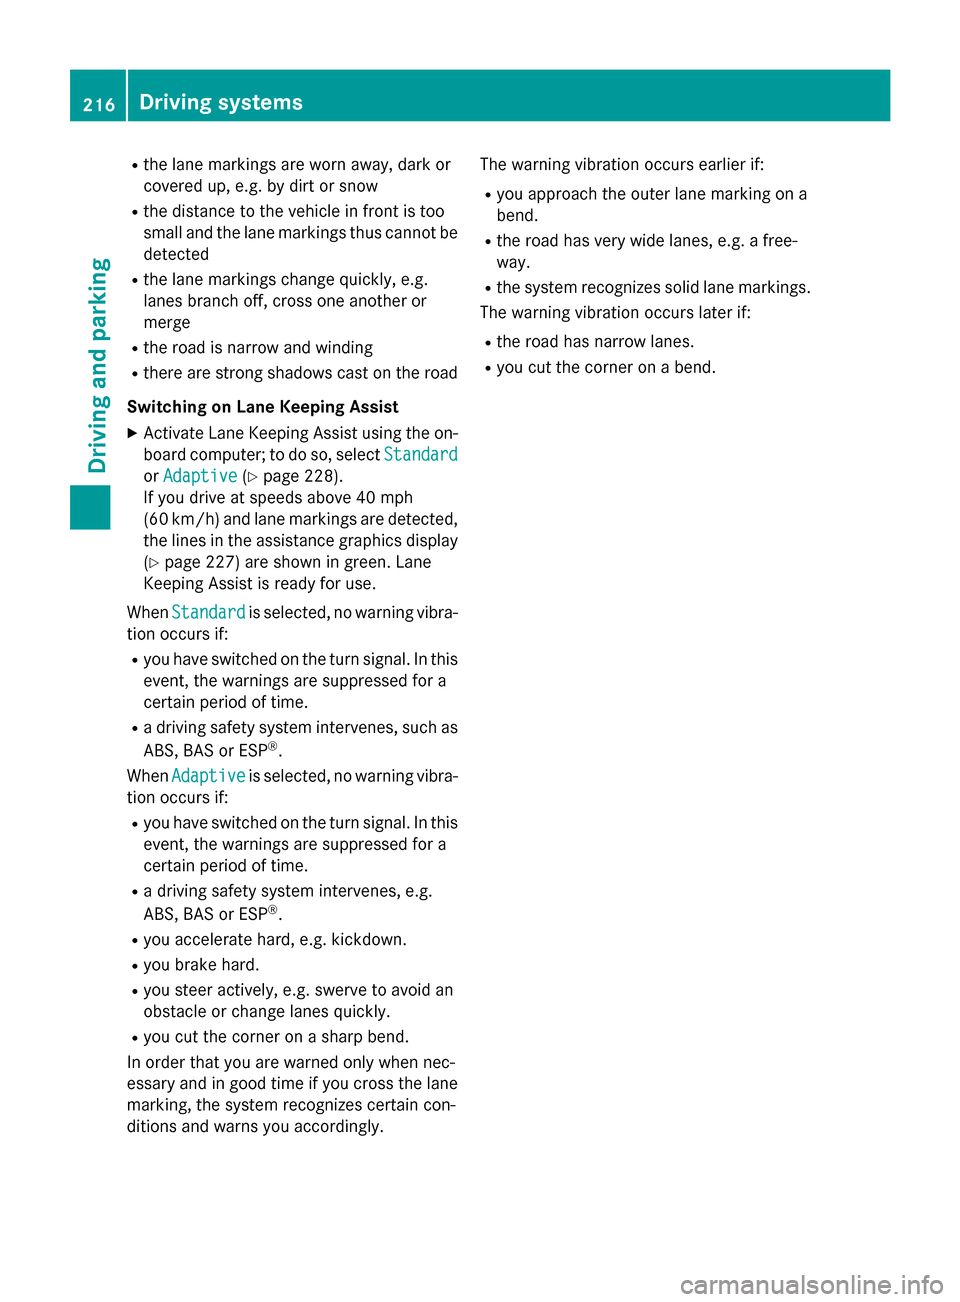
Rthe lane markings are worn away, dark or
covered up, e.g. by dirt or snow
Rthe distance to the vehicle in front is too
small and the lane markings thus cannot be
detected
Rthe lane markings change quickly, e.g.
lanes branch off, cross one another or
merge
Rthe road is narrow and winding
Rthere are strong shadows cast on the road
Switching on Lane Keeping Assist
XActivate Lane Keeping Assist using the on-
board computer; to do so, select Standard
orAdaptive(Ypage 228).
If you drive at speeds above 40 mph
(60 km/h) and lane markings are detected, the lines in the assistance graphics display
(
Ypage 227) are shown in green. Lane
Keeping Assist is ready for use.
When Standard
is selected, no warning vibra-
tion occurs if:
Ryou have switched on the turn signal. In this
event, the warnings are suppressed for a
certain period of time.
Ra driving safety system intervenes, such as
ABS, BAS or ESP®.
When Adaptive
is selected, no warning vibra-
tion occurs if:
Ryou have switched on the turn signal. In this
event, the warnings are suppressed for a
certain period of time.
Ra driving safety system intervenes, e.g.
ABS, BAS or ESP®.
Ryou accelerate hard, e.g. kickdown.
Ryou brake hard.
Ryou steer actively, e.g. swerve to avoid an
obstacle or change lanes quickly.
Ryou cut the corner on a sharp bend.
In order that you are warned only when nec-
essary and in good time if you cross the lane
marking, the system recognizes certain con-
ditions and warns you accordingly. The warning vibration occurs earlier if:
Ryou approach the outer lane marking on a
bend.
Rthe road has very wide lanes, e.g. a free-
way.
Rthe system recognizes solid lane markings.
The warning vibration occurs later if:
Rthe road has narrow lanes.
Ryou cut the corner on a bend.
216Driving system s
Driving an d parking
Page 250 of 390
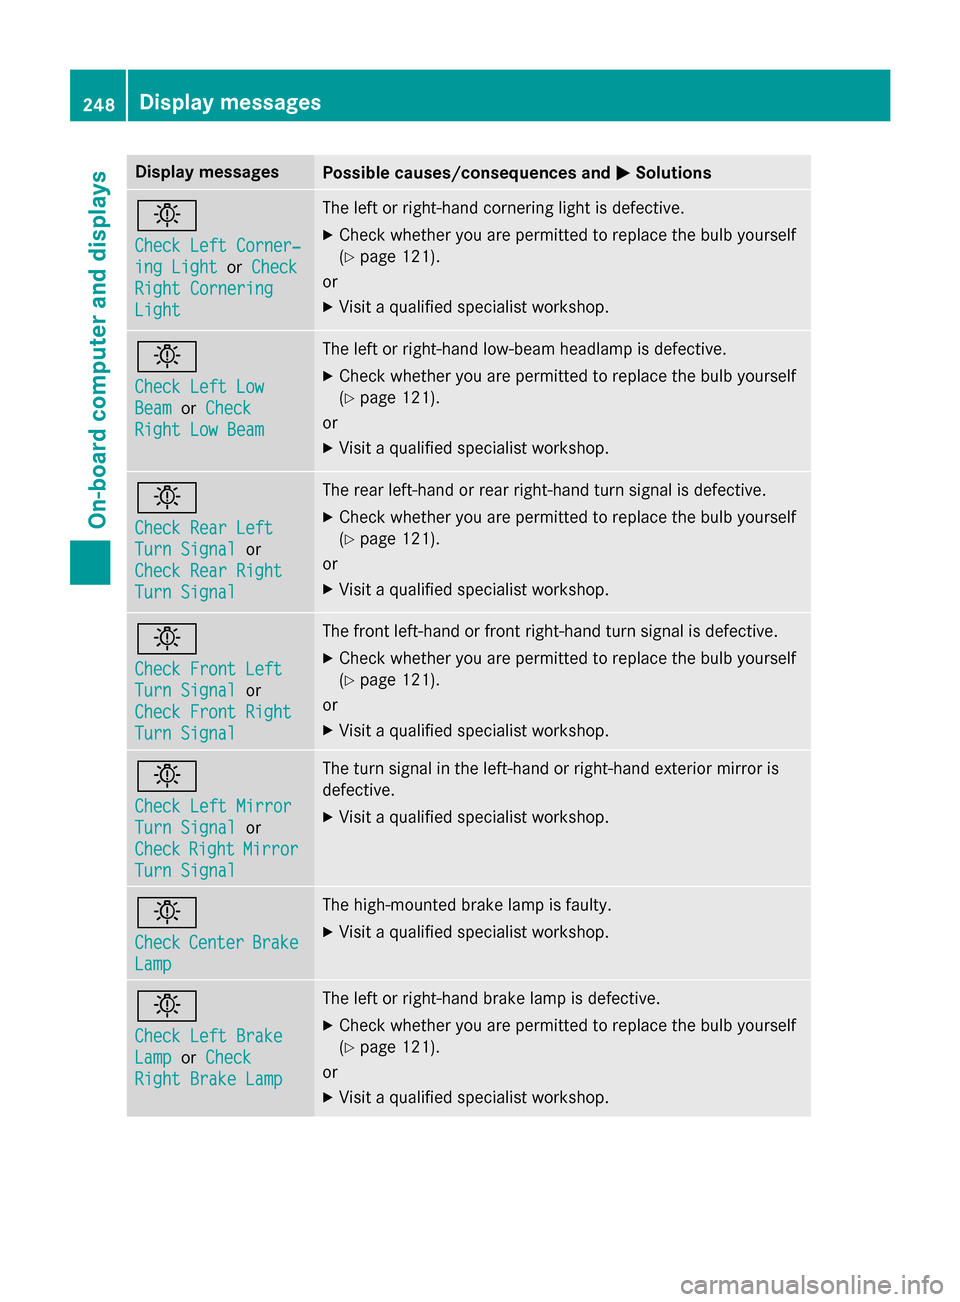
Display messagesPossible causes/consequences andMSolutions
b
Check LeftCorner ‐
ing LightorCheck
Right Cornering
Light
The lef tor right-hand cornering ligh tis defective.
XChec kwhether you are permitte dto replac eth ebulb yourself
(
Ypage 121).
or
XVisit aqualified specialist workshop .
b
Check LeftLow
Bea morCheck
Right Low Bea m
The leftor right-hand low-beam headlamp is defective.
XChec kwhether you are permitte dto replac eth ebulb yourself
(
Ypage 121).
or
XVisit aqualified specialist workshop .
b
Check RearLef t
TurnSignalor
Check Rea rRight
Tur nSignal
The rear left-han dor rear right-hand tur nsignal is defective.
XChec kwhether you are permitte dto replac eth ebulb yourself
(
Ypage 121).
or
XVisit aqualified specialist workshop .
b
Check Front Left
TurnSignalor
Check Front Right
Tur nSignal
The fron tleft-han dor fron tright-hand tur nsignal is defective.
XChec kwhether you are permitte dto replac eth ebulb yourself
(
Ypage 121).
or
XVisit aqualified specialist workshop .
b
Check LeftMirror
Tur nSignalor
Check
RightMirror
Tur nSignal
The tur nsignal in th eleft-han dor right-hand exterio rmirror is
defective.
XVisit aqualified specialist workshop .
b
CheckCenterBrake
Lamp
The high-mounte dbrak elamp is faulty.
XVisit aqualified specialist workshop .
b
Check LeftBrake
Lam porCheck
Right Brake Lam p
The leftor right-hand brak elamp is defective.
XChec kwhether you are permitte dto replac eth ebulb yourself
(
Ypage 121).
or
XVisit aqualified specialist workshop .
248Display messages
On-board computer and displays