key MERCEDES-BENZ GLA-Class 2016 X156 Service Manual
[x] Cancel search | Manufacturer: MERCEDES-BENZ, Model Year: 2016, Model line: GLA-Class, Model: MERCEDES-BENZ GLA-Class 2016 X156Pages: 390, PDF Size: 8.37 MB
Page 111 of 390
Mirrors
Rear-view mirror
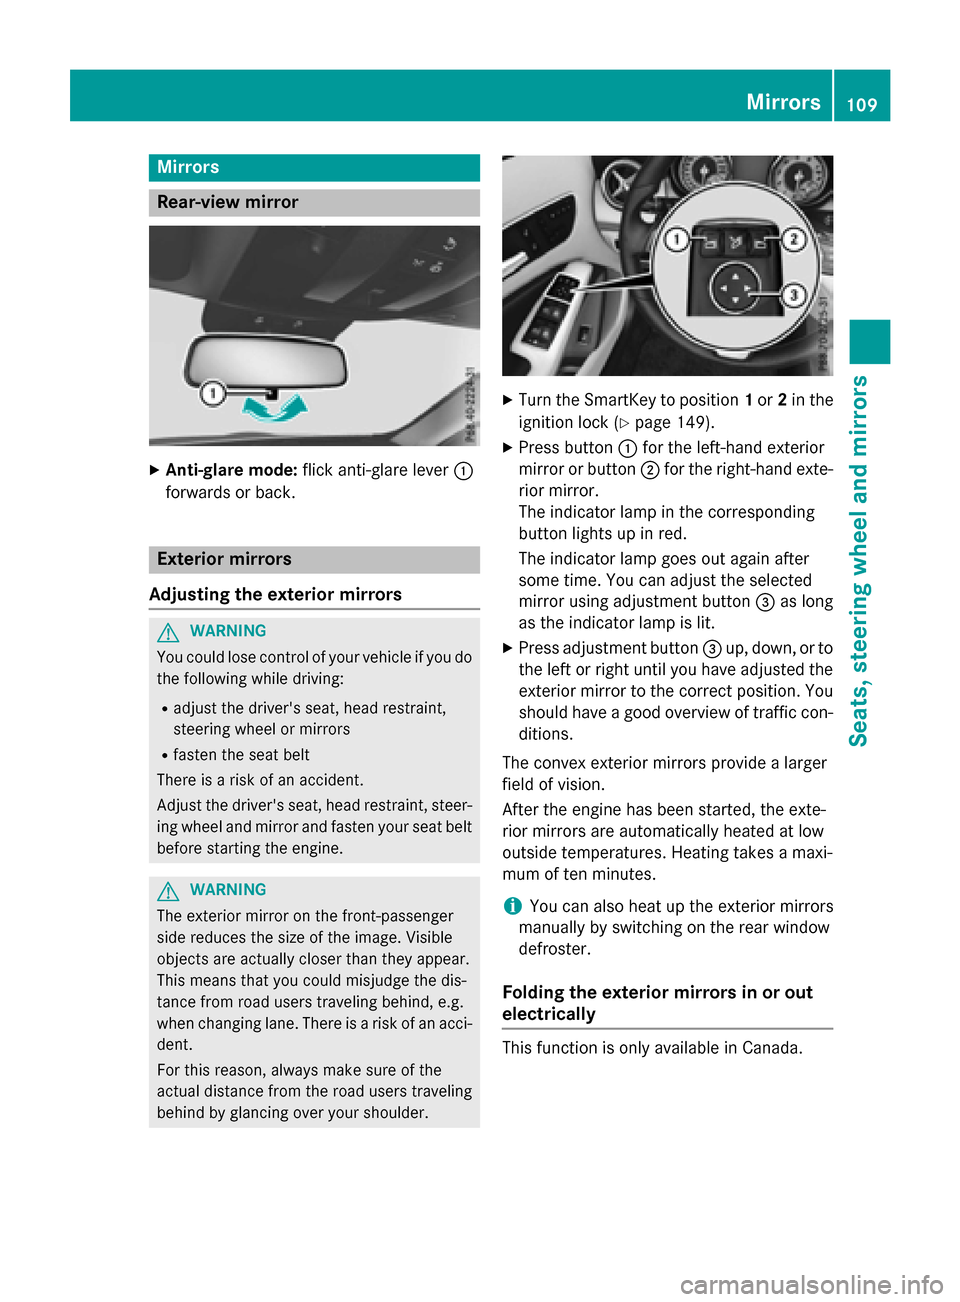
XAnti-glare mode:flick anti-glare lever :
forwards or back.
Exterior mirrors
Adjusting the exterior mirrors
GWARNING
You could lose control of your vehicle if you do the following while driving:
Radjust the driver's seat, head restraint,
steering wheel or mirrors
Rfasten the seat belt
There is a risk of an accident.
Adjust the driver's seat, head restraint, steer-
ing wheel and mirror and fasten your seat belt before starting the engine.
GWARNING
The exterior mirror on the front-passenger
side reduces the size of the image. Visible
objects are actually closer than they appear.
This means that you could misjudge the dis-
tance from road users traveling behind, e.g.
when changing lane. There is a risk of an acci-
dent.
For this reason, always make sure of the
actual distance from the road users traveling
behind by glancing over your shoulder.
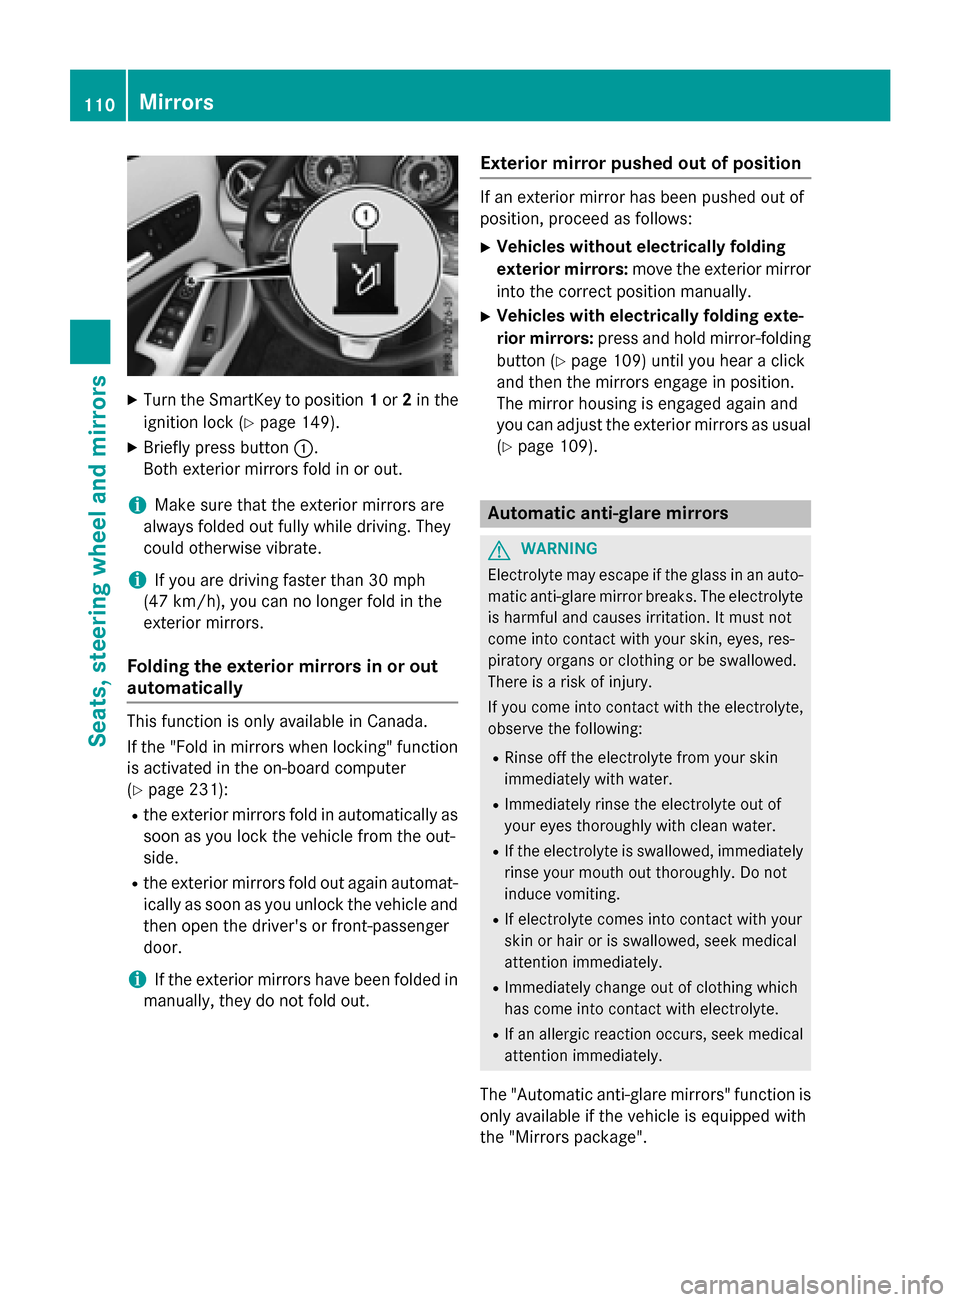
XTurn the SmartKey to position 1or 2in the
ignition lock (
Ypage 149).
XPress button :for the left-hand exterior
mirror or button ;for the right-hand exte-
rior mirror.
The indicator lamp in the corresponding
button lights up in red.
The indicator lamp goes out again after
some time. You can adjust the selected
mirror using adjustment button =as long
as the indicator lamp is lit.
XPress adjustment button =up, down, or to
the left or right until you have adjusted the
exterior mirror to the correct position. You
should have a good overview of traffic con-
ditions.
The convex exterior mirrors provide a larger
field of vision.
After the engine has been started, the exte-
rior mirrors are automatically heated at low
outside temperatures. Heating takes a maxi-
mum of ten minutes.
iYou can also heat up the exterior mirrors
manually by switching on the rear window
defroster.
Folding the exterior mirrors in or out
electrically
This function is only available in Canada.
Mirrors109
Seats, steering wheel and mirrors
Z
Page 112 of 390
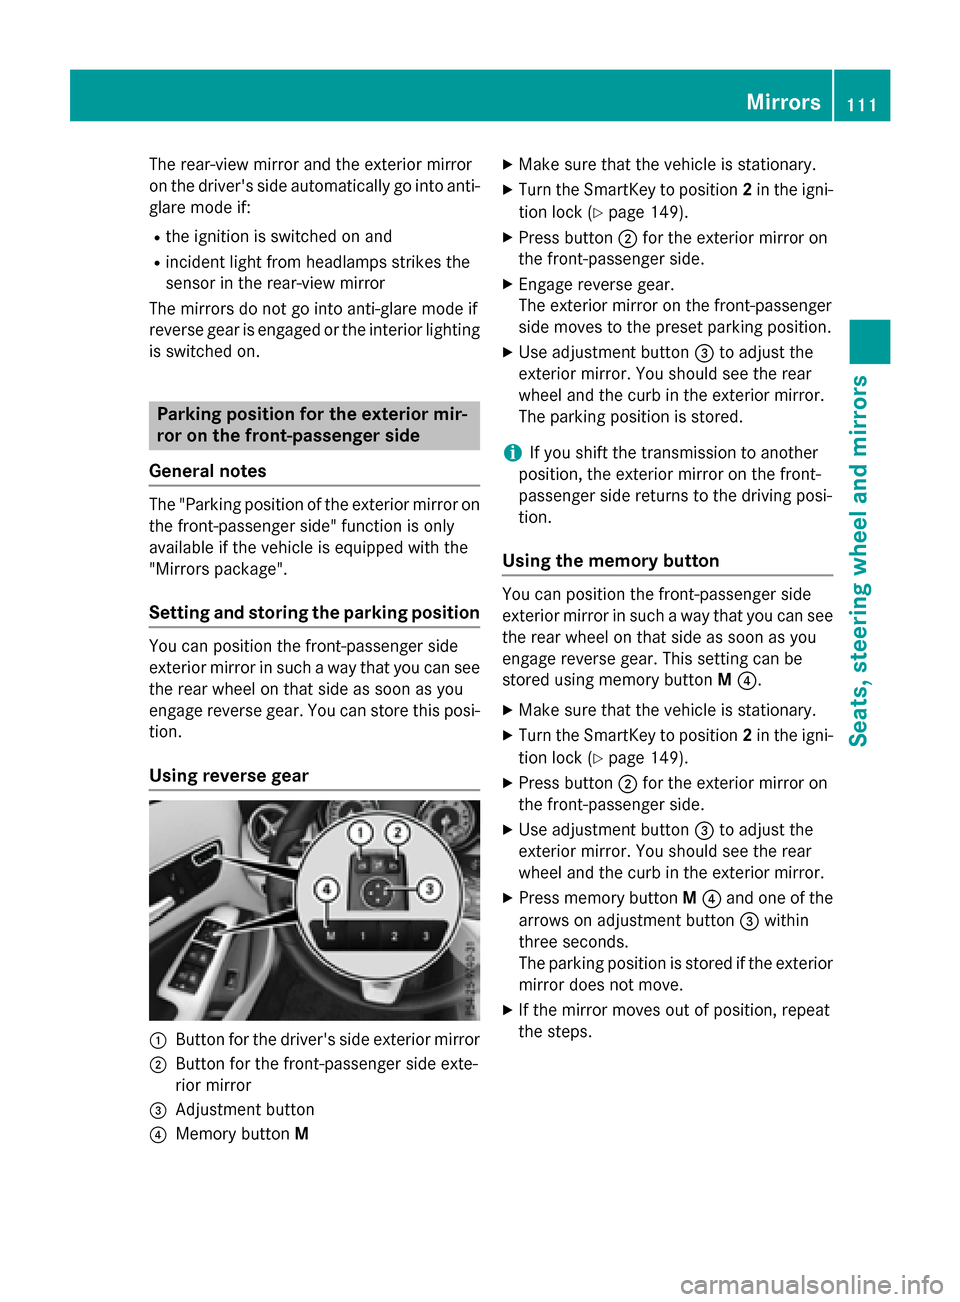
XTurn the SmartKey to position1or 2in the
ignition lock (
Ypage 149).
XBriefly press button :.
Both exterior mirrors fold in or out.
iMake sure that the exterior mirrors are
always folded out fully while driving. They
could otherwise vibrate.
iIf you are driving faster than 30 mph
(47 km/h) , you can no longer fold in the
exterior mirrors.
Folding the exterior mirrors in or out
automatically
This function is only available in Canada.
If the "Fold in mirrors when locking" function
is activated in the on-board computer
(
Ypage 231):
Rthe exterior mirrors fold in automatically as
soon as you lock the vehicle from the out-
side.
Rthe exterior mirrors fold out again automat-
ically as soon as you unlock the vehicle and
then open the driver's or front-passenger
door.
iIf the exterior mirrors have been folded in
manually, they do not fold out.
Exterior mirror pushed out of position
If an exterior mirror has been pushed out of
position, proceed as follows:
XVehicles without electrically folding
exterior mirrors: move the exterior mirror
into the correct position manually.
XVehicles with electrically folding exte-
rior mirrors: press and hold mirror-folding
button (
Ypage 109) until you hear a click
and then the mirrors engage in position.
The mirror housing is engaged again and
you can adjust the exterior mirrors as usual
(
Ypage 109).
Automatic anti-glare mirrors
GWARNING
Electrolyte may escape if the glass in an auto-
matic anti-glare mirror breaks. The electrolyte
is harmful and causes irritation. It must not
come into contact with your skin, eyes, res-
piratory organs or clothing or be swallowed.
There is a risk of injury.
If you come into contact with the electrolyte,
observe the following:
RRinse off the electrolyte from your skin
immediately with water.
RImmediately rinse the electrolyte out of
your eyes thoroughly with clean water.
RIf the electrolyte is swallowed, immediately
rinse your mouth out thoroughly. Do not
induce vomiting.
RIf electrolyte comes into contact with your
skin or hair or is swallowed, seek medical
attention immediately.
RImmediately change out of clothing which
has come into contact with electrolyte.
RIf an allergic reaction occurs, seek medical
attention immediately.
The "Automatic anti-glare mirrors" function is
only available if the vehicle is equipped with
the "Mirrors package".
110Mirrors
Seats, steering wheel and mirrors
Page 113 of 390
The rear-view mirror and the exterior mirror
on the driver's side automatically go into anti-
glare mode if:
Rthe ignition is switched on and
Rincident light from headlamps strikes the
sensor in the rear-view mirror
The mirrors do not go into anti-glare mode if
reverse gear is engaged or the interior lighting
is switched on.
Parking position for the exterior mir-
ror on the front-passenger side
General notes
The "Parking position of the exterior mirror on
the front-passenger side" function is only
available if the vehicle is equipped with the
"Mirrors package".
Setting and storing the parking position
You can position the front-passenger side
exterior mirror in such a way that you can see
the rear wheel on that side as soon as you
engage reverse gear. You can store this posi-
tion.
Using reverse gear
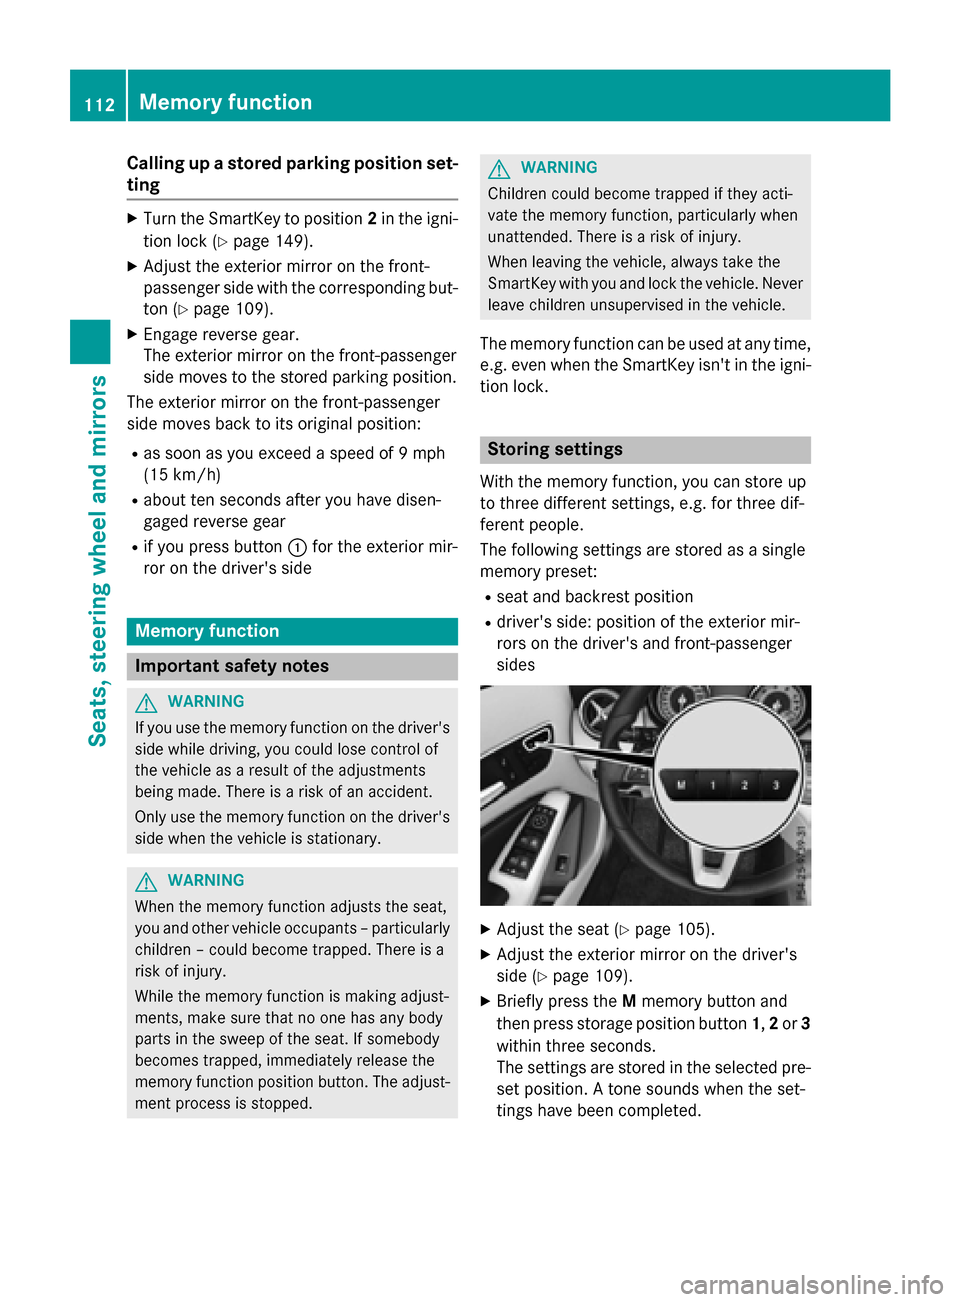
:Button for the driver's side exterior mirror
;Button for the front-passenger side exte-
rior mirror
=Adjustment button
?Memory button M
XMake sure that the vehicle is stationary.
XTurn the SmartKey to position 2in the igni-
tion lock (
Ypage 149).
XPress button ;for the exterior mirror on
the front-passenger side.
XEngage reverse gear.
The exterior mirror on the front-passenger
side moves to the preset parking position.
XUse adjustment button =to adjust the
exterior mirror. You should see the rear
wheel and the curb in the exterior mirror.
The parking position is stored.
iIf you shift the transmission to another
position, the exterior mirror on the front-
passenger side returns to the driving posi-
tion.
Using the memory button
You can position the front-passenger side
exterior mirror in such a way that you can see
the rear wheel on that side as soon as you
engage reverse gear. This setting can be
stored using memory button M?.
XMake sure that the vehicle is stationary.
XTurn the SmartKey to position 2in the igni-
tion lock (
Ypage 149).
XPress button ;for the exterior mirror on
the front-passenger side.
XUse adjustment button =to adjust the
exterior mirror. You should see the rear
wheel and the curb in the exterior mirror.
XPress memory button M? and one of the
arrows on adjustment button =within
three seconds.
The parking position is stored if the exterior
mirror does not move.
XIf the mirror moves out of position, repeat
the steps.
Mirrors111
Seats, steering wheel and mirrors
Z
Page 114 of 390
Calling up a stored parking position set-
ting
XTurn the SmartKey to position2in the igni-
tion lock (
Ypage 149).
XAdjust the exterior mirror on the front-
passenger side with the corresponding but-
ton (
Ypage 109).
XEngage reverse gear.
The exterior mirror on the front-passenger
side moves to the stored parking position.
The exterior mirror on the front-passenger
side moves back to its original position:
Ras soon as you exceed a speed of 9 mph
(15 km/h)
Rabout ten seconds after you have disen-
gaged reverse gear
Rif you press button :for the exterior mir-
ror on the driver's side
Memory function
Important safety notes
GWARNING
If you use the memory function on the driver's side while driving, you could lose control of
the vehicle as a result of the adjustments
being made. There is a risk of an accident.
Only use the memory function on the driver's
side when the vehicle is stationary.
GWARNING
When the memory function adjusts the seat,
you and other vehicle occupants – particularly
children – could become trapped. There is a
risk of injury.
While the memory function is making adjust-
ments, make sure that no one has any body
parts in the sweep of the seat. If somebody
becomes trapped, immediately release the
memory function position button. The adjust-
ment process is stopped.
GWARNING
Children could become trapped if they acti-
vate the memory function, particularly when
unattended. There is a risk of injury.
When leaving the vehicle, always take the
SmartKey with you and lock the vehicle. Never
leave children unsupervised in the vehicle.
The memory function can be used at any time,
e.g. even when the SmartKey isn't in the igni-
tion lock.
Storing settings
With the memory function, you can store up
to three different settings, e.g. for three dif-
ferent people.
The following settings are stored as a single
memory preset:
Rseat and backrest position
Rdriver's side: position of the exterior mir-
rors on the driver's and front-passenger
sides
XAdjust the seat (Ypage 105).
XAdjust the exterior mirror on the driver's
side (
Ypage 109).
XBriefly press the Mmemory button and
then press storage position button 1,2or 3
within three seconds.
The settings are stored in the selected pre-
set position. A tone sounds when the set-
tings have been completed.
112Memory function
Seats, steering wheel and mirrors
Page 118 of 390
Useful information
i
This Operator's Manual describes all
models and all standard and optional equip-
ment of your vehicle available at the time of
publication of the Operator's Manual.
Country-specific differences are possible.
Please note that your vehicle may not be
equipped with all features described. This
also applies to safety-related systems and
functions.
iRead the information on qualified special-
ist workshops (
Ypage 25).
Exterior lighting
General notes
For reasons of safety, Mercedes-Benz recom-
mends that you drive with the lights switched
on even during the daytime. In some coun-
tries, operation of the headlamps varies due
to legal requirements and self-imposed obli-
gations.
Setting the exterior lighting
Setting options
Exterior lighting can be set using the:
Rlight switch
Rcombination switch (Ypage 118)
Ron-board computer (Ypage 230)
Light switch
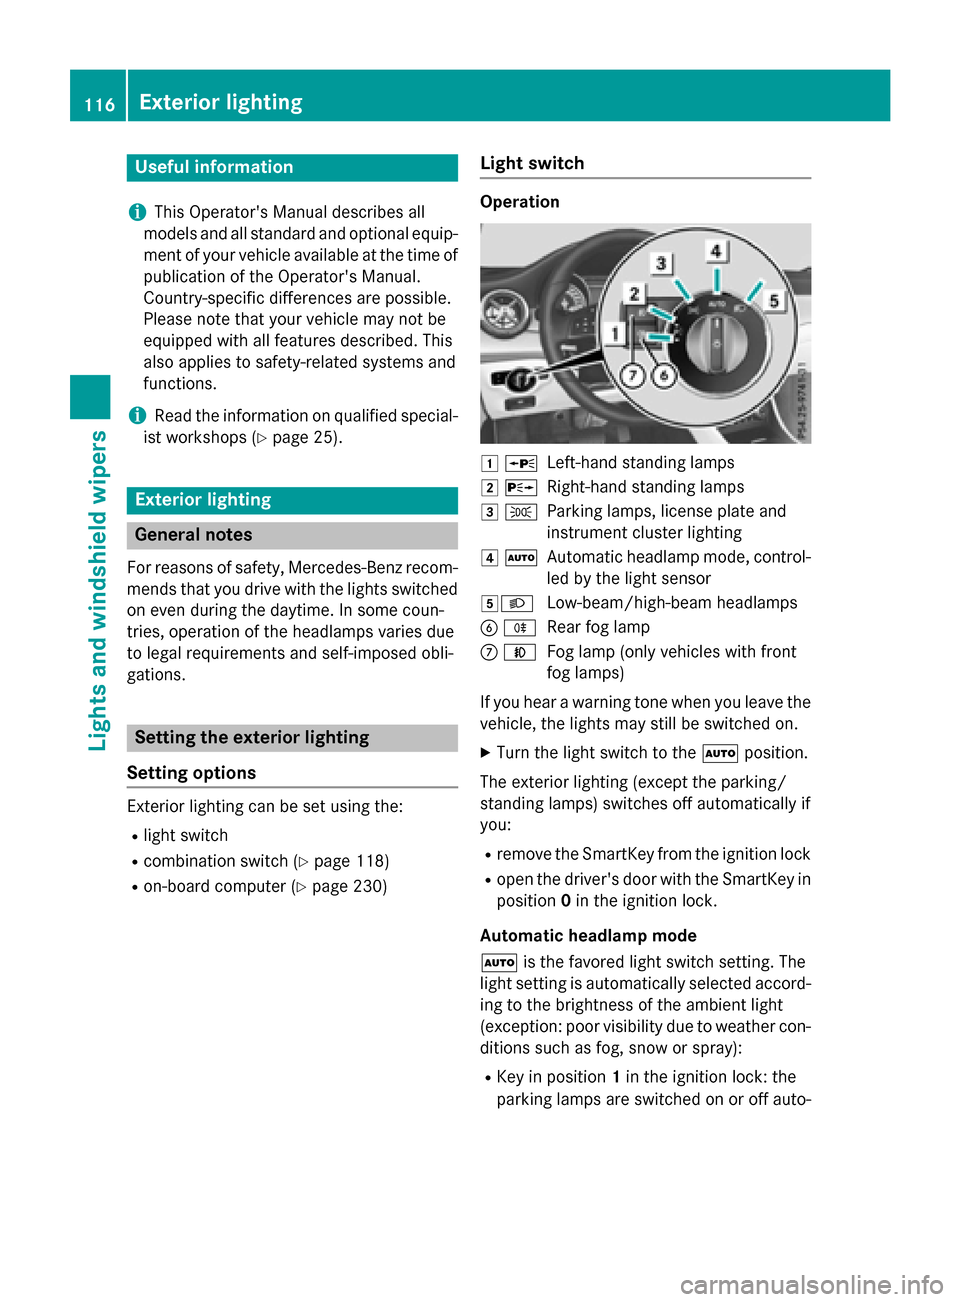
Operation
1 WLeft-hand standing lamps
2XRight-hand standing lamps
3TParking lamps, license plate and
instrument cluster lighting
4ÃAutomatic headlamp mode, control-
led by the light sensor
5LLow-beam/high-beam headlamps
BRRear fog lamp
CNFog lamp (only vehicles with front
fog lamps)
If you hear a warning tone when you leave the
vehicle, the lights may still be switched on.
XTurn the light switch to the Ãposition.
The exterior lighting (except the parking/
standing lamps) switches off automatically if
you:
Rremove the SmartKey from the ignition lock
Ropen the driver's door with the SmartKey in position 0in the ignition lock.
Automatic headlamp mode
à is the favored light switch setting. The
light setting is automatically selected accord-
ing to the brightness of the ambient light
(exception: poor visibility due to weather con-
ditions such as fog, snow or spray):
RKey in position 1in the ignition lock: the
parking lamps are switched on or off auto-
116Exterior lighting
Lights and windshield wipers
Page 119 of 390
matically depending on the brightness of
the ambient light.
RWith the engine running: if you have acti-
vated the daytime running lamps function
via the on-board computer, the daytime
running lamps or the parking lamps and the
low-beam headlamps are switched on or off
automatically depending on the brightness
of the ambient light.
XTo switch on the automatic headlamp
mode: turn the light switch to the Ã
position.
GWARNING
When the light switch is set to Ã, the low-
beam headlamps may not be switched on
automatically if there is fog, snow or other
causes of poor visibility due to the weather
conditions such as spray. There is a risk of an
accident.
In such situations, turn the light switch to
L.
The automatic headlamp feature is only an
aid. The driver is responsible for the vehicle's
lighting at all times.
Canada only:
The daytime running lamps improve the visi-
bility of your vehicle during the day. The day-
time running lamps function is required by law
in Canada. It cannot therefore be deactivated.
When the engine is running and the vehicle is
stationary: if you move the selector lever from
a drive position to P, the daytime running
lamps/low-beam headlamps go out after
three minutes.
When the engine is running, the vehicle is
stationary and in bright ambient light: if you
turn the light switch to the Tposition, the
daytime running lamps and parking lamps
turn on.
If the engine is running and you turn the light
switch to the Lposition, the manual set-
tings take precedence over the daytime run-
ning lamps.
USA only: The daytime running lamps improve the visi-
bility of your vehicle during the day. To do this,
the daytime running lamps function must be
switched on using the on-board computer
(
Ypage 230).
If the engine is running and you turn the light
switch to the TorL position, the man-
ual settings take precedence over the day-
time running lamps.
Low-beam headlamps
Even if the light sensor does not detect that it
is dark, the parking lamps and low-beam
headlamps switch on when the ignition is
switched on and the light switch is set to the
L position. This is a pa
rticularly useful
function in the event of rain and fog.
XTo switch on the low-beam headlamps:
turn the SmartKey in the ignition lock to
position 2or start the engine.
XTurn the light switch to L.
The green Lindicator lamp in the instru-
ment cluster lights up.
Front fog lamps
In conditions where visibility is poor due to
fog, snow or rain, the fog lamps improve vis-
ibility as well as making it easier for other road
users to see you. They can be operated
together with the parking lamps or together
with the parking lamps and low-beam head-
lamps.
XTo switch on the fog lamps: turn the key
in the ignition lock to position 2or start the
engine.
XTurn the light switch to LorÃ.
XPress the Nbutton.
The green Nindicator lamp in the instru-
ment cluster lights up.
XTo switch off the fog lamps: press the
N button.
The green Nindicator lamp in the instru-
ment cluster goes out.
Exterior lighting117
Lights and windshield wipers
Z
Page 120 of 390
Rear fog lamp
The rear fog lamp improves visibility of your
vehicle for the traffic behind in the event of
thick fog. Please take note of the country-
specific regulations for the use of rear fog
lamps.
XTo switch on the rear fog lamp:turn the
SmartKey in the ignition lock to position 2
or start the engine.
XTurn the light switch to LorÃ.
XPress the Rbutton.
The yellow Rindicator lamp in the
instrument cluster lights up.
XTo switch off the rear fog lamp: press the
R button.
The yellow Rindicator lamp in the
instrument cluster goes out.
Parking lamps
!If the battery has been excessively dis-
charged, the parking lamps or standing
lamps are automatically switched off to
enable the next engine start. Always park
your vehicle safely and sufficiently lit
according to legal standards. Avoid the
continuous use of the Tparking lamps
for several hours. If possible, switch on the
X right or the Wleft standing lamp.
XTo switch on: turn the light switch to T.
The green Tindicator lamp in the instru-
ment cluster lights up.
Standing lamps
Switching on the standing lamps ensures the
corresponding side of the vehicle is illumina-
ted.
XTo switch on the standing lamps: the
SmartKey should not be in the ignition lock
or it should be in position 0.
XTurn the light switch to W(left-hand side
of the vehicle) or X(right-hand side of
the vehicle).
Combination switch
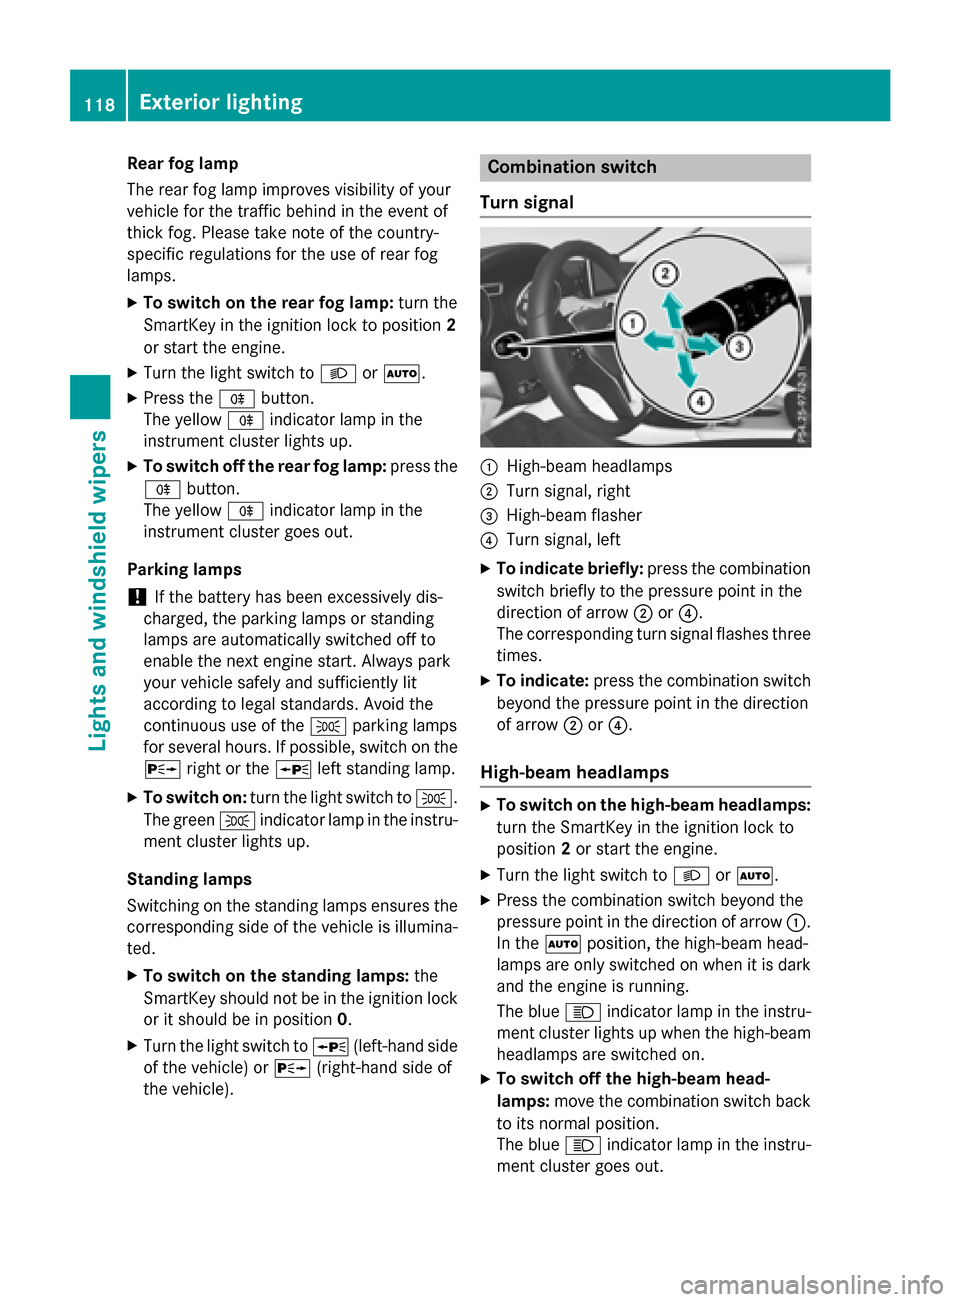
Turn signal
:High-beam headlamps
;Turn signal, right
=High-beam flasher
?Turn signal, left
XTo indicate briefly: press the combination
switch briefly to the pressure point in the
direction of arrow ;or?.
The corresponding turn signal flashes three
times.
XTo indicate: press the combination switch
beyond the pressure point in the direction
of arrow ;or?.
High-beam headlamps
XTo switch on the high-beam headlamps:
turn the SmartKey in the ignition lock to
position 2or start the engine.
XTurn the light switch to LorÃ.
XPress the combination switch beyond the
pressure point in the direction of arrow :.
In the Ãposition, the high-beam head-
lamps are only switched on when it is dark
and the engine is running.
The blue Kindicator lamp in the instru-
ment cluster lights up when the high-beam
headlamps are switched on.
XTo switch off the high-beam head-
lamps: move the combination switch back
to its normal position.
The blue Kindicator lamp in the instru-
ment cluster goes out.
118Exterior lighting
Lights and windshield wipers
Page 121 of 390
High-beam flasher
XTo switch on:turn the SmartKey in the
ignition lock to position 1or 2, or start the
engine.
XPull the combination switch in the direction
of arrow =.
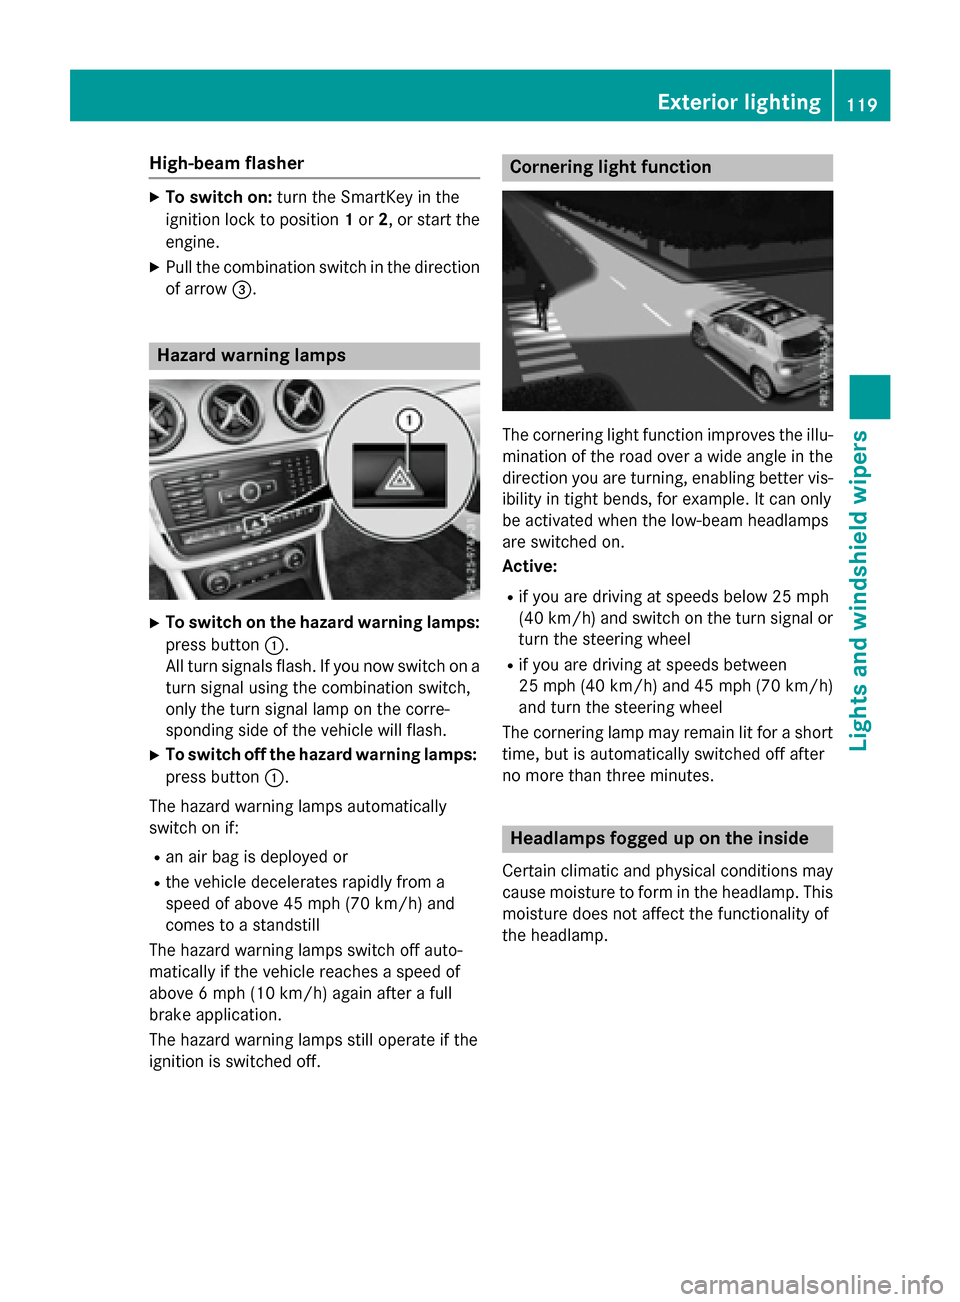
Hazard warning lamps
XTo switch on the hazard warning lamps:
press button :.
All turn signals flash. If you now switch on a
turn signal using the combination switch,
only the turn signal lamp on the corre-
sponding side of the vehicle will flash.
XTo switch off the hazard warning lamps:
press button :.
The hazard warning lamps automatically
switch on if:
Ran air bag is deployed or
Rthe vehicle decelerates rapidly from a
speed of above 45 mph (70 km/h) and
comes to a standstill
The hazard warning lamps switch off auto-
matically if the vehicle reaches a speed of
above 6 mph (10 km/h) again after a full
brake application.
The hazard warning lamps still operate if the
ignition is switched off.
Cornering light function
The cornering light function improves the illu-
mination of the road over a wide angle in the
direction you are turning, enabling better vis-
ibility in tight bends, for example. It can only
be activated when the low-beam headlamps
are switched on.
Active:
Rif you are driving at speeds below 25 mph
(40 km/h) and switch on the turn signal or
turn the steering wheel
Rif you are driving at speeds between
25 mph (40 km/h) and 45 mph (70 km/h)
and turn the steering wheel
The cornering lamp may remain lit for a short
time, but is automatically switched off after
no more than three minutes.
Headlamps fogged up on the inside
Certain climatic and physical conditions may
cause moisture to form in the headlamp. This
moisture does not affect the functionality of
the headlamp.
Exterior lighting119
Lights and windshield wipers
Z
Page 122 of 390
Interior lighting
Overview of interior lighting
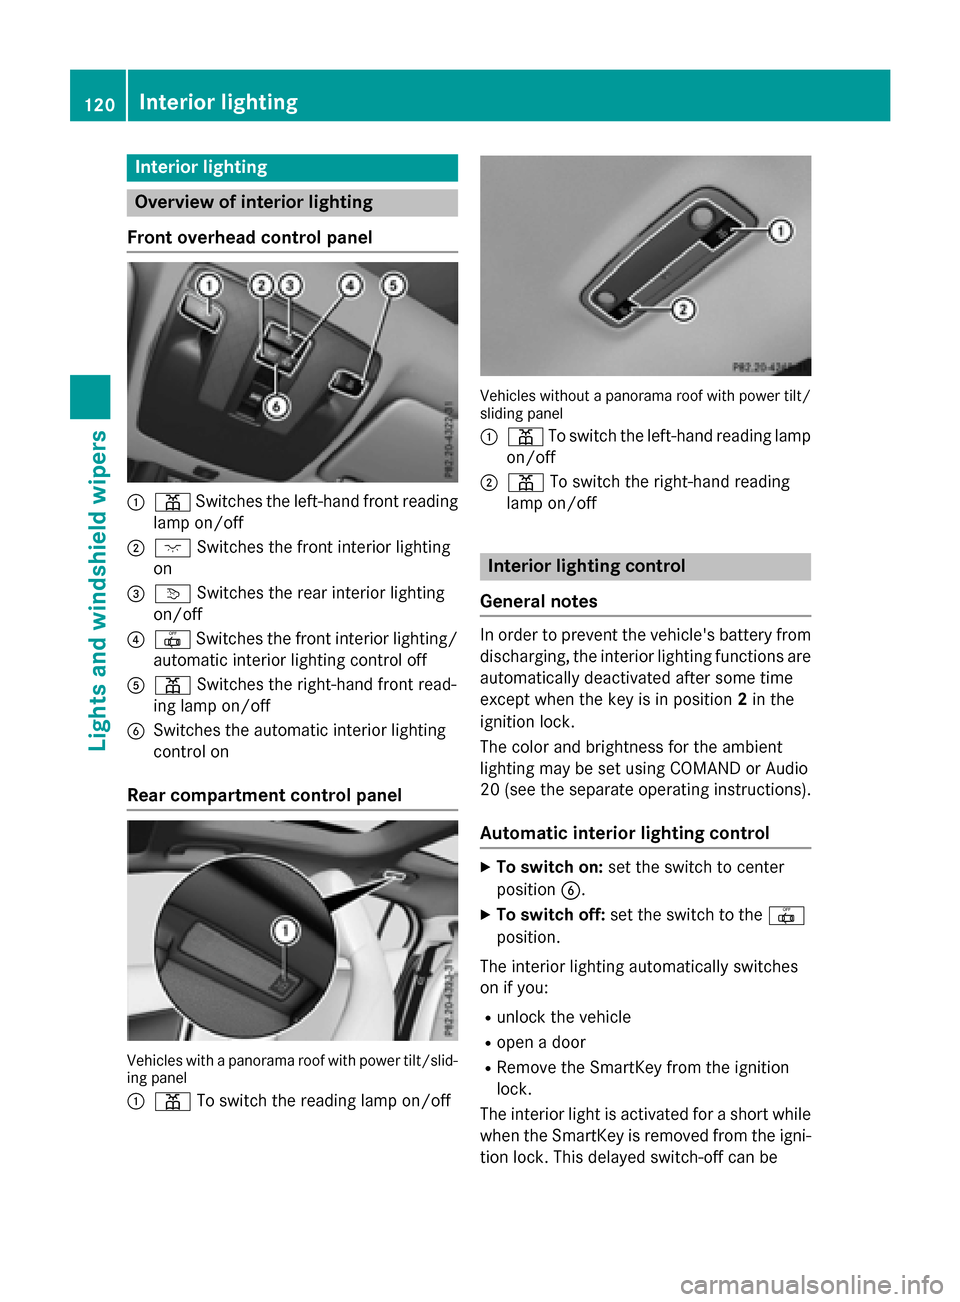
Front overhead control panel
:p Switches the left-hand front reading
lamp on/o ff
;cSwitches the front interior lighting
on
=v Switches the rear interior lighting
on/o ff
?| Switches the front interior lighting/
automat icinterior lighting control off
Ap Switches the right-hand front read-
ing lamp on/o ff
BSwitches the automat icinterior lighting
control on
Rear compartment control panel
Vehicles wit h apanoram aroo fwit hpowe rtilt/slid-
ing panel
:
p Toswit ch the reading lamp on/o ff
Vehicles withoutapanoram aroo fwit hpowe rtilt /
sliding panel
:
p To switch the left-hand reading lamp
on/o ff
;p To switch the right-hand reading
lamp on/o ff
Interior lighting control
General notes
In order to prevent the vehicle's battery from
discharging, the interior lighting functions are
automatical lydeactivated after some time
exce ptwhen the key is inposit ion2in the
ignit ion lock.
The color and brightness for the ambient
lighting may beset using COMAND or Aud io
20 (see the separate operating instructions).
Automatic interior lighting control
XTo switch on: set the switch to center
posit ionB.
XTo switch off: set the switch to the |
posit ion.
The interior lighting automatical lyswitches
on ifyou:
Runlock the vehicle
Ropen a door
RRemo vethe SmartKey from the ignit ion
lock.
The interior lightis act ivat ed for a short while
when the SmartKey isremoved from the igni-
tion lock. This delayed switch-off can be
120Interior lighting
Lights and windshield wipers
Page 123 of 390
adjusted using COMAND or Audio 20 (see the
separate Operator's Manual).
Manual interior lighting control
XTo switch the front interior lighting on:
set the switch to thecposition.
XTo switch the front interior lighting off:
set the switch to the |position or (if the
door is closed) to the center position.
XTo switch the rear interior lighting on or
off: press the ubutton.
XTo switch the reading lamp on or off:
press the pbutton.
Crash-responsive emergency lighting
The interior lighting is activated automatically
if the vehicle is involved in an accident.
XTo switch off the crash-responsive
emergency lighting: press the hazard
warning lamp button.
or
XLock and then unlock the vehicle using the SmartKey.
Replacing bulbs
Important safety notes
Xenon bulbs
GDANGER
Xenon bulbscarry a high voltage. You can get
an electr icshock ifyou remove the cover of
the Xenon bulband touch the electrical con-
tacts. There isa risk of fatal injury.
Never touch the parts or the electrical con-
tacts of the Xenon bulb. Always have work on
the Xenon bulbscarried out at a qualified spe-
cialist workshop.
If your vehicle is equipped with Xenon bulbs,
you can recognize this by the following: the
cone of light from the Xenon bulbs moves
from the top to the bottom and back again when you start the engine. For this to be
observed, the lights must be switched on
before starting the engine.
Bulbs and lamps are an important aspect of
vehicle safety. You must therefore make sure
that these function correctly at all times.
Have the headlamp setting checked regularly.
Other bulbs
GWARNING
Bulbs, lamps and connectors can get very hot
when operating. Ifyou change a bulb, you
could burn yourself on these components.
There is a risk of injury.
Allow these components to cool down before
changing a bulb.
Do not use a bulb that has been dropped or if
its glass tube has been scratched.
The bulb may explode if:
Ryou touch it
Rit is hot
Ryou drop it
Ryou scratch it
Only operate bulbs in enclosed lamps
designed for that purpose. Only install spare
bulbs of the same type and the specified volt- age.
Marks on the glass tube reduce the service
life of the bulbs. Do not touch the glass tube
with your bare hands. If necessary, clean the
glass tube when cold with alcohol or spirit and
rub it off with a lint-free cloth.
Protect bulbs from moisture during opera-
tion. Do not allow bulbs to come into contact
with liquids.
There are bulbs other than the Xenon bulbs
that you cannot replace. Only replace the
bulbs listed (
Ypage 122). Have the bulbs that
you cannot replace yourself changed at a
qualified specialist workshop.
If you require assistance replacing bulbs, con- sult a qualified specialist workshop.
If the new bulb still does not light up, consult
a qualified specialist workshop.
Replacing bulbs121
Lights and windshield wipers
Z