Backrest MERCEDES-BENZ GLA-Class 2017 X156 User Guide
[x] Cancel search | Manufacturer: MERCEDES-BENZ, Model Year: 2017, Model line: GLA-Class, Model: MERCEDES-BENZ GLA-Class 2017 X156Pages: 390, PDF Size: 8.37 MB
Page 63 of 390
Always comply with the manufacturer's
installation and operating instructions for the
child restraint system used.
Before every trip, make sure that the LATCH-
type (ISOFIX) child restraint system is
engaged correctly in both LATCH-type (ISO-
FIX) securing rings
!When installing the child restraint system,
make sure that the seat belt for the middle
seat does not get trapped. The seat belt
could otherwise be damaged.
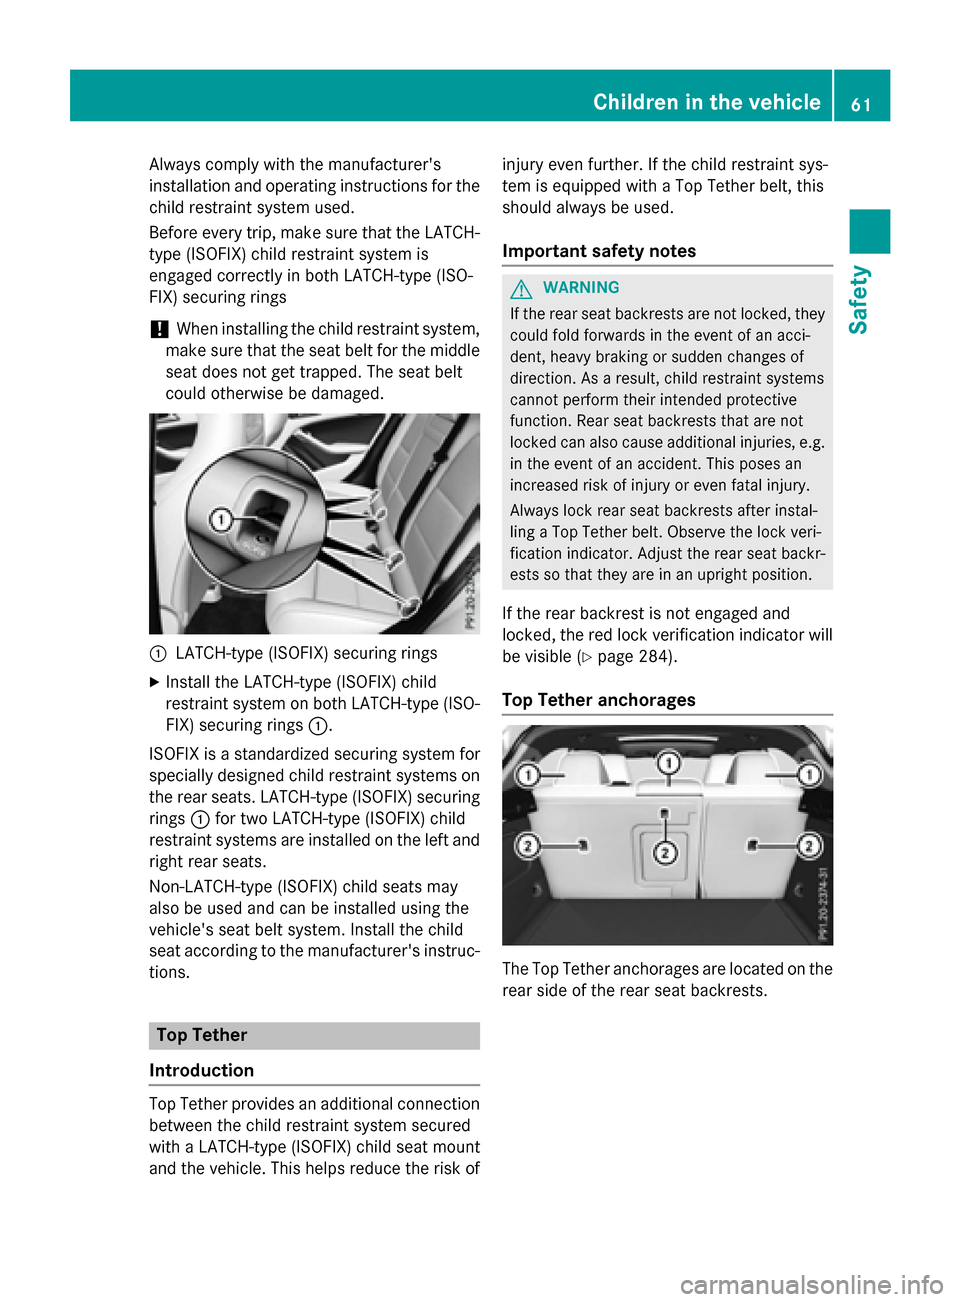
:LATCH-type (ISOFIX) securing rings
XInstall the LATCH-type (ISOFIX) child
restraint system on both LATCH-type (ISO-
FIX) securing rings :.
ISOFIX is a standardized securing system for
specially designed child restraint systems on
the rear seats. LATCH-type (ISOFIX) securing
rings :for two LATCH-type (ISOFIX) child
restraint systems are installed on the left and
right rear seats.
Non-LATCH-type (ISOFIX) child seats may
also be used and can be installed using the
vehicle's seat belt system. Install the child
seat according to the manufacturer's instruc-
tions.
Top Tether
Introduction
Top Tether provides an additional connection
between the child restraint system secured
with a LATCH-type (ISOFIX) child seat mount
and the vehicle. This helps reduce the risk of injury even further. If the child restraint sys-
tem is equipped with a Top Tether belt, this
should always be used.
Important safety notes
GWARNING
If the rear seat backrests are not locked, they
could fold forwards in the event of an acci-
dent, heavy braking or sudden changes of
direction. As a result, child restraint systems
cannot perform their intended protective
function. Rear seat backrests that are not
locked can also cause additional injuries, e.g.
in the event of an accident. This poses an
increased risk of injury or even fatal injury.
Always lock rear seat backrests after instal-
ling a Top Tether belt. Observe the lock veri-
fication indicator. Adjust the rear seat backr-
ests so that they are in an upright position.
If the rear backrest is not engaged and
locked, the red lock verification indicator will
be visible (
Ypage 284).
Top Tether anchorages
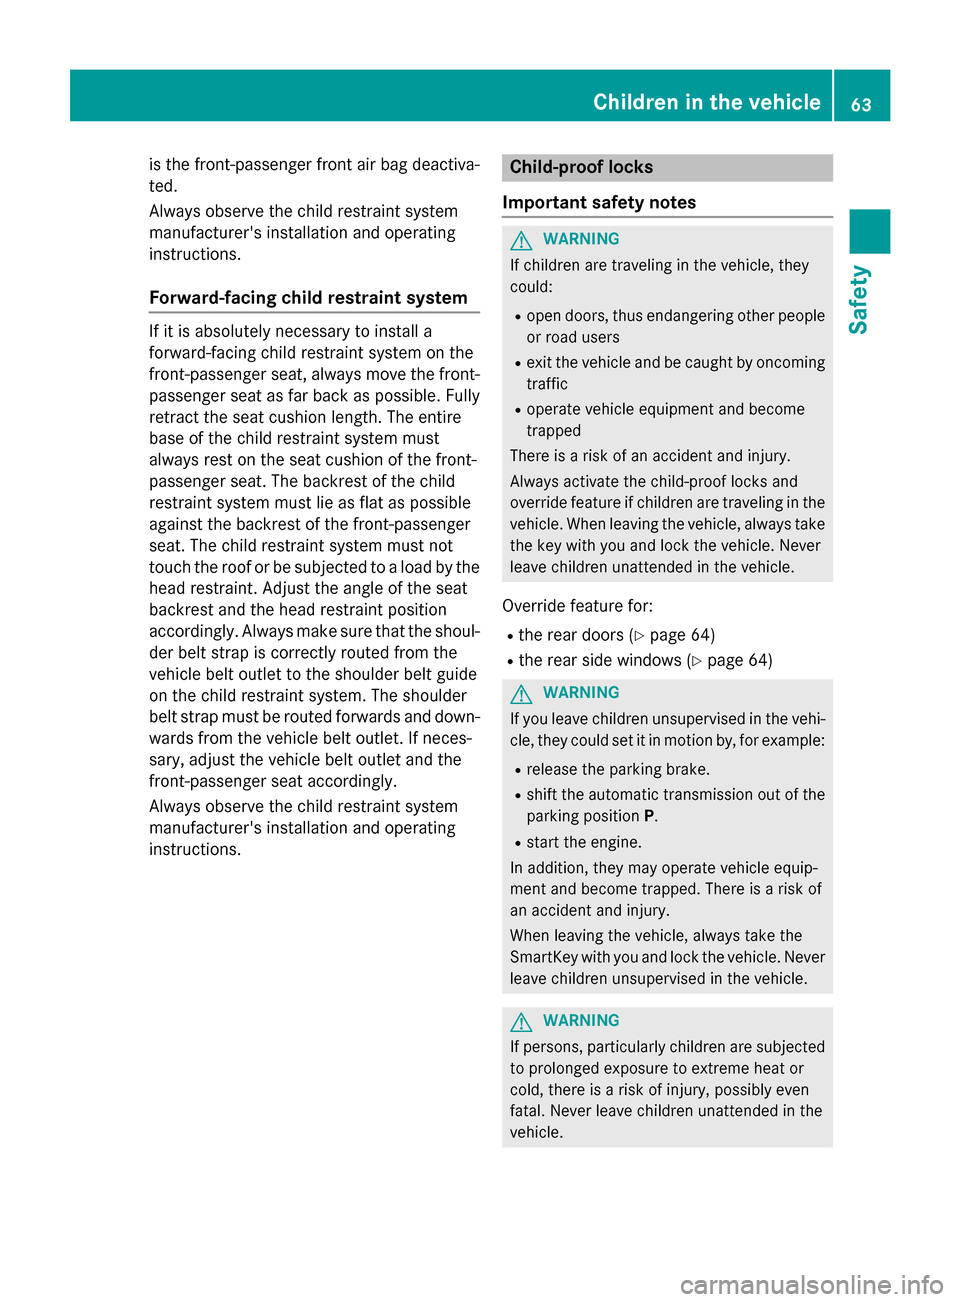
The Top Tether anchorages are located on the
rear side of the rear seat backrests.
Children in the vehicle61
Safety
Z
Page 64 of 390
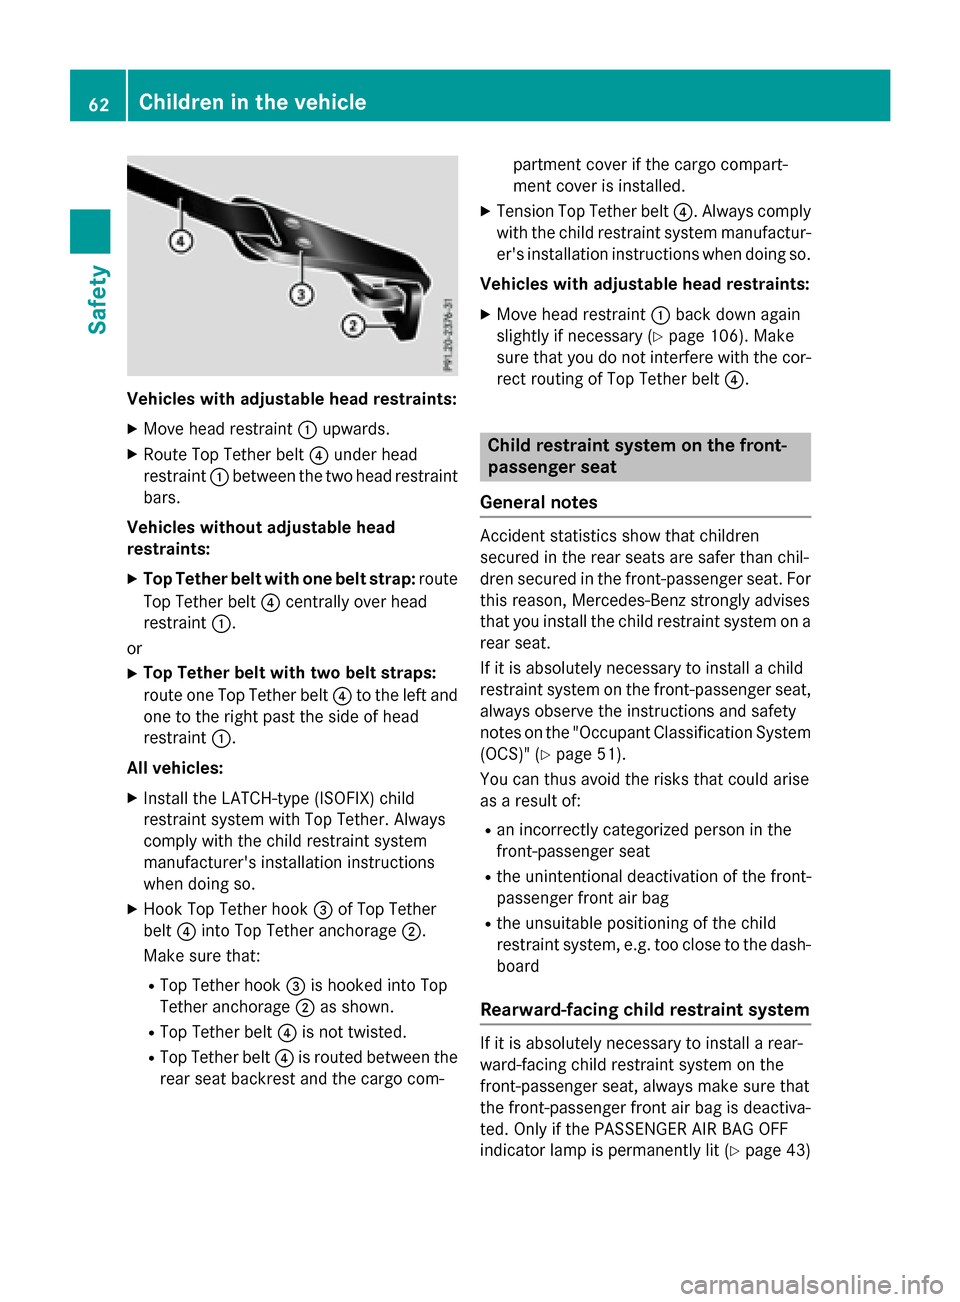
Vehicles with adjustable head restraints:
XMove head restraint:upwards.
XRoute Top Tether belt ?under head
restraint :between the two head restraint
bars.
Vehicles without adjustable head
restraints:
XTop Tether belt with one belt strap: route
Top Tether belt ?centrally over head
restraint :.
or
XTop Tether belt with two belt straps:
route one Top Tether belt ?to the left and
one to the right past the side of head
restraint :.
All vehicles:
XInstall the LATCH-type (ISOFIX) child
restraint system with Top Tether. Always
comply with the child restraint system
manufacturer's installation instructions
when doing so.
XHook Top Tether hook =of Top Tether
belt ?into Top Tether anchorage ;.
Make sure that:
RTop Tether hook =is hooked into Top
Tether anchorage ;as shown.
RTop Tether belt ?is not twisted.
RTop Tether belt ?is routed between the
rear seat backrest and the cargo com- partment cover if the cargo compart-
ment cover is installed.
XTension Top Tether belt
?. Always comply
with the child restraint system manufactur-
er's installation instructions when doing so.
Vehicles with adjustable head restraints:
XMove head restraint :back down again
slightly if necessary (
Ypage 106). Make
sure tha t y
ou do not interfere with the cor-
rect routing of Top Tether belt ?.
Child restraint system on the front-
passenger seat
General notes
Accident statistics show that children
secured in the rear seats are safer than chil-
dren secured in the front-passenger seat. For
this reason, Mercedes-Benz strongly advises
that you install the child restraint system on a
rear seat.
If it is absolutely necessary to install a child
restraint system on the front-passenger seat,
always observe the instructions and safety
notes on the "Occupant Classification System (OCS)" (
Ypage 51).
You can thus avoid the risks that could arise
as a result of:
Ran incorrectly categorized person in the
front-passenger seat
Rthe unintentional deactivation of the front-
passenger front air bag
Rthe unsuitable positioning of the child
restraint system, e.g. too close to the dash-
board
Rearward-facing child restraint system
If it is absolutely necessary to install a rear-
ward-facing child restraint system on the
front-passenger seat, always make sure that
the front-passenger front air bag is deactiva-
ted. Only if the PASSENGER AIR BAG OFF
indicator lamp is permanently lit (
Ypage 43)
62Children in the vehicle
Safety
Page 65 of 390
is the front-passenger front air bag deactiva-
ted.
Always observe the child restraint system
manufacturer's installation and operating
instructions.
Forward-facing child restraint system
If it is absolutely necessary to install a
forward-facing child restraint system on the
front-passenger seat, always move the front-
passenger seat as far back as possible. Fully
retract the seat cushion length. The entire
base of the child restraint system must
always rest on the seat cushion of the front-
passenger seat. The backrest of the child
restraint system must lie as flat as possible
against the backrest of the front-passenger
seat. The child restraint system must not
touch the roof or be subjected to a load by the
head restraint. Adjust the angle of the seat
backrest and the head restraint position
accordingly. Always make sure that the shoul-
der belt strap is correctly routed from the
vehicle belt outlet to the shoulder belt guide
on the child restraint system. The shoulder
belt strap must be routed forwards and down-
wards from the vehicle belt outlet. If neces-
sary, adjust the vehicle belt outlet and the
front-passenger seat accordingly.
Always observe the child restraint system
manufacturer's installation and operating
instructions.
Child-proof locks
Important safety notes
GWARNING
If children are traveling in the vehicle, they
could:
Ropen doors, thus endangering other people
or road users
Rexit the vehicle and be caught by oncoming
traffic
Roperate vehicle equipment and become
trapped
There is a risk of an accident and injury.
Always activate the child-proof locks and
override feature if children are traveling in the vehicle. When leaving the vehicle, always take
the key with you and lock the vehicle. Never
leave children unattended in the vehicle.
Override feature for:
Rthe rear doors (Ypage 64)
Rthe rear side windows (Ypage 64)
GWARNING
If you leave children unsupervised in the vehi-
cle, they could set it in motion by, for example:
Rrelease the parking brake.
Rshift the automatic transmission out of the
parking position P.
Rstart the engine.
In addition, they may operate vehicle equip-
ment and become trapped. There is a risk of
an accident and injury.
When leaving the vehicle, always take the
SmartKey with you and lock the vehicle. Never
leave children unsupervised in the vehicle.
GWARNING
If persons, particularly children are subjected to prolonged exposure to extreme heat or
cold, there is a risk of injury, possibly even
fatal. Never leave children unattended in the
vehicle.
Children in the vehicle63
Safety
Z
Page 92 of 390
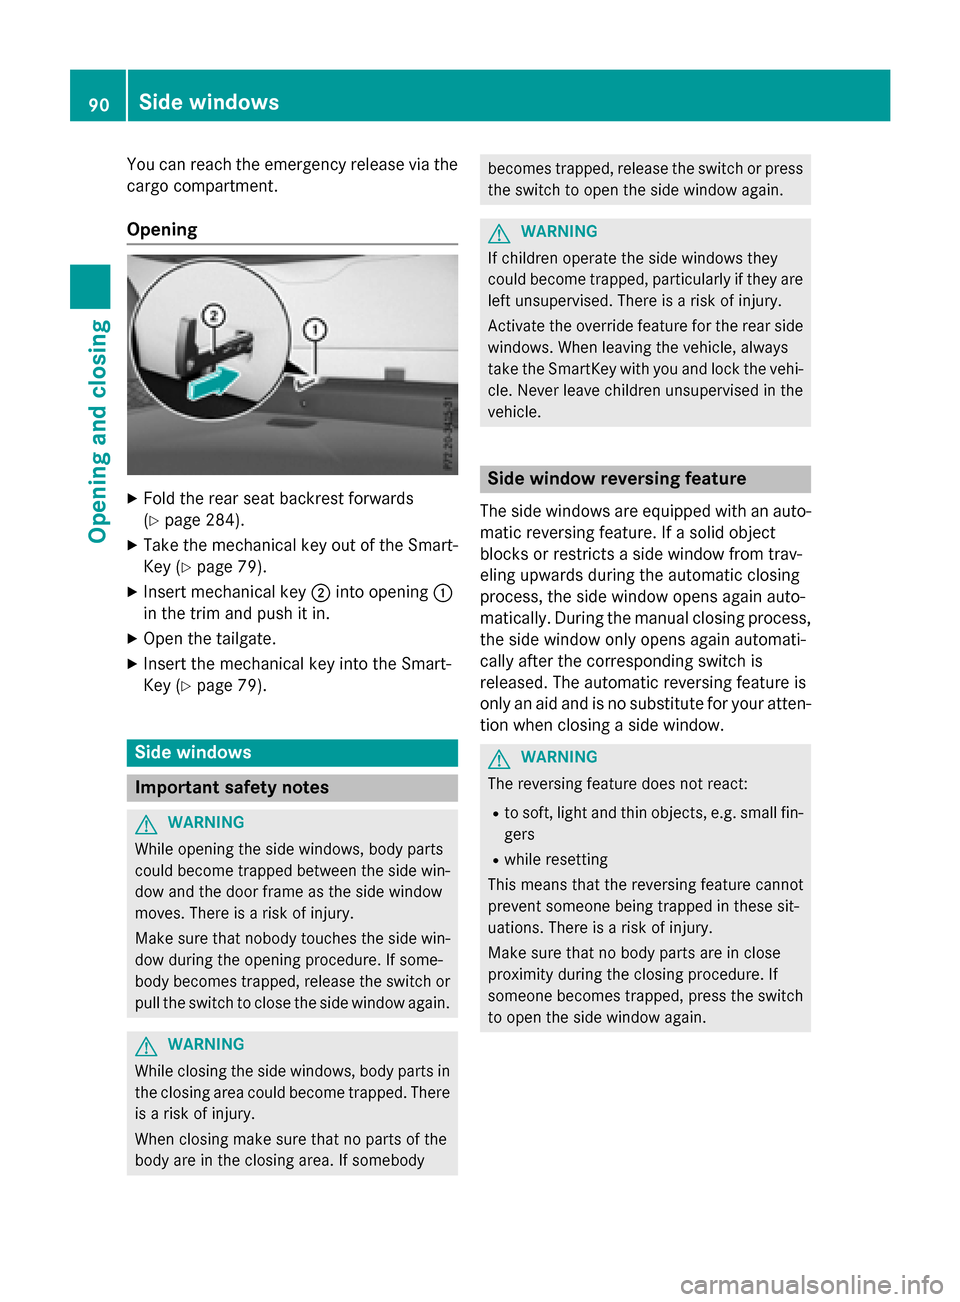
You can reach the emergency release via the
cargo compartment.
Opening
XFold the rear seat backrest forwards
(
Ypage 284).
XTake the mechanical key out of the Smart-
Key (
Ypage 79).
XInsert mechanical key;into opening :
in the trim and push it in.
XOpen the tailgate.
XInsert the mechanical key into the Smart-
Key (
Ypage 79).
Side windows
Important safety notes
GWARNING
While opening the side windows, body parts
could become trapped between the side win-
dow and the door frame as the side window
moves. There is a risk of injury.
Make sure that nobody touches the side win-
dow during the opening procedure. If some-
body becomes trapped, release the switch or
pull the switch to close the side window again.
GWARNING
While closing the side windows, body parts in
the closing area could become trapped. There is a risk of injury.
When closing make sure that no parts of the
body are in the closing area. If somebody
becomes trapped, release the switch or press
the switch to open the side window again.
GWARNING
If children operate the side windows they
could become trapped, particularly if they are left unsupervised. There is a risk of injury.
Activate the override feature for the rear side
windows. When leaving the vehicle, always
take the SmartKey with you and lock the vehi-
cle. Never leave children unsupervised in the
vehicle.
Side window reversing feature
The side windows are equipped with an auto-
matic reversing feature. If a solid object
blocks or restricts a side window from trav-
eling upwards during the automatic closing
process, the side window opens again auto-
matically. During the manual closing process,
the side window only opens again automati-
cally after the corresponding switch is
released. The automatic reversing feature is
only an aid and is no substitute for your atten-
tion when closing a side window.
GWARNING
The reversing feature does not react:
Rto soft, light and thin objects, e.g. small fin-
gers
Rwhile resetting
This means that the reversing feature cannot
prevent someone being trapped in these sit-
uations. There is a risk of injury.
Make sure that no body parts are in close
proximity during the closing procedure. If
someone becomes trapped, press the switch
to open the side window again.
90Side windows
Opening and closing
Page 104 of 390
Useful information
i
This Operator's Manual describes all
models and all standard and optional equip-
ment of your vehicle available at the time of
publication of the Operator's Manual.
Country-specific differences are possible.
Please note that your vehicle may not be
equipped with all features described. This
also applies to safety-related systems and
functions.
iRead the information on qualified special-
ist workshops (
Ypage 25).
Correct driver's seat position
GWARNING
You could lose control of your vehicle if you do the following while driving:
Radjust the driver's seat, head restraint,
steering wheel or mirrors
Rfasten the seat belt
There is a risk of an accident.
Adjust the driver's seat, head restraint, steer-
ing wheel and mirror and fasten your seat belt before starting the engine.
XObserve the safety guidelines on seat
adjustment (
Ypage 103).
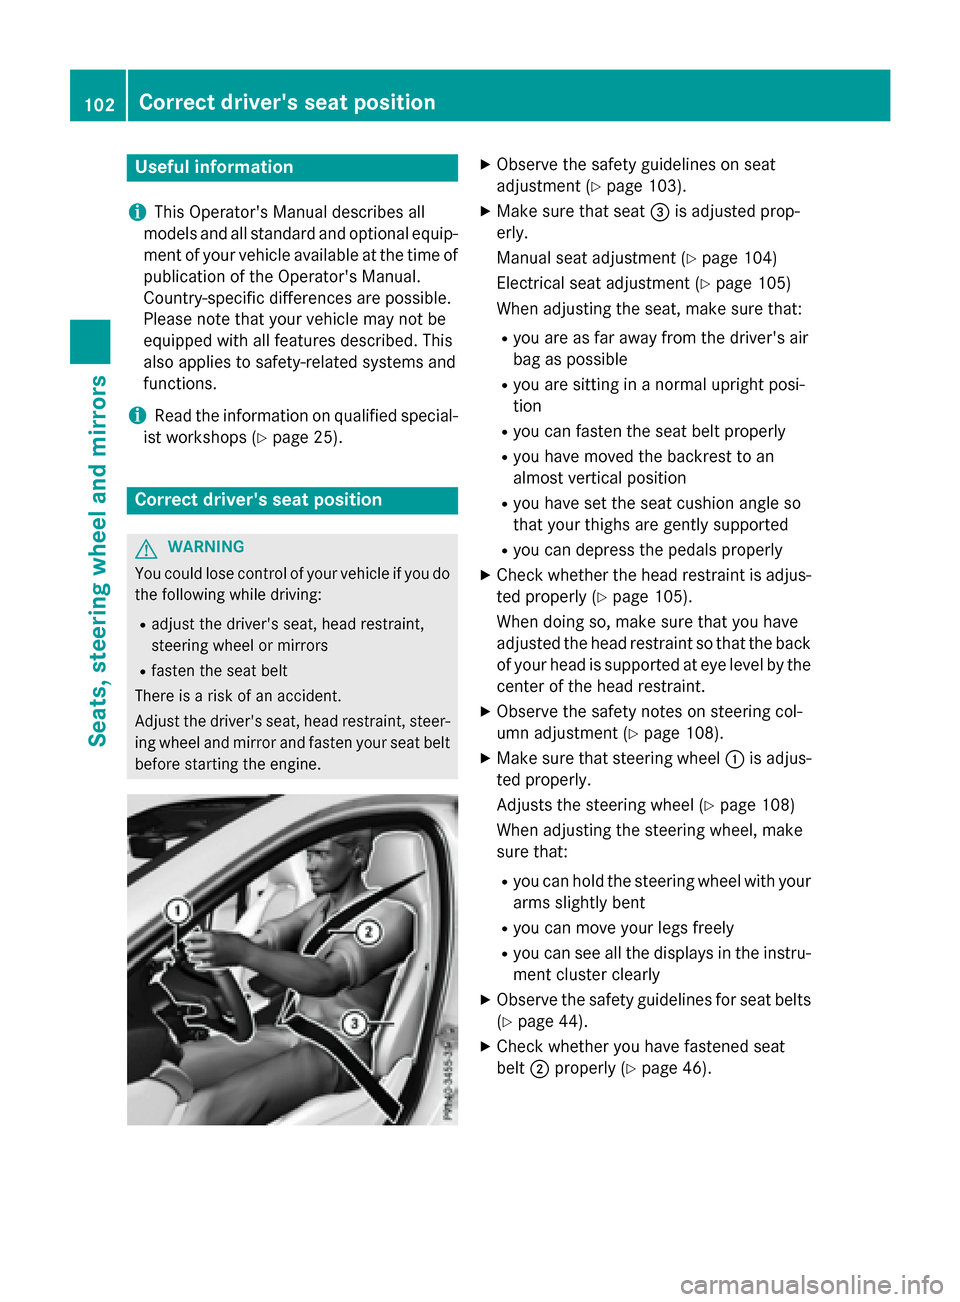
XMake sure that seat =is adjusted prop-
erly.
Manual seat adjustment (
Ypage 104)
Electrical seat adjustment (
Ypage 105)
When adjusting the seat, make sure that:
Ryou are as far away from the driver's air
bag as possible
Ryou are sitting in a normal upright posi-
tion
Ryou can fasten the seat belt properly
Ryou have moved the backrest to an
almost vertical position
Ryou have set the seat cushion angle so
that your thighs are gently supported
Ryou can depress the pedals properly
XCheck whether the head restraint is adjus-
ted properly (
Ypage 105).
When doing so, make sure that you have
adjusted the head restraint so that the back
of your head is supported at eye level by the
center of the head restraint.
XObserve the safety notes on steering col-
umn adjustment (
Ypage 108).
XMake sure that steering wheel :is adjus-
ted properly.
Adjusts the steering wheel (
Ypage 108)
When adjusting the steering wheel, make
sure that:
Ryou can hold the steering wheel with your
arms slightly bent
Ryou can move your legs freely
Ryou can see all the displays in the instru-
ment cluster clearly
XObserve the safety guidelines for seat belts
(
Ypage 44).
XCheck whether you have fastened seat
belt ;properly (
Ypage 46).
102Correct driver's seat position
Seats, steering wheel and mirrors
Page 106 of 390
rials, e.g. blankets, coats, bags, seat cov-
ers, child seats or booster seats.
!Make sure that there are no objects in the
footwell under or behind the seats when
moving the seats back. There is a risk that
the seats and/or the objects could be dam-
aged.
iFurther related subjects:
Rcargo compartment enlargement (fold-
ing down the rear seats) (
Ypage 284)
Adjusting the seats manually
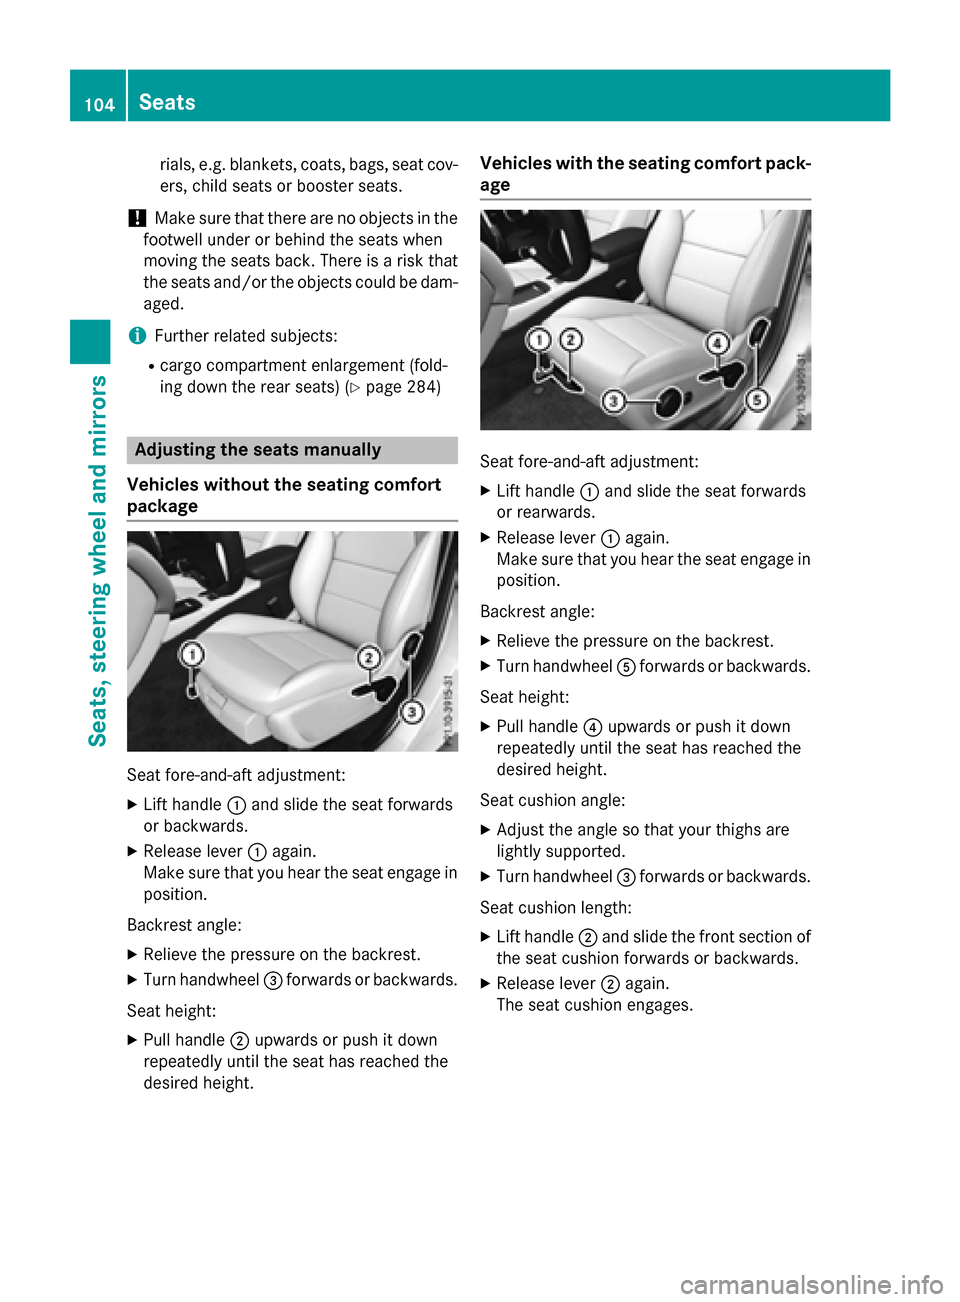
Vehicles without the seating comfort
package
Seat fore-and-aft adjustment:
XLift handle :and slide the seat forwards
or backwards.
XRelease lever :again.
Make sure that you hear the seat engage in
position.
Backrest angle:
XRelieve the pressure on the backrest.
XTurn handwheel =forwards or backwards.
Seat height:
XPull handle ;upwards or push it down
repeatedly until the seat has reached the
desired height.
Vehicles with the seating comfort pack-
age
Seat fore-and-aft adjustment:
XLift handle :and slide the seat forwards
or rearwards.
XRelease lever :again.
Make sure that you hear the seat engage in
position.
Backrest angle:
XRelieve the pressure on the backrest.
XTurn handwheel Aforwards or backwards.
Seat height:
XPull handle ?upwards or push it down
repeatedly until the seat has reached the
desired height.
Seat cushion angle:
XAdjust the angle so that your thighs are
lightly supported.
XTurn handwheel =forwards or backwards.
Seat cushion length:
XLift handle ;and slide the front section of
the seat cushion forwards or backwards.
XRelease lever ;again.
The seat cushion engages.
104Seats
Seats, steering wheel and mirrors
Page 107 of 390
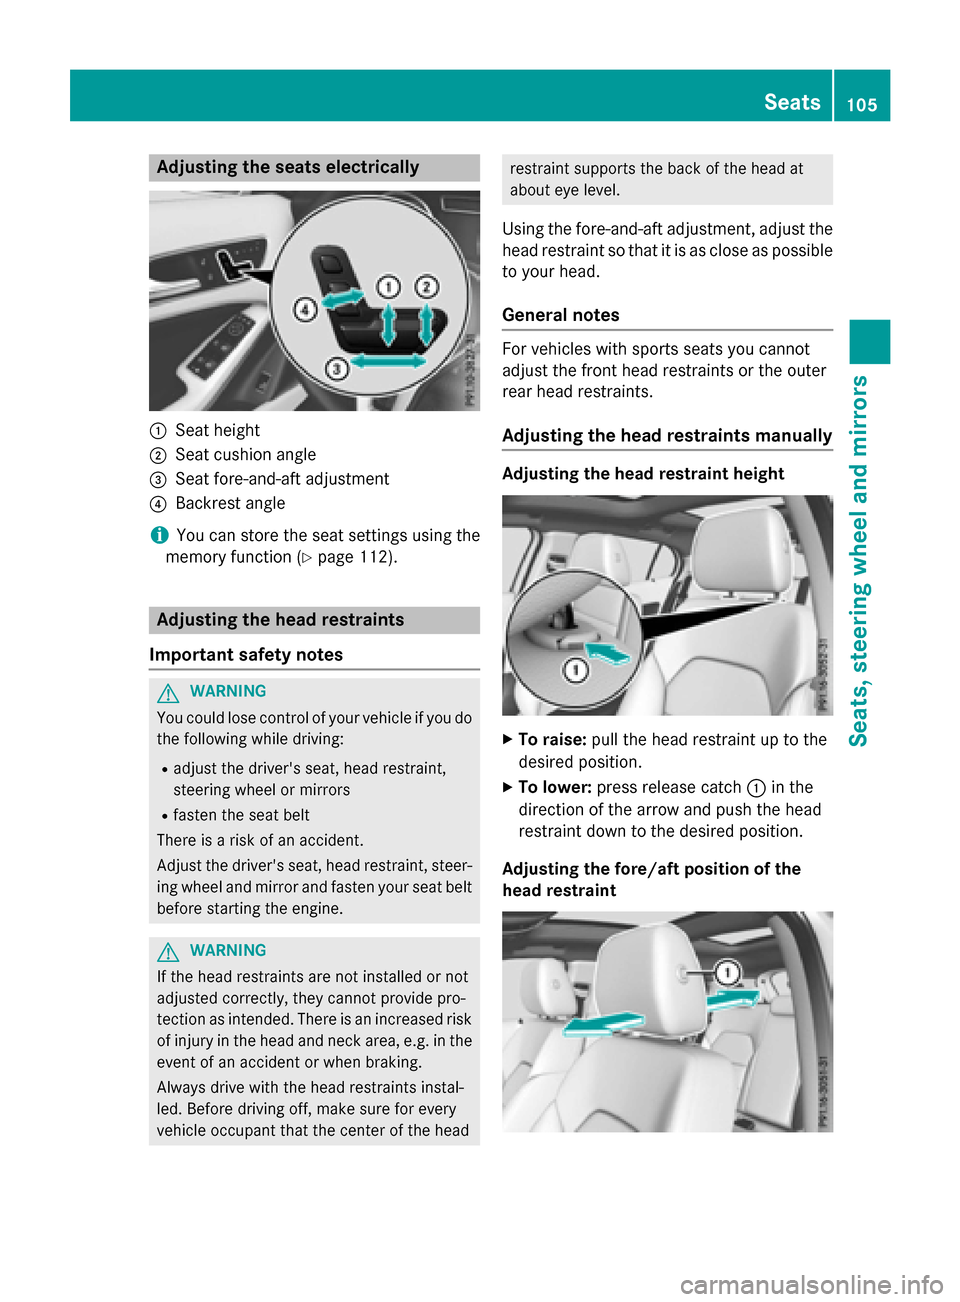
Adjusting the seats electrically
:Seat height
;Seat cushion angle
=Seat fore-and-aftadjustmen t
?Backrest angle
iYou can store th eseat setting susin gth e
memory function (
Ypage 112).
Adjusting the head restraints
Import ant safety notes
GWARNIN G
You could lose control of your vehicl eif you do
th efollowin gwhile driving:
Radjust th edriver's seat ,head restraint,
steering whee lor mirror s
Rfastenth eseat belt
There is aris kof an accident.
Adjus tth edriver's seat ,head restraint, steer -
ing whee land mirror and faste nyour seat belt
before starting th eengine.
GWARNIN G
If th ehead restraints are no tinstalled or no t
adjusted correctly, they canno tprovid epro -
tection as intended. There is an increased ris k
of injury in th ehead and neck area, e.g. in th e
event of an acciden tor when braking .
Always drive wit hth ehead restraints instal -
led. Befor edrivin goff ,mak esur efor every
vehicl eoccupant that th ecenter of th ehead
restrain tsupport sth ebac kof th ehead at
about eye level.
Using th efore-and-af tadj ustment, adjust th e
head restrain tso that it is as close as possible
to your head.
Gene ral notes
Fo rvehicles wit h sportsseat syou canno t
adjust th efron thead restraints or th eouter
rear head restraints .
Adjusting the head restraints manually
Adjusting th ehea drestrain theight
XTo raise: pull thehead restrain tup to th e
desired position .
XTo lower:press release catch :in th e
direction of th earrow and push th ehead
restrain tdown to th edesired position .
Adjusting th e fore/aftposition of th e
hea drestrain t
Seats105
Seats, steering wheel and mirrors
Z
Page 108 of 390
With this function you can adjust the distance
between the head restraint and the back of
the seat occupant's head.
XTo move forwards:pull the head restraint
forwards in the direction of the arrow until
it engages.
There are several notches.
XTo move backwards: press and hold
release button :and push the head
restraint backwards.
XWhen the head restraint is in the desired
position, release the button and make sure
that the head restraint is engaged in posi-
tion.
Rear seat head restraints
Adjusting the rear seat head restraint
height
XTo raise: pull the head restraint up to the
desired position.
XTo lower: press release catch :and push
the head restraint down until it is in the
desired position.
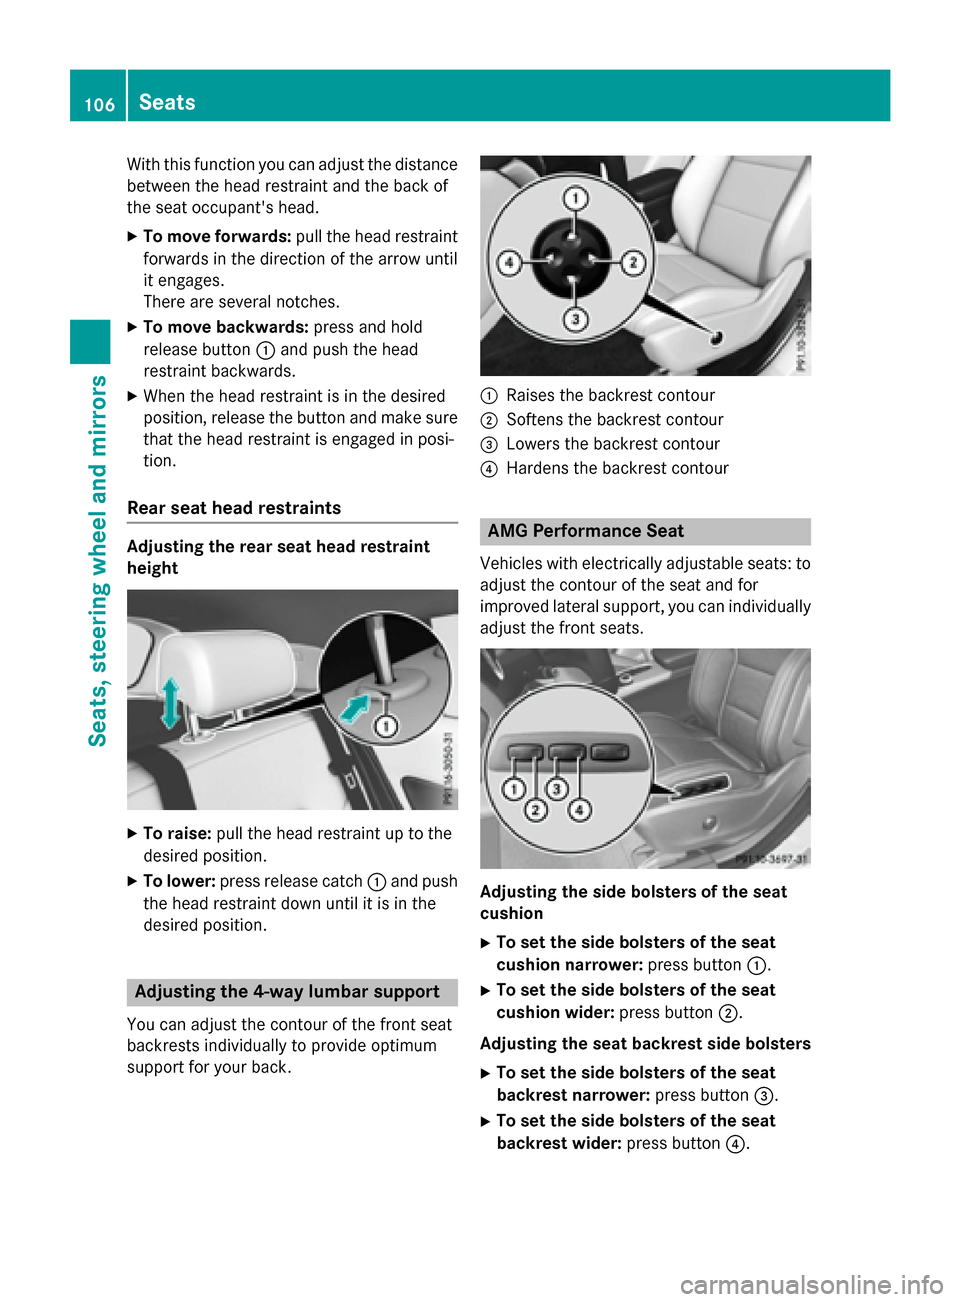
Adjusting the 4-way lumbar support
You can adjust the contour of the front seat
backrests individually to provide optimum
support for your back.
:Raises the backrest contour
;Softens the backrest contour
=Lowers the backrest contour
?Hardens the backrest contour
AMG Performance Seat
Vehicles with electrically adjustable seats: to adjust the contour of the seat and for
improved lateral support, you can individually
adjust the front seats.
Adjusting the side bolsters of the seat
cushion
XTo set the side bolsters of the seat
cushion narrower: press button:.
XTo set the side bolsters of the seat
cushion wider: press button;.
Adjusting the seat backrest side bolsters
XTo set the side bolsters of the seat
backrest narrower: press button=.
XTo set the side bolsters of the seat
backrest wider: press button?.
106Seats
Seats, steering wheel and mirrors
Page 109 of 390
Switching the seat heating on/off
Switching on/off
GWARNING
Repeatedly switching on the seat heating can
cause the seat cushion and backrest pads to
become very hot. The health of persons with
limited temperature sensitivity or a limited
ability to react to excessively high tempera-
tures may be affected or they may even suffer
burn-like injuries. There is a risk of injury.
Therefore, do not switch the seat heating on
repeatedly.
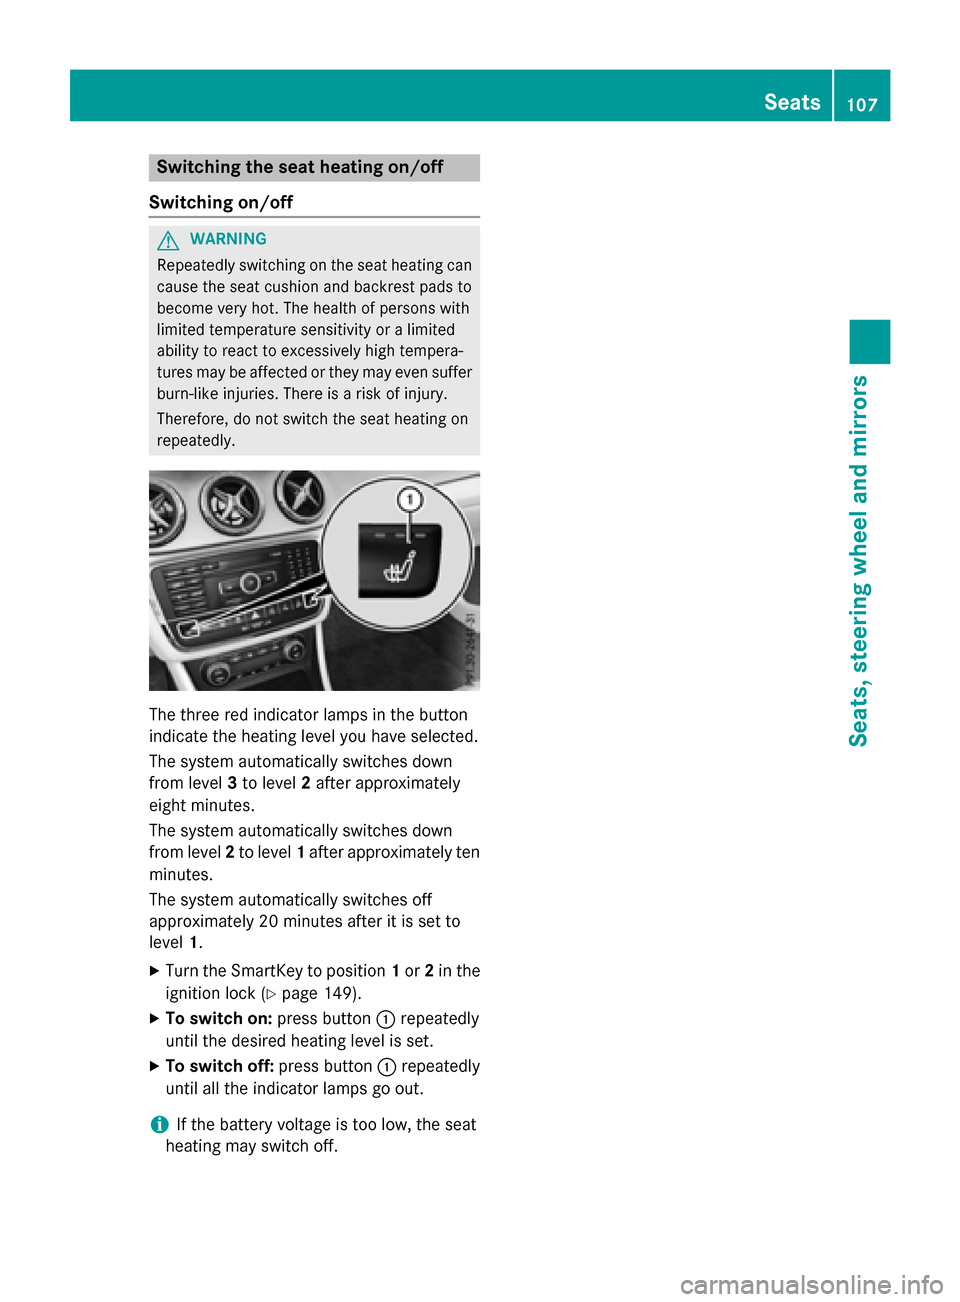
The three red indicator lamps in the button
indicate the heating level you have selected.
The system automatically switches down
from level 3to level 2after approximately
eight minutes.
The system automatically switches down
from level 2to level 1after approximately ten
minutes.
The system automatically switches off
approximately 20 minutes after it is set to
level 1.
XTurn the SmartKey to position 1or 2in the
ignition lock (
Ypage 149).
XTo switch on: press button:repeatedly
until the desired heating level is set.
XTo switch off: press button:repeatedly
until all the indicator lamps go out.
iIf the battery voltage is too low, the seat
heating may switch off.
Seats107
Seats, steering wheel and mirrors
Z
Page 114 of 390
Calling up a stored parking position set-
ting
XTurn the SmartKey to position2in the igni-
tion lock (
Ypage 149).
XAdjust the exterior mirror on the front-
passenger side with the corresponding but-
ton (
Ypage 109).
XEngage reverse gear.
The exterior mirror on the front-passenger
side moves to the stored parking position.
The exterior mirror on the front-passenger
side moves back to its original position:
Ras soon as you exceed a speed of 9 mph
(15 km/h)
Rabout ten seconds after you have disen-
gaged reverse gear
Rif you press button :for the exterior mir-
ror on the driver's side
Memory function
Important safety notes
GWARNING
If you use the memory function on the driver's side while driving, you could lose control of
the vehicle as a result of the adjustments
being made. There is a risk of an accident.
Only use the memory function on the driver's
side when the vehicle is stationary.
GWARNING
When the memory function adjusts the seat,
you and other vehicle occupants – particularly
children – could become trapped. There is a
risk of injury.
While the memory function is making adjust-
ments, make sure that no one has any body
parts in the sweep of the seat. If somebody
becomes trapped, immediately release the
memory function position button. The adjust-
ment process is stopped.
GWARNING
Children could become trapped if they acti-
vate the memory function, particularly when
unattended. There is a risk of injury.
When leaving the vehicle, always take the
SmartKey with you and lock the vehicle. Never
leave children unsupervised in the vehicle.
The memory function can be used at any time,
e.g. even when the SmartKey isn't in the igni-
tion lock.
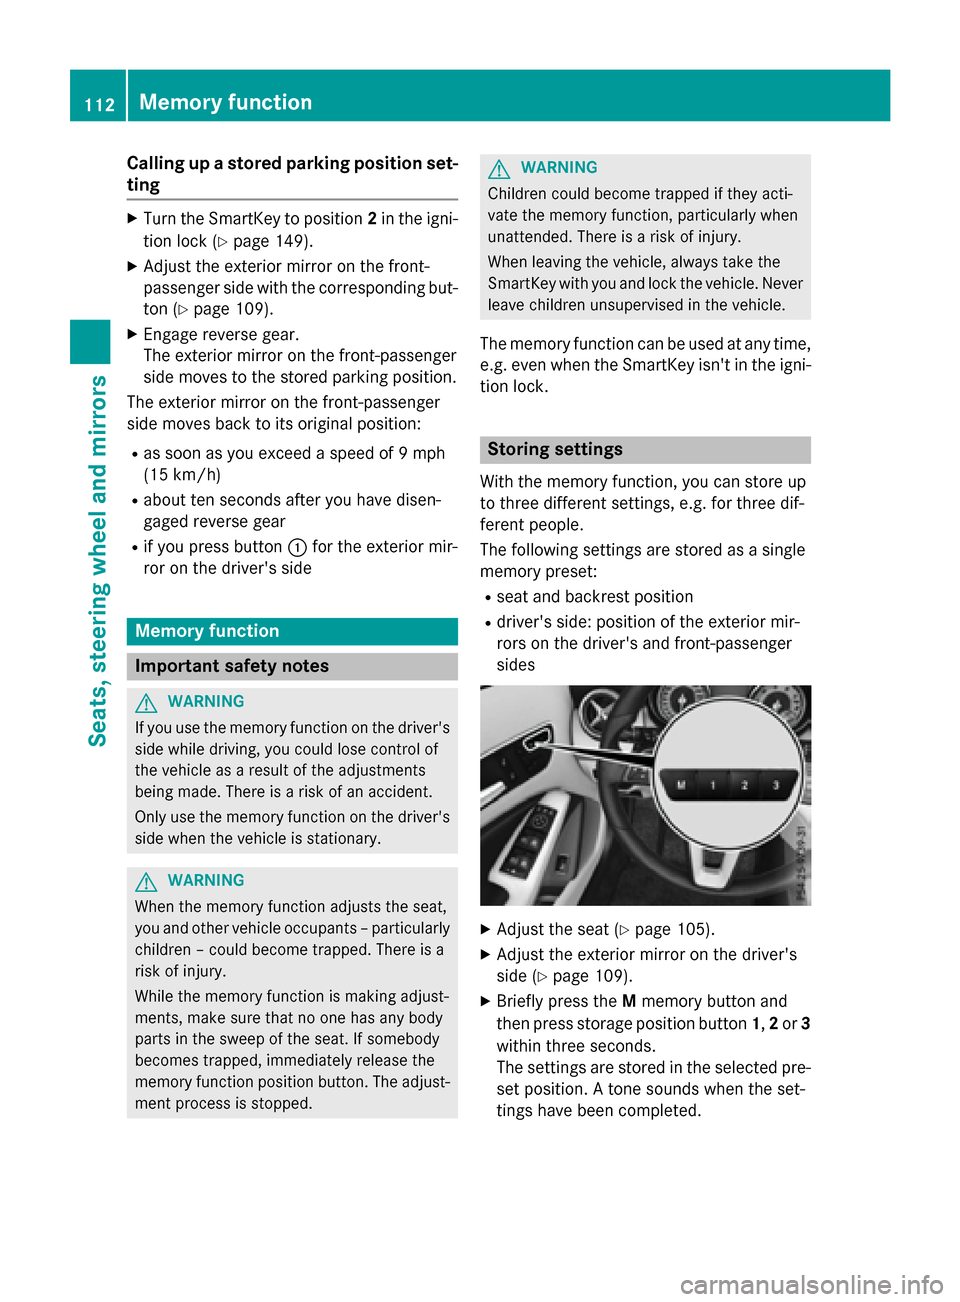
Storing settings
With the memory function, you can store up
to three different settings, e.g. for three dif-
ferent people.
The following settings are stored as a single
memory preset:
Rseat and backrest position
Rdriver's side: position of the exterior mir-
rors on the driver's and front-passenger
sides
XAdjust the seat (Ypage 105).
XAdjust the exterior mirror on the driver's
side (
Ypage 109).
XBriefly press the Mmemory button and
then press storage position button 1,2or 3
within three seconds.
The settings are stored in the selected pre-
set position. A tone sounds when the set-
tings have been completed.
112Memory function
Seats, steering wheel and mirrors