sensor MERCEDES-BENZ GLA-Class 2017 X156 User Guide
[x] Cancel search | Manufacturer: MERCEDES-BENZ, Model Year: 2017, Model line: GLA-Class, Model: MERCEDES-BENZ GLA-Class 2017 X156Pages: 390, PDF Size: 8.37 MB
Page 79 of 390
The SmartKey centrally locks/unlocks:
Rthe doors
Rthe tailgate
Rthe fuel filler flap
The turn signals flash once when unlocking
and three times when locking.
When the locator lighting is activated in Audio
20/COMAND, it also lights up when it is dark after the vehicle is unlocked with the remote
control (see the separate operating instruc-
tions).
You can also set an audible signal to confirm
that the vehicle has been locked. The audible
signal can be activated and deactivated using
the on-board computer (
Ypage 230).
XTo open the tailgate automatically from
outside the vehicle: press and hold button
F until the tailgate opens (
Ypage 87).
Vehicles with KEYLESS-GO or KEYLESS-
GO start function:
XTo close the tailgate automatically from
outside the vehicle: if the key is located in
the immediate vicinity of the vehicle, press
the F button on the key (
Ypage 87).
When the tailgate closes you can then
release the button.
KEYLESS-GO
General notes
Bear in mind that the engine can be started by
any of the vehicle occupants if there is a
SmartKey in the vehicle.
Locking and unlocking
You can start, lock or unlock the vehicle using
KEYLESS-GO. To do this, you only need carry the SmartKey with you. You can combine the
functions of KEYLESS-GO with those of a con-ventional SmartKey. Unlock the vehicle by
using KEYLESS-GO, for instance, and lock it
using the &button on the SmartKey. The driver's door and the door at which the
handle is used, must both be closed. The
SmartKey must be outside the vehicle. When
locking or unlocking with KEYLESS-GO, the
distance between the SmartKey and the cor-
responding door handle must not be greater
than 3 ft (1 m).
A check which periodically establishes a radio
connection between the vehicle and the
SmartKey determines whether a valid Smart-
Key is in the vehicle. This occurs, for example:
Rwhen starting the engine
Rwhilst driving
Rwhen the external door handles are
touched
Rduring convenience closing
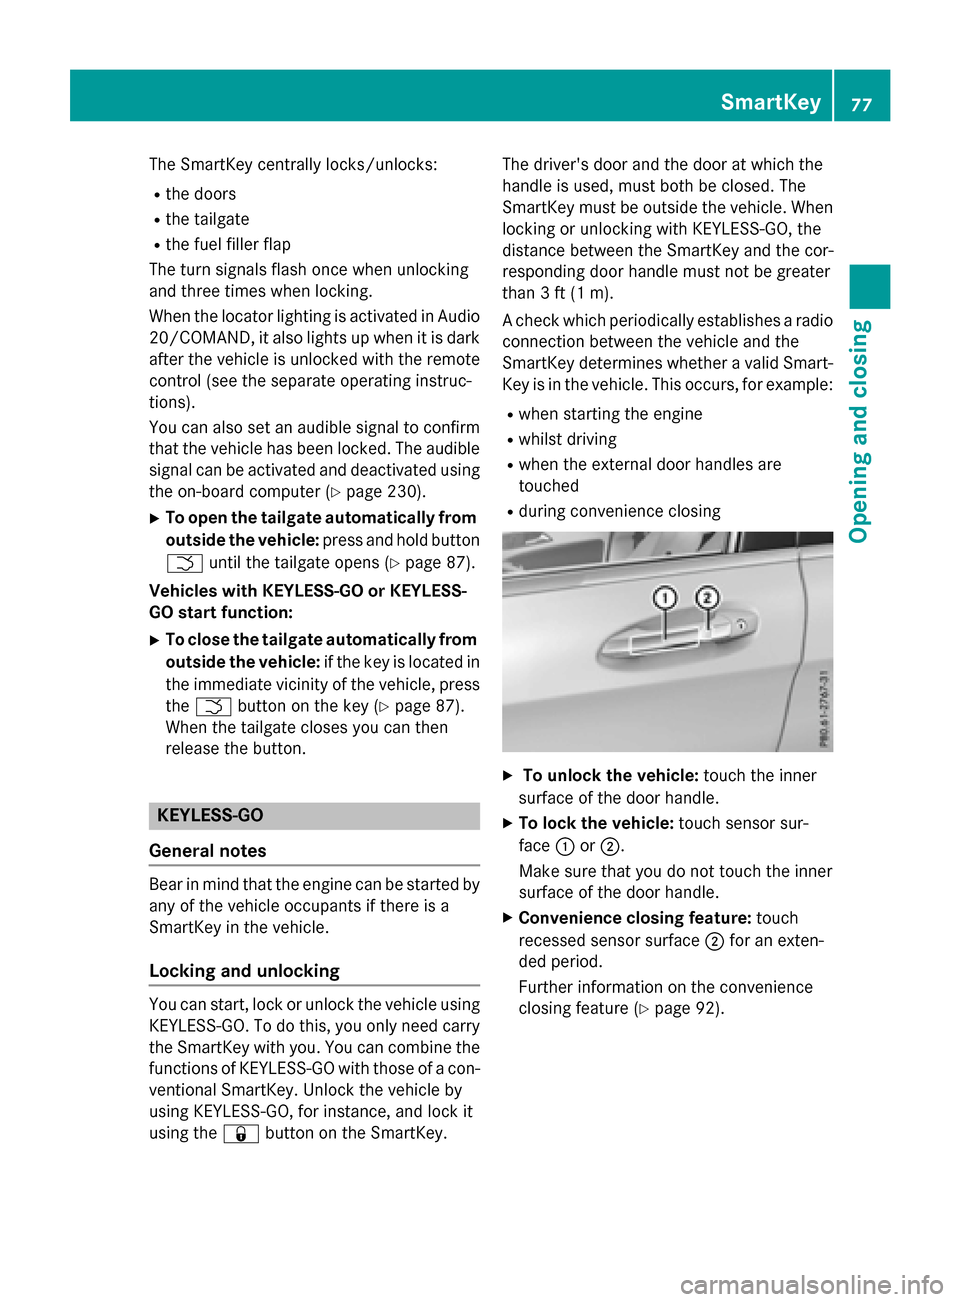
XTo unlock the vehicle:
touch the inner
surface of the door handle.
XTo lock the vehicle: touch sensor sur-
face :or;.
Make sure that you do not touch the inner
surface of the door handle.
XConvenience closing feature: touch
recessed sensor surface ;for an exten-
ded period.
Further information on the convenience
closing feature (
Ypage 92).
SmartKey77
Opening and closing
Z
Page 80 of 390
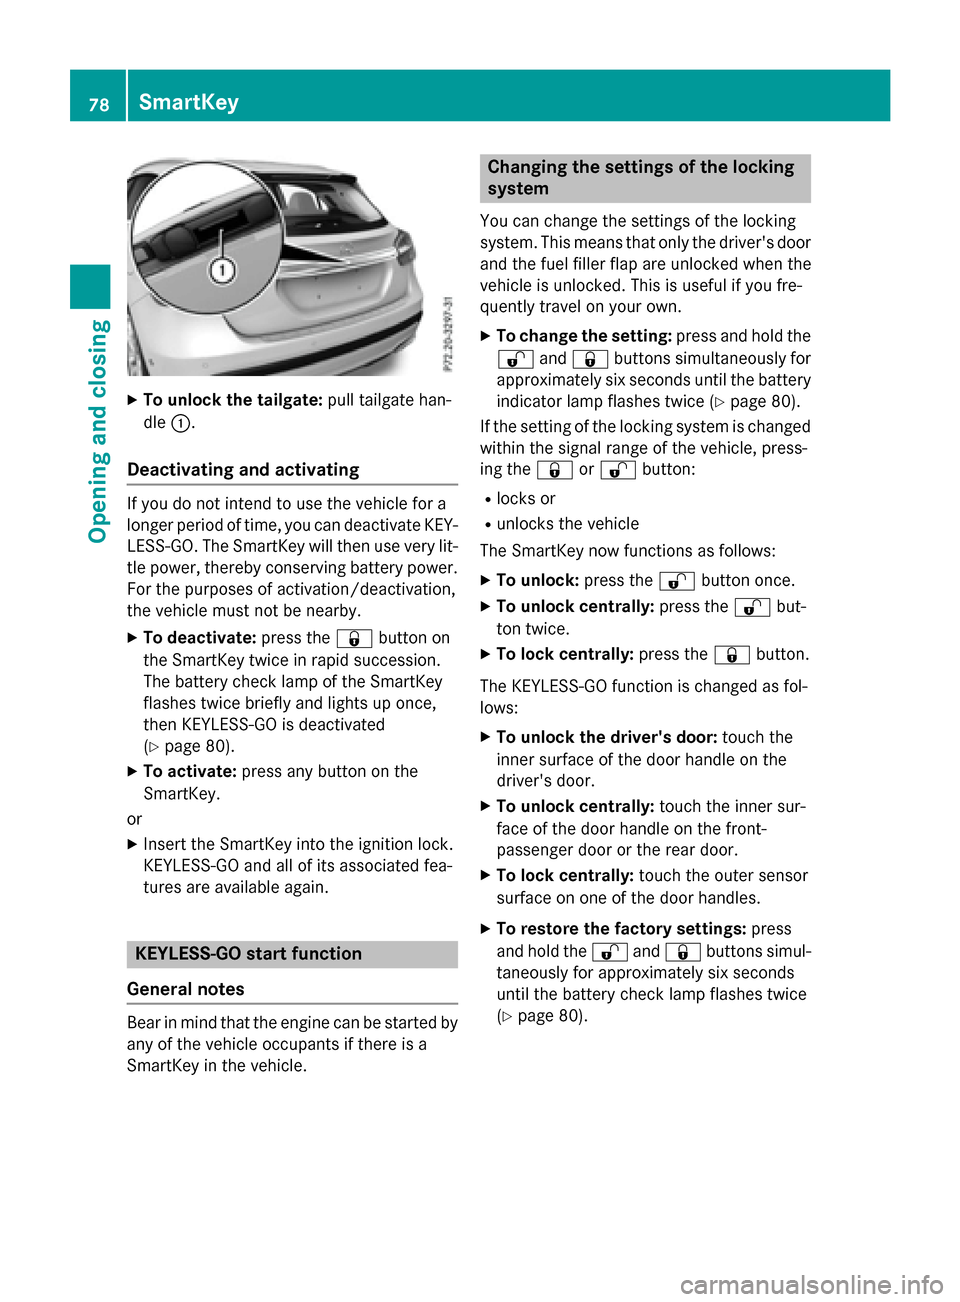
XTo unlock the tailgate:pull tailgate han-
dle :.
Deactivating and activating
If you do not intend to use the vehicle for a
longer period of time, you can deactivate KEY-
LESS-GO. The SmartKey will then use very lit-
tle power, thereby conserving battery power.
For the purposes of activation/deactivation,
the vehicle must not be nearby.
XTo deactivate: press the&button on
the SmartKey twice in rapid succession.
The battery check lamp of the SmartKey
flashes twice briefly and lights up once,
then KEYLESS-GO is deactivated
(
Ypage 80).
XTo activate: press any button on the
SmartKey.
or
XInsert the SmartKey into the ignition lock.
KEYLESS-GO and all of its associated fea-
tures are available again.
KEYLESS-GO start function
General notes
Bear in mind that the engine can be started by
any of the vehicle occupants if there is a
SmartKey in the vehicle.
Changing the settings of the locking
system
You can change the settings of the locking
system. This means that only the driver's door
and the fuel filler flap are unlocked when the
vehicle is unlocked. This is useful if you fre-
quently travel on your own.
XTo change the setting: press and hold the
% and& buttons simultaneously for
approximately six seconds until the battery
indicator lamp flashes twice (
Ypage 80).
If the setting of the locking system is changed
within the signal range of the vehicle, press-
ing the &or% button:
Rlocks or
Runlocks the vehicle
The SmartKey now functions as follows:
XTo unlock: press the%button once.
XTo unlock centrally: press the%but-
ton twice.
XTo lock centrally: press the&button.
The KEYLESS-GO function is changed as fol-
lows:
XTo unlock the driver's door: touch the
inner surface of the door handle on the
driver's door.
XTo unlock centrally: touch the inner sur-
face of the door handle on the front-
passenger door or the rear door.
XTo lock centrally: touch the outer sensor
surface on one of the door handles.
XTo restore the factory settings: press
and hold the %and& buttons simul-
taneously for app
roximately six seconds
until the battery check lamp flashes twice
(
Ypage 80).
78SmartKey
Opening and closing
Page 94 of 390
Convenience closing feature
Important safety notes
GWARNING
When the convenience closing feature is oper- ating, parts of the body could become trapped
in the closing area of the side window and the
sliding sunroof. There is a risk of injury.
Observe the complete closing procedure
when the convenience closing feature is oper-
ating. Make sure that no body parts are in
close proximity during the closing procedure.
Vehicles with KEYLESS-GO, the KEYLESS-
GO start function, Exclusive Package or
AMG Exclusive Package: at the same time
you can:
Rlock the vehicle
Rclose the side windows
Rclose the panorama roof with power tilt/
sliding panel
On vehicles with a panorama roof with power
tilt/sliding panel, you can then close the
roller sunblind.
iNotes on the automatic reversing feature
for:
Rthe side window (Ypage 90)
Rthe panorama roof with power tilt/slid-
ing panel (
Ypage 95)
Rthe roller sunblind (Ypage 97)
Using the SmartKey
XVehicles with Exclusive Package or
AMG Exclusive Package but without
KEYLESS-GO and the KEYLESS-GO start
function: for the following operations,
point the tip of the SmartKey at the door
handle on the driver's door. The SmartKey
must be close to the driver's door handle.
iVehicles with KEYLESS-GO or the KEY-
LESS-GO start function: the SmartKey
must be in close proximity to the vehicle.
XPress and hold the &button until the
side windows and the panorama roof with
power tilt/sliding panel are fully closed.
XMake sure that all the side windows and the
panorama roof with power tilt/sliding
panel are closed.
On vehicles with a panorama roof with power
tilt/sliding panel:
XPress and hold the &button again until
the roller sunblind of the panorama roof
with power tilt/sliding panel closes.
XTo interrupt convenience closing:
release the &button.
Using KEYLESS-GO
The driver's door and the door at which the
handle is used, must both be closed. The
SmartKey must be outside the vehicle. The
gap between the SmartKey and the corre-
sponding door handle should not be greater
than 3 ft (1 m).
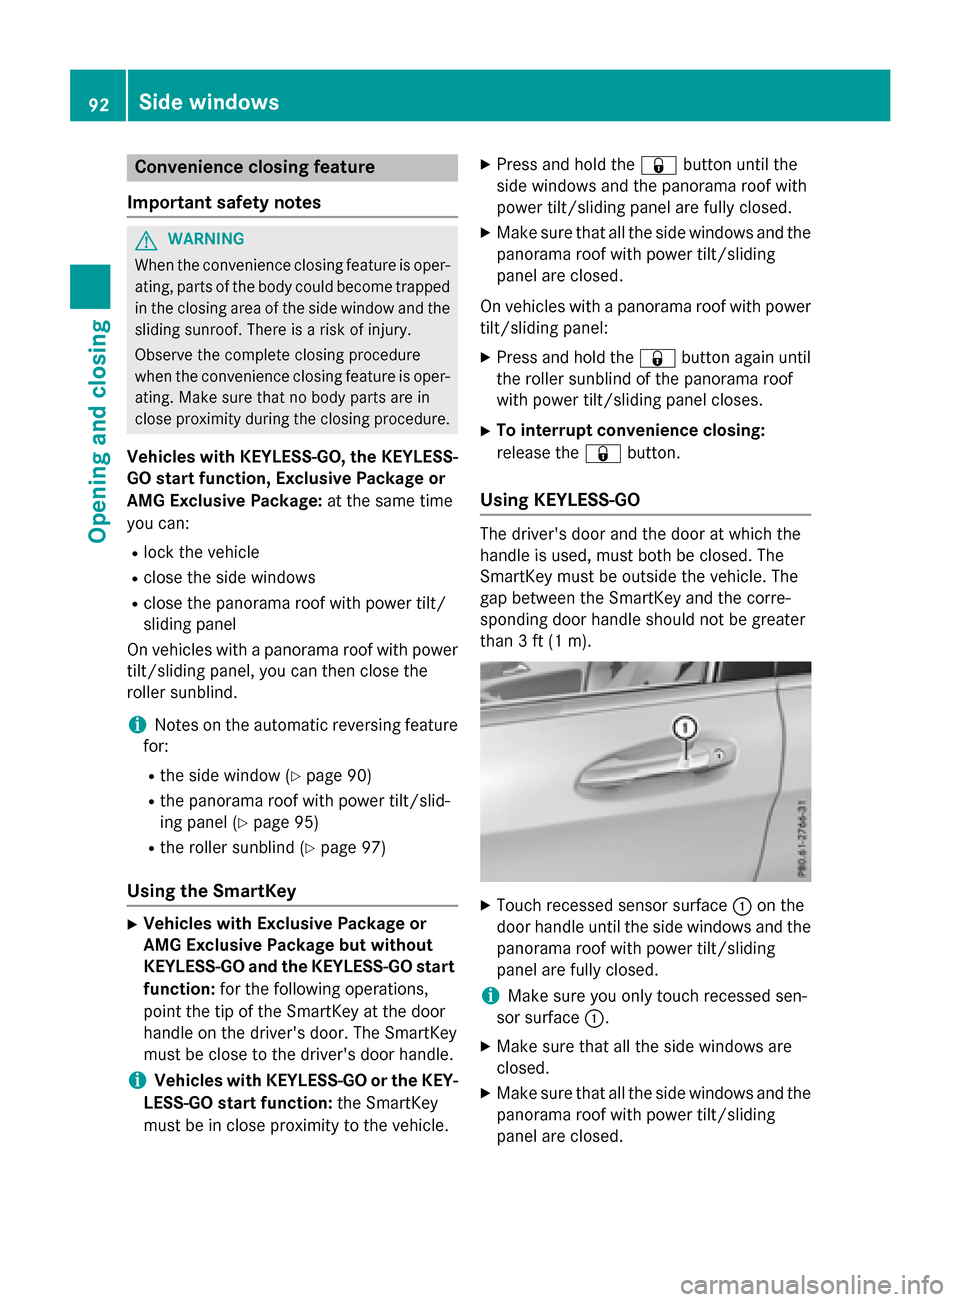
XTouch recessed sensor surface :on the
door handle until the side windows and the
panorama roof with power tilt/sliding
panel are fully closed.
iMake sure you only touch recessed sen-
sor surface :.
XMake sure that all the side windows are
closed.
XMake sure that all the side windows and the
panorama roof with power tilt/sliding
panel are closed.
92Side windows
Opening and closing
Page 95 of 390
On vehicles with a panorama roof with power
tilt/sliding panel:
XTouch recessed sensor surface:on the
door handle again until the roller sunblind
of the panorama sliding sunroof closes.
XTo interrupt convenience closing:
release recessed sensor surface :on the
door handle.
Resetting the side windows
If a side window can no longer be closed fully,
you must reset it.
XClose all the doors.
XTurn the SmartKey to position 1or 2in the
ignition lock (
Ypage 149).
XPull the corresponding switch on the door
control panel until the side window is com-
pletely closed (
Ypage 91).
XHold the switch for an additional second.
If the side window opens again slightly:
XImmediately pull the corresponding switch on the door control panel until the side win-
dow is completely closed (
Ypage 91).
XHold the switch for an additional second.
XIf the respective side window remains
closed after the button is released, then it
has been set correctly. If this is not the
case, repeat the steps above again.
Side windows93
Opening and closing
Z
Page 98 of 390
XTurn the SmartKey to position1or 2in the
ignition lock (
Ypage 149).
XPress or pull the 3switch in the corre-
sponding direction.
If you press/pull the 3switch beyond the
point of resistance, automatic operation is
started in the corresponding direction. You
can stop automatic operation by pressing/
pulling the switch again.
After opening the sliding sunroof, the roller
sunblind closes slightly automatically. This
reduces drafts in the vehicle interior.
If the sliding sunroof is raised at the rear, it
lowers slightly automatically at higher
speeds. The noise level in the vehicle interior
is reduced as a result.
At low speeds it raises again automatically.
You can also temporarily deactivate auto-
matic lowering. To do so, press the 3
switch. The sliding sunroof raises again auto-
matically.
You can continue to operate the sliding sun-
roof after switching off the engine or remov-
ing the SmartKey from the ignition lock. This
function remains active for five minutes or
until you open a front door.
The sliding sunroof cannot be opened if a roof
carrier is installed. In order to allow ventila-
tion of the vehicle interior, you can raise the
sliding sunroof.
If contact is made with a roof carrier approved
by Mercedes-Benz, the sliding sunroof lowers
slightly but remains raised at the rear.
Rain-closing feature
The rain-closing feature is only available for
vehicles with a rain sensor.
When the SmartKey is in position 0in the
ignition lock or is removed, the sliding sunroof
closes automatically:
Rif it starts to rain.
Rat extreme outside temperatures.
Rafter six hours.
Rif there is a malfunction in the power sup-
ply.
The panorama roof with power tilt/sliding
panel remains raised at the rear in order to
allow ventilation of the vehicle interior.
If the panorama roof with power tilt/sliding
panel is obstructed while being closed by the
rain-closing feature, it opens again slightly.
The rain-closing feature is then deactivated.
The panorama roof with power tilt/sliding
panel does not close if:
Rit is raised at the rear.
Rit is blocked.
Rno rain is falling on the area of the wind-
shield being monitored by the rain sensor.
If the vehicle is under a bridge or in a car-
port, for example, the field of the sensor
may be covered.
Operating the roller sunblind for the
panorama roof with power tilt/sliding
panel
Important safety notes
GWARNING
Parts of the body could become trapped
between the roller sunblind and frame or slid-
ing sunroof during automatic opening or clos-
ing. There is a risk of injury.
When opening or closing, make sure that no
body parts are in the sweep of the roller sun-
blind.
If somebody becomes trapped:
Rrelease the switch immediately, or
Rduring automatic operation, push the
switch briefly in any direction
The opening or closing procedure will be stop- ped.
The roller sunblind shields the vehicle interior
from sunlight. The roller sunblind can only be
opened and closed when the panorama roof
with power tilt/sliding panel is closed.
96Panorama roof with power tilt/sliding panel
Opening and closing
Page 113 of 390
The rear-view mirror and the exterior mirror
on the driver's side automatically go into anti-
glare mode if:
Rthe ignition is switched on and
Rincident light from headlamps strikes the
sensor in the rear-view mirror
The mirrors do not go into anti-glare mode if
reverse gear is engaged or the interior lighting
is switched on.
Parking position for the exterior mir-
ror on the front-passenger side
General notes
The "Parking position of the exterior mirror on
the front-passenger side" function is only
available if the vehicle is equipped with the
"Mirrors package".
Setting and storing the parking position
You can position the front-passenger side
exterior mirror in such a way that you can see
the rear wheel on that side as soon as you
engage reverse gear. You can store this posi-
tion.
Using reverse gear
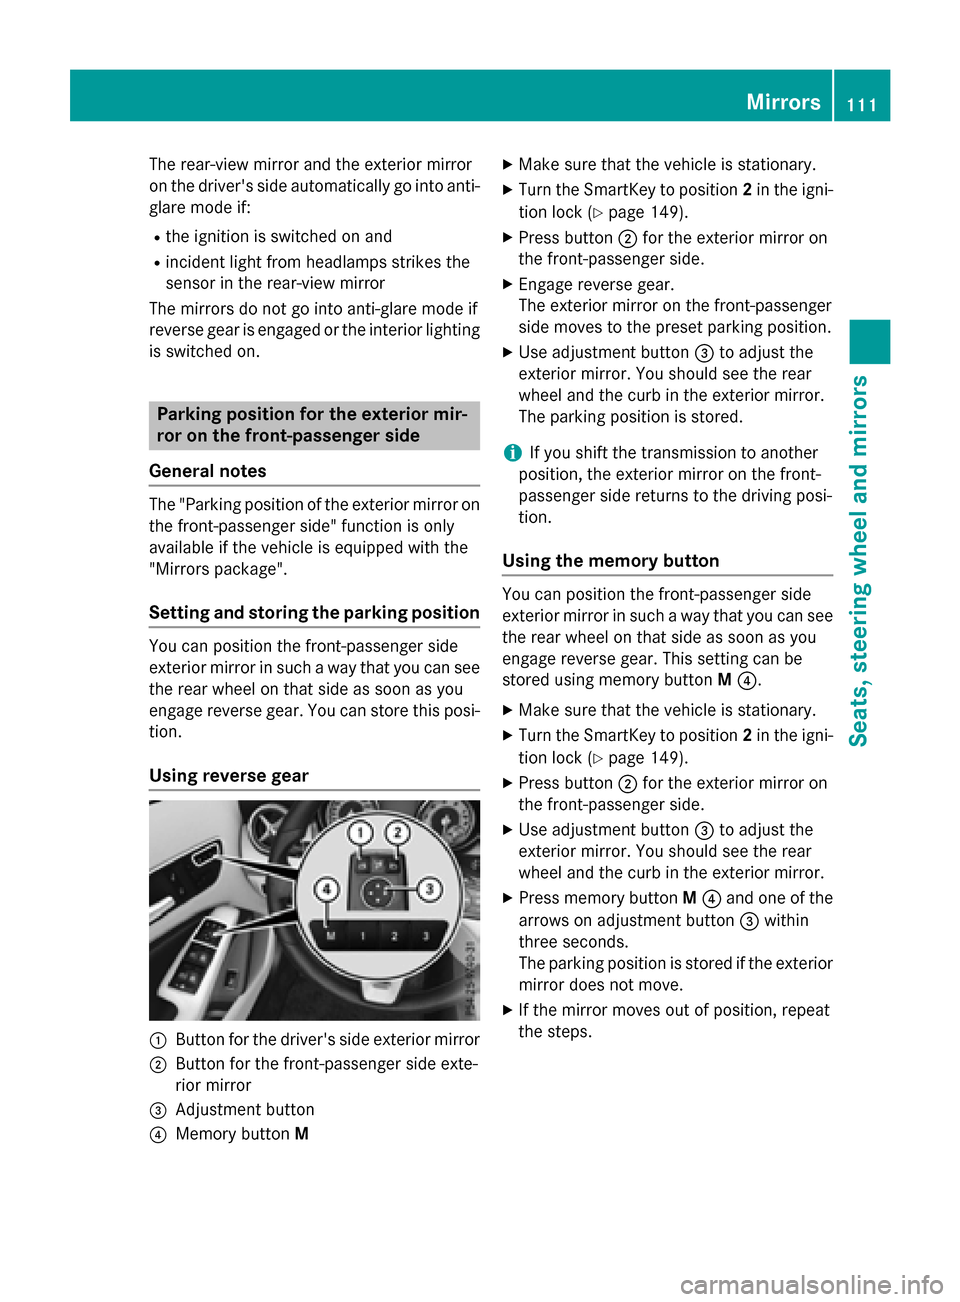
:Button for the driver's side exterior mirror
;Button for the front-passenger side exte-
rior mirror
=Adjustment button
?Memory button M
XMake sure that the vehicle is stationary.
XTurn the SmartKey to position 2in the igni-
tion lock (
Ypage 149).
XPress button ;for the exterior mirror on
the front-passenger side.
XEngage reverse gear.
The exterior mirror on the front-passenger
side moves to the preset parking position.
XUse adjustment button =to adjust the
exterior mirror. You should see the rear
wheel and the curb in the exterior mirror.
The parking position is stored.
iIf you shift the transmission to another
position, the exterior mirror on the front-
passenger side returns to the driving posi-
tion.
Using the memory button
You can position the front-passenger side
exterior mirror in such a way that you can see
the rear wheel on that side as soon as you
engage reverse gear. This setting can be
stored using memory button M?.
XMake sure that the vehicle is stationary.
XTurn the SmartKey to position 2in the igni-
tion lock (
Ypage 149).
XPress button ;for the exterior mirror on
the front-passenger side.
XUse adjustment button =to adjust the
exterior mirror. You should see the rear
wheel and the curb in the exterior mirror.
XPress memory button M? and one of the
arrows on adjustment button =within
three seconds.
The parking position is stored if the exterior
mirror does not move.
XIf the mirror moves out of position, repeat
the steps.
Mirrors111
Seats, steering wheel and mirrors
Z
Page 118 of 390
Useful information
i
This Operator's Manual describes all
models and all standard and optional equip-
ment of your vehicle available at the time of
publication of the Operator's Manual.
Country-specific differences are possible.
Please note that your vehicle may not be
equipped with all features described. This
also applies to safety-related systems and
functions.
iRead the information on qualified special-
ist workshops (
Ypage 25).
Exterior lighting
General notes
For reasons of safety, Mercedes-Benz recom-
mends that you drive with the lights switched
on even during the daytime. In some coun-
tries, operation of the headlamps varies due
to legal requirements and self-imposed obli-
gations.
Setting the exterior lighting
Setting options
Exterior lighting can be set using the:
Rlight switch
Rcombination switch (Ypage 118)
Ron-board computer (Ypage 230)
Light switch
Operation
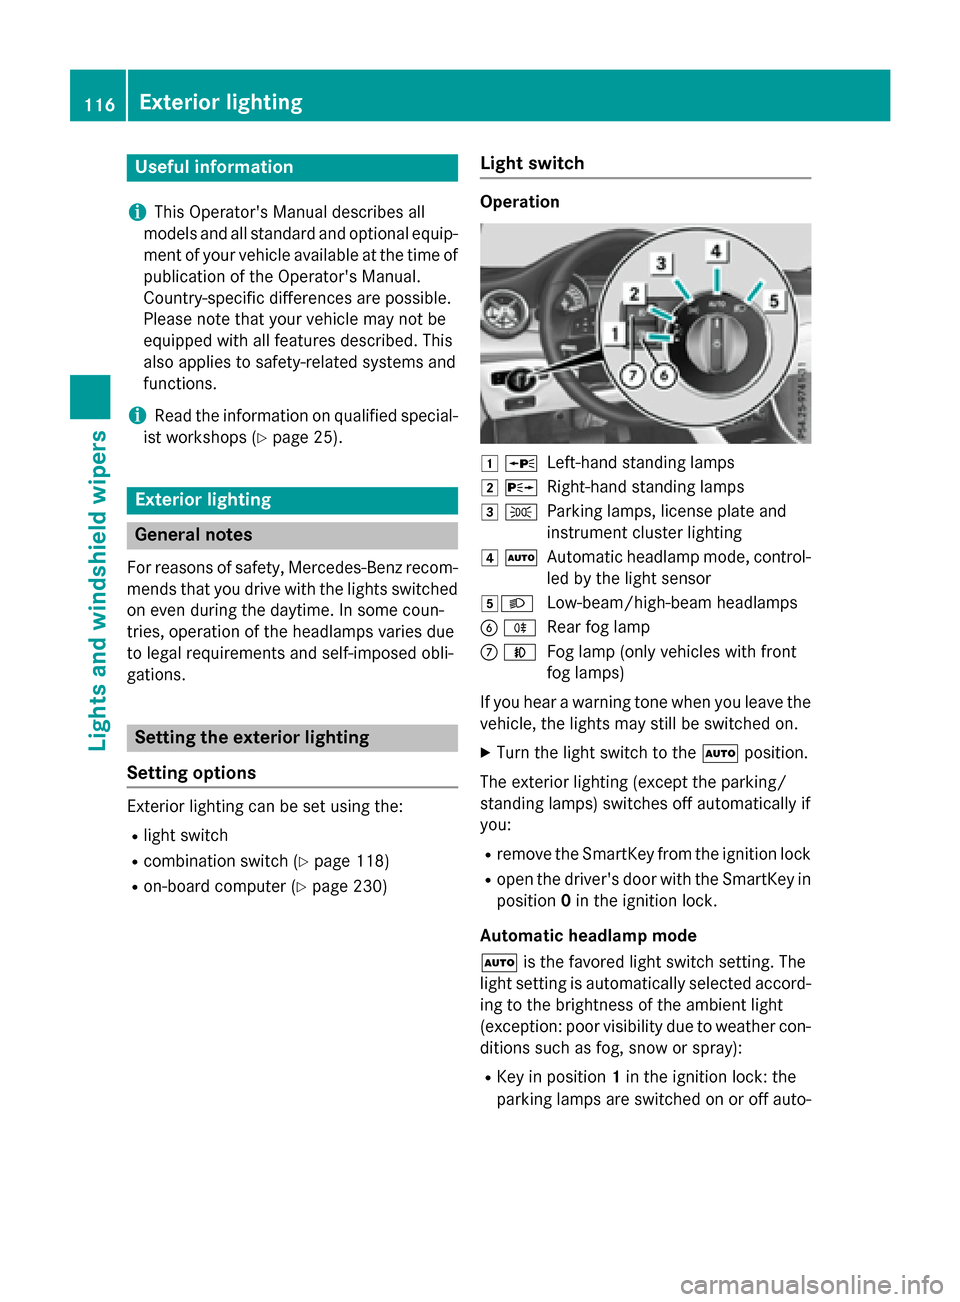
1 WLeft-hand standing lamps
2XRight-hand standing lamps
3TParking lamps, license plate and
instrument cluster lighting
4ÃAutomatic headlamp mode, control-
led by the light sensor
5LLow-beam/high-beam headlamps
BRRear fog lamp
CNFog lamp (only vehicles with front
fog lamps)
If you hear a warning tone when you leave the
vehicle, the lights may still be switched on.
XTurn the light switch to the Ãposition.
The exterior lighting (except the parking/
standing lamps) switches off automatically if
you:
Rremove the SmartKey from the ignition lock
Ropen the driver's door with the SmartKey in position 0in the ignition lock.
Automatic headlamp mode
à is the favored light switch setting. The
light setting is automatically selected accord-
ing to the brightness of the ambient light
(exception: poor visibility due to weather con-
ditions such as fog, snow or spray):
RKey in position 1in the ignition lock: the
parking lamps are switched on or off auto-
116Exterior lighting
Lights and windshield wipers
Page 119 of 390
matically depending on the brightness of
the ambient light.
RWith the engine running: if you have acti-
vated the daytime running lamps function
via the on-board computer, the daytime
running lamps or the parking lamps and the
low-beam headlamps are switched on or off
automatically depending on the brightness
of the ambient light.
XTo switch on the automatic headlamp
mode: turn the light switch to the Ã
position.
GWARNING
When the light switch is set to Ã, the low-
beam headlamps may not be switched on
automatically if there is fog, snow or other
causes of poor visibility due to the weather
conditions such as spray. There is a risk of an
accident.
In such situations, turn the light switch to
L.
The automatic headlamp feature is only an
aid. The driver is responsible for the vehicle's
lighting at all times.
Canada only:
The daytime running lamps improve the visi-
bility of your vehicle during the day. The day-
time running lamps function is required by law
in Canada. It cannot therefore be deactivated.
When the engine is running and the vehicle is
stationary: if you move the selector lever from
a drive position to P, the daytime running
lamps/low-beam headlamps go out after
three minutes.
When the engine is running, the vehicle is
stationary and in bright ambient light: if you
turn the light switch to the Tposition, the
daytime running lamps and parking lamps
turn on.
If the engine is running and you turn the light
switch to the Lposition, the manual set-
tings take precedence over the daytime run-
ning lamps.
USA only: The daytime running lamps improve the visi-
bility of your vehicle during the day. To do this,
the daytime running lamps function must be
switched on using the on-board computer
(
Ypage 230).
If the engine is running and you turn the light
switch to the TorL position, the man-
ual settings take precedence over the day-
time running lamps.
Low-beam headlamps
Even if the light sensor does not detect that it
is dark, the parking lamps and low-beam
headlamps switch on when the ignition is
switched on and the light switch is set to the
L position. This is a pa
rticularly useful
function in the event of rain and fog.
XTo switch on the low-beam headlamps:
turn the SmartKey in the ignition lock to
position 2or start the engine.
XTurn the light switch to L.
The green Lindicator lamp in the instru-
ment cluster lights up.
Front fog lamps
In conditions where visibility is poor due to
fog, snow or rain, the fog lamps improve vis-
ibility as well as making it easier for other road
users to see you. They can be operated
together with the parking lamps or together
with the parking lamps and low-beam head-
lamps.
XTo switch on the fog lamps: turn the key
in the ignition lock to position 2or start the
engine.
XTurn the light switch to LorÃ.
XPress the Nbutton.
The green Nindicator lamp in the instru-
ment cluster lights up.
XTo switch off the fog lamps: press the
N button.
The green Nindicator lamp in the instru-
ment cluster goes out.
Exterior lighting117
Lights and windshield wipers
Z
Page 127 of 390
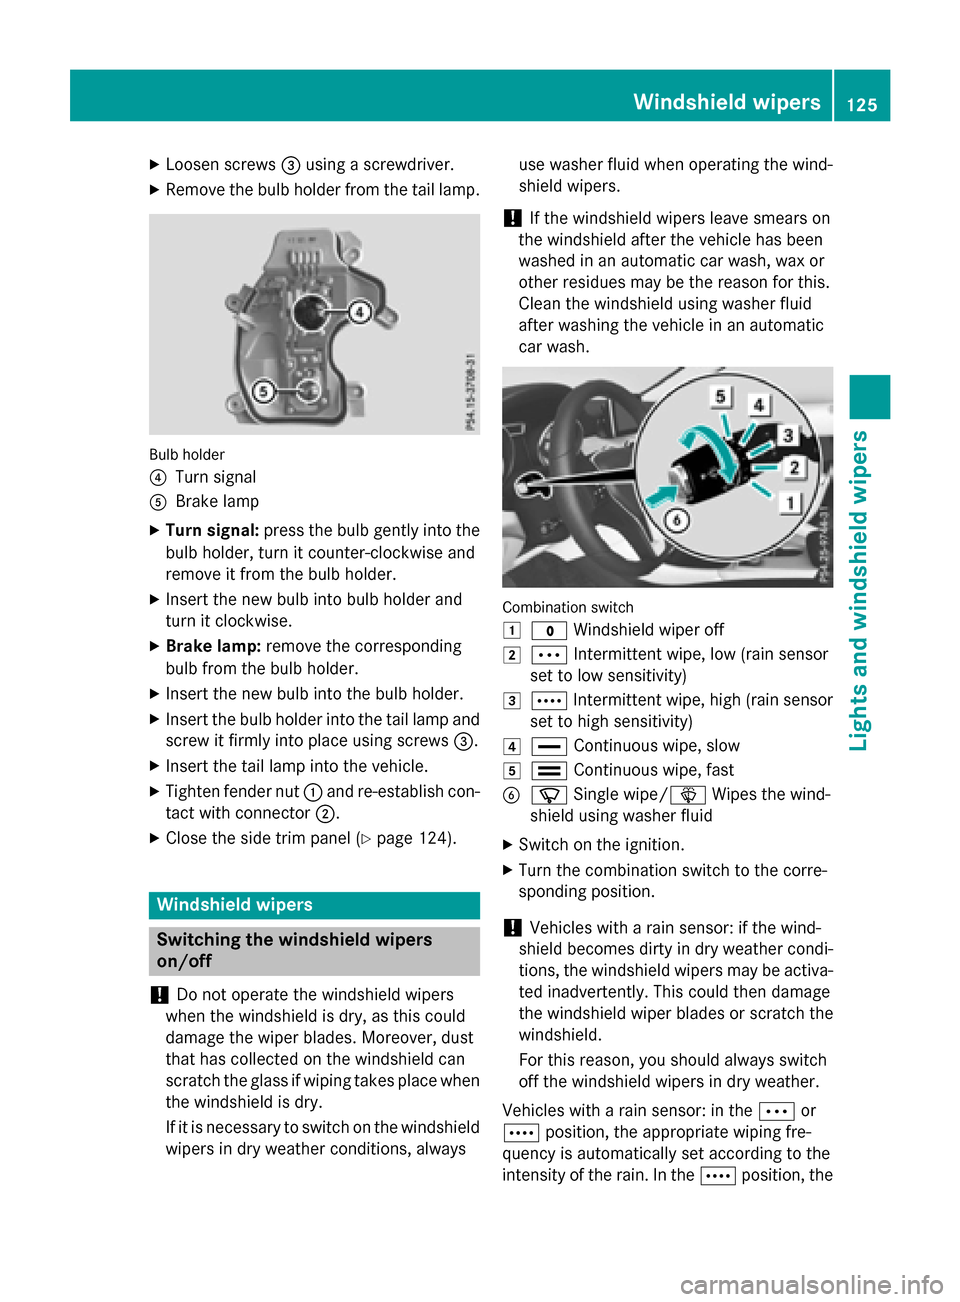
XLoosen screws=using a screwdriver.
XRemove the bulb holder from the tail lamp.
Bulb holder
?
Turn signal
ABrake lamp
XTurn signal: press the bulb gently into the
bulb holder, turn it counter-clockwise and
remove it from the bulb holder.
XInsert the new bulb into bulb holder and
turn it clockwise.
XBrake lamp: remove the corresponding
bulb from the bulb holder.
XInsert the new bulb into the bulb holder.
XInsert the bulb holder into the tail lamp and
screw it firmly into place using screws =.
XInsert the tail lamp into the vehicle.
XTighten fender nut:and re-establish con-
tact with connector ;.
XClose the side trim panel (Ypage 124).
Windshield wipers
Switching the windshield wipers
on/off
!
Do not operate the windshield wipers
when the windshield is dry, as this could
damage the wiper blades. Moreover, dust
that has collected on the windshield can
scratch the glass if wiping takes place when
the windshield is dry.
If it is necessary to switch on the windshield
wipers in dry weather conditions, always use washer fluid when operating the wind-
shield wipers.
!If the windshield wipers leave smears on
the windshield after the vehicle has been
washed in an automatic car wash, wax or
other residues may be the reason for this.
Clean the windshield using washer fluid
after washing the vehicle in an automatic
car wash.
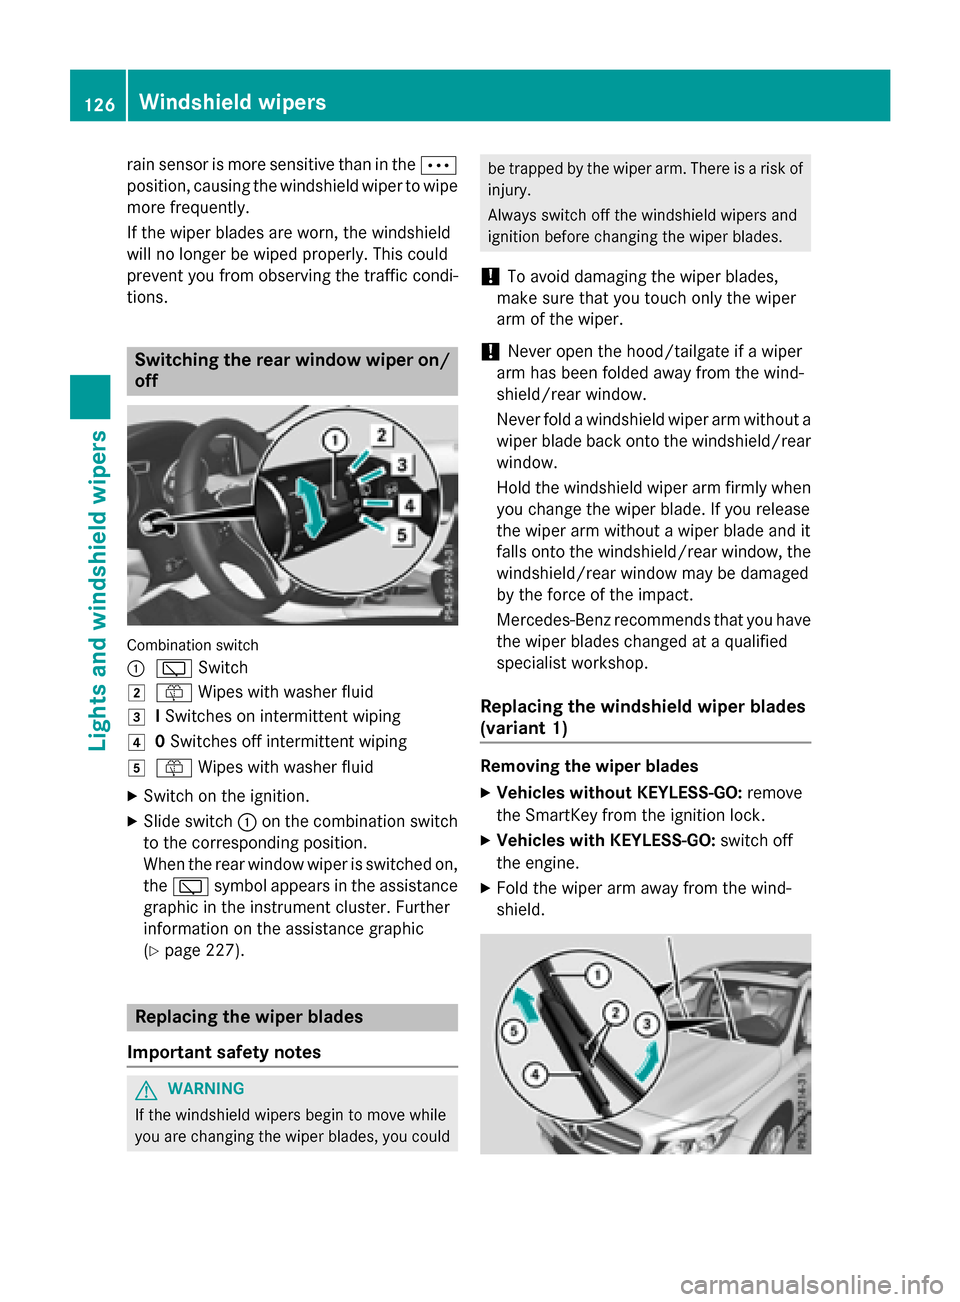
Combination switch
1
$ Windshield wiper off
2ÄIntermittent wipe, low (rain sensor
set to low sensitivity)
3Å Intermittent wipe, high (rain sensor
set to high sensitivity)
4° Continuous wipe, slow
5¯Continuous wipe, fast
BíSingle wipe/î Wipes the wind-
shield using washer fluid
XSwitch on the ignition.
XTurn the combination switch to the corre-
sponding position.
!Vehicles with a rain sensor: if the wind-
shield becomes dirty in dry weather condi-
tions, the windshield wipers may be activa-
ted inadvertently. This could then damage
the windshield wiper blades or scratch the
windshield.
For this reason, you should always switch
off the windshield wipers in dry weather.
Vehicles with a rain sensor: in the Äor
Å position, the appropriate wiping fre-
quency is automatically set according to the
intensity of the rain. In the Åposition, the
Windshield wipers125
Lights and windshield wipers
Z
Page 128 of 390
rain sensor is more sensitive than in theÄ
position, causing the windshield wiper to wipe
more frequently.
If the wiper blades are worn, the windshield
will no longer be wiped properly. This could
prevent you from observing the traffic condi-
tions.
Switching the rear window wiper on/
off
Combination switch
:
è Switch
2ôWipes with washer fluid
3ISwitches on intermittent wiping
40 Switches off intermittent wiping
5ô Wipes with washer fluid
XSwitch on the ignition.
XSlide switch :on the combination switch
to the corresponding position.
When the rear window wiper is switched on,
the è symbol appears in the assistance
graphic in the instrument cluster. Further
information on the assistance graphic
(
Ypage 227).
Replacing the wiper blades
Important safety notes
GWARNING
If the windshield wipers begin to move while
you are changing the wiper blades, you could
be trapped by the wiper arm. There is a risk of
injury.
Always switch off the windshield wipers and
ignition before changing the wiper blades.
!To avoid damaging the wiper blades,
make sure that you touch only the wiper
arm of the wiper.
!Never open the hood/tailgate if a wiper
arm has been folded away from the wind-
shield/rear window.
Never fold a windshield wiper arm without a
wiper blade back onto the windshield/rear
window.
Hold the windshield wiper arm firmly when
you change the wiper blade. If you release
the wiper arm without a wiper blade and it
falls onto the windshield/rear window, the
windshield/rear window may be damaged
by the force of the impact.
Mercedes-Benz recommends that you have
the wiper blades changed at a qualified
specialist workshop.
Replacing the windshield wiper blades
(variant 1)
Removing the wiper blades
XVehicles without KEYLESS-GO: remove
the SmartKey from the ignition lock.
XVehicles with KEYLESS-GO: switch off
the engine.
XFold the wiper arm away from the wind-
shield.
126Windshield wipers
Lights and windshield wipers