snow chains MERCEDES-BENZ GLA-Class 2017 X156 User Guide
[x] Cancel search | Manufacturer: MERCEDES-BENZ, Model Year: 2017, Model line: GLA-Class, Model: MERCEDES-BENZ GLA-Class 2017 X156Pages: 390, PDF Size: 8.37 MB
Page 206 of 390
Parking tips:
ROn narrow roads, drive as close to the park-
ing space as possible.
RParking spaces that are littered or over-
grown might be identified or measured
incorrectly.
RParking spaces that are partially occupied
by trailer drawbars might not be identified
as such or be measured incorrectly.
RSnowfall or heavy rain may lead to a parking
space being measured inaccurately.
RPay attention to the PARKTRONIC
(
Ypage 202) warning messages during the
parking procedure.
RYou can intervene in the steering procedure
to correct it at any time. Active Parking
Assist will then be canceled.
RWhen transporting a load which protrudes
from your vehicle, you should not use
Active Parking Assist.
RNever use Active Parking Assist when snow
chains are installed.
RMake sure that the tire pressures are
always correct. This has a direct influence
on the parking characteristics of the vehi-
cle.
Use Active Parking Assist for parking spaces:
Rthat are parallel or at right-angles to the
direction of travel
Rthat are on straight roads, not bends
Rthat are on the same level as the road, e.g. not on the pavement
Detecting parking spaces
Objects located above the height range of
Active Parking Assist will not be detected
when the parking space is measured. These
are not taken into account when the parking
procedure is calculated, e.g. overhanging
loads, tail sections or loading ramps of goodsvehicles.
GWARNING
If there are objects above the detection range:
RActive Park Assist may steer too early
Rthe vehicle may not stop in front of these
objects
You may cause a collision as a result. There is
a risk of an accident.
If objects are located above the detection
range, stop and deactivate Active Parking
Assist.
For further information on the detection
range (
Ypage 201).
Active Parking Assist does not assist you
parking in spaces at right angles to the direc-
tion of travel if:
Rtwo parking spaces are located directly
next to one another
Rthe parking space is directly next to a low
obstacle such as a low curb
Ryou park forwards
Active Parking Assist does not assist you
parking in spaces that are parallel or at right
angles to the direction of travel if:
Rthe parking space is on a curb
Rthe system reads the parking space as
being blocked, for example by foliage or
grass paving blocks
Rthe area is too small for the vehicle to
maneuver into
Rthe parking space is bordered by an obsta- cle, e.g. a tree, a post or a trailer
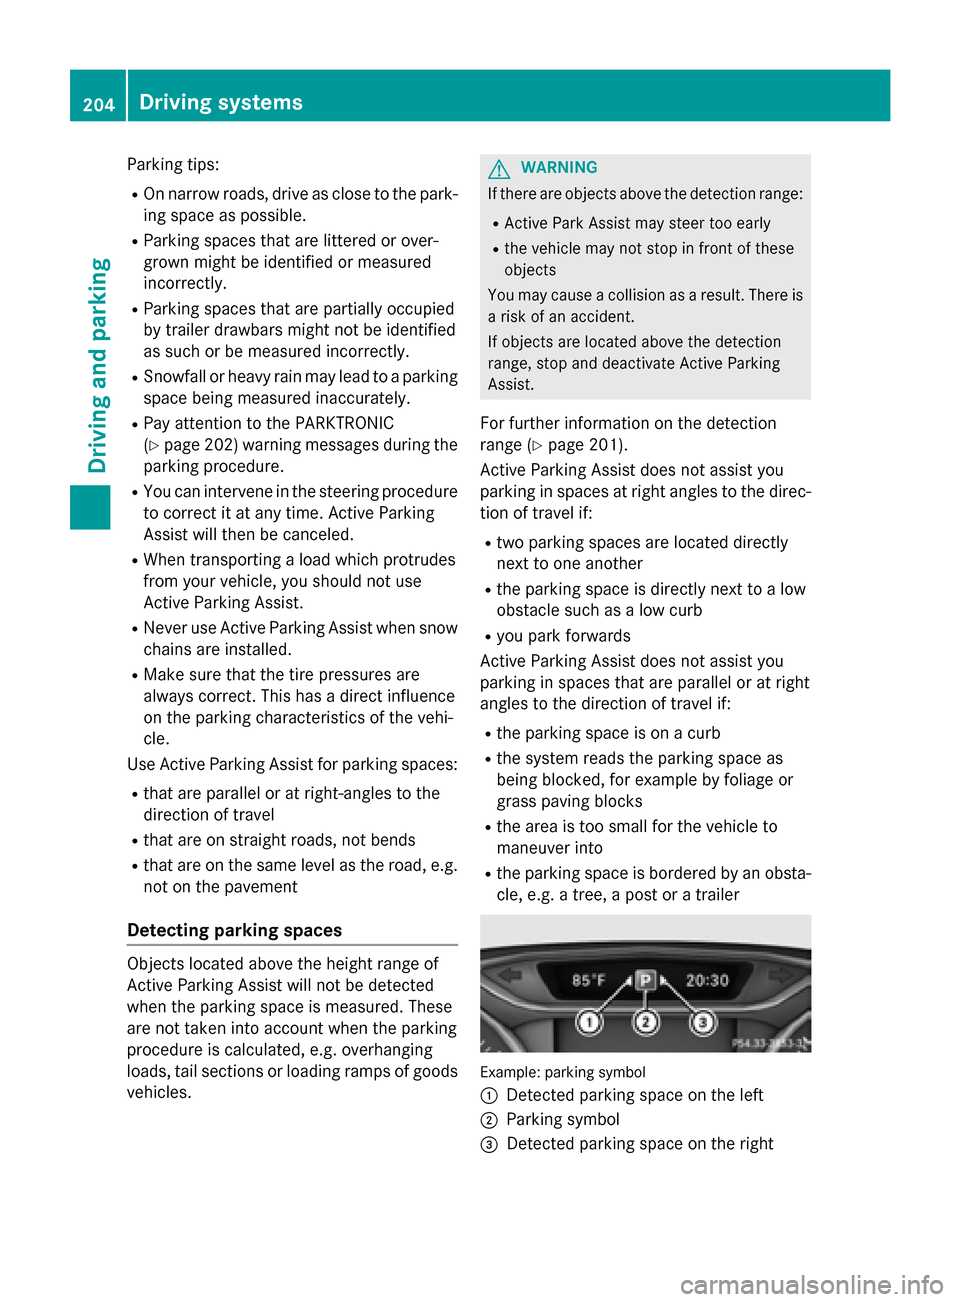
Example: parking symbol
:
Detected parking space on the left
;Parking symbol
=Detected parking space on the right
204Driving systems
Driving and parking
Page 230 of 390
It may be best to deactivate ESP®in the fol-
lowing situations:
Rwhen using snow chains
Rin deep snow
Ron sand or gravel
Deactivating/activating ESP
®in Mercedes-
AMG vehicles (
Ypage 70).
For further information about ESP
®, see
(
Ypage 69).
XStart the engine.
XPress the =or; button on the steer-
ing wheel to select the DriveAssist
menu.
XPress9or: to select ESP.
XPressato confirm.
The current selection appears.
XTo activate/deactivate: press thea
button again.
ESP
®is deactivated if the åwarning
lamp in the instrument cluster lights up
continuously when the engine is running.
If the ÷ andå warning lamps light up
continuously, ESP
®is not available due to a
malfunction.
Observe the information on warning lamps
(
Ypage 271).
Observe the information on display messages
(
Ypage 236).
Activating/deactivating COLLISION
PREVENTION ASSIST PLUS
XPress the =or; button on the steer-
ing wheel to select the DriveAssist
menu.
XPress the9or: button to select
Collision Prevent. Assist
.
XPress ato confirm.
The current selection appears.
XTo activate/deactivate: press thea
button again.
When COLLISION PREVENTION ASSIST
PLUS is deactivated, the æsymbol
appears in the multifunction display in the
assistance graphic display. For further information about COLLISION
PREVENTION ASSIST PLUS, see (
Ypage 66).
Activating/deactivating ATTENTION
ASSIST
XPress the
=or; button on the steer-
ing wheel to select the DriveAssist
menu.
XPress the9or: button to select
Attention Assist
.
XPress ato confirm.
The current selection appears.
XPress ato confirm.
XPress the :or9 button to set Off,
Standard
or Sensitive.
XPress the abutton to save the setting.
When ATTENTION ASSIST is deactivated,
the é symbol appears in the multifunc-
tion display in the assistance graphics dis-
play.
For further information about ATTENTION
ASSIST, see (
Ypage 211).
Activating/deactivating Blind Spot
Assist
XPress the =or; button on the steer-
ing wheel to select the DriveAssist
menu.
XPress the9or: button to select
Blind Spot Assist
.
XPress ato confirm.
The current selection appears.
XTo activate/deactivate: press thea
button again.
For further information about Blind Spot
Assist, see (
Ypage 213).
Activating/deactivating Lane Keeping
Assist
XPress the =or; button on the steer-
ing wheel to select the DriveAssist
menu.
XPress the9or: button to select
Lane Keeping Assist
.
XPress ato confirm.
The current selection appears.
228Menus and submenus
On-board computer and displays
Page 345 of 390
vide the best possible grip in wintry road con-
ditions. Only these tires will allow driving
safety systems such as ABS and ESP
®to
function optimally in winter. These tires have
been developed specifically for driving in
snow.
Use M+S tires of the same make and tread on all wheels to maintain safe handling charac-
teristics.
Always observe the maximum permissible
speed specified for the M+S tires you have
mounted.
When you have mounted the M+S tires:
XCheck the tire pressures (Ypage 343).
XRestart the tire pressure loss warning sys-
tem (Canada) (
Ypage 347) or restart the
tire pressure monitor (USA) (
Ypage 350).
Snow chains
GWARNING
If snow chains are mounted on the rear
wheels, the snow chains could cause abrasion
to the vehicle body or to chassis components.
This could cause damage to the vehicle or the
tires. There is a risk of an accident.
To avoid hazardous situations:
Rnever mount snow chains on the rear
wheels
Ronly mount snow chains in pairs on the
front wheels.
!On some tire sizes there is not enough
space for snow chains. To avoid damage to the vehicle or tires, observe the "Wheel and
tire combinations" section under "Tires and
wheels".
For safety reasons, Mercedes-Benz recom-
mends that you only use snow chains that
have been specially approved for your vehicle
by Mercedes-Benz, or are of a corresponding
standard of quality. For more information,
please contact a qualified specialist work-
shop. If you intend to mount snow chains, please
bear the following points in mind:
RSnow chains may not be mounted on all
wheel/tire combinations. Permissible
wheel-tire combinations (
Ypage 367).
ROnly use snow chains when driving on
roads completely covered by snow.
Remove the snow chains as soon as possi-
ble when you come to a road that is not
snow-covered.
RLocal regulations may restrict the use of
snow chains. Observe the appropriate reg-
ulations if you wish to mount snow chains.
RDo not exceed the maximum permissible
speed of 30 mph (50 km/h).
RWhen snow chains are installed, never use
Active Parking Assist (
Ypage 203).
You may wish to deactivate ESP
®when pull-
ing away with snow chains installed
(
Ypage 69). You can thereby allow the wheels
to spin in a controlled manner, achieving an
increased driving force (cutting action).
Tire pressure
Tire pressure specifications
Important safety notes
GWARNING
Underinflated or overinflated tires pose the
following risks:
Rthe tires may burst, especially as the load
and vehicle speed increase.
Rthe tires may wear excessively and/or
unevenly, which may greatly impair tire
traction.
Rthe driving characteristics, as well as steer-
ing and braking, may be greatly impaired.
There is a risk of an accident.
Tire pressure343
Wheels and tires
Z
Page 349 of 390
Checking tire pressures manually
To determine and set the correct tire pres-
sure, proceed as follows:
XRemove the valve cap of the tire that is to
be checked.
XPress the tire pressure gauge securely onto
the valve.
XRead the tire pressure and compare it to
the recommended value on the Tire and
Loading Information placard or the tire
pressure table (
Ypage 343).
XIf the tire pressure is too low, increase the
tire pressure to the recommended value.
XIf the tire pressure is too high, release air.
To do so, press down the metal pin in the
valve, using the tip of a pen for example.
Then check the tire pressure again using
the tire pressure checker.
XScrew the valve cap onto the valve.
XRepeat these steps for the other tires.
Tire pressure loss warning system
(Canada only)
General notes
While the vehicle is in motion, the tire pres-
sure loss warning system monitors the set
tire pressure using the rotational speed of the
wheels. This enables the system to detect
significant pressure loss in a tire. If the speed
of rotation of a wheel changes as a result of a
loss of pressure, a corresponding warning
message will appear in the multifunction dis-
play.
You can recognize the tire pressure loss warn-
ing by the Run Flat Indicator Active
Press 'OK' to Restartmessage in the
multifunction display in the Serv.
menu.
Information on the message display can be
found in the "Restarting the tire pressure loss
warning system" section (
Ypage 347).
Important safety notes
The tire pressure warning system does not
warn you of an incorrectly set tire pressure.
Observe the notes on the recommended tire
pressure (
Ypage 343).
The tire pressure loss warning does not
replace the need to regularly check the tire
pressure. An even loss of pressure on several tires at the same time cannot be detected by
the tire pressure loss warning system.
The tire pressure monitor is not able to warn
you of a sudden loss of pressure, e.g. if the
tire is penetrated by a foreign object. In the
event of a sudden loss of pressure, bring the
vehicle to a halt by braking carefully. Avoid
abrupt steering movements.
The function of the tire pressure loss warning
system is limited or delayed if:
Rsnow chains are mounted on your vehicle's
tires.
Rroad conditions are wintry.
Ryou are driving on sand or gravel.
Ryou adopt a very sporty driving style (cor-
nering at high speeds or driving with high
rates of acceleration).
Ryou are driving with a heavy load (in the
vehicle or on the roof).
Restarting the tire pressure loss warn-
ing system
Restart the tire pressure loss warning system
if you have:
Rchanged the tire pressure
Rchanged the wheels or tires
Rmounted new wheels or tires
XBefore restarting, make sure that the tire
pressures are set properly on all four tires
for the respective operating conditions.
The recommended tire pressure can be
found on the Tire and Loading Information
placard on the B-pillar. Additionally, a tire
pressure table is attached to the fuel filler
flap. The tire pressure loss warning system can only give reliable warnings if you have
Tire pressure347
Wheels and tires
Z
Page 371 of 390
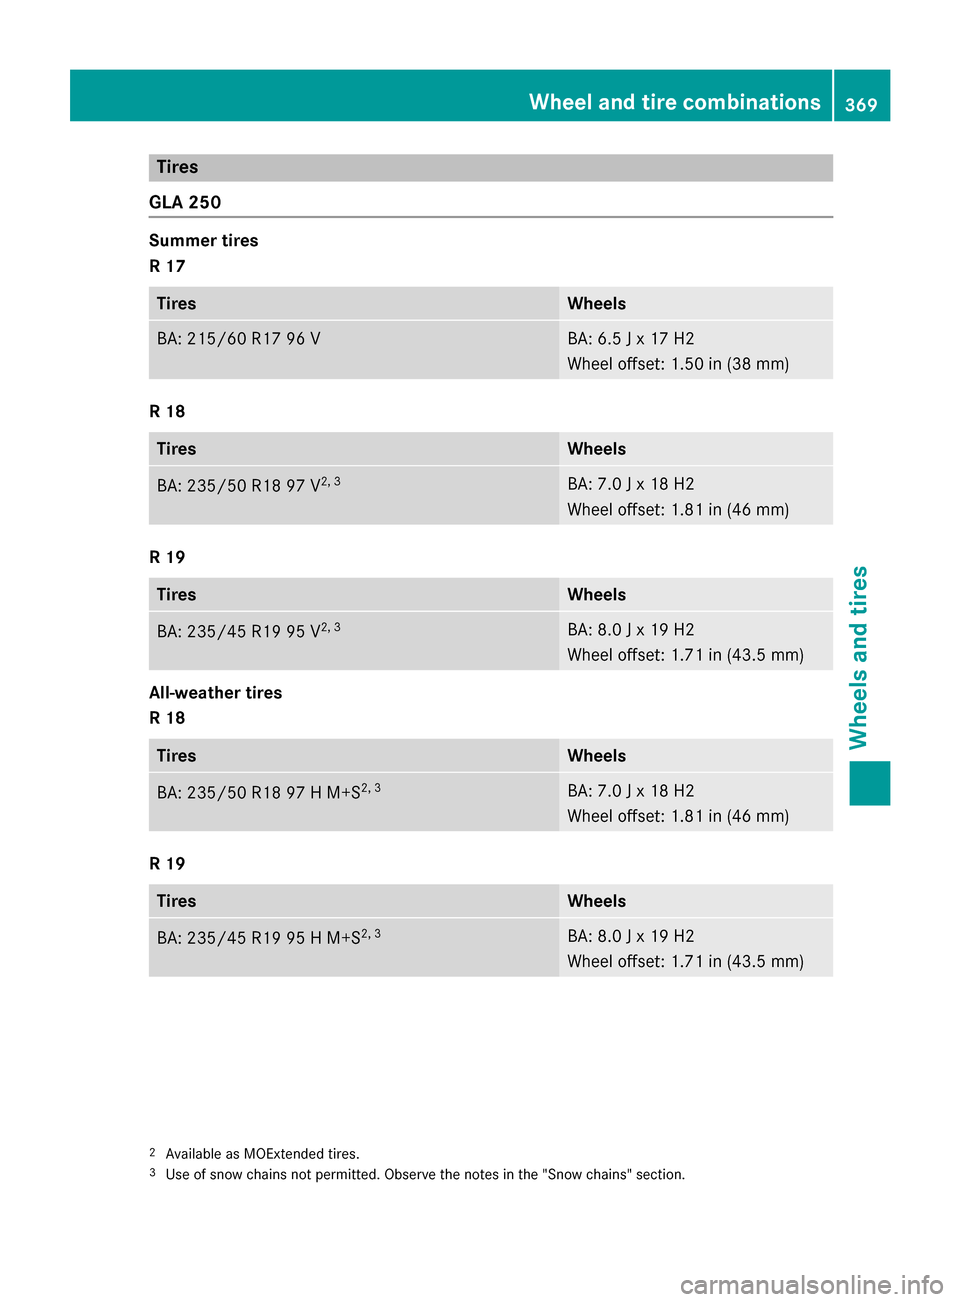
Tires
GLA 250
Summer tires
R 17
TiresWheels
BA: 215/60 R1796 VBA: 6.5 J x 17 H2
Wheel offset: 1.50 in (38 mm)
R 18
TiresWheels
BA: 235/50 R18 97 V2, 3BA: 7.0 J x 18 H2
Wheel offset: 1.81 in (46 mm)
R 19
TiresWheels
BA: 235/45 R19 95 V2, 3BA: 8.0 J x 19 H2
Wheel offset: 1.71 in (43.5 mm)
All-weather tires
R 18
TiresWheels
BA: 235/50 R18 97 H M+S2, 3BA: 7.0 J x 18 H2
Wheel offset: 1.81 in (46 mm)
R 19
TiresWheels
BA: 235/45 R19 95 H M+S2, 3BA: 8.0 J x 19 H2
Wheel offset: 1.71 in (43.5 mm)
2Available as MOExtended tires.3Use of snow chains not permitted. Observe the notes in the "Snow chains" section.
Wheel and tire combinations369
Wheels and tires
Z
Page 372 of 390
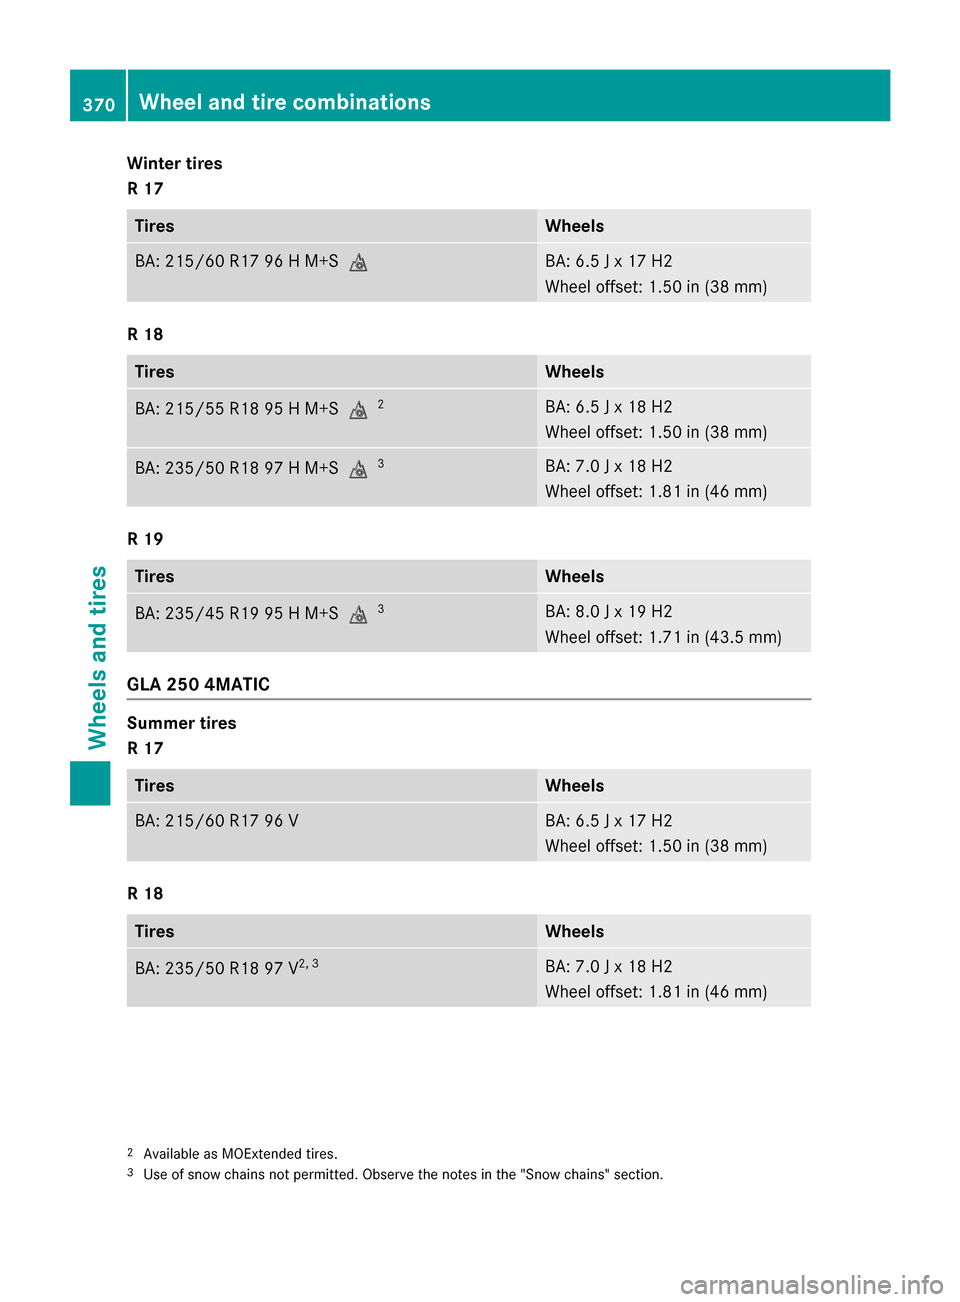
Winter tires
R 17
TiresWheels
BA: 215/60 R17 96 H M+SiBA: 6.5 J x 17 H2
Wheel offset: 1.50 in (38 mm)
R 18
TiresWheels
BA: 215/55 R18 95 H M+Si2BA: 6.5 J x 18 H2
Wheel offset: 1.50 in (38 mm)
BA: 235/50 R18 97 H M+Si3BA: 7.0 J x 18 H2
Wheel offset: 1.81 in (46 mm)
R 19
TiresWheels
BA: 235/45 R19 95 H M+Si3BA: 8.0 J x 19 H2
Wheel offset: 1.71 in (43.5 mm)
GLA 250 4MATIC
Summer tires
R 17
TiresWheels
BA: 215/60 R17 96 VBA: 6.5 J x 17 H2
Wheel offset: 1.50 in (38 mm)
R 18
TiresWheels
BA: 235/50 R18 97 V2, 3BA: 7.0 J x 18 H2
Wheel offset: 1.81 in (46 mm)
2Available as MOExtended tires.3Use of snow chains not permitted. Observe the notes in the "Snow chains" section.
370Wheel and tire combinations
Wheels and tires
Page 373 of 390
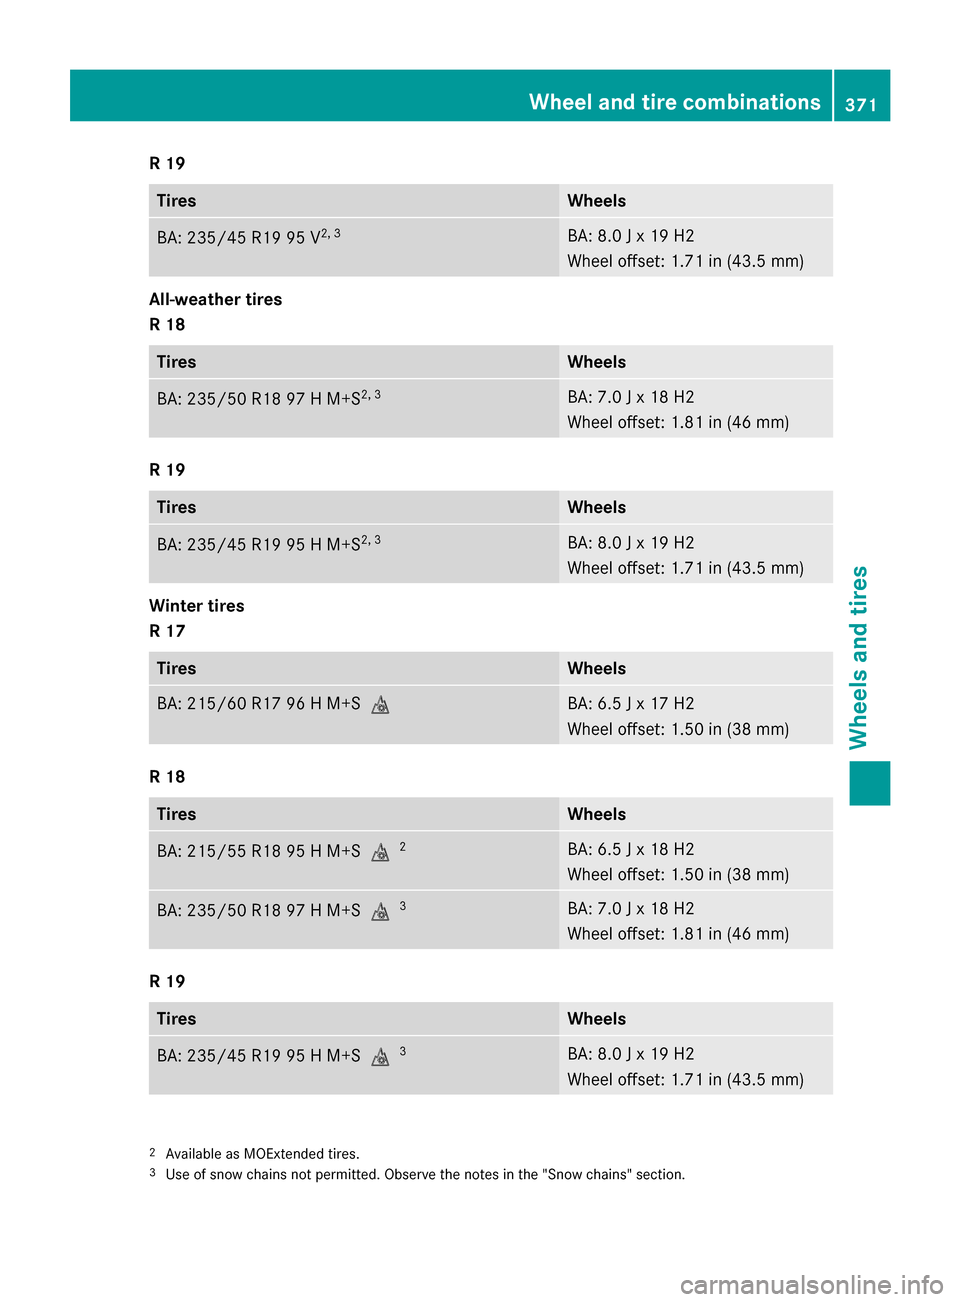
R 19
TiresWheels
BA: 235/45 R19 95 V2, 3BA: 8.0 J x 19 H2
Wheel offset: 1.71 in (43.5 mm)
All-weather tires
R 18
TiresWheels
BA: 235/50 R18 97 H M+S2, 3BA: 7.0 J x 18 H2
Wheel offset: 1.81 in (46 mm)
R 19
TiresWheels
BA: 235/45 R19 95 H M+S2, 3BA: 8.0 J x 19 H2
Wheel offset: 1.71 in (43.5 mm)
Winter tires
R 17
TiresWheels
BA: 215/60 R17 96 H M+SiBA: 6.5 J x 17 H2
Wheel offset: 1.50 in (38 mm)
R 18
TiresWheels
BA: 215/55 R18 95 H M+Si2BA: 6.5 J x 18 H2
Wheel offset: 1.50 in (38 mm)
BA: 235/50 R18 97 H M+Si3BA: 7.0 J x 18 H2
Wheel offset: 1.81 in (46 mm)
R 19
TiresWheels
BA: 235/45 R19 95 H M+Si3BA: 8.0 J x 19 H2
Wheel offset: 1.71 in (43.5 mm)
2Available as MOExtended tires.3Use of snow chains not permitted. Observe the notes in the "Snow chains" section.
Wheel and tire combinations371
Wheels and tires
Z
Page 374 of 390
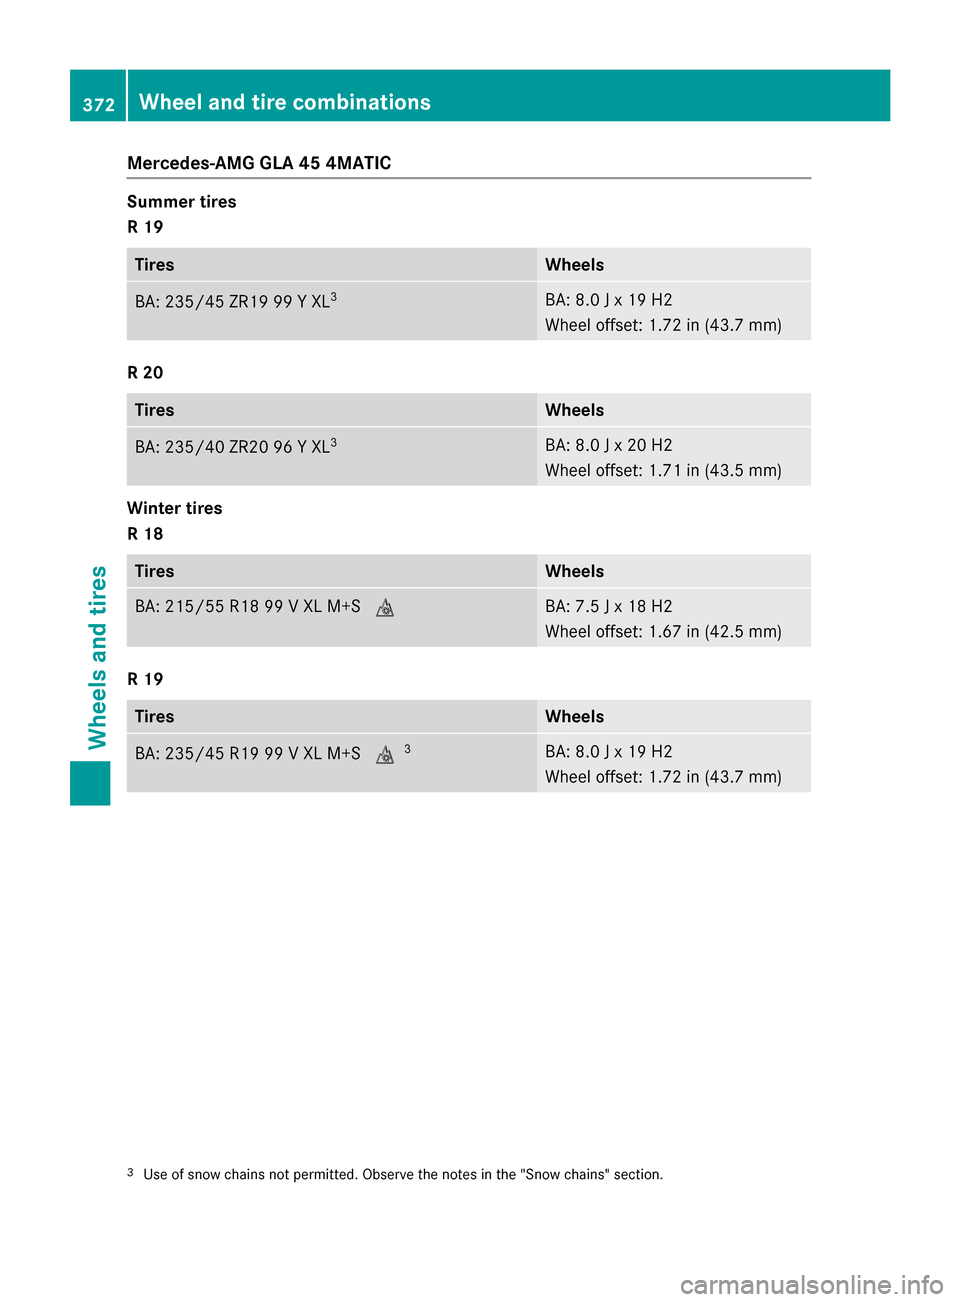
Mercedes-AMG GLA 45 4MATIC
Summer tires
R 19
TiresWheels
BA: 235/45 ZR19 99 Y XL3BA: 8.0 J x 19 H2
Wheel offset: 1.72 in (43.7 mm)
R 20
TiresWheels
BA: 235/40 ZR20 96 Y XL3BA: 8.0 J x 20 H2
Wheel offset: 1.71 in (43.5 mm)
Winter tires
R 18
TiresWheels
BA: 215/55 R18 99 V XL M+SiBA: 7.5 J x 18 H2
Wheel offset: 1.67 in (42.5 mm)
R 19
TiresWheels
BA: 235/45 R19 99 V XL M+Si3BA: 8.0 J x 19 H2
Wheel offset: 1.72 in (43.7 mm)
3Use of snow chains not permitted. Observe the notes in the "Snow chains" section.
372Wheel and tire combinations
Wheels and tires